Web Programming with
HTML, XHTML, and CSS
Second Edition
HTML, XHTML, and CSS
Introduction . . . xxiii
Chapter 1: Creating Structured Documents . . . 1
Chapter 2: Links and Navigation. . . 53
Chapter 3: Images and Objects . . . 77
Chapter 4: Tables . . . 109
Chapter 5: Forms. . . 139
Chapter 6: Frames . . . 185
Chapter 7: Cascading Style Sheets . . . 211
Chapter 8: More Cascading Style Sheets . . . 273
Chapter 9: Page Layout . . . 323
Chapter 10: Design Issues . . . 361
Chapter 11: Learning JavaScript. . . 403
Chapter 12: Working with JavaScript . . . 453
Chapter 13: Putting Your Site on the Web . . . 501
Appendix A: Answers to Exercises . . . 539
Appendix B: XHTML Element Reference . . . 563
Appendix C: CSS Properties . . . 607
Appendix D: Color Names and Values . . . 637
Appendix E: Character Encodings. . . 645
Appendix F: Special Characters . . . 649
Appendix G: Language Codes . . . 665
Appendix H: MIME Media Types . . . 669
Appendix I: Deprecated and Browser-Specific Markup . . . 681
Web Programming with
HTML, XHTML, and CSS
Web Programming with
HTML, XHTML, and CSS
Second Edition
with HTML, XHTML, and CSS, Second Edition
Published by
Wiley Publishing, Inc. 10475 Crosspoint Boulevard Indianapolis, IN 46256
www.wiley.com
Copyright © 2008 by Wiley Publishing, Inc., Indianapolis, Indiana ISBN: 978-0-470-25931-3
Manufactured in the United States of America 10 9 8 7 6 5 4 3 2 1
No part of this publication may be reproduced, stored in a retrieval system or transmitted in any form or by any means, electronic, mechanical, photocopying, recording, scanning or otherwise, except as permitted under Sections 107 or 108 of the 1976 United States Copyright Act, without either the prior written permission of the Publisher, or authorization through payment of the appropriate per-copy fee to the Copyright Clearance Center, 222 Rosewood Drive, Danvers, MA 01923, (978) 750-8400, fax (978) 646-8600. Requests to the Publisher for permission should be addressed to the Legal Department, Wiley Publishing, Inc., 10475 Crosspoint Blvd., Indianapolis, IN 46256, (317) 572-3447, fax (317) 572-4355, or online at http://www.wiley.com/go
/permissions.
Limit of Liability/Disclaimer of Warranty:The publisher and the author make no representations or war-ranties with respect to the accuracy or completeness of the contents of this work and specifically disclaim all warranties, including without limitation warranties of fitness for a particular purpose. No warranty may be created or extended by sales or promotional materials. The advice and strategies contained herein may not be suitable for every situation. This work is sold with the understanding that the publisher is not engaged in rendering legal, accounting, or other professional services. If professional assistance is required, the services of a competent professional person should be sought. Neither the publisher nor the author shall be liable for damages arising herefrom. The fact that an organization or Website is referred to in this work as a citation and/or a potential source of further information does not mean that the author or the publisher endorses the information the organization or Website may provide or recommendations it may make. Further, readers should be aware that Internet Websites listed in this work may have changed or disappeared between when this work was written and when it is read.
For general information on our other products and services or to obtain technical support, please contact our Customer Care Department within the U.S. at (800) 762-2974, outside the U.S. at (317) 572-3993 or fax (317) 572-4002.
Library of Congress Cataloging-in-Publication Data is available from the publisher.
Trademarks:Wiley, the Wiley logo, Wrox, the Wrox logo, Wrox Programmer to Programmer, and related trade dress are trademarks or registered trademarks of John Wiley & Sons, Inc. and/or its affiliates, in the United States and other countries, and may not be used without written permission. All other trademarks are the property of their respective owners. Wiley Publishing, Inc. is not associated with any product or vendor mentioned in this book.
Jon Duckettpublished his first web site in 1996 while studying for a BSc (Hons) in Psychology at Brunel University, London. Since then, he has helped create a wide variety of web sites for companies of all sizes. He has also co-written more than ten programming-related books on topics from ASP to XML (via many other letters of the alphabet), covering diverse aspects of web programming including design, architecture, and coding.
About the Technical Editor
Acquisitions Editor Jennifer Watson
Development Editor William Bridges
Technical Editor Benjamin Schupak
Production Editor Christine O’Connor
Copy Editor Nancy Rapoport
Editorial Manager Mary Beth Wakefield
Production Manager Tim Tate
Vice President and Executive Group Publisher Richard Swadley
Vice President and Executive Publisher Joseph B. Wikert
Project Coordinator, Cover Lynsey Stanford
Compositor
Simmy Cover, Happenstance Type-O-Rama
Proofreader Christopher Jones
Indexer
Introduction xxiii
Chapter 1: Creating Structured Documents
1
A Web of Structured Documents
1
Introducing XHTML
2
Core Elements and Attributes
9
The <html> Element
9
The <head> Element
10
The <title> Element
11
The <body> Element
11
Attribute Groups
12
Core Attributes
12
Internationalization
14
UI Events
15
Basic Text Formatting
16
White Space and Flow
17
Creating Headings Using hn Elements
18
Creating Paragraphs Using the <p> Element
21
Creating Line Breaks Using the <br /> Element
21
Creating Preformatted Text Using the <pre> Element
22
Presentational Elements
26
The <b> Element
26
The <i> Element
26
The <u> Element (deprecated)
27
The <s> and <strike> Elements (deprecated)
27
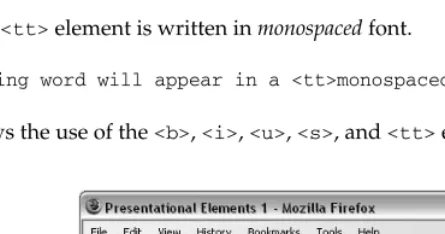
The <tt> Element
27
The <sup> Element
28
The <sub> Element
28
The <big> Element
28
The <small> Element
28
The <hr /> Element
28
Phrase Elements
29
The <em> Element Adds Emphasis
30
The <acronym> Element Is for Acronym Use
31
The <dfn> Element Is for Special Terms
32
The <blockquote> Element Is for Quoting Text
32
The <q> Element Is for Short Quotations
33
The <cite> Element Is for Citations
33
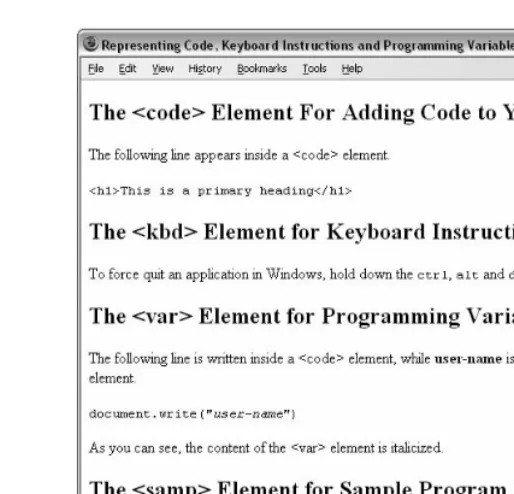
The <code> Element Is for Code
34
The <kbd> Element Is for Text Typed on a Keyboard
34
The <var> Element Is for Programming Variables
35
The <samp> Element Is for a Program Output
35
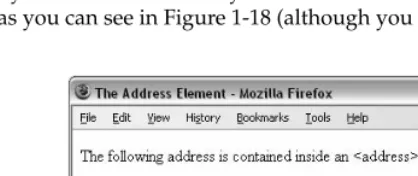
The <address> Element Is for Addresses
36
Lists
36
Using the <ul> Element to Create Unordered Lists
36
Ordered Lists
37
Definition Lists
39
Nesting Lists
40
How It Works
43
Editing Text
45
Using <ins> to Indicate New Additions to Text
46
Using <del> to Indicate Deleted Text
46
Using Character Entities for Special Characters
47
Comments
47
The <font> Element (deprecated)
48
Understanding Block and Inline Elements
48
Grouping Elements with <div> and <span>
49
Summary
50
Exercises
51
Chapter 2: Links and Navigation
53
Basic Links
54
Linking to Other Documents
54
Linking to E-mail Addresses
56
Understanding Directories and Directory Structures
57
What Are You Linking To?
58
What a URL Is Made Up Of
59
Absolute and Relative URLs
61
The <base> Element
64
Creating Links with the <a> Element
65
Creating a Source Anchor with the href Attribute
65
Creating a Destination Anchor Using the name and id Attributes
Advanced E-mail Links
74
Summary
75
Exercises
76
Chapter 3: Images and Objects
77
Adding Images to Your Site
77
Types of Image Formats
78
Bitmap Images
78
Vector Images
85
Adding Images Using the <img> Element
86
Adding Other Objects with the <object> Element
93
The <object> Element’s Attributes
94
The <param> Element
97
Adding a Flash Movie To A Page
98
Using Images as Links
99
Image Maps
100
Server-Side Image Maps
101
Client-Side Image Maps
102
Summary
105
Exercises
106
Chapter 4: Tables
109
Introducing Tables
109
Basic Table Elements and Attributes
112
The <table> Element Creates a Table
113
The <tr> Element Contains Table Rows
117
The <td> and <th> Elements Represent Table Cells
119
Advanced Tables
125
Splitting Up Tables Using a Head, Body, and Foot
125
Adding a <caption> to a Table
128
Spanning Columns Using the colspan Attribute
128
Spanning Rows Using the rowspan Attribute
129
Grouping Columns Using the <colgroup> Element
130
Columns Sharing Styles Using the <col> Element
132
Accessibility Issues with Tables
132
How Tables Linearize
132
Linearization of Tables Used for Layout
133
Linearization of Tables Used for Data
135
Summary
136
Chapter 5: Forms
139
Introducing Forms
140
Creating a Form with the <form> Element
141
The action Attribute
142
The method Attribute
142
The id Attribute
142
The name Attribute (deprecated)
142
The onsubmit Attribute
143
The onreset Attribute
143
The enctype Attribute
144
The accept-charset Attribute
144
The accept Attribute
144
The target Attribute
145
White Space and the <form> Element
145
Form Controls
145
Text Inputs
145
Buttons
150
Checkboxes
154
Radio Buttons
156
Select Boxes
158
File Select Boxes
164
Hidden Controls
165
Object Controls
166
Creating Labels for Controls and the <label> Element
169
Structuring Your Forms with <fieldset> and <legend> Elements
171
Focus
173
Tabbing Order
173
Access Keys
175
Disabled and Read-Only Controls
176
Sending Form Data to the Server
178
HTTP get
178
HTTP post
179
Summary
183
Exercises
183
Chapter 6: Frames
185
Introducing the Frameset
185
When to Use Frames
188
The <frameset> Element
189
Browser-Specific Extensions to the <frameset> Element
192
The <frame> Element
194
The src Attribute
195
The name Attribute
195
The frameborder Attribute
195
The marginwidth and marginheight Attributes
196
The noresize Attribute
196
The scrolling Attribute
196
The longdesc Attribute
197
The <noframes> Element
197
Creating Links Between Frames
198
Setting a Default Target Frame Using the <base> Element
200
Nested Framesets
200
Floating or Inline Frames with <iframe>
204
The <iframe> Element
206
Summary
209
Exercises
209
Chapter 7: Cascading Style Sheets
211
Introducing CSS
212
A Basic Example
213
Inheritance
216
Where You Can Add CSS Rules
217
The <link> Element
218
The <style> Element
220
Advantages of External CSS Style Sheets
220
CSS Properties
221
Controlling Fonts
223
The font-family Property
224
The font-size Property
226
The font-weight Property
227
The font-style Property
228
The font-variant Property
229
The font-stretch Property
230
The font-size-adjust Property
230
Text Formatting
230
The color Property
231
The text-align Property
231
The vertical-align Property
232
The text-decoration Property
234
The text-indent Property
234
The text-transform Property
235
The letter-spacing Property
236
The word-spacing Property
237
The white-space Property
237
The direction Property
238
The unicode-bidi Property
239
Text Pseudo-Classes
239
The first-letter Pseudo-Class
239
The first-line Pseudo-Class
240
Selectors
243
Universal Selector
243
The Type Selector
243
The Class Selector
244
The ID Selector
244
The Child Selector
244
The Descendent Selector
245
The Adjacent Sibling Selector
245
Using Child and Adjacent Sibling Selectors to Reduce Dependence
on Classes in Markup
245
Attribute Selectors
247
Lengths
249
Absolute Units
249
Relative Units
249
Percentages
251
Introducing the Box Model
251
An Example Illustrating the Box Model
252
The Border Properties
255
The padding Property
258
The margin Property
259
Dimensions
260
Summary
270
Exercises
270
Chapter 8: More Cascading Style Sheets
273
Links
274
Backgrounds
275
The background-color Property
276
The background-image Property
277
The background-repeat Property
278
Lists
283
The list-style-type Property
284
The list-style-position Property
285
The list-style-image Property
286
The list-style Property (the shorthand)
286
The marker-offset Property
287
Tables
287
Table-Specific Properties
289
The border-collapse Property
289
The border-spacing Property
291
The caption-side Property
292
The empty-cells Property
292
The table-layout Property
294
Outlines
294
The outline-width Property
295
The outline-style Property
295
The outline-color Property
295
The outline Property (the shorthand)
296
The :focus and :active Pseudo-Classes
296
Generated Content
297
The :before and :after Pseudo-Elements
297
The content Property
298
Miscellaneous Properties
301
The cursor Property
301
The display Property
302
The visibility Property
302
Additional Rules
304
The @import Rule: Modularized Style Sheets
304
The @charset Rule
305
The !important Rule
305
Positioning with CSS
305
Normal Flow
306
The position Property
306
Box Offset Properties
307
Relative Positioning
307
Absolute Positioning
309
Fixed Positioning
310
The z-index Property
311
Floating Using the float Property
312
The clear Property
314
Summary
320
Chapter 9: Page Layout
323
Understanding the Site
323
Understanding a Site’s Aims
324
Whom You Expect to Visit
325
New Content
326
Defining Your Site’s Content
326
Grouping and Categorization
327
Creating a Site Map
328
Identifying Key Elements for Every Page
329
Page Size (and Screen Resolution)
330
Fixed-Width vs. Liquid Designs
331
Designing Pages
337
Sketching the Placement of Elements
337
Introducing the Style
339
Navigation
342
Home Pages
345
Content Pages
345
Structuring Pages
346
Single-Column Layouts
348
Two-Column Layouts
350
Three-Column Layouts
353
Sacrificial Columns
354
Advanced Layout Using CSS
356
Creating a Layout Using Nested Tables
356
Summary
359
Exercises
359
Chapter 10: Design Issues
361
Text
362
White Space Helps Make More Attractive Pages
362
Carefully Aligned Text Is More Readable
365
Adjusting Line Height Makes Text More Readable
365
Wide Columns of Text Are Harder to Read
366
Background Images Can Make Text Hard to Read
366
Choose Fonts Carefully
367
Fixed-Size Fonts Are Affected by Screen Resolution
369
Navigation
369
Menus
369
Links
374
Shading Multiple Rows of a Table
378
Forms
380
Before Designing the Form
380
Designing the Form
382
Summary
401
Exercises
401
Chapter 11: Learning JavaScript
403
What Is Programming About?
404
How to Add a Script to Your Pages
406
Comments in JavaScript
408
The <noscript> Element
408
The Document Object Model
410
Introducing the Document Object Model
410
Objects, Methods, and Properties
412
The Forms Collection
415
Form Elements
416
Images Collection
419
Different Types of Objects
422
Starting to Program with JavaScript
422
Variables
423
Assigning a Value to a Variable
424
Lifetime of a Variable
424
Operators
424
Arithmetic Operators
425
Assignment Operators
425
Comparison Operators
426
Logical or Boolean Operators
427
String Operator
427
Functions
427
How to Define a Function
428
How to Call a Function
428
The Return Statement
429
Conditional Statements
429
if Statements
429
if . . . else Statements
430
A switch Statement
431
Conditional (or Ternary) Operator
432
Looping
432
while
433
for
434
Infinite Loops and the break Statement
435
Events
435
Built-in Objects
437
String
437
Date
441
Math
444
Array
446
Window
447
Writing JavaScript
449
A Word About Data Types
450
Keywords
451
Summary
451
Exercises
452
Chapter 12: Working with JavaScript
453
Practical Tips for Writing Scripts
453
Has Someone Already Written This Script?
454
Reusable Functions
454
Using External JavaScript Files
455
Place Scripts in a Scripts Folder
455
Form Validation
456
When to Validate
456
How to Validate
456
Form Enhancements
470
Focus on First Form Item
470
Auto-Tabbing Between Fields
471
Disabling a Text Input
472
Case Conversion
474
Trimming Spaces from Beginning and End of Fields
474
Selecting All the Content of a Text Area
475
Check and Uncheck All Checkboxes
476
Image Rollovers
482
Random Script Generator
485
Pop-Up Windows
486
JavaScript Libraries
487
Animated Effects using Scriptaculous
488
Drag-and-Drop Sortable Lists Using Scriptaculous
490
Sortable Tables with MochiKit
492
Creating Calendars with YUI
494
When Not to Use JavaScript
496
Drop-Down Navigation Menus
497
Hiding Your E-mail Address
497
Quick Jump Select Boxes
497
Anything the User Requires from Your Site
497
Summary
498
Exercises
498
Chapter 13: Putting Your Site on the Web
501
Meta Tags
502
name and content Attributes
503
http-equiv and content
505
The scheme Attribute
508
Testing Your Site
508
The Importance of Directory Structure and Relative URLs
509
Validating HTML, XHTML, and CSS
509
Link Checking
513
Checking Different Screen Resolutions and Color Depths
514
Accessibility Checkers
514
Development Server or Live Server
515
Checking in Different Versions of Browsers
515
Pilot Testing
516
Proofreading
517
Taking the Leap to Live
517
Getting a Domain Name
517
Hosting
518
Search Engine Strategies
522
Other Web Marketing Possibilities
525
Statistical Analysis
526
Version Control
527
What Next?
529
Blogs
529
Discussion Boards or Forums
530
Adding a Search Utility
530
Introducing Other Technologies
531
Server-Side Web Programming: ASP.NET, and PHP
531
Choosing a Server-Side Language
532
Content Management
532
Flash
535
Learning Graphics Packages
536
Appendix A: Answers to Exercises
539
Appendix B: XHTML Element Reference
563
Appendix C: CSS Properties
607
Appendix D: Color Names and Values
637
Appendix E: Character Encodings
645
Appendix F: Special Characters
649
Appendix G: Language Codes
665
Appendix H: MIME Media Types
669
Appendix I: Deprecated and Browser-Specific Markup
681
There are a lot of books about designing and building web pages, so thank you for picking up this one. Why do I think it is different? Well, the Web has been around for over a decade now, and during its life many technologies have been introduced to help you create web pages, some of which have lasted, others of which have disappeared. Many books that teach you to write web pages are revisions of earlier versions of the same book and therefore still take the same approach as the previous edition did. The purpose of this book, however, is to teach you how to create pages for the Web as it is today and will be for the next few years. Then, once you have worked through this book, it should continue to serve as a helpful refer-ence text you can keep nearby and dip into when you need to.
At one time, you needed to learn only one language to write web pages: HTML. As the Web has advanced, however, so have the technologies you need to learn in order to create effective and attractive web pages. As the title of this book suggests, you will be learning a few different languages:
❑ HTML and XHTML:HTML and XHTML are needed to explain the structureof any web pages.
They’re used to indicate what text should be considered a heading, where paragraphs start and end, and what images should appear in the document, and to specify links between different pages. As you might be relieved to hear, you shouldn’t think of HTML and XHTML as two sep-arate languages. Rather, you can consider XHTML as more like the latest version of HTML.
❑ CSS:CSS is used to control how a document should appear. For example, you can use it to spec-ify that a typeface should be a large, bold, Arial typeface or that the background of a page should be a light green. It can also be used to control where different items appear on a page. For example, you can use CSS to present text in two columns on the same page.
❑ JavaScript:You learn a little bit of JavaScript to add interactivity to the web pages you create, and to work with the browser displaying the web page.
Despite the fact that you are looking at several languages, not just HTML, you can consider it a very good time to be coming to the Web because many of the technologies used to create web pages have matured, and favored methods, or “best practices,” for creating web sites have been emerging. It is these that you will be learning.
About the Book
pages that take advantage of some of the latest features of browsers, but you will also want to make sure that your pages work in some older browsers that are still popular today.
Because there has been so much change in the way web pages are built, and because there are so many different versions of web browsers, some features are listed in the book but are marked as “deprecated”; this means that while that section should still work in modern browsers, you are no longer advised to use it because software might not support it much longer.
Another issue you need to be aware of when writing web pages is the increasing number of devices capable of accessing the Web, such as mobile phones, PDAs (personal digital assistants), and TV set-top boxes. You will be relieved to know that many of these devices employ the same languages that you will be learning in this book — and by learning to use XHTML with CSS you will be able to create web sites that will last much longer than those written in plain old HTML.
Another area where the Web has changed from a few years back is the increased emphasis on usability and accessibility. Usability refers to making the site easy for users to get around (or navigate) and achieve what they came to your site for, whereas accessibilityaddresses making a site available to as many users as
possible, in particular people with disabilities (who may have impaired vision or difficulty using a mouse). Many governments around the world will not issue a contract to build web sites for them unless the site will meet strict accessibility guidelines. A little careful thought before you build your web site means that people with vision impairments can either view your site with larger text or have it read to them by a screen reader. There are books dedicated to the topics of usability and accessibility and that are aimed at web developers who need to learn how to make their code more accessible and usable, but my aim is to teach you to code with many of these principles in mind from the start.
By the end of this book, you will be writing web pages that not only use the latest technologies, but also are still viewable by older browsers. Pages that look great can still be accessed by those with visual and physical impairments. These are pages that not only address the needs of today’s audiences but can also work on emerging technologies — and the skills you learn should be relevant longer.
Whom This Book Is For
This book is written for anyone who wants to learn how to create web pages, and for people who might have dabbled in writing web pages (perhaps using some kind of web-page authoring tool) but want to really understand the languages of the Web to create better pages.
More experienced web developers can also benefit from this book because it teaches some of the latest technologies, such as XHTML, and encourages you to embrace web standards that not only meet the needs of the new devices that access the Web, but also help make your sites available to more visitors.
What This Book Cover s
By the end of this book, you will be able to create professional looking and well-coded web pages.
Not only will you learn the code that makes up markup languages such as XHTML, but you will also see how to apply this code so you can create sophisticated layouts for your pages, positioning text and images where you would like them to appear and getting the colors and fonts you want. Along the way, you will see how to make your pages easy to use and available to the biggest audience possible. You will also learn practical techniques such as how to make your web site available on the Internet and how to get search engines to recognize your site.
The main technologies covered in this book are HTML, XHTML, and CSS. You will also learn the basics of JavaScript, enough to work on some examples that add interactivity to your pages and allow you to work with basic scripts. Along the way, I introduce and point you to other technologies you might want to learn in the future.
The code I will encourage you to write is based on what are known as web standards; HTML, XHTML,
and CSS are all created and maintained by the World Wide Web Consortium, or W3C (www.w3.org/), an organization dedicated to creating specifications for the Web. You will also learn about some features that are not standards; it is helpful to know some of these in case you come across such markup and need to know what it does. (In such cases, I make it clear that the features are not part of the standard.)
What You Need to Use This Book
All you need to work through this book is a computer with a web browser (preferably Firefox 2 or higher, Safari 2 or higher, or Internet Explorer 6 or higher), and a simple text editor such as Notepad on Windows or TextEdit on Mac.
If you have a web-page editor program, such as Macromedia Dreamweaver or Microsoft FrontPage, you are welcome to use it, but I will not be teaching you how to use these programs. Each of these programs is different and entire books have been written about them. Even with such programs available, you can write much better sites when you really understand the code these programs generate because you’ll often want to go in and edit this by hand.
How This Book Is Organized
The first chapter of this book will show you how the main task in creating a web site is marking upthe text
you want to appear on your site using things called elementsand attributes. As you will see, these elements
and attributes describe the structure of a document (what is a heading, what is a paragraph of text, what is a link, and so on).
such as structuring a document into headings and paragraphs, creating links between pages, adding color and images, displaying tables, and so on. With each task or topic that is introduced you will see an example first to give you an idea of what is possible; then you can look at the elements and attributes used in detail.
I should mention that you do not need to read all the detailed explanations of every aspect of an element on your first reading of the book — as long as you have an idea of what is possible. For the sake of com-pleteness (and to keep related information in the same place), I have included some functionality that you will rarely want to use. You can always come back to the finer detail later when you find the need to use some of the more obscure functionality. So, if you want to move on at a faster pace, feel free to get the gist of the markup and then move on.
Each chapter ends with exercises designed to get you working with the concepts you’ve just learned. Don’t worry if you have to go back and review the content of the chapter in order to complete the exer-cises; this book has been created with the intention that it should be a helpful reference for years to come, so don’t feel you need to learn everything by heart. Along the way, you’ll see which browsers support each element, and you’ll learn plenty of handy tips, tricks, and techniques for creating profes-sional web pages.
Once you have seen how to create and structure a document using HTML and XHTML, you then learn how to make your pages look more attractive using cascading style sheets (CSS). You learn how to change the typefaces and size of fonts used, color of text, backgrounds and borders around items, and alignment of objects to the center, left, or right of the page.
Having worked through these two chapters, and using the examples in the book, you should be able to write quite complex web pages. These chapters will serve as a helpful reference you can keep coming back to and the examples will act as a toolkit for building your own sites.
Chapters 9 and 10 look at important web-page design issues. You see some examples of popular page layouts and how to construct them; you learn how to create a good navigation bar to allow users to find the pages they want on your site; you find out what makes a form effective; and you learn how to make your web sites available to as many people as possible. These chapters really build upon the theory you learned in the first half of the book and help you create professional-looking pages that attract users and make your site easy to use.
Chapters 11 and 12 introduce you to JavaScript, a programming language known as a scripting language
that you use in web pages. While the entire JavaScript language is too large to teach you in two chapters, you should get a feel for how it works and see how to integrate scripts into your pages.
Chapter 13, the final chapter, prepares you to put your site on the Internet and covers web hosting, FTP, and validating your code. Finally, I give you some ideas of where you can go now that you’ve worked through this book; there are a lot of other things you might want to add to your site or learn in order to advance your web skills, and this chapter gives you an idea of what else is possible and what you need to learn to do that.
Conventions
To help you get the most from the text and keep track of what’s happening, this book uses a number of typographical conventions.
Tips, hints, tricks, and asides to the current discussion are set off and placed in italics like this.
As for styles in the text:
❑ Important words are italicizedwhen first introduced.
❑ Keystrokes appear like this: Ctrl+A.
❑ Filenames, URLs, and code within the text appear in monospace, like so: www.wrox.com.
❑ Code appears two different ways: General code examples are shown without a background. When
I want to draw particular attention to a line of code, it will be highlighted on a gray background.
Source Code
As you work through the examples in this book, you may choose either to type in all the code manually or to use the source code files that accompany the book. All of the source code used in this book is avail-able for download at www.wrox.com. Once at the site, simply locate the book’s title (either by using the
Search box or by using one of the title lists) and click the Download Code link on the book’s detail page to obtain all the source code for the book.
Because many books have similar titles, you may find it easiest to search by ISBN; this book’s ISBN is 9780470259313.
Once you download the code, just decompress it with your favorite compression tool. Alternately, you can go to the main Wrox code download page at www.wrox.com/dynamic/books/download.aspxto
see the code available for this book and all other Wrox books.
Er rata
I’ve made every effort to ensure that there are no errors in the text or in the code. However, no one is perfect, and mistakes do occur. If you find an error in this book, such as a spelling mistake or faulty piece of code, I would be very grateful for your feedback. By sending in errata, you may save another reader hours of frustration, and at the same time you will be helping to provide even higher quality information.
To find the errata page for this book, go to www.wrox.comand locate the title using the Search box or one
of the title lists. Then, on the book details page, click the Book Errata link. On this page you can view all Boxes like this one hold important, not-to-be forgotten information that is directly
errata that has been submitted for this book and posted by Wrox editors. A complete book list including links to each book’s errata is also available at www.wrox.com/misc-pages/booklist.shtml.
If you don’t spot “your” error on the Book Errata page, go to www.wrox.com/contact/techsupport.shtml
and complete the form there to send us the error you discovered. We’ll check the information and, if appro-priate, post a message to the book’s errata page and fix the problem in subsequent editions of the book.
p2p.wrox.com
For author and peer discussion, join the P2P forums at p2p.wrox.com. The forums are a web-based system
for you to post messages related to Wrox books and related technologies and interact with other readers and technology users. The forums offer a subscription feature to e-mail you about topics of your choosing when new posts are made to the forums. Wrox authors, editors, other industry experts, and your fellow readers are present on these forums.
At http://p2p.wrox.comyou will find a number of different forums that will help you not only as you
read this book, but also as you develop your own applications. To join the forums, just follow these steps:
1.
Go to p2p.wrox.comand click the Register link.2.
Read the terms of use and click Agree.3.
Complete the required information to join as well as any optional information you wish to provide and click Submit.4.
You will receive an e-mail with information describing how to verify your account and complete the registration process.You can read messages in the forums without joining P2P, but in order to post your own messages, you must join.
Once you join, you can post new messages and respond to messages other users post. You can read mes-sages at any time on the Web. If you would like to have new mesmes-sages from a particular forum e-mailed to you, click the Subscribe to this Forum icon by the forum name in the forum listing.
1
Creating Str uctured
Documents
In this chapter, you meet the first technologies you need to learn in order to write web pages: HTML and XHTML. In fact, what you will really be learning is XHTML—although I will be explaining the differences between HTML and XHTML as we go along. (As I already mentioned, you can consider XHTML simply to be the latest version of HTML.)
The main goal of this chapter is to demonstrate how the primary role of XHTML is to describe the structure of your documents.
In this chapter, then, you:
❑ Learn the difference between tags, elements, and attributes
❑ See how a web page uses markup to describe how the page should be structured
❑ Meet the elements that allow you to mark up text such as headings and paragraphs
❑ Learn many other elements that can add additional presentation information and phrasing
to your documents
❑ See how to add bulleted and numbered lists to documents
❑ Are introduced to some core concepts that distinguish different types of elements in XHTML
By the end of the chapter you will have a good idea of how to structure a page in XHTML and will have written your first web pages.
A Web of Str uctured Documents
Every morning I used to read a newspaper. A newspaper is made up of several stories or articles (and probably a fair smattering of advertisements, too). Each story has a headline and then some paragraphs, perhaps a subheading, and then some more paragraphs; it may also include a picture or two.
I don’t buy a daily paper anymore, as I tend to look at news online, but the structure of articles on news web sites is very similar to the structure of articles in newspapers. Each article is made up of headings, paragraphs of text, and the odd picture. The parallel is quite clear; the only real difference is that each story gets its own page on a web site, and that page is accessed by clicking on a headline or a brief sum-mary either on the site’s main home page or one of the home pages for a subsection of the site (such as the politics, sports, or entertainment sections).
Consider another example: Say I’m catching a train to see a friend, so I check the schedule to see what time the trains go that way. The main part of the schedule is a tabletelling me what times trains arrive and
when they depart from different stations. In the same way that a lot of documents have headings and para-graphs, a lot of other documents use tables; from the stocks and shares pages in the financial supplement of your paper to the TV listings at the back, you come across tables of information every day—and these are often recreated on the Web.
Another kind of document you often come across is a form. For example, I have a form sitting on my desk (which I really must mail) from an insurance company. This form contains fields for me to write my name, address, and the amount of coverage I want, and boxes I have to check to indicate the number of rooms in the house and what type of lock I have on my front door. Indeed, there are lots of forms on the Web, from a simple search box that asks what you are looking for to the registration forms you are required to go through before you can place an online order for books or CDs.
As you can see, there are many parallels between the structure of printed documents you come across every day and pages you see on the Web. So you will hardly be surprised to learn that when it comes to writing web pages, your code tells the web browser the structure of the information you want to display— what text to put in a heading, or in a paragraph, or in a table, and so on—so that the browser can present it properly to the user.
In order to tell a web browser the structure of a document—how to make a heading, a paragraph, a table, and so on—you need to learn HTML and XHTML.
Introducing XHTML
XHTML, or Extensible Hypertext Markup Language, and its predecessor HTML, are the most widely used languages on the Web. As its name suggests, XHTML is a markup language, which may sound complicated,
until you realize that you come across markup every day.
When creating a document in a word processor, you can add styles to the text to explain the document’s structure. For example, you can distinguish headings from the main body of the text using a heading style (usually with a larger font). You can use the Enter (or Return) key to start a new paragraph. You can insert tables into your document to hold data, or create bulleted lists for a series of related points, and so on. While this does affect the presentation of the document, the key purpose of this kind of markup is to pro-vide a structure that makes the document easier to understand.
the tags to indicate the structureof the document, which part of the document is a heading, which parts
are paragraphs, what belongs in a table, and so on. Browsers such as Internet Explorer, Firefox, and Safari will use this markup to help present the text in a familiar fashion, similar to that of a word processor (head-ings are bigger than the main text, there is space between each paragraph, lists of bullet points have a circle in front of them). However the way these are presented is up to the browser; the XHTML specification does not say which font should be used or what size that font should be.
While earlier versions of HTML allowed you to control the presentation of a document—things like which typefaces and colors a document should use—XHTML markup is not supposed to be used to style the document; that is the job of CSS, which you meet in Chapter 7.
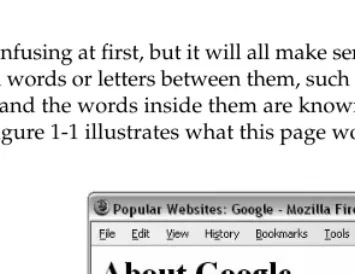
Let’s have a look at a very simple web page. As I mentioned in the introduction, you don’t need any special programs to write web pages—you can simply use a text editor such as Notepad on Windows or TextEdit on a Mac, and save your files with an .html file extension. You can download this example along with all the code for this book from the Wrox web site at www.wrox.com; the example is in the Chapter 1
folder and is called ch01_eg01.html.
<html> <head>
<title>Popular Websites: Google</title> </head>
<body>
<h1>About Google</h1>
<p>Google is best known for its search engine, although Google now offers a number of other services.</p>
<p>Google’s mission is to organize the world’s information and make it universally accessible and useful.</p>
<p>Its founders Larry Page and Sergey Brin started Google at Stanford University.</p>
</body> </html>
This may look a bit confusing at first, but it will all make sense soon. As you can see, there are several sets of angle brackets with words or letters between them, such as <html>, <head>, </title>, and </body>.
These angle brackets and the words inside them are known as tags, and these are the markup we have
been talking about. Figure 1-1 illustrates what this page would look like in a web browser.
As you can see, this document contains the heading “About Google” and a paragraph of text to introduce the company. Note also that it says “Popular Websites: Google” in the top-left of the browser window; this is known as the titleof the page.
To understand the markup in this first example, you need to look at what is written between the angle brackets and compare that with what you see in the figure, which is what you will do next.
Tags and Elements
If you look at the first and last lines of the code for the last example, you will see pairs of angle brackets containing the letters <html>. The two brackets and all of the characters between them are known as a tag,
and there are lots of tags in the example. All the tags in this example come in pairs; there are opening tagsand
closing tags. The closing tag is always slightly different from the opening tag in that it has a forward slash
after the first angled bracket </html>.
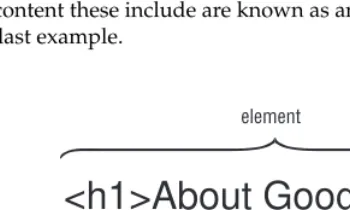
A pair of tags and the content these include are known as an element. In Figure 1-2, you can see the head-ing for the page of the last example.
Figure 1-2
The opening tag says “This is the beginning of a heading” and the closing tag says “This is the end of a heading.” Like most of the tags in XHTML, the text inside the angled brackets explains the purpose of the tag—here h1indicates that it is a level 1 heading (or top-level heading). As you will see shortly, there are
also tags for subheadings (<h2>, <h3>, <h4>, <h5>, and <h6>). Without the markup, the words “About Google” in the middle of the tags would just be another bit of text; it would not be clear that they formed the heading.
Now look at the three paragraphs of text about the company; each one is held between an opening <p>
tag and a closing </p>tag. And, you guessed it, the pstands for paragraph.
Because this basic concept is so important to understand, I think it bears repeating:
tagsare the angle brackets and the letters and numbers between them, whereas
elementsare tags and anything between the opening and closing tags.
closing tag element
<h1>About Google</h1>
As you can see, the markup in this example actually describes what you will find between the tags, and the added meaning the tags give is describing the structure of the document. Between the opening <p>
and closing </p>tags are paragraphs, and between the <h1>and </h1>tags is a heading. Indeed, the
whole document is contained between opening <html>and closing </html>tags.
You will often find that terms from a family tree are used to describe the relationships between elements. For example, an element that contains another element is known as the parent, while the element that is
between the parent element’s opening and closing tags is called a childof that element. So, the <title>
element is a child of the <head>element, the <head>element is the parent of the <title>element, and
so on. Furthermore, the <title>element can be thought of as a grandchild of the <html>element.
Separating Heads from Bodies
Whenever you write a web page in XHTML, the whole of the page is contained between the opening
<html>and closing </html>tags, just as it was in the last example. Inside the <html>element, there
are two main parts to the page:
❑ The <head>element:Often referred to as the head of the page, this contains information about
the page (this is not the main content of the page). It is information such as a title and a descrip-tion of the page, or keywords that search engines can use to index the page. It consists of the opening <head>tag, the closing </head>tag, and everything in between.
❑ The <body>element:Often referred to as the body of the page, this contains the information you actually see in the main browser window. It consists of the opening <body>tag, closing </body>
tag, and everything in between.
Inside the <head>element of the first example page, you can see a <title>element:
<head>
<title>Popular Websites: Google</title> </head>
Between the opening and closing titletags are the words Popular Websites: Google, which is the
title of this web page. If you remember Figure 1-1, which showed the screenshot of this page, I brought your attention to the words right at the top of the browser window. This is where browsers like Internet Explorer, Firefox, and Safari display the title of a document; it is also the name they use when you save a page in your favorites.
The real content of your page is held in the <body>element, which is what you want users to read, and
is shown in the main browser window.
You may have noticed that the tags in the example you have been looking at appear in a symmetrical order. If you want to have one element inside another, then both the element’s opening and closing tags must be inside the containing element. For example, the following is allowed:
<p> This paragraph contains some <em>emphasized text.</em></p>
Whereas the following is wrong because the closing </em>tag is not inside the paragraph element:
<p> This paragraph contains some <em>emphasized text. </p></em>
In other words, if an element is to contain another element, it must wholly contain that element. This is referred to as nestingyour elements correctly.
Attributes Tell Us About Elements
What really differentiates web documents from standard documents are the links (or hyperlinks) that take you from one web page to another. Let’s take a look at an example of a link by adding one to the example you just looked at. Links are created using an <a>element (the astands for anchor).
Here we will add a link from this page to Google in a new paragraph at the end of the document. There is just one new line in this example (code sample ch01_eg02.html) and that line is highlighted:
<html> <head>
<title>Popular Websites: Google</title> </head>
<body>
<h1>About Google</h1>
<p>Google is best known for its search engine, although Google now offers a number of other services.</p>
<p>Google’s mission is to organize the world’s information and make it universally accessible and useful.</p>
<p>Its founders Larry Page and Sergey Brin started Google at Stanford University.</p>
<p><a href=”http://www.Google.com/”>Click here to visit Google’s Web site.</a></p>
</body> </html>
Inside this new paragraph is the <a>element that creates the link. Between the opening <a>tag and the
closing </a>tag is the text that you can click on, which says “Click here to visit Google’s Web site.”
Figure 1-3 shows you what this page looks like in a browser.
Figure 1-3
If you look closely at the opening tag of the link, it carries something called an attribute. In this case it’s the hrefattribute; this is followed by an equal sign, and then the URL for Google’s web site in quotation
marks. In this case, the hrefattribute is telling you where the link should take you. You look at links in
greater detail in the next chapter, but for the moment this illustrates the purpose of attributes.
Attributes are used to say something about the element that carries them, and they always appear on the opening tag of the element that carries them. All attributes are made up of two parts: a nameand a value:
❑ The nameis the property of the element that you want to set. In this example, the <a>element
carries an attribute whose name is href, which you can use to indicate where the link should
take you.
❑ The valueis what you want the value of the property to be. In this example, the value was the URL
that the link should take you to, so the value of the hrefattribute is http://www.Google.com.
The value of the attribute should always be put in double quotation marks, and it is separated from the name by the equal sign. If you wanted the link to open in a new window, you could add a target
attrib-ute to the opening <a>tag as well, and give it a value of _blank:
<a href=”http://www.Google.com” target=”_blank”>
This illustrates that elements can carry several attributes, although an element should never have two attributes of the same name.
The XML Declaration
Sometimes you will see something that is known as the XML Declaration at the beginning of an XHTML document. The XHTML language was actually written using another language called XML (Extensible Markup Language, which is used to create markup languages), and any XML document can begin with this optional XML declaration:
<?xml version=”1.0” encoding=”UTF-8” ?>
If you include the XML declaration, it must be right at the beginning of the document; there must be nothing before it, not even a space. The encodingattribute indicates the encoding used in the document.
An encoding (short for character encoding) represents how a program or operating system stores characters that you might want to display. Because different languages have different characters, and indeed because some programs support more characters than others, there are several different encodings.
Document Type Declaration
As mentioned previously, XHTML is the successor to HTML—although you can just think of it as being the latest version. XHTML employs a stricter syntax than its predecessor HTML. For example, your element and attribute names in XHTML must all be written in lowercase (whereas earlier versions of HTML were not case-sensitive), every element that has some content must have a corresponding closing element, and some of the elements and attributes may be marked as deprecated—meaning that they were likely to be phased out in future versions of XHTML.
Each XHTML page should therefore begin with a DOCTYPEdeclaration to indicate to a browser (or any
other program) the version of HTML or XHTML that is being used in that page.
While I have been talking about XHTML as one language, there were actually three versions or flavors of XHTML released—this was done to help existing web developers make the transition from HTML to XHTML:
❑ Transitional XHTML 1.0, which still allowed developers to use the deprecated markup from HTML 4.1 (which is likely to be phased out) but required the author to use the new stricter syntax.
❑ Strict XHTML 1.0, which was to signal the path forward for XHTML, without the deprecated stylistic markup and obeying the new stricter syntax.
❑ Frameset XHTML 1.0, which is used to create web pages that use a technology called frames(you
meet frames in Chapter 6).
If by now you are feeling a little overwhelmed by all the different versions of HTML and XHTML, don’t be! Throughout this book, you will be primarily learning Transitional XHTML 1.0. In the process, you will learn which elements and attributes have been marked as deprecated and what the alternatives for using these are. If you avoid the deprecated elements and attributes, you will automatically be writing Strict XHTML 1.0.
The DOCTYPEdeclaration goes before the opening <html>tag in a document, and after the optional XML
If you are writing Transitional XHTML 1.0 (and include stylistic markup in your document), then your
DOCTYPEdeclaration should look like this:
<!DOCTYPE html PUBLIC “-//W3C//DTD XHTML 1.0 Transitional//EN” “http://www.w3.org/TR/xhtml1/DTD/xhtml1-transitional.dtd”>
If you are writing Strict XHTML 1.0, your DOCTYPEdeclaration will look like this:
<!DOCTYPE html PUBLIC “-//W3C//DTD XHTML 1.0 Strict//EN” “http://www.w3.org/TR/xhtml1/DTD/xhtml1-strict.dtd”>
For frameset documents (discussed in Chapter 6), your DOCTYPEdeclaration would look like this:
<!DOCTYPE html PUBLIC “-//W3C//DTD XHTML 1.0 Frameset//EN” “http://www.w3.org/TR/xhtml1/DTD/xhtml1-frameset.dtd”>
Having learned Transitional XHTML 1.0, you should be able to understand older versions of HTML and be safe in the knowledge that (unless specifically warned), your XHTML code will work in the majority of browsers used on the Web today.
Core Elements and Attributes
Now that you understand how the contents of a web page are marked up using elements that describe the structure of the document, the next step is to learn all the elements you can use to describe the struc-ture of the various kinds of document you might wish to display on the Web. The rest of this chapter, and much of the next few chapters, will introduce you to all these elements.
As each element is introduced, I will be quite thorough about how it may be used, and which attributes it may take. This allows the book to act as a complete reference once you have learned how to write web pages. But, when you are first going through it, if you feel you understand what an element is used for, feel free to skip further ahead in that chapter if you want to—you can always come back later and read about it again.
Let’s start by taking a closer look at the four main elements that form the basic structure of every document:
<html>, <head>, <title>, and <body>. These four elements should appear in every XHTML document that
you write, and you will see them referred to throughout this book as the skeletonof the document.
The <html> Element
The <html>element is the containing element for the whole XHTML document. After the optional XML
declaration and required DOCTYPEdeclaration, each XHTML document should have an opening <html>
tag and each document should end with a closing </html>tag.
If you are writing Strict XHTML 1.0, the opening tag must also include something known as a namespace identifier(this indicates that the markup in the document belongs to the XHTML 1.0 namespace). Therefore the opening tag should look like this:
<html xmlns=”http://www.w3.org/1999/xhtml”>
While it is not strictly required in Transitional XHTML documents, it is a good practice to use it on all XHTML documents.
Only two elements appear as direct children of an <html>element: <head>and <body>(although the <head>and <body>elements will usually contain many more elements).
The <html>element can also carry the following attributes, which you will meet in the “Attribute Groups”
section later in this chapter:
id dir lang xml:lang
The <head> Element
The <head>element is just a container for all other header elements. It should be the first thing to appear
after the opening <html>tag.
Each <head>element should contain a <title>element indicating the title of the document, although it
may also contain any combination of the following elements, in any order:
❑ <base>, which you will meet in Chapter 2.
❑ <object>, which is designed to include images, JavaScript objects, Flash animations, MP3 files,
QuickTime movies, and other components of a page. It is covered in Chapter 3.
❑ <link>to link to an external file, such as a style sheet or JavaScript file, as you will see in
Chapter 7.
❑ <style>to include CSS rules inside the document; it is covered in Chapter 7.
❑ <script>for including script in the document, which you’ll see in Chapter 11.
❑ <meta>, which includes information about the document such as keywords and a description,
which are particularly helpful for search applications; this is covered in Chapter 13.
The profileattribute is not actually in use yet, although it was included so it could be used in the future to specify a URL for something known as a profilethat would describe the content of the document. The other attributes are covered in the “Attribute Groups” section later in this chapter.
You may sometimes come across the use of the versionattribute in HTML 4.1 and earlier to indicate which version of HTML the document uses, although it is usually left off. XHTML documents should use the DOCTYPEdeclaration along with the xmlns
The opening <head>tag can carry the following attributes:
id dir lang xml:lang profile
The <title> Element
You should specify a title for every page that you write. It lives inside the <title>element (which, as
you saw earlier in the chapter, is a child of the <head>element). It is used in several ways:
❑ At the very top of a browser window (as you saw in the first example and Figure 1-1)
❑ As the default name for a bookmark in browsers such as IE, Firefox, and Safari
❑ By search engines that use its content to help index pages
Therefore, it is important to use a title that really describes the content of your site. For example, the home page of our site should not just say “Home Page”; rather it should describe what your site is about. For example, rather than just saying Wrox Home Page, it is more helpful to write:
<title>Wrox: Books for programmers written by programmers</title>
The test for a good title is whether a visitor can tell what she will find on that page just by reading the title, without looking at the actual content of the page.
The <title>element should contain only the text for the title; it may not contain any other elements. The <title>element can carry the following attributes, which are covered in the “Attribute Groups” section
later in the chapter:
id dir lang xml:lang
The <body> Element
The <body>element appears after the <head>element and contains the part of the web page that you
actually see in the main browser window, which is sometimes referred to as body content. It may contain anything from a couple of paragraphs under a heading to more complicated layouts containing forms and tables, and is likely to constitute the majority of any XHTML document. Most of what you will be learning in this and the following four chapters will be written between the opening <body>tag and
closing </body>tag.
The <body>element may carry all of the attributes from the attribute groupsyou are about to meet in the next section. If you are using Transitional XHTML or HTML 4.1, you can use any of the following depre-cated attributes on the <body>element (which are covered in Appendix I):
background bgcolor alink link vlink text
There are also several browser specific attributes that you might see used on the <body>element; these
also are covered in Appendix I:
Attribute Groups
As you have seen, attributes live on the opening tag of an element and provide extra information about the element that carries them. All attributes consist of a nameand a value; the name reflects a property of the
ele-ment the attribute is describing, and the value is a value for that property. For example, the xml:lang
attribute describes the language used within that element; a value such as EN-USwould indicate that the language used inside the element is U.S. English. Many of the elements in XHTML can carry some or all of the attributes you will meet in this section.
There are three groups of attributes that many of the XHTML elements can carry (as you have already seen, the <html>, <head>, <title>, and <body>elements share some of these attributes). Don’t worry
if they seem a little abstract at the moment; they will make more sense as you read on, but because they are used by so many elements I have grouped them here to avoid having to repeat them each time they come up. As I say, don’t worry if they do not make complete sense at the moment, as long as you remember where you read this. You can keep referring back to them when you need to. The three attribute groups are:
❑ Core attributes:The class, id, and titleattributes
❑ Internationalization attributes:The dir, lang, and xml:langattributes
❑ UI events:Attributes associated with events onclick, ondoubleclick, onmousedown,
onmouseup, onmouseover, onmousemove, onmouseout, onkeypress, onkeydown, and onkeyup(these are covered in more detail in Chapter 11)
Core Attributes
The four core attributes that can be used on the majority of XHTML elements (although not all) are:
id title class style
Where these attributes occasionally have special meaning for an element that differs from the description given here, I revisit them; otherwise their use can generally be described as you see in the subsections that follow.
The id Attribute
The idattribute can be used to uniquely identify any element within a page. You might want to uniquely
identify an element so that you can link to that specific part in the document, or to specify the element so that you can associate a CSS style or JavaScript to the content of that one element within the document.
The syntax for the idattribute is as follows (where stringis your chosen value for the attribute):
id=”string“
Together, the core attributes and the internationalization attributes are known as the
For example, the idattribute could be used to distinguish between two paragraph elements, like so:
<p id=”accounts”>This paragraph explains the role of the accounts department.</p> <p id=”sales”>This paragraph explains the role of the sales department.</p>
Note that there are some special rules for the value of the idattribute. It must:
❑ Begin with a letter (A–Z or a–z) and can then be followed by any number of letters, digits (0–9),
hyphens, underscores, colons, and periods (you may not start the value with a digit, hyphen, underscore, colon, or period).
❑ Remain unique within that document; no two idattributes may have the same value within that XHTML document.
Before the idattribute was introduced, the nameattribute served a similar purpose in HTML documents,
but its use was deprecated in HTML 4.01, and now you should generally use the idattribute in XHTML documents. If you need to use the nameattribute, it is available in Transitional XHTML, but not Strict
XHTML (you might want to use the nameattribute if you are dealing with older browsers that were written before the idattribute was introduced).
The class Attribute
Although the idattribute uniquely identifies a particular element, the classattribute is used to specify that
an element belongs to a classof element. It is commonly used with CSS, so you will learn more about the use of the classattribute in Chapter 7,