Digital Synchronoscope Prototype Based on
STM32F401 Nucleo
F. Danang Wijaya
Dept. of Electrical Engineering and Information Technology Universitas Gadjah Mada
Yogyakarta, Indonesia [email protected]
Eka Firmansyah
Dept. of Electrical Engineering and Information Technology Universitas Gadjah Mada
Yogyakarta, Indonesia [email protected]
Laskar Pamungkas
Dept. of Electrical Engineering and Information Technology Universitas Gadjah Mada
Yogyakarta, Indonesia [email protected]
Abstract—Nowadays, world trend in maintaining energy sustainability is connecting several small and medium scale generators from renewable energy sources to the main electricity grid through a distribution network, or popularly known as the microgrid. One of the main problems of the microgrid is the synchronization of parallel operation. Generator synchronoscope, synchronization detector, and regulator device, will certainly make the microgrid operation easier and more reliable. Digital synchronoscope, which is more thorough in the detection of synchronization parameters and equipped with automation features for the tripping process in generator synchronization, can replace analog synchronoscope which is still widely used. This study was implemented to produce a prototype of digital synchronoscope that has some advantages such as low priced, robust, and simple in electrical schematic.
Keywords— synchronization; synchronous parameters; automatization; microgrid; STM32F401 Nucleo
I. INTRODUCTION
One of the real step becoming a trend in maintaining energy sustainability today is connecting small and medium-scale generations based on renewable energy sources to the main electricity grid through a distribution network, which is often referred to the distributed generation (DG). Practically, some of the DG can be connected to the network and distribute the load connected to the distribution network, or often called by microgrid. Although the contribution which is not as big as the large-scale generation, but for a case of a feeder lines with a voltage of 20 kV which has the economic capacity of up to 10 MVA, for the generation of small scale with a capacity of about 0.5 to 2 MW has a significant contribution, related to the source that use renewable energy.
One of the main problem of the microgrid is certainly a synchronization or parallel operation of the generators in pair. Synchronous generator is a type that is often installed in the microgrid, but the synchronization process requires several
steps that need to be considered. The stages relate several parameters, such as voltage, frequency, phase sequence and phase angle, both on the generator side and grid side [1]. That parallel operation usually use the tools that is able to monitor the entire value of the parameter in the generator side and grid side, so users can determine the proper value for synchronization. That tool is known as synchronizer or synchronoscope. Conventional synchronoscope is still commonly used in Indonesia in the form of analog modules, such as a set of analog voltmeter, analog frequencymeter, and the needle-based synchronoscope determining that the synchronous generator is ready to be paralleled with the electricity grid [2].
Therefore, the study of digital synchronoscope appointed to improve the reliability and accuracy of synchronization parameter measurement. Moreover, in case of detection of phase sequence and phase angle can be easier, avoiding manual steps, and the digital synchronoscope that can be developed to have automatically trip feature. Moreover, voltage and frequency values obtained by the digital synchronoscope are used as an input to the automatic voltage regulator (AVR) and the governor, so they can adjust the values for voltage and frequency generator, so the synchronous condition can be maintained to the microgrid automatically. The digital synchronoscope devices will be implemented by the microcontroller, in the form of a STM32F401 Nucleo board.
II. SYNCHRONIZATION METHOD
A. Ideal Method
Fig 1. Synchronization of Synchronous Generator Scheme
Figure 1 above represents two generators on one busbar, red generator is in stand alone condition and will be paralleled or synchronized to the busbar where green generator has been operated (has been synchronized with the network/busbar). The synchronoscope role is to display and compare the parameters that must be fulfilled by both synchronous generators, then give the command to the circuit breaker (CB) on the generator that are ready to be synchronized to close at the right time and conditions.
Ideally, parameters that must be fulfilled for the synchronization process of red generator and the busbar are [3]:
1. The generator’s voltage value must be the same with the line voltage of the system.
2. The generator’s phase sequence must be the same with the system’s phase sequence.
3. The frequency of the incoming generator is adjusted to be slightly higher than the system’s frequency.
4. The generator is ready to be connected to the system when the phase angles are equal.
B. Synchronization Method in This Study
This research will design a digital synchronoscope prototype that can synchronize 3-phase synchronous generator with small capacity to electrical grid (PLN) which capacity is much greater. Synchronization method used in this prototype can be made easy because it does not need to consider the parameters of voltage and phase angle, because the value of the voltage and phase angle in a synchronous machine will immediately follow the 3-phase electrical grid which capacity is much larger and more stable.
Synchronization parameters that must be fulfilled by the synchronization process in this study are:
1. Frequency of the incoming generator must be the same with or slightly higher than the busbar’s frequency.
2. Phase sequence of the incoming generator must be the same with the busbar’s phase sequence.
This method starts by detecting the phase sequence of the grid using the ADC input of the phase sequence sensor. Then
the program will give instructions to the STM32F401RE Nucleo pin to trigger the relay in accordance with the phase sequence that has been detected. The process ends by the first LED that light up as the first indicator. The next process is the detection of synchronous generator frequency value using input capture feature on Nucleo STM32F401RE. The input capture will detect the value of generator frequency, and displays it on the LCD with a precision of 0.023 Hz. User can increase the frequency of synchronous generators manually by increasing the speed of the prime mover. Once the generator has frequency value that equal to the grid frequency, or slightly higher than the 3-phase grid frequency, the second LED will be light up as the second indicator which indicate that the synchronous generator is ready to be connected with 3-phase grid. The whole process is represented in the flowchart as shown in Figure 2:
III. DIGITAL SYNCHRONOSCOPE DESIGN
A. General System Design
Fig 3. General System Design of Digital Synchronoscope Fig 2. Flowchart of Synchronization Method in This Study
START
Grid Phase Sequence Detection
Phase Sequence Has Been Detected: Switch Circuit is Triggered & Indicator 1 ON
Generator Frequency Detection
Generator Frequency Has Been Fullfiled: Main Switch is Triggered & Indicator 2 ON
FINISH Generator Frequency = Grid ?
YES
In general, the prototype is divided into several sections: Main Control Unit (MCU) based on STM32F401RE board, switch circuit arranged by HH54P relay, phase sequence sensor mounted on the grid, and the frequency sensor mounted on the synchronous generator. The MCU is the controlling part of the other. The MCU equipped with Alphanumeric Liquid Crystal Display (LCD) 2x16 and two Light Emitting Diodes (LEDs) as the indicator. LCD will display the value of generator’s frequency and also the grid’s phase sequence. The first indicator (LED1) will be lit when the phase sequence has been detected and the relay switch circuit will be worked. Then, if the value of the generator frequency is the same with the grid’s frequency, the second indicator (LED2) will be lit. Once these two conditions are fulfilled, the main breaker between generator and the grid can work (trip) to connect the generator to the grid.
The main switch circuit consists of HH54P relay that allows two possible contacts of 3-phase grid with 3-phase generator, the RST or RTS. The parameters, such frequency and phase sequence in the generator and grid constantly monitored, each with frequency sensor and phase sequence sensor. But in this digital synchronoscope prototype, the generator’s phase sequence has been known in the nameplate, and the grid frequency is assumed in a constant value of 50 Hz. Thus, the phase sequence sensor is only used on the grid side and the frequency sensor is only used in the generator side.
Phase sequence detection algorithm works by detecting the polarity of the 3-phase grid, then performed twice comparation on one of the 3-phase grid. The method is selected due to its simplicity that only require voltage divider by the resistor arrangement, and ADC feature of the microcontroller. In addition, the method has not been used in most application. In this prototype, ADC features is applied using ARM microcontroller Mini51, and phase sequence detection algorithm is also programmed on ARM microcontroller Mini51. The ARM Mini51 then sends a command to the STM32F401RE for the combination of relay switch via the transmitter serial pin (ARM Mini51 TX), and is received by receiver serial pin (STM32F401RE RX).
The purpose of using the serial communication is for the STM32F401RE protection. As we know that the price of STM32F401RE is more expensive than ARM Mini51. The fault possibility will be occurred on ARM Mini51, and the serial communication will separate the electrical connection between ARM Mini51 and STM32F401RE. Also for the protection purpose, optocoupler attached between both microcontrollers [4]. The frequency sensor also using voltage divider arrangement that is passed to LM311 as a comparator IC, then processed by STM32F401RE to detect the value of generator frequency, and displayed on the LCD 2x16 [5]. Using the same reason, optocoupler was installed between LM311 output and STM32F401RE [6].
B. Switch Circuit on the Digital Synchronoscope Prototype
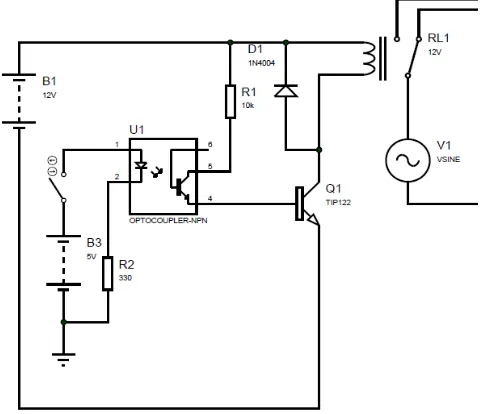
One commonly used switch circuit is using a microcontroller triggering the base pin on darlington transistor to drive the relay. That trigger circuit schematic is also protected with optocoupler. Relay is a switch which is
electrically operated and categorized as an electromechanical components consisting of two main parts, that the electromagnetic (coil) and the mechanic (a set of switch contacts).
Fig 4. The Trigger Circuit for Electromechanical Relay
Relay uses the electromagnetic principle to trip the switch, so with a small current (low power) source can drive the relay contact and it can deliver a higher voltage electricity. For example, using electromagnetic relay witch coil cut-off characteristic 5V and 50 mA being able to move the relay armature (which serves as contacts or switches) to conduct a higher electricity 220V 2A [7].
Figure 4 shows the HH54P switch circuit relay drove by darlington transistor which has base currents (Ib) being triggered by the microcontroller. Optocoupler attached between the microcontroller and the base side of darlington transistor to protect the circuit by preventing electrical connection and replacing with the optical connection [6]. The reverse bias diode is mounted in parallel against the relay coil and also act as the relay protection that prevents transient current generated by the coil winding [8].
C. STM32F401RE Nucleo
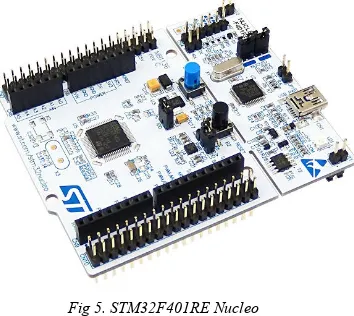
STM32F401RE Nucleo is shown in Figure 5, provides a flexible programming features and easy for users to realize the ideas or building prototypes using all kinds of STM32 microcontrollers. Connectivity with Arduino and ST Morpho headers makes STM32F401RE Nucleo is easy to perform the expand functions on the development board with many options of STM32F401RE Nucleo special shield. STM32F401RE Nucleo does not require a separate probe to connect with software debugger/programmer and designed with STM32 software with extensive library and various examples of programs that can be connected directly to the sources in the mbed online [10].
Fig 5. STM32F401RE Nucleo
D. Input Capture Adjustment
One feature that is used to detect frequency is input capture facility owned by the timer feature of STM32F401RE Nucleo. The working principle of this feature is the input capture function to capture interrupt signal change that is given to it. Changes occur when the instantaneous condition of high signal or rising edge, instantaneous condition of low signal or falling edge, and the combination of both, or both edges as shown in Figure 6. When the capture occurs, then an input capture registers will do the calculation by taking the value of a timer running until the next capture occur [10].
Fig 6. Input Capture Model on Digital Signal
Timer on STM32F401RE Nucleo has a 16-bit prescaler, so that it can be selected a range from 0 until 65535 to determine the resolution of the timer, according to the equation [10]:
prescaler
The measurement accuracy in Hertz from a case with the measuring frequency of F and the time period T=1/F, can be determined by formula: operates on STM32F401RE Nucleo, which has a 32-bit counter period, so that it can be chosen a range from 0 until 4294967295. Configuration of prescaler and counter period allows the user to adjust the resolution of the input capture as precise as the expected particularity [10].
The implemented prescaler value of 500 was obtained and rounded from the calculation by using the equation (1), (2), and (3) with the expected accuracy of 0.02 Hz. At the frequency measurement test of 50 Hz, the input capture value was obtained fluctuate within the range of 2145 to 2146. The timer resolution or equivalently with the resolution for each capture:
5 Tresolution0.0000093218
Frequency measurement by the input capture value of 2145:
resolution
Frequency measurement by the input capture value of 2146:
s
Thus, the frequency sensor accuracy:
) 2146 (
) 2145
(inputcapture Finputcapture
F
The obtained frequency sensor accuracy has already matched with the expected accuracy of 0.02 Hz.
IV. PHASE SEQUENCE DETECTION ALGORITHM
Phase sequence detection method used in this study start with the polarity detection of the 3-phase grid, then determined
Fig 7. The Possibility of 3-Phase Combination
The first step of this algorithm is determining the combination of the 3-phase grid polarity. It is assumed that the 3-phase grid which the phase sequence want to be detected called the ABC. Normally, 3-phase balanced grid certainly has six combinations of phase polarity as shown in Figure 7 and listed in Table 1 ("Phase Polarity" column). Figure 7 represents 3-phase balanced sinusoidal referenced by the red signal, so the blue signal is lagged by 120º, and the green signal is led by 120º. After the 3-phase polarity detection, the second step is the comparison of two phases to detect phase sequence, it is assumed in this algorithm, named Phase A and Phase B.
TABLE I. THE PHASE SEQUENCE DETECTION ALGORITHM
The column "Comparation" indicated comparison of 2 times voltage detection with ADC features. A1 is the first ADC retrieval phase A, and A2 is the second ADC retrieval phase A. The same way with A1 is the first ADC retrieval phase A, and A2 is the second ADC retrieval phase A. The first voltage detection must have a time interval by 10º with the second detection. If the time interval is too long, the detected phase polarity can be changed, so the algorithm becomes invalid. The 10º interval is time tolerance to prevent a phase polarity change, so the validity of the algorithm is maintained.
The 3-phase sinusoidal grid of 50 Hz has a period of 0.02 seconds. Then the interval of ADC retrieval is (10º/360º) x 0.02 = 0.000556 seconds. That value of interval is still reachable by Nuvoton Mini51 which has a clock frequency of 24MHz [11]. The comparison of two ADC retrieval are determined by the algorithm ("Comparation" column) in order to know the phase sequence of 3-phase network, whether RST or RTS.
The phase sequence detection algorithm used in this study has some advantages, such as simple and low priced. The implementation of this algorithm only requires voltage divider schematic and microcontroller’s ADC feature. The phase sequence detection method that commonly used in generator synchronization, such as the method that use light bulb or DC motor, can be replaced with the method used in this study.
V. PROTOTYPE TESTING AND RESULT
A. Frequency Measurement Testing
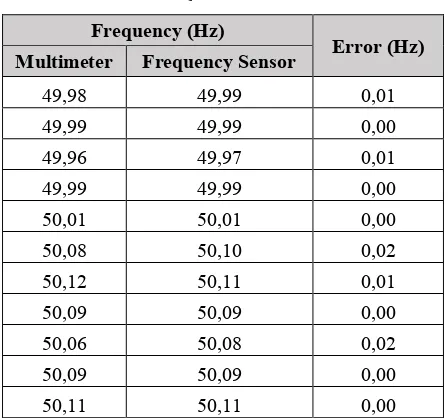
The 3-phase generator and grid frequency are directly detected using a frequency sensor that has been designed. At the same time, it is also applied frequency measurement using a multimeter. Both values are compared and calculated the error that represent both suitability frequency value.
TABLE II. FREQUENCY MEASUREMENT RESULT
Frequency (Hz)
Error (Hz) Multimeter Frequency Sensor
49,98 49,99 0,01
49,99 49,99 0,00
49,96 49,97 0,01
49,99 49,99 0,00
50,01 50,01 0,00
50,08 50,10 0,02
50,12 50,11 0,01
50,09 50,09 0,00
50,06 50,08 0,02
50,09 50,09 0,00
50,11 50,11 0,00
Table 2 above shows that the sensor accuracy to measure the frequency ranged around 50 Hz has been very good. Measurement error that occurs with frequency sensor refers to the measurement using a multimeter being very small, with the calculation based on the data from Table 2, it concluded that the value of the average error is 0.0063 Hz and the maximum error is 0.02 Hz. The value proves that the frequency sensor designed in this study is reliable to use, refers to the standard frequency tolerance by SPLN are ± 1 % or ± 0.5 Hz.
B. Phase Sequence Sensor Testing
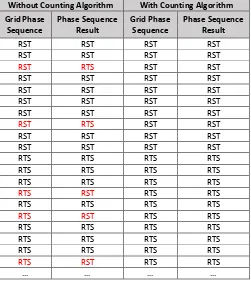
Table 3 shows the sampling of 20 data being tested to detect the phase sequence. Number of testing are all 4500 data at each phase sequence RST and RTS. There are measurement errors (indicated by red text) in the phase sequence sensor testing without adding counting algorithms. The error is caused by the offset value of retrieval ADC which fluctuate, so the effect occur on the inconsistency of the algorithm. The way to overcome the error is adding a counting algorithm. A2…A1 B2…B1
> RST
< RTS
> RST
< RTS
< > RST
> < RTS
< RST
> RTS
< RST
> RTS
> < RST
< > RTS
+
Phase Polarity Comparation
+
-
+
+
+
--
+
-IF
THEN IF
RESULT
THEN
+
--
+
+
-TABLE III. PHASE SEQUENCE SENSOR TESTING RESULT
Without Counting Algorithm With Counting Algorithm Grid Phase same. The way to overcome the error is doing the counting on the number of the phase sequence detected. Based on testing without counting method, a maximum phase error detection is 30% on every 10 data, then the counting number must exceed: 30% x 10 data = 3 data. Counting number what implemented was 5 data. In other words, the microcontroller will calculate how many detection will resulted RST and RTS phase sequence. Microcontroller will store the number of calculations in a variable.
The phase sequence with the number of calculations that
have reached 5 times counting beforehand will be selected for the phase sequence sent by Nuvoton Mini51 USART_TX as the result of the detection. After the phase sequence was selected, both counting variables will be reset, the value is returned to 0, and do the counting for the next phase sequence detection. Table 3 also shows that there is no error in the phase sequence detection after applied the counting method in the main algorithm.
C. Digital Synchronoscope Prototype Testing
The final testing will synchronize a small capacity 3-phase synchronous generator to a large power system grid like the illustration in Figure 3. First, the digital synchronoscope will equate grid phase sequence with the generator phase sequence. The first step was marked by the light of the LED 1 as the first Indicator. Furthermore, the prime mover is rotated manually.
When the conditions are fulfilled, or generator frequency equal to the frequency of the grid, the LED 2 as second indicator will light up. Then the main circuit breaker will connect the synchronous generator to the grid.
Fig 8. Digital Synchronoscope Prototype Testing
However, for the protection, breaker is manually tripped after the entire LED indicators glow. Once connected to the grid, synchronous generator excitation is increased gradually so that synchronous generators started supplying VAR [1]. In this test, the MCB is installed between the grid with the synchronoscope and between synchronous generator with the synchronoscope for the safety. Figure 8 shows the installation of this test. The results of this test goes well.
VI. CONCLUSION
The digital synchronoscope prototype in this study can synchronize a small capacity 3-phase synchronous generator to the power system grid with the accuracy of 3-phase frequency sensor of 0,023 Hz. As for the phase sequence detection method on a 3-phase grid can be done by knowing the polarity of the 3-phase in a time, then in the period of the phase shift is less than 10º from that time, the sensor will detect the voltage magnitude on one phase twice to do a comparison according to the phase sequence RST or RTS.
The advantages of this method are its simple construction, robust, and lower cost. That because the prototype simply use voltage divider and microcontroller’s ADC feature. This study is implemented using STM32F401 Nucleo microcontroller board and the supporting devices.
REFERENCES
[1] S. J. Chapman, Electric Machinery Fundamentals, New York: McGraw-Hill, 2005.
[2] Zuhal, Dasar Teknik Tenaga Listrik dan Elektronika Daya, Jakarta: PT Gramedia Pustaka Utama, 2000.
[3] D. P. Kothari and I. J. Nagrath, Electric Machines, 4th ed., New Delhi: McGraw-Hill, 2010.
[4] Datasheet Photocoupler TLP521−1,TLP521−2,TLP521−4, Toshiba, 2001.
[5] Datasheet LM311 Single Comparator, Fairchild Semiconductor, 2001.
[6] Datasheet Photocoupler 4N35, 4N36, 4N37, Vishay Semiconductor, 2010.
[7] Miniature Control Relays HH52, 53, 54, Fuji Electric.
[8] R. T. Paynter, Introductory Electronic Devices and Circuits, United States of America: Prentice-Hall International, 1997.
[9] TIP120 / TIP121 / TIP122 NPN Epitaxial Darlington Transistor, Fairchild Semiconductor, 2014.
[10] Datasheet STM32F401xD STM32F401xE, STMicroelectronics, 2015.


