Getting Started with the Web
Getting Started with the Web by Shelley Powers
Copyright © 2015 Shelley Powers. All rights reserved. Printed in the United States of America.
Published by O’Reilly Media, Inc., 1005 Gravenstein Highway North, Sebastopol, CA 95472.
O’Reilly books may be purchased for educational, business, or sales promotional use. Online editions are also available for most titles (http://safaribooksonline.com). For more information, contact our corporate/institutional sales department: 800-998-9938 or
Revision History for the First Edition 2015-06-19: First Release
2015-09-04: Second Release
The O’Reilly logo is a registered trademark of O’Reilly Media, Inc. Getting
Started with the Web and related trade dress are trademarks of O’Reilly Media, Inc. Cover image © David Merrett “Take off!”
While the publisher and the author have used good faith efforts to ensure that the information and instructions contained in this work are accurate, the publisher and the author disclaim all responsibility for errors or omissions, including without limitation responsibility for damages resulting from the use of or reliance on this work. Use of the information and instructions contained in this work is at your own risk. If any code samples or other technology this work contains or describes is subject to open source licenses or the
intellectual property rights of others, it is your responsibility to ensure that your use thereof complies with such licenses and/or rights.
Chapter 1. Setting Up Your Web
Space
Getting a Domain
Your own website establishes a unique online identity untainted by the branding of popular social media tools. No matter the other options for
maintaining a space online, including having a Facebook page or a Twitter or Google+ account, nothing represents you, your cause, or your organization better than having your own website. Best of all, it doesn’t have to cost a lot of money, and you don’t have to be technical or hire professionals to get your site online.
The place to start when creating your website is determining your web
address, your URL, as it is commonly known. URL stands for uniform
resource locator, and is your website’s address. The URL is what you type into the address bar in your browser when you want to go to a specific web page, and it’s what you use in a link when linking to a story or resource. The primary component of the URL is the domain name. Google’s domain name is “google.com”, the Humane Society of the United State’s is
“humanesociety.org”, and the White House uses “whitehouse.gov”. All three are similar in that all three start with a descriptive or identifying name — “google”, “humanesociety”, and “whitehouse” — followed by an
abbreviation, “.com”, “.org”, and “.gov”, respectively. The first part of the
domain is the name you pick that best describes your site, followed by a
top-level domain or TLD, describing the type of website represented by the domain. Combined, both form a unique address that represents your web space.
The Top-Level Domain
The TLD provides some information about your website, though the
semantics behind the more common ones has weakened over the years. For
instance, the most frequently used TLD is .com, originally intended for
commercial uses. However, it has become the de facto, all purpose catchall for domains, used for anything from companies (“oreilly.com”) to food weblogs (“browneyedbaker.com”). Because of such common usage, anyone
can use the .com TLD.
Most of the TLDs are available to anyone for any use, while others are
restricted. The .gov TLD is restricted to government use only, as is the .edu
(education only), and .mil (for the military). Other TLDs are open for
general-purpose use, but your website must meet certain criteria. These are
typically geographically associated domains, such as .us for US websites, or
.co.uk for sites in the UK.
There are many generic top-level domains, or gTLDs, available to anyone,
including .info, .me, .rocks, and even .tv, though the costs for each vary —
sometimes considerably. The list of TLDs you can use is long and growing longer by the month:
.com: General-purpose domain, most commonly used
.net: Originally intended for networks, but also used generally
.org: Typically nonprofit organizations, but now used generally
.info: General information
.club: As in "coffee.club"
.me: Assigned to the Republic of Montenegro, but access open to all
.photography: Self-explanatory
.guru: For the self-help experts among us
.website: For those who like redundancy
.io: Indian Ocean, but popular among technology websites
.cm: More open alternative to .com
.co: Another open alternative to .com
SORRY, “CATS” IS OUT
Registering Your Domain
Once you have an idea of the domain you want, the next steps are to check whether it’s available, and if it is, to register it. Domain name registration ensures that the domain name is yours to use.
You can register a domain name two different ways. The first is to register it through the company you’ll use to host your website. The second is to use a
name registrar. This is a company that primarily provides name registration services, though many registrars also provide hosting services.
The advantage to registering with your host company is that most provide free domain registration services for a single domain, as long as you remain with the company. And you don’t have to fuss with the mechanics of
associating the domain with the actual website.
The advantage to using a name registrar is that it is simpler to transfer a domain if you decide to move your site to a different hosting company. Reputable hosting companies providing free domain services also provide a procedure to move your domain if you cancel your hosting contract. But you’ll usually have to pay a registration fee that’s higher than if you registered the name with a name registrar.
Name registrars also provide more options for maintaining your domain(s),
including the ability to park the domain until you’re ready to host it
somewhere. A parked domain is one that’s held for you at the registrar. It’s a way of reserving your domain until you’re ready to launch your website. This section assumes you’re registering a domain at a name registrar and
parking it until you find a hosting company.
There are several very good name registrars. Some of the most popular are Namecheap, 1&1, Name, and GoDaddy. I’ll demonstrate the name
registration process with Namecheap, though the process is similar in all registrars.
interested in. The registrar then checks to see if the domain is available. You’ll usually type just the name component, not the TLD extension, so that you can see what combinations are available.
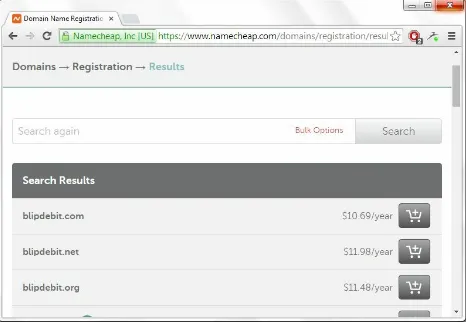
Let’s say you’re interested in a domain name of “blipdebit”, as in “blip de bit”, not “blip debit”. You’ve picked this name because it’s catchy, perhaps maps to the site purpose, and you think it’s a unique combination of letters that is available in most, if not all, TLDs. Typing the name in Namecheap’s
input field returns a result showing us “blipdebit” is available with all TLDs,
as shown in Figure 1-1.
Figure 1-1. Namecheap search results for “blipdebit”
THE ICANN FAQ
ICANN provides a helpful FAQ and list of accredited domain registrars. Included in the FAQ is more information about the various TLDs, as well as good advice to make sure your registration process is problem–free.
Now you can add as many name/TLD combinations as you wish. I strongly
recommend picking .com, as this is the most common TLD (the one most
people are familiar with). You don’t need to select any others, unless you think at some point you’ll need a domain name variation for a separate
purpose, or you like how the name looks with .rocks and want to ensure you
have access to it at a later time.
However, if .com isn’t available, or you just don’t care for it, feel free to use
whatever TLD is available to you. My own domain, burningbird.net, uses the
.net TLD, because .com wasn’t available when I registered it, and I’ve not
ABOUT FINDING YOUR SITE
Nowadays, most people access websites via search engine or links from other sites (or Twitter or Facebook or other social media site) rather than actually typing the domain name into the browser address bar. Later in the book, I’ll cover how you can ensure that search engines find your website, and how to promote your site in social media.
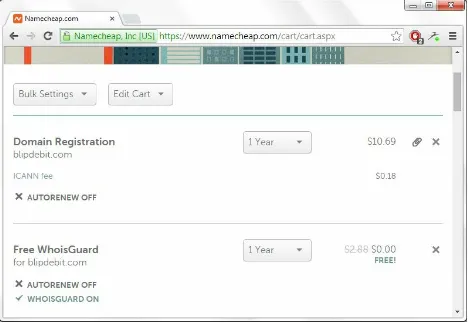
After you’ve added one or more domain names to the shopping cart, you’re ready to check out. In the checkout page, Namecheap automatically sets
autorenew to off. This means that the domain won’t automatically renew with Namecheap when it expires. When you register a domain name, you only register it for a set period of time, typically one or two years. At that point, you’ll either need to renew the domain with your existing registrar or move it to a new registrar and renew it. If you don’t, you’ll lose the domain. You don’t have to worry about accidentally losing the domain, as the registrar will provide ample warning of the expiration date.
Some registrars, like GoDaddy, require that you register your domain for two years. Others may set the domain to automatically renew. It’s important to read the fine print before checking out so you understand exactly what you’re getting.
Namecheap also provides an option to add a WhoisGuard. I strongly
WHOIS
WHOIS is a method of searching through the global domain name database for
information about an existing domain name. Name registrars use WHOIS to check to see if a domain is available. Typing “WHOIS” in a search engine will return any number of websites that will allow you to check the information about the domain.
As an example, running a WHOIS request on “oreilly.com” at GoDaddy, O’Reilly’s registrar, we discover O’Reilly’s corporate address, phone number, and website admin email address. Most businesses and large organizations don’t care if this information is exposed, but smaller organizations and individuals usually do.
The WHOIS guard service (or whatever is the name of the service provided by the registrar you use) provides a way of sheltering this information. Instead of your name, email, phone number, and address showing up when someone does a WHOIS on your domain, people see ones generated by the WHOIS guard service. People can still contact you...but only through the service. It is more than sufficient to protect your privacy.
The registrar may offer other options, such as support for Secure Sockets Layer (SSL) or hosting your website. I’ll cover SSL in Chapter 6, but for now, just stick with the domain name and WHOIS guard. Depending on the registrar you use, you might have to wade through several pages of offers before you’re actually able to check out.
DOMAIN NAME PARKING
Using Hosting Companies
A hosting company provides the physical server and Internet access for your website. There are many hosting companies, each providing a set of services.
Some companies only provide shared hosting services, others are site
Types of Web Hosting
A dedicated server is a leased computer maintained at a hosting company website. One of the more well–known dedicated server companies is
Rackspace. Though the company provides the hardware and Internet access, you’re controlling what’s installed on the server and are responsible for maintaining it. You can contract with the hosting company to provide setup and maintenance, but it’s expensive. The dedicated server itself isn’t cheap. A virtual private server (VPS) is a system where you have all the advantages of a dedicated server, including administrative privileges, but you’re sharing a physical server. My own VPS is hosted with Linode. You’re still
responsible for maintaining your slice of the server pie, but it’s less expensive than having a dedicated server.
A website-builder host is one where you don’t have to have your own domain name. The Wordpress.com host is a site like this, as is Weebly. Instead of
yourdomain.com, you’ll get a domain like yourname.weebly.com. Most site builders provide a free option with very limited functionality, though they also provide an upgrade into a more traditional shared hosting service.
GO FOR THE CLOUD
The last few years saw the rise of the cloud, as in cloud services. Amazon provides cloud services, as do Google, Microsoft, and many of the hosting companies.
Unlike more traditional hosting services, cloud services allow companies to partition part of their website’s functionality to another server. They could host some of their data operations or their more complex processing on the other site.
When looking for a host, you may come across sites offering cloud services. There may come a time when you’ll need such a service, but not when you’re just starting out.
Finding Your Hosting Company
You have a wealth of choices when it comes to choosing a hosting company. Following is just a partial list of the companies I’m most familiar with:
Dreamhost
HostGator
BlueHost
A Small Orange
InMotion
Arvixe
REVIEWS OF BEST HOSTING COMPANIES
PC Magazine put together a great side-by-side review of several different hosting companies, providing a good starting point in your company search.
Shared hosting systems are typically Linux-based, though you can find hosts that support Windows. I recommend a Linux website even if you’re most familiar with Windows, as Linux is the most common type of system with support for the largest number of software and service options. It’s also the less expensive option, and you don’t have to touch the Linux operating
system until you’re ready for more advanced functionality — all of the basic website management functionality can be managed via a control panel. I would suggest only going with Windows if you really want to use Windows-specific functionality, such as ASP.NET.
SUBDOMAINS
A subdomain is a subset of a domain. If you’ve seen URLs like
http://doc.somecompany.com, or http://technology.anothercompany.rocks, the “doc” and
“technology” represent subdomains. These subdomains can use different applications and even have more restricted access. They’re a way of partitioning your site while still only having one domain.
What package you choose depends on your needs. If you want support for more than one domain, you’ll need to ensure the package allows for multiple domains. If you want email support with your domain, the package needs to provide mailbox services. If you’re putting together a small, online store, having access to shopping cart functionality is essential. FTP support is a must, as is database support if you plan on eventually using weblogging software or a content management system (CMS).
Regardless of your unique needs, one service you must have is a control
PLESK CONTROL PANEL
Another well-known control panel is Plesk. Though I cover cPanel in this book, the procedures when using Plesk should be similar.
Signing Up with a Host
Focusing in on one host, BlueHost, I’ll walk you through the sign-up process and how to connect your new domain name with your new website. As with the name registrar, signing up for a hosting service is similar across all of the companies.
Most hosting companies provide different packages, and BlueHost is no exception. It provides three options for shared hosting: Starter, Plus, and Pro. Note that the price quoted is if you sign up for a three-year package, so be forewarned that the price per month is higher if you decide on a 12- or 14-month package.
Since you’re just starting, and you only have one domain, let’s go with the Starter package. You can always upgrade at a later time (most hosts allow upgrading, so start cheap, and work up). In the sign-up page, you’ll either provide a domain for BlueHost to register for you or type in the domain name you registered with a name registrar. Since you’ve already used a name
registrar to park a domain, go with the second option.
The next page collects account information, including name and address, as well as payment information. With rare exceptions, shared hosting companies require payment upfront for at least a year’s worth of hosting.
BlueHost, like the other hosting companies, also provides optional extras you can add to your account, including enhanced backup support and site
security. For now, unless there’s an option you’re absolutely sure you want, go with the basic service (you can add most extras at a later time).
Your Website’s Address and Connecting Your Domain
You have a domain managed by one company, and your website hosted in another. How do you connect the two? Easily. All you need to do is point
your domain to BlueHost’s name servers. Before we make the connection,
though, let’s take a closer look at how domains get mapped to server locations, and what a name server is.
The Internet addressing system consists of Internet Protocol (IP) addresses
that usually look like four sets of three numbers, separated by periods. My
site’s current IP address is 173.255.206.103. You can type this address into a
browser and my default website displays, since I have a dedicated IP
address. The system for the address is IPv4, which has been the primary Internet addressing system for years. Recently a new addressing system, IPV6, was created because the popularity of the Web is depleting IPv4 addresses. An example of an address under IPv6 is:
FE80:0000:0000:0000:0202:B3FF:FE1E:8329
Definitely not for the faint of heart. And not something you want to type into a browser address field. Or try to remember. Neither address system provides addresses that are easy for humans to remember.
What we need is a way to map these network addresses to domain names
humans do understand. That’s where the Domain Name System (DNS) enters
the picture. The DNS maps network addresses to domain names via a hierarchy of name servers that maintain this pairing.
BlueHost provides two name servers: ns1.BlueHost.com and
ns2.BlueHost.com. In these name servers, the company provides the
information that maps the domain name you provided when you signed up with the IP address you share with other BlueHost customers. All you need to do now is transfer the DNS management for your parked domain at the name registrar to the hosting company. You do that by replacing the name servers the registrar lists with the name servers the hosting company provides.
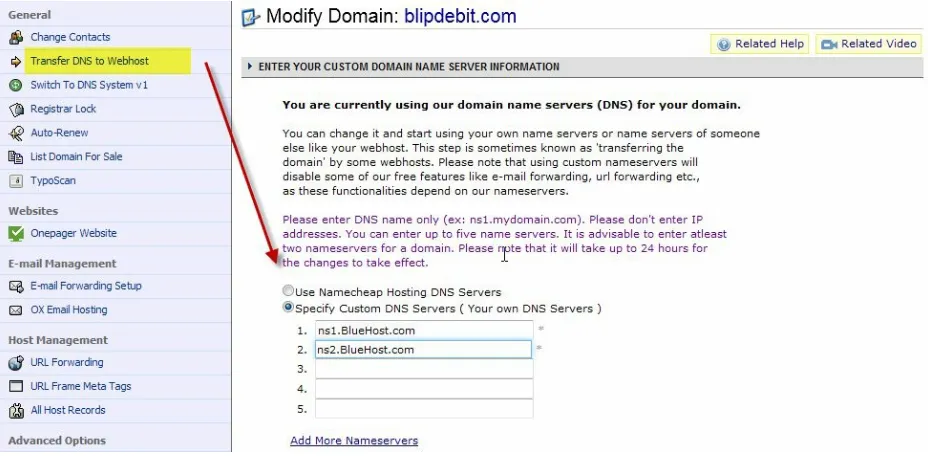
in the menu under your account name. In the left side of the page is a View Domains option. Clicking this will list all your domains to the right. Click the domain you’re having BlueHost manage. Select “Transfer DNS to Webhost” from the left side in the page that opens, as highlighted in Figure 1-3. In the page that opens, you’ll see five text fields in the middle of the page. Enter the
web host’s name servers (in this case, ns1.BlueHost.com and
ns2.BlueHost.com) into the fields, as demonstrated in Figure 1-3. You need to enter at least two, but you can enter up to five if your hosting company
provides more than two name servers.
Figure 1-3. Selecting Transfer DNS to Webhost opens a page where you can enter the host’s name servers
That’s it. You’re all done. The same process works regardless of web hosting company and name registrar:
1. Register your domain at the name registrar.
2. Sign up with a web host, providing the domain name when prompted.
4. Transfer DNS from the registrar to the host by copying the name server addresses into the spaces provided at the registrar.
Again, if your host is also your registrar, you can skip the DNS transfer
process. But if you want to switch to another host, you’ll have to go through a DNS transfer at that time.
FOLLOW YOUR DOMAIN NAME
Domain propagation is the process where the domain/IP address makes it way throughout the Internet. You can follow your domain name as it propagates through the DNS in the
Global DNS Propagation Checker. Checking your domain over time, you’ll see the IP address associated with your domain slowly change from the registrar’s IP address to your web host.
Communicating with Your Server Using FTP
You’ll need to use file transfer protocol (FTP) to upload content to your new
Introducing the cPanel
Most hosting companies use cPanel, the most popular of control panels. However, not all cPanel installations look the same, because the software allows each hosting company to brand the tool with its own look and feel, as well as refine what options are displayed for its customers.
For the most part, though, if you’ve used cPanel at one company, you can easily use it at any other. Or if you’ve used the cPanel company’s own demo installation, you can easily use the hosting company’s version.
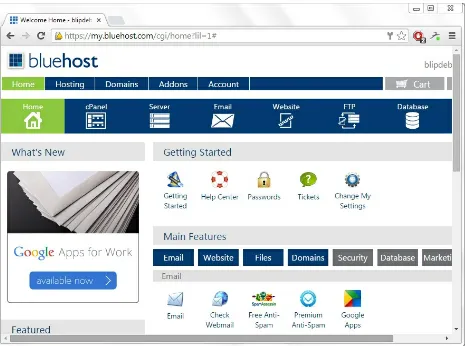
Logging back into BlueHost (or whatever hosting company you’re using) using the direct home link, your account’s cPanel management system is displayed, as shown in Figure 1-4.
Across the top are several options, including access to the Server. Other cPanel installations may not have the topmost set of links, in which case you’ll need to look for the service icons within the cPanel page. Each should be clearly labeled.
When you click the Server option, BlueHost asks you to verify your account for the first time. Hosting companies have been trying to shut down
spammers with extra steps, and this is one of them. It’s a pain, but thankfully, you only have to verify your account once (this process does differ across hosting companies). Verification is easily accomplished by calling a given phone number using the phone associated with your account, and providing the last four characters of your password or last four digits of your credit card.
Once verified, clicking the Server option opens a page with links to check your disk space usage, bandwidth usage, and so on. It’s a way to keep track of what’s happening with your website. The other cPanel icons along the top (e.g., Email, Website, FTP, Databases, and Manage IPs) are links to options located elsewhere in the cPanel page. They’re ways of managing website software, email accounts, FTP logins, databases, and unique IP addresses, if you ever purchase an individual IP address.
Setting Up and Using an FTP Account
When you first set up your website, unless you’re using packaged software such as Wordpress, you’ll need to upload at least one web page. You’ll need an FTP account in order to use FTP to transfer the page from your home computer to the server.
An FTP account is a way of using client-side software to create a connection between your computer (or tablet or smartphone) to your website on the hosting company’s server. You can use any FTP software, as long as it supports the type of FTP you’re using. By default, an FTP account is
nonencrypted, which means that any data you send or receive from the server is sent without encryption and can be seen by any hacker who may have
tapped into the system. In Chapter 6 I’ll cover how to set up SFTP, or secure
FTP, for your account. SFTP adds encryption so that any snoop can’t peek at
the data. For now, though, we’ll stick with FTP, just to get you started. When you signed up for BlueHost, the company created a default FTP account for you. You’ll see this FTP username in the welcome email. The password is the same password you created to access cPanel. The email also
provides the FTP URL for your site, which is the domain name with an ftp
subdomain. For blipdebit.com, it’s ftp.blipdebit.com.
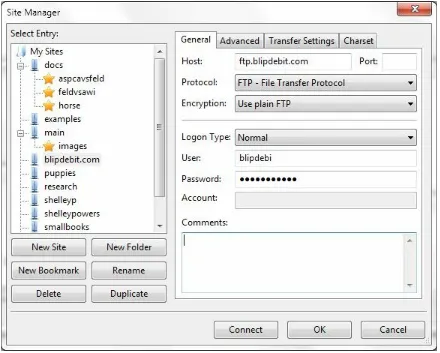
Any FTP client software can provide access to your server. The one I use is Filezilla, a free application that works in all platforms. Once downloaded and installed, opening the application provides a page listing a local subdirectory (on your computer) and files in that subdirectory in windows to the left, and directories and files on your server to the right. To establish a connection to your server, you’ll either type in the host name, username, and password at
the top (i.e., ftp.blipdebit.com, blipdedi, and whatever password), or you can
click Site Manager in the File menu. Using Site Manager allows us to create persistent accounts for the servers, rather than having to re-type the account information each time we want to connect. Figure 1-5 shows the Site
Figure 1-5. FileZilla Site Manager entry for ftp.blipdebit.com
You don’t have to specify the port when you create the entry, because
FileZilla will use the default port (21) for FTP. I’ll cover the concept of ports later in “Quick Review of Web Server Basics”.
PORTS: THE HIDDEN ADDRESS COMPONENT
What isn’t shown in the URL is the port number. A port is a communication endpoint: the connecting component of any network communications. Your server can serve up pages for several different ports, as well as several different domains and subdomains. The default port for web pages is port 80. Because it’s the default, browsers and applications that can process requests for web pages without you having to specify the port — they assume port 80 by default. You can, though, actually provide the port if you wish:
Note that the port is separated from the domain by a colon.
Different services have different default ports. HTTP Secure (HTTPS), covered in Chapter 6, has a default port of 443. FTP uses 21, while SFTP uses 22. Email’s default port is 25.
A second way you can configure your FTP client is download the FTP client configuration files that cPanel provides for each FTP account. In the FTP Accounts page, click the Configure FTP Client links associated with an account. A page section opens beneath the account, with links to three
different FTP clients: Filezilla, Core FTP, and Cyberduck. Click the one you wish, and save the file to your local PC. To use, open your FTP client and import the configuration file. For Filezilla, do this by selecting File, and then Import. A new site configuration is created automatically for you.
Clicking on Connect creates the connection to your server. If you used a configuration file, you’ll be prompted for your password. The right side of the FileZilla window now shows the subdirectories and files in your server. The default FTP account created when you created your hosting account opens the server connection at the topmost level of the file hierarchy for your account. Just like in Windows, the Mac OS, or any other environment, file subdirectories on the server are created in a tree-like hierarchy. The
subdirectory you’ll focus most of your effort in is named public_html, as
Figure 1-6. The blipdebit.com website opened in FileZilla
You can transfer files from your computer to the server, or transfer files from the server to your computer, once you connect to the server. You can transfer web pages, graphic files, or other document types that you want to make accessible from you server.
If you want the web page or other document to be publicly accessible, you’ll
need to place it in the public_html subdirectory. This subdirectory forms the
root for your website. In fact, since most of your work is in public_html, it’s
handy to have an FTP account that opens directly into public_html, rather
than at the higher account level. It’s a simple matter to create a new FTP account.
you’d like to use for the FTP account and a password. Note that the account name is for a specific use, not necessarily a person. When you create an FTP account, the system automatically provides a separate subdirectory for that account name, so you can upload files directly to the subdirectory. If we type in “boss” as the account name, the form automatically creates a new
subdirectory reflecting the account name, as shown in Figure 1-7.
Figure 1-7. Creating a new FTP account
Since we want the account to load files directly to public_html, we’ll delete
the added boss subdirectory. Clicking Create FTP Account creates the new
FTP account. When you use this FTP account in your FTP application, you’ll
need to use the full FTP account name of [email protected] for the
username. Once connected, the software opens directly into the public_html
Uploading Your First Web Page
The BlueHost generic page is better than an error of 404 Not Found, which is what people get in their browsers when they access a web page that doesn’t exist. But you’re really going to want to start putting up your own content. We’re going to start small. Using your favorite text editor, copy the following text (including angle brackets and other annotation) into a new document,
and name it index.html:
<!DOCTYPE html>
<html lang="en"> <head>
<meta charset="utf-8">
<title>The HTML5 Herald</title>
<meta name="description" content="Blip de Bit!"> </head>
<body>
<h1>Hello, World!</h1>
<p>How do you like my new site, eh?</p> </body>
</html>
The text is Hypertext Markup Language (HTML), which is the language used for most web pages. This specific web page is based on the latest version of HTML, HTML 5. I’ll cover HTML in more detail in Chapter 2, but this page basically creates a plain web page with “Hello, World!” in large text, and “How do you like my new site, eh?” in smaller text underneath.
Open your FTP client, connect to the server using your public_html account,
Setting Up an Email Address
Nowadays, people are more likely to use their Gmail account for all site-related email needs, but it’s simple to set up an email address if you want one associated with your domain. In fact, it’s not unusual for websites to have a
[email protected] email for people to send emails about potential problems at the site (or to spam you, unfortunately).
Click the Email icon in cPanel to create a new email address. In the page that opens, enter the information for the email account, including email username, password, and the size of the email mailbox, as shown in Figure 1-9.
Figure 1-9. Creating your webmaster email account
Once you’ve created the new email address, it’s listed in the Email accounts table at the bottom of the Email page. You can change the email account’s password or mailbox quota by accessing the email account in this table. You can also access the account’s email. At the end of the table is a drop-down menu from which you can choose to either configure an email client, or access Webmail: an online web email client built into cPanel that allows you to manage your email directly in the web page.
the clients you’d like, or you can set up your email to automatically forward email to your Gmail or other account. You can also configure client email software from this page. For now, let’s access the Squirrel web-based email client. I’ve always been fond of small, furry rodents.
Figure 1-10. The various web-based email clients available to you from cPanel and other options
Quick Review of Web Server Basics
We covered a lot of ground in one chapter.
You started out by registering a domain with a name registrar. You then signed up with a new web hosting company and transferred DNS
management from your name registrar to your hosting company.
You also created your first FTP and email accounts, as well as uploaded your very first web page and sent an email to your new email account.
I wanted to briefly touch on some of the technology behind the scenes of all this activity; just enough so that if people mention any of it, you’ll know what they’re talking about.
Your domain name is a combination of name and TLD, or top-level domain. It’s part of the URL you type into a browser address bar. The other
components of the domain are the protocol used, typically HTTP (hypertext transfer protocol), and possibly additional text following the domain for a specific website article. An example is:
http://www.somedomain.com/some-article
The www in the domain name used to indicate URLs in the World Wide
Web, but such use isn’t necessary nowadays. It’s more of an artifact than a requirement, and many sites completely forgo its use. The domain name, and
the www subdomain should point to the same site if the hosting company
configures the domain setting correctly.
We also briefly touched on the FTP protocol, used for transferring files to and from the server. Though we didn’t mention it, email is dependent on yet another protocol: the simple mail transfer protocol, or SMTP.
server. In addition, the hosting company we covered in this chapter is using Linux-based servers. Again, this is the most common type of servers for web companies. One major advantage to the Linux system is it allows the host company to host several customers on the same server, yet keep each of your files safe and private from the other customers. The host company also has a plethora of tools to monitor what’s happening in your site, many of which you can access directly in cPanel via the System link I covered earlier. Your web pages are served up by Apache, but different software is used for FTP as well as handling email. Email servers are some of the most complex servers to set up, and a major reason many people really don’t want to
maintain their own web-based systems. Which email server your host is using is, thankfully, something you’ll never have to deal with.
In the background are a host of other services busy keeping your site safe and secure. There are firewalls to keep the bad guys out, and backup programs to help you recover your site if it gets trashed. Most hosting companies provide good, basic security, spam protection for email, and backups for free, but if you want to have more in-depth control, you’ll most likely need to purchase an optional service. Again, these services should be available on cPanel, and you’ll recognize if they’re for pay or not by the addition of “Pro” to the icon title.
If you run into problems, you can check out the hosting company
Chapter 2. Structuring The Web
Content with HTML
Now that you have your hosting company and your very first web page, it’s time to take a closer look at exactly what it is you uploaded.
The page you uploaded in Chapter 1 consisted of the markup shown in Example 2-1.
Example 2-1. Your first web page <!DOCTYPE html>
<html lang="en"> <head>
<meta charset="utf-8"> <title>Blip de Bit</title>
<meta name="description" content="Blip de Bit!"> </head>
<body>
<h1>Hello, World!</h1>
<p>How do you like my new site, eh?</p> </body>
</html>
Basic Page Structure
Hypertext Markup Language, or HTML, is the language of the Web. It
consists of elements — text components enclosed in angle brackets (<, >),
each of which has its own meaning and default appearance. Browsers have
the ability to read the markup elements, such as <head> or <p> and know
exactly what to do with the contents. Some of the elements provide information; others provide structuring for the page contents.
In Example 2-1, the basic page structure is defined by four overall elements: The doctype declaration
The html element
The head element
The doctype
The doctype element (<!DOCTYPE html>) tells the browser what type of markup is being used in the page. In Example 2-1, the markup is HTML5, the fifth version of the most common type of HTML. Other common
doctype declarations are ones for HTML 4.01 transitional:
<!DOCTYPE HTML PUBLIC "-//W3C//DTD HTML 4.01 Transitional//EN" "http://www.w3.org/TR/html4/loose.dtd">
and XHTML 1.1:
<!DOCTYPE html PUBLIC "-//W3C//DTD XHTML Basic 1.1//EN" "http://www.w3.org/TR/xhtml-basic/xhtml-basic11.dtd">
The doctype is important because it gives the browser a heads-up about what to expect, and also how to treat the individual markup elements. Take the
XHTML 1.1 doctype. XHTML, or Extensible Markup Language, is another
LOWERCASE VERSUS UPPERCASE ELEMENTS
The html Element
The first element after the doctype in Example 2-1 is the html element. It’s
also known as the document’s root element. It’s not a required element, but,
as we’ll soon see, it is very useful.
In the example, the html element consists of opening and closing tags:
<html lang="en">...</html>
The opening tag consists of the element’s name (and any attributes — more on these later), enclosed in angle brackets. The closing tag is also enclosed in angle brackets, but the element name is preceded by a forward slash (/). The closing tag isn’t mandatory in HTML5, as it is for other document types (e.g, XHTML). In HTML5, tools that process the HTML documents use cues, such as open tags for other elements, as indicators it should treat the element
as closed. The closing cue for the html element’s closing is the end of the
USE CLOSING TAGS
It’s a good idea to use closing tags, if for no other reason than ensuring no errors that can impact the page’s visual display are introduced. It also helps to keep your markup visually organized.
The html element has content within the opening tag. This content is known
as an attribute. HTML attributes provide additional information about the
element, separate from its content. In Example 2-1, the html attribute is
lang="en". It lets the browser know that English is the primary language used in the web document. Browsers are usually smart enough to figure this out, but it helps to be as precise as possible in the markup. The more
information you provide, the less the browser has to guess (and possibly guess incorrectly).
HTML is a hierarchical language, which means that elements are contained within elements, and the overall document forms a tree-like structure of
nested elements. The html element wraps all of the other web page elements,
some of which also contain nested elements, and so on. The first html nested
The head Element and an Introduction to Empty
Elements
The head element isn’t required, but I strongly recommend you include it, if
for no other reason than to give your web page a title. The head element is
used to organize the metadata for the web page. Metadata literally means
data about data, and the metadata in the head element provides information
about the web page.
The most common of the elements nested in the head element is the title.
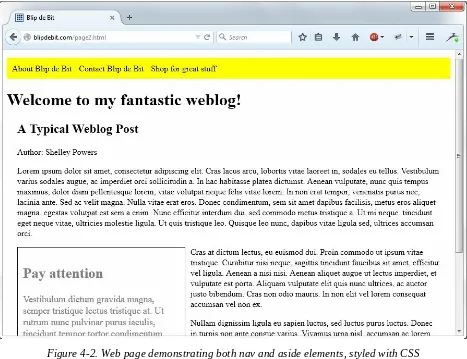
The title element provides a title for the web page. It may be the same as the web page’s article title, but it usually reflects the website name in some form. In Example 2-1, the title is Blip de Bit. If you open the website in a browser, the title displays in the tab at the top of the page. Figure 2-1 shows Firefox
with two opened tabs: one to blipdebit.com, and one to another of my sites,
burningbird.net.
Figure 2-1. Web page title elements on display
The second metadata element is meta. It’s a generic element for marking
element is used to provide two pieces of information:
Charset — the character encoding used for the document
A web page description, given with the name and content attributes
The character encoding for a web page document tells the browser what kind of encoding scheme is used for the special characters, like the copyright ©. When the browser encounters a character sequence, such as or ©, it knows to display a single space or the copyright character,
respectively. The most common character encoding for the Web is UTF-8, as
shown in Example 2-1.
The name and content attributes in the second meta element are used to designate name/value pairs permitted in HTML5. From the W3C HTML5 specification, the following are allowed:
application-name
When the name attribute is set to application-name, the value of
the content attribute must be a string representing the name of the web application that the page represents.
author
When the name attribute is set to author, the value of the content
attribute must be a string that gives the name of one of the authors of the document.
description
When the name attribute is set to description, the value of the
content attribute must be a string that describes the page. generator
When the name attribute is set to generator, the value of the content
attribute must be a string that identifies the software used to generate the document.
When the name attribute is set to keywords, the value of the content
attribute must be a set of comma-separated strings, each of which is a keyword relevant to the document.
MYTHS ABOUT META
A common myth about the meta element is that it can aid your search engine results. Search engines have progressed beyond the need of utilizing the meta element for useful information.
Notice that the meta elements don’t have any closing tags. They wouldn’t
regardless of doctype used, because they’re known as void, or empty,
elements. In other words, they are elements whose function comes in via their attributes, not their contents.
Another way empty elements can be displayed is as self-closing tags:
<meta charset="utf-8" />
<meta name="description" content="Blip de Bit!" />
The element tags have been modified with an ending backslash (/). The self-closing tag markup is required with XHTML, but not HTML5. You can use the self-closing markup in HTML5, but it isn’t required and is rarely used nowadays.
That’s the last of the elements included in the head element for Example 2-1.
The body Element
The body element contains the web page contents. In Example 2-1, the
contents consist of an h1 header element and a paragraph (p) element. The
contents in the two elements are displayed in the page, but as was
demonstrated in Figure 1-8 in Chapter 1, how the contents are displayed differs.
The HTML specification provides minimal display characteristics for the
HTML elements. The different header elements, ranging from h1 all the way
to h6, are bold by default, have a specific font type and size (decreasing in
size from h1 to h6). More importantly, they have a semantic meaning. When
search engines parse the page, they can recognize the text that forms the heading for a story or article. When screen readers interpret the page, they can determine which text should be spoken, first. You could use a paragraph as a header, and use CSS (discussed later) to style it to look the same as a header element, but then you’ll lose the semantic advantage of using the proper element.
The same applies to the paragraph (p) element. Like the header, it has a
default styling. It inherits the default font type and size defined in the default
browser stylesheet — the document that contains the styling instructions for
the page contents. It’s also a block element, like the headers, which means
that the elements expand to fit the width of the space containing it and begin a new line at the point where they’re inserted. In the following code block, two headers are divided by two paragraphs:
<h1>The Big Header</h1>
<p>The h1 header is equivalent to a chapter title, while the headers (h2 through h6) progressively nested subtitles and section headers.
</p><h2>The Sub-Heading</h2>
<p>Notice how each if you have two elements, one following the other, how you end one element, first...</p>
<p>...before starting another</p>
default Chrome stylesheet. Even though the h2 header starts on the same line as the paragraph preceding it, it begins a new line in the actual display. The same with the paragraph elements.
Figure 2-2. Two headers (h1 and h2) with three different paragraphs
Some elements can nest in other elements, as the >body and >head elements
do in >html, and the >h1 and >p elements nest in the >body. But when the elements are nested in another, the entire element must be contained in the outer element, and that includes both the opening and closing tags if you use both. >
<body>
<p>paragraph...</p> </body>
If you use closing tags, the closing tag for the paragraph must occur before
the closing tag for the body element.
Commonly Occurring HTML Elements
There are a large number of HTML elements in addition to those we’ve covered, but there are a core set you’ll frequently encounter. We’ll take a look at these commonly occurring elements in this section. HTML5 introduced new categorization schemes, but most of us split the HTML
elements into as block-level elements, or inline elements, which I’ll cover
NEWER SEMANTIC ELEMENTS
The HTML elements I cover in this chapter are all old friends who have been with us past editions of HTML. I cover newer, semantically rich elements introduced in HTML5 in
Inline Elements
As you might expect with the name, inline elements are those are used within blocks of text, to modify or add additional information to sections of text within the block.
The most common inline element has to be the link, the a element. Without
it, the Web wouldn’t be the Web. Links are what we use to connect web pages to other web pages. A web page link is a very simple thing. The information about the link is defined in attributes, while the text the link surrounds is displayed as the link text:
My publisher is <a href="http://oreilly.com">O'Reilly</a>.
By default, the text enclosed in the link element is underlined, and offset with a different color (typically blue by default). Clicking the link opens the web
page defined in the href attribute.
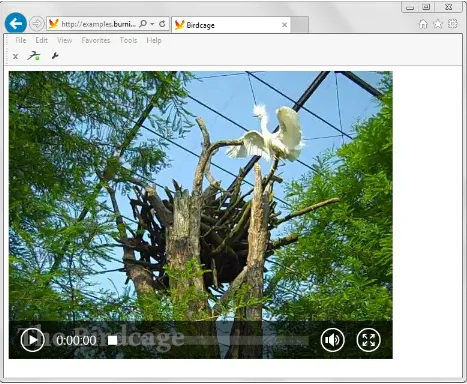
Another very popular inline element is the img element, which allows us to
embed an image in the web page. All browsers support PNG, GIF, or JPEG image files, while some support other types, such as SVG (scalar vector
graphics). An example of an img element for a JPEG is the following:
<img src="http://yourdomain.com/yourimage.jpg" alt="Image showing..." />
The URL for the image is given in the src attribute. In the HTML, the image
source file has already been uploaded to your site, and the location of the image is relative to your site’s primary content folder. If your main website
pages are loaded into the subdirectory named public_html, and you create a
new subdirectory named images in public_html, then the image URL would
AVOID HOT LINKING
You can link images in other websites, a technique known as hot linking, but doing so is frowned on, and many sites block others from directly linking their images.
The alt attribute is a brief description of what’s displayed in the image. It’s
used to provide a textual description of the contents for people using screen
readers or other assistive technologies. It’s not mandatory to provide the alt
attribute, but it is strongly encouraged.
Also note that the img element is an empty element. All of the necessary
information comes from the attributes. I used the end forward slash in the element, but you don’t have to include it as long as your document is HTML5.
Several inline elements provide textual semantics, as well as some default
formatting. Among the most popular are the strong, b, em, i, and small
elements. They’re wrapped around the text you want to highlight in some way.
This is a paragraph and I want to <em>emphasize this text</em>.
You do need the ending tag for these inline elements, as well as the other inline elements that are not empty.
The strong element is used to indicate serious or important material. By default, it’s portrayed in bold text. If you’re only interested in bold text, and aren’t interested in highlighting text because it’s essential or important, you
can use the b element instead.
The em element is used to emphasize the text. It’s displayed as italic text, by
default. If you just want to display text in italics, and aren’t interested in
attaching semantic importance, use the i element, instead.
smaller font than the other web page text.
Example 2-2 utilizes all of the inline elements we’ve covered by modifying our original HTML document and adding new content.
Example 2-2. Blip de Bit web page modified with new inline elements <!doctype html>
<html lang="en"> <head>
<meta charset="utf-8"> <title>Blip de Bit</title>
<meta name="description" content="Blip de Bit!"> </head>
<body>
<h1>Hello, World!</h1>
<p>How do you like my new site, eh? </p>
<p>I want you to feel <em>welcome</em> when you visit my website. I don't <strong>ever</strong> want you to feel you came to the wrong place. There is no better place to <b>Blip de Bit</b> like <i>blipdebit.com</i>.
</p>
<p><small>Blip de Bip is not a registered trademark name.</small> </p>
</body> </html>
Figure 2-3 shows the web page, loaded into Firefox.
Earlier I mentioned about closing tags and nested elements, and how the order of the tags should be maintained. This is even more crucial for inline elements. As an example, if you’re using both bold and italic markup at the same time, you need to ensure that the order of closing tags follows the order of the opening tags, or you could end up with an unexpected web page
Figure 2-3. Blip de Bit web page with inline elements loaded into Firefox
The following demonstrates how not to close inline elements:
<p>This is <b>a big <i>chunk</b> of text</i>.</p>
while a proper use of tags is demonstrated in the following:
<p>This is <b>a big <i>chunk</i> of text</b>.</p>
Returning to the inline elements, a very common element is an inline element
that has characteristics of a block-level element: the br, or break, element. It
inserts a new line into the web page, and that’s all it does:
Some text<br />Some other text
The web page would show the first part of the web contents on one line, the
second part (after the br) on another line. It’s an empty element, and in
HTML5 you can skip the last forward slash if you wish.
Another popular inline element is the span; I’ll cover it, as well as the
Common Block-Level Elements
Block-level elements are ones that expand to fit the container width, and insert a line break, both before and after the element, in the page flow. Other than these two shared characteristics, most are significantly different from each other.
The paragraph (p) is the most common of the block-level elements, and
you’ve seen it demonstrated in both Examples 2-2 and 2-3. Two other
common elements frequently found in web pages are the ordered list (ol) and
the unordered list (ul). They’re used for listing information, but they’re also
used to create menus and drop-down option lists. The difference between the
two is that the order of list items in an unordered list is irrelevant, while the order of the list items in an ordered list are very relevant.
Two lists in a body element are created in the following code to demonstrate how the list contents are displayed in a web page. Note that the list items in
both lists are delimited by a third element, the aptly named list item (li). The
list item can be text, or it can be other HTML elements, including new lists:
<body> <li>Strawberry</li> <li>Blueberry</li> </ul></li>
<ol><li>First sub-item</li> <li>Second sub-item</li> </ol></li>
<li>Fourth item</li> </ol>
Figure 2-4 displays the result of this HTML in a Firefox browser. The ul list items are indicated with a closed circle in the outer list, and an open circle in
the nested ul element. The symbol used with the list items changes for each
level of nesting. The ol contents are annotated with a number representing
their position within their parent container. The nested ol items numbering
starts over from the beginning. The list items are indented in their parent
element (whether body or li), by default.
Figure 2-4. Unordered and ordered lists and nested lists
Another popular block-level element is blockquote. You can use it to embed
longer quotations in a web page:
<blockquote>
<p>Another popular block-level element is blockquote. You can use it to embed longer quotations in a web page, and include an optional citation for the quote.
</p>
</blockquote>
The quoted text is embedded in a paragraph element, which is then nested in the blockquote element. By default, the blockquote contents are indented
embedded between two paragraphs and displayed in Chrome.
Figure 2-5. Blockquote demonstrated in Chrome
One element that used to be ubiquitous in web pages before CSS is the table.
It was ubiquitous because it was a simple way to organize a web page’s structure. Now, its use is strictly for organization and presentation of data.
A simple HTML table consists of table rows (via the tr element), which
contain the data in cells (enclosed in td elements), with column headers
(managed with th elements). An example of a simple column,
three-row table is shown in Example 2-3.
Example 2-3. A simple three-column, three-row HTML table
<table>
<td>4.56</td><td>98.12</td><td>100.66</td> </tr>
<tr>
<td>35.77</td><td>98.01</td><td>3906.04</td> </tr>
The default display for this table in IE is shown in Figure 2-6. Note that the
and row.
Figure 2-6. A basic three-column, three-row HTML table
The table has no outline. If you want to give it an outline, and don’t want to
use CSS, you can do so by using the border attribute in the table element:
<table border="1">
The browser draws a border around the table, and around each table data cell and column header (as shown in Figure 2-7), after the example is modified
with the addition of the border attribute and opened in Firefox.
Figure 2-7. HTML table with the addition of the border attribute
Other common block-level elements are form elements, which I’ll introduce
in Chapter 4, and the div element, covered later in its own section. Before
leaving the block-level elements, I did want to point out the use of
whitespace (the new lines and indentation) in the HTML, and what it means to the page layout.
In the HTML table code, the data cells for two of the table rows are defined
on one line, while in the third, the individual td elements are separated by
this use of whitespace impacts on the display, because for the most part, whitespace outside of attribute values is treated the same in HTML: it’s all equivalent to a single space. If we use three consecutive tabs, they appear as a single space in the web page. If you separate two elements by several new lines, they also appear only as a single space.
The only reason we use the whitespace is that it makes the HTML more readable. Readable HTML is HTML we can more easily modify or correct. However, with so many content management systems (CMS) creating web pages automatically, the HTML for many web pages is
compressed — sometimes completely, with most new lines and indentation stripped out.
The div and span Elements
Two elements used in most web pages are the div and the span element.
Their only purpose is to group: either elements (div), or text (span). They
provide a way to do something with the group without attaching any semantics to the grouping.
Many web pages use the div element to mark sections of the web page, such
as the sidebar, main content, footers, etc. Before HTML5, the div element
was the only way to mark off sections of the web page for a specific purpose.
They provided a way to apply CSS styling (covered in Chapter 3) to a group of elements as a whole:
<div id="sidebar"> <p>some content</p>
<p>some other content</p> </div>
The div element frequently has either the class or id attribute, in order to
identify the element (or group of elements), for styling.
The same use of attributes and grouping applies to the span. The span
element allows us to provide styling for a block of text without having to use
semantic elements (e.g., strong or em). The span element also allows us to
provide other, arbitrary styling (provide a background color, change font, etc.).
Without CSS, neither the span or div element would be that much use, so it’s
ADDITIONAL READING
Chapter 3. Styling the Page with
CSS
Once you’ve formatted your web page with HTML, you’re going to want to liven it up. Though web pages using default styling are functional, they’re not that interesting-looking or unique. To make them so, you’ll need Cascading Style Sheets (CSS).
CSS is a way of adding visual and other styling to web page contents. It can
be applied directly to an element, using the style attribute. In the following
HTML, the background color for the div element contents is set to red:
<div style="background-color: red">...</div>
Using style attributes directly in elements is supported in all of the browsers,
but its use is discouraged. Making a style change means having to search for
all uses of the style attribute and changing them individually. A preferred
CSS Stylesheets
A stylesheet is a listing of CSS settings grouped together. By grouping the settings together, we can easily find the style settings to make our changes. The stylesheet can either be embedded directly into the web page or linked in as an external document. The latter approach is particularly favored, because then we can apply the same CSS across several different web pages without having to repeat the same CSS in each page.
To include an embedded stylesheet, add a style element to the head element
in the web page:
You can specify a type attribute for the element, but the default type of
text/css is sufficient for our needs.
To link an external CSS stylesheet, using the link element:
<link type="text/css" rel="stylesheet" media="screen"
href="./css/main.css" />
A CSS stylesheet link has a type of text/css, and the rel attribute is set to
stylesheet. The rel attribute establishes the relationship type of the
linked document. The media attribute specifies the media type to which it
applies, such as screen in this instance. This setting means the stylesheet is configured for computer screens.
The last attribute in the link is href, containing the relative or absolute URL
for the stylesheet. An absolute URL provides the entire URL (e.g.,
http://somedomain.com/main.css), while a relative URL provides information about where the file is located relative to the current document. In the
accessible from the host page’s location. The ./ signals the current web page location. If the host web page is located at the top-level directory of the
Applying CSS
There are several basic ways you can apply CSS to web page elements, and in this chapter, I’m covering the most basic. The most common and simplest is to apply the CSS to an entire set of a specific type of element. As an
example, if we want to change the default font family for all paragraph elements in a web page, we’d use the following CSS:
p {
font-family: Times, "Times New Roman", Georgia, serif; }
The selector is the element name, followed by an opening curly bracket (brace), the CSS, and the closing curly bracket/brace. Unless the style setting is overridden later in the same stylesheet, or in another stylesheet linked after this one in the document, all paragraphs in the page use one of Times, Times New Roman, Roman, Georgia, or serif. The reason multiple values are listed is that not all browsers support all font families. The browser traverses the list and stops once it finds a font family it does support.
The style setting ends with a semicolon. The style rule itself consists of a
property name (font-family) and the setting. Multiple style settings can be
given for the same element(s):
p {
font-family: Times, "Times New Roman", Georgia, serif; font-size: 14px;
}
If we’re only interested in applying the style setting to certain paragraphs, we
can use the class attribute. The class attribute is added to the target
paragraphs:
<p class="highlight">...</p>
that the item is a class name:
p.highlight {
font-family: Times, "Times New Roman", Georgia, serif; font-size: 14px;
}
If you want the style setting to apply to all elements with the given class
name, leave off the element designation:
.highlight {
font-family: Times, "Times New Roman", Georgia, serif; font-size: 14px;
}
If you want to be more selective and apply a style setting to only one
element, use the id attribute in the element:
<div id="sidebar">...</div>
Now, the style setting applies only to the one given element:
#sidebar {
width: 200px; margin: 10px; float: right; }
Many (but not all) CSS styles are inheritable, which means when you apply a
CSS style setting to an element, it applies to all elements contained within
that element. So if you have a div element with a couple of paragraphs,
setting the font family for the div element, also sets the font family for the
contained paragraphs:
#sidebar {
font-family: Verdana, Geneva, sans-serif; }
#sidebar p {
font-family: Georgia, serif; }
This stylesheet selector applies to all paragraphs that are nested within the
div element with an id of sidebar. Any other elements contained in the
same div element inherit the sans-serif fonts, while the paragraphs have their
THAT CASCADING THING
Another impact on the CSS setting for an element is if there are multiple CSS stylesheets, all applying their own rules to the same element. The browser than uses an algorithm, the
CSS cascade, to determine which settings are applied to which elements. I defer to my favorite website, Mozilla Developer Network, for a detailed explanation of the CSS cascade.
There is also a way of providing a CSS selector pattern, such as looking for
all first paragraphs in a div block and so on, but this is beyond the scope of
The CSS
Now that you know how to add the CSS to the web page, let’s dive directly into the most common CSS you’ll need or are likely to encounter until you get into more advanced web page design.
To demonstrate the impact various style settings can have on a web page, let’s start with an HTML page, shown in Example 3-1, with various elements that we’ll style throughout this section.
Example 3-1. Example HTML used to demonstrate style settings
<body>
<div id="main">
<h1>Hello, World!</h1>
<p>Now that you know how to add the CSS to the web page, let's dive directly into the most common CSS you'll need, or are likely to encounter until you get into more advanced web page design.</p>
<p>The most significant change you can make to a web page is altering the fonts used for all of the text. The default fonts provided by the browsers are serviceable but
don't provide the unique look and feel you want from your site.</p> </div>
Fonts
The most significant change you can make to a web page is altering the fonts used for all of the text. The default fonts provided by the browsers are
serviceable, but don’t provide the unique look and feel you want for your site.
The fonts can be changed for every element that displays text. This includes headers and paragraphs, as well as the content in lists. To demonstrate, let’s
start with a simple stylesheet that changes the font family for the h1, p, and li
page elements. We’ll mix it up a bit, using different types of fonts:
<style>
I used three different types of font families: serif, sans-serif, and monospace. The results are shown in Figure 3-2. As you’ll notice, the header isn’t