Learning Debian GNU/Linux
By Bill McCarty
1st Edition September 1999
1-56592-705-2, Order Number: 7052 360 pages, DM70,- , Includes CD-ROM
Copyright
Table of Contents
Preface
Chapter 1: Why Run Linux?
Chapter 2: Preparing to Install Linux Chapter 3: Installing Linux
Chapter 4: Issuing Linux Commands
Chapter 5: Installing and Configuring the X Window System Chapter 6: Using the X Window System
Chapter 7: Configuring and Administering Linux Chapter 8: Using Linux Applications and Clients Chapter 9: Playing Linux Games
Chapter 10: Setting Up a Linux-Based LAN Chapter 11: Getting Connected to the Internet Chapter 12: Setting Up a Linux-Based WAN Chapter 13: Conquering the BASH Shell
Appendix A: Linux Directory Tree Appendix B: Principal Linux Files
Appendix C: The Debian Package Management Utilities Appendix D: Managing the Boot Process
Appendix E: Linux Command Quick Reference Appendix F: Open Publication License
Index
Symbols | A | B | C | D | E | F | G | H | I | J | K | L | M | N | O | P | Q | R | S | T | U | V | W |
X | Y | Z
Back to: Learning Debian GNU/Linux
O'Re illy Ho m e | O'Re illy - P a rt n e rb u c h h a n d lu n g e n | Be s t e llin fo rm a t io n e n | Ko n t a k t ie re n S ie u n s I n t e rn a t io n a l | Üb e r O'Re illy | To c h t e rfirm e n
Learning Debian GNU/Linux
By Bill McCarty
Warenkorb anzeigen
Dieses Produkt ist vergriffen und nicht mehr lieferbar.
Learning Debian GNU/Linux guides the new user of Linux through the installion and configuration of Debian GNU/Linux. Debian is the purely Open Source Linux distribution, crafted and maintained by a worldwide network of volunteers. Windows users will gain a gentle introduction to this exciting computing world guided by Bill McCarty in Learning Debian GNU/Linux.
Ergänzende O'Reilly Titel:
Learning Red Hat Linux Linux Device Drivers
Linux Network Administrator's Guide, 2nd Edition Running Linux, 3rd Edition
O'Re illy Ho m e | O'Re illy Bu c h h a n d lu n g e n | Be s t e llin fo rm a t io n e n | Ko n t a k t ie re n S ie u n s I n t e rn a t io n a l | Üb e r O'Re illy | To c h t e rfirm e n
Learning Debian GNU/Linux
By Bill McCarty
1st Edition September 1999
1-56592-705-2, Order Number: 7052 360 pages, DM70,- , Includes CD-ROM
Preface
Preface
Contents:
Organization of This Book Conventions Used in This Book We'd Like to Hear from You Acknowledgments
Lately it seems that two topics crop up in conversation after conversation: the stock market and Linux. As for the stock market, I'm something of a pessimist. When friends and even perfect strangers continually recount their recent financial successes, I
conclude that a stock market correction is overdue. (I've shifted my investments to bonds.)
As for Linux, I'm considerably more - perhaps wildly - optimistic. When my realtor tells me about the TV feature on Linux she saw on CNN, I see it as a harbinger of Linux Spring. Like her, my cable TV repairman, and my colleague in the next office, you've probably heard about Linux from a magazine, radio or TV program, or a friend. You're wondering what Linux is about and whether you should give it a try. If so, particularly if you currently use Microsoft Windows, this book was written for you.
about what happens inside Windows, you can install and configure Linux. Thousands of people from all walks of life - even journalists, who are notorious for their technical ineptitude - have already done so.
This book will make your Linux journey easier, by giving you the big picture, providing you with step-by-step procedures, and getting you started doing useful or fun activities, such as word processing or games. This book focuses on the needs of the new Linux user and on desktop Linux applications. You'll learn about networks and servers, but the details of those topics are left for more advanced books.
This book includes a CD-ROM that contains Debian GNU/Linux, so you have in your hand all you need to get started using Linux. Much of the material in this book applies to Linux generally and not merely to Debian GNU/Linux; so, even if you prefer to use another Linux distribution, you'll probably find this book useful.
Organization of This Book
Chapter 1, Why Run Linux?, is designed to introduce you to Linux and help you determine whether Linux is appropriate for you.
Chapter 2, Preparing to Install Linux, helps you understand what's involved in installing Linux and guides you through a procedure to gather information needed to successfully install Linux.
Chapter 3, Installing Linux, takes you step-by-step through the installation of Linux. Chapter 4, Issuing Linux Commands, describes the basics of how to use the Linux command-line interface, which resembles MS-DOS but is much more powerful and sophisticated.
Chapter 5, Installing and Configuring the X Window System, shows you how to install and configure X.
Chapter 6, Using the X Window System, shows you how to use X, the graphical user interface included with Debian GNU/Linux. If you've used Microsoft Windows, you'll find X familiar and easy to use.
Chapter 7, Configuring and Administering Linux, shows you how to configure your Linux system. Administering a multi-user operating system such as Linux is somewhat more complicated than administering a single-user operating system, but Linux includes tools that simplify the work.
Chapter 9, Playing Linux Games, describes several of the most popular games available for Linux. The chapter also shows you how to run your favorite Microsoft Windows games under Linux.
Chapter 10, Setting Up a Linux-Based LAN, shows you how to connect your Linux system to other systems on your local area network.
Chapter 11, Getting Connected to the Internet, shows you how to connect via your Internet Service Provider (ISP) to the Internet. Once connected, you can use your Linux system to surf the Web and access other familiar Internet services.
Chapter 12, Setting Up a Linux-Based WAN, shows you how to set up servers that users around the world can access via the Internet. For example, you'll learn how to install and configure Apache, the world's most popular web server.
Chapter 13, Conquering the BASH Shell, digs deeper into the BASH shell, the Linux command-line interface first introduced in Chapter 4. Here you'll see firsthand just how powerful and easy to use Linux can be.
Appendix A, Linux Directory Tree, describes the structure of the principal Debian GNU/Linux directories.
Appendix B, Principal Linux Files, describes the principal Debian GNU/Linux configuration files.
Appendix C, The Debian Package Management Utilities, describes the utilities provided by Debian GNU/Linux for working with packages. These utilities let you install applications, uninstall applications, and query a database that describes installed applications. This appendix also includes commands for installing the applications described in this book.
Appendix D, Managing the Boot Process, explains how PCs boot and describes how to configure your system to conveniently boot Linux.
Appendix E, Linux Command Quick Reference, briefly describes the most useful Linux commands. It also presents Linux equivalents for common MS-DOS commands. Appendix F, Open Publication License, describes the Open Publication License this book is distributed under.
Conventions Used in This Book
Back to: Learning Debian GNU/Linux
O'Re illy Ho m e | O'Re illy - P a rt n e rb u c h h a n d lu n g e n | Be s t e llin fo rm a t io n e n | Ko n t a k t ie re n S ie u n s I n t e rn a t io n a l | Üb e r O'Re illy | To c h t e rfirm e n
Learning Debian GNU/Linux
By Bill McCarty
1st Edition September 1999
1-56592-705-2, Order Number: 7052 360 pages, DM70,- , Includes CD-ROM
Chapter 1
1. Why Run Linux?
Contents:
Linux at Home and at Work What is Linux?
Reasons to Choose or Not Choose Linux Linux Resources on the Internet
This chapter introduces you to the upstart operating system Linux. It helps you determine whether Linux is right for you, by surveying the features and performance that Linux offers. It demonstrates that choosing Linux is a practical - even wise - decision for many computer users. The chapter also helps you feel at home with Linux and other Linux users, by introducing you to the history and culture of Linux. Finally, it points you to some popular gathering places on the Internet where you can correspond with other Linux users, get up-to-the-minute Linux news and information, and obtain free technical support.
1.1 Linux at Home and at Work
accomplished by using Linux:
● Tired of slow telephone modem transfer rates, a PC owner leases a cable modem
that provides high-speed transfers. He installs the new modem in a Linux system that routes packets to and from the computers of other family members. Now the entire family can simultaneously surf the Web at warp speed.
● Struggling to complete a dissertation, a graduate student determines that most of
his problems stem from bugs and inadequate features of his word processing program. Dumping Microsoft Windows and Microsoft Word, he loads Linux onto his computer and uses free text processing software he downloads from the Web. In contrast to the frequent system hangs and lost work he experienced with Windows, his new system runs for over 100 days before needing to be shutdown for installation of new hardware.
● Considered among the world's best, the experienced graphics artists at Digital
Domain have generated visual effects for such films as Apollo 13, Dante's Peak, The Fifth Element, Interview with the Vampire, and True Lies. But when director James Cameron selected Digital Domain to conjure visual effects for Titanic, the artists faced a task of unprecedented size and complexity. Concerned to obtain enormous computing power at the lowest cost, they purchased 160 DEC Alpha computers. Most DEC Alpha users run Microsoft Windows NT or Digital Unix as an operating system. However, Digital Domain chose to run Linux on 105 of their new computers. If you've seen Titanic and Digital Domain's breathtaking effects, you know what a good decision this was.
● Needing a supercomputer, but having a budget sufficient for only a
minicomputer, scientists at the Los Alamos National Laboratory created Avalon, a system of 70 networked computers that run Linux. Instead of millions of
dollars, the scientists spent only about $152,000 - none of it on software, because Linux is free. Their Avalon system performs more than 10 billion floating-point operations per second, roughly on par with the Silicon Graphics Origin2000 system, which costs $1.8 million. Linux-based Avalon ranks as the 315th fastest computer in the world.
Linux began as a hacker's playground, but has become progressively easier to use and consequently more popular: today, perhaps as many as 7.5 million computers run
Linux. Many Linux users are not hackers, but relatively ordinary computer users. Linux has become an operating system of formidable appeal and potential:
● In 1996, computing trade magazine Infoworld named Linux "Best Computer
Desktop Operating System." A year later, they named the Linux community "Best Tech Support Organization."
● The cover of the August 10, 1998, issue of the influential business magazine
Forbes featured super-programmer Linus Torvalds, author of the Linux kernel. The article pointed out that Intel, IBM, Netscape, Oracle, and other computing industry giants have taken a keen commercial interest in Linux and other open-source software.
Linux held 17.2% of the server operating system market, up 212% from 1997. In contrast, Microsoft's flagship operating system, Windows NT, held a 36%
market share - barely twice as great.
● Lawyers defending Microsoft against the U.S. government's antitrust charges
argued that Linux poses a real threat to Microsoft's domination of the desktop operating systems market.
Acknowledgments 1.2 What is Linux?
Back to: Learning Debian GNU/Linux
O'Re illy Ho m e | O'Re illy - P a rt n e rb u c h h a n d lu n g e n | Be s t e llin fo rm a t io n e n | Ko n t a k t ie re n S ie u n s I n t e rn a t io n a l | Üb e r O'Re illy | To c h t e rfirm e n
Learning Debian GNU/Linux
By Bill McCarty
1st Edition September 1999
1-56592-705-2, Order Number: 7052 360 pages, DM70,- , Includes CD-ROM
Chapter 2
2. Preparing to Install Linux
Contents:
Minimum Hardware Requirements
Collecting Information About Your System Preparing Your Hard Disk
This chapter presents information you need to know and tasks you need to perform before installing Linux. It helps you make certain that your IBM-compatible PC meets the minimum hardware requirements for Linux. It shows you how to document your system configuration so that you can respond to questions presented by the Linux install procedure. Finally, it shows you how to prepare your hard disk for Linux.
2.1 Minimum Hardware Requirements
Linux supports a wide range of PC hardware; but not even Linux supports every known device and system. Your PC must meet certain minimum requirements in order to run Linux. The following sections present these minimum requirements; however, for the latest and most complete information, you should check the Debian Project web site at
http://www.debian.org/. The Debian web site will also help you determine if Linux supports all the devices installed in your system.
Linux does not support the Intel 286 and earlier processors. However, it fully supports the Intel 80386, 80486, Pentium, Pentium Pro, Pentium II, and Pentium III processors. Nevertheless, some users feel that their 80386 Linux systems respond sluggishly, particularly when running X. So, if you want optimum performance, you should install Linux on a PC having an 80486 processor or better.
Linux also supports non-Intel processors such as the Cyrix 6x86 and the AMD K5 and K6. Most Linux users have systems that use Intel chips; if your system uses a non-Intel chip, you may find it more difficult to resolve possible problems.
2.1.2 Motherboard
Linux supports the standard ISA, EISA, PCI, and VESA (VLB) system buses used on most IBM-compatible PCs. Linux recently gained support for IBM's MCA bus, used in IBM's PS/2 series of computers. However, at the time of this writing, Debian
GNU/Linux does not yet support the MCA bus. If you have an IBM PS/2, you may be unable to install Debian GNU/Linux (check the Debian Project web site for the latest available information on support for the MCA bus).
Your motherboard should include at least 16 MB of RAM for optimum Linux
performance. Some users have managed to coax Linux into working on systems with as little as 4 MB of RAM. However, if your system has less than 16 MB of RAM, you probably won't be pleased with its performance. If you plan to run X, you may wish to install more than 16 MB of RAM - perhaps 64 MB. Although X operates well with 16 MB of RAM, you can open more windows and switch between them more quickly if you have additional memory.
A handful of motherboards presents special problems when installing Linux. Generally, the problem stems from a bad BIOS, for which a fix is often available. Check the
Debian Project web site for details.
2.1.3 Drives
For convenient installation using the CD-ROM included with this book, your system should include an IDE or SCSI CD-ROM drive. It's also possible to install Linux from a PCMCIA CD-ROM drive, an FTP site, an NFS server, an SMB shared volume, or a hard drive. Consult the Debian Project web site for details.
Your system should also include a 3.5-inch floppy drive. You'll use the floppy drive to boot your system from a special Linux diskette you create.
1.4 Linux Resources on the Internet
2.2 Collecting Information About Your System
Back to: Learning Debian GNU/Linux
O'Re illy Ho m e | O'Re illy - P a rt n e rb u c h h a n d lu n g e n | Be s t e llin fo rm a t io n e n | Ko n t a k t ie re n S ie u n s I n t e rn a t io n a l | Üb e r O'Re illy | To c h t e rfirm e n
Learning Debian GNU/Linux
By Bill McCarty
1st Edition September 1999
1-56592-705-2, Order Number: 7052 360 pages, DM70,- , Includes CD-ROM
Chapter 3
3. Installing Linux
Contents:
Installing the Operating System and Applications Getting Help
In this chapter, you'll learn how to install Linux by following a simple, step-by-step procedure. Most users will be able to complete the installation procedure without difficulty; however, the chapter includes a section that describes how you can obtain help if you encounter installation problems. Once you successfully complete the installation procedure, you'll have your own working Linux system.
3.1 Installing the Operating System and
Applications
To install Linux, you follow a simple, step-by-step procedure that has three main phases:
● Installing the operating system kernel and base system
● Configuring the new Linux system
● Installing applications
WARNING: Although the Linux installation procedure is generally troublefree, errors or malfunctions that occur during the installation of an operating system can result in loss of data. You should not begin the installation procedure until you have backed up all data on your system and determined that your backup is error-free.
Like other modern Linux distributions, Debian GNU/Linux includes a screen-based install program that simplifies the installation and initial configuration of Linux. However, the install program works somewhat differently than a typical Microsoft Windows application. For instance, it does not support use of a mouse or other pointing device; all input is via the keyboard. So that you can make effective use of the install program, the next three subsections describe the user-interface controls used by the install program, present the special keystrokes recognized by the install program, and explain the use of Linux's virtual consoles.
3.1.1.1 User-interface controls
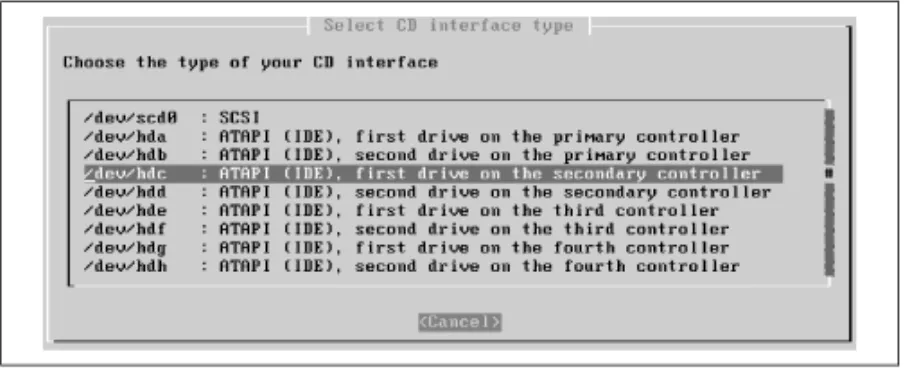
Figure 3.1 shows a typical screen displayed by the install program. This screen includes the following controls:
A main window
The install program runs in a full screen window. The top line of the window displays the name of the current installation step. In Figure 3.1, the current step is "Select CD Interface Type." You cannot minimize or change the size of the install program's main window. The cursor
Like Windows programs, the installation program has a cursor on screen. Unlike Windows, the cursor movement and cursor actions are controlled by the keyboard, rather than by the mouse. The location of the cursor is called the input focus. At any time, exactly one control has the input focus, which lets it respond to keyboard input. The install program displays a rectangular blue cursor that identifies the field having the input focus. In Figure 3.1, the list item named /dev/hdc has the input focus.
A scrollable list
Scrollable lists let you page through a list of items that may be too long to display all at once. At any time, one line in the scrollable list is active, as indicated by blue highlighting. When a scrollable list has the input focus the Up and Down arrow keys let you choose a different active item. Some scrollable lists associate actions with items; you can initiate the action associated with the active item by pressing Enter.
Buttons
Many install program windows include one or more buttons. You can make a button active by pressing the Tab key to move the cursor to the button. When a button is active, pressing
Enter initiates the action associated with it.
Although Figure 3.1 does not show a text box, some install program windows include one. Text boxes let you type text that is sent to the install program when you press the Ok button. You can recognize a text box by the underscores that define its input area.
3.1.1.2 Common keystrokes
Several keystrokes let you direct the operation of the install program. For example, you can use the
Tab key to move the input focus from one control to the next. Table 3.1 summarizes the keystrokes that the install program recognizes. You may want to keep this table handy as you work with the install program.
Table 3.1: Keystrokes Recognized by the Install Program
Keystroke Meaning
Enter Send a button press to the install program. Tab Move the input focus to the next field. Down Move the cursor down.
Up Move the cursor up. Left Move the cursor left. Right Move the cursor right.
WARNING: You should press keys only when an installation program dialog box is active. Pressing keys at other times can send keystrokes to programs invoked by the install program, which may interpret your input in an unpredictable fashion.
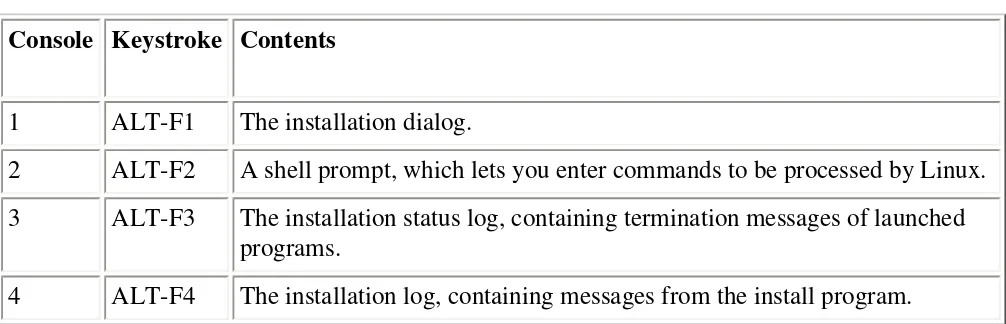
3.1.1.3 Using virtual consoles
A console is a combination of a keyboard and a display device, such as a video monitor. A console provides a basic user interface adequate to communicate with a computer: you can type characters on the keyboard and view text on the display device.
several virtual consoles. By pressing a special combination of keys, you can control which console your system's keyboard and monitor are connected to. Table 3.2 describes the virtual consoles used by the install program. The main installation dialog appears in virtual console 1. The contents of other virtual consoles can be useful in troubleshooting; however, you will not usually need to switch from one virtual console to another. Nevertheless, you may find it interesting to view the contents of the virtual consoles.
Table 3.2: Virtual Consoles Used by the Install Program
Console Keystroke Contents
1 ALT-F1 The installation dialog.
2 ALT-F2 A shell prompt, which lets you enter commands to be processed by Linux. 3 ALT-F3 The installation status log, containing termination messages of launched
programs.
4 ALT-F4 The installation log, containing messages from the install program.
3.1.2 Installing the Kernel and Base System
If your system can boot from a CD-ROM, you can boot Linux directly from the CD that
accompanies this book, which is by far the simplest way to boot Linux. If your system supports booting from a CD-ROM, configure your system to do so and boot Linux now.
3.1.2.1 Booting from MS-DOS or Windows 9x
If your system can't boot from a CD-ROM, you can boot Linux by first booting MS-DOS or
Windows 9x. To do so, use File Manager to copy the following files from the install directory of the CD-ROM that accompanies this book, to your Windows desktop:
boot.bat linux loadlin.exe root.bin
Next, right click on the boot.bat file on your desktop - not the one on the CD-ROM - and select the Create Shortcut menu item. Windows creates a desktop icon named Shortcut to boot.bat. Right click on this icon and select the Properties menu item. A Properties dialog appears. Click on the Program tab and then click on the Advanced button. Click on the check box marked "MS-DOS mode" and then click on OK. Finally, click on OK to exit the Properties dialog.
To boot Linux, double click on the Shortcut to boot.bat desktop icon. A dialog box asks if you want to close all other programs and continue. Close any important applications and then click on Yes to boot Linux.
If your system can't boot from a CD-ROM diskette and you have difficulty booting Linux from MS-DOS or Windows 9x, you can boot Linux from floppy diskettes. Before beginning the installation, obtain two floppy disks. You'll use one to create the Linux installation disk and another from which to boot your Linux system.
To begin installing Linux, you must boot your system from a floppy diskette containing the boot kernel. Creating the boot disk requires some special measures; you can't simply copy files onto a disk and then boot it.
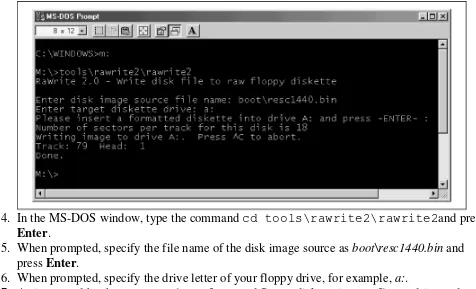
To create the boot disk, perform the following steps: 1. Insert the Linux CD-ROM in your CD-ROM drive.
2. Start an MS-DOS Prompt window by clicking on Start, selecting Programs, and clicking on MS-DOS Prompt.
3. In the MS-DOS window, change to the drive letter that corresponds to your CD-ROM drive, for example, m: (see Figure 3.2).
Figure 3.2: Using rawrite2 to make a boot disk
4. In the MS-DOS window, type the command cd tools\rawrite2\rawrite2and press
Enter.
5. When prompted, specify the file name of the disk image source as boot\resc1440.bin and press Enter.
6. When prompted, specify the drive letter of your floppy drive, for example, a:.
7. As instructed by the program, place a formatted floppy diskette in your floppy drive and press Enter.
It takes perhaps a minute or so for the rawrite2 utility to create the floppy diskette. Wait for the utility to complete and then restart your system using the floppy diskette.
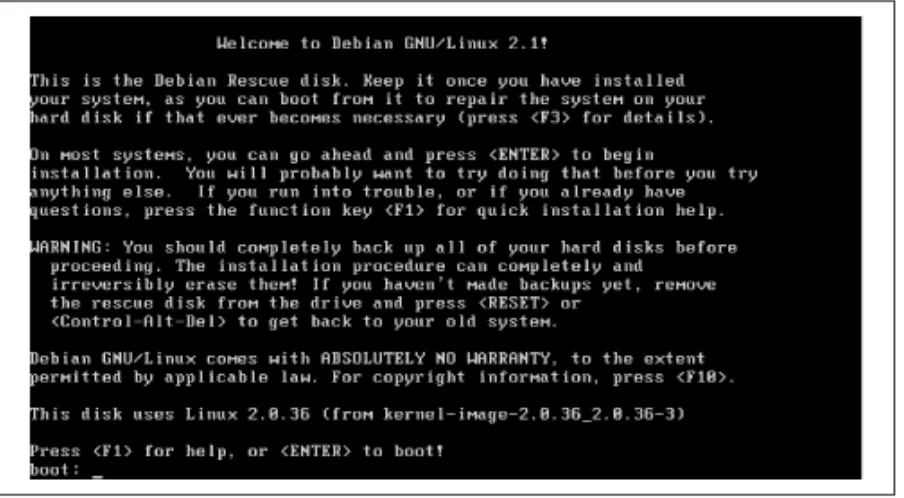
3.1.2.3 Starting the installation procedure
When Linux boots, you should see the boot: prompt shown in Figure 3.3. Press Enter to begin the installation process.
The boot: prompt lets you enter various kernel options. Most systems can be started without using any kernel options. However, if you cannot successfully boot your system from a CD-ROM or floppy diskette, you should suspect that a kernel option is needed. Pressing F1 in response to the boot prompt will access some help pages. If the information in the help pages is not sufficient to resolve your problem, seek help as described in the section titled Section 3.2, "Getting Help, near the end of this chapter.
3.1.2.4 Choosing color versus monochrome
Once the install program starts, it first displays the Select Color or Monochrome Display screen, shown in Figure 3.4, which asks whether subsequent install program screens should appear in color or monochrome (black and white). Use the Up and Down keys to move to the type of monitor attached to your system and press Enter to select it. If you selected Color, the screen reappears in color. To move forward to the next screen, highlight Next and press Enter.
Figure 3.4: The Select Color or Monochrome Display screen
3.1.2.5 Release notes
arrow keys to read text beyond the first page. When you've read the release notes, highlight Continue and press Enter.
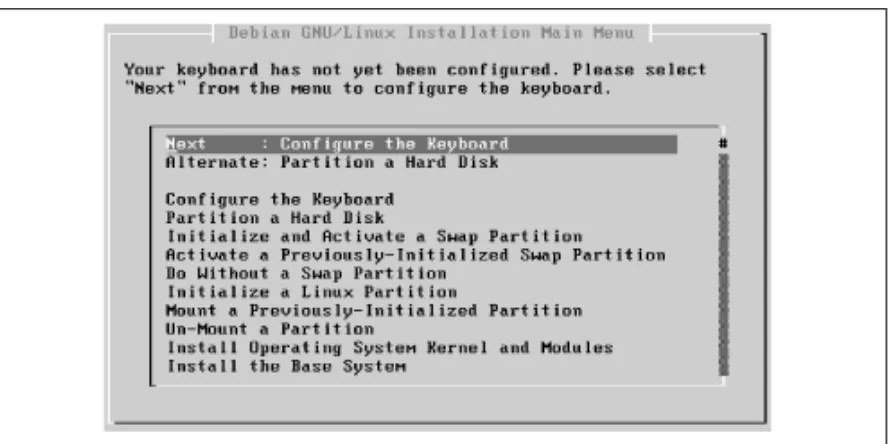
3.1.2.6 The Installation Main Menu
The install program now displays the Installation Main Menu, shown in Figure 3.5. This menu guides you through the installation process; it reappears in slightly different form after each installation step is completed.
Figure 3.5: The Installation Main Menu
The only control on the menu is a scrollable list. The first few items of the list present the installation steps that you should most likely perform next. The most likely step is labeled Next. The remaining items of the list present other installation steps. If an installation goes awry, you can manually select the proper sequence of steps to quickly get things back on track.
However, you'll seldom, if ever, need this capability; choosing Next is almost always the
appropriate action. To continue by configuring your system's keyboard, highlight Next and press
Enter.
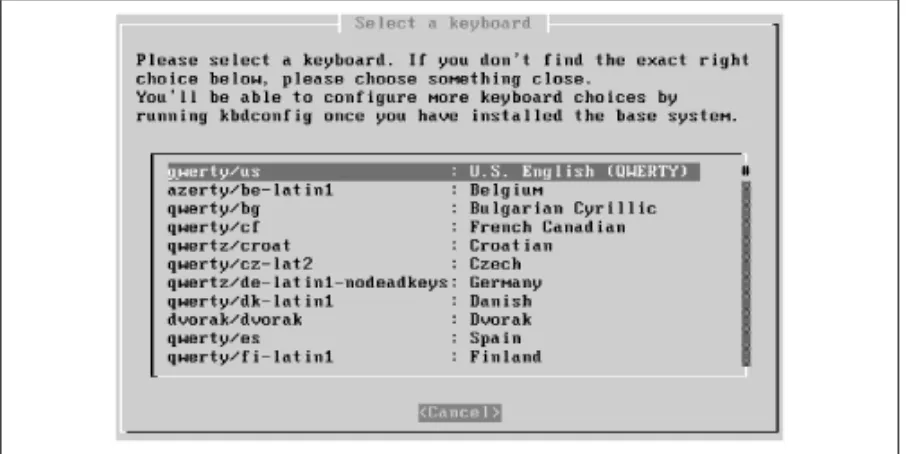
3.1.2.7 Selecting a keyboard
The install program displays the Select a Keyboard screen, shown in Figure 3.6. Use the Up and Down arrow keys to select the appropriate keyboard. Most U.S. users will prefer the pre-selected choice, U.S. English (QWERTY). When you've selected the proper keyboard, press ENTER to continue.
The installation main menu re-appears, with the Next choice designated Partition a Hard Disk. Press
Enter to continue.
3.1.2.8 Selecting the hard drive
The Select Disk Drive screen, shown in Figure 3.7, appears. The screen contains a scrollable list that lets you choose the drive to be partitioned. Drives are named by using the standard Linux method. IDE hard drives are named hd x, where x is a letter from a to z. Drive hda is your system's first IDE hard drive, drive hdb is your system's second IDE hard drive, and so on. SCSI drives are named scd x, where x is a letter from a to z that corresponds to the SCSI drive's disk ID number. As explained on the screen, the install program may mistakenly identify a CD-ROM drive as a hard drive.
Figure 3.7: The Select Disk Drive screen
Choose the drive that you want to partition and press Enter.
3.1.2.9 Partitioning a hard drive
Figure 3.8: The initial cfdisk screen
To create a new partition from the available free space, use the Up and Down arrow keys to select a free space entry. Then use the Left and Right arrow keys to select the New menu item at the bottom of the screen. Press Enter to create the partition.
As shown in Figure 3.9, cfdisk asks whether the new partition should be a primary or logical partition. Choose Primary and press Enter.
A hard disk can have a maximum of four primary partitions; a logical partition lets you escape this limitation. After creating a logical partition, you can create several extended partitions within it. However, cfdisk is not able to create extended partitions. If your hard disk already contains several partitions, you'll need to seek help in using a program other than cfdisk to partition your hard disk. See the section titled Section 3.2," near the end of this chapter.
Figure 3.9: Specifying the partition type
Next, cfdisk asks you to specify the size (in MB) of the new partition. As a rule of thumb, you should leave 50-100 MB of free space in which to establish a Linux swap partition. Type the desired size, which must not exceed the available free space, and press Enter.
Next, if the new partition is smaller than the available free space, you're asked whether the new partition should be created at the beginning or the end of the available space. It generally makes little difference. Select Beginning or End, according to your preference, and press Enter.
Select the Bootable menu item by using the Left and Right arrow keys and press Enter. The screen is updated to reflect the new status of the partition. Notice how the new partition is named by using the name of the hard disk ( hda) and a sequential number (1). Make a note of the name of the Linux partition.
Figure 3.10: The updated display
Now, you must create a Linux swap partition from the remaining free space. Use the Up and Down arrow keys to select the free space and use the Left and Right arrow keys to select the New menu item. Press Enter.
Create the swap partition as a primary partition, with a size of 50-100 MB. Make a note of the name of the swap partition, which will be something like hda2.
Next, you must identify the new partition as a swap partition. Use the Left and Right arrow keys to select the Type menu item and press Enter. Type the code that corresponds to a Linux swap
partition (82) and press Enter.
Finally, you must write the modified partition table to the hard disk. Use the Left and Right arrow keys to select the Write menu item and press Enter. The program tells you that erroneous changes to the partition table can destroy data. Check your work and, if the partition information is correct, type Yes and press Enter.
If the partition information is not correct, you can easily revise it. Select the erroneous partition and use the Delete menu item to delete the partition. You can then use the New menu item to recreate the partition with the proper size and type.
The program confirms that the partition table was written by displaying a message near the bottom of the screen. Exit the program by using the Left and Right arrow keys to select the Quit menu item and pressing Enter.
The main menu appears, with the Next item designated Initialize and Activate a Swap Partition. Press Enter to proceed.
3.1.2.10 Initializing and activating a swap partition
The install program asks if you want the partition scanned for bad blocks. For a small partition such as a swap partition, this takes only a few moments and can help you avoid puzzling problems. Select Yes and press Enter.
The install program then informs you that all data on the swap partition will be destroyed. Make certain that you've correctly identified the partition, select Yes, and press Enter to begin the initialization. The display helps you keep track of the progress of the task.
When initialization is complete, the main menu reappears, with the Next item designated Initialize a Linux Partition. Press Enter to proceed.
3.1.2.11 Initializing a Linux partition
The install program asks you to identify the Linux partition. Using your notes, select the proper partition - the larger of the two partitions you earlier created - and press Enter.
The install program asks if you want the partition scanned for bad blocks. For a large partition, this can take can several minutes. However, identifying and marking bad blocks can help you avoid puzzling problems, particularly if your hard disk hasn't been previously used. Select Yes and press
Enter.
The install program then informs you that all data on the Linux partition will be destroyed. Make certain that you've correctly identified the partition, select Yes, and press Enter to begin the initialization. The display helps you keep track of the progress of the task.
When initialization is complete, the install program asks whether the Linux partition should be mounted as the root file system, the one to which programs will be installed. Select Yes and press
Enter to mount the partition.
When the partition has been mounted, the main menu reappears, with the Next item designated Install Operating System Kernel and Modules. Press ENTER to proceed.
3.1.2.12 Installing the Operating System Kernel and Modules
The install program asks you to specify the medium which contains the Linux distribution. Use the Up and Down arrow keys to select CDROM and press Enter.
As shown in Figure 3.11, the install program asks you to identify the CD-ROM drive that contains the distribution. Highlight the appropriate device and press Enter. If you can't confidently identify the device, don't fret. If the install program fails to find the distribution, you'll get another chance to identify the device.
The install program prompts you to place the distribution CD-ROM in the CD-ROM drive. Do so and then press Enter.
The install program prompts you to specify the CD-ROM directory that contains the distribution files. The text box is initialized with the default directory /debian, which is the appropriate choice for the CD-ROM that accompanies this book. Simply use the Up and Down arrow keys to highlight Ok and press Enter.
The install program next asks how you want to specify the location of the resc1440.bin file that contains the kernel. Select the item designated List and press Enter.
The install program builds a list that contains the name of each directory that contains a file named resc1440.bin. The CD-ROM that accompanies this book includes only one such directory, so you can simply press Enter to select that directory.
The install program copies the kernel and modules to the hard drive. Then the main menu reappears, with the Next item designated Configure Device Driver Modules. Press Enter to proceed.
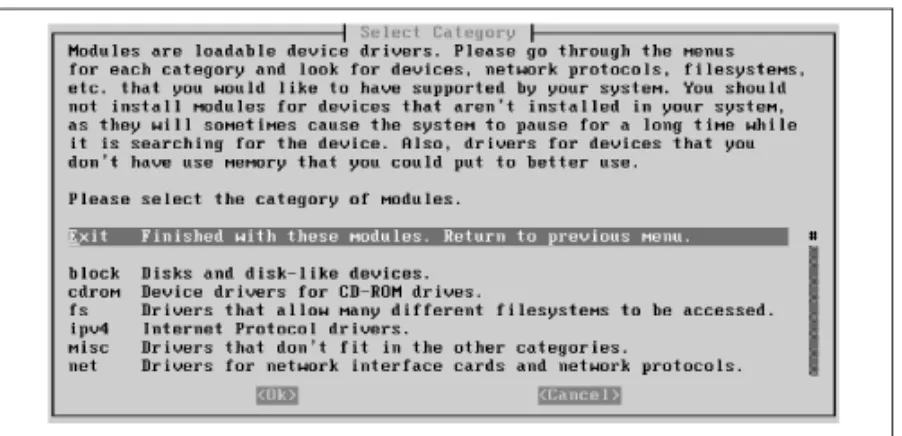
3.1.2.13 Configuring device driver modules
The install program prompts you to select a module category, by presenting the screen shown in Figure 3.12. Each category contains a list of modules, small programs that extend the capability of the kernel to accommodate special devices and functions. By using the Select Category screen and its subscreens, you can specify which modules should be automatically loaded when you boot your Linux system.
To see how this works, select the item designated "fs" and press Enter. The screen shown as Figure 3.13 appears. As the screen explains, you can specify that a module should be loaded by selecting the corresponding list item, and pressing Enter. Select the item designated "binfmt_aout" and press
Enter.
Figure 3.13: Selecting fs modules
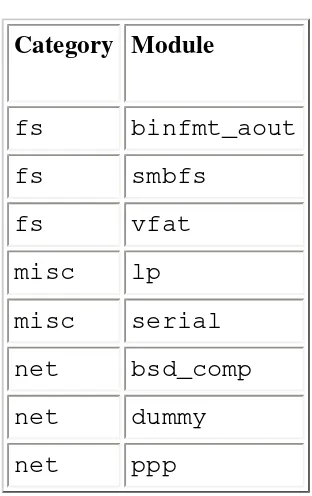
A confirmation screen, shown in Figure 3.14 appears. To install the module, select the Install item and press Enter. A text-mode screen appears briefly to display the progress and result of installing the module. When the module has been installed, press Enter to return to the module selection screen.
Table 3.3 shows the modules you should install. If your computer has a network adapter, you should also install the proper module from the net category. If your computer has a CD-ROM with a
proprietary interface (one other than ATAPI or SCSI), you should also install the proper module from the cdrom category. If you fail to install the proper modules, you can easily install them later. However, the device corresponding to a module will not function until the module has been
installed.
When installing some modules, such as the lp module, the install program may prompt you for additional information, using a screen similar to that shown in Figure 3.15. Most modules will load and operate correctly even if you specify no command-line arguments. So, the simplest approach is to forego them. If a device associated with a module fails to operate correctly, you should suspect that command-line arguments are needed. Use the information in the Section 3.2" section to learn what arguments to specify and how to specify them.
Table 3.3: Modules To Install
Category Module
fs binfmt_aout
fs smbfs
fs vfat
misc lp
misc serial
net bsd_comp
net dummy
net ppp
When you've specified all the necessary modules, exit the Select Category screen by highlighting Exit and pressing Enter. Then the main menu reappears, with the Next item designated Configure the Network. Press Enter to proceed.
3.1.2.14 Configuring the network
The install program presents a screen, shown in Figure 3.16 that lets you choose a hostname for your system. If your system is attached to a network, the network administrator has likely assigned a hostname; in that case, you should specify that hostname here. Otherwise, you may select a hostname of your own choosing. Simply type the hostname in the text box, use the Up and Down arrow keys to highlight the Ok button, and press Enter.
Figure 3.16: Choosing the hostname
The install program asks whether your computer is connected to a network. If your computer is permanently connected to a network, highlight Yes and press Enter. Otherwise, even if your computer temporarily connects to a network via a dialup connection, highlight No and press Enter. If you specified that your computer is connected to a network, the install program presents a series of screens that prompt you for information describing your system and the network to which it connects. Your network administrator should provide you with the information required by the install program, including:
● IP Address, the network address of your system (for example, 192.168.1.2).
● Netmask, a bitmask that specifies the portion of your system's network address that uniquely
identifies the network (for example, 255.255.255.0).
● Broadcast Address, which specifies the network address to which broadcast messages will be
sent.
● Gateway, the network address of the router your system uses to send packets beyond its local
network (for example, 192.168.1.1).
● Nameservers, the network addresses of the systems that provide hostname lookup services to
your system (for example, 192.168.1.1).
● Type of primary network interface (for example, Ethernet or token ring).
The first such screen prompts you to specify the domain name associated with the network. Domain names are often - though not always - two words separated by a dot: for example, oreilly.com. Type the domain name associated with your network, highlight the Ok button, and press Enter. The install program asks you to verify the full name of your computer, which consists of the hostname and the domain name. Check your work. If the full name is correct, highlight Yes and press Enter. Otherwise, highlight No and press Enter; doing so will allow you to re-specify the erroneous information.
The install program next asks you to specify the IP address of your computer, which usually consists of four one- to three-digit numbers, separated by dots: for example, 192.168.1.1. Type the IP address, highlight the Ok button, and press Enter.
Next, the install program asks you to specify the netmask, which has a form resembling that of the IP address. Generally, the netmask value includes only the numbers 0 and 255. Type the netmask, highlight the Ok button, and press Enter. If you don't know the netmask, you can try the value 255.255.255.0, which is often correct.
Next, the install program asks you to specify your system's broadcast address. Generally, the first item - which specifies that the broadcast address is formed by setting the last several bits of the IP address to one - is the correct choice. Highlight the desired item and press Enter.
Next, the install program asks whether your computer connects via a gateway to networks other than its local network. If a gateway exists, highlight Yes and press Enter; otherwise highlight No and press Enter.
If you specified that a gateway exists, the install program prompts you for the IP address of the gateway system. Type the IP address, highlight the Ok button, and press Enter.
Next, the install program asks about nameservers. Generally, another system acts as the nameserver for a desktop system; therefore, unless your network administrator suggests otherwise, select the first item and press Enter.
If you specified that your system uses a nameserver, the install program asks for the nameserver's IP address. You can actually specify as many as five nameservers so that if one server is unavailable, your system can use another. Type one or more IP address, separating each address from the next by a space. Then, highlight the Ok button and press Enter.
highlight Yes and press Enter to proceed. Otherwise, highlight No and press Enter in order to be able to correct the erroneous information.
Figure 3.17: Confirming the network configuration
When you've confirmed the network configuration, the install program asks you to specify the type of the primary network interface, by presenting the screen shown in Figure 3.18. Generally, systems are connected to their network via an Ethernet card. Unless your network administrator suggests differently, select the "eth0" entry and press Enter.
Figure 3.18: Choosing the network interface
After you select the network interface, the main menu reappears, with the Next item designated Install the Base System. Press Enter to proceed.
3.1.2.15 Installing the base system
The sequence of screens that follows resembles the sequence that appeared earlier when you installed the operating system kernel and modules. The install program first asks what medium contains the Linux distribution; select cdrom and press Enter.
Next, the install program asks you to identify the CD-ROM drive that contains the distribution. Highlight the appropriate device and press Enter. If you can't confidently identify the device, don't fret. If the install program fails to find the distribution, you'll get another chance to identify the device.
The install program prompts you to specify the CD-ROM directory that contains the distribution files. The text box is initialized with the default directory /debian, which is the appropriate choice for the CD-ROM that accompanies this book. Simply use the Up and Down arrow keys to highlight Ok and press Enter.
The install program next asks how you want to specify the location of the base2_1.tgz file that contains the first part of the base system. Select the item designated List and press Enter.
The install program builds a list that contains the name of each directory that contains a file named base2_1.tgz. The CD-ROM that accompanies this book includes only one such directory, so you can simply press Enter to select that directory.
The install program copies the base system to the hard drive. Then the main menu reappears, with the Next item designated Configure the Base System. Press Enter to proceed.
3.1.2.16 Configuring the base system
To configure the base system, you must first select the time zone associated with the system's location. You can do this either of two ways, by using the screen shown in Figure 3.19. The list at the left of the screen (titled Timezones) lets you select a time zone by its coded designation. The list at the right of the screen (cryptically titled Directories) lets you select a time zone by location, using familiar geographical names. Use the Left and Right arrow keys to select the list you want to use, then use the Up and Down arrow keys to select the appropriate list item and press Enter. If you selected a location, the install program may present a second screen that lets you more precisely designate the location. Use the Up and Down arrow keys to select the desired item and press Enter.
Figure 3.19: Selecting the Time Zone
The main menu reappears, with the Next item designated Make Linux Bootable Directly from Hard Disk.
Do not press Enter. Instead, use the Up and Down arrow keys to select the Alternate item, designated Make a Boot Floppy. By booting Linux from a floppy, you avoid several potential problems. For further information on booting Linux, including information on booting Linux directly from a hard disk, see Appendix D, Managing the Boot Process.
3.1.2.17 Making a boot floppy
Next, the install program instructs you to place a blank floppy diskette in your system's first floppy disk drive. Insert a floppy diskette - it need not be formatted - and press Enter. The install program creates the boot floppy.
WARNING: All data on the floppy disk will be lost.
After the floppy diskette has been created, the main menu appears, with the Next item designated Reboot the System. Press Enter.
The install program asks you to confirm your decision to reboot the system. Leave the newly created boot floppy in the floppy disk drive, highlight Yes, and press Enter. Your system should restart. If - after a minute or so - it hasn't restarted, press the system's reset button or cycle power to the system.
A boot prompt should appear shortly after your system completes its power-on self test. Press Enter to boot Linux from the floppy diskette. Linux should load, causing a series of messages to cascade off the screen.
3.1.3 Configuring the New System
Once your system has booted, you'll see a series of screens that prompt you to configure your new system. First, you're prompted to establish a password for the root user.
3.1.3.1 Establising a root password
When your system has booted, you should see the screen shown in Figure 3.20. This screen lets you establish a password for the root user, the master user who administers the system. Follow the on-screen instructions, by typing a password consisting of from five to eight characters. If you choose a password that the install program regards as insecure, the system will prompt you to type another password. If you really want the original password, simply type it again; the system will not object a second time. For security, the system will not display a password as it's typed. Instead, it will
prompt you to enter the password a second time, helping you avoid typing a password other than the one you intend.
3.1.3.2 Establishing a normal user account
Next, the install program asks whether you want to create a normal user account, in addition to the root user account. Respond by typing Y and pressing Enter. Then type a username, consisting of eight characters or less and including only letters and digits. Many Linux users create usernames that consist of the first letter of their first name followed by their last name, or the first seven
characters of their last name if their last name has eight or more characters. For example, the author often uses the username bmccarty. After typing the username, press Enter. If you make a
mistake, use the backspace key to erase the erroneous letters.
The system will ask you to establish a password for the new user account, much as it did for the root account. It then asks you to supply the following additional information:
Full Name
Your full name, including your first and last name Room Number
The room number of your office Work Phone
Your work phone number Home Phone
Your home phone number Other
Other brief information about the user
You should supply the full name. You can supply or omit the other information as you see fit. Once you've entered all the information, the system asks you to confirm your entries. Type Y and press
3.1.3.3 Configuring shadow passwords
Next, the system asks whether to configure shadow passwords. Unless you have a good reason for doing otherwise, you should configure shadow passwords by typing Y and pressing Enter. That way, your system's encrypted passwords are stored in a file that only the root user can read, making your system much less susceptible to break-ins.
3.1.3.4 Removing PCMCIA support
If your system doesn't require PCMCIA support, the system prompts you to allow it to remove the PCMCIA modules. So long as you don't actually require PCMCIA support, you should type Y and press Enter.
3.1.3.5 Connecting via PPP
At this point, depending on options you previously selected, the system may prompt you to allow it to connect via PPP to download requested packages. If this prompt appears, respond by typing N and pressing Enter. Downloading the packages over a dial-up connection would be a very time-consuming operation; it's much quicker to access the packages from the CD-ROM that accompanies this book.
3.1.3.6 Choosing Packages
Next, the system asks whether you'd like to use a speedy way of specifying what applications (packages) you want to install. Type Y and press Enter to take the fast route, which lets you select from a set of system profiles or tasks.
The screen shown in Figure 3.21 appears. This screen lets you choose profiles that describe the kind of system you want, or tasks that describe the kinds of operations you want your system to perform. The system associates a set of applications with each profile or task; selecting a profile or task instructs the system to install the associated applications in an upcoming step.
Figure 3.21: Selecting a profile
Next, the system informs you that it's about to start the dselect program, which actually installs the selected applications. Press Enter to begin.
3.1.4 Installing the Applications
The initial dselect screen, the program's main menu, is shown in Figure 3.22. You can use the Up and Down arrow keys to highlight a menu item. You can select the highlighted menu item by pressing Enter. The on-screen instructions earlier advised that you should skip Access and Update: ignore these instructions.
Instead, you'll generally select the menu items in order in which they appear. However, you'll skip menu item 2 (Select), menu item 4 (Config), and menu item 5 (Remove).
Figure 3.22: The dselect main menu
3.1.4.1 Accessing the packages
Highlight the Access menu item and press Enter. The program presents a list of methods for accessing the applications to be installed. Use the Up and Down arrow keys to highlight the entry designated apt and press Enter.
Next, you'll be asked if you want to change the source list. Respond Yes, which initiates a dialog that builds a simple configuration. Here's a sample dialog that shows the responses you should give to install packages from the CD-ROM diskette that accompanies this book:
I see you already have a source list.
---source list displayed here: contents vary
---Do you wish to change it?[y/N]
y
Set up a list of distribution source locations
For example:
Please give the distribution tag to get or a path to the package file ending in a /. The distribution
tags are typically something like: stable unstable frozen non-US
Distribution [stable]:
stable
Please give the components to get
The components are typically something like: main contrib non-free
Components [main contrib non-free]:
main contrib
Would you like to add another source?[y/N]
N
3.1.4.2 Mounting the CD-ROM
Access the second virtual console by pressing Alt-F2. Login as root and issue the following commands:
mkdir /cdrom
mount -t iso9660 -o ro /dev/
hdx /cdrom
where hdx represents the Linux designation of the CD-ROM drive that contains the diskette that
accompanies this book. For example, hdb is the secondary drive on the first controller. See Figure 3.1 for other common designations.
If the command succeeds, return to the first virtual console by pressing Alt-F1. Otherwise, check the arguments and try again.
3.1.4.3 Updating the list of available packages
Highlight the Update menu item and press Enter. The program will update its list of available packages. When prompted to do so, press Enter to return to the main menu.
Skip the Select menu item, by highlighting the Install menu item. Press Enter to begin installing the selected packages.
A mail package called exim will request configuration information as it's installed. Table 3.4 summarizes these requests and provides the information with which you should respond.
Table 3.4: Configuration Information for exim
Prompt Response
Select a number from 1 to 5.... 2 Visible mail name of your system Enter Other system names appearing on incoming names Enter Domains for which mail is relayed Enter Local machines for which mail is relayed Enter RBL (sites from which mail will not be accepted) Enter
Smart host handling outgoing mail The outgoing mail host provided by your Internet service provider, if any
User account for system administration mail Enter
You can revise the configuration of exim after installation by issuing the command eximconfig. When all the selected packages have been installed, the program will display the message
"Installation OK." Press Enter to return to the main menu.
3.1.4.5 Exiting dselect
Exit the dselect program by highlighting the Quit menu item and pressing Enter. The screen shown in Figure 3.23 appears.
To login to Linux for the first time, type root or the name of the user account you earlier created, and then press Enter. When the system prompts for the password, type the password and press
Enter. You should then see a shell prompt, consisting of a pound sign (#) or dollar sign ($), as shown in Figure 3.24. Congratulations: you've just installed and configured Linux.
Figure 3.24: The Linux shell prompt
If you don't see a shell prompt, or if something went wrong earlier in the installation process, don't despair. The next section will show you how to obtain the help you need to get your Linux system up and running.
2.3 Preparing Your Hard Disk 3.2 Getting Help
Back to: Learning Debian GNU/Linux
O'Re illy Ho m e | O'Re illy - P a rt n e rb u c h h a n d lu n g e n | Be s t e llin fo rm a t io n e n | Ko n t a k t ie re n S ie u n s I n t e rn a t io n a l | Üb e r O'Re illy | To c h t e rfirm e n
Learning Debian GNU/Linux
By Bill McCarty
1st Edition September 1999
1-56592-705-2, Order Number: 7052 360 pages, DM70,- , Includes CD-ROM
Chapter 4
4. Issuing Linux Commands
Contents:
The System Use Cycle
Working with the Linux Command Prompt How Linux Organizes Data
Working with Devices Useful Linux Programs
This chapter shows you how to begin using your Linux system. It shows you how to boot your system, log in, issue commands, log out, and shut down your system. It also explains how to use the man command, which provides help on using other commands. The chapter describes how Linux organizes data as filesystems, directories, and files and how you can work with removable media, such as diskettes. It describes how to query the status of your system. And, finally, it explains how to use pico, a simple text editor.
4.1 The System Use Cycle
This section introduces you to the cycle of Linux system use. If you're a user of Microsoft Windows, you're accustomed to a pattern of system use that forms a cycle:
● Boot the system
● Identify yourself to the system
● Use the system
● Shutdown the system
differently.
4.1.1 Booting the System
Most Linux users boot their system from its hard drive. Of course, if you made a boot diskette during system installation, you can use it to boot your system.
First, you must prepare your system for booting. If your system is running, you must shut it down by following the proper procedure for shutting down the operating system that's active. For example, if you're running Microsoft Windows, click Start Shut Down and select the Shut Down option in the Shut Down dialog box. Press OK to begin the system shutdown. After a few seconds, Windows displays a screen telling you that it's safe to turn off power to your system. Turn off the power or, if your system automatically powers down, wait a few seconds until the system powers itself down.
Next, you must set your system to boot from the desired device. To boot your system from its hard drive, remove any floppy diskette from your system's floppy drive. To boot your system from a floppy diskette, insert your Linux boot diskette into your system's floppy drive.
Now, you're ready to boot your system. Switch your system on (or press your system's reset button, if your system is powered on) and watch as it performs its self test. Shortly thereafter, you should see a boot: prompt on the system's monitor. If you like, you can list the available boot configurations stored on the boot device by pressing Tab. To boot the system, type the name of the desired configuration and press Enter, or simply press Enter to boot using the default configuration.
Once it loads, Linux begins probing your system and its devices, printing status information on your system's monitor. This status information is helpful if your system fails to boot properly, because it discloses the point in the boot process where the problem occurred.
When Linux has completed its boot process, your system's monitor will display a login prompt similar to this:
Debian GNU/Linux 2.1 desktop tty1 desktop login:
4.1.2 Logging In
Before you can use the system, you must identify yourself by logging in. The install program created a special user named root; by identifying yourself as the root user, you can gain access to the system. Normally, you use the root userid only when performing system administration tasks, because the root user has special capabilities that other users lack.
To log on, type root and press Enter. The system prompts you for the password associated with the root userid. Type the password you established during the installation process and press
Enter. To prevent anyone nearby from learning your password, Linux does not display it as you
type. If you suspect you've typed it incorrectly, simply press Enter and start over; or press
Backspace once (or more) for each character you've entered and then re-enter it. If you type the
try again.
Like other members of the Unix family, the Linux operating system is case sensitive. Be sure to type the userid root just as it appears, using all lowercase characters. Similarly, you must type the password exactly as you entered it in the Root Password dialog box during system
installation.
Also, some Linux programs require you to type Ctrl-BACKSPACE, rather than BACKSPACE. If you press BACKSPACE and see ^H echoed to the console, try pressing Ctrl-BACKSPACE instead.
When you've successfully logged in, you'll see a command prompt that looks something like this:
root@desktop:/root#
This prompt tells you that the Linux bash shell is ready to accept your commands.
4.1.3 Issuing Commands
The component of Linux that interprets and executes commands is called the shell. Linux supports a variety of different shells, but the most popular is the bash shell. This chapter presents the basics of using the bash shell; you'll learn more about the shell in Chapter 13,
Conquering the BASH Shell.
The Linux bash shell presents the user with a command-line interface (CLI). CLIs are familiar to Windows users who have worked in the MS-DOS Prompt window, and indeed the Microsoft Windows MS-DOS Prompt window is a kind of command-line shell for Windows. The Linux
bash shell works much like the MS-DOS Prompt window. You type text commands and the system responds by displaying text replies. As your first Linux command, type w and press
Enter. Your screen should look something like this:
root@desktop:/root#
w
11:12am up 6 min, 1 user, load average: 0.00, 0.08, 0.05
USER TTY FROM LOGIN@ IDLE JCPU PCPU WHAT root tty1 11:13am 0.00s 0.20s 0.11s -bash
The w command tells Linux to display the system status and a list of all system users. In the example, the output of the command tells you that it's now 11:12 a.m., that the system has been up for 6 minutes, and that only one user - root - is currently logged in. Notice that the command output is very terse, packing much information into a few lines. Such output is typical of Linux commands. At first, you may find Linux output cryptic and difficult to read, but over time you'll grow to appreciate the efficiency with which Linux communicates information.
Now try a second command, the date command:
root@desktop:/root#
date
Tue Feb 23 11:15:20 PST 1999
The date command displays the current date and time.
If you find working with MS-DOS distasteful or intimidating, you may not immediately enjoy working with the Linux command line. However, give yourself some time to adjust. The Linux command line has several features that make it easier to use, and more powerful, than MS-DOS. If, after working with the Linux command line for several days, you don't find yourself at home, don't despair. Linux provides a graphical user interface in addition to its command-line interface. You'll learn about the graphical user interface in Chapter 6, Using the X Window System.
4.1.4 Correcting Commands
Sometimes you may type a command incorrectly, causing Linux to display an error message. For example, suppose you typed dat instead of date:
root@desktop:/root#
dat
bash: dat: command not found
In such a case, carefully check the spelling of the command and try again. If you notice an error before pressing Enter, you can use the Backspace key to return to the point of the error and then type the correct characters.
Just as a web browser keeps track of recently visited sites, Linux's BASH shell keeps track of recently issued commands. This list is called the history list, and you can scroll back through it using the Up arrow key, or back down using the Down arrow key, just as you would with the Back and Forward buttons on a web browser. In fact, the history list provides several powerful ways to remember and reuse frequently issued commands, as we'll see in Chapter 13.
The Up and Down arrow keys let you scroll through a list of commands recently issued. This feature is handy when you want to repeat a command. Simply use the Up arrow key to find the command and press Enter to re-execute it. You can also use this feature when you want to issue a command similar to one you recently issued. Use the Up arrow key to find the original
command. Then, use the Left and Right arrow keys to position the cursor and make whatever changes to the command you like. Finally, press Enter to execute the command.
4.1.5 Using Virtual Consoles
In Microsoft Windows, you can have several MS-DOS Prompt windows simultaneously active. Although the bash shell doesn't have a graphical user interface, you can nevertheless work with several instances of the shell, by using Linux virtual consoles. Linux provides six virtual
is the number of a virtual console (1-6), causes Linux to display virtual console n. For example, you can display virtual console 2 by typing Alt-F2. You can view only a single console at a time, but you can switch rapidly between consoles by using the appropriate keystroke.
Virtual consoles are handy when you've started a time-consuming task and want to be able to perform an unrelated task while the original task is working. You'll also find them useful after you've established several userids on your system, because you can log on as one userid on one virtual console while you're logged on as another userid on a different console.
Virtual consoles have a screen saver feature like that found on Microsoft Windows. If a virtual console is inactive for an extended period, Linux blanks the monitor screen. To restore the screen without disturbing its contents, press the Shift key.
4.1.6 Logging Out
When you're done using a virtual console, you should log out by typing the command exit and pressing Enter. When you log out, the system frees memory and other resources that were allocated when you logged in, making those resources available to other users.
When the system logs you out, it immediately displays a login prompt. If you change your mind and want to access the system, you can login simply by supplying your userid and password.
4.1.7 Shutting Down the System
You shouldn't turn off power to a computer while it's running Linux; instead, you should shut down the operating system and then turn off power. To shut down a Linux system, you use the
shutdown command, which resides in a directory named /sbin:
root@desktop:/root#
/sbin/shutdown -h now
Don't type the prompt, which automatically appears on the command line. Only the root user can issue the shutdown command. If you want to restart a Linux system, you can use an alternative form of the shutdown command:
root@desktop:/root#
/sbin/shutdown -r now
Or, even more conveniently, you can use the familiar MS-DOS "three-finger salute":
Ctrl-Alt-Del, which simply issues a shutdown command on your behalf.
3.2 Getting Help 4.2 Working with the Linux Command Prompt
Back to: Learning Debian GNU/Linux
O'Re illy Ho m e | O'Re illy - P a rt n e rb u c h h a n d lu n g e n | Be s t e llin fo rm a t io n e n | Ko n t a k t ie re n S ie u n s I n t e rn a t io n a l | Üb e r O'Re illy | To c h t e rfirm e n
Learning Debian GNU/Linux
By Bill McCarty
1st Edition September 1999
1-56592-705-2, Order Number: 7052 360 pages, DM70,- , Includes CD-ROM
Chapter 5
5. Installing and Configuring the X
Window System
Contents:
What is X? Installing X Configuring X
Starting and Stopping X
This chapter helps you install, configure, and use the X Window System (often known simply as X). Once X is up and running, you can choose how to start X. This chapter explains your options and also gives some tips on optimizing the performance of X.
5.1 What is X?
X is the standard graphical user interface for Linux. Like other graphical user interfaces such as Microsoft Windows and Mac OS, X lets you interact with programs by using a mouse (or other pointing device) to point and click, providing a simple means of
communicating with your computer.
X Consortium, Inc. became responsible for the continued development and publication of X.
Despite its age, X is a remarkable and very modern software system: a cross-platform, network-oriented graphical user interface. It runs on a wide variety of platforms,
including essentially every variety of Unix. X Clients are available for use, for example, under Windows 3.x, 9x, and NT. The sophisticated networking capabilities of X let you run a program on one computer while viewing the graphical output on another
computer, connected to the first via a network. With the advent of the Internet, which interconnected a sizable fraction of the computers on the planet, X achieved a new height of importance and power.
Most Linux users run XFree86, a freely available software system compatible with X. XFree86 was developed by the XFree86 software team, which began work in 1992. In 1994, The XFree86 Project assumed responsibility for ongoing research and
development of XFree86.
4.5 Useful Linux Programs 5.2 Installing X
Back to: Learning Debian GNU/Linux
O'Re illy Ho m e | O'Re illy - P a rt n e rb u c h h a n d lu n g e n | Be s t e llin fo rm a t io n e n | Ko n t a k t ie re n S ie u n s I n t e rn a t io n a l | Üb e r O'Re illy | To c h t e rfirm e n