a scientific approach, laying out a series of
work. You’ll even find information on JRuby
virtual machine
and understand your code
deeper into Ruby, you’ll find
a fascinating way to become a better programmer.
consulting firm McKinsey & Co. Shaughnessy
Covers Ruby 2.x, 1.9, and 1.8
10.times
do
puts
n
end
Ruby Under a
Microscope
An Illustrated Guide
to Ruby Internals
Pat Shaughnessy
R
ub
y U
nd
er a M
icr
osc
op
ADVANCE PRAISE FOR RUBY UNDER A MICROSCOPE
“Many people have dug into the Ruby source code, but few make it back out and tell the tale as elegantly as Pat does in Ruby Under a Microscope! I particularly love the diagrams—and there are lots of them—as they make many opaque implementation topics a lot easier to understand, especially when coupled with Pat’s gentle narrative. This book is a delight for language implementation geeks and Rubyists with a penchant for dig-ging into the guts of their tools.”
—PETER COOPER (@PETERC), EDITOROFRUBY INSIDEANDRUBY WEEKLY
“Man, this book was missing in the Ruby landscape—awesome content.” —XAVIER NORIA (@FXN), RUBY HERO, RUBYON RAILS CORE TEAM MEMBER
“Pat Shaughnessy did a tremendous job writing THE book about Ruby internals. Definitely a must read—you won’t find information like this anywhere else.”
—SANTIAGO PASTORINO (@SPASTORINO), WYEWORKS CO-FOUNDER,
RUBYON RAILS CORE TEAM MEMBER
“I really enjoyed the book and now have a far better understanding of both Ruby and CS. The writing made very complex topics (at least for me) very accessible, and I found the book hard to put down. Diagrams were awesome and are already popping in my head as I code. This is by far one of my top 3 favourite Ruby books.”
—VLAD IVANOVIC (@VLADIIM), DIGITAL STRATEGISTAT HOLLER SYDNEY
“While I’m not usually digging into Ruby Internals, this book was an absolutely awesome read.”
—DAVID DERYL DOWNEY (@DAVIDDWDOWNEY), FOUNDEROF CYBERSPACE
Ruby Under a
Microscope
An Illustrated Guide
to Ruby Internals
RUBY UNDER A MICROSCOPE. Copyright © 2014 by Patrick Shaughnessy.
All rights reserved. No part of this work may be reproduced or transmitted in any form or by any means, elec-tronic or mechanical, including photocopying, recording, or by any information storage or retrieval system, without the prior written permission of the copyright owner and the publisher.
Printed in USA First printing
17 16 15 14 13 1 2 3 4 5 6 7 8 9
ISBN-10: 1-59327-527-7 ISBN-13: 978-1-59327-527-3
Publisher: William Pollock Production Editor: Riley Hoffman Cover Illustration: Charlie Wylie Interior Design: Octopod Studios Developmental Editor: William Pollock Technical Reviewer: Aaron Patterson Copyeditor: Julianne Jigour
Compositors: Susan Glinert Stevens and Riley Hoffman Proofreader: Elaine Merrill
For information on distribution, translations, or bulk sales, please contact No Starch Press, Inc. directly: No Starch Press, Inc.
245 8th Street, San Francisco, CA 94103
phone: 415.863.9900; fax: 415.863.9950; [email protected]; www.nostarch.com
Library of Congress Cataloging-in-Publication Data Shaughnessy, Pat.
Ruby under a microscope : an illustrated guide to Ruby internals / by Pat Shaughnessy. pages cm
Summary: "An under-the-hood look at how the Ruby programming language runs code. Extensively illustrated with complete explanations and hands-on experiments. Covers Ruby 2.x"-- Provided by publisher.
ISBN 978-1-59327-527-3 (paperback) -- ISBN 1-59327-527-7 (paperback) 1. Ruby (Computer program language) I. Title.
QA76.73.R83S53 2013 005.1'17--dc23
2013030614
No Starch Press and the No Starch Press logo are registered trademarks of No Starch Press, Inc. Other product and company names mentioned herein may be the trademarks of their respective owners. Rather than use a trademark symbol with every occurrence of a trademarked name, we are using the names only in an editorial fashion and to the benefit of the trademark owner, with no intention of infringement of the trademark.
A B O U T T H E A U T H O R
B R I E F C O N T E N T S
Foreword by Aaron Patterson . . . xv
Acknowledgments . . . .xvii
Introduction . . . xix
Chapter 1: Tokenization and Parsing . . . 3
Chapter 2: Compilation . . . 31
Chapter 3: How Ruby Executes Your Code . . . 55
Chapter 4: Control Structures and Method Dispatch . . . 83
Chapter 5: Objects and Classes . . . 105
Chapter 6: Method Lookup and Constant Lookup. . . 133
Chapter 7: The Hash Table: The Workhorse of Ruby Internals . . . 167
Chapter 8: How Ruby Borrowed a Decades-Old Idea from Lisp . . . 191
Chapter 9: Metaprogramming. . . 219
Chapter 10: JRuby: Ruby on the JVM . . . 251
Chapter 11: Rubinius: Ruby Implemented with Ruby . . . 273
Chapter 12: Garbage Collection in MRI, JRuby, and Rubinius . . . 295
C O N T E N T S I N D E T A I L
FOREWORD by Aaron Patterson xv
ACKNOWLEDGMENTS xvii
INTRODUCTION xix
Who This Book Is For . . . xx
Using Ruby to Test Itself. . . xx
Which Implementation of Ruby?. . . xxi
Overview . . . xxi
1 TOKENIZATION AND PARSING 3 Tokens: The Words That Make Up the Ruby Language . . . 4
The parser_yylex Function . . . 8
Experiment 1-1: Using Ripper to Tokenize Different Ruby Scripts . . . 9
Parsing: How Ruby Understands Your Code . . . 12
Understanding the LALR Parse Algorithm . . . 13
Some Actual Ruby Grammar Rules . . . 20
Reading a Bison Grammar Rule . . . 22
Experiment 1-2: Using Ripper to Parse Different Ruby Scripts . . . 23
Summary . . . 29
2 COMPILATION 31 No Compiler for Ruby 1.8 . . . 32
Ruby 1.9 and 2.0 Introduce a Compiler . . . 33
How Ruby Compiles a Simple Script. . . 34
Compiling a Call to a Block . . . 38
How Ruby Iterates Through the AST. . . 42
Experiment 2-1: Displaying YARV Instructions . . . 44
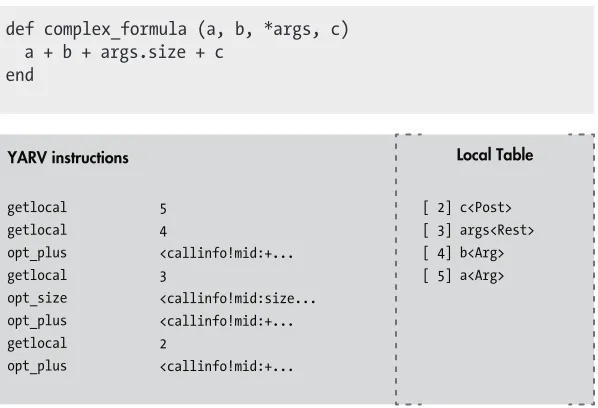
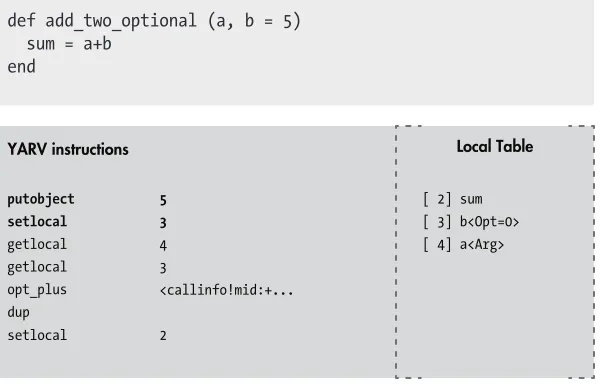
The Local Table . . . 46
Compiling Optional Arguments. . . 48
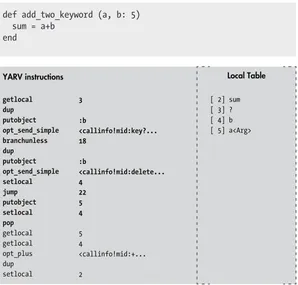
Compiling Keyword Arguments. . . 49
Experiment 2-2: Displaying the Local Table . . . 51
Summary . . . 53
3 HOW RUBY EXECUTES YOUR CODE 55 YARV’s Internal Stack and Your Ruby Stack . . . 56
Stepping Through How Ruby Executes a Simple Script. . . 58
Executing a Call to a Block. . . 61
Taking a Close Look at a YARV Instruction . . . 63
Local and Dynamic Access of Ruby Variables . . . 67
Local Variable Access . . . 67
Method Arguments Are Treated Like Local Variables . . . 70
Dynamic Variable Access. . . 71
Climbing the Environment Pointer Ladder in C . . . 74
Experiment 3-2: Exploring Special Variables . . . 75
A Definitive List of Special Variables . . . 79
Summary . . . 81
4 CONTROL STRUCTURES AND METHOD DISPATCH 83 How Ruby Executes an if Statement . . . 84
Jumping from One Scope to Another . . . 86
Catch Tables . . . 88
Other Uses for Catch Tables . . . 90
Experiment 4-1: Testing How Ruby Implements for Loops Internally . . . 90
The send Instruction: Ruby’s Most Complex Control Structure . . . 92
Method Lookup and Method Dispatch . . . 92
Eleven Types of Ruby Methods . . . 93
Calling Normal Ruby Methods. . . 95
Preparing Arguments for Normal Ruby Methods . . . 95
Calling Built-In Ruby Methods . . . 97
Calling attr_reader and attr_writer . . . 97
Method Dispatch Optimizes attr_reader and attr_writer . . . 98
Experiment 4-2: Exploring How Ruby Implements Keyword Arguments . . . 99
Summary . . . 103
5 OBJECTS AND CLASSES 105 Inside a Ruby Object . . . 106
Inspecting klass and ivptr . . . 107
Visualizing Two Instances of One Class . . . 108
Generic Objects . . . 109
Simple Ruby Values Don’t Require a Structure at All . . . 110
Do Generic Objects Have Instance Variables? . . . 111
Reading the RBasic and RObject C Structure Definitions. . . 112
Where Does Ruby Save Instance Variables for Generic Objects? . . . 113
Experiment 5-1: How Long Does It Take to Save a New Instance Variable?. . . 113
What’s Inside the RClass Structure? . . . 115
Inheritance . . . 118
Class Instance Variables vs. Class Variables. . . 120
Getting and Setting Class Variables . . . 122
Constants . . . 124
The Actual RClass Structure . . . 125
Reading the RClass C Structure Definition. . . 127
Experiment 5-2: Where Does Ruby Save Class Methods? . . . 127
6
METHOD LOOKUP AND CONSTANT LOOKUP 133
How Ruby Implements Modules . . . 135
Included Classes Share the Method Table with the Original Module . . . 153
8
HOW RUBY BORROWED A DECADES-OLD IDEA FROM LISP 191
Blocks: Closures in Ruby . . . 192
Stepping Through How Ruby Calls a Block. . . 194
Borrowing an Idea from 1975 . . . 196
The rb_block_t and rb_control_frame_t Structures . . . 198
Experiment 8-1: Which Is Faster: A while Loop or Passing a Block to each?. . . 200
Lambdas and Procs: Treating a Function as a First-Class Citizen. . . 203
Stack vs. Heap Memory. . . 204
A Closer Look at How Ruby Saves a String Value . . . 204
How Ruby Creates a Lambda . . . 207
How Ruby Calls a Lambda . . . 209
The Proc Object . . . 211
Experiment 8-2: Changing Local Variables After Calling lambda . . . 214
Calling lambda More Than Once in the Same Scope . . . 216
Summary . . . 217
9 METAPROGRAMMING 219 Alternative Ways to Define Methods. . . 221
Ruby’s Normal Method Definition Process . . . 221
Defining Class Methods Using an Object Prefix . . . 223
Defining Class Methods Using a New Lexical Scope . . . 224
Defining Methods Using Singleton Classes . . . 226
Defining Methods Using Singleton Classes in a Lexical Scope . . . 227
Creating Refinements. . . 228
Using Refinements . . . 229
Experiment 9-1: Who Am I? How self Changes with Lexical Scope . . . 231
self in the Top Scope . . . 231
self in a Class Scope . . . 232
self in a Metaclass Scope. . . 233
self Inside a Class Method . . . 234
Metaprogramming and Closures: eval, instance_eval, and binding . . . 236
Code That Writes Code . . . 236
Calling eval with binding . . . 238
An instance_eval Example . . . 240
Another Important Part of Ruby Closures . . . 241
instance_eval Changes self to the Receiver . . . 242
instance_eval Creates a Singleton Class for a New Lexical Scope. . . 243
How Ruby Keeps Track of Lexical Scope for Blocks . . . 244
Experiment 9-2: Using a Closure to Define a Method . . . 246
Using define_method. . . 246
Methods Acting as Closures . . . 247
10
JRUBY: RUBY ON THE JVM 251
Running Programs with MRI and JRuby . . . 252
How JRuby Parses and Compiles Your Code . . . 254
How JRuby Executes Your Code . . . 255
Implementing Ruby Classes with Java Classes. . . 257
Experiment 10-1: Monitoring JRuby’s Just-in-Time Compiler . . . 260
Experiment Code . . . 260
Using the -J-XX:+PrintCompilation Option . . . 261
Does JIT Speed Up Your JRuby Program? . . . 262
Strings in JRuby and MRI. . . 263
How JRuby and MRI Save String Data . . . 264
Copy-on-Write . . . 265
Experiment 10-2: Measuring Copy-on-Write Performance . . . 267
Creating a Unique, Nonshared String . . . 267
Experiment Code . . . 268
Visualizing Copy-on-Write . . . 269
Modifying a Shared String Is Slower . . . 270
Summary . . . 271
11 RUBINIUS: RUBY IMPLEMENTED WITH RUBY 273 The Rubinius Kernel and Virtual Machine . . . 274
Tokenization and Parsing . . . 276
Using Ruby to Compile Ruby . . . 277
Rubinius Bytecode Instructions. . . 278
Ruby and C++ Working Together . . . 279
Implementing Ruby Objects with C++ Objects . . . 280
Experiment 11-1: Comparing Backtraces in MRI and Rubinius . . . 281
Backtraces in Rubinius . . . 282
Arrays in Rubinius and MRI . . . 284
Arrays Inside of MRI . . . 285
The RArray C Structure Definition . . . 286
Arrays Inside of Rubinius . . . 286
Experiment 11-2: Exploring the Rubinius Implementation of Array#shift . . . 288
Reading Array#shift . . . 288
Modifying Array#shift . . . 289
Summary . . . 292
12 GARBAGE COLLECTION IN MRI, JRUBY, AND RUBINIUS 295 Garbage Collectors Solve Three Problems. . . 297
Garbage Collection in MRI: Mark and Sweep . . . 297
The Free List . . . 297
MRI’s Use of Multiple Free Lists . . . 298
Marking. . . 299
Sweeping. . . 300
Lazy Sweeping . . . 300
The RVALUE Structure . . . 301
Disadvantages of Mark and Sweep. . . 302
Experiment 12-1: Seeing MRI Garbage Collection in Action . . . 302
Seeing MRI Perform a Lazy Sweep . . . 303
Seeing MRI Perform a Full Collection . . . 304
Interpreting a GC Profile Report . . . 305
Garbage Collection in JRuby and Rubinius . . . 309
Copying Garbage Collection . . . 309
Bump Allocation . . . 310
The Semi-Space Algorithm . . . 311
The Eden Heap. . . 312
Generational Garbage Collection . . . 313
The Weak Generational Hypothesis . . . 313
Using the Semi-Space Algorithm for Young Objects. . . 314
Promoting Objects. . . 314
Garbage Collection for Mature Objects . . . 315
References Between Generations . . . 316
Concurrent Garbage Collection . . . 317
Marking While the Object Graph Changes . . . 317
Tricolor Marking . . . 319
Three Garbage Collectors in the JVM . . . 320
Experiment 12-2: Using Verbose GC Mode in JRuby . . . 321
Triggering Major Collections . . . 323
Further Reading . . . 324
Summary . . . 325
F O R E W O R D
Oh, hi! I didn’t see you come in. I don’t want to be too forward, but let me preface this by saying you should buy this book!
My name is Aaron Patterson, but my Internet friends call me “tenderlove.” I am on both the Ruby core team and the Ruby on Rails core team, and I did the technical review of this book. Does that mean you should listen to me? No. Well, maybe.
Actually, when Pat approached me to do the technical review of this book, I was so excited that my top hat fell off and I dropped my monocle in my coffee! I knew about Pat’s previous work on Ruby Under a Microscope, and the idea of making an updated and print version available made me really happy. I think many developers are intimidated by Ruby’s internals and are afraid to dive in. Quite often people ask me how they can learn about how Ruby works under the hood or where to get started hacking on Ruby inter-nals. Unfortunately I didn’t have a good answer for people—until now.
Pat’s style of writing, in combination with experimentation, makes Ruby internals very approachable. The experiments are combined with explana-tions of Ruby’s internals such that you can easily understand why Ruby acts the way it does with regard to behavior and performance. Next time you encounter some behavior in your Ruby code, whether it be with perfor-mance, local variables and your environment, or even garbage collection, this book won’t just tell you why your code behaves the way it does, but will even tell you how.
If you’re someone who wants to start hacking on Ruby’s internals, or if you just want to understand why Ruby acts the way it does without any hand-waving, this is the book for you. I enjoyed this book, and I hope you will too.
Aaron Patterson
A C K N O W L E D G M E N T S
I could never have finished a project like this without
the support of many different people!
First of all, thanks to Satty Bhens and everyone else at McKinsey for giving me the flexibility to write a book and keep my day job at a great company. Alex Rothenberg and Daniel Higginbotham gave me invalu-able advice, suffered through reading many early drafts, and helped me throughout the process. Special thanks to Xavier Noria, who took an interest in the project early on, gave me fantastic feedback on the entire rough draft, and was also the inspiration behind Experiment 6-1. Santiago Pastorino reviewed the rough draft as well. Jill Caporrimo, Prajakta Thakur, Yvannova Montalvo, Divya Ganesh, and Yanwing Wong were my “proofread-ing SWAT team.” Self-publish“proofread-ing would have been much harder without your help. Finally, without the constant encouragement and support Peter Cooper has given me this year, I probably never would have attempted to write this book. Thank you, Peter.
What seems complex from
a distance is often quite
I N T R O D U C T I O N
At first glance, learning how to use Ruby can seem
fairly simple. Developers around the world find Ruby’s
syntax to be graceful and straightforward. You can
express algorithms in a very natural way, and then it’s
just a matter of typing
rubyat the command line and
pressing
ENTER, and your Ruby script is running.
However, Ruby’s syntax is deceptively simple; in fact, Ruby employs sophisticated ideas from complex languages like Lisp and Smalltalk. On top of this, Ruby is dynamic; using metaprogramming, Ruby programs can inspect and change themselves. Beneath this thin veneer of simplicity, Ruby is a very complex tool.
Ruby Under a Microscope will show you what happens inside Ruby when you run a simple program. You’ll learn how Ruby understands and executes your code, and with the help of extensive diagrams, you’ll build a mental model of what Ruby does when you create an object or call a block.
Who This Book Is For
Ruby Under a Microscope is not a beginner’s guide to learning Ruby. I assume you already know how to program in Ruby and that you use it daily. There are already many great books that teach Ruby basics; the world doesn’t need another one.
Although Ruby itself is written in C, a confusing, low-level language, no C programming knowledge is required to read this book. Ruby Under a Microscope will give you a high-level, conceptual understanding of how Ruby works without your having to understand how to program in C. Inside this book, you’ll find hundreds of diagrams that make the low-level details of Ruby’s internal implementation easy to understand.
N O T E Readers familiar with C will find a few snippets of C code that give a more concrete sense of what’s going on inside Ruby. I’ll also tell you where the code derives from, making it easier for you to start studying the C code yourself. If you’re not interested in the C code details, just skip over these sections.
Using Ruby to Test Itself
It doesn’t matter how beautiful your theory is, it doesn’t matter how smart you are. If it doesn’t agree with experiment, it’s wrong. —Richard Feynman
Imagine that the entire world functioned like a large computer program. To explain natural phenomena or experimental results, physicists like Richard Feynman would simply consult this program. (A scientist’s dream come true!) But of course, the universe is not so simple.
Fortunately, to discover how Ruby works, all we need to do is read its internal C source code: a kind of theoretical physics that describes Ruby’s behavior. Just as Maxwell’s equations explain electricity and magnetism, Ruby’s internal C source code explains what happens when you pass an argument to a method or include a module in a class.
Which Implementation of Ruby?
Ruby was invented by Yukihiro “Matz” Matsumoto in 1993, and the original, standard version of Ruby is often known as Matz’s Ruby Interpreter (MRI). Most of this book will discuss how MRI works; essentially, we’ll learn how Matz implemented his own language.
Over the years many alternative implementations of Ruby have been written. Some, like RubyMotion, MacRuby, and IronRuby, were designed to run on specific platforms. Others, like Topaz and JRuby, were built using programming languages other than C. One version, Rubinius, was built using Ruby itself. And Matz himself is now working on a smaller version of Ruby called mruby, designed to run inside another application.
I explore the Ruby implementations JRuby and Rubinius in detail in Chapters 10, 11, and 12. You’ll learn how they use different technologies and philosophies to implement the same language. As you study these alter-native Rubies, you’ll gain additional perspective on MRI’s implementation.
Overview
In Chapter 1: Tokenization and Parsing, you’ll learn how Ruby parses your Ruby program. This is one of the most fascinating areas of computer science: How can a computer language be smart enough to understand the code you give it? What does this intelligence really consist of?
Chapter 2: Compilation explains how Ruby uses a compiler to convert your program into a different language before running it.
Chapter 3: How Ruby Executes Your Code looks at the virtual machine Ruby uses to run your program. What’s inside this machine? How does it work? We’ll look deep inside this virtual machine to find out.
Chapter 4: Control Structures and Method Dispatch continues the description of Ruby’s virtual machine, looking at how Ruby implements control structures such as if...else statements and while...end loops. It also explores how Ruby implements method calls.
Chapter 5: Objects and Classes discusses Ruby’s implementation of objects and classes. How are objects and classes related? What would we find inside a Ruby object?
Chapter 6: Method Lookup and Constant Lookup examines Ruby modules and their relationship to classes. You’ll learn how Ruby finds methods and constants in your Ruby code.
Chapter 7: The Hash Table: The Workhorse of Ruby Internals
explores Ruby’s implementation of hash tables. As it turns out, MRI uses hash tables for much of its internal data, not only for data you save in Ruby hash objects.
Chapter 8: How Ruby Borrowed a Decades-Old Idea from Lisp reveals that one of Ruby’s most elegant and useful features, blocks, is based on an idea originally developed for Lisp.
Chapter 10: JRuby: Ruby on the JVM introduces JRuby, an alternative version of Ruby implemented with Java. You’ll learn how JRuby uses the Java Virtual Machine (JVM) to run your Ruby programs faster.
Chapter 11: Rubinius: Ruby Implemented with Ruby looks at one of the most interesting and innovative implementations of Ruby: Rubinius. You’ll learn how to locate—and modify—the Ruby code in Rubinius to see how a particular Ruby method works.
Chapter 12: Garbage Collection in MRI, JRuby, and Rubinius con-cludes with a look at garbage collection (GC), one of the most mysterious and confusing topics in computer science. You’ll see how Rubinius and JRuby use very different GC algorithms from those used by MRI.
1
T O K E N I Z A T I O N A N D P A R S I N G
How many times do you think Ruby reads and
trans-forms your code before running it? Once? Twice?
The correct answer is three times. Whenever you run a Ruby script— whether it’s a large Rails application, a simple Sinatra website, or a back-ground worker job—Ruby rips your code apart into small pieces and then puts them back together in a different format three times! Between the time you type ruby and the time you start to see actual output on the console, your Ruby code has a long road to take—a journey involving a variety of different technologies, techniques, and open source tools.
Figure 1-1 shows what this journey looks like at a high level.
tokens AST
nodes
YARV Instructions Your
Ruby Code Tokenize Parse Compile
Figure 1-1: Your code’s journey through Ruby
language. Next, Ruby parses these tokens; that is, it groups the tokens into meaningful Ruby statements just as one might group words into sentences. Finally, Ruby compiles these statements into low-level instructions that it can execute later using a virtual machine.
I’ll cover Ruby’s virtual machine, called “Yet Another Ruby Virtual Machine” (YARV), in Chapter 3. But first, in this chapter, I’ll describe the tokenizing and parsing processes that Ruby uses to understand your code. After that, in Chapter 2, I’ll show you how Ruby compiles your code by translating it into a completely different language.
N O T E Throughout most of this book we’ll learn about the original, standard implementa-tion of Ruby, known as Matz’s Ruby Interpreter (MRI) after Yukihiro Matsumoto, who invented Ruby in 1993. There are many other implementations of Ruby avail-able in addition to MRI, including Ruby Enterprise Edition, MagLev, MacRuby, RubyMotion, mruby, and many, many others. Later, in Chapters 10, 11, and 12, we’ll look at two of these alternative Ruby implementations: JRuby and Rubinius.
Tokens: The Words That Make Up the Ruby Language
Suppose you write a simple Ruby program and save it in a file called
simple.rb, shown in Listing 1-1.
10.times do |n| puts n end
Listing 1-1: A very simple Ruby program (simple.rb) ROA DM A P
Tokens: The Words That Make Up the Ruby Language . . . .4 The parser_yylex Function . . . .8 Experiment 1-1: Using Ripper to Tokenize Different Ruby Scripts . . . 9
Parsing: How Ruby Understands Your Code . . . .12 Understanding the LALR Parse Algorithm. . . .13 Some Actual Ruby Grammar Rules. . . .20 Reading a Bison Grammar Rule. . . .22 Experiment 1-2: Using Ripper to Parse Different Ruby Scripts . . . 23
Listing 1-2 shows the output you would see after executing the program from the command line.
$ ruby simple.rb 0
1 2 3 --snip
--Listing 1-2: Executing --Listing 1-1
What happens after you type ruby simple.rb and press ENTER? Aside from general initialization, processing your command line parameters, and so on, the first thing Ruby does is open simple.rb and read in all the text from the code file. Next, it needs to make sense of this text: your Ruby code. How does it do this?
After reading in simple.rb, Ruby encounters the series of text characters shown in Figure 1-2. (To keep things simple, I’m showing only the first line of text here.)
0 . t i m e s d o | n |
1
Figure 1-2: The first line of text in simple.rb
When Ruby sees these characters, it tokenizes them. That is, it con-verts them into a series of tokens or words that it understands by stepping through the characters one at a time. In Figure 1-3, Ruby starts scanning at the first character’s position.
0 . t i m e s d o | n |
1
Figure 1-3: Ruby starts to tokenize your code.
The Ruby C source code contains a loop that reads in one character at a time and processes it based on what that character is.
To keep things simple, I’m describing tokenization as an independent process. In fact, the parsing engine I describe next calls this C tokenize code whenever it needs a new token. Tokenization and parsing are separate pro-cesses that actually occur at the same time. For now, let’s just continue to see how Ruby tokenizes the characters in your Ruby file.
0 . t i m e s d o | n | 1
Figure 1-4: Ruby steps to the second text character.
And stepping forward again, in Figure 1-5, Ruby finds a period character.
0 . t i m e s d o | n |
1
Figure 1-5: Ruby finds a period character.
Ruby actually considers the period character to be numeric because it might be part of a floating-point value. In Figure 1-6, Ruby steps to the next character, t.
0 . t i m e s d o | n |
1
Figure 1-6: Ruby finds the first nonnumeric character.
Now Ruby stops iterating because it has found a nonnumeric charac-ter. Because there are no more numeric characters after the period, Ruby considers the period to be part of a separate token, and it steps back one, as shown in Figure 1-7.
0 . t i m e s d o | n |
1
Figure 1-7: Ruby steps back one character.
Finally, in Figure 1-8, Ruby converts the numeric characters that it found into the first token from your program, called tINTEGER.
tINTEGER . t i m e s d o | n |
10
Ruby continues to step through the characters in your code file, con-verting them into tokens and grouping characters as necessary. The second token, shown in Figure 1-9, is a single character: a period.
t i m e s d o | n |
tINTEGER 10 .
Figure 1-9: Ruby converts the period character into a token.
Next, in Figure 1-10, Ruby encounters the word times and creates an identifier token.
d o | n |
tINTEGER
10 .
tIDENTIFIER times
Figure 1-10: Ruby tokenizes the word times.
Identifiers are words in your Ruby code that are not reserved words. Identifiers usually refer to variable, method, or class names.
Next, Ruby sees do and creates a reserved word token, as indicated by
keyword_do in Figure 1-11.
| n |
tINTEGER
10 .
tIDENTIFIER
times keyword_do
Figure 1-11: Ruby creates a reserved word token: keyword_do.
Reserved words are keywords that carry significant meaning in Ruby because they provide the structure, or framework, of the language. They are called reserved words because you can’t use them as normal identifiers, although you can use them as method names, global variable names (such as $do), or instance variable names (for example, @do or @@do).
Internally, the Ruby C code maintains a constant table of reserved words. Listing 1-3 shows the first few, in alphabetical order.
alias and begin break case class
T HE PA RSE R _Y Y L E X F UNC T ION
If you’re familiar with C and are interested in learning more about the detailed way in which Ruby tokenizes your code file, see the parse.y file in your version of Ruby. The .y extension indicates that parse.y is a grammar rule file—one that contains a series of rules for the Ruby parser engine. (I’ll discuss these in the next section.) parse.y is an extremely large and complex file with over 10,000 lines of code!
For now, ignore the grammar rules, and search for a C function called parser_ yylex, about two-thirds of the way down the file, around line 6500. This complex C function contains the code that actually tokenizes your code. Look closely and you should see a very large switch statement that starts with the code shown in Listing 1-4.
u retry:
v last_state = lex_state; w switch (c = nextc()) {
Listing 1-4: The C code inside Ruby that reads in each character from your code file
The nextc() function w returns the next character in the code file text stream. Think of this function as the arrow in the previous diagrams. The lex_state variable v keeps information about what state or type of code Ruby is processing at the moment.
The large switch statement inspects each character of your code file and takes a different action based on what it is. For example, the code shown in Listing 1-5 looks for whitespace characters and ignores them by jumping back up to the retry label u just above the switch statement in Listing 1-4.
/* white spaces */
case ' ': case '\t': case '\f': case '\r': case '\13': /* '\v' */
space_seen = 1; --snip
goto retry;
Listing 1-5: This C code checks for whitespace characters in your code and ignores them.
Ruby’s reserved words are defined in the file called defs/keywords. If you open this file, you’ll see a complete list of all of Ruby’s reserved words (see a partial list in Listing 1-3). The keywords file is used by an open source package called gperf to produce C code that can quickly and efficiently look up strings in a table—in this case, a table of reserved words. You can find the generated C code that looks up reserved words in lex.c, which defines a function named rb_reserved_word, called from parse.y.
Finally, as shown in Figure 1-12, Ruby converts the remaining charac-ters to tokens.
tINTEGER
10 .
tIDENTIFIER
times keyword_do |
tIDENTIFIER
n |
Figure 1-12: Ruby finishes tokenizing the first line of text.
Ruby continues to step through your code until it has tokenized the entire Ruby script. At this point, it has processed your code for the first time, ripping it apart and putting it back together again in a completely different way. Your code began as a stream of text characters, and Ruby converted it to a stream of tokens, words that it will later combine into sentences.
Experiment 1-1: Using Ripper to Tokenize Different
Ruby Scripts
Now that we’ve learned the basic idea behind tokenization, let’s look at how Ruby actually tokenizes different Ruby scripts. After all, how else will you know that the previous explanation is actually correct?
As it turns out, a tool called Ripper makes it very easy to see what tokens Ruby creates for different code files. Shipped with Ruby 1.9 and Ruby 2.0, the Ripper class allows you to call the same tokenization and parsing code that Ruby uses to process text from code files. (Ripper is not available in Ruby 1.8.)
Listing 1-6 shows how simple using Ripper is.
require 'ripper' require 'pp' code = <<STR 10.times do |n| puts n end STR puts code
u pp Ripper.lex(code)
Listing 1-6: An example of how to call Ripper.lex(lex1.rb)
After requiring the Ripper code from the standard library, you call it by passing some code as a string to the Ripper.lex method u. Listing 1-7 shows the output from Ripper.
$ ruby lex1.rb 10.times do |n| puts n end
[[1, 2], :on_period, "."], v [[1, 3], :on_ident, "times"],
[[1, 8], :on_sp, " "], [[1, 9], :on_kw, "do"], [[1, 11], :on_sp, " "], [[1, 12], :on_op, "|"], [[1, 13], :on_ident, "n"], [[1, 14], :on_op, "|"],
[[1, 15], :on_ignored_nl, "\n"], [[2, 0], :on_sp, " "],
[[2, 2], :on_ident, "puts"], [[2, 6], :on_sp, " "], [[2, 7], :on_ident, "n"], [[2, 8], :on_nl, "\n"], [[3, 0], :on_kw, "end"], [[3, 3], :on_nl, "\n"]]
Listing 1-7: The output generated by Ripper.lex
Each line corresponds to a single token that Ruby found in your code string. On the left, we have the line number (1, 2, or 3 in this short example) and the text column number. Next, we see the token itself displayed as a symbol, such as :on_intu or :on_identv. Finally, Ripper displays the text characters that correspond to each token.
The token symbols that Ripper displays are somewhat different from the token identifiers I used in Figures 1-2 through 1-12 that showed Ruby tokenizing the 10.times do code. I used the same names you would find in Ruby’s internal parse code, such as tIDENTIFIER, while Ripper used :on_ident
instead.
Regardless, Ripper will still give you a sense of what tokens Ruby finds in your code and how tokenization works.
Listing 1-8 shows another example of using Ripper.
$ ruby lex2.rb 10.times do |n| puts n/4+6 end
--snip
[[2, 2], :on_ident, "puts"], [[2, 6], :on_sp, " "], [[2, 7], :on_ident, "n"], [[2, 8], :on_op, "/"], [[2, 9], :on_int, "4"], [[2, 10], :on_op, "+"], [[2, 11], :on_int, "6"], [[2, 12], :on_nl, "\n"], --snip
This time Ruby converts the expression n/4+6 into a series of tokens in a very straightforward way. The tokens appear in exactly the same order they did inside the code file.
Listing 1-9 shows a third, slightly more complex example.
$ ruby lex3.rb
[[3, 2], :on_ident, "array"], [[3, 7], :on_sp, " "], u [[3, 8], :on_op, "<<"],
[[3, 10], :on_sp, " "], [[3, 11], :on_ident, "n"], [[3, 12], :on_sp, " "], [[3, 13], :on_kw, "if"], [[3, 15], :on_sp, " "], [[3, 16], :on_ident, "n"], [[3, 17], :on_sp, " "], v [[3, 18], :on_op, "<"], [[3, 19], :on_sp, " "], [[3, 20], :on_int, "5"], --snip
--Listing 1-9: A third example of running Ripper.lex
As you can see, Ruby is smart enough to distinguish between << and <
in the following line: array << n if n < 5. The characters << are converted to a single operator token u, while the single < character that appears later is converted into a simple less-than operator v. Ruby’s tokenize code is smart enough to look ahead for a second < character when it finds one <.
Finally, notice that Ripper has no idea whether the code you give it is valid Ruby or not. If you pass in code that contains a syntax error, Ripper will just tokenize it as usual and not complain. It’s the parser’s job to check syntax.
Running this, you get the output shown in Listing 1-11.
$ ruby lex4.rb 10.times do |n puts n end --snip
--[[[1, 0], :on_int, "10"], [[1, 2], :on_period, "."], [[1, 3], :on_ident, "times"], [[1, 8], :on_sp, " "], [[1, 9], :on_kw, "do"], [[1, 11], :on_sp, " "], [[1, 12], :on_op, "|"], [[1, 13], :on_ident, "n"], [[1, 14], :on_nl, "\n"], --snip
--Listing 1-11: Ripper does not detect syntax errors.
Parsing: How Ruby Understands Your Code
Once Ruby converts your code into a series of tokens, what does it do next? How does it actually understand and run your program? Does Ruby simply step through the tokens and execute each one in order?
No. Your code still has a long way to go before Ruby can run it. The next step on its journey through Ruby is called parsing, where words or tokens are grouped into sentences or phrases that make sense to Ruby. When parsing, Ruby takes into account the order of operations, methods, blocks, and other larger code structures.
But how can Ruby actually understand what you’re telling it with your code? Like many programming languages, Ruby uses a parser generator. Ruby uses a parser to process tokens, but the parser itself
is generated with a parser generator. Parser gen-erators take a series of grammar rules as input that describe the expected order and patterns in which the tokens will appear.
The most widely used and well-known parser generator is Yacc (Yet Another Compiler Compiler), but Ruby uses a newer version of Yacc called Bison. The grammar rule file for Bison and Yacc has a
.y extension. In the Ruby source code, the gram-mar rule file is parse.y (introduced earlier). The
parse.y file defines the actual syntax and grammar that you have to use while writing your Ruby code; it’s really the heart and soul of Ruby and where the language itself is actually defined!
Ruby doesn’t use Bison to actually process tokens; instead, it runs Bison ahead of time, during the build process, to create the actual parser code. In effect, there are two separate steps to the parsing process, shown in Figure 1-13.
Before you run your Ruby program, the Ruby build process uses Bison to generate the parser code (parse.c) from the grammar rule file (parse.y). Later, at run time, this generated parser code parses the tokens returned by Ruby’s tokenizer code.
Run Time
Grammar Rules (parse.y )
Ruby Build Time
Parser Code (parse.c)
tokens AST
nodes
Tokenize Parse Compile
Ruby Code (.rb files)
YARV Instructions Generate
Parser
(Bison)
Figure 1-13: The Ruby build process runs Bison ahead of time.
Because the parse.y file and the generated parse.c file also contain the tokenization code, Figure 1-13 has a diagonal arrow from parse.c to the tokenize process on the lower left. (In fact, the parse engine I’m about to describe calls the tokenization code whenever it needs a new token.) The tokenization and parsing processes actually occur simultaneously.
Understanding the LALR Parse Algorithm
How does the parser code analyze and process the incoming tokens? With an algorithm known as LALR, or Look-Ahead Left Reversed Rightmost Derivation. Using the LALR algorithm, the parser code processes the token stream from left to right, trying to match their order and the pattern in which they appear against one or more of the grammar rules from parse.y. The parser code also “looks ahead” when necessary to decide which gram-mar rule to match.
Suppose you want to translate from the Spanish:
Me gusta el Ruby. [Phrase 1]
to the English:
I like Ruby.
And suppose that to translate Phrase 1, you use Bison to generate a C language parser from a grammar file. Using the Bison/Yacc grammar rule syntax, you can write the simple grammar shown in Listing 1-12, with the rule name on the left and the matching tokens on the right.
SpanishPhrase : me gusta el ruby { printf("I like Ruby\n");
}
Listing 1-12: A simple grammar rule matching the Spanish Phrase 1
This grammar rule says the following: If the token stream is equal to me,
gusta, el, and ruby—in that order—we have a match. If there’s a match, the Bison generated parser will run the given C code, and the printf statement (similar to puts in Ruby) will print the translated English phrase.
Figure 1-14 shows the parsing process in action.
SpanishPhrase:
Tokens
Grammar Rule
me
gusta
el
ruby
me gusta el ruby
Figure 1-14: Matching tokens with a grammar rule
There are four input tokens at the top, and the grammar rule is under-neath. It should be clear that there’s a match because each input token cor-responds directly to one of the terms on the right side of the grammar rule. We have a match on the SpanishPhrase rule.
Now let’s improve on this example. Suppose you need to enhance your parser to match Phrase 1 and Phrase 2:
Me gusta el Ruby. [Phrase 1]
and:
Le gusta el Ruby. [Phrase 2]
The modified grammar file in Listing 1-13 can parse both Spanish phrases.
SpanishPhrase: VerbAndObject el ruby { printf("%s Ruby\n", $1);
};
VerbAndObject: SheLikes | ILike { $$ = $1;
};
SheLikes: le gusta { $$ = "She likes"; }
ILike: me gusta { $$ = "I like"; }
Listing 1-13: These grammar rules match both Phrase 1 and Phrase 2.
As you can see, there are four grammar rules here instead of just one. Also, you’re using the Bison directive $$ to return a value from a child grammar rule to a parent and $1 to refer to a child’s value from a parent.
Unlike with Phrase 1, the parser can’t immediately match Phrase 2 with any of the grammar rules.
In Figure 1-15, we can see the el and ruby tokens match the SpanishPhrase
rule, but le and gusta do not. (Ultimately, we’ll see that the child rule
VerbAndObject does match le gusta, but never mind that for now.) With four grammar rules, how does the parser know which other rules to try to match against? And against which tokens?
SpanishPhrase:
Tokens
Grammar Rule
el
ruby
?
VerbAndObject
le gusta el ruby
Figure 1-15: The first two tokens don’t match.
describes the algorithm the parser uses to find matching grammar rules. We’ll get to the look ahead part in a minute. For now, let’s start with LR:
• L (left) means the parser moves from left to right while processing the token stream. In this example, that would be le, gusta, el, and ruby, in that order.
• R (reversed rightmost derivation) means the parser takes a bottom-up strategy, using a shift/reduce technique, to find matching grammar rules.
Here’s how the algorithm works for Phrase 2. First, the parser takes the input token stream, shown again in Figure 1-16.
Tokens
le gusta el ruby
Figure 1-16: The input stream of tokens
Next, it shifts the tokens to the left, creating what I’ll call the grammar rule stack, as shown Figure 1-17.
shift Tokens
Grammar Rule Stack
le
gusta el rubyFigure 1-17: The parser moves the first token onto the grammar rule stack.
Because the parser has processed only the token le, it places this token in the stack alone for the moment. The term grammar rule stack is a bit of an oversimplification; while the parser uses a stack, instead of grammar rules, it pushes numbers onto its stack to indicate which grammar rule it has just parsed. These numbers, or states, help the parser keep track of which gram-mar rules it has matched as it processes tokens.
Next, as shown in Figure 1-18, the parser shifts another token to the left.
gusta
le
shift Tokens
Grammar Rule Stack
el ruby
Now there are two tokens in the stack on the left. At this point, the parser stops to search the different grammar rules for a match. Figure 1-19 shows the parser matching the SheLikes rule.
reduce
SheLikes
Tokens Grammar Rule Stack
el ruby
Figure 1-19: The parser matches the SheLikes rule and reduces.
This operation is called reduce because the parser is replacing the pair of tokens with a single matching rule. The parser looks through the avail-able rules and reduces, or applies the single matching rule.
Now the parser can reduce again because there’s another matching rule: VerbAndObject! The VerbAndObject rule matches because its use of the
OR (|) operator matches either the SheLikesorILike child rules. You can see in Figure 1-20 that the parser replaces SheLikes with
VerbAndObject.
reduce Tokens
Grammar Rule Stack
el ruby
VerbAndObject
Figure 1-20: The parser reduces again, matching the VerbAndObject rule.
But think about this: How did the parser know to reduce and not continue to shift tokens? Also, if in the real world there are actually many matching rules, how does the parser know which one to use? How does it decide whether to shift or reduce? And if it reduces, how does it decide which grammar rule to reduce with?
In other words, suppose at this point in the process multiple matching rules included le gusta. How would the parser know which rule to apply or whether to shift in the el token first before looking for a match? (See Figure 1-21.)
gusta
le
Tokens Grammar Rule Stack
el ruby
Here’s where the look ahead portion of LALR comes in. In order to find the correct matching rule, the parser looks ahead at the next token. The arrow in Figure 1-22 shows the parser looking ahead at the el token.
gusta
le
Tokens Grammar Rule Stack
el ruby
?
Figure 1-22: Looking ahead at the next token in the input stream
Additionally, the parser maintains a state table of possible outcomes depending on what the next token is and which grammar rule was just parsed. In this case, the table would contain a series of states, describing which grammar rules have been parsed so far and which states to move to next depending on the next token. (LALR parsers are complex state machines that match patterns in the token stream. When you use Bison to generate the LALR parser, Bison calculates what this state table should con-tain based on the grammar rules you provided.)
In this example, the state table would contain an entry indicating that if the next token was el, the parser should first reduce using the SheLikes
rule before shifting a new token.
Rather than waste your time with the details of what a state table looks like (you’ll find the actual LALR state table for Ruby in the generated
parse.c file), let’s continue the shift/reduce operations for Phrase 2, “Le gusta el Ruby.” After matching the VerbAndObject rule, the parser would shift another token to the left, as shown in Figure 1-23.
Grammar Rule Stack
shift
el
VerbAndObject
Tokens
ruby
Figure 1-23: The parser shifts another token onto the stack.
At this point, no rules would match, and the state machine would shift another token to the left (see Figure 1-24).
Grammar Rule Stack
shift
el ruby
VerbAndObject
Figure 1-25 shows how the parent grammar rule SpanishPhrase would match after a final reduce operation.
Grammar Rule Stack
SpanishPhrase
reduce and match!Figure 1-25: The parser matches the SpanishPhrase rule—and the entire input stream!
I’ve shown you this Spanish-to-English example because Ruby parses your program in exactly the same way! Inside the Ruby parse.y source code file, you’ll see hundreds of rules that define the structure and syntax of the Ruby language. There are parent and child rules, and the child rules return values the parent rules can refer to in exactly the same way our
SpanishPhrase grammar rules do, using the symbols $$, $1, $2, and so on. The only real difference is scale: Our SpanishPhrase grammar example is trivial, really. In contrast, Ruby’s grammar is very complex; it’s an intricate series of interrelated parent and child grammar rules, which sometimes refer to each other in circular, recursive patterns. But this complexity just means that the generated state table in parse.c is quite large. The basic LALR algo-rithm, which describes how the parser processes tokens and uses the state table, is the same in our Spanish example as it is in Ruby.
To get a sense of just how complex the state table is for Ruby, you can try using Ruby’s -y option, which displays internal debug information every time the parser jumps from one state to another. Listing 1-14 shows a small portion of the output generated when you run the 10.times do example from Listing 1-1.
$ ruby -y simple.rb Starting parse Entering state 0
Reducing stack by rule 1 (line 850): -> $$ = nterm @1 ()
Stack now 0 Entering state 2
Reading a token: Next token is token tINTEGER () Shifting token tINTEGER ()
Entering state 41
Reducing stack by rule 498 (line 4293): $1 = token tINTEGER ()
-> $$ = nterm numeric () Stack now 0 2
Entering state 109 --snip
Some Actual Ruby Grammar Rules
Let’s look at some actual Ruby grammar rules from parse.y. Listing 1-15 con-tains the simple example Ruby script from Listing 1-1 on page 4.
10.times do |n| puts n end
Listing 1-15: The simple Ruby program from Listing 1-1.
Figure 1-26 shows how Ruby’s parsing process works with this script.
Grammar Rules program: top_compstmt
top_compstmt: top_stmts opt_terms top_stmts: ... | top_stmt | ... top_stmt: stmt | ...
stmt: ... | expr expr: ... | arg arg: ... | primary
primary: ... | method_call brace_block | ... Ruby Code
10.times do |n| puts n end
Figure 1-26: The grammar rules on the right match the Ruby code on the left.
On the left is the code that Ruby is trying to parse. On the right are the actual matching grammar rules from the Ruby parse.y file, shown simplified. The first rule, program: top_compstmt, is the root grammar rule that matches every Ruby program in its entirety.
As you go down the list, you see a complex series of child rules that also match the entire Ruby script: top statements, a single statement, an expression, an argument, and, finally, a primary value. Once Ruby’s parse reaches the primary grammar rule, it encounters a rule with two matching child rules: method_call and brace_block. Let’s look at method_call first (see Figure 1-27).
Grammar Rules
method_call: ... | primary_value '.' operation2 | ... Ruby Code
10.times
Figure 1-27: 10.times matches the method_call grammar rule.
see that the method_call rule matches another primary value, followed by a period character, followed by an operation2 rule.
Figure 1-28 shows that the primary_value rule first matches the value 10.
Grammar Rules
primary_value: primary primary: literal | ... Ruby Code
10
Figure 1-28: The value 10 matches the primary_value grammar rule.
Then, in Figure 1-29, the operation2 rule matches the method name times.
Grammar Rules
operation2: identifier | ... Ruby Code
times
Figure 1-29: The times method name matches the operation2 grammar rule.
How does Ruby parse the contents of the do ... puts ... end block that’s passed to the times method? It uses the brace_block rule we saw in Figure 1-26. Figure 1-30 shows the definition of the brace_block rule.
Grammar Rules
brace_block: ... | keyword_do opt_block_param compstmt keyword_end | ... Ruby Code
do |n| puts n end
Figure 1-30: The entire block matches the brace_block rule.
I don’t have space here to go through all the remaining child gram-mar rules, but you can see how this rule, in turn, contains a series of other matching child rules:
• keyword_do matches the do reserved keyword.
• opt_block_param matches the block parameter |n|.
• compstmt matches the contents of the block itself, puts n.
R E A DING A BISON GR A MM A R RUL E To give you a taste of the actual Ruby parse.y source code, take a look at Listing 1-16, which shows part of the method_call u grammar rule definition.
u method_call : --snip
primary_value '.' operation2 {
/*%%%*/
$<num>$ = ruby_sourceline; /*% %*/
}
opt_paren_args {
/*%%%*/
$$ = NEW_CALL($1, $3, $5); nd_set_line($$, $<num>4); /*%
$$ = dispatch3(call, $1, ripper_id2sym('.'), $3); $$ = method_optarg($$, $5);
%*/ }
Listing 1-16: Ruby’s actual method_call grammar rule from parse.y
As with the preceding Spanish-to-English example grammar file, you can see that there are snippets of complex C code after each of the terms in the grammar rule. Listing 1-17 shows one example of this.
$$ = NEW_CALL($1, $3, $5); nd_set_line($$, $<num>4);
Listing 1-17: Ruby calls this C code when the opt_paren_args grammar rule matches.
The Bison-generated parser will execute one of these snippets when there’s a match for a rule on the tokens found in the target Ruby script. However, these C code snippets also contain Bison directives, such as $$ and $1, that allow the code to create return values and to refer to values returned by other grammar rules. We end up with a confusing mix of C and Bison directives.
To make things worse, Ruby uses a trick during its build process to divide these C/Bison code snippets into separate pieces. Some of these pieces are used by Ruby, while others are used only by the Ripper tool from Experiment 1-1. Here’s how that trick works:
• The C code that appears between the /*%%%*/ line and the /*% line in Listing 1-16 is actually compiled into Ruby during the Ruby build process.
Experiment 1-2: Using Ripper to Parse Different
Ruby Scripts
In Experiment 1-1, you learned how to use Ripper to display the tokens that Ruby converts your code into, and we’ve just seen how the Ruby grammar rules in parse.y are also included in the Ripper tool. Now let’s learn how to use Ripper to display information about how Ruby parses your code. Listing 1-18 shows how to do it.
require 'ripper' require 'pp' code = <<STR 10.times do |n| puts n end STR puts code
u pp Ripper.sexp(code)
Listing 1-18: An example of how to call Ripper.sexp
This is exactly the same code from Experiment 1-1, except that we call
Ripper.sexpu instead of Ripper.lex. Running this gives the output shown in Listing 1-19.
[:program,
[[:method_add_block, [:call,
[:@int, "10", [1, 0]], :".", [:@ident, "times", [1, 3]]],
Ruby uses this very confusing syntax to allow the Ripper tool and Ruby itself to share the same grammar rules inside parse.y.
What are these snippets actually doing? As you might guess, Ruby uses the Ripper code snippets to allow the Ripper tool to display information about what Ruby is parsing. (We’ll try that next, in Experiment 1-2.) There’s also some bookkeeping code: Ruby uses the ruby_sourceline variable to keep track of which source code line corresponds to each portion of the grammar.
[:do_block, [:block_var,
[:params, [[:@ident, "n", [1, 13]]], nil, nil, nil, nil, nil, nil], false],
[[:command,
[:@ident, "puts", [2, 2]],
[:args_add_block, [[:var_ref, [:@ident, "n", [2, 7]]]], false]]]]]]]
Listing 1-19: The output generated by Ripper.sexp
You can see some bits and pieces from the Ruby script in this cryptic text, but what do all of the other symbols and arrays mean?
It turns out that the output from Ripper is a textual representation of your Ruby code. As Ruby parses your code, matching one grammar rule after another, it converts the tokens in your code file into a complex inter-nal data structure called an abstract syntax tree (AST). (You can see some of the C code that produces this structure in “Reading a Bison Grammar Rule” on page 22.) The AST is used to record the structure and syntacti-cal meaning of your Ruby code.
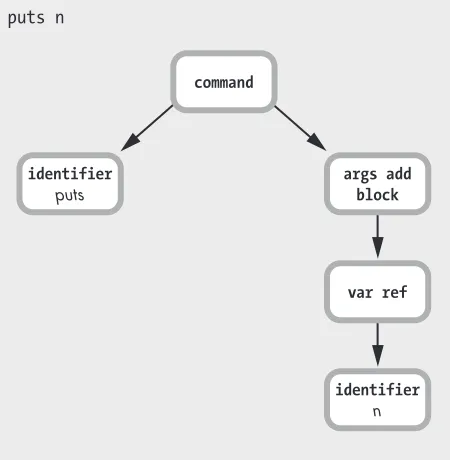
To see what I mean, look at Figure 1-31, which shows a graphical view of part of the output that Ripper generated for us: the puts n statement inside the block.
puts n
identifier
puts
args add block
var ref
identifier
n
command
This diagram corresponds to the last three lines of the Ripper output, repeated here in Listing 1-20.
[[:command,
u [:@ident, "puts", [2, 2]],
[:args_add_block, [[:var_ref, [:@ident, "n", [2, 7]]]], false]]]
Listing 1-20: The last three lines of the Ripper.sexp output
As in Experiment 1-1, when we displayed token information from Ripper, you can see that the source code file line and column information are dis-played as integers. For example, [2, 2]u indicates that Ripper found the
puts call on line 2 at column 2 of the code file. You can also see that Ripper outputs an array for each of the nodes in the AST—with [:@ident, "puts", [2, 2]]u, for example.
Now your Ruby program is beginning to “make sense” to Ruby. Instead of a simple stream of tokens, which could mean anything, Ruby now has a detailed description of what you meant when you wrote puts n. You see a function call (a command), followed by an identifier node that indicates which function to call.
Ruby uses the args_add_block node because you could pass a block to a command/function call like this. Even though you’re not passing a block in this case, the args_add_block node is still saved into the AST. (Notice, too, how the n identifier is recorded as a :var_ref, or variable reference node, not as a simple identifier.)
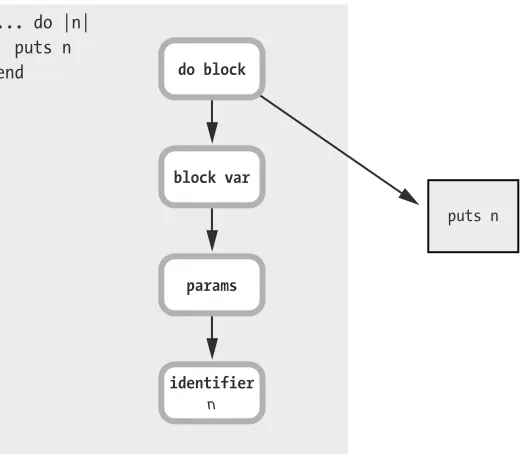
Figure 1-32 represents more of the Ripper output.
... do |n| puts n
end do block
block var
params
identifier
n
puts n
You can see that Ruby now understands that do |n| ... end is a block, with a single block parameter called n. The puts n box on the right repre-sents the other part of the AST shown earlier—the parsed version of the
puts call.
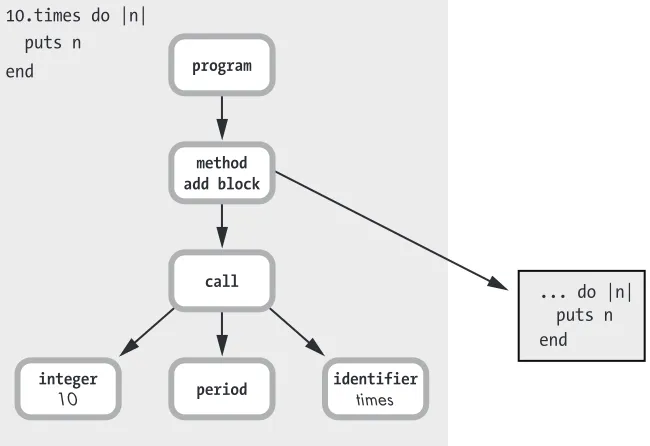
Finally, Figure 1-33 shows the entire AST for the sample Ruby code.
10.times do |n| puts n end
method add block
call
integer
10
... do |n|
puts n
end
period identifier
times
program
Figure 1-33: The AST for the entire Ruby program
Here, method add block means that you’re calling a method, but with a block parameter: 10.times do. The call tree node obviously represents the actual method call 10.times. This is the NODE_CALL node that we saw earlier in the C code snippet. Ruby’s understanding of what you meant with your code is saved in the way the nodes are arranged in the AST.
To clarify things, suppose you pass the Ruby expression 2 + 2 to Ripper, as shown in Listing 1-21.
require 'ripper' require 'pp' code = <<STR 2 + 2 STR puts code
pp Ripper.sexp(code)
Running this code gives the output in Listing 1-22.
[:program, [[:binary,
[:@int, "2", [1, 0]], :+,
[:@int, "2", [1, 4]]]]]
Listing 1-22: The output of Ripper.sexp for 2 + 2
As you can see in Figure 1-34 below, the + is represented with an AST node called binary.
2 + 2
program
integer
2 plus
integer
2
binary
Figure 1-34: The AST for 2 + 2
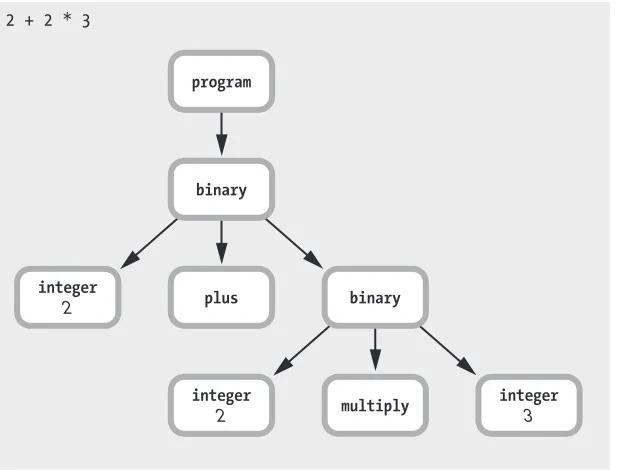
But see what happens when I pass the expression 2 + 2 * 3 into Ripper, as in Listing 1-23.
require 'ripper' require 'pp' code = <<STR 2 + 2 * 3 STR puts code
pp Ripper.sexp(code)
Listing 1-23: Code to display the AST for 2 + 2 * 3
[:program, [[:binary,
[:@int, "2", [1, 0]], :+,
u [:binary,
[:@int, "2", [1, 4]], :*,
[:@int, "3", [1, 8]]]]]]
Listing 1-24: The output of Ripper.sexp for 2 + 2 * 3
Figure 1-35 shows what that looks like.
program
binary
integer
plus binary
2 + 2 * 3
2
integer
2 multiply
integer
3
Figure 1-35: The AST for 2 + 2 * 3
Ruby was smart enough to realize that multiplication has a higher pre-cedence than addition, but what’s really interesting is how the AST tree structure captures the information about the order of operations. The token stream 2 + 2 * 3 simply indicates what you wrote in your code file. But the parsed version that’s saved to the AST structure now contains the
One final note: Ruby actually contains some debug code that can dis-play information about the AST node structure. To use it, run your Ruby script with the parsetree option (see Listing 1-25).
$ ruby --dump parsetree your_script.rb
Listing 1-25: Display debug information about your code’s AST using the parsetree option.
This will display the same information we’ve just seen, but instead of showing symbols, the parsetree option should show the actual node names from the C source code. (In Chapter 2, I’ll also use the actual node names.)
Summary
In Chapter 1, we looked at one of the most fascinating areas of computer science: how Ruby can understand the text that you give it—your Ruby pro-gram. In order to do this, Ruby converts your code into two different for-mats. First, it converts the text in your Ruby program into a series of tokens. Next, it uses an LALR parser to convert the input stream of tokens into a data structure called an abstract syntax tree.
The code Ruby actually
runs looks nothing like
2
C O M P I L A T I O N
Now that Ruby has tokenized and parsed your code,
is it ready to run it? Will it finally get to work and
iter-ate through the block 10 times in my simple
10.times doexample? If not, what else could Ruby possibly have to
do first?
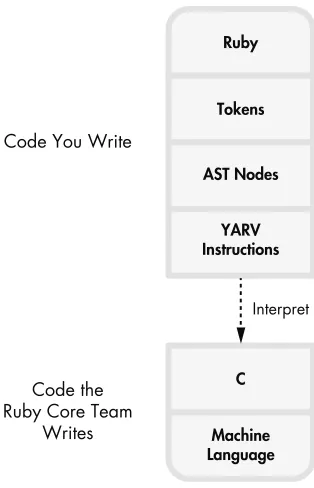
Starting with version 1.9, Ruby compiles your code before executing it. The word compile means to translate your code from one program-ming language to another. Your programprogram-ming language is easy for you to understand, while usually the target language is easy for the computer to understand.
For example, when you compile a C program, the compiler translates C code to machine language, a language your computer’s microprocessor hardware understands. When you compile a Java program, the compiler translates Java code to Java bytecode, a language the Java Virtual Machine understands.
Ruby’s compiler runs automatically without you ever knowing. Here in Chapter 2, I’ll explain how Ruby does this and what language it translates your code into.
No Compiler for Ruby 1.8
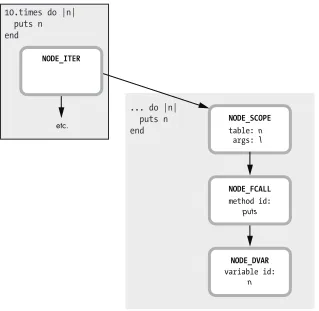
The Ruby core team introduced a compiler with version 1.9. Ruby 1.8 and earlier versions of Ruby don’t contain a compiler. Instead, Ruby 1.8 immediately executes your code after the tokenizing and parsing processes are finished. It does this by walking through the nodes in the AST tree and executing each one. Figure 2-1 shows another way of looking at the Ruby 1.8 tokeniz-ing and parstokeniz-ing processes.
The top of Figure 2-1 shows your Ruby code. Below this are the different internal formats Ruby con-verts your Ruby code into. These are the tokens and AST nodes we saw in Chapter 1—the different