NetBeans IDE 7
Cookbook
Over 70 highly focused practical recipes to maximize your
output with NetBeans
Rhawi Dantas
BIRMINGHAM - MUMBAI
NetBeans IDE 7 Cookbook
Copyright © 2011 Packt Publishing
All rights reserved. No part of this book may be reproduced, stored in a retrieval system, or transmitted in any form or by any means, without the prior written permission of the publisher, except in the case of brief quotations embedded in critical articles or reviews.
Every effort has been made in the preparation of this book to ensure the accuracy of the information presented. However, the information contained in this book is sold without war-ranty, either express or implied. Neither the author, nor Packt Publishing, and its dealers and distributors will be held liable for any damages caused or alleged to be caused directly or indirectly by this book.
Packt Publishing has endeavored to provide trademark information about all of the companies and products mentioned in this book by the appropriate use of capitals. However, Packt Publishing cannot guarantee the accuracy of this information.
First published: May 2011
Production Reference: 1200511
Published by Packt Publishing Ltd. 32 Lincoln Road
Olton
Birmingham, B27 6PA, UK. ISBN 978-1-849512-50-3
www.packtpub.com
Cover Image by Ed Maclean ([email protected])
Credits
Author
Rhawi Dantas
Reviewers
Adam Dudczak Laurențiu Matei Holger Stenzhorn
Acquisition Editor
Chaitanya Apte
Development Editor
Roger D'Souza
Technical Editor
Pallavi Kachare
Copy Editor
Kriti Sharma
Project Coordinator
Jovita Pinto
Proofreader
Dan McMahon
Indexer
Hemangini Bari
Production Coordinator
Aparna Bhagat
Cover Work
Aparna Bhagat
About the Author
Rhawi Dantas
is a Brazilian Software Engineer, more specifically from Recife, with severeal years of experience in the Java platform. He has mainly focused on Web/Server developmen and hsa contributed to projects ranging from mobile/server integration, different customization of IDEs and development of CRMs. He currently works at Paf.com with Java Web development.He graduated as Bachelor in Information Systems and at that time he had the opportunity to work as a tutor for the University with Object Oriented Programming subject. Besides full-time work he is on his way with his Masters in Software Systems at the Tampere University of Technology.
He is also certified as SCJP, SCWCD, and SCSNI.
This is a small thank you to the three most important women in my life: Sônia Dantas, Paula Mäkinen-Dantas, and Maria Dantas. I would also like to thank the work of my editors, especially Jovita Pinto and Roger D'Souza, and all of the reviewers for their valuable contribution.
About the Reviewers
Adam Dudczak
works as a computer programmer and researcher in PoznanSupercomputing and Networking Center. He is an experienced Java developer who has a broad experience in building large-scale content management systems. He has co-authored several papers in the field of digital libraries, information retrieval, and text mining.
Adam is a leader of the Poznan Java User Group (http://www.jug.poznan.pl), and has organized numerous local Java-related events including Poznan NetBeans day and NetBeans Platform training. He is also a member of the GeeCON conference (http:/geecon.org) organizing committee.
In his free time he teaches Java development at Poznan University of Technology and writes a blog: http://dudczak.info/dry.
Lauren
ț
iu Matei
holds a master's degree in Systems and Computer Science from Politehnica University in Bucharest.He works for MrSwing, a financial software company, as senior developer and for 8Seconds, an e-mail optimization company, as head of research and development.
His main interests are web development, clustering, and multi-tier architecture.
His best skills are combined in the open source project Chartsy.org, a stock trading, screening and charting platform based on the NetBeans Platform.
Holger Stenzhorn
studied computational linguistics at Saarland University in Saarbrücken, Germany and is currently a research associate at the Department of Paediatric Oncology and Hematology of the Saarland University Hospital in Homburg, Germany. Before, he had positions as a researcher at the Institute for Medical Biometry and Medical Informatics of the Freiburg University Medical Center, Germany and the Institute of Formal Ontology and Medical Information Science in Saarbrücken, Germany, and he was also visiting researcher at the Digital Enterprise Research Institute in Galway, Ireland, before he worked as a software engineer at XtraMind Technologies in Saarbrücken, Germany.His work focuses on the representation and management of information and data, ontologies and Semantic Web technologies, biomedical informatics, natural language processing, user interfaces and software design and development. In the past he has participated in the development of multilingual document retrieval, information extraction, and natural language generation systems, both in industry and academia.
He has been involved in several ontology engineering and application tasks: an ontology for clinical trials on nephroblastoma and breast cancer (EU-funded ACGT project), an ontology for the research on cerebral aneurysms (EU-funded @neurIST project) as well as the BioTop top-domain ontology. His main work at the moment focuses on developing a software system (ObTiMA) for the improved management of clinical trials. Further, he is a member of the Healthcare and Life Sciences Interest Group of the World Wide Web Consortium.
www.PacktPub.com
Support files, eBooks, discount offers and more
You might want to visit www.PacktPub.com for support files and downloads related to your book.Did you know that Packt offers eBook versions of every book published, with PDF and ePub files available? You can upgrade to the eBook version at www.PacktPub.com and as a print book customer, you are entitled to a discount on the eBook copy. Get in touch with us at [email protected] for more details.
At www.PacktPub.com, you can also read a collection of free technical articles, sign up for a range of free newsletters and receive exclusive discounts and offers on Packt books and eBooks.
http://PacktLib.PacktPub.com
Do you need instant solutions to your IT questions? PacktLib is Packt's online digital book library. Here, you can access, read and search across Packt's entire library of books.
Why Subscribe?
f Fully searchable across every book published by Packt
f Copy and paste, print and bookmark content
f On demand and accessible via web browser
Free Access for Packt account holders
If you have an account with Packt at www.PacktPub.com, you can use this to access PacktLib today and view nine entirely free books. Simply use your login credentials for immediate access.
Table of Contents
Preface
1
Chapter 1: NetBeans Head First
7
Introduction 7
Creating a Java Project Using Wizard 7
Creating libraries 10
Sharing libraries 12
Importing Projects from Eclipse 13 Importing existing Maven Projects 16
Chapter 2: Basic IDE Usage
19
Introduction 19
Creating a Java Project using Maven support 20
Creating a package 22
Creating a class 24
Running the main class 26
Debugging a class 27
Creating constructors 31
Generating toString(), equals(), and hashCode() 33 Generating getters and setters 35
Chapter 3: Designing Desktop GUI Applications
37
Introduction 37
Creating a Java Desktop Application 38
Creating a Frame 44
Creating a Panel 47
Adding Event Listeners 53
Connecting your Application to a Database 56 Creating a customized icon for your application 61 Making executable Java Desktop Applications 67
ii
Table of Contents
Chapter 4: JDBC and NetBeans
71
Introduction 71
Setting up with MySQL 72
Setting up with PostgreSQL 75 Setting up with Apache Derby/Java DB 78
Setting up with Oracle 81
Built-in SQL editor 85
Chapter 5: Building Web Applications
93
Introduction 93
Creating a web project using the wizard 94 Introduction to Java EE 6 using NetBeans 99 Adding JSF as a web framework 108 Using JSF as a web framework 110 Using Apache Struts as a web framework 119 Using GWT as a web framework 127
Chapter 6: Using JavaFX
137
Introduction 137
Creating a JavaFX Project 138 Build UI with NetBeans JavaFX Composer 141 Connecting JavaFX Application to Web Service 146 Connecting JavaFX Application to Database 150 Application States in JavaFX 153
Chapter 7: EJB Application
157
Introduction 157
Creating EJB project 158
Adding JPA support 159
Creating Stateless Session Bean 163 Creating Stateful Session Beans 166 Sharing a service through Web Service 171 Creating a web service client 174
Chapter 8: Mobile Development
179
Introduction 179
Creating CLDC/MIDP applications 180 Creating CDC applications 188 Using the Visual Mobile Designer 190 Beautifying your mobile application 195
iii
Chapter 9: Java Refactoring
199
Introduction 199
Renaming elements 200
Moving elements 202
Extracting a superclass 204
Extracting an interface 207
Encapsulating fields 211
Chapter 10: Extending the IDE
217
Introduction 217
Creating a new project Wizard 218 Creating a new file wizard 224
Creating options panels 228
Chapter 11: Profiling and Testing
235
Introduction 235
Profiling Java code 236
Creating unit tests 244
Using SQE for improved code quality 249 Monitoring HTTP connections 253 Using the JMeter load generator 258
Chapter 12: Version Control
263
Introduction 263
Adding a project to Subversion 263 Checking in modifications 266 Working with a Subversion branch 271 Resolving conflicts in Subversion 275 Creating a Mercurial project 276 Cloning a Mercurial repository 279 Committing to a Mercurial project 280
Index
283
Preface
Welcome to the NetBeans Cookbook.NetBeans is a Java Integrated Development Environment, IDE, which enables fast application development with the most adopted frameworks, technologies, and servers.
Different than other IDEs, NetBeans comes already pre-packaged with a wide range of functionality out of the box, such as support for different frameworks, servers, databases, and mobile development.
This book does require a minimal knowledge of Java platform, more specifically the language ifself. But the book might as well be used by either beginners, who are trying to dip their toes in new technology, or more experienced developers, who are trying to switch from other IDEs but want to decrease their learning curve of a new environment. NetBeans integrates so many different technologies, many of which are present in this book, that it is beyond the scope of this book to cover all of them in depth. We provide the reader with links and information where to go when further knowledge is required.
What this book covers
Chapter 1, NetBeans Head First introduces the developer to the basics of NetBeans by creating basic Java projects and importing Eclipse or Maven projects.
Chapter 2, Basic IDE Usage covers the creation of packages, classes, and constructors, as well as some usability feature.
Chapter 3, Designing Desktop GUI Applications goes through the process of creating a desktop application, then connecting it to a database and even modifying it to look more professional.
Chapter 4, JDBC and NetBeans helps the developer to setup NetBeans with the most common database systems on the market and shows some of the functionality built-in to NetBeans for handling SQL.
2
Chapter 5, Building Web Applications introduces the usage of web frameworks such as JSF, Struts, and GWT.3
Chapter 6, Using JavaFX explains the basic of JavaFX application states and connecting our JavaFX app to a web service interface.
Chapter 7, EJB Application goes through the process of building an EJB application which supports JPA, stateless, and stateful beans and sharing a service through a web service interface.
Chapter 8, Mobile Development teaches how to create your own CLDC or CDC applications with the help of NetBeans Visual Mobile Designer.
Chapter 9, Java Refactoring lets NetBeans refactor your code to extract classes, interfaces, encapsulate fields, and other options.
Chapter 10, Extending the IDE includes handy examples on how to create your own panels and wizards so you can extend the functionality of the IDE.
Chapter 11, Profiling and Testing covers NetBeans Profiler, HTTP Monitor, and integration with tools that analyze code quality and load generator.
Chapter 12, Version Control shows how to configure NetBeans to be used with the most common version control systems on the market.
What you need for this book
Both Java Development Toolkit and NetBeans are essential for this book. Follow the link below for the Java SDK:
http://www.oracle.com/technetwork/java/javase/downloads/index.html
And the one below for NetBeans:
http://netbeans.org/downloads/index.html
Note that since Oracle has decided not to include JavaFX development in the 7.0 release of NetBeans the 6.9.1 is required when doing the examples contained in the Using JavaFX chapter.
Here is the link for NetBeans 6.9.1:
http://netbeans.org/community/releases/69/
Other frameworks and tools, when required, are listed in the Introduction section of the recipe.
3
Who this book is for
This book is for everyone that wants to try NetBeans or is beginning with a new technology and would like an uncomplicated way to setup and start coding.
Familiarity with the Java programming language is required but examples contained in this book will range from basic concepts, like creating a class, to more advanced ones, like using different web frameworks or debugging an application.
Conventions
In this book, you will find a number of styles of text that distinguish between different kinds of information. Here are some examples of these styles, and an explanation of their meaning. Code words in text are shown as follows: "The MouseAdapter is the interface which is used by the triggered event when a mouse is clicked."
A block of code is set as follows:
String firstName; String lastName; String maritialStatus; int id;
int accountNumber;
When we wish to draw your attention to a particular part of a code block, the relevant lines or items are set in bold:
jButton1.addMouseListener(new java.awt.event.MouseAdapter() { public void mouseClicked(java.awt.event.MouseEvent evt) {
jButton1MouseClicked(evt);
} });
New terms and important words are shown in bold. Words that you see on the screen, in menus or dialog boxes for example, appear in the text like this: "Leave all the other options marked and click Finish".
Warnings or important notes appear in a box like this.
Tips and tricks appear like this.
4
Reader feedback
Feedback from our readers is always welcome. Let us know what you think about this book—what you liked or may have disliked. Reader feedback is important for us to develop titles that you really get the most out of.
To send us general feedback, simply send an e-mail to [email protected], and mention the book title via the subject of your message.
If there is a book that you need and would like to see us publish, please send us a note in the
SUGGEST A TITLE form on www.packtpub.com or e-mail [email protected]. If there is a topic that you have expertise in and you are interested in either writing or contributing to a book, see our author guide on www.packtpub.com/authors.
Customer support
Now that you are the proud owner of a Packt book, we have a number of things to help you to get the most from your purchase.
Downloading the example code
You can download the example code files for all Packt books you have purchased from your account at http://www.PacktPub.com. If you purchased this book elsewhere, you can visit http://www.PacktPub.com/support and register to have the files e-mailed directly to you.
Errata
Although we have taken every care to ensure the accuracy of our content, mistakes do happen. If you find a mistake in one of our books—maybe a mistake in the text or the code—we would be grateful if you would report this to us. By doing so, you can save other readers from frustration and help us improve subsequent versions of this book. If you find any errata, please report them by visiting http://www.packtpub.com/support, selecting your book, clicking on the erratasubmissionform link, and entering the details of your errata. Once your errata are verified, your submission will be accepted and the errata will be uploaded on our website, or added to any list of existing errata, under the Errata section of that title. Any existing errata can be viewed by selecting your title from http://www.packtpub.com/support.
5
Piracy
Piracy of copyright material on the Internet is an ongoing problem across all media. At Packt, we take the protection of our copyright and licenses very seriously. If you come across any illegal copies of our works, in any form, on the Internet, please provide us with the location address or website name immediately so that we can pursue a remedy.
Please contact us at [email protected] with a link to the suspected pirated material.
We appreciate your help in protecting our authors, and our ability to bring you valuable content.
Questions
You can contact us at [email protected] if you are having a problem with any aspect of the book, and we will do our best to address it.
1
NetBeans Head First
In this chapter, we will cover:
f Creating a Java Project using Wizard
f Creating libraries
f Sharing libraries
f Importing Projects from Eclipse
f Importing existing Maven Projects
Introduction
How to start a project successfully is often overlooked, but is always important. Projects often consist of many components that are built separately and then combined together to create a larger system. Because of this, we will look at how to create and share libraries
so we can benefit from modularity and a more decentralized system. This will also help in configuring your environment to work with, for example, checking project folders into and out of version control systems.
Due to the decentralized nature of software engineering, we will take a look at how to import projects from different sources. This will give us a greater opportunity to work with various teams that use different sets of tools while still benefiting from NetBeans's capabilities.
Creating a Java Project Using Wizard
Let's start with a Java project. There is not much configuration to be done with this kind of project, but this will help in familiarizing with the IDE. It will also will give some insight on how to create other, more advanced projects since the flow is almost identical.
8
Getting ready
If you do not have NetBeans installed on your machine yet, please visit:
http://netbeans.org
It is also necessary to have Java installed; please visit: http://www.oracle.com/ technetwork/java/javase/downloads/index.html
How to do it...
1. Let's create a New Project. This can be achieved by either clicking File and then
New Project, or by pressing Ctrl+Shift+N.
2. In the New Project window, two panes will be shown. Choose Java on the Categories
pane and Java Application on the Proejcts pane, then click Next.
3. At the Name and Location step, Project Name should be filled with HelloWorld. 4. At Create Main Class, append com to the beginning of helloworld.Main, giving
com.helloworld.Main.
5. Leave all the other options marked and click Finish. The configuration window should look like the following screenshot:
9
How it works...
While the project location can be specified, since we did not change the folder, NetBeans automatically adds the project to NetBeansProjects, which is the NetBeans default project folder.
Use dedicated Folder for Storing Libraries is marked since we would like to have a specific project folder where all of the libraries will be stored, making packaging and distribution easier in the future. Libraries are packaged as JAR files. A JAR file is an example of a library that contains Java sources, which enable the developer to extend the functionality of applications. NetBeans will automatically generate a main class called Main, add a main() method, and generate default comments through the class when the CreateMainClass option is marked.
NetBeans will create the package structure, which will consist of Source Packages and Test Packages. The code templates provided by the IDE will correctly place the files in their respective folders. For example, if one JUnit test is created, the file will be placed under the TestPackages folder automatically.
One node containing libraries will also be shown in the projects view. This is where NetBeans will copy the necessary libraries. In the Java project, for example, NetBeans copies and configures the JUnit libraries into our newly-created project by default. Different projects will have different dependencies.
There's more...
You should play a bit with other project wizards. Most of the popular frameworks are supported in NetBeans IDE. It is good to get to know them.
10
Creating libraries
We will create a library folder upon project creation. For this recipe, we will create a Java EE project.
A library consists of a set of files that are packaged inside a compressed file. Many files can exist inside a library but usually, in Java, libraries contain only class, JARs, and configuration files. Libraries in Java can have different extensions.
Libraries in Java can have different extensions:
f JAR: An acronym for Java Archive. This file extension is built on top of a normal ZIP file to aggregate various files.
f WAR: Web Application Archive means that this file is responsible for obtaining Web Application related files. Example: images, Java files, JSPs, Servlets, XMLs, other JARs, and so on.
f EAR: The Enterprise Archive usually encompasses all the other files combined. Normally it contains other WARs (and will also hold the same file types), configuration types, and other JARs. This file is better suited to compact into a single file, many different modules of an application.
Both WAR and EAR are built on top of JAR. These files will be explored in future recipes so for now we will only work with normal JAR files.
Getting ready
Please refer to the Getting ready section of the previous recipe for necessary tools and configurations.
Once that is complete, it is possible to continue to the next section.
How to do it...
1. Create a New Project by either clicking File and then New Project, or pressing Ctrl+Shift+N (shortcut).
2. In the New Project window, choose Java Web on the Categories side and
Web Application on the Projects, then click Next.
3. At Name and Location, click on Use Dedicated Folder for Storing Libraries. 4. Now, either type the folder path or select one by clicking on Browse.
11
5. After choosing the folder enter Project Name as CreatingLibraries and, proceed by clicking Next and then Finish.
How it works...
Since we are creating libraries, a new project is going to be needed for this purpose. Projects can be packaged as libraries and reused in other projects to extend their functionality. Let's not worry about changing any of the default values that are set by the IDE for Project Name and web servers, since it is not a part of the scope of this recipe.
When selecting Use Dedicated Folder for Storing Libraries, it should be noted that this is where the libraries required for compilation will be stored.
NetBeans will perform the heavy lifting of copying all the necessary libraries to the specified folder. After following these steps, a new project will be created with the shared libraries folder at the chosen location.
12
There's more...
The usage of a Java Web project is just to exemplify; but projects in normal Java, Java ME, or Java EE would also follow these same steps with the same results.
If you are feeling curious, a good suggestion is to check the folder and file structure of the newly created lib folder.
Sharing libraries
After creating a library directory, the next step is to actually share the project's library. When projects become mature enough, or just for testing purposes, the developer can package the entire project into compressed Java Archive Files (JAR). These compressed files might be enterprise (EAR) or web (WAR) format, or simply JARs.
For this recipe, we will be using the previously created project and creating the WAR file from it.
Getting ready
If no Project is currently available at the Projects tab, follow the Creating libraries recipe to ensure that this recipe will work.
How to do it...
1. Click on the Projects tab, or press Ctrl+1.
2. Right-click on the project's name and click on build. Or
3. Click on Files, or press Ctrl+2, to navigate to the File structure of the project. 4. Expand the project node by double-clicking on the project's name.
5. Right-click on build.xml. 6. Select Run Target.
7. On Run Target's sub menu, click on dist.
8. The Output panel will show the path in which the WAR file is placed.
13
How it works...
NetBeans uses Apache Ant as the automated building system of choice.
This script is incorporated into NetBeans menus while on the Projects panel, as seen by the build menu. By clicking on build, NetBeans will call the Ant script and initiate the process of bundling all the necessary files of this project into the WAR file.
The second step-by-step is given as an example on how to access the dist target through the Files panel.
There's more...
Unsure which way to execute? And why is it good to have a separate build.xml generated by NetBeans?
File Structure or Project Structure?
The second method, though longer, is very complete in the sense that other targets can be attained, in case the dist is not necessarily what we want.
What is the advantage of a separate ANT build file?
The advantage with NetBeans build.xml is that it can be used outside the IDE as well; very useful if you are deploying the application in a machine that does not have access to a Graphical Interface. It also lets the project be packaged without the necessity of using NetBeans.
For example, sometimes the developer needs to connect remotely to some server that does not provide a graphical window manager to solve issues/bugs/introduce features. In this case, it is easy to make necessary changes, package the solution, and deploy to the application server.
Importing Projects from Eclipse
If you wish to work alongside Eclipse or MyEclipse, NetBeans lets you use the Project Import functionality.
This functionality will import one or more projects created by the Eclipse IDE simply by specifying the workspace in which they are housed.
Getting ready
A valid Eclipse project, with sources and dependencies, must be used in order to continue with this recipe.
14
How to do it...
1. Click on File and then on Import Project and Eclipse Project.... 2. In the Import Eclipse Project window, select Import Eclipse Project.
3. Click on the Browse... button. An Open dialog will pop-up for workspace selection. 4. After selecting a valid workspace project, click the Next > button.
5. In the ProjectstoImport section, select the projects you want to import. 6. Select Store NetBeans project data inside Eclipse project folders. 7. Click the Finish button.
How it works...
By selecting the workspace directory, NetBeans will then analyze and convert the metadata created by Eclipse.
The project structure, along with the dependencies, will be available for NetBeans usage. It is important to notice that NetBeans will not change the way the Eclipse project behaves. On Store NetBeans project data inside Eclipse project folders, NetBeans will create its own structure inside the Eclipse folder structure. Select this option if you want to distribute the NetBeans project directory in a Version Control System. This ensures that libraries and configuration files used by Eclipse and NetBeans are the same.
15
It is also possible to use NetBeans without placing its configuration files inside Eclipse's workspace. If this is the desired outcome, then select Create imported NetBeans projects in a separate location and then click on Browse... to select the folder where NetBeans configurations will exist.
The imported Eclipse projects will then be placed on the Projects tab on the right-hand side. In the There's more… section, there is a list of some errors that might arise when importing an Eclipse project.
There's more...
Now let's talk about some other options, as well as some pieces of general information that are relevant to this task.
Synchronizing Eclipse
With multiple developers working on a project, it is common that changes to a project happen from time to time. When this happens, NetBeans can resynchronize the projects by the following:
f File
f Import Eclipse Project
f Resynchronize Eclipse Projects
After following these steps, the classpaths of all the projects imported to Eclipse will be in sync. Changes to your local project will not be synchronized back, however. This way, NetBeans ensures that the local configurations will not damage the parent project.
More error dialogs
While importing Eclipse projects, some importing errors might come up.
Many of these errors are not specific to our recipe but the following notes might come in handy while developing future projects.
Some of these errors are:
f Resolve Missing Server Problem: Just right-click on the project node and browse to the folder where the server is installed.
f Resolve Reference Problem: Occurs when libraries are missing from the project class path. Solving this is very similar to the missing server problem. Right-click on the project node and select Resolve Reference Problem, and then select the folder where the library is.
16
f Eclipse platform for Project Name cannot be used. It is a JRE and the NetBeans project requires a JDK. NetBeans will use the default platform: This is due to the Eclipse project being configured with a JRE instead of JDK. To solve this, click on the toolbar in Tools, and then select Java Platforms. The Java Platform Manager will be shown, click on Add Platform... and from the options, select the correct Java Platform the application is being developed on.
Importing existing Maven Projects
With NetBeans, Maven support is already integrated to the IDE. And with the latest release, 7.0, Maven 3.0 is integrated.
There is no requirement to download or configure plugins. It is as simple as that.
Getting ready
Note that even if Maven is not in the System Path, NetBeans already has an embedded version for ease of use. This is very useful if there is no specific Maven version to be used. However, it is a good practice to install and configure Maven properly.
For more information, visit: http://maven.apache.org/.
An existing Maven project should exist in order to continue with this recipe.
How to do it...
To open a Maven project:
1. Click on File and then Open Project or press Ctrl+Shift+O. 2. The Open Project dialog will be shown.
Select the folder where the Maven project is placed by clicking on Look In (A Maven project will have the following icon):
Once the File name changes to the correct folder, click Open Project.
17
How it works...
NetBeans recognizes Maven projects based on the Project Object Model (POM) files and certain other characteristics intrinsic to the format.
After clicking Open Project, the Projects tab will show the Maven structure.
Maven, like Ant, helps developers package and maintain projects. Developers can perform certain tasks by invoking Maven goals, such as packaging and executing test cases.
2
Basic IDE Usage
In this chapter, we will cover:
f Creating a Java Project using Maven support
f Creating a package
f Creating a class
f Running the main class
f Debugging a class
f Creating constructors
f Generating toString(), equals(), and hashCode()
f Generating getters and setters
Introduction
Now that we are all set, let's start with what every developer loves: coding.
NetBeans features a handful of project wizards. These wizards abstract the tedious job of creating folder structures and automate most of the job required by the developer in terms of importing the required libraries.
Creating a Java project with NetBeans Wizards is simple and easy. With NetBeans' help, we will explore the basics of project creation and configuration. Some more advanced project creations, like Maven support, are also covered in this chapter. These are actually the first steps of more advanced projects that will come in later chapters. Besides using Projects Wizards, this chapter shows the Java editor for the first time. As with other IDEs NetBeans also eases the creation of files such as: Classes, interfaces, JSP's, Servlets, and many more can be easily created with a few clicks.
Apart from the rich set of wizards, NetBeans features a great Java debugger and in this chapter you will learn how to debug a simple Java class.
20
Creating a Java Project using Maven support
Apache Maven is a build automation and project management tool hosted by theApache foundation.
It uses a XML file called Project Object Model file (POM) to describe tasks, dependencies and goals that will be used to package, compile and even deploy out application in servers. Recently, Apache Maven has had a surge of interest since it has become an industry standard; it simplifies development, facilitates a test-driven approach, can be used for continuous integration, and simplifies cooperation between developers in a team who are working with different tools. For these reasons, the NetBeans team decided that the IDE should have built-in support for it. Since version 6.7, this is bundled together with the IDE, making the usage of Maven as easy as possible.
Maven can also be used by the command line, its primary usage, but a handful of commands must be memorized, such as package and clean. By using NetBeans instead, one can rely on a list of commands that are already pre-loaded with the IDE. This will ensure that the developer is just one click away from finding out the command that keeps on slipping their mind.
Getting ready
Maven is already built-in to the NetBeans IDE, but if you want to use Maven in your everyday work, you should also have Maven installed in your system. Although using the bundled Maven in NetBeans is not a good practice for production environments, it can be used as a temporary solution.
Apache Maven can be found at: http://maven.apache.org
The latest release of NetBeans supports Maven 3.0, which is also the latest release from Apache.
How to do it...
1. To create a New Project either click on File and then New Project or press
Ctrl+Shift+N. On the New Project window, two panes will be shown. Choose Maven
at the Categories side, Java Application on the Projects side, then click Next. 2. At the Name and Location step, Project Name should be filled with HelloMaven. 3. Leave all the other options, meaning: ProjectLocation, GroupId, Version, and
Package, with their default settings, and click Finish.
21
How it works...
The first time a Maven project is created with NetBeans, the IDE will automatically handle all Maven configurations and generate the necessary files for future project creations.
Maven archetypes are the models where projects are defined, maintained, and developed. Selecting the Maven Archetype will create a standard Java project. NetBeans will do the following (you can confirm this in the Project View):
1. Create the package structure.
2. Copy the necessary libraries to the Libraries folder.
3. Copy the necessary testing libraries to the TestLibraries folder.
4. Automatically generate a main class and place it under SourcePackages. 5. Automatically generate a test class and place it under Testpackages. 6. Place the POM file under Project files.
22
There's more...
Learn why the IDE needs to download a repository locally and how to edit the POM file.
Speeding Maven development
The IDE will also download a repository index from the central repository. This local index of the commonly-used archetypes will speed up the creation process when new archetypes are necessary.
Editing POM
Under the Projects tab, expand the Project Files node and double-click on pom.xml. This will open the XML editor, making it possible to edit this file. Feel free to explore what each tag means and edit it.
See also
For importing an existing Maven Project, try our Importing existing Maven Projects recipe in the NetBeans Head First chapter.
Creating a package
Everything is better when organized. With this in mind, we will check how to create packages using the IDE.
Besides being more organized, it is bad coding practice to leave all classes in the same package or in the root package.
How to do it...
First we will need to create a new project, so please refer to our recipe Creating a Java Project using Wizard in the beginning of this chapter, for project creation. When naming the project, enter CreatingPackages. When the Projects tab shows the CreatingPackages project, expand the CreatingPackages node, if not yet expanded.
Now we will create a package for our source code:
1. Expand the Source Packages node (if not yet expanded). 2. Right-click on com.creatingpackages.
3. Select New and then click on Java Package....
23
4. In the Package Name text field, append gui (so that it looks like
com.creatingpackages.gui).
5. Leave Location set as Source Packages. 6. Click Finish.
A new empty package will be shown right under com.creatingpackages. And finally, a package for our unit test source code:
1. Expand the Test Packages node (if not yet expanded). 2. Right-click on Test Packages.
3. Select New and then click on Java Package....
4. In the Package Name text field, type com.creatingpackages.tests.gui. 5. Leave Location set as Test Packages.
6. Click Finish.
A new empty test package named com.creatingpackages.tests.gui is shown below
Test Packages.
The final setup should look like this:
How it works...
Having understood that, we will see both ways of creating a package: one, by clicking on the desired folder destination, where the package will reside and the other, by clicking where the root node of the package will be.
By right-clicking on com.creatingpackages, the IDE will understand that we wish to create a package under the current one and will then automatically append the full path of the packages in Package Name. The user then needs to only type the rest of the path. This saves a lot of time when the project grows and nested packages start to spread.
24
The second option is to right-click directly on the desired node in the Packages tab. In our example we are creating a package under TestPackages. Right-clicking on the Test Packages node will trigger a clean Package Name and it is up to the developer to decide what the full path is going to be.
There's more...
It is also possible to create packages in the Files tab and with a new Class creation wizard.
The Files tab
By navigating to the Files tab, it is possible to see how the folder structure is organised, similarly to the Projects tab. It is also possible to create a Package using this view by following the same steps described previously.
The Files tab differs from the Project view in the sense that the files are presented as they exist in the filesystem. The Project view on the other hand, presents the files as they are organized from the project perspective.
Automatic creation of packages
It is also possible to create packages when a new class is created by the IDE.
Creating a class
One of the most repetitive tasks in software development is creating classes. Once again, with NetBeans wizards, creation of classes is very easy and straightforward.
Getting ready
It is necessary to have a project in order to create a class, so if you are unsure on how to do this, please check the Creating a Java project using Wizard recipe. However, when naming the project, enter CreatingClasses.
How to do it...
When the Projects tab shows the CreatingClasses project, expand the CreatingClasses
node, if not yet expanded.
Even though NetBeans will create a main class, we will create another one:
1. Right-click on the CreatingClasses project, and select New and Java Class.... 2. On the New Java Class window, type MyClass under Class Name.
3. On the package selection, click on the dropdown and select creatingclasses.
25
4. Add .my as a suffix in the Package. This will be shown as creatingclasses.my. 5. Click Finish.
How it works...
The class is created relative to the path of the right-click. Having said that, this example shows that it is also possible to create packages during class creation.
By appending a dot (.) as a suffix, the IDE will create a Java class and a package. In this case, package creatingclasses.my and a class called MyClass.
The class created by the IDE is a very basic one. Added by the IDE are comments and package path, along with the class declaration.
There's more...
Discovering hidden file types with the Other option.
Other file types
Any number of files can be created by using this method. If curiosity strikes, check the files under Other... after right-clicking on a project name and selecting New.
26
Running the main class
It is possible to compile and run the main class straight from NetBeans IDE. The primary reason for executing the main class is fairly obvious, that is, to test that modifications made in the software are actually what the coder(s) intended.
How to do it...
It is necessary to have a project in order to create a class, so if you are unsure how to do this, please check the Creating a Java project using Wizard recipe. However, when naming the project, enter RunMainClassApp.
With the main class open, enter the following line of code inside of the main() method:
System.out.println("Main class output");
Then right-click inside the Java editor of the Main.java file and select Run File.
How it works...
NetBeans will always show the RunFile option for a Java class that contains the main method.
After Run File is selected, NetBeans will then compile and execute it. The output, if any, of the main class will be shown in the Output view.
For this example, the output is: Main class output
There's more...
Thinking that using the mouse is overkill? Or prefer running the entire project?
Run class shortcut
It is much faster to use some key combinations than to reach for the mouse every time. So, if changes need to be checked fast, just hit Shift+F6 and the class will be executed.
Run project shortcut
With a Java Desktop project there is a possibility to run the entire project. With this specific type of project, the Main class, the one created by NetBeans, is the one to execute.
It is possible to run the main project by right-clicking on the project name and selecting
Run or pressing F6.
27
Debugging a class
It is possible to set breakpoints and watches in NetBeans and, on execution, check what the value of a given variable or object is.
NetBeans debugger also lets the developer follow method calls and execute code one line at a time giving a fine-grained visualization on how the code is running.
This is one of the features where NetBeans shines in comparison to other IDEs so without further ado, let's dive in. NetBeans has already included many of the plugins, performance tools, and servers that are used for easing the process of setup and debugging.
Getting ready
We will be using a Java Application Project for this example. Since we are just showcasing the capabilities of the debugger too, we won't be using anything complicated; a normal Java Application Project will suffice. If you're unsure on how to create one, please check the recipe Creating a Java Project using Wizard.
We are also going to need a Java class. If the Creating a Java Project using Wizard recipe was used, then a main class is already generated and that one can be used in our example. If a project already exists, then it is possible to follow the Create a class recipe in order to get a clean class for the work to proceed. The automatically generated class will be our main class, so the class name is Main.java.
If the Creating a Java Project using Wizard recipe is followed, the project name used for this recipe would be HowToDebugApp and all of the default settings present on the wizards should be left untouched.
How to do it...
We will need another class to demonstrate how to setup breakpoints in other objects.
1. Right-click on Source Packages, under the HowToDebugApp project, select New and
Java Class....
2. On the New Java Class window, type Person under Class Name.
3. On package selection, click on the dropdown and select howtodebugapp. 4. Click Finish.
The Person.java file will show up on the Java Editor. Inside the Person class declaration, write:
int age; String name;
28
Now lets refactor our class by encapsulating the fields:
1. Right-click on the Person class inside the Java Editor. 2. Select Refactor and then click on Encapsulate Fields....
3. Then click on Select All and Refactor. The getters and setters will be added to Person.java and the fields will have the visibility modifiers set to private. 4. Open Main.java. If Main.java is not open in the Java Editor, double-click it. Inside the main method, enter the following:
Person person1 = new Person(); Person person2 = new Person(); person1.setName("Rhawi"); person1.setAge(28); person2.setName(null); person2.setAge(32);
It is not good practice to set variables with null values but, for the purpose of this example, we will do it this one time.
A watch is exactly what the name says, it "watches" a specific variable for the entire lifetime of the application and displays its value in the variables view.
To add a watch, simply:
1. Select person1 variable.
2. There are two ways to add a watch: On the top bar, click on Debug and then New Watch... or press Control+Shift+F7 and click OK. person1 will be added to the
Variables view.
29
For our first breakpoint, click on the left-side bar, where line numbers are placed, specifically on the line shown below:
person2.setName(null);
A breakpoint will be added to the side bar and a long pinkish line will specify the breakpoint location.
Then add another breakpoint, but this time to Person.java, where the line is:
this.age = age;
Finally, let's debug our example. Open Main.java and press Control+Shift+F5.
How it works...
Upon the debug mode execution, NetBeans stops the execution at the first breakpoint. The breakpoint tells the IDE to temporarily halt the program and let the developer examine the contents of variables and watches at that point.
30
In our example, NetBeans will look like this:
It is possible to see our watch, shown with a blue diamond icon, and also the normal variables, shown with a green lozenge. It is possible to expand the watch or variables to check the contents of the object on runtime.
The execution point is highlighted in green. To jump one line of code in the execution, press F8. To continue press F5; the IDE will resume the debugging process until another breakpoint is found, at which point the execution will once again stop, so that the developer can have another chance to examine the execution. In our example, the execution will continue until the Person's set method for age is reached. To continue with the execution, just press F5 one more time and the program execution will continue until the end, since we do not have any other breakpoints.
To remove a breakpoint, simply click on it and it will disappear.
31
There's more...
What if I want a breakpoint when my variable reaches a certain value? Watches are too complicated, is there something easier? Does NetBeans debug other types of applications?
Conditional breakpoints
It is possible to create breakpoints with conditions.
Just right-click on the breakpoint, select Breakpoint, and then Properties. A Breakpoint Properties window will show up, with a section where the conditions can be specified.
Other ways to check variable content
It is also possible to check the contents of a variable without needing to watch the Variables
view. When the execution stops, just place the mouse pointer over the variable. A tooltip will be shown with the variable result.
This is very fast and useful especially when you first start debugging, and don't know what watches are needed yet.
Different kinds of debuggable applications
In this recipe, we used a Java Desktop application as a base for our example. But debugging can also be used with different applications, such as Web Apps and Mobile Apps, which are also written in different programming languages.
Creating constructors
All classes have constructors, even if these constructors are just default ones. But what happens when the constructors starts to get bigger and bigger, and harder to maintain? With just two key strokes, we can automatically generate constructors for NetBeans.
Getting ready
Check the recipe Creating a Java Project using Wizard.
Feel free to modify the default settings, but if you wish to follow exactly what we are presenting here, just modify the Project Name to CreatingConstructorsApp and uncheck create main class.
32
How to do it...
With the project open:
1. Right-click on the CreatingConstructorsApp project and select New and
Java Class....
2. On the New Java Class window, type Address under Class Name. 3. Under package, type myclasses.
4. Click Finish.
5. When the Address Java Class opens, insert the following code:
int zipcode; int number; String street; String city;
6. Then press Alt+Insert. A small pop-up will be shown with the title Generate.
Select the first option, which is named Constructor..., then select all four fields, and click on Generate.
How it works...
NetBeans recognizes the fields in the class and generates the constructor based on the fields that were selected.
As best practice, NetBeans names all the constructor fields the same way as the declared variables.
33
There's more...
What about default constructors? And how to generate multiple constructors?
Default constructor creation
It is also possible to generate default constructors, constructors without any fields, by using this same method.
Simply press Alt+Insert and upon field selection, leave them all unmarked, and click on
Generate. A default constructor will then appear inside the class.
Generating toString(), equals(), and
hashCode()
To generate toString(), equals(), and hashCode(), the process is almost the same as with the constructor. However, it is important to know when to implement those methods and when not to. For example, if overriden, equals and hashCode must be implemented using the same set of fields in the code. The equals method should be used when equality is required, where it would be necessary to compare different instances of the class. The basic implementation checks for identity, the same as using ==. The hashCode method exists for two reasons: one being efficiency, so objects can be used with collections that require a hash, such as HashSet and HashMap, and the other being conformity with equals. So, when an object is equal to the other, hashCodes of those two objects must also be identical.
Getting ready
Check the recipe Creating a Java Project using Wizard.
Feel free to modify the default settings, but if you wish to follow exactly what we are
presenting here, just modify the Project Name to CreatingToStringEqualsHashCodeApp and uncheck create main class.
How to do it...
With the project open:
1. Right-click on the CreatingToStringEqualsHashCodeApp project and select New and
Java Class....
2. On the New Java Class window, type Book under Class Name. 3. Under package, type myclasses.
4. And click Finish.
34
In the class body, insert the following:
int isbn; String name; String author; int price;
Let's first generate toString():
1. Place the cursor before the closing bracket (}). 2. Press Alt+Insert.
3. Select toString().... With all the fields selected, press Generate.
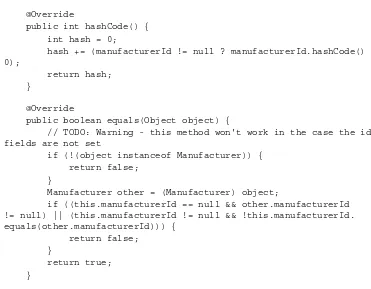
4. NetBeans will then implement toString and place it inside the body of Book.java. Now, for equals() and hashCode():
1. Once again, place the cursor before the closing bracket (}). 2. Select equals() and hashCode()....
3. Press Alt+Insert. 4. Select isbn. 5. Click Generate.
After pressing Generate, it is possible to see hashCode implemented.
How it works...
Since toString() is a method which usually requires all the information from the implementing object, we added all the present fields to the implementation when we generated it.
The case is a bit different with ISBN, since it is already a unique number, and other fields like name or author do not satisfy the uniqueness condition, so it was the only one selected.
There's more...
Want to know more about hashCode and equals?
hashCode() and equals() rules
There are few rules related to the use of hashCode and equals that are worth checking but are beyond the scope of this recipe:
http://www.ibm.com/developerworks/java/library/j-jtp05273.html
35
Generating getters and setters
Finally, let's take a look at one of the more tedious tasks in Java: implementing the getters and setters for all the fields in our class. With a few fields, there is not much work to be done but with time, classes might grow in size and more fields usually means more getters/setters. Thanks to NetBeans' refactoring capabilities, this is just as easy as pressing
Alt+Insert. Seriously!
Getting ready
Check the recipe Creating a Java Project using Wizard.
Feel free to modify the default settings, but if you wish follow exactly what we are presenting here, just modify the Project Name to CreatingGettersSettersApp and uncheck create main class.
How to do it...
With the project open:
1. Right-click on the CreatingGettersSettersApp project and select New and Java Class....
2. On the New Java Class window, type Account under Class Name. 3. Under package, type myclasses.
4. And click Finish.
Inside the body of Account.java, insert:
String firstName; String lastName; String maritalStatus; int id;
int accountNumber; long saldo;
boolean accountActive;
36
After the last line of code and before the closing bracket (}), place the cursor and: 1. Press Alt+Insert.
2. Select Getter and setter....
3. Select the uppermost checkbox that says Account. 4. Click on Generate.
NetBeans will then create all the getters and setters for all of the fields that are present in Account.java.
There's more...
Are the getters and setters mandatory and is it possible to add those methods later in the game?
Addition of newer get/set methods
It is also possible to regenerate getters and setters if more fields are added to the class. Try adding a few variables and perform the steps once again when needed.
Also, not all fields will need getters and/or setters, so use them wisely. Some frameworks rely heavily on the usage of get/set pairs, such as Spring and EJB.
3
Designing Desktop
GUI Applications
In this chapter, we will cover:
f Creating a Java Desktop Application
f Creating a Frame
f Creating a Panel
f Adding Event Listeners
f Connecting your application to a database
f Creating a customized icon for your application
f Making executable Desktop Applications
Introduction
One of the greatest strengths of NetBeans is the powerful Swing GUI Builder. It uses Java's Swing as the default framework and with it, it's possible to:
f Create and design complex GUI applications
f Drag-and-drop components from a palette component
f Design beautiful-looking applications
f Previewing the changes before compiling
f Possibility to bind data straight from the Database to your component
38
And it's possible to do much more.
Besides being totally free, the Swing GUI Builder lets the developer concentrate on coding. To learn more about Swing development, you can refer the following book:
https://www.packtpub.com/netbeans-platform-6-9-developers-guide/book
Starting with the basics, we will see how to create a simple Java Desktop Application and then build on that by adding panels, GUI controls, and connections to databases.
Furthermore, we'll also cover details like customizing the icon of the applications and creating executables for easier distribution. This will give a more professional look to the applications. Another great thing about the Swing GUI Builder is that it can be extended with other frameworks, and not just plain Swing. We will show you how to extend a default component palette with an additional SwingX widget.
For more details about SwingX, please visit:
https://swingx.dev.java.net/
In this recipe we will be using, as with throughout the entire book, the Java SDK 6 that can be found at:
http://www.oracle.com/technetwork/java/javase/downloads/index.html
and NetBeans Java version, since it will support Java SE, Platform, and bundled servers.
Creating a Java Desktop Application
In this recipe, you will see how to create a new Java Desktop Application project. You will have to understand the component Palette, which classes are created by the IDE and what they represent for your application, and how to use the inspector to see which components are in your project.
How to do it...
1. Create a Java Desktop Application project; this can be achieved by clicking File and then New Project or by pressing Ctrl+Shift+N (shortcut).
2. In the New Project window, choose Java on the Categories side, Java Desktop Application on the Projects side, then click Next.
3. A disclaimer window will be shown, click Next.
4. At Name and Location, click on Project Name and enter DesktopApp.
39
5. At ChooseApplicationShell, select BasicApplication. 6. Tick the box on Use Dedicated Folder for Storing Libraries. 7. We can now proceed by clicking Next and then Finish.
The following screenshot shows how the third step of the wizard should look like:
How it works...
Creating a Desktop application presents us with new options. The Choose Application Shell
gives two:
f Basic Application
f Database Application
40
When one of these options is selected, NetBeans provides the user with some explanation of what files are being created and what to expect from them. This explanation can be seen at the right-hand side of the Application Shell. After following these steps, NetBeans will create a complete project structure that should look like this:
Three Java files are created as a skeleton, so that the developer can start coding on top of them to create an application. To create the applications, NetBeans follows the Swing Applications Framework. It is important to understand what each file does so we can implement them correctly:
f DesktopAboutBox.java: As seen in most Windows applications. It is implemented to give some information about the company, developer, and the version of application.
f DesktopApp.java: The application launcher. Basically it is used to initialize resources, inject them into the desktop app, and run the GUI class, in our case, DesktopView. This is where the main method exists.
f DesktopView.java: Our main graphical class. This is where we will lay out the components, program those components to react to events, and so on.
Note that these classes have different icons. DesktopApp.java has an icon corresponding to a normal Java class, since it is a normal Java class with a main method. The "Graphical" classes are seen with a representation of a small window inside the icon.
NetBeans creates these classes so it can better manage the design and placement of components in the Java files. This is achieved by the addition of a block of non-editable code, which is highlighted blue to differentiate it from the rest of the production code. This non-editable block is created by NetBeans as a blueprint for the entire application so the basic functionality will always be the same. If modification of this non-editable block were to be allowed, the application could perform in ways that could not be determined by the IDE.
41
It is possible to see this when toggling between Design and Source in the Java editor, as shown in the next screenshot:
After selecting the design button, we have three small buttons available:
Selection mode: Let's the developer choose the components that are inside the Form.
Connection Mode: Launches a wizard that helps the developer to set an event that will establish a connection between objects.
Preview Design: Launches a preview of the GUI that is being written.
The other subsequent buttons are used for component alignment and resizability.
By default, the main graphical class, in our case DesktopView.java, is already created with a few components:
The components range from Panels and menus to a status bar. The component Tree View, in the previous screenshot, shows where each component belongs. In our case, Form DesktopView has a mainPanel [JPanel] and a menuBar [JMenuBar]. The menuBar then has a fileMenu [JMenu] and a helpMenu [JMenu], and so on. This kind of organization can have multiple levels in the hierarchy, and different components belonging to each level.
42
Form DesktopView is the main window where all of our components will be placed, or inside one of the child components.
From the component Palette, it is possible to drag-and-drop the components into Form under the GUI Designer.
There are a number of toolkits available, such as Swing, AWT, and Persistence components. Each of these frameworks has its own separate tab. It is also possible to add components from external frameworks to our example, though we'll only use Swing Application Framework. Under Palette, the Properties window displays Properties, Binding, Events, and Code related to the selected component in the Designing window:
43
There's more...
Interested in seeing a cool Java Desktop project? It is not necessary to run the project to see the design changes in the application; check out how, in the following section.
Check the source for the Mars Rover Viewer
Of the sample projects available, the Mars Rover Viewer is the coolest and most complete Java Desktop Application, since it shows many concepts related to Swing Application Framework, background tasks, and resource maps, and is included with the IDE.
1. In the New Project window, expand Samples on the Categories side and select Java
on the Projects side. Then select Mars Rover Viewer and click Next. 2. Leave all the default settings marked and then click Finish.
The contents of the Mars Rover Viewer will be shown in the Editor. After this, run the main project either by using the shortcut F6 or by clicking on the RunMainProject button on the toolbar.
Preview Design
During development it is often neccessary, to check the behavior and design of the applica-tion. NetBeans grants a very convenient way to do this with the Preview Design button. The launched window will present the coded events, like pressing a button to launch another window.
See also
This was just a general introduction on how to create Java Desktop Applications. So if you want to do something more productive with your application, it is recommended to please check the following recipes:
f Creating a Frame
f Creating a Panel
f Adding Event Listeners
44
Creating a Frame
NetBeans is using javax.swing.JFrame as a base for all Swing applications; in this recipe, we will use the word Frame to denote instances of javax.swing.JFrame class. The Frame is nothing more than a border where the developer will place the components; think of a real frame where the canvas goes, so the artists can paint on it, and where other components will be added. The provided implementation from NetBeans is very basic in its content but it already has some basic controls, so the designer can close, expand, and align the components implemented.
Desktop Applications will have at least one Frame, but several other components can be included in its "body".
Getting ready
For this recipe, you will require a Java Desktop Project created according to the recipe Creating a Java Desktop Application recipe, given at the beginning of this chapter.
How to do it...
With the IDE and the Java Desktop Application project:
1. Right-click desktopapp package, select New, and click on JFrame Form.... 2. Under Class Name, write MyJFrame and click Finish.
An empty JFrame will be shown on the editor.
45
How it works...
The IDE creates the MyJFrame.java class and places it under the desktopapp package. NetBeans then automatically generates the code for the default close operation, adds and configures a javax.swing.GroupLayout, and names it as "Form".
The execution behavior is also added by the IDE with a main method added to the body of the class, different from what was previously seen in Creating a Java Desktop Application.
So this is more of a "fresh start" for the entire application. No window, no status bar, and no other components. It is a clean sheet where the developers have total liberty to do what they want.
There's more...
Want to deploy your Swing application on a different platform from the one where it is being written? Want to check out what code was generated by NetBeans in the background? Your application does not need to close when pressing the x (close) button on the corner of the window.
Changing the look and feel of your application
Swing gives you the possibility of changing how your applications Look and Feel. The Look and Feel of an application is basically how the window border, buttons, titles, and system colors of a program are specified.
Swing has different Look and Feel for various operating systems, so your application will look different when launched under Windows, Linux, or Solaris.
To change the Look and Feel of you application:
1. Select desktopapp under the Projects window and right-click on it.
2. Then select Properties, expand the Application node, and select Desktop App. 3. Click on the drop-down named Look & Feel and select the desired one.
If you wish to check the look and feel of a configuration before setting it up as the default, then open the MyJFrame.java class and on the GUI Designer, click on Design and the
Inspector. A window will appear on the left corner of the IDE.
Then right-click on the JFrame icon, select Preview Design and click on one of the three options given by the IDE: Metal, CDE/Motif, or GTK+.