James Bucanek
Professional
Xcode
®
3
Wrox
Programmer to Programmer™
Join the discussion @
p2p.wrox.com
Get more out of
wrox.com
Interact
Take an active role online by participating in our
P2P forums @ p2p.wrox.com
Wrox Online Library
Hundreds of our books are available online
through Books24x7.com
Wrox Blox
Download short informational pieces and code
to keep you up to date and out of trouble!
Join the Community
Sign up for our free monthly newsletter at
newsletter.wrox.com
Browse
Ready for more Wrox? We have books and
e-books available on .NET, SQL Server, Java,
XML, Visual Basic, C#/ C++, and much more!
Contact Us.
We always like to get feedback from our readers. Have a book idea?
PROFESSIONAL
PROFESSIONAL
Xcode
®
3
Indianapolis, IN 46256 www.wiley.com
Copyright © 2010 by Wiley Publishing, Inc., Indianapolis, Indiana
Published simultaneously in Canada
ISBN: 978-0-470-52522-7
Manufactured in the United States of America
10 9 8 7 6 5 4 3 2 1
No part of this publication may be reproduced, stored in a retrieval system or transmitted in any form or by any means, electronic, mechanical, photocopying, recording, scanning or otherwise, except as permitted under Sections 107 or 108 of the 1976 United States Copyright Act, without either the prior written permission of the Publisher, or authorization through payment of the appropriate per-copy fee to the Copyright Clearance Center, 222 Rosewood Drive, Danvers, MA 01923, (978) 750-8400, fax (978) 646-8600. Requests to the Publisher for permission should be addressed to the Permissions Department, John Wiley & Sons, Inc., 111 River Street, Hoboken, NJ 07030, (201) 748-6011, fax (201) 748-6008, or online at http://www.wiley.com/go/permissions.
Limit of Liability/Disclaimer of Warranty: The publisher and the author make no representations or warranties with respect to the accuracy or completeness of the contents of this work and specifi cally disclaim all warranties, including without limitation warranties of fi tness for a particular purpose. No warranty may be created or extended by sales or promotional materials. The advice and strategies contained herein may not be suitable for every situation. This work is sold with the understanding that the publisher is not engaged in rendering legal, accounting, or other professional services. If professional assistance is required, the services of a competent professional person should be sought. Neither the publisher nor the author shall be liable for damages arising herefrom. The fact that an organization or Web site is referred to in this work as a citation and/or a potential source of further information does not mean that the author or the publisher endorses the information the organization or Web site may provide or recommendations it may make. Further, readers should be aware that Internet Web sites listed in this work may have changed or disappeared between when this work was written and when it is read.
For general information on our other products and services please contact our Customer Care Department within the United States at (877) 762-2974, outside the United States at (317) 572-3993 or fax (317) 572-4002.
Wiley also publishes its books in a variety of electronic formats. Some content that appears in print may not be available in electronic books.
Library of Congress Control Number: 2009942829
ABOUT THE AUTHOR
JAMES BUCANEK has spent the past 30 years programming and developing microcomputer systems. He has experience with a broad range of
technologies, from embedded consumer products to industrial robotics. His projects include the fi rst local area network for the Apple II, distributed air conditioning control systems, a piano teaching device, miniaturized radio transmitters with temperature probes to monitor the health of livestock — you can’t make this stuff up — digital oscilloscopes, silicon wafer deposition furnaces, and collaborative writing tools for K-12 education. James is currently focused on Macintosh and iPhone software development.
ACQUISITIONS EDITOR
Scott Meyers
PROJECT EDITOR
Christopher J. Rivera
TECHNICAL EDITOR
Michael Trent
PRODUCTION EDITOR
Eric Charbonneau
COPY EDITOR
Kim Cofer
EDITORIAL DIRECTOR
Robyn B. Siesky
EDITORIAL MANAGER
Mary Beth Wakefi eld
PRODUCTION MANAGER
Tim Tate
VICE PRESIDENT AND EXECUTIVE GROUP PUBLISHER
Richard Swadley
VICE PRESIDENT AND EXECUTIVE PUBLISHER
Barry Pruett
ASSOCIATE PUBLISHER
Jim Minatel
PROJECT COORDINATOR, COVER
Lynsey Stanford
COVER DESIGN
Michael Trent
COVER PHOTO
© tillsonburg/iStockPhoto
PROOFREADER
Josh Chase, Word One
INDEXER
ACKNOWLEDGMENTS
CONTENTS
INTRODUCTION xxvii
CHAPTER 1: INSTALLING XCODE 1
The Xcode Installer
2
Running the Installer
3
Upgrading Xcode
6
Removing and Reinstalling Xcode
7
Summary
8
CHAPTER 2: THE GRAND TOUR 9
The Project
9
Source Groups 11
Smart Groups 11
Menus
12
Editors
12
Searching, Symbols, and Refactoring
13
Getting Help
15
Building
16
Getting It Right
17
Collaboration and Version Control
18
Summary
18
CHAPTER 3: XCODE LAYOUT 19
Project Layout
22
Choosing a Layout 22
Changing the Layout 24
Groups & Files
24
Project Structure Group 25
Smart Groups 26
Organizing Groups and Their Contents 26 Showing and Hiding Groups 27 Making Your Layout the Default Layout 28 Customizing the Implementation and Interface Builder Files Smart Groups 29
Details, Details
32
Showing and Hiding Detail Columns 34 Showing Details in the Groups & Files List 35Info Windows
35
Toolbars
37
Status Bar and Favorites Bar
38
Activity Viewer Window
39
Summary
39
CHAPTER 4: THE PROJECT 41
Creating a New Project
42
Choosing a Template 43
Naming the New Project 44
What’s in a Name? 44
Who’s _MyCompanyName_? 45
Opening One or More Projects 47 Renaming and Relocating Projects 48
Upgrading Projects 49
Project Settings
50
Summary
51
CHAPTER 5: SOURCES 53
References
54
Source Item Types
58
Source Item Attributes
60
Setting an Item’s Path 60
Source Item Type and Encoding 61 Changing Attributes for Multiple Items 62
Organizing Sources
63
Default References 63
Sharing a Subfolder 64
Everything is Relative 66
Outside the Box 68
Bad References 70
Best Practices 71
Creating New Source Files
71
Creating an Empty File
75
Adding Existing Items
75
Selecting the Items to Add 75
CONTENTS
Adding an Open File 79
Ridding Targets of Unwanted Files 79
Removing Source Items
80
Reorganizing Sources
80
Moving Files 81
Rearranging Folders 83
Reorganizing by Re-adding 84
Summary
85
CHAPTER 6: EDITING TEXT 87
Windows and Panes
88
Editing Panes 88
Closing and Saving Editor Panes 92
The Editor Pane
94
Scrollbars 95
Split-Pane Editing 96
Gutter 97
Navigation Bar 98
Display Options
99
Text Wrapping 100
Invisible Characters 100
Global Display Options 100
Navigation Within a File
104
Cursor Movement 104
Emacs 105
Scrolling 106
Jumping to Functions, Breakpoints, and Bookmarks 106
Jumping to Other Files 109
Editing
113
Selecting Text 113
Deleting Text 115
Drag and Drop 115
Font and Text Styles 116
Saving Files 116
Undo 117
Shell Scripts
118
Spell Checking
119
Interactive Checking 119
Checking One Word 121
File Encoding
122
Localizing Files
123
Creating Localized Versions of a File 124 Removing Some or All Localizations 125
Printing
125
Services
126
Summary
126
CHAPTER 7: SYNTAX-AWARE EDITING 127
Code Sense
128
Enabling Code Sense 128
Reindexing a Project 129
Syntax Coloring
130
Customizing Syntax Coloring 130 Changing Syntax Coloring for a Single File 132
Code Folding
134
Code Focus 134
Folding Code 135
Unfolding Code 135
Indenting Text
136
Setting Tab Width and Indent Width 137
Automatic Indentation 138
Syntax-Aware Indentation 138
Re-indenting Text 142
Code Completion
142
Accepting Suggestions 143
Using Completion Lists 145
Completion Arguments 146
Text Macros
146
Editing Symbol Names
148
Summary
150
CHAPTER 8: SEARCHING 151
Searching and Replacing Text in a Single File
152
Setting Search Options 152
Replacing Text 154
Searching and Replacing Text in Multiple Files
154
Finding a Pattern in Multiple Files 156 Replacing Text in Multiple Files 157
CONTENTS
Search Patterns
160
Textual or String Search 161 Regular Expression Search 161
Symbol Search 170
Search History
172
Recent Search Patterns and Replacement Text 172
Recent Search Results 173
Global Search Patterns 173
Find Results Smart Group
173
Search Shortcuts
174
Searching Lists
175
Summary
177
CHAPTER 9: CLASS BROWSER 179
Navigating the Class Browser
179
Browsing Classes 180
Getting Class Documentation 181 Opening Multiple Class Browsers 181
Class Browser Option Sets
182
Browser Shortcuts
184
Summary
184
CHAPTER 10: REFACTORING 185
Refactoring Workfl ow
186
C and Objective-C Transformations
188
Rename 188
Extract 190
Encapsulate 192
Create Superclass 193
Move Up and Move Down 194
Modernize Loop 195
Updating a Project to Objective-C 2.0
197
Refactoring Pitfalls
198
Rename 198
Encapsulate 198
Move Up 199
Move Down 199
Modernize Loop 200
Use Properties 200
CHAPTER 11: SNAPSHOTS 201
Taking Snapshots
202
Managing Snapshots
203
Commenting on Snapshots 203
Examining Snapshots 204
Restoring Changes 205
Deleting Snapshots
206
Summary
206
CHAPTER 12: HELP AND DOCUMENTATION 207
The Documentation Window
208
Browsing Documentation 209
Navigating Help Documents 210
Bookmarks 212
External Links 213
Sample Projects
214
Searching Documentation
215
Search Field 215
Search Control Bar 217
Text Search 219
Command and Xcode Help Search 220
Documentation Shortcuts
221
Editing Shortcuts 221
Quick Help 221
Documentation Shortcuts 222
Man Pages
223
Customizing Help
223
Managing Subscriptions 224
Customizing Quick Help 226
Limiting Font Size 226
The Xcode Community
226
Summary
227
CHAPTER 13: INTERFACE BUILDER 229
What Is Interface Builder?
230
Code vs. Interface Builder 231 The Three C’s of Interface Builder 233
Interface Builder Workfl ow
233
CONTENTS
Interface Builder’s Interface
236
Inspector Palette 238
Library Palette 238
Multiple NIB Document Windows 239
Creating a Nib Document
239
Choosing a Template 240
Adding a New Nib Document to a Project 242
Opening Sister Localizations
243
Creating Objects
243
Copying, Duplicating, and Deleting Objects
245
Selecting Objects
245
Objects in the Nib Document Window 246
Object Order 246
View Objects 246
Adjusting the Selection 249
Confi guring Objects
250
Moving and Resizing Objects 250
Subviews 252
Creating an Instance of a Custom Class 270 Adding Custom Outlets to Your Class 271 Adding Custom Actions to Your Class 272 Initializing Custom Objects at Run Time 273
Placeholder Objects
274
File’s Owner 275
First Responder 275
Other Placeholders 276
Decomposing an Interface
277
Importing and Exporting Classes
277
Nib Document Formats
278
Customizing Document and Compatibility Checking 282 Developing Custom Interface Builder Objects 282
Summary
283
CHAPTER 14: CLASS MODELING 285
Creating a Class Model
287
Creating a New Class Model Document 288
Creating a Quick Model 290
Class Model Browser
291
Class Model Diagram
292
Nodes 293
Tools 295
Navigation 296
Editing a Class Model
297
Moving Nodes 297
Page Layout 300
Changing the Tracking 300
Adding Annotations 302
Customizing Colors and Fonts 302 Hiding Classes and Members 303
Summary
307
CHAPTER 15: DATA MODELING 309
Technology
310
Terminology
311
Creating a Data Model
312
Creating Entities 314
Creating Properties 315
Adding Fetched Properties 317
Adding Fetch Requests 318
Data Modeling Interface
318
Data Model Browser 318
Details Pane Views 319
Data Model Diagram 320
Tools 321
Duplicating Entities and Properties 321
Predicate Builder 321
Creating an Instant Interface
326
Migrating Data Schemas
327
CONTENTS
Adding Lightweight Migration Hints 329 Creating a Migration Mapping 330
Creating NSManagedObject Subclasses
334
Exporting Class Methods
336
Importing Data Models
337
Summary
337
CHAPTER 16: TARGETS 339
Targets vs. Sub-Projects
340
The Ideal Single-Project Project 341 The Ideal Multi-Project Project 342 The Project in the Middle 342
The Anatomy of a Target
343
Target Dependencies 343
Target Build Phases 344
Target Membership 344
Target Build Settings 345
Target Build Rules 345
Target Product 346
Target Types
346
Native Targets 347
External Targets 347
Aggregate Targets 348
Java and Other Jam-Based Targets 348
Creating a Target
349
Target Template Groups 350
Duplicating Targets 353
Deleting Targets 353
Build Phases
353
Files in a Build Phase 354
Build Phase Types 356
Build Rules
359
Creating Custom Build Rules 360
A Build Rule Example 362
Dependencies
364
Adding Target Dependencies 364 Adding Project Dependencies 365 Strategies for Target Dependencies 366
Build Settings
367
Properties
369
Products
371
Executables
371
Summary
372
CHAPTER 17: BUILDING PROJECTS 373
Starting and Stopping a Build
374
Selecting the Active Target and Build Confi guration 375 Controlling the Build of Individual Items 377 Building an Inactive Target 378
Clean Builds
378
Partial Builds
380
The Build Window
381
Build Transcript Items 382
Transcript Item Text 384
Navigating Errors and Warnings 385
Message Bubbles 386
Build Preferences
387
Establishing Common Build Locations 387 Automating Build Window Behavior 388 Other Global Build Options 388
Handling Unsaved Files 389
Build Locations
389
Build Location Strategies
392
Build Settings
393
The Scope of Build Settings 395 Build Setting Evaluation 396 Build Setting Value Substitution 397 Conditional Build Settings 399 Variable Build Settings 400
Build Confi gurations
401
Editing Build Settings
402
Filtering Build Settings 403 Viewing Names and Defi nitions 403 A Peek-A-Boo Build Script 405 Changing Build Setting Values 405 Creating a Conditional Build Setting 407 Creating a Custom Build Setting 408 Deleting a Build Setting 408 Switching Between Build Confi gurations 408
CONTENTS
Confi guration Settings Files
410
Adding a Confi guration Settings File 411 Using Confi guration Settings Files 412
Moving Build Settings Around
412
Environment Settings
413
Customizing the Build
414
Per-File Compiler Flags 414
Cross-Development 415
Building Universal Binaries 419 Selected Build Settings in Detail 421
The xcodebuild Tool
429
Using the xcodebuild Tool 429
Compatibility 431
Xcode Automator Actions
431
Distributed Builds
432
Sharing Your System with Others 434 Distributing Your Builds to the Workgroup 434
Summary
436
CHAPTER 18: DEBUGGING 437
Running Your Application
438
Monitoring Your Process 439 Stopping the Executable 439 Choosing the Active Executable 439
Debug Anytime, Anywhere
440
Built to be Debugged
442
Debugging Executables
446
The Process Behind the Curtain 446
Debugger Spoken Here 447
Attaching to Running Executables
447
In-Editor Debugging
449
The Listing or Editor Pane 456
The Variables Pane 457
Controlling the Debugger
460
Pause and Continue 461
Stepping Out 463 Stepping Over and Into Single Instructions 463
Continue to Here 463
The Mini-Debugger
464
Breakpoints
465
Breakpoint Types 466
Breakpoints Window 466
Breakpoint Details in an Editor Pane 468
Deleting Breakpoints 468
Enabling and Disabling Breakpoints 469 Creating Symbolic Breakpoints 469
Iff y Breakpoints 470
Breakpoint Ignore Count 473
Breakpoint Actions 474
Breakpoint Continuation 478 Importing and Exporting Breakpoints 479
Breakpoint Templates 479
Examining Data
480
Scalar Formats 480
Viewing Data in Another Window 481 Viewing Global Variables 482
Expressions 483
Data Formatters
484
Creating a Custom Data Formatter 484 Troubleshooting Data Formatters 488 Beyond Data Formatter Strings 489
Object Descriptions 490
Watchpoints
490
Changing Data and Code
491
The Magic Fix 491
Magic Fix Limitations 493
Debugger Console
493
Shared Libraries
494
Custom Executables
496
General Settings 496
Arguments and Environment 498
Debugging 498
Selecting an Executable 500
Debugger Preferences
500
CONTENTS
Debugging Aides
506
Catching a Throw 506
Stopping for Debugger() and DebugStr() 506
Guard Malloc 506
Debug Variables 506
Summary
509
CHAPTER 19: PERFORMANCE ANALYSIS 511
Performance Basics
512
If It isn’t Broken . . . 512 Embrace Your Own Ignorance 513 Improve Performance Systematically 513
Preparing for Analysis
514
Shark
514
Profi le View 517
Code View 519
Stack View 521
Refi ning the Analysis 522
Saving and Comparing Shark Sessions 523
Merging Shark Sessions 524
Using Shark to Analyze Remote and iPhone Applications 524
Learn More About Shark 525
Instruments
525
Terminology 526
Recording Trace Data 526
Analyzing Trace Data 529
Customizing Instruments 534 Saving and Exporting Instrument Data 536 Creating Instrument Templates 536 Using Instruments by Itself 537
Typical Scenarios 540
Summary
548
CHAPTER 20: UNIT TESTING 549
How Unit Tests Work
550
Getting Started with Unit Tests
551
Independent Unit Tests 551
Dependent Unit Tests 552
Adding a Unit Test Target
553
Unit Test Target Dependencies 555 Confi guring an Independent/Logic Unit Test 556 Confi guring a Mac OS X Dependent Unit Test 556 Confi guring an iPhone Application Test 558Creating a Unit Test
560
Common Test Initialization 561
Objective-C Tests 562
Objective-C Test Macros 565
C++ Tests 567
Debugging Unit Tests
572
Debugging iPhone Application Tests 572 Debugging Dependent Mac OS X Unit Tests 572 Debugging Independent Unit Tests 575
Summary
575
CHAPTER 21: SHARING SOURCE 577
Sharing via Xcode
578
Source Tree Basics 578
Source Control Basics 578
Source Trees
579
Defi ne a Source Tree 580
Source Tree References 580
Source Control
582
Using Source Control 583
Defi ning a Repository 583
Source Control Options 587
Your SSH Certifi cates 589
Creating a Subversion Repository 589
Filtering Out Noise 590
Browsing Repositories 592
Adding a Project to Source Control 594
Checking Out a Project 595
Exporting a Project 597
Confi guring a Project for Source Control 597
Project Roots 599
Source Control Interface 599 SCM Smart Group and Window 601
Committing Changes 604
CONTENTS
Adding Files to Source Control 605 Deleting Files under Source Control 606 Renaming Files under Source Control 607
Updating Files 607
Comparing Revisions 609
Merging Changes 611
Viewing Annotations 612
Resolving Confl icts 612
Going Offl ine 613
Source Control and the Project Document 614
Source Control vs. Snapshots
615
Summary
615
CHAPTER 22: USING THE ORGANIZER 617
Project & Sources
618
Adding Items to the Organizer 619 Embracing Foreign Projects 620 Searching Organizer Folders 620
Taking Snapshots 621
Using Organizer Actions
621
Automatically Created Actions 621 Creating Custom Actions 622 Preserving and Sharing Actions 627
Action Ideas 628
Devices
629
Adding and Removing Devices 629 Installing Provisioning Profi les 630 Managing Development Applications 631 Downloading Application Data 632 Installing Alternate Operating Systems 632
Reviewing Crash Logs 633
Monitoring the Device’s Console 634 Capturing Screenshots and the Default Image 635
iPhone Development
636
Crash Logs 636
Provisioning Profi les 636
Screenshots 637
Software Images 637
CHAPTER 23: CUSTOMIZING XCODE 639
Xcode Preferences
640
Key Bindings
641
Menu Key Bindings 642
Text Key Bindings 644
Using an External Editor
646
Using an Alternate Editor Once 646 Specifying the Default Editor 647 Using an External Editor 648 Supported External Editors 649
Text Macros
649
Creating Text Macro Defi nitions 649 Sanctioned Text Macro Customization 654
Expert Preferences
656
Projects and Files 658
Editing 659
Functions Menu 660
Building 661
Distributed Builds 662
Debugging 663
Snapshots 664
Source Code Management 665
Documentation 665
Templates
665
File Templates 666
Template Macros 667
Project Templates 668
Target Templates 672
User Scripts
674
The StartupScript 674
Creating a User Script 675
User Script Options 675
Anatomy of a User Script 677
User Script Variables 677
Script Helpers 680
AppleScript
681
Resetting Your Xcode Customizations
683
Summary
683
INTRODUCTION
WELCOME TO PROFESSIONAL XCODE 3. The Xcode Development Tools is Apple ’ s free suite of software development resources. The Xcode Development Tools package includes project organizers, editors, utilities, debuggers, software development kits, and documentation.
Xcode is uniquely qualifi ed to produce native solutions both for Apple ’ s Mac OS X operating system and the popular iPhone and iPod Touch devices. If your development plans include Mac OS X or the iPhone OS, Xcode is the only rational choice for your development platform.
The size, complexity, and depth of Xcode are both a blessing and a curse. In your favor, you have a wealth of development tools, templates, and documentation, but all that comes at a cost; there ’ s so much to learn and explore that it might take you months — even years — to fully exploit its capabilities. That ’ s where this book comes in.
Professional Xcode 3 takes you on a detailed tour of the Xcode integrated development
environment. Besides just explaining features, it will tell what those features are best used for, and give you some sound advice on making your Xcode workfl ow smooth, effective, and effi cient.
It ’ s as important to known what this book is not about. This book is not an introduction to programming on Mac OS X or the iPhone. You won ’ t fi nd any “ Hello World ” projects in these pages. This book is the guide that you ’ ll need after you ’ ve built that example project and are ready to build your own. Do you start another project or create a second target? What if you want to share code between two projects? Do you copy the fi les, use source control, defi ne a source tree, or use project - relative references? Confused? This is the book where you ’ ll fi nd the answers to those questions, the pros and cons of each approach, and some practical advice on which solution is best for you.
WHO THIS BOOK IS FOR
This book is for anyone who wants to get the most out of Xcode. It ’ s for anyone creating multiple projects, large projects, projects that produce multiple products, and projects that need to be built for different deployment targets. It ’ s for anyone working on an open source project, setting up source control, sharing development assets between projects, or collaborating with other developers.
This book is for anyone who wants to write source code effi ciently, navigate between fi les, quickly rename variables, or refactor a class. This book covers the length and breadth of the Xcode editors, their navigation, syntax coloring, and code completion. It describes the many search and replace functions, class browsing, class modeling, and class refactoring.
shows you shortcuts for jumping from your source code right to the defi nition or documentation of any function, class, or symbol.
This book is for anyone who needs to debug, analyze, and polish a Mac OS X or iPhone application. It explains how to use the debugger, create and set complex conditional breakpoints, create custom data interpreters, debug on a second computer remotely, and debug full - screen applications. It shows you how to look for ineffi cient code, track down memory leaks, catch application crashes, and debug an application that ’ s already running.
Finally, this book is for anyone who wants to automate their workfl ow. This book explains how to add custom script phases to targets, custom code templates in the editor, write breakpoint actions that run during debugging, attach action scripts to their project, and share those solutions with other developers.
WHAT THIS BOOK COVERS
This book covers the Xcode Integrated Development Environment (IDE) application. The Xcode Development Tools is the suite of resources that includes the Xcode application. Xcode (the application) is your cockpit, your command center, which drives the whole of the rest of your development system. While there are many interesting things you can do with the development tools, this book concentrates on Xcode (the application) and an Xcode - centric workfl ow. It shows you how to use your compilers, debuggers, linkers, data models, source control, documentation, and automation tools — all without ever stepping outside the Xcode application.
This book covers other important developer tools, particularly those that you ’ ll use in conjunction with Xcode. The most signifi cant are Interface Builder, Instruments, and Shark. All of these tools work hand - in - glove with Xcode, and you ’ ll learn how to seamlessly transition between them.
This book also serves as a guide to additional research. No single book could possibly cover every aspect of Mac OS X and iPhone OS development. Apple produces a vast amount of high - quality documentation. This book often sketches the outline of a common solution, and then points you to the documentation or resource where you can explore the topic more completely.
HOW THIS BOOK IS STRUCTURED
Professional Xcode 3 is broadly organized in the order you typically develop a project. Of course development is never a linear process, but the chapters mimic the general steps you take when producing software:
Create a project
Populate it with source fi les and other resources
Write code
➤
➤
INTRODUCTION
Edit your code and make global changes
Analyze your code ’ s structure
Look up APIs in the documentation
Design a user interface and connect it to your code
Create data models
Add project targets
Build your project
Debug your project
Analyze its performance
Collaborate with other developers
Each chapter includes a brief introduction to the topic, followed by successively more detailed explanations of the technology. If you want to learn everything about, say, targets you can read Chapter 16 from start to fi nish. But if you only need to answer the question “ should I create a target or a new project, ” that answer is in the fi rst couple of sections. If you don ’ t need to create a new target, you can move on. Come back later when you need to create a target, or customize an existing one.
I ’ ve tried to organize the book topically so that it can serve as a resource for future research. When you fi rst create a data model in Core Data, you probably aren ’ t worrying about developing a migration map to the next version of your data model. But when you do create that second version, I trust that you ’ ll know where to open the book and fi nd the answer. (Hint, it ’ s in the Data
Modeling chapter.)
WHAT YOU NEED TO USE THIS BOOK
This book was written for Xcode 3.2. To use Xcode 3.2, you will need the following:
An Intel - based Macintosh computer running Mac OS X 10.6 (a.k.a. Snow Leopard) or later
An Apple developer account (either iPhone or Mac OS X, a free account is suffi cient)
For iPhone development, you ’ ll eventually need an iPhone or iPod Touch device and an iPhone developer account — but you can get started without one
At least 10 GB of free disk space
CONVENTIONS
To help you get the most from the text and keep track of what ’ s happening, we ’ ve used a number of conventions throughout the book.
As for styles in the text:
We highlight new terms and important words when we introduce them.
We show keyboard strokes like this: Command+A.
We show fi le names, URLs, and code within the text like so: persistence.properties .
We present code as follows:
We use a monofont type with no highlighting for most code examples.
SOURCE CODE
As you work through the examples in this book, you may choose either to type in all the code manually or to use the source code fi les that accompany the book. All of the source code used in this book is available for download at http://www.wrox.com . Once at the site, simply locate the book ’ s title (either by using the Search box or by using one of the title lists) and click the Download Code link on the book ’ s detail page to obtain all the source code for the book.
Because many books have similar titles, you may fi nd it easiest to search by ISBN; this book’s ISBN is 978-0-470-52522-7.
Once you download the code, just decompress it with your favorite compression tool. Alternately, you can go to the main Wrox code download page at http://www.wrox.com/dynamic/books/ download.aspx to see the code available for this book and all other Wrox books.
ERRATA
We make every effort to ensure that there are no errors in the text or in the code. However, no one is perfect, and mistakes do occur. If you fi nd an error in one of our books, like a spelling mistake or faulty piece of code, we would be very grateful for your feedback. By sending in errata you may save another reader hours of frustration and at the same time you will be helping us provide even higher quality information.
To fi nd the errata page for this book, go to http://www.wrox.com and locate the title using the Search box or one of the title lists. Then, on the book details page, click the Book Errata link. On this page you can view all errata that has been submitted for this book and posted by Wrox editors.
➤
➤
➤
INTRODUCTION
A complete book list including links to each book ’ s errata is also available at www.wrox.com/ misc - pages/booklist.shtml .
If you don ’ t spot “ your ” error on the Book Errata page, go to www.wrox.com/contact/
techsupport.shtml and complete the form there to send us the error you have found. We ’ ll check the information and, if appropriate, post a message to the book ’ s errata page and fi x the problem in subsequent editions of the book.
P2P.WROX.COM
For author and peer discussion, join the P2P forums at p2p.wrox.com . The forums are a Web -based system for you to post messages relating to Wrox books and related technologies and interact with other readers and technology users. The forums offer a subscription feature to e - mail you topics
of interest of your choosing when new posts are made to the forums. Wrox authors, editors, other industry experts, and your fellow readers are present on these forums.
At http://p2p.wrox.com you will fi nd a number of different forums that will help you not only as you read this book, but also as you develop your own applications. To join the forums, just follow these steps:
p2p.wrox.com and click the Register link.
1.
Go to2.
Read the terms of use and click Agree.3.
Complete the required information to join as well as any optional information you wish to provide and click Submit.You can read messages in the forums without joining P2P but in order to post your own messages, you must join.
Once you join, you can post new messages and respond to messages other users post. You can read messages at any time on the Web. If you would like to have new messages from a particular forum e - mailed to you, click the Subscribe to this Forum icon by the forum name in the forum listing.
1
Installing Xcode
WHAT'S IN THIS CHAPTER?
Installing the Xcode Developer Tools
Choosing the install location and packages
Upgrading Xcode
Removing Xcode
Xcode is part of the Xcode Developer Tools suite developed and distributed by Apple. If you haven ’ t installed it already, read this chapter to fi nd out how to do so. If the tools are already installed, you can skip to the next chapter.
If you ’ ve already installed Xcode, be aware that the default installation choices do not include all Xcode components. Features described in some chapters may require you to reinstall the omitted packages before you can use them. Return to this chapter to reinstall, upgrade, or remove the Xcode Developer Tools in your system.
The Xcode Developer Tools encompass a huge amount of material: dozens of applications, scores of utilities, hundreds of sample projects, and thousands of pages of documentations. Despite its scope, the developer tools team at Apple has made it remarkably easy to install this wealth of tools in only a few minutes.
➤
➤
➤
THE XCODE INSTALLER
To install the Xcode Developer Tools, you must be running Mac OS X and have access to an Xcode Developer Tools installer. At the time this book was published, the current version of Xcode was 3.2, which requires that you be running Mac OS X 10.6 (aka Snow Leopard) or later. This entire book was written with, and assumes you are using, Xcode version 3.2 or later. Although the tools require Mac OS X 10.6 or later to run, you can develop code that ’ s compatible with systems as old as Mac OS X 10.4. Some development packages, like the iPhone SDK, may have additional hardware or operating system requirements. The Xcode Developer Tools installer is available from many sources. Many fl avors of the Mac OS X operating system installer include a copy of the Xcode Development Tools. Updated versions are occasionally included in the monthly Apple Developer Connection (ADC) DVD for download. First check to see whether you have a recent version of the Xcode developer tools already.
The latest version of the Xcode Developer Tools can always be downloaded from the Apple Developers Connection at http://developer.apple.com/ . Anyone with an ADC account can download the latest development tools, software development kits, and example code directly from Apple. Online ADC accounts are free and require only that you create an ADC account and agree to the nondisclosure agreement that covers all Apple development technologies. Student, Select, and Premier accounts can be purchased and include many additional benefi ts. One of these is the monthly ADC mailing, mentioned earlier, which includes regular updates to tools and reference material. Other perks include discounts on hardware used for development and direct access to Apple engineers for technical questions. If you are serious about developing software for Mac OS X or the iPhone OS, you should invest in a paid membership. If you plan to sell your iPhone applications through Apple ’ s App Store, you must have a paid iPhone developer account.
Apple has never made incremental updaters for Xcode. Every version of Xcode ever released has included a complete copy of the entire suite. As such, there is nothing to be gained by installing an earlier version of Xcode and then upgrading it to a later version. Just install the latest version.
RUNNING THE INSTALLER
To start the installation process, open the XcodeTools or iPhone SDK package. You can fi nd the XcodeTools package in the Optional Installs folder of the Mac OS X install DVD, as shown on the left in Figure 1 - 1. The iPhone SDK package is in the iPhone SDK disk image, as shown on the right in Figure 1 - 1. Opening the package launches the installer utility.
FIGURE 1-1
The installer presents a greeting screen. Click the Continue button. It next presents the software licensing agreement that accompanies the use of the developer tools provided by Apple, and possibly additional licensing agreements for iPhone and other SDKs. The pop - up menu at the top of the window may allow you to read the licensing agreement in other languages. Review the document using the scroll bar. If you like, you can print or save the agreement for review or for your records by clicking the Print or Save button.
After you click the Continue button, a dialog box asks you to confi rm that you agree to the terms of the license. Click the Agree button.
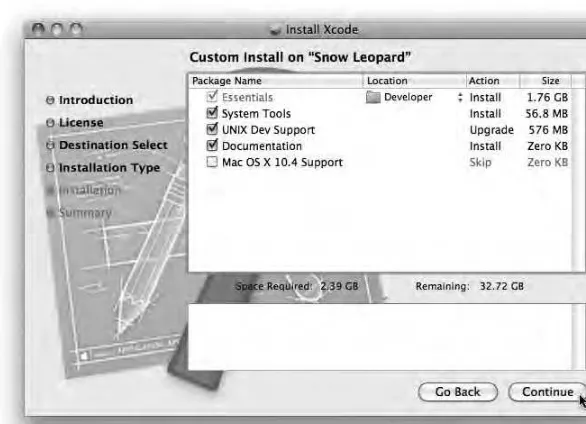
If this is your fi rst installation, the installer may prompt you to choose the volume to install. Choose your startup volume. The Custom Install screen, shown in Figure 1 - 2, selects the packages you want installed and where. By default, the bulk of the Xcode package is installed in the /Developer folder of the startup volume. Unless you have a compelling reason to change the installation location, accept the default /Developer folder.
Beginning with Xcode 3.1, the Xcode tools, documentation, and frameworks can be installed in an alternate location, allowing you to install several different versions of Xcode simultaneously. For example, you may need to keep a copy of Xcode 2.2 or 3.0 in order to maintain legacy projects. To install Xcode in an alternate location, select the pop - up button in the location column and choose a different volume or folder: /Xcode3.1 , for example. Note that the UNIX Developer Support package is always installed in the /usr/bin directory, and WebObjects is always installed in /Developer .
The installer will present a default set of packages to install. Alter the set of installation packages by checking, or unchecking, each one in the list. Select a package to display a brief description of its contents.
The following table explains the contents and usefulness of the various Xcode Developer Tools packages.
FIGURE 1-2
PACK AGE DESCRIPTION
Developer Tools Essentials This package contains the core set of development tools, including the Xcode IDE and all of the Mac OS X SDKs. You must install this package.
PACK AGE DESCRIPTION
System Tools Installs standalone system analysis tools such as Shark and DTrace components. These can be used independently or from within the Xcode IDE. You should install this package.
UNIX Development Support Installs a set of compilers and other command-line tools in the /usr/bin directory. Note that these are duplicates of the compilers installed by the Developer Tools Essentials. Install this package if you intend to write shell scripts that perform builds or use makefi les that expect UNIX development tools to be in their traditional location.
Mac OS X 10.4 Support Installs the compilers and SDKs compatible with Mac OS X 10.4. Install this only if you must produce code that runs on Mac OS X 10.4.
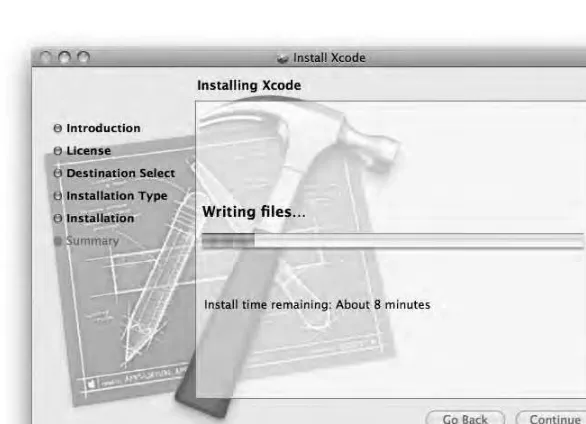
After you choose what you want to install, click the Continue button to start the installation process, shown in Figure 1 - 3. You will have to supply the account name and password of an administrator when asked.
FIGURE 1-3
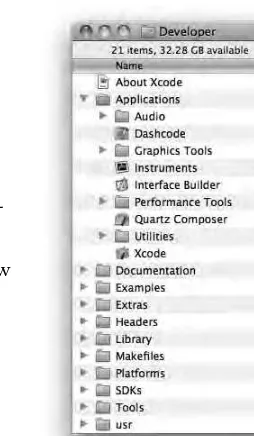
The bulk of the installation occurs in the /Developer folder, or whatever alternate location you chose, shown in Figure 1 - 4. Here you will fi nd all of the Xcode applications, command - line tools, example code, and documentation. I recommend that you add the Xcode IDE application to your dock now.
Do not attempt to move or rename this folder or any of its contents. The installer places support fi les in the system - wide /Library/Application Support folder. It installs some special development frameworks, resources, and a few patches into the /System folder. UNIX tools and man pages are installed in the /usr folder.
After the installer is fi nished, check out any “ About ” documents installed for an overview of the developers tools and for any late -breaking news, additions, or corrections.
Congratulations, you ’ ve installed Xcode! If you like, you can now skip to Chapter 2.
UPGRADING XCODE
If you already have an older version of Xcode installed, you ’ ll fi nd some subtle differences when you run the installer again. The installer automatically detects the version of any package that you have previously installed. The packages, shown in Figure 1 - 5, show which packages will be upgraded, installed, or skipped. An
upgrade indicates that the installer has a newer version of the package to install. The size indicates the estimated amount of additional disk space required to upgrade the package. Skipped packages will not be upgraded or installed. If a package is disabled, Xcode has determined that the existing package does not need to be, or cannot be, upgraded. This is typically because you already have the most current, or a later, version installed. The Xcode installer will never “ downgrade ” a package by attempting to install an older version over a newer one.
FIGURE 1-4
After you select the packages you want upgraded, click the Continue button. The installer runs much as it does when installing for the fi rst time.
Typically you won ’ t have any problems using your upgraded tools as soon as the installer is
fi nished. However, if you immediately start using some of the performance analysis tools or attempt distributed builds, you may run into problems. These facilities use daemons and system frameworks that may need to be reloaded. Restart your system after upgrading your Xcode tools.
REMOVING AND REINSTALLING XCODE
The Xcode Developer Tools provide the means for completely eradicating itself — the entire suite of tools, support fi les, libraries, and frameworks — from your system. One really good reason to do this is to perform a clean installation of the tools. Apple often makes pre - release versions of Xcode available to ADC members. As a general rule, you cannot install a release version over a pre - release version even when that release version is newer. You may also have some need to downgrade your installation, something the regular installation process won ’ t allow.
To remove your installation of Xcode, open a Terminal window and enter the following command:
sudo /Developer/Library/uninstall-devtools --mode=all
If you installed Xcode in a location other than /Developer , adjust the path accordingly. If this fi le is not present — earlier versions of Xcode used different scripts stored in different locations — refer to the “ About ” document for the currently installed version to fi nd the appropriate script.
The script must be run from an administrator ’ s account. The sudo command prompts you for the password to that account.
The script uses the receipts left by prior installations of Xcode to surgically remove everything that was previously installed. It also takes care of a few special cases, such as removing symbolic links that get created during the post - installation process.
The - - mode argument has four possible values, listed in the following table.
Removing and Reinstalling Xcode
❘
7MODE DESCRIPTION
all Removes all tools and directories installed by Xcode.
systemsupport Removes only the UNIX support fi les (utilities, man pages, and so on) from the startup volume.
unixdev Removes the compilers and other command-line tools installed by the UNIX Development Support package, described in the previous table.
After the old copy of the developer tools is removed, you can reinstall whatever version of Xcode you want. The installer treats this as a new installation, installing fresh copies of everything.
After you reinstall the tools, you may need to restart your system. The uninstall - devtools script stops processes like the distributed build daemon, but the installer may not restart them again. Removing system frameworks and then replacing them with altered versions can seriously confuse the operating system. Restarting your computer causes all of these resources to be reloaded, reinitialized, and restarted properly.
SUMMARY
You ’ re probably eager to start exploring Xcode, but installing the software fi rst is a necessary evil. As you ’ ve seen, the process is relatively painless and quick.
2
The Grand Tour
WHAT'S IN THIS CHAPTER?
Learning about the Project
Understanding Menus and Editors
Getting Help
Starting up Xcode is sort of like walking through the front gates of Disneyland, or onto the campus of a major university, or even a big shopping mall for the very fi rst time. It ’ s vast and you have no idea where to go fi rst. If you just start walking, you ’ ll quickly be lost and disoriented, so you do what every fi rst - time visitor does; you get a map.
Neither Xcode, nor any of those other places, has been intentionally designed to be cryptic or confusing. In fact, they all go out of their way to be as friendly and accommodating as possible. However, the sheer size and complexity of what they offer cause them to be perplexing and frustrating at times. If you take a moment to get a feel for the scope and organization of Xcode, your initial forays will be much more enjoyable. Start by getting your bearings.
THE PROJECT
The central construct in Xcode, both physically and metaphorically, is the project . Everything you will accomplish in Xcode begins with a project. In fact, without an open project Xcode won ’ t do much beyond letting you browse the documentation and set some preferences. The spirit of your project is stored in a project document on your fi le system. The project window, shown in Figure 2 - 1, is the manifestation of that document.
➤
➤
Because you can ’ t explore much in Xcode without a project, take the time to create one now. You can throw it away later.
Launch the Xcode application and follow these steps:
1.
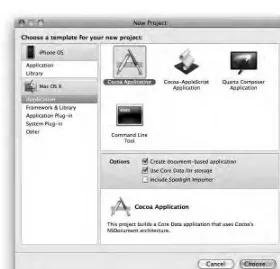
From the Xcode File menu, choose the New Project command (Shift+Command+N). If you ’ ve just launched Xcode, click the big Create New Xcode Project button in the Welcome to Xcode window.2.
In the Application group, choose the Cocoa Application template (the options don ’ t matter), as shown in Figure 2 - 2. Click the Choose button.3.
Enter Grand Tour for the project name.4.
Pick a location for the new project and click the Save button. FIGURE 2-1Xcode creates a project folder , containing a project document in addition to the source and resource fi les generated by the template.
Use this project to explore the various groups in the project window. You can also build, run, and even debug this project right now. Explore the properties of source items, groups, and other objects by Right/Control+clicking them.
The project window is your central workspace. Here you organize and navigate your project ’ s resources, settings, and targets. From here you can initiate builds, launch the application, or start the debugger. Most of the menu commands apply to the currently active project window.
The left side of the project window is the Groups & Files pane. This is where everything that constitutes your project is represented and organized. Resources can be put into groups for better management. Click the expansion triangle to the left of a group ’ s icon to explore its contents.
The right side of the project window is a multipurpose pane. It usually shows the details of the selection made in the Groups & Files pane, but it can also be used as an editor — or you may not even have a right side to your window. Xcode provides different window layouts to suit your work style. Chapter 3 explains these different styles and how to navigate your workspace.
Source Groups
Broadly, the Groups & Files pane contains two kinds of groups. At the top is the project group. This has the same icon and name as the project document. The project group organizes all of the source fi les and resources that make up your project, and is generically referred to as the source group . Sources are the fi les and folders used in your project. This could consist of program source fi les, headers, property lists, image fi les, dynamic libraries, frameworks, testing code, and even other projects. None of these constituent parts are stored in the project document itself. The fi les you will use to build your project exist elsewhere on your fi le system. The project group only contains references to those sources, not the sources themselves. Chapter 5 explains how to create, manage, and organize source references in the project group.
Double - clicking any source item opens it in an editor, assuming the item type is one that can be edited in Xcode.
Smart Groups
The remaining groups are referred to as smart groups. Unlike the project group, which you can organize however you like, the smart groups each represent some specifi c kind of information about your project. These groups are self - organizing and update automatically to refl ect the state of your project.
One of the most important smart groups is the Targets group. This group shows the targets defi ned in the project. Each product your project produces, typically an executable program, is represented by a target. A target is organized into build phases. Each build phase performs a specifi c step in the build process, such as compiling all of the source fi les for a target or copying a set of fi les into the resource folder of an application bundle. A source is said to be a member of a target if the target includes that source item in any of its phases. Targets can depend on other targets, and they
are highly customizable and extensible. Chapter 16 explains the kinds of targets Xcode provides and how to create your own. It also shows you how to organize and customize targets to meet your needs.
The Executables smart group lists the executables (programs that can be launched and run) in the project. Typically, each target produces one executable. The executables in a project can be run or debugged from within Xcode.
Most of the remaining smart groups gather information about your project, collecting them into readily accessible locations. For example, the Find Results smart group contains the history and results of recent searches. The Project Symbols smart group lists all of the symbols defi ned in your project. You can create your own smart groups that automatically collect source fi les that meet a certain criteria. If you ’ ve ever used smart playlists in iTunes, you are already familiar with this concept.
MENUS
The menus in Xcode are grouped by function. The File menu is where you ’ ll fi nd basic fi le and project commands. Use these commands to create new projects, fi les, and groups; close windows; save fi les; take snapshots; and print.
The Edit menu deals primarily with the editing of source fi les. The View menu controls the visual appearance of source fi les, windows, and lists. It also contains a number of fi le and window navigation commands. The Project menu contains commands specifi c to the project and its targets.
The Build, Run, Design, and SCM menus contain commands for building the project, debugging an executable program, class and data model design, and source control management, respectively. Each of these topics is covered in its own chapter. The Help menu is the gateway to the ADC reference library and the programming documentation. It also provides a few shortcuts to common topics.
The Window menu is one means of listing, and navigating between, the currently open windows. It also provides access to the organizer, described in Chapter 22.
EDITORS
Xcode includes other kinds of editors, such as the property list editor, that enable you to edit the content of other document types easily. More sophisticated documents, most notably Interface Builder documents, are edited using separate applications that integrate with Xcode. You can also tap your favorite text, image, audio, or resource editor to augment, or replace, the editors provided by Xcode.
Chapter 13 discusses Interface Builder. Chapter 15 explains the data model editor.
SEARCHING, SYMBOLS, AND REFACTORING
Xcode includes many tools for exploring and altering the content and structure of your project. These are useful for fi nding something specifi c in your application and for understanding the structure of classes in an application.
The simplest of these tools are the various search commands. You can search a single fi le, or a group of fi les, for text patterns ranging from a sequence of characters to complex regular expressions. These commands are covered in Chapter 8.
The Class Browser, shown in Figure 2 - 4, compiles the classes and data structures in your application into a structured table. Chapter 9 shows you how to use it.
FIGURE 2-3
Chapter 14 introduces you to the class modeler. Like the Class Browser, it constructs a picture of your project ’ s classes and their relationships. Unlike the Class Browser, the picture drawn by the class modeler is — well — a picture. The class modeler produces a graph of the classes in your application (see Figure 2 - 5). Models can be customized and are dynamically updated as you alter your code.
FIGURE 2-4
Chapter 10 describes the refactoring tool. This tool enables you to rename classes and variables intelligently, insert new classes into the hierarchy, relocate methods to a superclass or subclass, and upgrade legacy programming patterns to modern standards.
GETTING HELP
Someone once said, “ It ’ s not what you know, it ’ s what you can fi nd out. ” This sentiment is especially applicable to programming. It is impossible to remember every function name, every parameter, and every data type in the thousands of classes, headers, and libraries available to you. Often the question is not so much which specifi c function to call as it is “ Where do I begin? ”
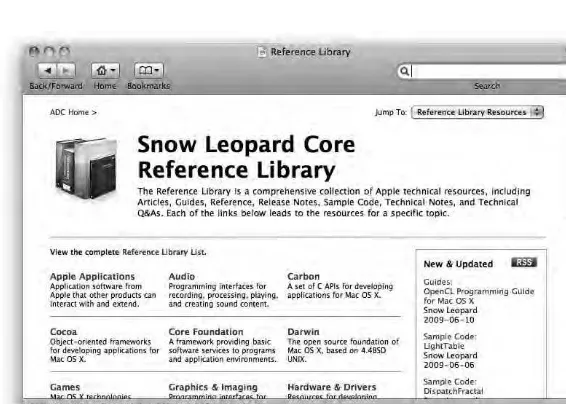
Integrated into Xcode is the bulk of the Apple Developer Connection Reference Library, shown in Figure 2 - 6. This contains a vast wealth of introductory articles, examples, and programming guidance.
FIGURE 2-6
The Reference Library also includes a detailed, indexed, and searchable database documenting every major API in the Mac OS X and iPhone operating systems, an example of which is shown in Figure 2 - 7. You can instantly access the symbols in the Reference Library from within your source code or search the documentation interactively.
Being a productive programmer will largely depend on being able to quickly extract what you ’ re looking for from this mountain of detail. Chapter 12 helps you fi nd what you need.
BUILDING
The ultimate goal of any project is to produce something. Building takes the source items in your project and transforms them into a fi nal product. Building can be roughly divided into two activities: defi ning how to build each product and then controlling what gets built and when.
The “ how ” portion is largely defi ned by the targets. Each target defi nes the steps and sources used to construct its product. This is explained in Chapter 16.
The “ what and when ” portion is explained in Chapter 17. This chapter explains how to initiate a build process and select exactly what you want to build. Most of the build process is witnessed through the project build window, shown in Figure 2 - 8.
Chapter 16 also explains Xcode ’ s system of build settings and build confi gurations . Build settings are collections of options that control everything from what warnings the compiler will emit to the names of your executable fi les. A project contains multiple sets of build settings, forming a layered hierarchy of values. A build setting may apply to the entire project, or only to the fi les of certain targets, depending on where in the hierarchy the build setting is defi ned.
Build confi gurations add another dimension (literally) to build settings. Build confi gurations make it easy to confi gure projects that produce subtle variations of the same products, such as debug and release versions. You can also manage not - so - subtle variations; a single project target could produce an application for in - house testing, another version for use by the sales department, and a third variation for the fi eld service engineers.
GETTING IT RIGHT
After your project is built, you then have to verify that it performs the way you intended it to. If any bugs are found, you must locate and correct them.
Xcode is integrated with several debuggers. Launching your application under the control of a debugger, as shown in Figure 2 - 9, enables you to step through the code in your application, view variables, and even fi x bugs and alter data while it ’ s running. The debugger facilities and commands are all explained in Chapter 18.
FIGURE 2-8
In addition to the debugger, you can employ unit testing and a cadre of performance and program analysis tools to help you identify, locate, and eliminate unwanted program behavior. Chapter 19 explains the analysis tools. Chapter 20 shows you how to set up your own unit tests.
COLLABORATION AND VERSION CONTROL
You can share projects and project sources with other projects and other developers. You can also confi gure your project to work directly with a variety of source control systems. Chapter 21 shows you how to create common pools of project resources and how to integrate your projects with a source control manager.
SUMMARY
This should give you some idea of the breadth and scope of the Xcode development environment. As you can see, there ’ s a lot to cover in the subsequent chapters. You ’ re probably anxious to get started, so move on to the next chapter to organize your workspace and learn your way around the interface.
3
Xcode Layout
WHAT'S IN THIS CHAPTER?
Identifying the basic workspace components
Setting up your workspace style
Customizing windows and panes
Getting information about items in your project
Now that you have a bird ’ s eye view of how Xcode is organized, drop a few hundred feet and look at the visual layout of Xcode. In this chapter, you learn how items are organized in the Xcode project window, how to choose a window layout style that you like, how to arrange and customize windows, and how to get information about your project.
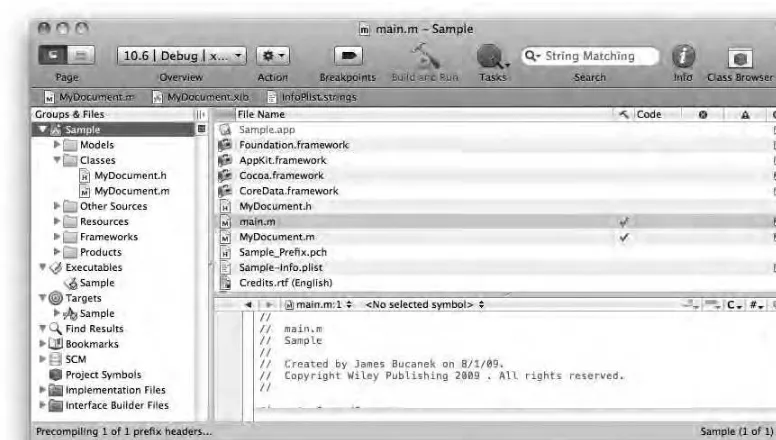
The project window, shown in Figure 3 - 1, represents your project and is your home base in Xcode. All of the components that make up your project are organized here. It is also the central means of browsing your project, allowing you to see the products that your project produces, symbols defi ned in your project, bookmarks you ’ ve saved, and other aspects. All other windows in your project are subordinate to your project window. Closing the project window closes the project and all other windows related to the project.
➤
➤
➤
Project content (source fi les, property lists, details, log output) is presented in individual windows or in one or more panes that share a single window. Some windows are always organized into multiple panes, like the project and debugger windows. Other windows, like editing windows, usually consist of a single pane, but can often be split into multiple panes if you like. You learn more about this later in this chapter and in Chapter 6.
Broadly, content presented in Xcode can be divided into fi ve categories: the project window, editing panes, Info windows, fl oating windows, and utility windows.
The project window is unique. It contains the Groups & Files pane and the details pane. These panes do not appear in any other window. Depending on your project layout style, the project window can also include editing panes and present the content of other utility windows.
Editing panes edit the content of source fi les, and are where you will be spending much of your time during development. Editing panes are often contained in their own window.
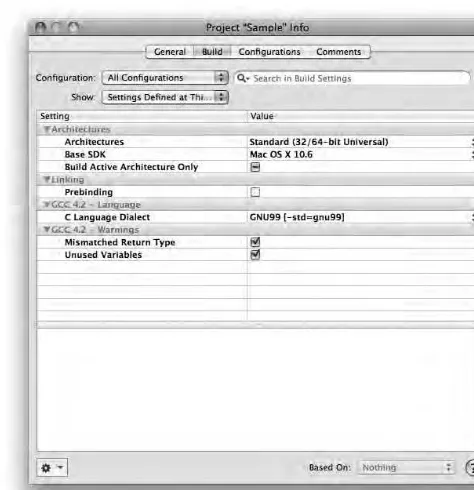
Info windows display detailed information about an item in your project. This is where you examine the details and options for each item. You can usually open an Info window by choosing Get Info, either by clicking the toolbar button or choosing View ➪ Get Info. Info windows vary depending on the type of item being inspected. Figure 3 - 2 shows a typical Info window for the project.
Xcode also presents transient information in fl oating windows and tool tips. These include suggested code completions, API documentation, detailed error descriptions, and variable inspectors. An example of a Quick Help window is shown in Figure 3 - 3.
FIGURE 3 - 2
FIGURE 3 - 3