What readers are saying about
Pragmatic Version Control
Using Git
Pragmatic Version Control Using Git is an excellent guide to getting you started with Git. It will teach you not only how to get yourself started but also how to cooperate with others and how to keep your history clean.
Pieter de Bie
Author, GitX
If you are thinking of using Git, I highly recommend this book. If you are not using a version control system (and code or create content on a computer), put the book down, slap yourself, pick the book back up, and buy it.
Jacob Taylor
Entrepreneur and Cofounder, SugarCRM Inc.
Not only has this book convinced me that Git has something to offer over CVS and Subversion, but it has also showed me how I can benefit from using it myself even if I’m using it alone in a CVS/Subversion environment. I expect to be a full-time Git user soon after reading this, which is hard to believe considering this is the first distributed version control system I’ve ever looked at.
Chuck Burgess
2008 PEAR Group Member
Travis has done an excellent job taking a tricky subject and making it accessible, useful, and relevant. You’ll find distributed version control and Git much less mysterious after reading this book.
Mike Mason
Pragmatic Version Control
Using Git
Travis Swicegood
The Pragmatic Bookshelf
Many of the designations used by manufacturers and sellers to distinguish their prod-ucts are claimed as trademarks. Where those designations appear in this book, and The Pragmatic Programmers, LLC was aware of a trademark claim, the designations have been printed in initial capital letters or in all capitals. The Pragmatic Starter Kit, The Pragmatic Programmer, Pragmatic Programming, Pragmatic Bookshelf and the linkingg
device are trademarks of The Pragmatic Programmers, LLC.
Every precaution was taken in the preparation of this book. However, the publisher assumes no responsibility for errors or omissions, or for damages that may result from the use of information (including program listings) contained herein.
Our Pragmatic courses, workshops, and other products can help you and your team create better software and have more fun. For more information, as well as the latest Pragmatic titles, please visit us at
http://www.pragprog.com
Copyright © 2008 Travis Swicegood.
All rights reserved.
No part of this publication may be reproduced, stored in a retrieval system, or transmit-ted, in any form, or by any means, electronic, mechanical, photocopying, recording, or otherwise, without the prior consent of the publisher.
Printed in the United States of America.
Contents
Acknowledgments 9
Preface 10
Who’s This Book For? . . . 11
What’s in This Book? . . . 11
Typographic Conventions . . . 13
Online Resources . . . 13
I
Welcome to the Distributed World
14
1 Version Control the Git Way 15 1.1 The Repository . . . 161.2 What Should You Store? . . . 17
1.3 Working Trees . . . 18
1.4 Manipulating Files and Staying in Sync . . . 18
1.5 Tracking Projects, Directories, and Files . . . 19
1.6 Tracking Milestones with Tags . . . 20
1.7 Creating Alternate Histories with Branches . . . 21
1.8 Merging . . . 22
1.9 Locking Options . . . 24
1.10 Next Steps . . . 25
2 Setting Up Git 26 2.1 Installing Git . . . 26
2.2 Configuring Git . . . 31
2.3 Using Git’s GUI . . . 33
CONTENTS 6
3 Creating Your First Project 36
3.1 Creating a Repository . . . 37
3.2 Making Changes. . . 37
3.3 Starting to Work with a Project . . . 40
3.4 Using and Understanding Branches . . . 43
3.5 Handling Releases. . . 44
3.6 Cloning a Remote Repository . . . 48
II Everyday Git
50
4 Adding and Committing: Git Basics 51 4.1 Adding Files . . . 524.2 Committing Changes . . . 55
4.3 Seeing What Has Changed . . . 58
4.4 Managing Files. . . 61
5 Understanding and Using Branches 65 5.1 What Are Branches? . . . 66
5.2 Creating a New Branch . . . 67
5.3 Merging Changes Between Branches . . . 69
5.4 Handling Conflicts . . . 74
5.5 Deleting Branches. . . 77
5.6 Renaming Branches . . . 78
6 Working with Git’s History 80 6.1 Inspecting Git’s Log . . . 81
6.2 Specifying Revision Ranges . . . 82
6.3 Looking at Differences Between Versions . . . 85
6.4 Finding Out Who’s to Blame . . . 86
6.5 Following Content . . . 88
6.6 Undoing Changes . . . 91
6.7 Rewriting History . . . 94
7 Working with Remote Repositories 100 7.1 Network Protocols . . . 100
7.2 Cloning a Remote Repository . . . 103
7.3 Keeping Up-to-Date . . . 104
7.4 Pushing Changes . . . 105
CONTENTS 7
8 Organizing Your Repository 109
8.1 Marking Milestones with Tags . . . 110
8.2 Handling Release Branches . . . 112
8.3 Using Valid Names for Tags and Branches . . . 114
8.4 Tracking Multiple Projects . . . 115
8.5 Using Git Submodules to Track External Repositories. 116 9 Beyond the Basics 122 9.1 Compacting Repository History . . . 123
9.2 Exporting Your Repository . . . 124
9.3 Rebasing a Branch . . . 125
9.4 Using the Reflog . . . 128
9.5 Bisecting Your Repository . . . 131
III Administration
135
10 Migrating to Git 136 10.1 Communicating with SVN . . . 13610.2 Making Sure git-svn Is Available . . . 140
10.3 Importing a Subversion Repository . . . 141
10.4 Keeping Up-to-Date with a Subversion Repository . . . 143
10.5 Pushing Changes to SVN . . . 145
10.6 Importing from CVS. . . 146
11 Running a Git Server with Gitosis 147 11.1 Making Sure Dependencies Are Met . . . 148
11.2 Installing Gitosis . . . 149
11.3 Creating Administrator Credentials. . . 149
11.4 Configuring the Server for Gitosis. . . 150
11.5 Initializing Gitosis . . . 151
11.6 Configuring Gitosis . . . 151
11.7 Adding New Repositories . . . 152
11.8 Setting Up a Public Repository . . . 154
CONTENTS 8
IV Appendixes
157
A Git Command Quick Reference 158
A.1 Setup and Initialization. . . 158
A.2 Normal Usage . . . 159
A.3 Branches . . . 160
A.4 History . . . 162
A.5 Remote Repositories . . . 164
A.6 Git to SVN Bridge . . . 165
B Other Resources and Tools 167 B.1 Extras Bundled with Git . . . 167
B.2 Third-Party Tools . . . 168
B.3 Git Repository Hosting . . . 171
B.4 Online Resources . . . 172
C Bibliography 174
Acknowledgments
Although my name is on this book as the author, it is only here because of a long list of people. Please indulge me while I take a moment to thank them.Thanks to Dave Thomas and Andy Hunt for taking the chance on a new author. The entire team they’ve put together at Pragmatic Bookshelf is amazing. I owe a special thanks to my editor, the ever helpful Susannah Davidson Pfalzer.
I would also like to thank all of those who offered me feedback on the book as it progressed through beta form. Especially helpful was the great team of technical reviewers: Chuck Burgess, Pieter de Bie, Stu-art Halloway, Junio Hamano, Chris HStu-artjes, Mike Mason, John Mertic, Gary Sherman, Jacob Taylor, and Tommi “Tv” Virtanen. Thanks also to the wonderful teams of developers and colleagues at SugarCRM and Ning who supported me while I wrote this book.
Preface
Development teams around the globe are changing. They are dropping their clunky, old,centralized version control systems (VCSs) in favor of Git, which is a lightweight, distributed version control system (DVCS) and relative newcomer to the version control world.First here’s a quick overview: a version control system is like a bank vault. You take your valuables—in our case as developers, these valu-ables are the source code we write—and deposit them in the bank for safekeeping.1 Each change you mark—or commit—is recorded, and you can go back over the history just like you can review your bank statement.
In the Git world, it’s like you walk around with your own vault that has an automated teller attached right to it. You can fully disconnect from everyone else, share what you want, and of course keep track of your project’s history. The brainchild of Linus Torvalds, Git was orig-inally developed to track changes made to the Linux kernel. Git has matured from the original rough collection of scripts Linus created in a few weeks into a rich toolkit. Its following strengths can help you as a programmer:
• Distributed architecture: Disconnect completely, and work without the distractions of an always-on Internet connection.
• Easy branching and merging: Creating branches is easy, cheap, and fast, and unlike some version control systems, merging every-thing back together—even multiple times—is a snap.
WHO’STHISBOOK FOR? 11
• Subversion communication: Are you the only one in your company ready to make the switch? No worries if everyone else is still using Subversion. Git can import all your history from and send your changes back to a Subversion repository.
That’s the sixty-second introduction to Git, and the rest of this book will build on this simple foundation.
Who’s This Book For?
This book has something in it for everyone. If you’re new to version control and the preceding paragraphs are all you know about it, this book will walk you through the basics and get you up to speed on how Git can help you.
If you’re a seasoned developer and have a firm grasp on Subversion or CVS, you can skim Part I about Git specifics and jump into Part II to get into the good stuff—the Git commands and how they work.
What’s in This Book?
This book is divided into four parts:
• Part I is an introduction to version control with a Git slant. Chap-ter1,Version Control the Git Way, on page15 is where you’ll learn about version control in general and some of the fundamental con-cepts around VCS and how DVCS is different.
Chapter2,Setting Up Git, on page26walks you through installing and configuring Git, and Chapter3,Creating Your First Project, on page36 gets your feet wet by working on a simple HTML project2 that showcases a lot of Git’s functionality in a real project.
Chapters 2 and 3 are hands-on, so have your computer handy.
• Part II is where the training wheels come off. Chapter 4, Adding and Committing: Git Basics, on page 51 deals with the basics— the commands you need to accomplish everyday tasks—getting a repository started, making commits, and so on.
Next up, we jump into branches in Chapter5,Understanding and Using Branches, on page65. Branching is so key to how Git
WHAT’S INTHISBOOK? 12
ates that there’s a full chapter explaining what branches are and how to use them. With the first two chapters of Part II out of the way, you’ll be ready to start exploring the history of changes you’ve been creating. Chapter 6, Working with Git’s History, on page80 covers that.
Chapter7,Working with Remote Repositories, on page100 introdu-ces you to the concepts around sharing your work with others through remote repositories. The “social” aspect of any version control system is its killer feature, and Git is no different.
Once you know how to use Git and interact with other developers’ repositories, you’ll learn about some organizational techniques in Chapter 8,Organizing Your Repository, on page109 to keep your repository sane.
Finally, we round out Part II with Chapter 9, Beyond the Basics, on page122, which introduces you to some commands you’ll find useful for specialized situations.
These chapters all have lots of examples to follow along with, but keep in mind they are jumping-off points for how to use Git to work with your code’s history. Once you get more comfortable, feel free to experiment.
• Part III is all about administration and is not required reading if someone else on your team or in your company handles that for you. Chapter 10,Migrating to Git, on page 136shows you how to handle migration to Git from other popular VCSs, and Chapter11, Running a Git Server with Gitosis, on page147teaches you how to administer your public repositories with Gitosis.
• We close out with a few appendixes. In Appendix A, on page158, you’ll find a command reference so you can quickly find out how to do common commands.
In Appendix B, on page 167, you’ll find coverage of some extra tools—some that ship with Git and some of which you have to install yourself—and links to online resources.
TYPOGRAPHICCONVENTIONS 13
Typographic Conventions
A few typographical conventions are used throughout this book. They are as follows:
Git Refers to the program as a whole when capitalized.
git Refers to the command you run on the command line.
italic Signifies new concepts.
filesanddirectories Are displayed in this font.
prompt> Comes before something you should type. Longer commands may be broken up into several lines with a \at the end of each line. They can be typed as one line. They’re broken up in the book only so they fit on the page.
Online Resources
Each chapter in Part II starts with a repository that looks like your repository does if you follow along with each of the examples throughout the book. If you skip ahead, you can get a copy of the repository by cloning it from GitHub. You can find the repositories on GitHub from my profile:
http://github.com/tswicegood
The command you need to get the current repository is listed at the start of each chapter.
The book’s web page onpragprog.com3 is a great jumping-off point for what’s going on with the book. From there you can drop me a note on the forums or make suggestions or corrections on the errata page.
At this point, I’m sure you’re teeming with questions. So, without fur-ther ado, let’s jump into it!
Part I
Welcome to the Distributed
World
Chapter 1
Version Control the Git Way
A version control system (VCS) is a methodology or tool that helps you keep track of changes you make to the files in your project. In its sim-plest, manual form, a VCS is you creating a copy of the file you’re work-ing with and addwork-ing the date and time to the end of it.Being pragmatic, we want something that will help automate that pro-cess. This is where VCS tools come in. They track all the changes for us, keeping a copy of every change made to the code in our projects.
Distributed version control systems (DVCSs) are no different in that respect. Their main goal is still to help us track changes we make to the projects we’re working on. The difference between VCSs and DVCSs is how developers communicate their changes to each other.
In this chapter, we’ll explore what a VCS is and how a DVCS—Git in particular—is different from the traditional, centralized model. You’ll learn the following:
• What a repository is
• How to determine what to store • What working trees are
• How files are manipulated and how to stay in sync • How to track projects, directories, and their files • How to mark milestones with tags
• How to track an alternate history with a branch • What merging is
• How Git handles locking
THEREPOSITORY 16
1.1
The Repository
Therepositoryis the place where the version control system keeps track of all the changes you make. Most VCSs store the current state of the code, along with when each change was made, who made it, and a text log message that explains why they made the change.
You can think of a repository like a bank vault and its history like the ledger. Each time a deposit—what is called a commit in VCS lingo—is made, your VCS tool adds an entry to the ledger and stores the changes for safekeeping.
Originally, these repositories were accessible only if you were logged directly into the machines they were stored on. That doesn’t scale, so tools such as CVS, and later Subversion, were created. They allowed developers to work remotely from the repository and send their changes back using a network connection.
These systems follow acentralized repositorymodel. That means there is one central repository that everyone sends their changes to. Each developer keeps a copy of the latest version of the repository, and when-ever they make a change to it, they send that change back to the main repository.
The centralized repository is an improvement over having to directly access the machine where the repository lives, but it still has limita-tions. First, you have only the latest version of the code. To look at the history of changes, you have to ask the repository for that information.
That brings up the second problem. You have to be able to access the remote repository—normally over a network.
In this age of always-on, broadband Internet connections, we forget that sometimes we don’t have access to a network. As I’ve worked on this book, I’ve written parts at my home office, in coffee shops, on cross-country plane flights, and on the road (as a passenger) while traveling across country. I even did some of the final editing at a rustic cabin in Lake of the Ozarks, Missouri.
WHATSHOULDYOUSTORE? 17
Let’s go back to our bank vault analogy for a minute. A centralized system is like having one bank that every developer on your team uses. A distributed system is like each developer having their own personal bank.
You might be wondering how you can keep in sync with everyone else’s changes and make sure they have yours. Each developer still sends their changes back to the main project repository. They can have access to send the changes directly to the main repository (an action called pushing in Git), or they might have to submit patches, which are small sets of changes, to the project’s maintainer and have them update the main repository.
1.2
What Should You Store?
The short answer: everything.
The slightly less short answer: everything that you need to work on your project. Your repository needs a copy of everything in your project that’s essential for you to modify, enhance, and build new versions of it.
The first and most obvious thing you should store in the repository is your project’s source code. Without that, you can’t fix bugs or imple-ment new features.
Most projects have some sort of build files. A couple of common ones are Makefiles, Rakefiles, or Ant’s build.xml. These need to be stored so you can compile your source code into something usable.
Other common items to store in your repository are sample configura-tion files, documentaconfigura-tion, images that are used in the applicaconfigura-tion, and of course unit tests.
Determining what to include is easy. Ask yourself, “If I didn’t have X, could I do my work on this project?” If the answer is no, you couldn’t, then it should be included.
Like all good rules, there is an exception. The rule doesn’t apply to tools that you should use. You should include the Ant build.xml file but not the entire Ant program.
WORKINGTREES 18
1.3
Working Trees
So far we’ve discussed the repository and talked about all the files you’re storing in it, but we haven’t talked about where you make all of your changes. This happens in yourworking tree.
The working tree is your current view into the repository. It has all the files from your project: the source code, build files, unit tests, and so on.
Some VCSs refer to this as your working copy. People coming to Git for the first time from another VCS often have trouble separating the working tree from the repository. In a VCS such as Subversion, your repository exists “over there” on another server.
In Git, “over there” means in the .git/ directory inside your project’s directory on your local computer. This means you can look at the his-tory of the reposihis-tory and see what has changed without having to com-municate with a repository on another server.
So, how do you get this working tree in the first place? Well, you can start your own project and then tell Git to initialize a repository for it; or you can clone an existing repository.
Cloning makes a copy of another repository and thenchecks outa copy of itsmasterbranch—its main line of development. Checking out is the process Git uses to change your working tree to match a certain point in the repository. We’ll talk more about cloning repositories in Section7.2, Cloning a Remote Repository, on page103.
Of course, a VCS is all about tracking changes. So far, we’ve talked about repositories and your working tree—your current view of the repository—but we haven’t talked about those changes yet. Now we’ll cover that.
1.4
Manipulating Files and Staying in Sync
Tracking changes to your files over time is the whole reason for using a VCS. You make changes to the source code, rerun your unit tests to make sure your changes don’t have any side effects, and thencommit those changes.
TRACKINGPROJECTS, DIRECTORIES,AND FILES 19
A DVCS such as Git requires that you share your changes with other developers in order for them to have access to them. This is done by pushing the changes to anupstream repository.
An upstream repository is a public repository that you and possibly other developers all push changes to. Pushing is what you do when you want to send your data to another repository so it can be shared with other developers.
Pushing changes is just half of what you need to do to stay in sync. You also have to fetch changes to get the latest updates from other members on your team.
There are two steps to retrieving changes from a remote Git repository. First, you fetch them. That creates a copy of the remote repository’s changes for you. This step is sort of like the reverse of pushing. Instead of sending changes to another repository, you ask the remote repository to send you the changes it has.
Next, you merge those changes into your local history. Git provides tools that help you merge changes. Since you normally want to fetch and merge changes at the same time, Git provides a way to do both in one step through a process called pulling. Pulling is similar to an update command in Subversion or CVS.
Git is fully distributed, though. You can push and pull changes to and from multiple repositories. Working with remote repositories is a core part of fully understanding how Git works. We’ll cover it fully in Chap-ter7,Working with Remote Repositories, on page100.
1.5
Tracking Projects, Directories, and Files
So far you’ve seen how to store your code in repositories. In this section, we’ll talk about how to organize the things you store.
TRACKINGMILESTONES WITHTAGS 20
Technically, this has a lot of advantages. It reduces the amount of stor-age space needed to store the entire history of your repository and makes it feasible and fast to do things, such as detecting functions or classes moving between two files or determining where copied code came from. We’ll cover this in more detail in Section6.5,Following Con-tent, on page88.
You interact with the data in those files exactly like you do any other files. All your work happens in the working tree. It’s a set of normal directories and files that represents your current view of the repository.
The way you organize the files and directories in your repository makes up your project. Most projects follow a specific structure so everyone on the team knows where to put files so everyone else can find them.
Most companies, however, have more than one project. Some larger projects might even be broken down into several modules to make them more manageable. How you structure these modules within repositories is up to you.
Git allows you to structure your repositories however you like. You can create a new directory in the repository for each project so the projects share a common history, or you can create a new repository for each project.
Coming up with the perfect balance is challenging for someone new to the VCS world. In Chapter8,Organizing Your Repository, on page109, we’ll cover some of the ways you can structure your repository.
We’ve covered the basics now. You know what a repository and your working tree are. You know that your project is just how you lay out the contents of your repository. Now let’s exploretags.
1.6
Tracking Milestones with Tags
As projects progress, they hit milestones. Maybe you follow an agile methodology and have weekly development cycles where some new fea-ture is added every week, or maybe you’re on a traditional cycle where updates are released every few months.
CREATINGALTERNATEHISTORIES WITHBRANCHES 21
A tag is simply a name that you can use to mark some specific point in the repository’s history. It can be a major milestone such as a public release or something much more routine like the point at which a bug was fixed in your repository.
Tags help you keep track of the history of your repository by assigning an easy-to-remember name to a certain revision. Up next, we’ll cover branches—the part of any VCS that gives you the ability to work in alternate existences.
1.7
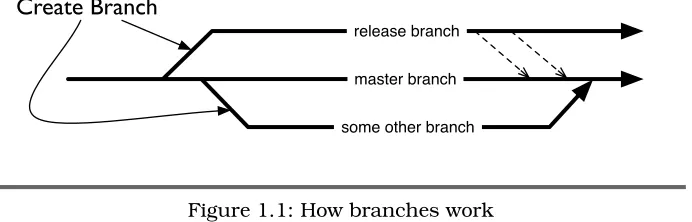
Creating Alternate Histories with Branches
When I was a kid, one of my favorite book series was the Choose Your Own Adventure series.1 Readers of these books will remember the way they work. You read a few pages and then make a choice. Does Joe enter the dark cave? If so, turn to page 42. Or does Joe turn around and leave the forest? If so, turn to page 23.
You can think of your repository like a book. You can read it from start to finish to get the entire story of your project. Branches are like the Choose Your Own Adventure books. There are multiple ways the story could go, each with a different history.
So, how do these alternate histories fit into your work with a version control system? Let’s say you have a few ideas to rewrite a calendar component in your project. I’ve never worked on a project that got the calendar portion of the code right the first time, but even if it’s not the calendar, there’s always something on a project that can be done better with the benefit of hindsight.
To make these changes, you need to get the rest of the team on board, and then you have to track your changes. You can copy all the code into another directory and start making changes, but then there’s no way to track the changes you make and—more importantly—undo the bad changes you make while experimenting.
This is where branches come in. You can create a branch that marks a point where the files in the repository diverged. Each branch keeps track of the changes made to its content separately from other branches so you can create alternate histories.
MERGING 22
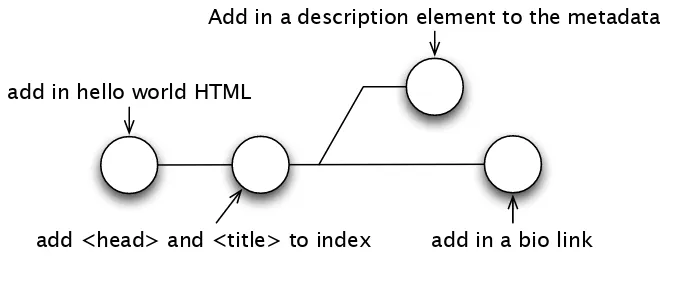
!"#$%&'(&")*+ &%,%"#%'(&")*+
#-!%'-$+%&'(&")*+
!"#$%#&'"$()*
Figure 1.1: How branches work
You can see how branches work in Figure 1.1. Your master branch is the main line of development. Some other VCSs call this their trunk. Your branches then “branch” off that line.
The branch can exist for the rest of the project or for just a few hours. It can be merged into another branch, but there’s no hard rule saying a branch has to be merged.
Sometimes, you don’t even want them to merge. It might be a branch to track an older major version of your project, or it could be an experi-mental branch that may end up getting deleted.
Just like everything in Git, branches can be created locally without having to share them. Creating local branches and not sharing them does have its benefits. You can experiment with changes and then share them when they’re something worth sharing or quietly delete them if the experiment didn’t work out.
Branches and tags are an important part of working with Git. There’s an entire chapter—Chapter 5,Understanding and Using Branches, on page65—that covers how to use both.
Most branches need to be merged with other branches to keep them up-to-date. Up next, we’ll talk about how Git handlesmergingthe branches together.
1.8
Merging
MERGING 23
He might start off going through the cave but end up on the banks of the same river that flowed alongside the forest that he left. Sometimes the author runs out of places to send our hero Joe, so he has to go down the same path but get there multiple ways.
Likewise, having a couple—or even dozens—of branches is OK, but their paths will sometimes need to come together. This is where merging comes in.
Merging is taking two or more branches and combining their history into one. Git goes about merging the same way you might. It compares two sets of changes and tries to determine where changes occurred.
When changes happen in different parts of a file, Git can merge them automatically. Sometimes it can’t work out what was supposed to hap-pen, so it errs on the side of caution and tells you there’s a conflict.
Say you and another developer on your team modify the same line of code but in different ways. Git sees this and can’t programmatically determine which one is correct, so it flags them as a conflict and waits for you to tell it which change is correct.
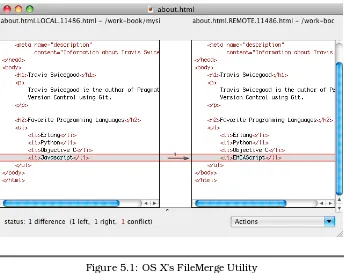
Fortunately, Git has several methods of handling conflicts. Knowing how these work is an important part of mastering Git. We’ll cover all of the tools you can use in Section5.4,Handling Conflicts, on page74.
With all these branches floating around and all of this talk of merging, you might be thinking “How can I keep track of what I’ve merged and where?”
Thankfully, you don’t have to keep track. Git handles it throughmerge tracking. Just like it sounds, merge tracking keeps track of what com-mits have been merged together and doesn’t merge them again.
This is a feature not found in many traditional VCSs such as CVS and, until recently, Subversion.2 Without some sort of merge tracking, you have to manually keep track of what commits have been merged and where. Manually tracking merges adds to the overhead of branches and is one reason many developers have tried to avoid it in the past.
LOCKINGOPTIONS 24
1.9
Locking Options
When you go to the library to check out a book (not this one, because you bought a copy, right?), no one else can check it out again until you turn it back in.
The reason for this is simple: when the library has only one copy of the book, it can’t physically give it to more than one person at a time. When a lot of people first hear the wordcheck outand that it relates to version control, they automatically think that version control must be like a library—only one person making changes at a time.
Some VCSs do work like this. You ask the repository if you can have thesettings.pyfile to make some changes. It says yes and then prevents everyone else from making changes until you check it back in.
This is locking at work; in particular, it’s strict locking. Just like a library, only one person can have a copy of the code at a time. This isn’t an efficient way for a team to work together, though, and doesn’t fit with our DVCS model where everyone is only loosely connected to everyone else.
The alternative that most VCSs and all DVCSs use is called optimistic locking.3 Optimistic locking allows multiple developers to work on the same code in the same files with the assumption that most of the time their changes won’t conflict.
It works like this: Joe and Alice both create clones of the repository they share and start making changes. They both make changes to the same file but in different areas of it. Alice pushes her change back to their shared repository; then Joe attempts to push his.
Joe’s attempt will be rejected, because Git detects that there has been a change on the server after he got his copy. Joe has to pull those changes from the repository, handle conflicts if there are any, and then push his change back to the server.
This all sounds incredibly complex, but it’s pretty simple. You rarely have two people on the same team editing the same file, so this prob-lem doesn’t occur often. When it does, Git can handle most merges automatically.
NEXTSTEPS 25
Configuration Management (CM)
You might have heard of tools loosely called configuration management (CM). They are a class of tools designed to han-dle the configuration of an application across multiple versions.
Many are built on top of a VCS and do support tracking the history of the configuration, but they are not version control sys-tems by themselves.
1.10
Next Steps
We’ve taken a 30,000-foot view of the DVCS world and the way Git interacts with it. We’ve covered what repositories are, determined what we should store (nearly everything!), and talked about what working trees are. You learned how files are tracked and how repositories stay in sync, and you got an introduction to tags, branches, and the art of merging.
Chapter 2
Setting Up Git
Before you can use Git, you have to install it and do some minimal configuration. Installation is a relatively straightforward process. In this chapter, we’ll do the following:
• Install Git
• Get it configured
• Introduce you to Git’s GUIs
• Show you how to use Git’s built-in help
Once we’re finished, you’ll be ready to start using Git to manage your projects.
2.1
Installing Git
If you feel comfortable with Makefiles andmake is your constant com-panion when adding new software to your computer, you can skim most of this section. If you’ve never heard of any of these, don’t worry—this section walks you through the process of installing Git for the first time.
Git has its heritage in the Linux world. It was originally meant to be downloaded as source code and compiled. Most modern distributions of Linux have a version of Git in their package repositories, and both Fink1and MacPorts2have Git packages. If you’re on Windows, you have several options to get Git up and running, which you’ll learn about in Section2.1,Installing on Windows, on page28.
INSTALLINGGIT 27
Installing on Linux
Each distribution of Linux uses one of the various package managers available. Most distributions contain Git within their repositories, but since it is new, you may have to search through development or unsta-ble packages to find it.
The only problem with these packages is that they tend to go out of date quite rapidly. You need to have Git version 1.6.0 or greater to follow along with the examples in this book.
For example, right now Ubuntu has the two packages you need to install Git:git-coreandgit-doc. However, they’re both on version 1.4.4. Instead of relying on the prebuilt version of Git in this case, I recom-mend downloading the latest release from Git’s website3 and compiling it yourself.
To do this in Ubuntu, you need to have the build-essential package in-stalled. Git also has some dependencies that need to be met, but they don’t change often, so you can useapt-getto grab all the dependencies with the following command:
prompt> sudo apt-get build-dep git-core git-doc
That installs all the dependencies for thegit-coreandgit-docpackages— the same dependencies Git has when you’re building from source.
Once the installation is completed, you can build Git. To do that, you need to uncompress the archive you downloaded from the Git website and switch into the directory where it’s located. To build Git, type the following command:
prompt> make prefix=/usr/local all doc
That sets up Git to be installed for all users of your computer. If you want to install it for yourself, you can leave theprefix=/usr/localpart out. Compiling Git takes a few minutes. Once it’s completed, you can install it by using this:
prompt> sudo make install install-doc
Once that’s completed, you can rungit --versionfrom the command line to verify that Git has installed. You should see something like this:
prompt> git --version
git version 1.6.0.2
INSTALLINGGIT 28
Check with your distribution’s community and/or vendor if you’re un-comfortable compiling software from source. They may be able to point you to a more up-to-date package.
Installing on OS X
If Mac OS X is more your style and you want to use a package manager, MacPorts keeps its copy of Git relatively current. To install Git using MacPorts, use theportscommand from Terminal:
prompt> sudo port install git-core +svn +doc
This command installs both Git and git-svn, which we’ll talk about in Chapter10,Migrating to Git, on page136.
There is also an installer package for Git that is maintained on Google Code.4 This installs Git and also has instructions for adding an Open in Git icon to the Finder.
If you want to compile from source, you need to have Xcode,5the devel-opment toolkit from Apple, installed. The command for compiling Git is similar to that in the Linux section.
The only part that changes is the documentation. I would advise against adding docand install-doc to the make commands because the depen-dencies can be a bit overwhelming.
Regardless of how you install Git, you can run git --version from the command line once you’re finished installing to verify that it is installed:
prompt> git --version
git version 1.6.0.2
Installing on Windows
Windows support has never been at the forefront of Git development because of its roots in the Linux kernel community. With its growing popularity, people have started work on making Git completely cross-platform. If you’re running Windows, you have a few options to get it up and running.
4. http://code.google.com/p/git-osx-installer/
INSTALLINGGIT 29
Cygwin
The “official” way to run Git in Windows is to use Cygwin, a Linux emu-lator. This presents several issues to most Windows users, not the least of which is getting Cygwin installed and running. If Cygwin happens to be your thing, Git is available as a binary package under Devel > git: Fast Version Control System.
You need to be sure to have a few other packages as well. First,openssh
from the Net category is a must because Git uses Secure Shell (SSH) as the default transfer protocol when it talks to remote repositories.
Next up, if you plan on using Git to talk to a Subversion repository like we’ll discuss in Chapter 10,Migrating to Git, on page 136, you need to install the subversion-perl package from the Libs category. Also in that category, you should grab tcltk so you can take advantage of the inte-grated graphical interfaces for Git that we’ll talk about in Section 2.3, Using Git’s GUI, on page33.
Finally, make sure to install your favorite text editor from the Editors category. Vim, emacs, or even Pico is fine, but you need to have an editor installed to take advantage of some of Git’s commit log features. If you don’t know what a commit log is, don’t worry—you will once you’re finished with the next chapter.
Git on MSys
There is a fork of Git that aims to bring Git to Windows using the under-lying Windows architecture. It is not officially supported yet but is in the process of being merged back into the official Git repository.
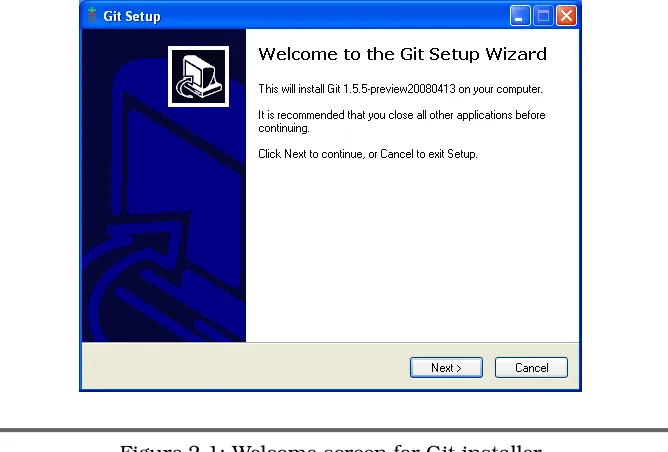
A project has been started on Google Code called Git on MSys whose goal is to take that forked code and create an easy-to-install Git pack-age for Windows. The installer can be downloaded from the project’s website.6
After you download the installer, double-click it to start the installation process. The first screen displays information about the software you’re about to install. You can see the screen in Figure2.1, on the next page. Click Next to continue.
The next step is the license and any incompatibilities between the Win-dows version of Git and the *nix version. Since this project is aimed at Windows, there will always be slight differences, such as how line
INSTALLINGGIT 30
Figure 2.1: Welcome screen for Git installer
endings are handled. Don’t worry about these changes. Any deviations from the standard Git are there to make it run better on Windows.
The next two steps are the location to install Git in and the name of the folder you want Git to create in your Start menu. The defaults are fine.
The next step is the additional enhancements you want Git on MSys to install. Leaving these at the default settings is fine.
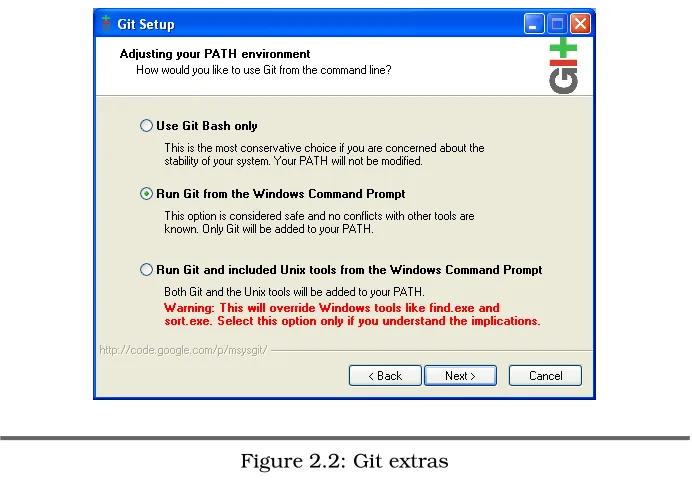
The next step (as shown in Figure 2.2, on the following page) adds Git to your PATH environment variable. This is necessary for Windows to know where to find thegitcommand on your system.
There are three choices. You should choose the second option. It allows you to invoke Git directly from the command line without adding any extra functionality.
CONFIGURINGGIT 31
Figure 2.2: Git extras
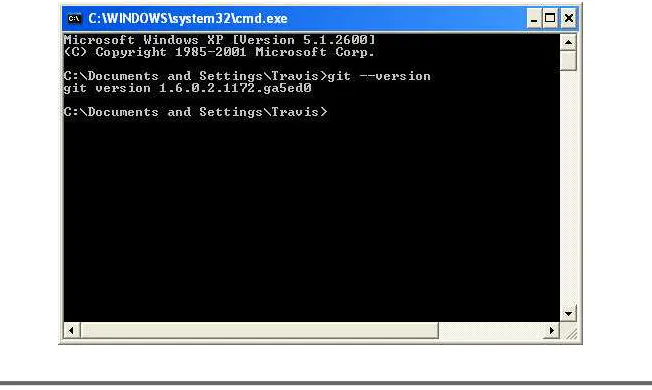
To start the command prompt, click Start and then Run. In the dialog box that pops up, type cmd, and click OK. Once it is started, type git --version. If everything is successful, Git outputs its version number like it does in Figure2.3, on the next page.
Regardless of which operating system you’re running, some basic con-figuration is necessary before you can start using Git. Let us cover that now.
2.2
Configuring Git
Git requires a few pieces of information from you to work. Since it is distributed, there’s no central repository to ask what your name or email address is. You can tell Git this information by using thegit config
command.
CONFIGURINGGIT 32
Figure 2.3: Displaying the current version of Git in Windows
and the second is an email address that other developers can use to contact you regarding your change.
Of course, substitute your name for mine:
prompt> git config --global user.name "Travis Swicegood"
prompt> git config --global user.email "[email protected]"
You can verify that Git stored your settings by passinggit configthe--list
parameter:
prompt> git config --global --list
user.name=Travis Swicegood
Those are the only two required configuration values, but Git allows you to configure more than 130 different settings.7 Most of these you’ll never need to tweak, but there is one extra change that is useful if you like color-coded output.
The settingcolor.uiis used to control colors in the user interface of Git. Setting it to "auto" adds color codes around the various output of Git whenever you’re viewing the output in the terminal.
USINGGIT’SGUI 33
You can turn this setting on with the following command:
prompt> git config --global color.ui "auto"
To me, the color-coded output is much easier to scan—especially the diffs, the differences between commits—but some people do prefer straight-up text, so color-coding isn’t turned on by default.
That’s all there is to configuring Git—you’re ready to start using it. Before we jump into our project in Chapter3,Creating Your First Project, on page 36, let’s cover some of Git’s graphical user interface (GUI) options.
2.3
Using Git’s GUI
Git comes with a Tcl/Tk8 GUI interface. You can run it from within your project’s directory by typinggit guiat the command prompt. Some OS-specific installers include context menu links to open git-gui—the name of the project—in the folder you are at.
git-gui provides an interface—like that in Figure2.4, on the next page— to many of the commands we’ll be discussing in this book. We won’t specifically be covering the GUI interface, but if you prefer working with a GUI, you can follow along relatively closely with the examples using git-gui.
Although git-gui provides you with an interface to perform operations such as committing changes, it doesn’t provide any interface for viewing the history of your repository. gitk does that. You can start it by running
gitkat the command line from within your project’s directory.
gitk displays the history of all the changes you make to your repository. If you want to see how the branches relate to each other, you can add the--allparameter to view all branches instead of just the current one. One final tool that is useful if you’re running Mac OS X is GitX. It’s a gitk-clone, created by Pieter de Bie, that is built specifically for the Mac environment. It is hosted and available for download on its GitHub web page.9
We mentioned the documentation earlier when you were installing Git. Now let’s cover how to access it.
ACCESSINGGIT’SBUILT-INHELP 34
Figure 2.4: git-gui running
2.4
Accessing Git’s Built-in Help
Git has an extensive user manual that is available from the command line and online.10From the command line, you can type this:
prompt> git help <command>
Just replace<command>with the command you want help on, and Git displays the user manual entry for that command.
The documentation is not installed by default if you build from source. Some package managers distribute it as a separategit-docpackage. If you’re building from source, you need to call thedoc and install-doc
targets when runningmake. Git requires AsciiDoc11 in order to convert the documentation from plain text into the manual form.
Don’t worry if you have trouble installing the documentation; you can always access it online at kernel.org, or you can download the HTML
ACCESSINGGIT’SBUILT-INHELP 35
version12 to your local computer. Look for the latest version of the
git-htmldocsfile.
Now you’ve gone through the Git installation and done the basic con-figuration. You have Git running, so now it’s time to start using it. In the next chapter, we’ll walk through a basic project so you can start to get familiar with Git.
Chapter 3
Creating Your First Project
Now it’s time to dig into Git. Up to this point, we have talked about abstract ideas and getting set up. That changes in this chapter.We’re going to work on a small HTML project and use Git to track it. Don’t worry if you don’t know HTML. The markup we’re using here is simple and easy to follow even if you aren’t familiar with HTML.
In this chapter, we’ll do the following:
• Create a repository
• Add some files and make some changes • Create a new branch
• Tag a release and clean up our repository release • Clone a repository
Once we’re finished, you’ll know the basics you need to get started with Git. This chapter is a high-level overview. There are a lot of new concepts and commands introduced to get you started.
We’ll be covering the commands and concepts introduced here pretty quickly, but each section has references to later parts in the book in case you can’t wait to learn more about something we’re talking about.
I encourage you to follow along with the examples in this chapter and the rest of the book, executing all the commands yourself. We learn via repetition, whether it’s our multiplication tables in grade school or typing a Git command into the command prompt.1
CREATING AREPOSITORY 37
3.1
Creating a Repository
Creating a repository in Git is simple, but it seems peculiar if you’re coming from Subversion or CVS. Your repository is something that exists separate from your copy of it in most VCSs. Your repository in Git is stored right alongside your working tree in a directory called.git. To create a repository in Git, you first need to decide where you want to store your project’s code. In this example, we’re going to create a simple HTML page, so let’s call our project mysite. You need to create a directory of the same name; then change into it, and typegit init. The whole process should look something like this:
prompt> mkdir mysite
prompt> cd mysite
prompt> git init
Initialized empty Git repository in /work/mysite/.git/
You’re done. You now have a Git repository that is ready to start track-ing your project.
“But there must be more!” you cry. Actually, no. Setting up a Git reposi-tory is an extremely lightweight operation. Thegit initcommand sets up a directory called .git that stores all the repository metadata, and the empty directory we’re in,mysite, serves as the working tree of code you have checked out from the repository.
3.2
Making Changes
Now that we have an empty repository, it’s time to add a file to it. Create a file calledindex.htmland add a header with the text “Hello World” in it. It should look something like this:
<html> <body>
<h1>Hello World!</h1> </body>
</html>
This gives us a basic HTML page to start tracking. We’ll add some more to it as we continue. Now that we have this file, it’s time to tell Git we want to track it. This is a two-step process. First we have to tell Git to add the file to its index using the command git add; then we create a commit usinggit commit.
MAKINGCHANGES 38
prompt> git commit -m "add in hello world HTML"
Created initial commit 7b1558c: add in hello world HTML 1 files changed, 5 insertions(+), 0 deletions(-) create mode 100644 index.html
git addtakes a file or the list of files you want to track as its parameter. Git has a couple of other useful ways to add files that we’ll talk about in Section4.1,Adding Files, on page 52.
git commitcreates acommit. Commits are the individual pieces of history stored by the repository. Each one marks the progression of your code. Git stores your name and email address—from the configuration we did earlier—and adds a message to each commit.
That’s what the-mand string in the earlier command are for. The com-mit message is add in hello world HTML. Properly written, log messages are the killer feature of any version control system. They’re a place to explain the reason of your commit. What does the new file do? Why did you change the code? For more information writing good commit messages, check out theJoe Asks. . . on page42.
So far, you’ve added a new file to the repository. You can see your com-mit by runninggit log:
commit 7b1558c92a7f755d8343352d5051384d98f104e4 Author: Travis Swicegood <[email protected]> Date: Sun Sep 21 14:20:21 2008 -0500
add in hello world HTML
The first line here shows the commit name. Commit names are SHA-1 hashes generated by Git to keep track of a commit. Git uses these hashes to make sure that each commit identifier is completely unique, something that’s important in a distributed environment. For more on why, check out theJoe Asks. . . on the following page.
You might have noticed that the commit name displayed in the git log
output starts with the same seven characters as part of the output from
git commit. That’s because git commitshows you an abbreviated form of the commit name—the full forty-character SHA-1 hash would take up too much space.
MAKINGCHANGES 39
Joe Asks. . .
What Are SHA-1 Hashes, and Why Does Git Use Them?
If you’re working with a centralized VCS where one server has the authority to designate one number to each commit, num-bers make sense. If you’re working in a distributed environment, they don’t.
When two different people are working on the same code, who’s to say what revision 181 is between the two of them? Git addresses this by using SHA-1 hashes.
SHA stands for Secure Hash Algorithm. It’s an algorithm devel-oped by the U.S. National Security Agency (NSA) to produce shorter strings, ormessage digests, of known data with little pos-sibility of a “collision” with another hash.
Git generates commit names by using some metadata from the repository, your information as the person making the com-mit, and the current timestamp. This data combined produces a unique hash that has a small probability of ever colliding with another commit.
The possibility does exist, though, but it’s low enough we can safely ignore it. For those math majors out there, or those who like trying to pronounce large numbers, the chances are 1 in
263, or 1 in 9,223,372,036,854,775,808. In American English, that’s nine quintillion, two hundred twenty-three quadrillion, three hundred seventy-two trillion, thirty-six billion, eight hundred fifty-four million, seven hundred seventy-five thousand, and eight hundred and eight. And, yes, I did have to look that up.
These forty-character hashes are kind of hard to remember, though, and many times they’re unnecessarily long. Most of the time the first seven or eight characters of a hash will be unique enough to match. Throughout Git, and this book, you’ll see shorter commit hashes used. When Git uses smaller hashes, it uses the first seven characters.
STAR TING TO WORK WITH APROJECT 40
3.3
Starting to Work with a Project
Now you have our repository in place, and you’re already tracking your first file. Next up you have to start dealing with changes.
The HTML is missing the <head>and <title> elements. Add them. Now yourindex.htmlfile should look like this:
<html> <head>
<title>Hello World in Git</title> </head>
<body>
<h1>Hello World!</h1> </body>
</html>
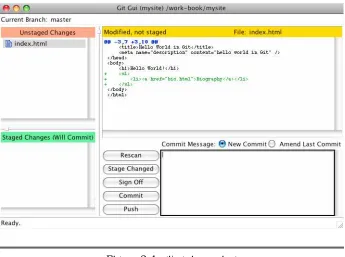
You know that your file changed, and so does Git. The command git statusshows you how Git sees your working tree, which is your current view of the repository. Subversion and CVS users will recognize this as their working copy.
prompt> git status # On branch master
# Changed but not updated:
# (use "git add <file>..." to update what will be committed) #
# modified: index.html #
no changes added to commit (use "git add" and/or "git commit -a")
This output tells us that Git sees the modification you made but doesn’t know what to do with it yet. The file is listed asmodified, but it’s under the header Changed but not updated. To commit it, you need to stage the change.
Staging a commit prepares it to be committed. There are three places in Git where your code can be stored. First, the one you work with directly when editing files is the working tree.
Second is the index, which I’ll refer to as thestaging area. The staging area is a buffer between your working tree and what is stored in the repository, the third and final area in Git. You can use the staging area to stage only the changes you want to commit to the repository. We’ll talk more about it in Section4.1,Adding Files, on page52.
STAR TING TO WORK WITH APROJECT 41
file. Instead of telling Git about a new file, though, it now tells Git about a new change to track.
prompt> git add index.html
prompt> git status # On branch master
# Changes to be committed:
# (use "git reset HEAD <file>..." to unstage) #
# modified: index.html #
In the git status command after you add the modified index.html, the header is now Changes to be committed instead of Changed but not up-dated. If you turned colors on, the line with index.html also changed from red to green.
Fire off a git commit command, remembering to include the -m with a commit message explaining why you made your change, and you are set:
prompt> git commit -m "add <head> and <title> to index" \ -m "This allows for a more semantic document."
Created commit a5dacab: add <head> and <title> to index 1 files changed, 3 insertions(+), 0 deletions(-)
Notice this time I used two-mparameters. Git accepts as many as you want to add and treats each one as a new paragraph. A quick check of
git logshows the message with two paragraphs: prompt> git log -1
commit a5dacabde5a622ce8ed1d1aa1ef165c46708502d Author: Travis Swicegood <[email protected]> Date: Sun Sep 21 20:37:47 2008 -0500
add <head> and <title> to index
This allows for a more semantic document.
That also introduces a new parameter togit log, the-1. You can change the number to limit the output ofgit logto the number of commits you want.
STAR TING TO WORK WITH APROJECT 42
Joe Asks. . .
What Should My Commit Log Message Contain?
Determining what to put in your commit log message can be tricky when you first start out. At its barest, the message should contain all the metadata explaining the “why” of the commit.
Here’s a few good commit messages:
• Changed from nested if/elseif statements to switch for readability
• Removes experimental code after proven not useful
Crafting the perfect log message is something of an art. It’s something that you can learn by looking at the logs of other successful projects. Git’s own log is a treasure trove of excellent commit messages.
Spend a minute or two with each commit you make, and sum-marize the changes the same way you would as if you were explaining them to another developer sitting next to you. A great rule of thumb is to write a simple, one-line sentence that tersely explains the commit and then spend another few sen-tences fully explaining your commit.
Another thing to keep in mind when writing your commit mes-sage is who is going to read it. If humans are the only ones ever reading your commit messages, then straight English is fine.
If a program is going to read your log messages, you need to make sure you’re including all the information it expects. There are tools that can read commit logs and update third-party tools such as ticket-tracking systems to show activity on tasks.
Adding Some Color to Git’s Output
USING ANDUNDERSTANDINGBRANCHES 43
3.4
Using and Understanding Branches
Branches are a way to maintain alternate histories of the project you’re working on, like we talked about in Section1.7,Creating Alternate His-tories with Branches, on page21. Alternate histories are great, but how do we use them in a real project?
The honest answer is “any way you want.” For our purposes, though, we’ll narrow it down a bit. Two types of branches are useful: different versions of a project in different branches and topic branches that deal with a specific feature. In this section, we’ll talk about the first kind of branches.
Your mysite code is almost ready to be released, but it still needs to be signed off on by everyone involved. In the meantime, you can start working on the new features in the next version.
You can use a branch to keep a copy of your code that’s ready to release so you don’t have to stop developing. The command to create a branch is git branch, and it takes two parameters: the name of the branch you want to create and the name of the branch you want to create it from:
prompt> git branch RB_1.0 master
That command creates a branch called RB_1.0 from themaster branch.
master is the name of the default branch in Git. CVS and Subversion users might recognize this as the trunk in those VCSs.
TheRBin the branch name stands forrelease branch. Adding the prefix makes it easier for you and other developers to quickly determine what branches are release branches.
Now you can start making changes without affecting the code that’s almost ready for a release. Next up is adding a link to a bio page. Right before the closing</body>tag, add this:
<ul>
<li><a href="bio.html">Biography</a></li> </ul>
Commit your changes now, except this time use the following com-mand:
prompt> git commit -a
... editor launch, create log message, save, and exit ... Created commit e993d25: add in a bio link
HANDLINGRELEASES 44
Notice that this time the command has the-aparameter on it. That tells Git to commit all files that it knows about that have changed.
Now you have a change on yourmaster branch that is not included on your release branch. Let’s switch to the release branch and make the final change to it before it’s ready for release. The command to switch isgit checkout.
prompt> git checkout RB_1.0
Switched to branch "RB_1.0"
If you had yourindex.htmlfile open, your editor is probably complaining about the file changing. Go ahead and reload the file. Now your changes from themaster branch have been removed—they’re still safely stored, in the other branch.
The final change that needs to be added to your file before it can be released is a description metatag. Add a description so the code in your
<head>block looks something like this:
<head>
<title>Hello World in Git</title>
<meta name="description" content="hello world in Git" /> </head>
Save and commit your changes:
prompt> git commit -a
... editor launch, create log message, save, and exit ...
Created commit 4b53779: Add in a description element to the metadata 1 files changed, 1 insertions(+), 0 deletions(-)
Now it’s ready to release. Now it’s time to mark the release with a tag.
3.5
Handling Releases
Your code is ready for its 1.0 release. It’s time to tag it. Tagging code in Git marks a specific point in the history of the repository so you can refer to it easily. Since this is the 1.0 release, tag it with that number:
prompt> git tag 1.0 RB_1.0
The two parameters specify the name of the tag and the point you want to tag: 1.0 and the branch RB_1.0, respectively. You can view a list of tags in your repository by runninggit tagwithout any parameters. Right now, it shows only the1.0tag you just created:
prompt> git tag
HANDLINGRELEASES 45
!""#$%#&#"'()*$+,$-%#'.'/'%,#,-#,0'#/',&"&,&
&""#$%#0'..-#1-*."#2345
&""#60'&"7#&%"#6,$,.'7#,-#$%"'8 &""#$%#	$-#.$%:
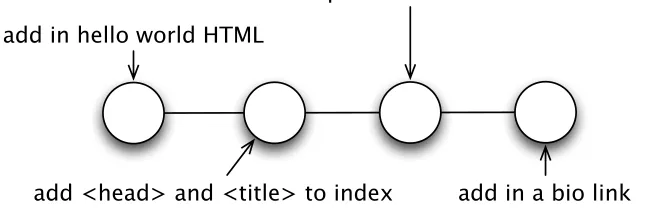
Figure 3.1:mysiterepository before rebase
Now that your code is tagged, you need to perform some cleanup. You have two branches, and each contains commits that the other does not know about. Themasterbranch—the branch you started working on 2.0 features in—needs to know about the new <meta> code you added in
RB_1.0.
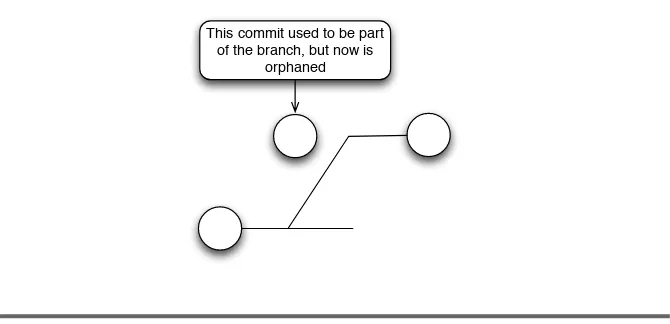
To do this, use the git rebase command. Rebasing takes the changes from a branch and replays them on top of another branch. Right now your repository looks like Figure 3.1. After rebasing, it looks like Fig-ure3.2, on the following page.
First, you need to switch back to themasterbranch. That’s thegit check-outcommand from earlier.
prompt> git checkout master
Switched to branch "master"
Next, you can run thegit rebasecommand. For our purposes right now, it takes one parameter: the name of the branch you want to rebase against.
prompt> git rebase RB_1.0
First, rewinding head to replay your work on top of it... Applying: add in a bio link
HANDLINGRELEASES 46
!""#$%#&#"'()*$+,$-%#'.'/'%,#,-#,0'#/',&"&,&
&""#$%#0'..-#1-*."#2345
&""#60'&"7#&%"#6,$,.'7#,-#$%"'8
&""#$%#	$-#.$%:
Figure 3.2:mysiterepository after rebase
to the same commit that the RB_1.0 branch does, so everything is still intact.
You use git branch to delete the branch by adding the -d parameter before the branch name:
prompt> git branch -d RB_1.0
Deleted branch RB_1.0.
So, how do you handle creating patches to the 1.0.x branch if you don’t keep the release branch around? That’s easy—create a branch off the tag you created.
Remember when you created the branch earlier? You gave it the name of the branch you wanted to create the branch from. Just change that to the tag, and you’re set:
prompt> git branch RB_1.0.1 1.0
prompt> git checkout RB_1.0.1
Switched to branch "RB_1.0.1"
A quick check of git log shows that you have only the three commits that were in yourRB_1.0branch:
prompt> git log --pretty=oneline
4b53779 Add in a description element to the metadata a5dacab add <head> and <title> to index
7b1558c add in hello world HTML
HANDLINGRELEASES 47
of it at the point you tag is enough. Git provides thegit archivecommand to do that.
This is how you create a gzipped tarball ofmysite: prompt> git archive --format=tar \
--prefix=mysite-1.0/ 1.0 \ | gzip > mysite-1.0.tar.gz
There are three parameters here. First, --format tells Git to generate tar output. Second, --prefixtells Git to put everything in the mysite-1.0/
directory. Finally,1.0tells Git to use that tag to determine what to store in the archive.
The third line gets a little more complicated if you’re not used to Unix-style commands. It pipes the output fromgit archive—a tar file—to gzip, which compresses the file. The output is then sent to themysite-1.0.tar.gz
file that you can distribute.
git archivealso lets you create zip files. Creating zip files is a little more straightforward because the output from git archive is already com-pressed. You can use the following command to create a zip file:
prompt> git archive --format=zip \
--prefix=mysite-1.0/ 1.0 \ > mysite-1.0.zip
The parameters are almost the same between the zip and tar formats. The value you pass to--formatchanges, and instead of piping the output throughgzip, with zips you send it directly to the file where you want to save it.
Of course, there’s often more to handling a release—you might have wiki pages to update, acceptance tests to run against the code, and so on—but every one of those tasks is dependent on the tools and methods you use.
By using tags, you can manage how Git interacts with those processes you have, and Git’s archive command can help you create the releases of your project’s source code.
CLONING AREMOTEREPOSITORY 48
3.6
Cloning a Remote Repository
One thing we haven’t touched on yet is remote repositories. You’ve built up the mysiterepository using commands that interact locally. Git can also deal with remote repositories, however, so you can share your work and get copies of others’ repositories.
To get started with a remote repository, you need to clone it using the
git clone command. Cloning a remote repository does what it sounds like. It creates a complete copy of the remote repository that you can start working with.
I already have my copy of mysite shared on GitHub, a Git repository hosting service. You can try the git clonecommand by creating a clone of it:
prompt> cd /work
prompt> git clone git://github.com/tswicegood/mysite.git mysite-remote
Initialized empty Git repository in /work/mysite-remote/.git/ remote: Counting objects: 12, done.
remote: Compressing objects: 100% (8/8), done. remote: Total 12 (delta 2), reused 0 (delta 0) Receiving objects: 100% (12/12), done.
Resolving deltas: 100% (2/2), done.
git clonetakes two parameters—the location of the repository you want to clone and the directory where you want the repository to live. The second is optional, but you already have amysitedirectory, so you need to provide the second parameter to put it in a directory of its own.
That’s all there is to cloning. You can provide some additional param-eters that we’ll talk about in Section7.2,Cloning a Remote Repository, on page103, but the majority of times you create a clone, providing the location and the directory you want to store the clone in is all you need to do.
Of course, you can push and fetch changes as well. We’re going to save those for later, though, once you’re more comfortable working with your local repository. There’s a whole chapter—Chapter7,Working with Remote Repositories, on page100—devoted to working with remote repositories.
CLONING AREMOTEREPOSITORY 49
Part I has been a lightning-fast tour of the concepts of VCS/DVCS and Git. This chapter particularly has been heavy on commands but thin on the “why” of the various commands. Working through the exercise in this chapter, you’ve used Git to manage a simple repository for your HTML page project.
Part II
Everyday Git
Chapter 4
Adding and Committing:
Git Basics
Now it’s time to dig into Git. Part I introduced you to Git; Part II is about specifics. We’ll dig into Git and go through the basic commands you need in your day-to-day use of Git.This chapter focuses on a few areas that we touched on in Chapter 3, Creating Your First Project, on page 36. You’ll now get a much deeper understanding of the following:
• Adding files
• Creating commits
• Checking on what has changed
• Managing files
We’ll be building on the repository we started in Chapter 3, Creating Your First Project, on page36. If you skipped ahead to this point, don’t worry—you can always clone the repository to get the repository that I built:
prompt> git clone git://github.com/tswicegood/mysite.git
Initialized empty Git repository in /work/mysite/.git/ remote: Counting objects: 12, done.
remote: Compressing objects: 100% (8/8), done. remote: Total 12 (delta 2), reused 0 (delta 0) Receiving objects: 100% (12/12), done.
Resolving deltas: 100% (2/2), done.
ADDINGFILES 52
4.1
Adding Files
You’re constantly adding new files and making changes to your reposi-tory’s contents.git addfills both of these roles. Just give it the name of a file or the files you want to add, and Git stages the changes to commit.
Before we proceed, there is a little terminology to clear up. Staged changes are simply changes in your working tree that you want to tell your repository about. When you stage a change, it updates what Git refers to as itsindex. A lot of people, myself included, refer to it as the staging area.
The staging area is just that, a place where you can set up commits prior to committing to your repository.
“But isn’t this double the amount of work? Why can’t I just commit?”
In a lot of cases, yes, it is double work and there are shortcuts that we’ll talk about in the next section to get around it, but don’t forget about the staging area. It gives you the ability to craft exactly the commit you