Releasing HTML5 Games for Windows 8 by Jesse Freeman
Copyright © 2014 Jesse Freeman. All rights reserved.
Printed in the United States of America.
Published by O’Reilly Media, Inc., 1005 Gravenstein Highway North, Sebastopol, CA 95472.
O’Reilly books may be purchased for educational, business, or sales promotional use. Online editions are also available for most titles (http://my.safaribooksonline.com). For more information, contact our corporate/ institutional sales department: 800-998-9938 or [email protected].
Editor: Rachel Roumeliotis
Nutshell Handbook, the Nutshell Handbook logo, and the O’Reilly logo are registered trademarks of O’Reilly Media, Inc. Releasing HTML5 Games for Windows 8, the image of an anglerfish, and related trade dress are trademarks of O’Reilly Media, Inc.
Many of the designations used by manufacturers and sellers to distinguish their products are claimed as trademarks. Where those designations appear in this book, and O’Reilly Media, Inc., was aware of a trade‐ mark claim, the designations have been printed in caps or initial caps.
While every precaution has been taken in the preparation of this book, the publisher and authors assume no responsibility for errors or omissions, or for damages resulting from the use of the information contained herein.
ISBN: 978-1-449-36050-4
I would like to dedicate this book to Phyllis Straus who was my advisor and close friend at FSU. The news of her passing broke my heart and she will truly be missed by me and
Accelerometer Support 138
Pen Support 138
Splash Screen 139
Dialog Boxes 139
Trial and In-App Purchase 139
Preface
Designing, building and publishing games is not an easy task. One of the most chal‐ lenging parts about publishing a game is how to distribute and monetize it. This is even more daunting when it comes to HTML5 games since cross browser compatibility and viable distribution channels are still maturing. Windows 8 offers an incredible oppor‐ tunity for independent game developers looking to distribute and monetize their HTML5 based game. This book will cover everything you need to know about porting over your web based JavaScript game to Window 8, how to integrate support for WinJS (the JavaScript communication layer to the native OS), and how to publish and sell your game on the Windows 8 Store. This book is a must read for anyone looking to seriously develop HTML5 games!
Audience
While this book was designed for web and game developers who already have a HTML5 game ready to port over to Windows 8, I did my best to cover useful information for anyone simply interested in publishing an HTML5 game to the Window Store. While this book may not directly help you if this is your first time making an HTML5 it will give you a detailed overview of everything that goes into running HTML5 games on Windows 8.
Assumptions This Book Makes
This book assumes that you have a working knowledge of HTML, JavaScript and have made a HTML5 game before. I also assume you already have at least one game ready to port over. While there is a chapter that covers porting an existing open source HTML5 game over you will need to have some working knowledge of the underlying language and technology needed to successfully publish any HTML5 game.
Conventions Used in This Book
The following typographical conventions are used in this book:
Italic
Indicates new terms, URLs, email addresses, filenames, and file extensions.
Constant width
Used for program listings, as well as within paragraphs to refer to program elements such as variable or function names, databases, data types, environment variables, statements, and keywords.
Constant width bold
Shows commands or other text that should be typed literally by the user.
Constant width italic
Shows text that should be replaced with user-supplied values or by values deter‐ mined by context.
This icon signifies a tip, suggestion, or general note.
This icon indicates a warning or caution.
Safari® Books Online
Safari Books Online (www.safaribooksonline.com) is an on-demand digital library that delivers expert content in both book and video form from the world’s leading authors in technology and busi‐ ness.
Technology professionals, software developers, web designers, and business and crea‐ tive professionals use Safari Books Online as their primary resource for research, prob‐ lem solving, learning, and certification training.
ogy, and dozens more. For more information about Safari Books Online, please visit us
online.
How to Contact Us
Please address comments and questions concerning this book to the publisher: O’Reilly Media, Inc.
We have a web page for this book, where we list errata, examples, and any additional information. You can access this page at http://oreil.ly/HTML5-Games-Windows-8. To comment or ask technical questions about this book, send email to bookques [email protected].
For more information about our books, courses, conferences, and news, see our website at http://www.oreilly.com.
Find us on Facebook: http://facebook.com/oreilly
Follow us on Twitter: http://twitter.com/oreillymedia
Watch us on YouTube: http://www.youtube.com/oreillymedia
Acknowledgments
First and foremost, I would like to thank my wife and sons for all their support while I was making this book. I’d also like to thank my parents and family for all their help and support over the years. I also have a lot of respect for all the thought leaders in the development community who continue to inspire me such as Christer Kaitila, Keith Peters, Chuck Freedman, Sean McCracken, Joel Hooks, Brendan Lee, Scott Penberthy, Seb Lee-Delisle, Rich Shupe, Jobe Makar, and especially Richard Davey who keeps pushing me to make better games.
Thank you as well to Rachel Roumeliotis from O’Reilly Media, Inc. for providing me with this opportunity and to David Isbitski and everyone else at Microsoft who helped make this possible. I also couldn’t have done this book without the help from my amazing tech editor Dave Voyles.
Finally I wanted to give a special thanks to Iñaki Diaz for helping me create the pixel art in my games.
CHAPTER 1
Getting Started with Windows 8
In this chapter, I introduce you to Windows 8, talking about what you need in order to get up and running. I’ll cover everything from why I chose Windows 8 and how to install it to an introduction to the Windows 8 operating system. Some of the information here may be helpful even if you are an experienced developer, especially as I cover how to use Windows 8 and some of its new paradigms.
Why Windows 8
Windows 8 is the latest version of the Windows operating system from Microsoft. It marks a radical departure from the past and pushes the OS into the post-PC era of tablets and ultra-portable laptops, while still supporting older desktops and laptops. If you think about it, Windows 8 is a huge move forward in terms of approachability for de‐ velopers due to the three main ways to write software for it: C++, C#, and HTML5. This book focuses on the latter and, more importantly, on helping you port an existing game over to the platform.
What got me excited about Windows 8 is that HTML5 is a first-class citizen. You can literally take a game that runs on the Web in a browser, get it up and running on Windows 8 quickly with very little modification, and start selling it in the Windows Store. Right now it is hard to monetize HTML5 games online, but Windows 8 provides a unique opportunity, which I discuss throughout the book.
I designed this book to be framework agnostic. While I prefer to use the Impact frame‐ work for my own games, I have seen games built with all kinds of JavaScript libraries, from homegrown frameworks to DOM-based implementations. It’s challenging to try and address all the different development approaches, so I focus on the things you need to consider when porting over your game, along with some code examples to get your brain thinking in terms of how HTML5 development is done on Windows 8. The rest of this chapter will discuss getting set up and ready to begin the porting process.
If you are planning on building an HTML5 Windows 8 game from scratch, I suggest reading through the entire book. This will give you a great overview of how Windows 8 development works. In the final chapter, I discuss simultaneous development work‐ flows for the Web and Windows 8.
What You Need
There are three things you will need in order to start doing development on Windows 8: a copy of Windows 8 plus a PC or Mac that can run it, a copy of Visual Studio Express, and a developer account.
There are a few optional things you may want to consider having as well: test hardware (which I will talk about in more detail later), a touchscreen monitor or touch-enabled device, and a copy of Visual Studio Pro or an MSDN subscription.
The first three items are self-explanatory. In order to do development for Windows 8 you will need to be on Windows 8 and have the right tools. Luckily, when it comes to doing Windows 8 development, you can also test on the same computer you use when coding and/or take advantage of the built-in simulator to test out various configuration and resolution types, if you don’t have the test hardware in person.
Also make sure to check out the passage at the end of the chapter about BizSpark and DreamSpark which may be great ways to get free copies of Windows 8 as well as Visual Studio.
Windows 8 Hardware
Chances are good that, if you have already created an HTML5 game, you have a com‐ puter that can be used for development. In that case, all you need to do is get a copy of Windows 8. If you are on a Mac, I have some instructions on how to set that up via Boot Camp in the next section. For now I want to focus on the types of Windows 8 hardware and what it means for you as far as testing and developing.
Devices
Windows 8 has an expansive list of supported hardware, both new and old, which you should be familiar with. It’s important to remember that you still need to support legacy systems, as well as the new form factors and input devices released along with the new OS. Here is a quick rundown of the typical types of devices your game could run on:
• Laptop (Non-touchscreen) – This is your standard laptop. Any laptop that ran Windows 7 should run Windows 8, but there are a few things to keep in mind with these older devices. Laptops usually have slower GPUs/CPUs, less RAM, and have a track pad plus a keyboard as the default input devices.
• Laptop (Touchscreen) – Most if not all new Windows 8 laptops are coming out with touchscreens. Windows 8 is a “first” OS, so these new ultra-thin, touch-enabled laptops will work great with Windows 8 out of the box. Plus, the extra touchscreen allows you to do basic touch testing for your game. If you are in the market for new hardware for doing Windows 8 development, I highly suggest making sure your next laptop has a built-in touchscreen.
• Convertible – This is a new category of ultra-portables that are tablets that can dock with a keyboard to become a laptop. These offer all the same conveniences of a tablet and laptop at the same time. They have touchscreens as their primary input and usually have very low-powered CPUs with built-in GPUs. These also come in two flavors: Windows 8 and Windows RT, which I will talk about in the next section. • Tablet – Windows 8 was designed to run amazingly on a tablet. These are similar to the convertibles but may not have any way to dock with a keyboard to become a “clamshell” form factor. The flagship of these types of devices would be Microsoft’s Surface. Tablets offer lots of options for input from touch to pen, even accelerom‐ eter, and can also be connected to a traditional mouse, keyboard, or game controller as well.
This quick overview of the Windows 8 device landscape can help inform you on some of the complexities that may arise when trying to get a game to run on all these different devices with multiple types of input. Over the course of the book, I’ll dig into some of these special use cases and work through solutions to help make developing HTML5 games for Windows 8 as straightforward as possible.
Windows 8 Versus Windows RT
After taking a look at the different types of devices ready to run Windows 8, let’s go over the difference between Windows 8 and Windows RT. Windows RT is a scaled down version of Windows 8 that was designed to run on ARM devices. On the surface, Win‐ dows RT looks identical to Windows 8 and even has a desktop mode, but Windows RT does not allow “classic” Windows apps to run (with the exception of a few Microsoft apps bundled with the device). The user can only run Modern apps, which are dis‐ tributed through the Windows Store. As an HTML5 developer, this has little to no impact on your game, with the exception of slower performance and needing one as a testing device.
The only reason I bring this up is that ARM devices generally have lower power and performance when compared to Intel-based devices, so if you intend to target Windows
RT (which happens by default when you compile your app), you will need to take that performance hit into consideration.
I highly suggest picking up at least one Windows RT device for testing. They usually start under $500, such as Microsoft’s Surface, and other OEMs also offer tablets as well as convertibles. It’s also important to note that you will not be able to run Visual Studio on Windows RT, making this device solely for testing or personal use, so don’t expect to be doing much development on it.
Introduction to Windows 8
I’m not going to spend a lot of time talking about Windows 8, but I do want to highlight a few key features that you should take note of when thinking about your own app and things you can take advantage of in your own game. Let’s get started.
Live Tiles
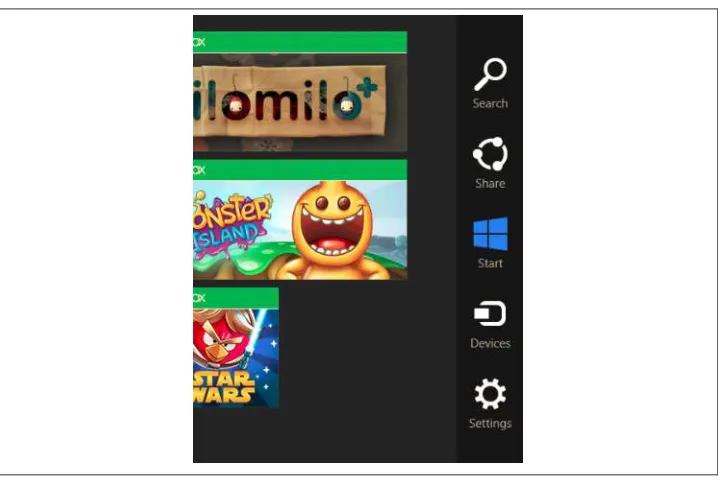
Live Tiles (Figure 1-1) are possibly the most prominent feature of Windows 8. You are presented with these large icons on the start screen as soon as you turn on the computer, and they are the primary way to launch apps.
Figure 1-1. Here are active Live Tile on the Windows 8 start screen.
Charms
Charms are a new and important way to surface contextual options for Modern apps. Sliding your finger in from the right-hand side of the screen edge or moving your mouse over to the far right of the screen brings up the Charms bar (Figure 1-2).
Figure 1-2. You can access Charms by swiping in from the right-hand side of the screen.
Charms are important if your app has search or sharing, but for games, we will focus primarily on the settings option.
Settings
Settings are important for a number of reasons. In Windows 8 games, we may need a place for our player to customize controls, tweak performance options, and display a help or privacy section.
Figure 1-3. Access the settings of an app or game via the Settings Charm.
As you will learn later on in this book, creating setting “fly-outs” (Figure 1-3) is incred‐ ibly easy and can be done entirely with JavaScript and HTML.
Windows Store
Perhaps the largest component of this entire process is getting your game into the Win‐ dows Store (Figure 1-4).
Figure 1-4. The Windows Store is where users are able to purchase and download new Windows 8 apps.
In Windows 8.1 the store (Figure 1-5) was dramatically redesigned with a more stream‐ line presentation and surfaces important categories such as featured apps, popular now and new releases.
Figure 1-5. The redesigned Windows Store has a larger feature area and to its right is a list of the most popular apps in the store..
I’ll talk a little more about Windows 8.1 and how to adapt your game’s publishing settings to take advantage of the new design in later chapters.
Shortcuts
Since this may be your first time working on Windows 8, I’ll introduce a few shortcuts to make your life easier, especially if you are not using a touchscreen:
• Windows Key – This will switch between the start screen and the currently open app.
• App Search – Simply start typing on the start screen in order to filter out and quickly find apps on your computer. This is a huge time saver.
• Windows Key + C – This will open up the Charms bar, including the clock. • Windows Key + X – This will display system shortcuts.
• Windows Key + Z – This will pull up the app bar, which most Windows 8 apps use for contextual navigation. You can also pull this up by right clicking when in Modern apps.
• Windows + D – This will quickly throw you into the desktop or “classic” Windows environment.
• Alt + Tab – This will cycle through “classic” Windows apps and Modern UI apps. Holding down Shift while doing this will cycle backwards.
• Windows + Tab – This will cycle through Modern UI apps that are active.
Windows 8.1
Windows 8.1 is an update to the original version of Windows 8 that was released in October of 2012. It’s more than just a collection of bug fixes, there are hundreds of new features as well as additional APIs and modifications to the overall OS. When it comes to porting HTML5 games over to Windows 8 there really isn’t much of a difference between version 8 and 8.1. Perhaps the most important thing to call out is the new support for WebGL in both IE 11 (which is the default browser in 8.1) and in native apps you publish to the store. That means if you are using WebGL and it runs in IE 11 you will be able to publish it to the store following the same steps outlined in this book. Windows 8.1 is a free update and because of that it is expected to gain adoption quickly among current Windows 8 users. The update process is incredibly streamlined but keep in mind there may be an existing user base of Windows 8 users. Windows 8 games can run on 8.1 but it doesn’t work in reverse. I will be focusing primarily on publishing to Windows 8 in the book and plan on updating more over time as 8.1 gains adoption. When there is something different in 8.1 I will call it out specifically. Keep in mind that this book was originally designed to focus on publishing HTML5 games to the Windows Store on Windows 8.
BizSpark and DreamSpark
The last thing I want to call out are two programs Microsoft has to help developers get free tools, copies of Windows 8 as well as trails for Azure called BizSpark and Dream‐ Spark. BizSpark is designed for small startups and individuals looking to get started developing apps, as well as games, for Microsoft’s platform. DreamSpark is designed for students looking to do the same. I highly suggest checking one of these programs out, especially if you are new to developing for Windows 8 and are looking to start your own business making games whether it’s on the side or full time. These programs are designed to give you everything you need to be successful and I have suggested to dozens of indie game devs that they sign up while working on porting existing games over to Windows 8.
CHAPTER 2
Getting Started with Visual Studio
When it comes to getting an HTML5 game up and running on Windows 8, I use the term porting lightly. Unlike other languages, you do not have to endure the difficult process of truly porting over your code. Windows 8 was designed to make HTML5-based apps run and perform like native ones written in C# or C++. In most cases you simply need to copy your code over to a Visual Studio project, include the files, and hit compile to see your game running. Let’s talk a little bit about which games will work and which ones won’t on Windows 8.
What Games Work Best
As a rule of thumb, if the game runs in IE10 then you are set. For extra insurance, you can double check your game in the Windows 8 version of IE10 to discover any minor issues that may arise. For the most part, the two browsers run identically. You can also do the same testing on Windows RT to see what performance would be like on ARM devices.
Outside of testing your game in IE10, completely Canvas-based games will generally be the easiest to port. This is true of any HTML5 game you are trying to run on different platforms, as Canvas is self-contained and consistently implemented across each of the major browsers at this point. Also, it’s important to note that Canvas is hardware ac‐ celerated in IE10, and you will see similar performance boosts that you would have gotten in WebKit-based browsers that support hardware-accelerated Canvas, such as Chrome.
I’ve also been testing out several different JavaScript game frameworks and have found that all of them run well on Windows 8. ImpactJS, which is one of my favorites, is a great one to use and is fairly easy to get set up out of the box with little to no modifications. You can also use DOM-based games, but expect to have to account for IE10-specific CSS issues. If you already built your game to support IE10 then you shouldn’t have a
problem. I’ve also had great success with “hybrid” games that make use of Canvas for the main game display and HTML for the UI. Just keep in mind you will need to do additional CSS work to make sure your UI scales well on different resolutions. I’m also happy to tell you that third-party JS libraries also work right out of the box. Here are a few I use in my own games:
• JQuery – You can use JQuery or other DOM manipulation libraries. Just be careful of code that writes to the DOM at run time, as there are some sandbox restrictions on dynamic element creation and code execution in HTML5 Windows 8 apps. • ImpactJS, EaselJS, etc. – Almost all Canvas-based JavaScript game/drawing frame‐
works should work right out of the box.
• TweenLite and TweenMax JS – A great library for tween and animations. WinJS also has its own animation classes, but if you want to keep your game cross-platform, you may want to consider a third-party tween library for programmatic animations. In this chapter, I focus on Canvas-based games. As I mentioned, these games are the easiest to get working on different platforms, and I have some great tips and techniques to get these kinds of games up and running in Windows 8.
In Windows 8.1, IE 11 is now the default browser. IE 11 has a host of new features with the biggest one being support for WebGL. This means that you can now port your WebGL games over to Windows 8.1 and publish them to the store. One thing to keep in mind is that IE 11’s WebGL support is still a work in progress and not every fea‐ ture found in other browsers may be supported. That is why it is crit‐ ical to test your games in IE first before attempting to put them in a Visual Studio project in order to work out any issues that may need to be addressed.
Introduction to Visual Studio Express
Visual Studio is an incredibly powerful IDE. In my opinion, it is one of the best out there, and you should be very familiar with it if you have used Eclipse or IntelliJ in the past. It’s project based, meaning that you open up a single project to work on at a time and you must specifically tell Visual Studio to include files in a project or it will be ignored. That may take some getting used to if you come from a TextMate, Sublime Text, or VIM background.
Before moving forward it’s important to know that there are several versions of Visual Studio. When it comes to building Windows 8 HTML5 apps you can simply use Visual Studio Express which is the free version. It differs slightly from Visual Studio Pro and Ultimate which are used for screenshots in this book. Everything I show in this book can be done in the free version and I will call out specific differ‐ ences in the two where needed. You can also get a free trail of Visual Studio Pro and Ultimate to follow along with the book’s examples. Make sure you check out the BizSpark or DreamSpark programs to see if you can qualify for free licenses of Visual Studio Pro and Ultimate.
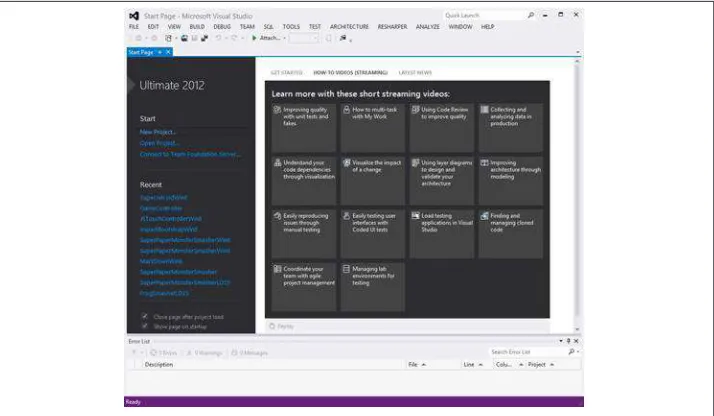
When you open Visual Studio, you will be presented with the screen in Figure 2-1.
Figure 2-1. Visual Studio’s start screen.
From here, you can open a project, create a new one, and even learn more via tutorials, videos, and additional links to resources from the launch screen. Creating a new project is simple thanks to an extensive collection of templates and documentation already included in Visual Studio (Figure 2-2).
Figure 2-2. Creating a new project from a template in Visual Studio.
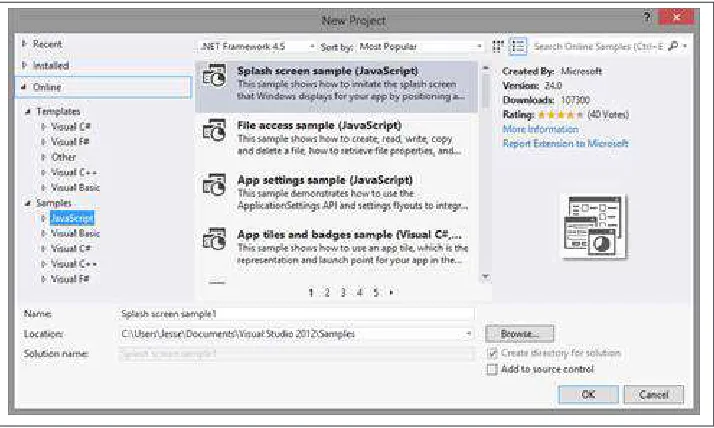
Figure 2-3. Check out the online templates for examples on how to use JavaScript to build Windows 8 apps.
I highly suggest going through the online templates in Samples -> JavaScript (Figure 2-3), as it covers all kinds of examples you may want to play around with to get a better handle on building JavaScript-based Windows 8 apps.
Once you create a project, you will be presented with a nav bar along the top, a code editor in the main window, and Solution Explorer on the right (Figure 2-4).
Figure 2-4. This is the layout you will see when starting a new project in Visual Studio.
These are just a few important things you should know while working in Visual Studio. First up is how to run your app, which you can do as soon as you create a new project. At the top of the toolbar you will see a green arrow button (Figure 2-5).
Figure 2-5. This button will launch your app locally for testing in debug mode.
This allows you to run your app locally, remotely, or in the simulator. It also lets you test different types of builds, such as debug and release.
Figure 2-6. This is the Solution Explorer in Visual Studio.
One of the most important things you should keep in mind when working in Visual Studio is including the files you want for your game in the solution. To do this, select the show all files option.
Figure 2-7. Selecting show all files will allow you to add new files into the project solu‐ tion.
Once you do that, you will see all the files in the project folder (Figure 2-7). Files not included in the solution are outlined in grey dots. To include them, simply right click on a folder or file and select Include In Project from the contextual menu. I’ll walk you through this more in the next chapter.
Reset Windows Layout, which you will find under the Window menu at the top right, can be used if you accidently close the Solution Explorer or lose the console window; you can reset the layout and get everything back. I suggest taking some time to poke around and see what there is to do in Visual Studio. You’ll also start picking this up as you begin to work more in the IDE.
Understanding Visual Studio Project Structure
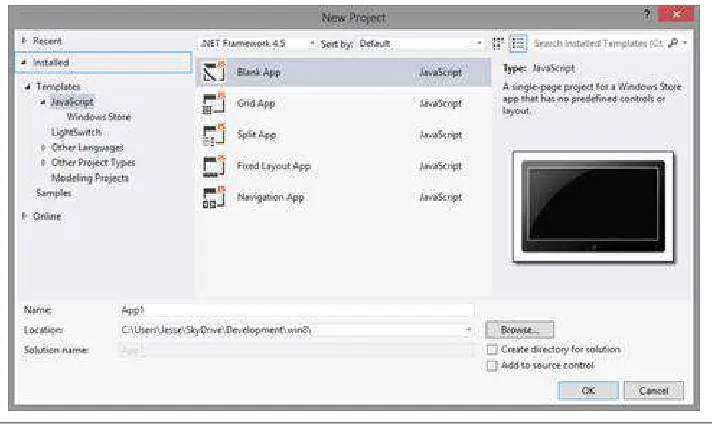
The first thing you’ll want to do is create a new project in Visual Studio. There are several HTML5-based project templates for you to choose from (Figure 2-8). Unless you want to take advantage of a pre-built Windows Store app’s UI, I would suggest choosing the blank project.
Figure 2-8. You should be familiar with the New Project screen from the first chapter.
It’s also important to note that you can uncheck the “Create directory for solution” option. This will put your VS project inside another folder with a supplied name and may be redundant if you don’t specifically want that.
Figure 2-9. Here is the deafult project structure of a Windows 8 HTML5 project.
There are some important directories and files you should know about:
• default.html – This is the main page of your project. Think of it as the index.html file you would typically create to host your game.
• js Directory – This is where you will find the default.js file, which sets up your project’s code when the default.html is run. While this file is optional, you will need to follow a similar setup in your own game if you choose not to use it. I will talk about this more later on in the chapter.
• images Directory– This is your default directory for images. It contains your ap‐ plication’s loading screen, icons, and store graphics. You can also place your own images in this folder as well.
• css Directory – This contains the app’s default CSS. This file simply contains a few meta tags to support different resolutions in your app. You can usually ignore or override it.
There is also one more important file we should look at in your project’s folder: the
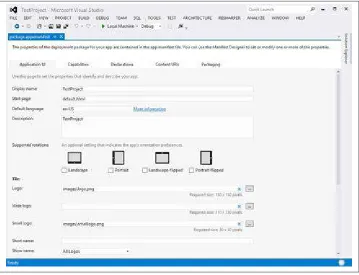
package.appxmanifest file. If you double click on this, you will be presented with different options to configure your project (Figure 2-10).
Figure 2-10. You can configure your application’s settings and capabilities by clicking on the package.appxmanifest file.
I’ll go over some of the more complex options, such as the Capabilities tab, later on in the book.
Finally, I want to cover the anatomy of the default.html file, as you will most likely be replacing some of the code in here or supplementing it with your own. As you can see, the basic code structure is fairly straightforward.
<!DOCTYPE html> <html>
<head>
<meta charset="utf-8" /> <title>HTMLGameTest</title>
<!-- WinJS references -->
<link href="//Microsoft.WinJS.1.0/css/ui-dark.css" rel="stylesheet" /> <script src="//Microsoft.WinJS.1.0/js/base.js"></script>
<script src="//Microsoft.WinJS.1.0/js/ui.js"></script>
<!-- HTMLGameTest references -->
</head> <body>
<p>Content goes here</p> </body>
</html>
You’ll notice there is hardly any code in this file. We have a reference to the default ui-dark.css file that has all the styling for standard Modern UI apps. Next we have a ref‐ erence to the base.js and ui.js, which allows us to build out Modern controls and UI. You’ll notice these three files are located at //Microsoft.WinJS.1.0/js. These are part of the WinJS library and are only available when you run your app in Windows 8.
WinJS is a built-in Windows 8 library that allows you to communi‐ cate with the OS. This helps bridge the game between the JavaScript run time and the native code running under the hood. We’ll talk more about WinJS throughout the rest of this book.
The paths to these files will be automatically resolved for you when the app is launched. WinJS is the underlying bridge that allows your app to talk to the OS via JS and also provides code needed to build out Modern UI components. You will want to keep these so that you can leverage WinJS in your own game. Finally, you’ll see two references to local files in your project: default.css and default.js.
Now you are ready to start putting your own code into the project.
Moving Your Code Over
You should have everything you need to get started from the first chapter: a copy of Windows 8, Visual Studio, and your own game’s source code that has been tested to run in IE 10. Consider this the quick-start guide to fast track running your own HTML5 game on Windows 8.
Since everyone has their own way of building a JS game, I’ll walk you through some basic concepts and suggestions on how to get your game running.
First, move all of your game’s code into the project. You can do this one of two ways: First, follow the current project’s structure and place all your images in the images folder. Then, move your CSS into the css directory, and anything else you may have. This way you work with the default project structure and only make a few alterations where they are needed.
Second, ignore the current project setup and move your code over as is. For example, Impact games make use of a media folder for all of their assets, including images and sounds, a lib folder for all of the JavaScript code, and have their own default index.html
page. Simply move these files over as is and you’ll retain the pre-existing project struc‐ ture.
Understanding the App Lifecycle
As with any type of software built on a larger framework, there is the notion of an application lifecycle. In our case, we are just referring to the build up, pause/resume, and tear down of our application in the Windows 8 environment. If you open up the js directory and select the default.js file, you will see the base WinJS app launch point.
// For an introduction to the Blank template, see the following documentation: // http://go.microsoft.com/fwlink/?LinkId=232509
(function () { "use strict";
WinJS.Binding.optimizeBindingReferences = true;
var app = WinJS.Application;
var activation = Windows.ApplicationModel.Activation;
app.onactivated = function (args) {
if (args.detail.kind === activation.ActivationKind.launch) {
if (args.detail.previousExecutionState !== activation.ApplicationEx-ecutionState.terminated) {
app.oncheckpoint = function (args) {
// TODO: This application is about to be suspended. Save any state // that needs to persist across suspensions here. You might use the // WinJS.Application.sessionState object, which is automatically // saved and restored across suspension. If you need to complete an // asynchronous operation before your application is suspended, call // args.setPromise().
};
app.start(); })();
This is similar to the window.onload or document.load where you would wait until the entire page is loaded then execute the code to run your game. I highly suggest that you modify your game to be initialized here instead of running on its own in the default.html file. This will allow you to better integrate your game into the Windows 8 app lifecycle and give you more control over how your game behaves based on being loaded up or resuming. The best part is that if your game already has some method for initializing it after the page is ready you can probably just comment that out in your index.html page and use this file to call the same method.
It’s up to you if you want to place your game’s initialization code into the default.js file. Your game will run perfectly fine on its own inside of the default.html file, but you will not be able to handle any resume logic on your own unless you build that into your game’s own code. Likewise, you can skip the default.js logic and simply put this in your own game’s code. All you need is a reference to WinJS.Application and the activation callback since Windows 8 will handle the rest for you.
Now that we have learned a little more about the app lifecycle, you can give your game a try and see if it will run on Windows 8.
Running Your Game for the First Time
You should have everything you need in place to run your game and see if it works. To test your game, click on the run button (Figure 2-11) at the top of the Visual Studio window.
Figure 2-11. Clicking on the green arrow will start the build process for your game’s project.
This will run the game locally in debug mode. Once the project is compiled you will be taken to the game, which will most likely be full screen if you are running on a single monitor.
Windows 8 runs great on multiple monitors. One of the best features of having a two-monitor setup is being able to run Modern apps on one screen and the “classic” desktop on the other monitor. What this means is that you can easily build your Windows 8 app side by side with Visual Studio’s debug tools visible, which will increase your pro‐ ductivity dramtically. If you are thinking about getting a second mon‐ itor or upgrading an exisiting one, I highly susggest getting a touchscreen. Not only will you be able to code Windows 8 games better with a two-screen setup, you can also test out touch controls.
In a single monitor setup, you can still switch back and forth between the game and Visual Studio’s debugger. Hopefully your game is running. Depending on your game’s controls, you should also be able to play it. In the event that your game is not working, I suggest checking out the chapter on debugging and optimization to help troubleshoot the problem.
Tips and Tricks for Running Your Game on Windows 8
In most cases, setting up your game should be as easy as copying over the files, including them in the project, and hitting compile. If you are running into issues or want to better understand what is going on under the hood to help refactor or clean things up, I’ll go over some techniques to help you debug your game in Visual Studio.
Disable Touch Behaviors via CSS
You may notice that pinch to zoom or double tap to zoom may happen in games you move over to Windows 8 from the Web. The quickest way to solve this is with the following CSS:
-ms-touch-action: none;
You can place this in the HTML, body, or Canvas element CSS to disable touch behaviors.
File Paths and Loading Locally
File paths are resolved to the root of your project when it is running. So, if you wanted to load an image from the images folder, you can simply do:
<img src="/images/name-of-image.png"/>
Likewise, you can do the same when loading images or assets dynamically via JavaScript. Hopefully you won’t have to make a single change to a file path or resource.
Avoid Modernizr Libraries
If your game is already running on the Web, you may be making use of some kind of Modernizr or some type of polyfill to help get your game running across each of the different browsers. While this works great for the Web, you will want to remove this library if it gives you problems. I have seen Visual Studio throw errors if the library violates Windows 8’s JavaScript sandbox by trying to inject live code into the DOM at runtime.
CHAPTER 3
Screen Resolution and Artwork
Windows 8 Resolutions
If you have done any desktop software development before, you may be familiar with the dizzying amount of resolution possibilities out there. While Windows 8 still has its share of resolution options, the form factors and the push towards tablets simplifies your baseline of supported resolutions.
Out of the box, Windows 8’s native resolution is 1366×768. While Windows 8’s mini‐ mum resolution is 1024×786, almost all new tablets and convertibles will have their minimum resolution set to 1366×768. But this isn’t the full story. Let’s take a look at the three main resolutions our game will need to support to pass certification for the Win‐ dows Store:
• Full Screen – This is the default resolution when the game is running in full-screen mode. This can be anywhere from 1366×768 and up.
• Snapped – This happens when your game is docked on the side of the screen and another application is running next to it. The minimum width of this resolution is 320 pixels wide.
• Filled – This would be the full-screen resolution minus 320 for the snap view. This resolution happens when you have another app docked in snapped view on the side of your game.
You can easily detect resolution changes by adding an event listener to the window like so:
window.addEventListener("resize", onViewStateChanged);
And, here is an example handler for the resize event.
function onViewStateChanged(event) {
var viewStates = Windows.UI.ViewManagement.ApplicationViewState; var newViewState = Windows.UI.ViewManagement.ApplicationView.value; if (newViewState === viewStates.snapped) {
// is snapped
}else if (newViewState === viewStates.filled) { // is filled
} else if (newViewState === viewStates.fullScreenLandscape) { // is full screen
} else if (newViewState === viewStates.fullScreenPortrait) { //is portrait
} } }
Notice how we can also detect screen rotation? You can disable that for your game, but in order to be approved by the store, you need to handle the other three view states properly. As of now, the majority of Windows 8 devices are probably running in land‐ scape mode. While portrait mode is the default orientation on phones, you’ll find that Windows 8 is designed for landscape due to its desktop heritage. That’s not to say that you should totally ignore portrait mode, but if you are working on minimizing scope creep, especially for your first Windows 8 game, I would suggest sticking to landscape. Likewise, if your game was designed to run in portrait mode since it was created for a mobile device first, you may have to consider centering it on a background image while in landscape mode, which is a popular technique many games are already utilizing in the Windows Store when running on larger resolutions the game wasn’t ideally intended to support.
Scaling Games for Full Screen
By design, all Windows 8 apps run at full screen at any resolution. What that means is that, given the huge user base of Windows 7 and the potential of upgrading desktops attached to large monitors, your game will have to support resolutions higher than 1366×768. Let’s be practical. While HTML5 games run great on Windows 8 at normal resolutions, the bigger the display, the slower your game will run. This is directly at‐ tributed by the increase of pixels your game will be trying to update to the display; the larger the resolution the more pixels being rendered. Fortunately, we can take advantage of a few techniques to stretch out our canvas in a way that will help balance performance and maintain the ascetics of your game.
There are two ways to stretch the canvas:
• Maintain Aspect Ratio – While this maintains the quality of your artwork, you may end up with black bars on the sides of your game.
This is a hard decision to make. Luckily, it’s very easy for us to test both out. We’ll start with scale to fit since you can simply do this in the CSS.
<style type="text/css">
This will work great on Windows 8, but be careful if you try this on the Web. Since most monitors are designed to be at fixed aspect ratios, like 4:3 or 16:9, your game will always look relatively fine. In the browser, however, the user can set the window to any arbitrary size, and this could look horrible depending on what they set it to. That is why it is sometimes better to try and maintain the aspect ratio, which is something we can do via JavaScript.
The basic concept of maintaining a game’s aspect ratio is to figure out its ideal size and divide the width by the height. From there we can attempt to fit the game into the current resolution by using its height as a point of reference. This means that your game will constrain its width to always make sure that the height of the canvas is set to 100 percent. Most likely this will yield black bars on the right and left sides of the game canvas unless the display matches your game’s aspect ratio. On the flip side, if your width is smaller than the max height, we will need to add black bars to the top and bottom of the game. This scenario will most likely happen if you design your game to run at a native reso‐ lution of 1366×768 and the person snaps another app next to your game, which will lower the resolution to 1024×768.
If you are not familiar with all of this, it may be a hard concept to wrap your head around. Let’s look at the code and add this to your own game to see how it affects the visuals at different resolutions. We’ll start with the basic CSS.
<style type="text/css">
padding: 0px;
Next, we will have to add a little bit of JS to control resizing the canvas.
<script type="text/javascript">
This also assumes that you have the following setup in your index.html or default.html with the canvas inside a div with an ID called game.
<body>
What’s great about this code is that it will work well on the Web as well as on the desktop, so you can consolidate your game’s scaling to a single function. Also, you can call win‐ dow.resizeGame() whenever you need to manually correct the scaling, such as when the game is finished initializing.
Hopefully, after running the two different examples on your game at different resolu‐ tions, you can pick the best one for your use case. No matter which one you chose, the benefits you will get at higher resolutions will be monumental. Rescaling the game on larger monitors with higher resolutions will still yield fast, fluid, responsive playback.
Understanding Snap View
Your game will not be approved for the Window Store unless you fully support snap view. This can be something as simple as throwing up a graphic telling the player they are in snap view and can’t continue playing, or doing something even more elaborate. Just keep in mind that making use of the snap view will not only encourage players to keep the game open while they check their email or do other things, but it will also get more attention by the curators of the Windows Store who look to feature developers who are making the best use of Windows 8’s new features and capabilities.
There are two basic ways we can handle snap view: using CSS meta tags or managing it via code with JavaScript. Both options allow you to mix and match HTML and Canvas elements, so it’s really about finding the right solution for the way your game is already created. Here are two examples to review in order to give you a better idea of how you want to implement it yourself.
In my index.html file, I have my canvas and my snap view image wrapped in the same game div I talked about previously in the scaling part of this chapter.
<body>
<div id="game">
<canvas id="canvas"></canvas>
<img id="snap-view" src="media/snap-view.png"/> </game>
</body>
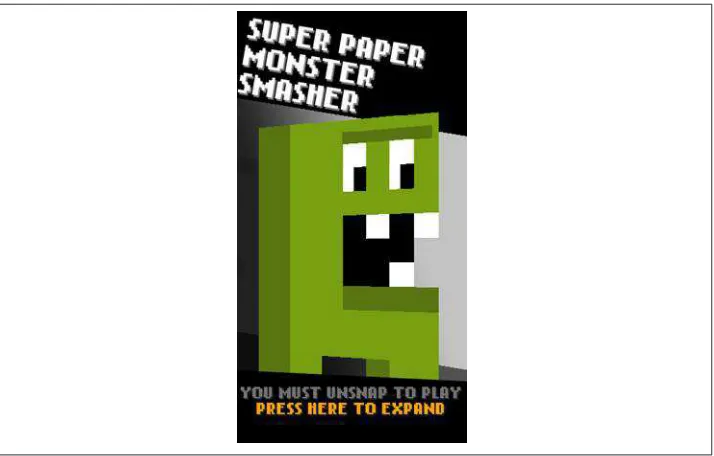
Make sure your snap view image is no larger than 320×768 (Figure 3-1).
Figure 3-1. The snap view image I am using for my game Super Paper Monster Smash‐ er.
The basic concept is that, while the canvas is automatically being stretched out to take up the full screen, the snap-view image isn’t visible. To make sure, we’ll alter its CSS properties to hide it. When I detect snap view, I simply hide the canvas and show the snap-view image.
First, let’s take a look at the CSS-only approach.
@media screen and (-ms-view-state: fullscreen-landscape) {
#canvas{
display: block; }
#snap-view{ display: none; }
}
@media screen and (-ms-view-state: filled) { #canvas{
display: block; }
}
As you can see, I have set up a CSS meta selector for detecting the snap view. You can also use a min-width meta selector if you want to use this code on the Web and in Windows 8 to help maintain constancy between your code base.
Now, let’s take a look at how to maintain this via JavaScript. Here is what the code for that looks like in my game.
As you can see, I simply tied this conditional into the earlier example where I detect the window’s resize event.
You may have also noticed from my snap view picture that I added some text telling the player to click on the image in order to expand the game and exit snap view. This is very easy to do. Simply add a click event to the image like this:
var snapView = document.getElementById("snap-view"); snapView.addEventListener('click', function(e) {
var boolean = Windows.UI.ViewManagement.ApplicationView.tryUnsnap(); })
As you can see, I have a simple image that fits perfectly in the 320-pixels-wide area provided by the snap view and can also center it vertically in case the game is running at a higher resolution. Remember that the height of the snap view is determined by the maximum resolution of the attached monitor, so it can be larger than 786 pixels high. The final thing we will want to make sure of is that whenever we enter snap view we pause our game. Hopefully your game has a way to pause itself. We can simply listen to the same resize event and determine if the game needs to be paused.
It is critical that you also pause the game and any sounds or music playing to offer up a clean experience when transitioning to snap view. If you are using a CSS-based solution, make sure you don’t forget to shut everything down in your game via JavaScript. The last thing you want is for your game to be running in the background when the player can’t interact with it under the snap view image.
To play it safe, you should pause the game any time you detect a resize event. The simple act of moving from snap to full or full to filled will probably be a little jarring for your players, and they wouldn’t have time to react on their own. Also, I wouldn’t un-pause your game if you leave snap view. You have to take into consideration that the player may have been doing something else when the app was unsnapped, such as closing another app, and may not be ready to jump back into the game. Whenever you change resolutions from full screen to filled and down to snap view, you should pause the game and let the player manually resume when they are ready.
In Windows 8.1, the user now has more control over how two apps run side by side. In addition to snap view, the user can split the screen between two apps so that each one takes up 50% of the usable screen resolution. That means that your game should be able to scale to ac‐ commodate this dynamic resolution changing. If you included the aspect ratio scaling code example from the previous section your game should handle this fine but it’s still important to keep in mind in case your game becomes unplayable at half of the screen’s resolution. This only applies to devices with a resolution higher than 1024 ×768.
As you can see, supporting snap view is a simple process and something that you don’t want to overlook when submitting your game to the Windows Store.
Upscaling Artwork
Upscaling allows you to show a smaller graphic at a much larger resolution. Since I work with pixel art, the effect tends to accentuate the pixels more, giving it the retro look most people are familiar with. There is no exact science behind how much to scale up, but I tend to do it in multiples of two. So, if I have a 16×16 pixel sprite, I can display it at 24×24 pixels by increasing the scale factor by two or even up to four times its original size.
Figure 3-2, Figure 3-3, and Figure 3-4 are an example of how this works.
Figure 3-2. 1x (actual size 63×42 pixels).
Figure 3-3. 2x (new size 126×84 pixels).
Figure 3-4. 4x (new size 251×167 pixels).
As you can see, the higher the scale factor the more pixelated the artwork looks. This is incredibly effective when you have smaller sized sprites and map tiles.
When resizing artwork in an image editor such as PhotoShop, make sure you use nearest pixel scaling to preserve the crispness of the pix‐ el art.
The one thing you want to make sure of when it comes to upscaling your artwork is that you pre-render the artwork at the higher size ahead of time. Many popular game frame‐ works allow you to resample the artwork on the fly to an off-screen canvas, but this will double the memory usage of your app and slow down the load time of your game. If you don’t anticipate changing the scale size of your game based on different resolu‐ tions, then it may make more sense to output everything at the correct scale factor ahead of time. This is especially important on slower devices. When it comes to getting the best performance out of Windows 8 games, you have to build for the lowest common denominator. If you are forced to resample your artwork on the fly, I suggest caching the generated art to the player’s computer and only regenerating it on major resolution changes, or when the app loads up for the first time.
Designing for Multiple Resolutions
While this section may not help you if you already have a completed game, I still want to spend a little time talking about some great ways to better handle multiple resolutions with forward-thinking design. There are a lot of simple tricks you can implement to help accommodate multiple resolutions. Most of the problems usually come up with the game’s UI. The first thing I do is open up my design tool and map out a few reso‐ lutions to see how they will look in my game. This is a similar technique to what I used to do in video editing to find a “safe zone” where the TV’s edges would clip text or video. Here is an example from my game Super Paper Monster Smasher.
Here you can see I have mapped out four different resolutions: full screen, filled, snap, and Web. In Figure 3-5 you will notice that my game’s native resolution is 800×480, since this started out as a Web game, and from there I can expand out the camera that renders the in-game graphics to offer more visible area at different sizes.
Having a dynamic camera is a great way to handle resolution changes. Simply expand the view of the game and you can easily fill in the screen and offer more visible real estate for the player. The downside is that you have to have a UI that can also be flexible enough to handle the resolution changes. Also, you run the risk of increasing perfor‐ mance issues since you are rendering more of the game, which is why I made sure to design my maximum resolution just under the 1366×768 pixel resolution of Windows 8 so I can stretch the canvas to fill in the difference.
When it comes to UI for your game, try to keep things as simple as possible because you will use up precious resources trying to render more to the screen, and you want to maximize your game’s screen real estate on tablets. Remember that your game will most likely be held in landscape mode on the left- and right-hand sides of the screen, so avoid putting important UI at the bottom of the screen, which could be blocked by a player’s hands.
Another important design technique for UI on multiple resolutions is to “dock” them to corners of the screen (Figure 3-6). Here are two examples of how the UI realigns itself based on the screen size.
Figure 3-6. Here is the UI and camera clipping at 800×480 pixels for the Web version of the game.
As you can see in Figure 3-7, the UI elements on the left-hand side always move to the left corner of the screen and the right-hand side elements move to the right. The pause button, which is a critical UI element, is centered inside of the empty space between each side’s UI. Another technique you can use on Windows 8 is to completely hide the
pause button and non-critical UI and expose them through the commands bar, which you access by swiping up from the bottom of the screen or right clicking. I tend to avoid doing this because, while modern UI standards dictate all non-essential UI should be hidden from view, games get a lot more leeway during approval. In a game, you want instant access to pausing the game, so make it easy for the player to hit it. If you rely on a gesture, you could make the player do something in the game that would potentially cause a problem.
Figure 3-7. The UI and camera clipping at 1024×768 pixels for the Windows 8 version of the game.
Live Tiles
Live Tiles are probably one of Windows 8’s most prominent features. Live Tiles are the icons on the new start screen, but these are more than just app icons. Like the name implies, these tiles are animated and can contain a wealth of high-level information about the app. When it comes to games, we can do some interesting things, such as display player stats and high scores, and even entice the player to come back to the game if they haven’t played in awhile. For the purposes of getting your first Windows 8 game to be published, I am just going to focus on the basics of setting up Live Tiles.
Figure 3-8. These are the options in Visual Studio to add your own images for the de‐ fault Live Tile graphic.
Figures 3-9, 3-10, and 3-11 show the images I am using in my own game along with their sizes.
Figure 3-9. The default logo is 150×150 pixels.
Figure 3-10. The wide logo is 310×150 pixels.
Figure 3-11. The small logo is 30×30 pixels.
In Windows 8, the wide logo is optional. In the Windows Store on 8.1 the app listings actually uses the wide logo which was not done in the earlier version of the store. This means that you should give addition‐ al thought into the design of that logo to help it stand out better in the store listing. If you do not supply a wide logo in your game it will automatically be centered on a wide side tile and given a grey back‐ ground.
Once you have your Live Tile images set up, you can also control if the game’s name is displayed automatically for you by Windows 8. Below where you set the Live Tile images, you will see an option to supply a short name and a dropdown with options on how to show the title (Figure 3-12), if you want to.
Figure 3-12. Options for adding text to your Live Tile.
As you can see, you can show the text on all logo types, not at all, on the default logo, or on the wide tile. Likewise, if you don’t want Windows 8 to automatically display your game’s name, I suggest simply setting it to “No Logos” and putting the game’s name in the artwork itself.
Splash Screen
You may have noticed an additional graphic in the images folder called splash‐ screen.png. You can set this in the .appxmanifest (Figure 3-13), just like we did with our game’s Live Tile graphics.
The splash screen is automatically displayed as the game loads up. Its deafult resolution is 620×300 pixels. In Figure 3-14 you will see a sample of what my own game’s splash screen looks like.
Figure 3-14. This is the splash screen graphic I use in Super Paper Monster Smasher.
There is nothing fancy about this. The image is centered on the screen and you can set the background color to help match up to your own splash image. I highly suggest making the background color of your splash screen solid so it looks seamless on the default background color. Remember that this image will be centered when the game is loading up so, if you are on a higher resolution monitor, you are going to see a lot of background color surrounding your splash screen image. There is no way to stretch this out to fill the screen.
You can also line up your own splash image to show up after the game is loaded to make this a seamless transition. Simply center the same image on the page and then hide it when you are ready to display the game.
Tips and Tricks for Working with Artwork on Windows 8
Working with images on Windows 8 is similar to how you would on the Web. The best advantage, however, is that you don’t have to worry about loading files from a server. Instead, you will need to focus on optimizing your files so they don’t take up a lot of memory and also limit your draw calls so you can increase performance on larger monitors. Here are some tips to do just that.
Use Sprite Sheets or Texture Atlases
Try to combine images as much as possible into a single graphic. Not only will this cut down on the number of images you need to manage in memory, it also helps speed up drawing to the Canvas by removing the overhead of having to manage multiple images.
There are generally two different ways to combine images: sprite sheets and texture atlases. Sprite sheets are usually used for images that are the same size and can easily be divisible by their width. A player may be 16×16 pixels wide, so you can line up all the player animations horizontally, vertically, or in a grid. By using the fixed width of the sprite, you can find each frame in the image.
Likewise, if you have lots of graphics that are not perfectly square, or you want to com‐ bine all of your game’s artwork into larger files, you can use a texture atlas. This is common when working in 3D and allows you to package up all of your textures into a single image and use an atlas file, which defines the coordinates of each image and where to find it on the texture. These atlas files can be in .xml, .json, or .txt. There are lots of free and paid texture packagers out there that can help you optimize your sprites.
Render for Native Resolution
Some JavaScript frameworks, such as ImpactJS, can automatically upscale your graphics when the game starts. While this works well on some devices, I have noticed consider‐ able slowdown on lower-powered Windows 8 devices trying to do the resizing. Instead, you should have all of your artwork pre-rendered at the correct scale factor.
You can also supply multiple scale images to choose from at runtime or, if you must have your game generate images at runtime, cache them and save them to the hard drive to use later. I’ve seen many games use this so that you only have one long load time the first time you run the game and then it resizes everything so consecutive loads are faster.
Handling Edge Cases
Figure 3-15. Testing out different resolutions in the simulator.
As you can see in Figure 3-15, simply select the icon that looks like a monitor on the right-hand side and select a different resolution to test your game out and see how it responds.
Set a Maximum Resolution
No matter what you end up doing to support multiple resolutions, just keep in mind the maximum resolution your game should render then scale the game up after that. For my Super Paper Monster Smasher game, my max resolution is 1076×600 pixels, which scales up perfectly to 1366×768 pixels. Anything higher than this and I simply scale the canvas up. This way the game is always rendering at a resolution I am com‐ fortable knowing will perform well. There is very little performance impact for scaling the canvas via CSS. If you were to create your game to run at 2560×1440, which is the native resolution on my 27″ monitor, the game would run incredibly slow.
CHAPTER 4
Handling Game Controls On Windows 8
When it comes to game controls for Windows 8, things can get a little overwhelming if you don’t have a plan in place when porting your game. If you remember back to
Chapter 1 where we reviewed the different Windows 8 device form factors, you may recall the diversity of Windows 8-capable hardware. With that in mind, the following input options could be available at any time to control your game:
• Mouse
Luckily, if you are coming over with an existing HTML5 game, chances are good that you are already using keyboard or mouse controls. In special cases, if your game was designed to run on mobile multi-touch, you may be ready for multi-touch on Windows 8 with a few minor modifications to your code.
The good news is that, if your game only uses the mouse, as in a single-input method, chances are good that you may not have to change a thing. We’ll get into this more when I discuss touch-first design. If you are using a keyboard, you may need to offer up additional controls on touchscreen devices. Usually, this is done with a virtual D-pad and buttons or a virtual controller stick.
Either way, it helps to take some time out to really think through the best controls for your game. Bad controls on a game could easily ruin an otherwise amazing creation. Since you are porting the game over to Windows 8, you don’t have to make concessions and have a great opportunity to supply the bare minimum touch controls to satisfy tablet
users and encourage them to use something better, like a game controller. We’ll explore this and more in the next few sections.
What Is a Touch-First Experience?
In Windows 8 design terminology, you will hear the term “touch-first experience” a lot. Windows 8 was built from the ground up to support touch input as the primary means of input, followed by a mouse and keyboard as secondary input. This has a lot to do with the shift from traditional desktops and laptops to tablet computers. The good news is that a mouse and a finger work similarly, so if you think touch first, a mouse will always work. Of course there are special cases where this may not always be true, espe‐ cially in games.
The real thing to keep in mind when building any HTML5 game is how it will be con‐ trolled. I design most of my games to work with a single touch or mouse click control when possible. This way my games will always work in a browser and also on mobile devices. Because of this, I am able to get my games running with no modification on Windows 8. Unfortunately, this may not always be the case.
You can learn more about touch-first experience for Windows 8 here.
Working with Traditional Input
When I refer to “traditional input” I am talking about a mouse and keyboard. That’s because the majority of computers out today have a mouse and keyboard. Touch-enabled devices, such as phones and tablets, are relatively new, especially when it comes to HTML5 games. If your game supports a mouse and keyboard, you will not have to change a thing in your code. Simply listen to keyboard and mouse events like you nor‐ mally would in a browser. Just remember that if you rely too heavily on the keyboard you are going to want to offer up some additional touch-centric controls for tablet users in order to pass Windows Store certification.
Working with Touch
In Windows 8 apps, we have very granular control over detecting the type of touch input our app is receiving. When it comes to WebKit games, there is a clear distinction between touch and mouse clicks. Usually in a WebKit app, you would do something like this:
From there, you could split up the logic in your app to handle touch differently than
Instead, on Windows 8, you can simply handle all mouse and touch events the same since you have access to an input abstraction class called the MSPointer. On Window 8, we refer to this as “handling touch-first input without compromising mouse,” and there is a great article on it here. It’s important to note that you can also check if the device is touch enabled, just like you do on WebKit, like so:
var touchEnabled = window.navigator.msPointerEnabled
To help illustrate how touch and mouse input is handled on Windows 8, take a look at
Figure 4-1.
Figure 4-1. Here you can see a graphical representation of how the MSPointer works by encapsulating mouse, touch, and pen input into a single point object.
As you can see, references to a pointer object abstracts the type of input and gives you the necessary x,y values along with other properties you would need to have access to in your game. Let’s look at how touch events work in Windows 8 compared to WebKit. When it comes to WebKit touch events, you would usually set up the following three events:
canvas.addEventListener( 'touchstart', onTouchStart, false ); canvas.addEventListener( 'touchmove', onTouchMove, false ); canvas.addEventListener( 'touchend', onTouchEnd, false );
This would cover your three main input states. It’s similar in Windows 8. The only difference is that you need to reference the MSPointer event instead.
canvas.addEventListener('MSPointerDown', onTouchStart, false); canvas.addEventListener("MSPointerMove", onTouchMove, false); canvas.addEventListener('MSPointerUp', onTouchEnd, false);
As you can see, the two are basically the same. If you wanted, you could easily detect the platform and swap out the correct event ID if you are building a cross-platform HTML5 game. One of the advantages of supporting this in your Windows 8 app is that IE 10 also supports the same touch model, so it will work flawlessly on the Web as well. From here, there are a few additional differences in the event that you would get back on Windows 8 versus WebKit. In WebKit, you could get the touch point’s ID via the .identifier property. In Windows 8, you would use .pointerID. From there, you can continue to access x,y and clientX,clientY just like you would do in WebKit. After that, your code should work basically the same. Also, since input can come from multiple sources in a Windows 8 game, you can test the pointerType of the event object you receive with the following constants:
MSPOINTER_TYPE_MOUSE 4 MSPOINTER_TYPE_PEN 3 MSPOINTER_TYPE_TOUCH 2
Simply get the value of pointerType from the event and see if it matches up to one of the above values. This is critical if you want your game to show virtual controls when it detects a touch event instead of the mouse. As you start to anticipate your game being played on devices with a mouse and keyboard, you may want to enable or disable the touch controls based on the input type. I have seen this in several apps that will show the onscreen keyboard when a touch is detected versus a mouse click.
Working with Controllers and Game Pads
One of the key advantages of building a game for Windows 8 is the ability to access physical hardware via the USB ports. Of course the first thing that may come to mind is how do I get my game to work with an Xbox controller or other compatible USB gamepad? While WinJS doesn’t directly expose access to the Windows 8 controller API, we will go over how to access this via the C++ bridge that allows JavaScript to commu‐ nicate with the underlying OS.
In order to get started, we are going to need to download this library, which abstracts the Windows 8 C++ controller API and exposes it to JavaScript.
For more information on how the underlying Windows 8 controller API works, make sure to read this.
To get started, copy over the cpp folder to the project and click on Solution and Add Existing Project.
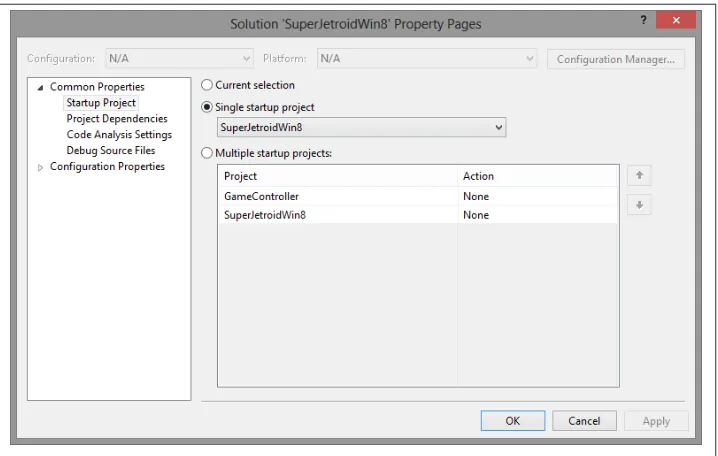
As you can see in Figure 4-2, we have added the GameController project to our Visual Studio solution. Now we need to sort out any dependencies between the two projects. You can do this by opening up the Project Dependencies window.
Figure 4-2. Navigate to where you put the GameController project to add it into your game’s project solution.
We will need to tell our main game project that it depends on the GameController project. Simply check the box (Figure 4-3). Now we need to reassign the default project for the solution. You can do that by selecting Startup Project.
Figure 4-3. Add the GameController project as a dependency.