w w w . s y n g r e s s . c o m
Syngress is committed to publishing high-quality books for IT Professionals and delivering those books in media and formats that fit the demands of our cus-tomers. We are also committed to extending the utility of the book you purchase via additional materials available from our Web site.
SOLUTIONS WEB SITE
To register your book, visit www.syngress.com/solutions. Once registered, you can access our [email protected] Web pages. There you will find an assortment of value-added features such as free e-booklets related to the topic of this book, URLs of related Web site, FAQs from the book, corrections, and any updates from the author(s).
ULTIMATE CDs
Our Ultimate CD product line offers our readers budget-conscious compilations of some of our best-selling backlist titles in Adobe PDF form. These CDs are the perfect way to extend your reference library on key topics pertaining to your area of exper-tise, including Cisco Engineering, Microsoft Windows System Administration, CyberCrime Investigation, Open Source Security, and Firewall Configuration, to name a few.
DOWNLOADABLE EBOOKS
For readers who can’t wait for hard copy, we offer most of our titles in download-able Adobe PDF form. These eBooks are often availdownload-able weeks before hard copies, and are priced affordably.
SYNGRESS OUTLET
Our outlet store at syngress.com features overstocked, out-of-print, or slightly hurt books at significant savings.
SITE LICENSING
Syngress has a well-established program for site licensing our ebooks onto servers in corporations, educational institutions, and large organizations. Contact us at [email protected] for more information.
CUSTOM PUBLISHING
Lawrence Abrams
Nancy Altholz
Kimon Andreou
Brian Barber
Tony Bradley
Daniel Covell
Laura E. Hunter
Mahesh Satyanarayana
Craig A. Schiller
Darren Windham
Winternals
®
D e f r a g m e n t a t i o n , Re c o v e r y, a n d
A d m i n i s t r a t i o n F i e l d G u i d e
tion (collectively “Makers”) of this book (“the Work”) do not guarantee or warrant the results to be obtained from the Work.
There is no guarantee of any kind, expressed or implied, regarding the Work or its contents.The Work is sold AS IS and WITHOUT WARRANTY.You may have other legal rights, which vary from state to state. In no event will Makers be liable to you for damages, including any loss of profits, lost savings, or other incidental or consequential damages arising out from the Work or its contents. Because some states do not allow the exclusion or limitation of liability for consequential or incidental damages, the above limitation may not apply to you.
You should always use reasonable care, including backup and other appropriate precautions, when working with computers, networks, data, and files.
Syngress Media®, Syngress®, “Career Advancement Through Skill Enhancement®,” “Ask the Author UPDATE®,” and “Hack Proofing®,” are registered trademarks of Syngress Publishing, Inc. “Syngress:The Definition of a Serious Security Library”™, “Mission Critical™,” and “The Only Way to Stop a Hacker is to Think Like One™”are trademarks of Syngress Publishing, Inc. Brands and product names mentioned in this book are trademarks or service marks of their respective companies.
KEY SERIAL NUMBER
Winternals Defragmentation, Recovery, and Administration Field Guide
Copyright © 2006 by Syngress Publishing, Inc. All rights reserved. Except as permitted under the Copyright Act of 1976, no part of this publication may be reproduced or distributed in any form or by any means, or stored in a database or retrieval system, without the prior written permission of the publisher, with the exception that the program listings may be entered, stored, and executed in a computer system, but they may not be reproduced for publication.
1 2 3 4 5 6 7 8 9 0 ISBN: 1-59749-079-2
Publisher: Andrew Williams Page Layout and Art: Patricia Lupien Acquisitions Editor: Gary Byrne Copy Editor: Audrey Doyle Technical Editor: Dave Kleiman Indexer: Nara Wood Cover Designer: Michael Kavish
Distributed by O’Reilly Media, Inc. in the United States and Canada.
Acknowledgments
v
Syngress would like to acknowledge the following people for their kindness and support in making this book possible.
Syngress books are now distributed in the United States and Canada by
O’Reilly Media, Inc.The enthusiasm and work ethic at O’Reilly are incredible, and we would like to thank everyone there for their time and efforts to bring Syngress books to market:Tim O’Reilly, Laura Baldwin, Mark Brokering, Mike Leonard, Donna Selenko, Bonnie Sheehan, Cindy Davis, Grant Kikkert, Opol Matsutaro, Steve Hazelwood, Mark Wilson, Rick Brown,Tim Hinton, Kyle Hart, Sara Winge, Peter Pardo, Leslie Crandell, Regina Aggio Wilkinson, Pascal Honscher, Preston Paull, Susan Thompson, Bruce Stewart, Laura Schmier, Sue Willing, Mark Jacobsen, Betsy Waliszewski, Kathryn Barrett, John Chodacki, Rob Bullington, Kerry Beck, Karen Montgomery, and Patrick Dirden. The incredibly hardworking team at Elsevier Science, including Jonathan Bunkell, Ian Seager, Duncan Enright, David Burton, Rosanna Ramacciotti, Robert Fairbrother, Miguel Sanchez, Klaus Beran, Emma Wyatt, Krista Leppiko, Marcel Koppes, Judy Chappell, Radek Janousek, Rosie Moss, David Lockley, Nicola Haden, Bill Kennedy, Martina Morris, Kai Wuerfl-Davidek, Christiane Leipersberger,Yvonne Grueneklee, Nadia Balavoine, and Chris Reinders for making certain that our vision remains worldwide in scope. David Buckland, Marie Chieng, Lucy Chong, Leslie Lim, Audrey Gan, Pang Ai Hua, Joseph Chan, June Lim, and Siti Zuraidah Ahmad of Pansing Distributors for the enthusiasm with which they receive our books.
vii
Technical Editor
Dave Kleiman(CAS, CCE, CIFI, CISM, CISSP, ISSAP, ISSMP, MCSE) has worked in the information technology security sector since 1990. Currently, he is the owner of
SecurityBreachResponse.com and is the Chief Information Security Officer for Securit-e-Doc, Inc. Before starting this position, he was Vice President of Technical Operations at Intelliswitch, Inc., where he supervised an international telecommunications and Internet ser-vice provider network. Dave is a recognized security expert. A former Florida Certified Law Enforcement Officer, he specializes in computer forensic investigations, incident response, intrusion anal-ysis, security audits, and secure network infrastructures. He has written several secure installation and configuration guides about Microsoft technologies that are used by network professionals. He has developed a Windows operating system lockdown tool, S-Lok (www.s-doc.com/products/slok.asp ), which surpasses NSA, NIST, and Microsoft Common Criteria Guidelines.
viii
Lawrence Abramsis the CTO for Thorn Communications, an Internet service provider based in New York City that focuses on managed services for colocation customers at its three data centers. Lawrence manages the technical and security operations as well as being involved in the day-to-day operations of the business. He is involved with the deployment and monitoring of intrusion preven-tion systems, intrusion detecpreven-tion systems, and firewall systems
throughout Thorn’s network to protect Thorn’s customers. Lawrence is also the creator of BleepingComputer.com, a Web site designed to provide computer help and security information to people with all levels of technical skills. With more than a million different visitors each month, it has become a leading resource to find the latest spy-ware removal guides.
Lawrence’s areas of expertise include malware removal and puter forensics. He is active in the various online antimalware com-munities where he researches new malware programs as they are released and disseminates this information to the public in the form of removal guides. He was awarded a Microsoft Most Valuable Professional (MVP) in Windows security for this activity.
Lawrence currently resides in New York City with his wife, Jill, and his twin boys, Alec and Isaac.
Nancy Altholz(MSCS, MVP) is a Microsoft MVP in Windows Security. She is a security expert and Wiki Malware Removal Sysop at the CastleCops Security Forum. As Wiki Malware Removal Sysop, she oversees and authors many of the procedures that assist site visitors and staff in system disinfection and malware prevention. As a security expert, she helps computer users with various
Windows computer security issues. Nancy is currently coauthoring Rootkits for Dummies( John Wiley Publishing), which is due for release in August 2006. She was formerly employed by Medelec’s
ix
Development. Nancy holds a master’s degree in Computer Science. She lives with her family in Briarcliff Manor, NY.
Kimon Andreouis the Chief Technology Officer at Secure Data Solutions (SDS) in West Palm Beach, FL. SDS develops software solutions for electronic discovery in the legal and accounting indus-tries. SDS is also a provider of computer forensic services. His expertise is in software development, software quality assurance, data warehousing, and data security. Kimon’s experience includes posi-tions as Manager of Support & QA at S-doc, a software security company, and as Chief Solution Architect for SPSS in the Enabling Technology Division. He also has led projects in Asia, Europe, North America, and South America. Kimon holds a Bachelor of Science in Business Administration from the American College of Greece and a Master of Science in Management Information Systems from
Florida International University.
Brian Barber(MCSE, MCP+I, MCNE, CNE-5, CNE-4, CNA-3, CNA-GW) is coauthor of Syngress Publishing’s Configuring
x
100 security architect and consultant with more than eight years of computer networking and administration experience, focusing the last four years on security.Tony provides design, implementation, and management of security solutions for many Fortune 500 enter-prise networks.Tony is also the writer and editor of the About.com site for Internet/network security. He writes frequently for many technical publications and Web sites.
I want to thank my wife, Nicki, for her support and dedication as I worked on this project. She is my “Sunshine” and my inspiration. I also want to thank Gary Byrne and Dave Kleiman for inviting me to participate on this project and for their unending patience as we worked to put it all together.
Daniel Covell(CCNA, MCP) is a Senior Systems Analyst at Sharp HealthCare in San Diego. Sharp HealthCare is an integrated
regional health-care delivery system that includes four acute-care hospitals, three specialty hospitals, and three medical groups. Sharp has more than 14,000 employees and represents $1 billion in assets and $1.4 billion in revenue. Daniel is a key team member in sup-porting more than 10,000 desktops and thousands of PDAs, laptops, and tablets.
Daniel has more than 13 years of experience in desktop support, network support, and system design. He has worked for government agencies, large outsourcing projects, and several consulting firms. His experience gives him a very broad understanding of technology and its management.
Daniel also owns a small computer consultancy business and currently resides in El Cajon, CA, with his wife, Dana.
Daniel wrote the section of Chapter 5 titled “Advanced Disk Fragmentation Management (Defrag Manager).”
xi
units and schools within the university. Her specialties include Windows 2000 and 2003 Active Directory design and implementa-tion, troubleshooting, and security topics. Laura has more than a decade of experience with Windows computers; her previous expe-rience includes a position as the Director of Computer Services for the Salvation Army and as the LAN administrator for a medical supply firm. She is a contributor to the TechTarget family of Web sites and to Redmond Magazine (formerly Microsoft Certified
Professional Magazine).
Laura has previously contributed to the Syngress Windows Server 2003 MCSE/MCSA DVD Guide & Training System series as a DVD presenter, author, and technical reviewer, and is the author of the Active Directory Consultant’s Field Guide (ISBN: 1-59059-492-4) from APress. Laura is a three-time recipient of the prestigious Microsoft MVP award in the area of Windows Server—
Networking. Laura graduated with honors from the University of Pennsylvania and also works as a freelance writer, trainer, speaker and consultant.
Laura wrote Chapter 3 and was the technical editor for Chapters 5 and 6.
Mahesh Satyanarayanais a final-semester electronics and commu-nications engineering student at the Visveswaraiah Technological University in Shimoga, India. He expects to graduate this summer and has currently accepted an offer to work for Caritor Inc., an SEI-CMM Level 5 global consulting and systems integration com-pany headquartered in San Ramon, CA. Caritor provides IT infras-tructure and business solutions to clients in several sectors
xii
Hawkeye Security Training, LLC. He is the primary author of the first Generally Accepted System Security Principles. He was a coau-thor of several editions of the Handbook of Information Security
Managementand a contributing author to Data Security Management. Craig has cofounded two ISSA U.S. regional chapters: the Central Plains Chapter and the Texas Gulf Coast Chapter. He is a member of the Police Reserve Specialists unit of the Hillsboro Police Department in Oregon. He leads the unit’s Police-to-Business-High-Tech speakers’ initiative and assists with Internet forensics.
Darren Windham (CISSP) is the Information Security lead at ViewPoint Bank, where he is responsible for ensuring compliance with GLB, FFIEC, OTS, FDIC, and SOX regulations, as well as managing technology risks within the organization.
Darren’s previous experience in technology includes network design, system configuration, security audits, internal investigations, and regulatory compliance. He has also worked as a security consul-tant for local companies, including other financial institutions. His background also includes system administration for manufacturing firms and one of the .coms of the late 1990s. Darren was a reviewer for the book Hacking Exposed: Computer Forensics(McGraw-Hill Osborne Media, ISBN: 0-07225-675-3).
Darren is a member of Information Systems Audit and Control Association® (ISACA), North Texas Electronic Crimes Task Force (N-TEC), and the North Texas Snort User Group.
Companion Web Site
xiii
Contents
Foreword . . . xxiii
Chapter 1 Recovering Your Computer with ERD Commander. . . 1
The Process Properties Dialog . . . .50
Exploring Program Autostart Locations Using Autoruns . . . . .57
Describing the Main Window View . . . .59
Registry and Folder Autostart Locations Monitored by Autoruns . . . .69
Newly Reported Startup Entry Slated for Next Version of Autoruns . . . .72
Researching an Autostart Item . . . .73
The Dynamic Duo: Using Autoruns and Process Explorer Together to Troubleshoot Startups and Combat Malware . . . .74
Requirements . . . .74
Investigating Autoruns Startups . . . .75
Example 1 . . . .75
Example 3 . . . .82
Step 5: View Process Explorer for Relevant Entries . . . . .90
Step 6: Stop and Delete the hxdef Service, and Then Reboot . . . .92
Step 7: Delete the hxdef Files and Registry Autostarts . . . .94
Step 8: Remove the Malware Payload . . . .95
Example 5 . . . .96
Other Examples of Malware That Uses Nontraditional Hidden Startups Locatable in Autoruns . . . . .102
The SmitFraud Trojan . . . .102
The Vundo Trojan . . . .104
Using File Compare in Autoruns to Diagnose Changes in Startups . . . .104
Viewing the Security Settings of Your Resources (AccessEnum) . . . .114
Listing the Users with Access to Encrypted Files (EFSDump) . . .126
Running EFSDump and Interpreting Its Results . . . .127
Moving/Deleting Files in Use on Reboot (PendMoves, MoveFile) . . . .128
Running PendMoves . . . .129
Running MoveFile . . . .130
Running ShareEnum and Interpreting Its Results . . . .132
Viewing Users Who Are Logged On and What They’re Doing . . . .152
Using PsLoggedOn to See Logged-On Users . . . .152
Real-World Examples . . . .154
Using LogonSessions to Find Information about a Logged-On User . . . .155
Using Tokenmon to Monitor a User’s Security Tokens . . . . .161
What Is a Token? . . . .161
Finding Open Resources and the Processes That Are Accessing Them . . . .168
Using PsTools to Examine Running Processes and Files . . . .168
Remotely Monitoring Open Files with PsFile.exe . . . .169
Monitoring Processes with PsList.exe . . . .172
Real-World Examples . . . .176
Using Filemon to Monitor
Using Regmon to Monitor Real-Time Activity in the Registry . . . .199
Configuring Regmon . . . .201
Understanding Regmon’s Output . . . .201
Setting Up Filters . . . .205
Examining the Registry during the Windows Boot Sequence in an NT-Based Operating System . . . .208
Real-World Examples . . . .209
DiskExt . . . .247
Analyzing the Partition Layout Using LDMDump . . . .254
Finding Volume Information Using LDMDump . . . .255
Disk Volume Management (NTFSInfo, VolumeID, LDMDump) . . . .257
Getting Extended NTFS Information . . . .257
Using NTFSInfo to Get MFT Details . . . .260
Metadata Files and NTFSInfo . . . .261
Investigating the Internals of the Logical Disk Manager . . . . .261
Looking inside the LDM Database . . . .263
Managing Volume IDs . . . .268
Managing Disk Utilization (Du, DiskView) . . . .270
An Easier Way to Find Large Directories . . . .271
Finding Space Utilized by User Documents and Applications . . . .272
Advanced Data Recovery and Centralized Recovery (Recovery Manager) . . . .288
Recovery Points . . . .288
Making Sense of a Windows Crash (Crash Analyzer Wizard) . . . .300
Running the Crash Analyzer Wizard . . . .300
Digging Deeper with RegMon . . . .323 Monitoring Active Network Connections
(TCPView,Tcpvcon,TCPView Pro) . . . .332 TCPView . . . .332 Tcpvcon . . . .335 TCPView Pro . . . .343 Performing DNS and Reverse DNS Lookups (Hostname) . . . . .344 Domain Name Addressing . . . .344
Using a Trace Feature During Application
Process Optimization . . . .420 Accessing a Windows NT 4.0 NTFS
Volume from a FAT File System Volume . . . .432 Diagnosing a Windows 2000 NTFS
Six years and seven months ago,Winternals brought forth a set of tools that came to my rescue. It was November of 1999 when I purchased my first Winternals Administrator’s Pak. It contained BlueSave Version 1.01, ERD Commander Professional Version 1.06, Monitoring Tools (FileMon and
Regmon) Enterprise Editions Version 1.0, NTFSDOS Professional Version 3.03, NTRecover Version 1.0, and Remote Recover Version 1.01.We had a Windows NT 4 server in the dead zone. I spent a few hours reading over the ERD and Remote Recover user guides, created a “client floppy” (yes this was when we still had to use floppies), and began my quest.Thank goodness that version of ERD had the ability to access NT-defined fault-tolerant drives, because within a few hours we had recovered the system and were back up and running. Since my Windows NT administrator experience began in 1996, I thought back on hundreds of incidents that made me wish I had purchased Winternals sooner. We have come a long way since then; the Winternals team has improved upon and added many tools and features to the Administrator’s Pak utilities. However, one thing remains the same—in the Microsoft administrator’s world,Winternals is a lifesaver.
Winternals not only makes excellent products you can purchase for the enterprise but also sponsors the freeware Sysinternals tools
(www.sysinternals.com), by far the greatest collection of freeware tools for the Microsoft administrator’s toolbox in the market.
I spent quite a bit of time speaking with Winternals users with various experience using the utilities and tools for different functions. Many of those users expressed interest in helping with the book, so I gathered a group of security professionals from around the globe, and we formed an outline.We had a great time working together and throwing ideas, and some jokes, around at each other.We set out with a goal of writing about the Winternals and
Sysinternals tools in real-world situations administrators can and will face on a daily basis, with the hope of making your jobs easier.The result was the Winternals Defragmentation, Recovery, and Administration Field Guide. All of the authors have worked extremely hard to put together a book that we hope you will find useful and enjoyable.
We begin with ERD Commander 2005 and then step through recovering your computer (what a change from back in 1999 to now).We then give you an overview of utilizing the tools for various tasks, such as locating and removing malware, troubleshooting, configuring security, recovering data, working with the source code to create useful tools, and working with NT 4.0-only tools.We wrap things up with a chapter about having fun with the Sysinternals tools. Heck, we have to have some fun in our jobs, and what better way then giving your fellow sysadmin gray hair with some fake BSODs!
All of us, and I imagine many of you, would like to thank Mark
Russinovich, Bryce Cogswell, and the Winternals team for putting together these utilities, giving us the fine selection of freeware tools, and making the lives of Microsoft administrators around the globe that much easier. In addition, we would like to thank Syngress for giving us the opportunity to get this infor-mation out to the community.
Recovering Your
Computer with ERD
Commander 2005
Solutions in this chapter:
■ Utilizing ERD Commander 2005 ■ Booting a Dead System
■ Being the Locksmith ■ Accessing Restore Points ■ Removing Hotfixes
Chapter 1
1
Summary
Solutions Fast Track
Introduction
ERD commander is one of the finest compilations of emergency utilities for
Microsoft systems administrators. With its graphical and command line environments that have the ability to access any Windows NT files system from a bootable CD in a Windows like environment, it is an integral part of the Windows administrator’s toolbox.There have been many times that I have been greeted by the Blue Screen of Death after installing a hotfix, and it was ERD that came to the rescue.
If there is one thing Winternals software is known for, it is its capability to bring dead systems back to life. Do not get me wrong. Winternals software is capable of doing so much more than that, but I am convinced that if you asked 100 network administrators of Windows servers what Winternals software is known for, they would say it is known for recovering a server that has fallen and cannot get up. Whether it is diagnosing windows crashes, finding malware, remotely recovering files off a dead system, fixing registry mishaps, or gaining access to a system you have been locked out of, ERD is there for you.
Utilizing ERD Commander 2005
ERD Commander 2005 is the crown jewels of Winternals’ latest version of the Administrator’s Pak.To help you get started, the ERD Commander 2005 Boot CD Wizard will guide you through the task of creating the most appropriate bootable CD for your environment. Once you have tailored the boot CD to your require-ments and tastes, you can boot the system and begin to grasp the power that is at your fingertips. In subsequent sections, we will delve into booting into the ERD Commander 2005 desktop interface and we will discuss the use of three of the most commonly used utilities for recovering an inaccessible or unresponsive system.
Creating the ERD Commander 2005 Boot CD
The ERD Commander 2005 Boot CD is not the main tool in the network adminis-trator or desktop support professional’s toolbox; it isthe toolbox.The team at
Winternals has created a powerful collection of tools and has made them available in a single location, accessible from a familiar and easy-to-use interface. In terms of the tasks you would perform to recover an inaccessible or unresponsive system, you should have everything you need on the CD. In this section, we will walk through the process of creating the boot CD, and customizing ERD Commander 2005 to suit your needs.
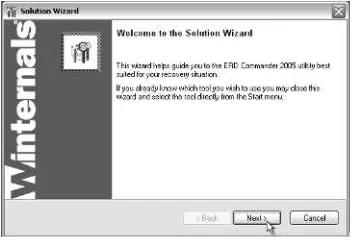
Programs | Administrators Pak | ERD Commander 2005 Boot CD Wizard). After double-clicking the Program Group item to launch the wizard, you will be presented with the “Welcome…” screen shown in Figure 1.1.
Figure 1.1Launching the ERD Commander 2005 Boot CD Wizard
Click the About button to display ERD Commander 2005 version informa-tion. Click the Nextbutton to proceed to the screen for accepting the Winternals license (see Figure 1.2). Note that the Next button is disabled until you except the license agreement; you must accept the license agreement to continue progressing through the wizard. Click the “Yes, I accept…”radio button and click Nextto continue. Clicking “No, I do not accept…” will terminate the wizard.
Figure 1.2Accepting the License Agreement
circumstances, and it would be awful for the software license to expire and the soft-ware to be unsupported or disabled just when you need to use it. Click the Next
button to continue.
Figure 1.3Verifying the Licensing Information
Configuring & Implementing…
A Boot CD in Every Pot
At this stage of the wizard, you will need to extract and prepare files so that you can configure and tailor them to your requirements in subsequent stages. Clicking the Nextbutton will launch the file extraction process, shown in Figure 1.4.
Figure 1.4Extracting the Files Required for the Boot CD
At this stage in the wizard we are starting to configure the boot CD, beginning with boot options (see Figure 1.5).The first boot option will cause the CD to boot straight into ERD Commander 2005.The second option is to boot into the remote recover client.The third option will present a selection screen (seen in Figure 1.20) and will prompt the user to boot into either the ERD Commander 2005 desktop interface or the Remote Recover client. Option number three (dual-mode opera-tion) provides the most flexibility and will be the most desirable option for most network administrators. Click the radio button for the desired option and click the
Nextbutton to continue.
At this stage in the wizard, the process splits into two paths that rejoin at a later step. If you selected the first option (“Always boot to ERD Commander 2005”), you will proceed into configuring the ERD Commander 2005 user interface. Choosing the second option (“Always boot as a Remote Recover client”), shown selected in Figure 1.6, will skip ERD Commander 2005 configuration and will take you through the process of configuring Remote Recover. If you selected dual-mode operation, ERD Commander 2005 will be configured first, before Remote Recover.
Figure 1.6Configuring a Remote Recover Client Boot CD
Remote Recover uses User Datagram Protocol (UDP) over Ethernet to access the server that needs to be revived (as opposed to NTRecover, which uses RS-232 [serial] connectivity over a null-modem serial cable; NTRecover will be discussed in detail in Chapter 11). As seen in Figure 1.7, the Remote Recover Options screen involves setting the UDP port number and restricting file system access on the client from the boot CD to read-only. Read-only access is sufficient for recovering data from the client system. If you need to add, rename, modify, or delete files on the client system, leave the checkbox empty, which is the default setting. Click the Next
button to continue.
W
ARNINGFigure 1.7Setting Remote Recover UDP Port and Disk Access Options
You configure the options for controlling access to the client system on the Remote Recover Security screen (see Figure 1.8). Since the purpose of this part of the wizard is to configure the client system boot disk—the boot disk that is used to boot the system to be recovered—the options establish the conditions under which functioning systems can connect. Functioning systems will need to run the host soft-ware, at a minimum.The first option will permit connections from any system run-ning the host software.The second will permit a connection from a system that is using the particular boot disk you are creating.The third option will permit connec-tions from any system running the host software as long as the correct password is provided.The password field will be enabled when you click on the radio button for the third option. Once you have chosen the desired option, click the Next button to continue.This concludes the configuration of Remote Recover.The next screen after this stage, Additional Mass Storage Drivers, is shown in Figure 1.12.
If you had opted to boot ERD Commander 2005 (refer back to Figure 1.5), you would have proceeded directly to the first stage in configuring the ERD Commander 2005 user interface, displayed in Figure 1.9.This stage involves selecting what tools you want to be available on the boot disk. All included components will be available from the Start menu in the ERD Commander 2005 desktop and through the Solution Wizard. By default, all tools are included. Once you have finished adding and removing the listed components click the Nextbutton to continue.
Figure 1.9Equipping the Boot CD with Recovery and Management Tools
You have two options for configuring Crash Analyzer support. Choosing the first option will install the debugging tools on the boot CD.You can use the default debugging tool offered in the available field (see Figure 1.10) or you can use the “…” button at the right of the field to navigate to the appropriate directory where your desired debugging tool is located. If Microsoft’s “Debugging Tools for
Windows” is not installed or the Wizard cannot locate the package, the Next button will be disabled, forcing you to select the second option. For option number two, you will use the debugging tool on the partition that hosts the Windows installation you will be attempting to recover. If the files required by the Crash Analyzer are missing or corrupted in the Windows installation directory, you are out of luck.The safest option is the first one. Select the desired option’s radio button and click Next
to continue.
N
OTEAs stated on the Crash Analyzer Support screen in Figure 1.10, the Crash Analyzer utility (described in detail in Chapter 7) uses Microsoft’s
screen and download the package, click the Cancelbutton to terminate the wizard, install it, and rerun the wizard. You could trust the
Debugging Tools on the client system, but if the file system is not intact or if the package was not installed on it, you will wish you had included it on the boot disk.
Figure 1.10Configuring Crash Analyzer Support
On the Password Protection screen, you have the option of preventing unautho-rized use of the CD by enforcing the use of a password before being able to access the ERD Commander 2005 desktop interface. Do not take this screen lightly. ERD Commander 2005 presents a level of access to a system that may be dangerous in the hands of an untrained or reckless individual, such as resetting passwords, which is demonstrated later in this chapter when we discuss being the locksmith. If unautho-rized use of the CD is possible, choose the second option and enter an identical password in both fields (see Figure 1.11). Click the Nextbutton to continue.
W
ARNINGFigure 1.11Securing the ERD Commander 2005 Boot CD
This is the stage where the two configuration processes (as dictated by the options you chose in Figure 1.5) rejoin.The next two screens permit the addition of drivers for mass storage devices and network controllers, or network interface cards (NICs). By default, the boot disk is equipped with a vast array of the most common device drivers. If you use specialized or less common controllers, or if you suspect that your device may be newer than the vintage of supplied mass storage drivers, you should add them here. Click the Add Devicebutton to specify the required drivers (see Figure 1.12).You will be asked for a location where the driver files are stored. You can specify as many drivers as you think you will need. Click the Next button to proceed to adding network controller drivers.
T
IPIf you are planning to use ERD Commander 2005 to recover virtual servers in a VMware environment, add the mass storage and network drivers that are added when you install VMware Tools in the Guest oper-ating system.
There is a good chance that you do not need to add anything on this screen; however, as stated earlier in this chapter, if you use NICs that are newer than your version of the Administrator’s Pak or you are using an esoteric network device, it is a good idea to add the driver as a precaution.The boot CD is equipped by default to support many network controller drivers and will use all of its drivers to attempt to bring up a NIC, not simply the ones you add on the screen. Once you have added the required network controller drivers, click the Next button to continue (see Figure 1.13).
Figure 1.13 Adding NIC Drivers
Figure 1.14Specifying Additional Utilities to Add on the Boot CD
You are almost done. On the Write CD Image File screen (as seen in Figure 1.15), you can accept the default location or select the location where you want the CD image to be written.The Browse button will bring up an Explorer window for you to navigate to the desired directory.You are free to change the filename to something more significant; however, it is imperative that you preserve the .iso file-name extension. Click Next to begin the CD image creation process, as seen in Figure 1.16.
Figure 1.15Specifying the Location of the CD Image File
not equipped with a drive that accepts DVD media. CD-R is probably the safest option because it is the most universally recognized.
Figure 1.16Creating the Boot CD Image
If the “Burn to the following CD recordable drive now...” selection is not avail-able (see Figure 1.17), your recording device is not natively supported by the wizard. If it is available, the image will be saved to your hard disk, and you can transfer the image using third-party software. Selecting “View supported recordable CD devices” will display the vast list of CD-R, CD-RW, DVD-R, and DVD-RW drives that are natively supported by ERD Commander 2005.
Figure 1.17Transferring the CD Image to Blank CD Media
Figure 1.18Completing the ERD Commander 2005 Boot CD Wizard
This is the final stage in the ERD Commander 2005 Boot CD Wizard.The Explore button in Figure 1.18 will open Windows Explorer to the directory speci-fied just above the button. If the CD creation could not be completed you may be able to launch the appropriate application from a context menu in the Explorer window. Failing that, you can do so from the Start menu. At this point, your individ-ually tailored boot disk is complete.You are now ready to boot a system and start using the ERD Commander 2005 utilities.
Using ERD Commander 2005 Recovery Utilities
If you left all of the components selected on the Tool Selection step of the wizard, they will be available from one of the three tool-related Program Groups on the Start menu in the ERD Commander 2005 desktop environment.Table 1.1 lists the Program Groups and where the tools are located.
Table 1.1ERD Commander 2005 Program Groups and Tool Names
Program Group Tool Name
Administrative Tools Autoruns (described in Chapter 2) Disk Management
Event Log RegEdit
Service and Driver Manager System Info
Networking Tools File Sharing
Table 1.1 continuedERD Commander 2005 Program Groups and Tool Names
Program Group Tool Name
System Tools Crash Analyzer (described in Chapter 7) Disk Commander
Disk Wipe
FileRestore (described in Chapter 6) Hotfix Uninstall (described later in this chapter)
Locksmith (described later in this chapter) System Compare
System File Repair
System Restore (described later in this chapter)
In addition to these stand-alone utilities, there is the Solution Wizard (shown in Figure 1.19). It is located in the top level of the ERD Commander 2005 Start menu (select Start | Solution Wizard). It is especially useful if you are unsure what utility to use, as it presents categories of typical system management and recovery tasks on a series of screens and asks questions that assist in narrowing down the choice of utilities to what should be the most appropriate for what you are trying to accomplish.
The ERD Commander 2005 desktop interface works in exactly the same way as a conventional Windows interface. If configured with the correct drivers, ERD Commander 2005 is network enabled and capable of managing local file systems, browsing the network in multiple domains, mapping to shared network drives, and connecting to the Internet. Common utilities, such as a text editor (Notepad), a file manager (Explorer), a Web browser (Mozilla Firefox), a terminal window for com-mand-line access (Console), and a search facility are included and accessible from the Start menu.You get all of this functionality in addition to the powerful Winternals management and recovery tools. In the sections that follow, we will discuss how to use some of the most popular utilities.
Booting a Dead System
This section will examine the use of the ERD Commander 2005 Boot CD to access a system in need of some assistance. If you have the Winternals Administrator’s Pak and you selected dual-mode operation in the Remote Recover step of the ERD Commander 2005 Boot CD Wizard (see Figure 1.5), you will be presented with options on how to use the CD for a given session, as shown in Figure 1.20.The first option (Run ERD Commander) is the default and when you select it, you will pro-ceed to configuring the ERD Commander session. If you select “Run Remote Recover client,” you will proceed directly to a Remote Recover session. Clicking
OK commits the selection and takes you into your selected session. If you do not wish to proceed to either of the available sessions, you can click on the appropriately named Reboot button, which causes the system to reboot, and you can start
Windows normally.
N
OTEThe version of Remote Recover that is included with ERD Commander 2005 is described in detail in Chapter 6.
If you need to interact with the file system on the system to be revived, you will need to select the appropriate partition with a Windows installation on it (see Figure 1.21). By default, the first partition discovered to have Windows installed on it will be selected and highlighted. If you do not need to connect to an operating system partition, you can select the line marked “(None)” in the System Root column. Select the appropriate keyboard layout and time zone for the server from the avail-able entries in the drop-down boxes and click OK to continue.
Figure 1.21Connecting to a Windows Partition
The boot sequence is now complete.The ERD Commander 2005 desktop envi-ronment (as seen in Figure 1.19) will be displayed (without any windows open), and you will be able to start restoring normal operation on the system.
Being the Locksmith
applications are available for resetting the password for the Administrator account. The Locksmith Wizard does more than many of these applications because it will unlock or reset the passwords for any local account on the system, and you do not need to know the original password.You can find it in the System Tools Program Group in the Start menu. Alternatively, with the correct answers to the appropriate questions, the Solution Wizard will also launch the Locksmith Wizard.
W
ARNINGThe system Registry hive must be intact on the Windows installation you are trying to restore. Locksmith writes the changes made in the EDR Commander 2005 environment directly to the Windows Registry. You will also need to boot normally into Windows to commit any password changes.
N
OTEYou can use the Locksmith Wizard only to reset passwords for local accounts on the system. It cannot reset accounts in Windows NT domains, nor in Active Directory.
You should boot into ERD Commander 2005 using the process described in the preceding section. For Locksmith to work, you must connect to a Windows par-tition because data is read from and written to the system Registry. After launching the wizard (select Start | System Tools | Locksmith), you will see the first screen, shown in Figure 1.22, which merely contains information about the
Figure 1.22 Launching the Locksmith Wizard
Figure 1.23Resetting the Password for the Administrator Account
W
ARNINGOn the final screen (shown in Figure 1.24), click the Finish button to exit the wizard. Note that the Back button is disabled. If you need to reverse the change to the password you just reset, or you need to modify the password for other local accounts, you can rerun Locksmith.
Figure 1.24Completing the Locksmith Wizard
You should reboot the system normally (select Start | Log Off | Restart | OK, and remove the ERD Commander 2005 Boot CD) immediately after com-pleting the wizard, or at your earliest convenience.Your password changes are not committed until you boot into Windows normally.To put it simply, the password that you saved last is the one that counts.
Accessing Restore Points
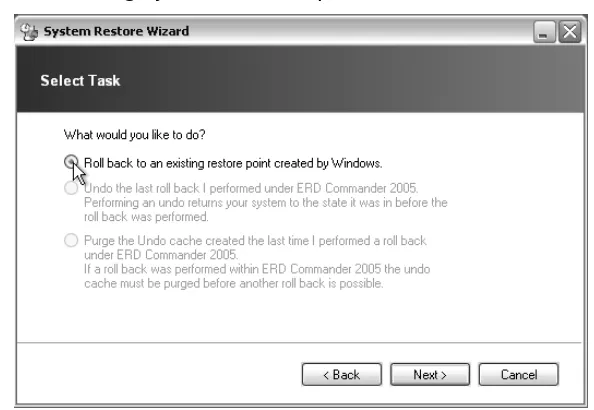
restore point without you having to run a now-unstable build of Windows XP. We will discuss the steps for using System Restore in the paragraphs that follow.
You begin by booting into the ERD Commander 2005 environment using the process described earlier in the chapter. For System Restore to work, you need to connect to a Windows partition because data is read from and written to the system Registry, and to the file system. After launching the wizard (select Start | System Tools | System Restore), you will see the first screen, which describes the System Restore Wizard (see Figure 1.25). Click the Next button on the “Welcome…” screen to proceed.
Figure 1.25Launching the System Restore Wizard
If System Restore locates the restore points on the mounted Windows partition, the “Welcome…” screen will appear as it does in Figure 1.25. If System Restore does not locate any restore points, the Next button will be disabled and exiting the wizard will be your only available option (by using the Cancel button.) Assuming that it can find the restore points, you can click on the Nextbutton to continue.
per-mitted only one system restore per session; you need to reboot for the rollback to take effect. If after reversing a system restore you realize you made a mistake by rolling back you will need to clear the undo cache—a record of the rollback activi-ties performed in this session—in order to attempt a restore to another point. Winternals designed this utility to permit you to roll back, undo the rollback, and undo the undo of the rollback so that you can roll back again. When you are sure that you are ready to continue, click the Nextbutton.
Figure 1.26Selecting System Restore Options
On the next screen, you can select the restore point to which you want to roll back. In the left pane on the screen in Figure 1.27, you can select the date when the restore point was created, and the list of available restore points for that date will be listed in the pane on the right.The navigational arrows in both panes can assist you in locating the correct month and date for the desired restore point. Click on the desired restore point in the pane on the right to highlight it and click the Next
Figure 1.27Finding and Selecting a Restore Point
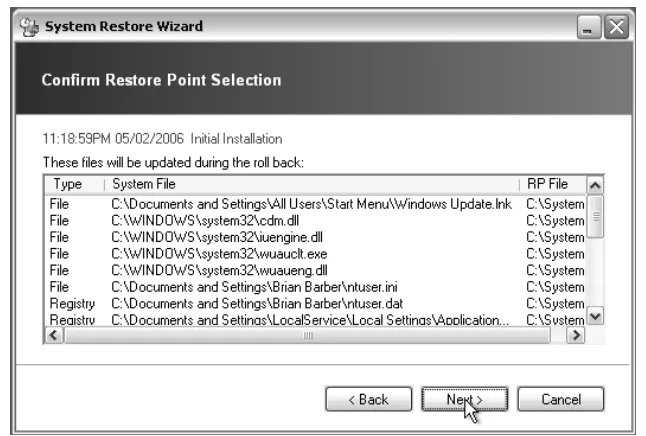
The Confirm Restore Point Selection screen is for information only, as demon-strated in Figure 1.28. A list will be displayed containing the files and Registry set-tings that will be deleted or modified.You may want to scroll through the list to ensure that everything is in order. When you are satisfied, click the Next button to begin the rollback to the selected restore point.
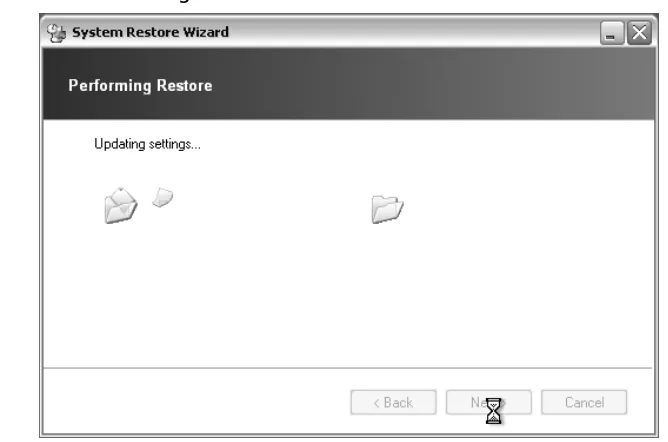
Once you click the Next button, the system restore process will begin.The file-names and Registry settings of the components that will be deleted or modified will be displayed as the process progresses to completion, as demonstrated in Figure 1.29.
Figure 1.29Executing the Restore Process
When the restore process is complete, the Update Complete screen will appear (shown in Figure 1.30).The actual process “decouples” the affected files and
Registry settings from the operating system. As a result, a reboot is required after the successful completion of the wizard for the changes to take effect. Click the Finish
button to exit the wizard and initiate a reboot (select Start | Log Off | Restart | OK, and remove the ERD Commander 2005 Boot CD) into Windows normally.
Removing Hotfixes
So far, with ERD Commander 2005, we have reset lost or forgotten passwords and restored the stability of an otherwise unstable Windows XP system by rolling back to a restore point. These functions are two common solutions to the things that prevent, or at least degrade, the normal operation of your servers and workstations. In this section, we will look at another source of frustration for network adminis-trators—hotfixes that ended up causing more problems than they were supposed to solve—and the solution ERD Commander 2005 delivers to come to their assis-tance: Hotfix Uninstall. This is a wizard-driven utility used to uninstall (decouple and remove) individual or multiple hotfixes when the installation of a particular hotfix has rendered a system unbootable and you get to a point when Windows Add/Remove Programs—the conventional method of removing hotfixes—is out of reach.
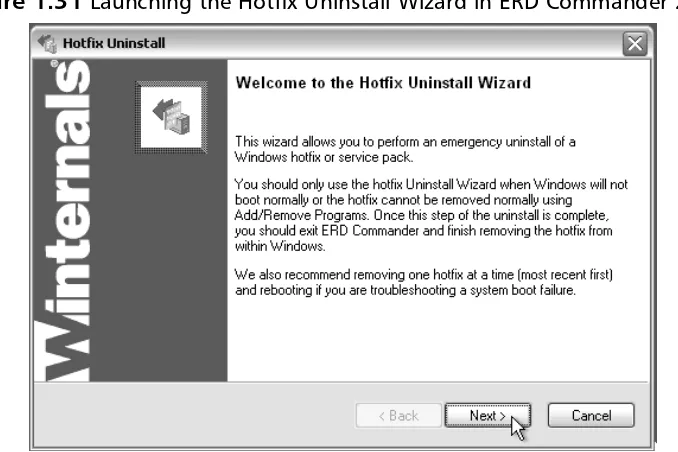
You should boot into ERD Commander 2005 using the process described ear-lier in this chapter. For Hotfix Uninstall to work, you must connect to a Windows partition because data is read from and written to the system Registry, and to the file system. After you launch the Hotfix Uninstall Wizard (select Start | System Tools | Hotfix Uninstall), the “Welcome…” screen appears with a description of the uninstallation process and warnings about when and how it should be used (see Figure 1.31). Click the Next button to proceed.
Designing & Planning…
Testing Means Never Having to Say You’re Sorry
Hotfix Uninstall is a great product and having it in your toolbox brings great peace of mind, but life would be even better if you never had to use it. More often than not, hotfixes repair some defect in Windows; however, certain hotfixes have been known to introduce problems as well. In order to avoid using Hotfix Uninstall (as much as possible), you should put some rigor around the installa-tion of hotfixes and other system updates. Microsoft has a number of patch man-agement solutions and offers several options for updating the Windows operating system and Microsoft applications. Windows Server Update Server (WSUS) and the Security Patch Management component of Systems Management Server (SMS) accommodate the testing of hotfixes before deploying them.
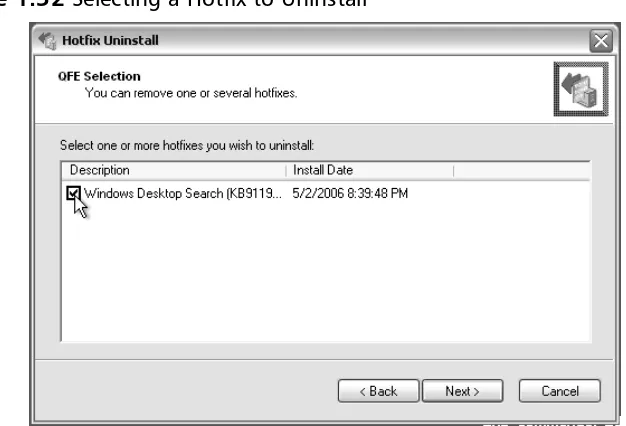
The list of hotfixes that are available for uninstallation will be displayed on the subsequent screen, which is labeled “QFE Selection” and is displayed in Figure 1.32. You can click in the checkbox adjacent to each item in the list to select the
offending hotfixes. Once you have finished making your selections, click on the
Nextbutton to continue.
Figure 1.32Selecting a Hotfix to Uninstall
T
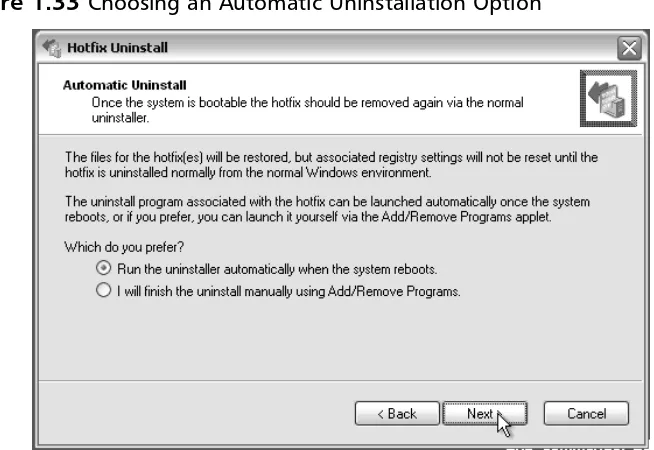
IPAs mentioned earlier in this chapter, Hotfix Uninstall only decouples the hotfix from the operating system; it does not remove the hotfix from the system. On the Automatic Uninstall screen (shown in Figure 1.33), you can choose an option for removing the offending hotfix after the next normal boot into Windows.The default action is to “Run the uninstaller automatically when the system reboots.” When a hotfix is identified for uninstallation in this wizard and the wizard com-pletes successfully, the window shown in Figure 1.35 will be displayed on a subse-quent reboot of the system into Windows prior to the creation of the Windows GUI, and the hotfix will be automatically removed. If you want to decouple the hotfix and then run Add/Remove Programs manually in Windows, you should choose the second option. Once you have selected your desired option, click the
Next button to proceed.
Figure 1.33Choosing an Automatic Uninstallation Option
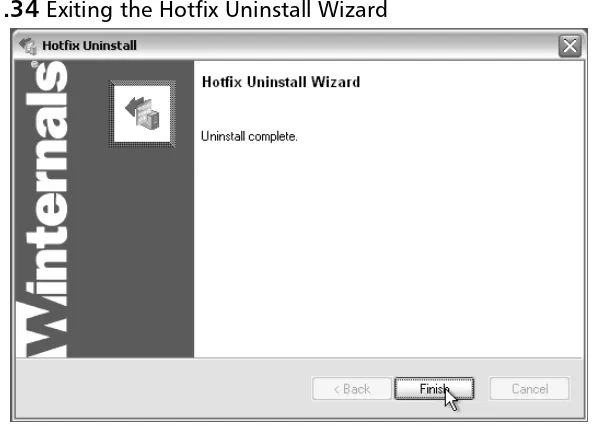
Figure 1.34Exiting the Hotfix Uninstall Wizard
As mentioned earlier in this section, the window in Figure 1.35 will be displayed the next time you boot normally into Windows before the fully appointed GUI is displayed. Click on the Next button to continue automatic removal of the hotfix.
Once you click the Next button, a window that shows the file restoration progress launches.The progress steps are displayed and the names of the hotfix files that are being deleted or copied back to their original locations in the file system are flashed in the window as they are processed, as demonstrated in Figure 1.36.
Figure 1.36Removing the Hotfix in Windows
Summary
By now, you can see that ERD Commander 2005 is capable of bailing a Windows network administrator out of a number of very difficult, even disastrous, situations. Armed with the trusty boot disk, the administrator can access a number of the very best tools available for restoring a system that has been rendered inaccessible or unavailable. It all begins with creating the boot disk that is specific to your system hardware and to the recovery tasks you imagine you will need to perform. Once created, ERD Commander presents the administrator with an interface that is familiar to any Windows user. If a panic situation, this reduces effort climbing the learning curve and reduces stress.
The most common tasks will focus on resetting passwords (Locksmith) and rolling back whatever you did last to mess things up in Windows (System Restore and Hotfix Uninstall). In XP you can use the System Restore Point functionality. In other versions of Windows you can remove a hotfix to restore the system to a bootable state. While it may not be possible to restore it back to absolute system sta-bility, it will get you back into a Windows environment where you have the full range software tools to complete the job.
Having said all of this, it is a powerful system that can be as easily used to cause damage as it is used for repair. When restoring a system, you need to possess elevated levels of access to get to components at the core of the operating system, such as the registry and file system settings. As much as possible, the boot disk should be pro-tected using passwords wherever available and in restricted distribution. Use ERD Commander 2005 in good health. Here is hoping that you never have to use it.
Solutions Fast Track
Utilizing ERD Commander 2005
You use the ERD Commander 2005 Boot CD Wizard to create a boot CD that is tailored to the needs of your role, your organization, and your system requirements.
There are two ways to access Winternals management and recovery utilities from the Start menu: the Program Groups (Administrative, Networking, and System Tools) and the Solution Wizard.
Booting a Dead System
If you configured the boot disk for dual-mode operation, you will have two boot options from which to choose: you can boot directly into the ERD Commander 2005 desktop interface, or you can boot into the Remote Recover client software.
If you are going to attempt to recover an inaccessible or unresponsive system, you will need to connect to a partition on the local hard disk where Windows is installed.
Being the Locksmith
Locksmith is a wizard-driven utility used to reset passwords for local user accounts. It is located at Start | System Tools | Locksmith.
You can use Locksmith to reset the password for any local user account (not NT Domain or Active Directory), without needing to know the existing password.
You will need to reboot the system for the password change to take effect.
Accessing Restore Points
System Restore is a wizard-driven utility used to roll back a Windows XP installation to an established restore point. It is located at Start | System Tools | System Restore.
Removing Hotfixes
Hotfix Uninstall is a wizard-driven utility used to uninstall (decouple and remove) individual or multiple hotfixes when the installation of a particular hotfix has destabilized a system. It is located at Start | System Tools | Hotfix Uninstall.
You will need to reboot the system to complete the uninstallation process.
Q:
Do I need to need to use the ERD Commander 2005 Boot CD to get access to all of the tools?A:
No. It you purchased and installed the Administrator’s Pak, you sill be able to access Remote Recover, Crash Analyzer and FileRestore from theAdministrator’s Pak program group, without having to reboot the system into ERD Commander using the boot CD.
Q:
I installed some software and now by system locks up every time I try to boot normally into Windows. How can ERD Commander 2005 help?A:
First, by using the boot CD, you can bypass the faulty Windows environment and gain access to Windows system files. Second, ERD Commander 2005 has many recovery utilities to suit a number of different situations.The utilities you will be most interested in will be Hotfix Uninstall, System Restore (only if you are running Windows XP) and the Service and Driver Manger.Q:
My system BSODs and reboots, every couple of days, does ERD Commander 2005 have anything to help me figure out the problem?Frequently Asked Questions
The following Frequently Asked Questions, answered by the authors of this book, are designed to both measure your understanding of the concepts presented in this chapter and to assist you with real-life implementation of these concepts. To have your questions about this chapter answered by the author, browse to
A:
ERD Commander 2005 has the Crash Analyzer (described in detail in Chapter 7), which is a Wizard-driven utility developed specifically to analyze crash dump and system errors and help pinpoint the driver that is most likely causing the crash. Armed with this information, you can then use Hotfix Uninstall, System Restore (only if you are running Windows XP) and the Service or Driver Manger, among others, to reverse the condition that is causing the BSOD.Q:
A colleague of mine just won the lottery and has moved to Tahiti. I just inher-ited the servers for which he was responsible and he neglected to tell anyone before he got on the plane. What can I do?A:
ERD Commander 2005 has a tool entitled Locksmith, which is a wizard-driven utility used to reset passwords for local user accounts.You will not be able to recover the passwords, but you will be able to create new ones, which happens to be a good practice when anyone on your position leaves the organization.Q:
I reset the password for the Administrator account on my local server, and I still cannot access the files I need, even though I rebooted into ERD Commander 2005 and am using the new password. What is going on?Examining
Your Computer
Solutions in this chapter:
■ Exploring Process Activity with Process
Explorer
■ Viewing and Controling Process Activity ■ Exploring Program Autostart Locations
Using Autoruns
■ The Dynamic Duo: Using Autoruns and
Process Explorer Together to Troubleshoot Startups and Combat Malware
Chapter 2
35
Summary
Solutions Fast Track
Introduction
Process Explorer does everything the Task Manager does, and then some. While it retains most of the Task Manager’s features, it adds so many bonus features that it could easily be a Task Manager replacement. In fact,Mark Russinovich added that capa-bility as an option in one of Process Explorer’s recent updates. As of this writing, the current version of Process Explorer is v10.06.
Exploring Process
Activity with Process Explorer
In this section, I will detail most of the functions and features available within Process Explorer. I will not touch on every single nuance available within the pro-gram, because that would be very time-consuming, and besides, Process Explorer comes with a highly detailed Help function that obviates the need for a detailed explanation here.
Default Display Explanation
When you first open Process Explorer, you see a window divided into two sections, or panes (see Figure 2.1).
The Upper Pane
The upper pane shows a process tree composed of all active processes and their chil-dren. A child is a process that is called during execution of its parent process.The same process can be a child to another process in the tree and the parent of a process that it calls during its own execution.The processes aligned along the leftmost border of the upper pane have no parents.The root of the process tree is the system idle process and all processes descend vertically from there.The children of a given process appear below the parent in an indented fashion. By default, the upper pane shows the processes from all users, but you can toggle this by selecting View | Show Processes from All Userson the menu.
Figure 2.2 is a key to the color-coding scheme that Process Explorer uses.You can change the colors if you want, by clicking Options | Configure
Highlighting, but I find the default choices to be very suitable.
Figure 2.2Process Explorer Color Highlighting Key
The Lower Pane
The lower pane is in dynamic link library (DLL) view by default. When you select a process in the upper pane by left-clicking it, it will be highlighted in a royal blue color and the bottom pane will list the DLLs used by that process.
You can change the lower pane to show all handles open to a process instead of showing the DLLs associated with a process.You do this by selecting View | Lower
fourth button in from the right. Handles represent the operating resources open to a process.The operating system maintains a handle table of these resources or objects, and a handle is an index into that table. Some examples of handles that a process can use are files, directories, processes, threads, Registry keys, drives, events, tokens, WindowsStations (desktop Windows), and ports. If you are unsure about the
meaning of a handle listed in the lower pane, you can double-click that specific item and view a Property box that provides a description of the handle.
The Toolbar Buttons
On my display, I cannot see all 10 available toolbar buttons by default.You may have to resize your CPU usage graph (discussed next) to expand the viewable area for your toolbar buttons.The 10 toolbar buttons represent shortcuts to various functions that you also can access in a less direct manner from the main menu (see Figure 2.3).
Figure 2.3The Process Explorer Toolbar Shortcuts
I will discuss the remaining toolbar functions in the section “Process Explorer’s Control Features,” later in this chapter.
The Mini-CPU Graph
At the top of the upper pane, you can’t miss the real-time CPU usage graph, called the Mini-CPU Graph.The vertical axis represents percentage of CPU activity and the horizontal axis represents time.You can hover your mouse cursor over peaks in the graph to examine the process responsible for CPU spikes to help you identify which process is consuming the majority of CPU cycles at any point in time.This is an ideal way to examine your system for overall resource consumption.The CPU activity always adds up to 100 percent, with the system idle process making up the difference. For example, in a system that is relatively inactive, the system idle process can consume 90 percent or more of the CPU cycles. Background programs such as the active protection and updating components of your antivirus or antispyware pro-grams normally consume the other 10 percent.
The Performance Graph displays a real-time up-close view of CPU activity. It will show you whether a process has sustained activity or spiking.The graph uses a simple color-coding scheme: red represents CPU usage in kernel mode and green is the sum of both kernel-mode plus user-mode CPU activity. An application normally executes in user mode, but it will make system calls to perform kernel-level func-tions through the application program interface (API). Some kernel-level funcfunc-tions it may need are disk reads or writes, I/O access for printing, new file creations, and so forth. Application programs that employ kernel-mode drivers will show red activity when active.They will have services running, and they will be highlighted in pink in the process tree structure.
The upper graph shows CPU activity and the lower bar graph indicates memory usage.You may have more than one property window open at once.This is conve-nient because if an application has more than one process running, you can examine the activity for each process simultaneously to assess the resource usage for a given program.
Examining Process Resource Consumption
In this section, I will use a practical example to illustrate a real-world application of the resource usage principles we just discussed. We will examine Process Explorer’s real-time CPU graph to see whether it reveals anything worthy of investigation, while my system is relatively idle. We will assess my system to identify the processes or programs that run in the background and are high in resource consumption. Malware processes are notable for their exorbitant drain on system resources, but my aim here is do identify any “resource hogs,” regardless of whether they are malware or benign applications.
I have noticed from Process Explorer’s CPU usage graph that the CounterSpy process called SunProtectionServer.exe is the biggest consumer of CPU cycles of the 45 processes running on my system. I use Sunbelt’s CounterSpy antispyware pro-gram, which I am very satisfied with and consider very effective. CounterSpy has both an on-demand scanner and a real-time protection component, which monitors a system in the background for threat activity.The real-time monitoring software is what is causing the CPU activity.Three CounterSpy processes run in the back-ground, but I will focus on only the active monitoring processes,
SunProtectionServer.exe and SunThreatEngine.exe.
SunProtectionServer.exe ranges between zero percent and 28 percent and its memory usage is an even 7.5 MB.
What baffles me when I look at the figures is why the CounterSpy graph goes up and down so much. I decide to open another Properties window to check out the Performance Graph of the other CounterSpy background process, called SunThreatEngine.exe. I also want to see what is happening with that process in terms of resources. SunThreatEngine.exe consumes nearly no CPU activity, fluctu-ating between zero percent and 1 percent, but it consumes a great deal of memory, hovering around 50 MB of RAM on my system. Now I know that
SunProtectionServer.exe consumes an inordinate number of CPU cycles, and SunThreatEngine.exe consumes a lot of RAM.
I decide to return to researching the CPU activity of SunProtectionServer.exe, to try to assess the cause for its unusual spiking. I click on Performancein the
Propertiesdialog so that I can inspect the raw performance data.The performance data displayed includes physical memory, virtual memory, and I/O and CPU statis-tics, which I examine to see whether I can narrow down the cause of the CPU spikes. Figure 2.4 shows both the Process Explorer performance data and the Performance Graph for the SunProtectionServer.exe process.
Figure 2.4SunProtectionServer.exe Performance Statistics
During program execution, a request for a valid address that is not in RAM triggers a page fault or interrupt, and control is transferred back to the operating system.The operating system then swaps the required page from virtual memory into RAM. Most of the CPU spikes coincide with a large number of page faults, as indicated by the Performance Window’s Page Fault Delta figures. My conclusion, therefore, is that the operating system is expending a lot of overhead to swap virtual pages into and out of physical memory for the SunProtectionServer.exe process.The process is doing numerous memory reads of data that is not in RAM.This is causing the CPU to work extra-hard swapping pages in and out of memory, which is causing the CPU spikes.
My overall assessment is that CounterSpy’s active protection on my system con-sumes more than 55 MB of memory, which seems to be rather excessive by anyone’s standards, and the CPU usage regularly spikes to around 25 percent, which is also rather excessive. Now, I have to decide whether I think CounterSpy is worth the resource trade-off, and I conclude that it is. First, CounterSpy has one of the best threat databases among antispyware programs and it has resisted caving in to ques-tionable companies that apply pressure to get their threats downgraded. Second, 55 MB of memory, compared with the 1 GB of memory available to me, is not such a big deal, and I feel I can spare it. I could turn off CounterSpy’s active protection and use it solely as an on-demand scanner, but I feel the trade-off is worth it, because I do not want to lose its superior protection capabilities. However, I am interested in pursuing the spiky CPU usage issue a bit more, mainly to verify two points:
1. Whether this activity is similar to other active protection programs’ resource usage
2. Whether other users have documented or reported what I am seeing
I examine my other active protection components for resource usage in the same way. Ewido Networks’ ewido anti-malware uses 37.1 MB of memory, which repre-sents 70 percent of what CounterSpy uses. My antivirus software, ESET’s NOD32, uses only 16.8 MB of memory, and Mischel Internet Security’s THGuard and BillP Studios’ WinPatrol both consume 5 MB of RAM, with no negligible CPU con-sumption.This confirms that CounterSpy is a standout in resource consumption when compared to my other active protection programs.
I have a question for you. When I log on to my client machine, which has the CounterSpy agent running on it, if I immediately bring up the Task Manager, the SunProtectionServer.exe process is running and taking up right around 50 percent of the CPU. No big deal; the machine is not too slow or bogged down.
I also see that numerous other users are reporting experiences similar to mine in terms of resource usage. However, unlike the previous user, my research reveals that SunProtectionServer.exe consumes only half of what that user reported; either that, or his computer’s available resources are half of mine. I suspect CounterSpy may have made substantial improvements to the program since users first reported these effects online.
One CounterSpy beta tester explains his experience in response to other users’ queries:
After beta testing this product from the time that it was in pre-beta until its release yesterday, all I can say is that I really don’t understand how it works. I did the majority of testing on a
Windows XP box with a 1GHz Pentium III and 768 MB of RAM. All the way through I was concerned about the high resource usage as I watched in Process Explorer, although it never seemed to affect my system. I was especially concerned about the advertised min-imum system specs and didn’t see how they could possibly support an app using resources of this magnitude.