‡√‘Ë¡µáπÕ¬ã“ß√«¥‡√Á«
Panduan Ringkas
Quick Start
·°—°≈ãÕ߇§√◊ËÕßæ‘¡æè HP Photosmart
Membongkar kemasan pencetak HP Photosmart
Unpack the HP Photosmart printer
1
1. ·°—‡∑ª·≈—¥÷ß°√—¥“…·¢ÁßÕÕ°®“°¿“¬„π·≈—√Õ∫ Ê
‡§√◊ËÕßæ‘¡æè
2. µ√«®›Õ∫Õÿª°√≥è∑’ËÕ¬Ÿã„π°≈ãÕß:
°. ‡§√◊ËÕßæ‘¡æè√ÿÜπ HP Photosmart 8400 series
¢. «–›¥ÿªáÕß°–πµ≈–∫À¡÷°æ‘¡æè
§. µ≈–∫À¡÷°æ‘¡æè
ß.
´Õß„›ã°√—¥“…∂㓬¿“æ
®. µ–«Õ¬ã“ß°√—¥“…
©. ›“¬‡§‡∫‘≈ USB
™. ª≈–Í°‰ø·≈—Õ—·¥Áª‡µÕ√è
´. ´Õøµè·«√è HP Photosmart ∫π·ºãπ´’¥’
¨. ‡Õ°›“√›”À√–∫ºŸá„™á
1. Remove the tape and cardboard packaging from inside and around the printer.
2. Check the contents of the box: a. HP Photosmart 8400 series printer b. Print cartridge protector
c. Print cartridges
d. Photo paper storage bag e. Paper sampler
f. USB cable
g. Power supply and power adapter h. HP Photosmart software on CD i. User documentation
1. Lepaskan pita perekat dan kemasan karton dari dalam dan sekeliling pencetak.
2. Periksa isi kotak kemasan:
a. Pencetak HP Photosmart 8400 series b. Pelindung kartrid cetak
c. Kartrid cetak
d. Kantung penyimpanan kertas Foto e. Contoh kertas
f. Kabel USB
g. Catu daya dan adaptor listrik h. CD perangkat lunak HP Photosmart i. Dokumentasi pengguna
d
e
f
g
h
a
b
c
i
1. µãÕ›“¬‰ø‡¢á“°–∫‡§√◊ËÕßæ‘¡æè °ãÕπ‡›’¬∫ª≈–Í°‰ø
!
¢áÕ›”§–≠:
Àá“¡µãÕ›“¬‡§‡∫‘≈ USB ®π°«ã“®—ª√“°Ø
¢áÕ§«“¡·®áß„Àᥔ‡π‘π°“√‡™ãππ–Èπ„π√—À«ã“ßµ‘¥µ–Èß
´Õøµè·«√è
2. °¥ªÿÜ¡ ‡ª‘¥ ∫π‡§√◊ËÕ߇æ◊ËÕ‡ª‘¥°“√∑”ß“π¢Õ߇§√◊ËÕß
æ‘¡æè
3. ‡¡◊ËÕ§”«ã“
Select language (‡≈◊Õ°¿“…“)
ª√“°Ø
∫πÀπá“®Õ¢Õ߇§√◊ËÕßæ‘¡æè „Àá„™áªÿÜ¡‡≈◊ËÕπ
À√◊Õ
‡æ◊ËÕ‡≈◊Õ°¿“…“¢Õߧÿ≥
4. °¥ µ°≈ß ‡æ◊ËÕ‡≈◊Õ°¿“…“¢Õߧÿ≥
5. „™áªÿÜ¡‡≈◊ËÕπ
À√◊Õ
‡æ◊ËÕ‡≈◊Õ°
Yes (㪋)
‡æ◊ËÕ¬◊π¬–π
·≈—°¥ µ°≈ß Àπá“®Õ¬◊π¬–π®—ª√“°Ø¢÷Èπ
6. ‡¡◊ËÕ§”«ã“
Select Country/Region (‡≈◊Õ°ª√—‡∑»/
¿Ÿ¡‘¿“§)
ª√“°Ø∫πÀπá“®Õ¢Õ߇§√◊ËÕßæ‘¡æè „Àá‡≈◊Õ°
ª√—‡∑»/¿Ÿ¡‘¿“§¢Õߧÿ≥ ·≈—°¥ µ°≈ß Àπá“®Õ¬◊π
¬–π®—ª√“°Ø¢÷Èπ
1. Connect the power cord to the printer and to a wall outlet.
!
Important: Do not connect the USB cable until prompted during softwareinstallation.
2. Press Onto turn on the printer. 3. When Select Languageappears on the
printer screen, use Navigation
or to highlight your language.4. Press OKto select your language. 5. Use Navigation
or to highlight Yesto confirm, then press OK. A confirmation screen appears.
6. When Select Country/Regionappears on the printer screen, highlight your
country/region, then press OK. A confirmation screen appears. 1. Hubungkan kabel listrik ke pencetak dan
ke stopkontak dinding.
!
Penting: Jangan menghubungkan kabel USB sampai Anda diperintahkan sewaktu instalasi perangkat lunak.2. Tekan Onuntuk menghidupkan pencetak. 3. Bila, Select Language (Pilih Bahasa),
muncul pada layar pencetak, tekan
atau untuk menonjolkan bahasa Anda.4. Tekan OKuntuk memilih bahasa Anda. 5. Gunakan Navigasi
atau untukmenonjolkan Yes (Ya)untuk konfirmasi, kemudian tekan OK. Muncul layar konfirmasi.
6. Bila Select Country/Region (Pilih Negara/Wilayah)muncul pada layar pencetak, tonjolkan negara/wilayah Anda, kemudian tekan OK. Muncul layar konfirmasi.
°“√µãÕª≈–Í°‰ø¢Õ߇§√◊ËÕß ·≈—µ–Èß¿“…“¢Õߧÿ≥
Menghubungkan daya ke listrik dan menyetel bahasa Anda
Connect the power and set your language
2
a
b
c
ªÿÜ¡‡ª‘¥
Tombol On (Hidup) On buttonªÿÜ¡‡≈◊ËÕπ
·≈—
Navigasi dan Navigation andªÿÜ¡µ°≈ß
Tombol OK OK buttonªÿÜ¡‡¡πŸ
Tombol Menu Menu button°“√ªáÕπ°√—¥“…∏√√¡¥“
Memuatkan kertas biasa
Load plain paper
3
ªáÕπ°√—¥“…∏√√¡¥“≈ß„π‡§√◊ËÕ߇æ◊ËÕµ√«®›Õ∫µ”·Àπãß
¢Õßµ≈–∫À¡÷°æ‘¡æè
1. ¬°Ω“§√Õ∫∂“¥°√—¥“…ÕÕ°¢÷Èπ
2. ¥÷ßµ–«°–È𧫓¡¬“«¢Õß°√—¥“…∑’ËÕ¬Ÿã∫π∂“¥°√—¥“…
‡¢á“ÕÕ°¡“ °ãÕπ‡≈◊ËÕπÕÕ°¡“∑“ߥá“π´á“¬®π›ÿ¥
3. «“ß°√—¥“…∏√√¡¥“Àπ÷Ëߪ÷° (‰¡ã‡°‘π 100 ·ºãπ) „π
∂“¥°√—¥“…‡¢á“
4. ª√–∫µ–«°–È𧫓¡°«á“ߢÕß°√—¥“… ·≈—µ–«°–È𧫓¡
¬“«¢Õß°√—¥“… ‡æ◊ËÕ„ÀáæÕ¥’°–∫¢Õ∫°√—¥“… ‚¥¬‰¡ã∑”
„Àá°√—¥“…ßÕ
5. ª‘¥∂“¥°√—¥“…ÕÕ°
6. ¥Ÿ„Àá·πã„®«ã“ ‰¥á¥÷ßµ–«‡≈◊ËÕπ∂“¥°√—¥“…∂㓬¿“扪
∑“ߥá“πÀπᓇ§√◊ËÕßæ‘¡æè·≈á« ‡æ◊ËÕ‰¡ã„Àá∂“¥„›ã
°√—¥“…∂㓬¿“æ∑”ß“π
À¡“¬‡Àµÿ:
À“°µáÕß°“√æ‘¡æè¿“æ∂㓬¢π“¥ 10x15 ´¡.
(4x6 π‘ú«) „Àá„™á∂“¥°√—¥“…∂㓬¿“æ ¥Ÿ∑’ËÀπá“ 12
¢Õ߇հ›“√™ÿ¥π’ÈÀ√◊Õ§Ÿã¡◊ÕºŸá„™áÀ“°µáÕß°“√√“¬≈—
‡Õ’¬¥‡æ‘Ë¡‡µ‘¡
Muatkan kertas biasa untuk mensejajarkan kartrid cetak.
1. Angkat baki Keluar.
2. Tarik keluar penuntun panjang kertas pada baki Masuk dan geser penuntun lebar kertas sejauh mungkin ke kiri. 3. Tempatkan setumpuk kertas letter biasa
(tidak lebih dari 100 lembar) di dalam baki Masuk.
4. Atur penuntun lebar kertas dan penuntun panjang kertas sehingga pas dekat tepi kertas tanpa menekuk kertas.
5. Turunkan baki Keluar.
6. Pastikan geseran baki Foto ditarik mengarah ke depan pencetak. Ini akan melepaskan baki Foto.
Catatan: Untuk mencetak foto indah 10x15 cm (4x6 inci), gunakan baki Foto Lihat halaman 12 buklet ini atau Petunjuk Pemakai untuk informasi lebih lanjut.
Load plain paper to align the print cartridges.
1. Raise the Out tray.
2. Pull out the paper-length guide on the In tray and slide the paper-width guide as far to the left as it will go.
3. Place a stack of plain letter paper (no more than 100 sheets) in the In tray. 4. Adjust the paper-width guide and the
paper-length guide to fit close to the edges of the paper without bending the paper.
5. Lower the Out tray.
6. Make sure the photo tray slider is pulled toward the front of the printer. This disengages the photo tray.
Note: To print beautiful 10x15 cm (4x6 inch) photos, use the Photo tray. See page 12 of this booklet or the User’s Guide for more information.
∂“¥°√—¥“…ÕÕ°
Baki KeluarOut tray
µ–«‡≈◊ËÕπ∂“¥°√—¥“…∂㓬¿“æ
Geseran baki FotoPhoto tray slider
µ–«°–È𧫓¡¬“«¢Õß°√—¥“…
Penuntun panjang kertasPaper-length guide
µ–«°–È𧫓¡°«á“ߢÕß°√—¥“…
Penuntun lebar kertas Paper-width guide
∂“¥°√—¥“…‡¢á“
Baki Masuk1. ¬°Ω“§√Õ∫¥á“π∫π¢÷Èπ °ãÕπ°¥≈ß ·≈—¥÷ßÕÕ°®“°
µ–«≈ÁÕ°µ≈–∫À¡÷°æ‘¡æè
2. ·°—µ≈–∫À¡÷°æ‘¡æè¿“æ∂㓬ÕÕ°®“°°≈ãÕß ·≈—·°—
·∑Á∫›’™¡æŸ‡æ◊ËÕ¥÷߇∑ª„›ÕÕ°
Àá“¡·µ—µáÕßÀ–«À¡÷°
À√◊ÕÀπá“›–¡º–›∑Õß·¥ß!
3. ∂◊Õµ≈–∫À¡÷°‡æ◊ËÕ„ÀáÀπá“›–¡º–›∑Õß·¥ß‡¢á“‰ª„π
‡§√◊ËÕßæ‘¡æè°ãÕπ ‡≈◊ËÕπµ≈–∫À¡÷°‡¢á“‰ª∑“ߥá“π
´á“¬„µá·∂∫‚≈À— ¥–πµ≈–∫À¡÷°æ‘¡æè®π°√—∑–Ëß
≈ÁÕ§‡¢á“∑’ËÕ¬ã“ß·πãπÀπ“
4. °¥µ–«≈ÁÕ°µ≈–∫À¡÷°®π≈ÁÕ§‡¢á“∑’Ë
5. ∑”µ“¡¢–ÈπµÕππ’ȇæ◊ËÕµ‘¥µ–Èßµ≈–∫À¡÷°æ‘¡æ蛓¡›’·≈—
µ≈–∫À¡÷°æ‘¡æè¿“æ∂㓬›’‡∑“
6. ª‘¥Ω“§√Õ∫¥á“π∫π °¥ªÿÜ¡ µ°≈ß ∫π·ºß§«∫§ÿ¡
‡¡◊ËÕª√“°Ø¢áÕ§«“¡∫πÀπá“®Õ ‡æ◊ËÕ¢Õ„Àá§ÿ≥æ‘¡æè
Àπá“°“√«“ßµ”·Àπãß°√—¥“…
* ‡°Á∫µ≈–∫À¡÷°æ‘¡æè∑’ˬ–߉¡ã‰¥á„™á‰«á∑’Ëπ’Ë §ÿ≥›“¡“√∂´◊úÕ
µ≈–∫À¡÷°æ‘¡æè›’¥”·¬°µã“ßÀ“° ¥Ÿ√“¬°“√µ≈–∫À¡÷°æ‘¡æè
∑’Ë¥’∑’Ë›ÿ¥∑’˧«√π”¡“„™á√ã«¡°–∫ß“πæ‘¡æè¢Õߧÿ≥‰¥á®“°ª°
À≈–ߢÕ߇հ›“√™ÿ¥π’È
1. Raise the top cover, then push down and pull out the print cartridge latch. 2. Unwrap the Photo print cartridge, then
pull the pink tab to remove the clear tape.
Do not touch the ink nozzles or copper-colored contacts.
3. Hold the cartridge so the copper-colored contacts go into the printer first. Slide the cartridge into the left side of the cradle under the metal bar. Push the cartridge until it snaps into place.
4. Push down on the cartridge latch until it locks.
5. Repeat this process to install the Tri-color and Gray Photo print cartridges. 6. Lower the top cover. Press OKon the
control panel when the printer screen prompts you to print an alignment page. * Store any unused print cartridge here. You can purchase an optional Black print cartridge. Check the back cover of this booklet to find the best cartridges to use for your print projects.
1. Angkat penutup atas, kemudian tekan ke bawah dan tarik keluar kaitan kartrid cetak. 2. Buka kemasan kartrid cetak Foto,
kemudian tarik tab merah muda untuk melepaskan pita rekat bening. Jangan menyentuh nozel tinta atau kontak warna tembaga.
3. Pegang kartrid sehingga kontak warna tembaga masuk lebih dulu ke dalam pencetak. Sorong kartrid ke dalam pegangan sisi kiri di bawah balok logam. Dorong kartrid sampai
menghentak masuk ke dalam tempatnya. 4. Tekan ke bawah kaitan kartrid sampai
mengunci.
5. Ulangi proses ini untuk memasang kartrid cetak Tri-color dan Gray Photo.
6. Turunkan penutup atas. Tekan OKpada panel kendali ketika layar pencetak mengarahkan Anda untuk mencetak halaman penjajaran.
* Simpan di sini kartrid cetak yang tidak digunakan. Anda dapat membeli kartrid cetak Black (Hitam) opsional. Periksa sampul belakang buklet ini untuk mengetahui kartrid yang paling baik digunakan untuk proyek cetakan Anda.
°“√µ‘¥µ–Èßµ≈–∫À¡÷°æ‘¡æè
Memasang kartrid cetak
Install the print cartridges
4
*
›”À√–∫‡°Á∫µ≈–∫À¡÷°æ‘¡æè·≈—«–›¥ÿªáÕß°–π ´÷Ë߇ªÁπÕÿª°√≥è‡≈◊Õ°„™á
* Simpan kartrid cetak dan pelindung opsional. * Store the optional print cartridge and protector.°“√µ‘¥µ–Èß´Õøµè·«√è HP Photosmart (Windows)
Menginstal perangkat lunak HP Photosmart (Windows)
Install the HP Photosmart software (Windows)
5
W
indo
w
s
Windows ‡∑ã“π–Èπ
Hanya Windows
Windows only
°“√µ‘¥µ–Èߥ᫬ USB ‡∑ã“π–Èπ
›”À√–∫
°“√µ‘¥µ–Èß∫π√—∫∫‡§√◊բ㓬
„Àá∑”µ“¡§”·π—
π”„π¿“§ºπ«°‡§√◊բ㓬¢ÕߧŸã¡◊ÕºŸá„™á
!
¢áÕ›”§–≠:
Àá“¡µãÕ›“¬‡§‡∫‘≈ USB ®π°«ã“√—∫∫®—
·›¥ß¢áÕ§«“¡·®áß
°“√µ‘¥µ–Èß·∫∫
Typical (·∫∫ª°µ‘)
®—™ã«¬„Àá´Õøµè·«√襟
·°á‰¢ ®–¥°“√·≈—„™á¿“æµã“ß Ê √ã«¡°–π‰¥á §«√‡≈◊Õ°
Minimum (µË”›ÿ¥)
‡©æ“—‡¡◊ËÕ§ÿ≥¡’Àπ㫬§«“¡®”√—∫∫
À√◊Õæ◊úπ∑’ËŒ“√襉¥√øè®”°–¥
1. „›ã·ºãπ´’¥’ HP Photosmart ≈ß„π‡§√◊ËÕߧա摫‡µÕ√è
·≈—ªÆ‘∫–µ‘µ“¡§”·π—π”∑’˪√“°Ø∫πÀπá“®Õ À“°
‰¡ãª√“°Ø§”·π—π”„¥ Ê „Àá§áπÀ“·≈—¥–∫‡∫‘≈§≈‘°‰ø≈è
setup.exe
∫π·ºãπ´’¥’
À¡“¬‡Àµÿ:
À“°°√Õ∫
Found New Hardware
(§áπÀ“Œ“√襷«√è„À¡ã)
ª√“°Ø „Àá§≈‘°∑’˧”«ã“
Cancel
(¬°‡≈‘°)
°ãÕπ∂Õ¥ª≈–Í°›“¬‡§‡∫‘≈ USB ·≈—
‡√‘Ë¡µáπ¢–ÈπµÕπ°“√µ‘¥µ–ÈßÕ’°§√–Èß
2. ‡≈◊Õ°°“√‡™◊ËÕ¡µãÕ‡ªÁπ™π‘¥ USB
3. ‡¡◊ËÕ√—∫∫·›¥ß¢áÕ§«“¡·®áß „Àᄙᛓ¬‡§‡∫‘≈ USB
‡™◊ËÕ¡µãÕ‡§√◊ËÕßæ‘¡æ臢ᓰ–∫§Õ¡æ‘«‡µÕ√è Õ“®„™á
‡«≈“À≈“¬π“∑’‡æ◊ËÕ§–¥≈Õ°‰ø≈è ·≈—Õ“®®—„™á‡«≈“
π“π¢÷Èπ∫π√—∫∫‡°ã“
4. ‡¡◊ËÕÀπá“ Congratulations (¢Õ·›¥ß§«“¡¬‘π¥’)
ª√“°Ø „Àá§≈‘°∑’˧”«ã“
Print a demo page
(æ‘¡æèÀπᓵ–«Õ¬ã“ß)
USB Installation Only
For Network installation, follow the instructions in the Network appendix of the User’s Guide.
!
Important: Do not connect the USB cable until prompted.The Typicalinstallation provides software to view, edit, manage, and share images. Only choose Minimumif you have limited system memory or hard drive space.
1. Insert the HP Photosmart CD into the computer and follow the onscreen instructions. If instructions do not appear, locate and double-click the setup.exefile on the CD.
Note: If the Found New Hardwarescreen (shown below) appears, click Cancel, unplug the USB cable, and restart the installation.
2. Choose USB connection type.
3. When prompted, connect the printer to the computer with the USB cable. It may take several minutes to copy files and possibly longer on older systems.
4. When the Congratulations page appears, click Print a demo page.
Hanya Instalasi USB
Untuk Network installation (Instalasi jaringan), ikuti petunjuk dalam Apendiks jaringan (apendiks a) pada Petunjuk Pemakai.
!
Penting: Jangan menghubungkan kabel USB sampai diperintahkan.Instalasi Typicalmenyediakan perangkat lunak untuk menampilkan, mengedit, mengatur dan berbagi gambar. Jika memori sistem atau ruang hard drive Anda terbatas, Anda hanya dapat memilih Minimum. 1. Masukkan CD HP Photosmart ke dalam
komputer dan ikuti petunjuk pada layar. Jika petunjuk tidak muncul, cari dan klik dua kali file setup.exepada CD.
Catatan: Jika layar Found New Hardware (Ditemukan Perangkat Keras Baru)
(ditunjukkan di bawah) muncul*, klik
Cancel (Batal), cabut kabel USB, dan mulai lagi instalasi.
2. Pilih jenis sambungan USB.
3. Bila diperintahkan, hubungkan pencetak ke komputer dengan kabel USB. Diperlukan beberapa menit untuk menyalin file dan pada sistem yang lebih tua, kemungkinan waktunya lebih lama. 4. Bila halaman Congratulations (Selamat)
muncul, klik Print a demo page (Cetak halaman demo).
1
2
3
°“√‡™◊ËÕ¡µãÕ USB
Sambungan USB USB connection°“√µ‘¥µ–Èß´Õøµè·«√è HP Photosmart (Macintosh)
Menginstal perangkat lunak HP Photosmart (Macintosh)
Install the HP Photosmart software (Macintosh)
5
Ma
ci
ntosh
Macintosh ‡∑ã“π–Èπ
Hanya Macintosh
Macintosh only
°“√µ‘¥µ–Èߥ᫬ USB ‡∑ã“π–Èπ
›”À√–∫
°“√µ‘¥µ–Èß∫π√—∫∫‡§√◊բ㓬
„Àá∑”µ“¡§”·π—π”
„π¿“§ºπ«°‡§√◊բ㓬¢ÕߧŸã¡◊ÕºŸá„™á
!
¢áÕ›”§–≠:
Àá“¡µãÕ›“¬‡§‡∫‘≈ USB ®π°«ã“√—∫∫®—
·›¥ß¢áÕ§«“¡·®áß
1. „›ã·ºãπ´’¥’
HP Photosmart
≈ß„π‡§√◊ËÕߧա摫‡µÕ√è
2. ¥–∫‡∫‘≈§≈‘°‰Õ§Õπ HP Photosmart CD
3. ¥–∫‡∫‘≈§≈‘°‰Õ§Õπ HP Photosmart Install ªØ‘∫–µ‘
µ“¡§”·π—π”∫πÀπá“®Õ
4. ‡¡◊ËÕ√—∫∫·›¥ß¢áÕ§«“¡·®áß „Àᄙᛓ¬‡§‡∫‘≈ USB
‡™◊ËÕ¡µãÕ‡§√◊ËÕßæ‘¡æ臢ᓰ–∫§Õ¡æ‘«‡µÕ√è Õ“®„™á
‡«≈“À≈“¬π“∑’‡æ◊ËÕ§–¥≈Õ°‰ø≈è ·≈—Õ“®®—„™á‡«≈“
π“π¢÷Èπ∫π√—∫∫‡°ã“
5. ‡≈◊Õ°‡§√◊ËÕßæ‘¡æè„π°√Õ∫‚µáµÕ∫ Print (æ‘¡æè)
À“°‰¡ãª√“°Ø‡§√◊ËÕßæ‘¡æè„π√“¬°“√ „Àá‡≈◊Õ°
Edit
Printer List
(·°á‰¢√“¬°“√‡§√◊ËÕßæ‘¡æè) ‡æ◊ËÕ‡æ‘Ë¡
‡§√◊ËÕßæ‘¡æè
À¡“¬‡Àµÿ:
À“°ª√—›∫ª–≠À“„π√—À«ã“ß°“√µ‘¥µ–Èß „Àᥟ
«‘∏’·°áª–≠À“„πÀπá“ 8
USB Installation Only
For Network installation, follow the instructions in the Network appendix of the User’s Guide.
!
Important: Do not connect the USB cable until prompted.1. Insert the HP Photosmart CD into the computer.
2. Double-click the HP Photosmart CD icon. 3. Double-click the HP Photosmart Install
icon. Follow the onscreen instructions. 4. When prompted, connect the printer and
computer with the USB cable. It may take several minutes to copy files and possibly longer on older systems.
5. Select the printer in the Print dialog box. If the printer does not appear in the list, select Edit Printer Listto add the printer.
Note: If you experience problems during installation, see Troubleshooting on page 8.
Hanya Instalasi USB
Untuk Network installation (Instalasi jaringan), ikuti petunjuk dalam Apendiks jaringan (apendiks a) pada Petunjuk Pemakai.
!
Penting: Jangan menghubungkan kabel USB sampai diperintahkan.1. Masukkan CD HP Photosmartke dalam komputer.
2. Klik dua kali ikon CD HP Photosmart. 3. Klik dua kali ikon CD HP
Photosmart.Install. Ikuti petunjuk pada layar.
4. Bila diperintahkan, hubungkan pencetak dan komputer dengan kabel USB. Diperlukan beberapa menit untuk menyalin file dan pada sistem yang lebih tua, kemungkinan waktunya lebih lama. 5. Pilih pencetak dalam kotak dialog Print
(Cetak). Jika pencetak tidak muncul dalam daftar, pilih Edit Printer List (Edit Daftar Pencetak) untuk menambahkan pencetak.
Catatan: Jika Anda mengalami masalah sewaktu instalasi, lihat Menyelesaikan Masalah di halaman 8.
2
3
4
1
°“√‡™◊ËÕ¡µãÕ USB
Sambungan USB USB connectionÀ“°µ‘¥µ–Èß´Õøµè·«√臧√◊ËÕßæ‘¡æ艡㛔‡√Á® À√◊Õ‡§√◊ËÕßæ‘¡æè·≈—§Õ¡æ‘«‡µÕ√艡㉥á›◊ËÕ›“√°–πÕ¬ã“߇À¡“—›¡À≈–ß®“°µ‘¥µ–Èß
´Õøµè·«√è „Àáµ√«®›Õ∫«‘∏’·°áª–≠À“®“°Àπá“π’È À“°§ÿ≥¬–ßµáÕß°“√§«“¡™ã«¬‡À≈◊Õ „Àáµ√«®›Õ∫√“¬≈—‡Õ’¬¥®“°‡Õ°›“√
∑’Ë¡“æ√áÕ¡°–∫‡§√◊ËÕßæ‘¡æèÀ√◊Õµ‘¥µãÕΩ㓬¥Ÿ·≈≈Ÿ°§á“
µ√«®¥Ÿ®ÿ¥‡™◊ËÕ¡µãÕ›“¬‡§‡∫‘≈∑–ÈßÀ¡¥√—À«ã“߇§√◊ËÕßæ‘¡æè·≈—§Õ¡æ‘«‡µÕ√è ·≈—¥Ÿ„Àá·πã„®«ã“ §ÿ≥°”≈–ß„™á´Õøµè·«√臧√◊ËÕß
æ‘¡æè√ÿÜπ≈ã“›ÿ¥
Windows
ª–≠À“:
´Õøµè·«√è°“√µ‘¥µ–È߉¡ã‰¥á‡√‘Ë¡°“√∑”ß“π‡Õß‚¥¬Õ–µ‚π¡–µ‘‡¡◊ËÕ„›ã·ºãπ´’¥’
«‘∏’·°áª–≠À“:
®“°‡¡πŸ Windows Start „Àá‡≈◊Õ° Run §≈‘° Browse (‡√’¬°¥Ÿ) ·≈—π”∑“߉ª¬–߉¥√øè´’¥’√Õ¡
∑’˧ÿ≥„›ã´’¥’´Õøµè·«√è HP Photosmart ¥–∫‡∫‘≈§≈‘°∑’ˉø≈è setup.exe
ª–≠À“:
À“°°√Õ∫ Found New Hardware Wizard (µ–«™ã«¬›√á“ß°“√§áπÀ“Œ“√襷«√è„À¡ã) ‡ª‘¥ÕÕ° ·µã‰¡ã¬Õ¡√–∫‡§√◊ËÕßæ‘¡æè
§ÿ≥Õ“®‡º≈ÕµãÕ›“¬‡§‡∫‘≈ USB °ãÕπ∑”µ“¡¢–ÈπµÕπ°“√µ‘¥µ–Èß´Õøµè·«√臛√Á®›¡∫Ÿ√≥è
«‘∏’·°áª–≠À“:
ª≈¥›“¬‡§‡∫‘≈ USB ÕÕ°°ãÕπ ·≈—‡√‘Ë¡µáπ¢–ÈπµÕπ°“√µ‘¥µ–Èß´Õøµè·«√èÕ’°§√–Èß µãÕ›“¬‡§‡∫‘≈ USB ‡¡◊ËÕ√—∫∫
·®áß„Àá∑√“∫„π√—À«ã“ߢ–ÈπµÕπ°“√µ‘¥µ–Èß´Õøµè·«√è
ª–≠À“:
°“√µ√«®›Õ∫§«“¡µáÕß°“√¢Õß√—∫∫æ∫«ã“ §Õ¡æ‘«‡µÕ√脙Ⴊ√·°√¡ Internet Explorer √ÿÜπ‡°ã“
«‘∏’·°áª–≠À“:
°¥ªÿÜ¡ Ctrl + Shift ∫π·ªáπæ‘¡æè ·≈—§≈‘°∑’˧”«ã“ Cancel (¬°‡≈‘°) „π°√Õ∫‚µáµÕ∫ System Requirements
(§«“¡µáÕß°“√¢Õß√—∫∫) ‡æ◊ËÕ≈—‡«áπµ–«∫≈ÁÕ° ·≈—∑”µ“¡¢–ÈπµÕπ°“√µ‘¥µ–Èß´Õøµè·«√è„Àá·≈᫇›√Á® §ÿ≥µáÕߪ√–∫√ÿÜπ‚ª√·°√¡
Internet Explorer ∑–π∑’À≈–ß®“°µ‘¥µ–Èß´Õøµè·«√è HP Photosmart ‰¡ã‡™ãππ–Èπ´Õøµè·«√è HP ®—∑”ß“π‰¡ã‡À¡“—›¡ À¡“¬‡Àµÿ:
§ÿ≥‰¡ã®”‡ªÁπµáÕßµ‘¥µ–Èß´Õøµè·«√è HP Õ’°§√–ÈßÀ≈–ß®“°ª√–∫√ÿÜπ‚ª√·°√¡ Internet Explorer
ª–≠À“:
À“°§Õ¡æ‘«‡µÕ√èÀ¬ÿ¥µÕ∫›πÕß„π√—À«ã“ߢ–ÈπµÕπ°“√µ‘¥µ–Èß´Õøµè·«√è ·›¥ß«ã“ ´Õøµè·«√èªáÕß°–π‰«√–›À√◊Õ‚ª√
·°√¡´Õøµè·«√èÕ◊Ëπ°”≈–ß∑”ß“πÕ¬Ÿã ·≈—∑”„ÀᢖÈπµÕπ°“√µ‘¥µ–Èߥ”‡π‘π‰ªÕ¬ã“ߙᓠÊ
«‘∏’·°áª–≠À“:
√Õ®π°√—∑–Ëß´Õøµè·«√觖¥≈Õ°‰ø≈臛√Á® ´÷Ëß®—„™á‡«≈“À≈“¬π“∑’ ·µã∂ᓺã“π‰ªÀ≈“¬π“∑’·≈á« ·≈—§Õ¡æ‘«
‡µÕ√è°Á¬–߉¡ãµÕ∫›πÕßÕ¬Ÿã‡™ãπ‡¥‘¡ „Àá√’›µ“√è∑§Õ¡æ‘«‡µÕ√è À¬ÿ¥À√◊Õª‘¥´Õøµè·«√èªáÕß°–π‰«√–›„¥ Ê ∑’ˇª‘¥„™áÕ¬Ÿã ÕÕ°®“°
‚ª√·°√¡´Õøµè·«√èÕ◊Ëπ Ê ∑–ÈßÀ¡¥ °ãÕπ√’›µ“√è∑´Õøµè·«√è›”À√–∫‡§√◊ËÕßæ‘¡æèÕ’°§√–Èß‚¥¬„™á§”·π—π”„πÀπá“ 6
À¡“¬‡Àµÿ:
´Õøµè·«√èªáÕß°–π‰«√–›®—°≈–∫¡“∑”ß“πÕ’°§√–Èß‚¥¬Õ–µ‚π¡–µ‘‡¡◊ËÕ§ÿ≥√’›µ“√è∑§Õ¡æ‘«‡µÕ√è
Windows ·≈— Macintosh
ª–≠À“:
À“°°√Õ∫‚µáµÕ∫ System Requirements (§«“¡µáÕß°“√¢Õß√—∫∫) ª√“°Ø„π√—À«ã“ß°“√µ‘¥µ–Èß À¡“¬§«“¡«ã“
Õߧèª√—°Õ∫Àπ÷ËߢÕß√—∫∫§Õ¡æ‘«‡µÕ√艡ãµ√ßµ“¡‡ß◊ËÕπ‰¢§«“¡µáÕß°“√¢–ÈπµË”¢Õß√—∫∫
«‘∏’·°áª–≠À“:
ª√–∫√ÿÜπÕߧèª√—°Õ∫π–Èπ„Àáµ√ßµ“¡§«“¡µáÕß°“√¢–ÈπµË”¢Õß√—∫∫ °ãÕπ√’›µ“√è∑´Õøµè·«√è›”À√–∫‡§√◊ËÕßæ‘¡æè
Õ’°§√–Èß
ª–≠À“:
§Õ¡æ‘«‡µÕ√艡ãÕã“π·ºãπ´’¥’ HP Photosmart
«‘∏’·°áª–≠À“:
¥Ÿ„Àá·πã„®«ã“ ·ºãπ´’¥’‰¡ã›°ª√°À√◊Õ¡’√Õ¬¢’¥¢ã«π À“°§Õ¡æ‘«‡µÕ√èÕã“π·ºãπ´’¥’Õ◊Ëπ ·µã‰¡ãÕã“π·ºãπ´’¥’ HP
Photosmart ·›¥ß«ã“ §ÿ≥Õ“®‰¥á√–∫·ºãπ´’¥’‡›’¬ ¢Õ√–∫·ºãπ´’¥’·ºãπ„À¡ã‰¥á®“°»Ÿπ¬è¥Ÿ·≈≈Ÿ°§á“ À“°·ºãπ´’¥’‰¡ã∑”ß“π
§ÿ≥Õ“®µáÕß´ãÕ¡·´¡‰¥√øè´’¥’√Õ¡
Jika perangkat lunak pencetak tidak berhasil menginstal atau jika pencetak dan komputer tidak saling berkomunikasi dengan benar setelah instalasi perangkat lunak, periksa halaman ini untuk mendapatkan solusi yang memungkinkan. Jika Anda masih memerlukan bantuan, periksa dokumentasi pencetak atau hubungi bagian Peduli Pelanggan.
Periksa semua sambungan kabel antara pencetak dan komputer, dan pastikan, bahwa Anda menggunakan perangkat lunak pencetak versi terbaru.
Windows
Masalah: Instalasi perangkat lunak tidak mulai secara otomatis ketika CD dimasukkan.
Solusi: Dari menu Start Windows, pilih Run. Klik Browse, dan navigasikan ke drive CD di mana Anda memasukkan CD perangkat lunak HP Photosmart. Klik dua kali file setup.exe.
Masalah: Jika Found New Hardware Wizard (Wizard Penemuan Perangkat Lunak Baru) terbuka tetapi tidak mengenali pencetak, mungkin Anda sudah menghubungkan kabel USB sebelum menyelesaikan instalasi perangkat lunak.
Solusi: Cabut kabel USB dan mulai lagi instalasi perangkat lunak. Hubungkan kabel USB bila diperintahkan sewaktu instalasi perangkat lunak.
Masalah: Tanda V pada persyaratan sistem menandakan, bahwa komputer sedang menjalankan versi Internet Explorer yang sudah tidak berlaku lagi.
Solusi: Tekan Ctrl + Shift pada papan tombol dan klik Cancel (Batal) pada kotak dialog System Requirements (Persyaratan Sistem) untuk memintas blok dan menyelesaikan instalasi perangkat lunak. Anda harus segera meng-update Internet Explorer setelah menginstal perangkat lunak HP Photosmart, atau perangkat lunak HP tidak akan bekerja secara layak. Catatan: Anda tidak perlu menginstal ulang perangkat lunak HP setelah meng-update Internet Explorer.
Masalah: Jika komputer berhenti menanggapi sewaktu instalasi perangkat lunak, ini mungkin berarti, bahwa perangkat lunak proteksi virus atau program perangkat lunak yang lain sedang berjalan di latar belakang dan memperlamban proses instalasi.
Solusi: Tunggu sebentar sampai perangkat lunak selesai menyalin file; ini bisa berlangsung beberapa menit. Jika, setelah beberapa menit, komputer masih belum menanggapi, restart komputer, tunda atau lumpuhkan perangkat lunak proteksi virus yang aktif, tutup semua program perangkat lunak, kemudian instal ulang perangkat lunak pencetak dengan mengikuti petunjuk pada halaman 6. Catatan: Perangkat lunak proteksi virus Anda akan otomatis aktif lagi bila Anda me-restart komputer.
Windows dan Macintosh
Masalah: Jika kotak dialog System Requirements (Persyaratan Sistem) muncul sewaktu instalasi, ini berarti ada komponen sistem komputer yang tidak memenuhi persyaratan sistem minimum.
Solusi: Upgrade komponen ke persyaratan sistem minimum kemudian instal ulang perangkat lunak pencetak.
Masalah: Komputer tidak dapat membaca CD HP Photosmart.
Solusi: Pastikan CD tidak kotor atau tergores. Jika CD yang lainnya dapat dibaca tetapi CD HP Photosmart tidak, mungkin CD Anda rusak. Anda dapat meminta CD baru dari bagian Peduli Pelanggan. Jika CD yang lain pun tidak dapat dibaca, berarti drive CD-ROM Anda perlu diservis.
«‘∏’·°áª–≠À“°“√µ‘¥µ–Èß
Menyelesaikan masalah instalasi
Installation troubleshooting
If the printer software did not install successfully or if the printer and computer are not
communicating properly after software installation, check this page for possible solutions. If you still need help, check the printer documentation or contact Customer Care.
Check all cable connections between the printer and computer, and ensure you are using the most recent version of the printer software.
Windows
Problem: The installation software does not start automatically when the CD is inserted.
Solution: From the Windows Start menu, select Run. Click Browse, and navigate to the CD drive where you inserted the HP Photosmart software CD. Double-click the setup.exe file.
Problem: If the Found New Hardware Wizard opens but doesn't recognize the printer, you may have connected the USB cable before completing the software installation.
Solution: Disconnect the USB cable and restart the software installation. Connect the USB cable when prompted during software installation.
Problem: The system requirements check indicates that the computer is running an outdated version of Internet Explorer.
Solution: Press Ctrl + Shifton the keyboard and click Cancelin the System Requirements dialog box to bypass the block and complete the software installation. You must update Internet Explorer immediately after installing the HP Photosmart software, or the HP software will not work properly. Note:You do not have to reinstall the HP software after updating Internet Explorer.
Problem: If the computer stops responding during software installation, it may mean that virus protection software or another software program is running in the background and slowing down the installation process.
Solution: Wait while the software finishes copying files; this may take several minutes. If, after several minutes, the computer is still not responding, restart the computer, pause or disable any active virus protection software, quit all other software programs, and then reinstall the printer software using the instructions on page 6. Note:Your virus protection software will turn back on automatically when you restart the computer.
Windows and Macintosh
Problem: If the System Requirements dialog box appears during installation, it means a component of the computer system does not meet minimum system requirements.
Solution: Upgrade the component to the minimum system requirement and then reinstall the printer software.
Problem: The computer could not read the HP Photosmart CD.
Solution: Make sure the CD isn’t dirty or scratched. If other CDs work but the HP Photosmart CD does not, you may have a damaged CD. You can request a new CD from Customer Care. If other CDs don’t work, you may need to service the CD-ROM drive.
„›ã°“√襧«“¡®”
Menyisipkan kartu memori
Insert a memory card
°“√æ‘¡æè¿“æ∂㓬¿“æ·√°¢Õߧÿ≥
Mencetak foto pertama Anda
Print your first photo
1
À¡“¬‡Àµÿ:
„›ã°“√襧«“¡®”≈ß„π‡§√◊ËÕßæ‘¡æè∑’≈—°“√è¥
1. ¬°™ãÕß„›ã°“√襧«“¡®”¢÷Èπ
2. ∂◊Õ°“√襧«“¡®”‡æ◊ËÕ„Àá¥á“π∑’Ë∂Ÿ°µáÕßÀß“¬¢÷Èπ ›”À√–∫
√“¬≈—‡Õ’¬¥‡æ‘Ë¡‡µ‘¡‡°’ˬ«°–∫°“√„™á°“√襧«“¡®”
„Àᥟ∑’˧Ÿã¡◊ÕºŸá„™á
3. „›ã°“√襧«“¡®”≈ß„π›≈ÁÕµ°“√è¥∑’ˇÀ¡“—›¡ §ãÕ¬ Ê
¥–π°“√襇¢á“‰ª„π‡§√◊ËÕßæ‘¡æè®π›ÿ¥
§”‡µ◊Õπ:
Àá“¡‡›’¬∫°“√襧«“¡®”§á“߉«á„π‡§√◊ËÕßæ‘¡æè
°“√¥–π°“√襧«“¡®”‡¢á“‰ª≈÷°‡°‘π‰ªÕ“®∑”„Àá°“√襧«“¡
®”À√◊Õ‡§√◊ËÕßæ‘¡æè™”√ÿ¥‡›’¬À“¬
Note: Insert only one memory card into the printer at a time.
1. Raise the Memory Card door.
2. Hold the memory card so the correct side faces up. For more information about using memory cards, see the User’s Guide.
3. Insert the memory card into the appropriate card slot. Gently push the memory card into the printer until it stops.
Caution: The memory card does not insert all the way into the printer. Forcing the memory card into the printer too far may damage the memory card or the printer.
Catatan: Sisipkan hanya satu kartu memori ke dalam pencetak setiap kali.
1. Angkat pintu Kartu Memori.
2. Pegang kartu memori sehingga sisi yang benar menghadap ke atas. Untuk informasi lebih lanjut tentang menggunakan kartu memori, lihat Petunjuk Pemakai.
3. Sisipkan kartu memori ke dalam slot kartu yang sesuai. Dengan perlahan-lahan, sorong kartu memori ke dalam pencetak sampai kartu berhenti.
Awas: Kartu memori tidak akan masuk seluruhnya ke dalam pencetak. Memaksa kartu memori untuk masuk lebih jauh ke dalam pencetak dapat merusak kartu memori atau pencetak.
MultiMediaCard À√◊Õ Secure Digital
MultiMediaCard atau Secure Digital MultiMediaCard or Secure DigitalMicrodrive À√◊Õ CompactFlash
Microdrive atau CompactFlash Microdrive or CompactFlash
SmartMedia À√◊Õ°“√è¥ xD-Picture
SmartMedia atau xD-Picture Card SmartMedia or xD-Picture Card
Memory Sticks Memory Sticks Memory Sticks
1. ¥Ÿ„Àá·πã„®«ã“ ‰¥á„›ã°“√襧«“¡®”∑’Ë¡’¿“æ≈ß„π›≈ÁÕµ
°“√襧«“¡®”∑’Ë∂Ÿ°µáÕß
2. °¥≈Ÿ°»√‡≈◊Õ°¿“æ∂㓬‡æ◊ËÕ‡≈◊ËÕπ¥Ÿ¿“æµã“ß Ê ∫π
°“√襧«“¡®”
3. ‡¡◊ËÕ¿“æ∑’˧ÿ≥µáÕß°“√æ‘¡æèª√“°Ø∫πÀπá“®Õ¢Õß
‡§√◊ËÕßæ‘¡æè·≈á« „Àá°¥ªÿÜ¡‡≈◊Õ°¿“æ∂㓬
1. Make sure a memory card that contains photos is inserted into the correct memory card slot.
2. Press the Select Photosarrows to navigate through the photos on the memory card. 3. When the photo you want to print
appears on the printer screen, press
Select Photos . 1. Pastikan kartu memori yang berisi foto,
disisipkan ke dalam slot kartu memori yang benar.
2. Tekan panah Pilih Fotountuk menavigasi melintasi foto pada kartu memori. 3. Bila foto yang ingin Anda cetak, muncul
pada layar printer, tekan Select Photos (Pilih Foto) .
°“√‡≈◊Õ°¿“æ∑’Ë®—æ‘¡æè
Memilih foto yang akan dicetak
Select a photo to print
2
‡≈◊Õ°ªÿÜ¡‡≈◊Õ°¿“æ∂㓬
Tombol Pilih Foto Select Photos button≈Ÿ°»√‡≈◊Õ°¿“æ∂㓬
Panah Pilih Foto Select Photos arrows„›ã°√—¥“…∂㓬¿“æ¢π“¥ 10x15 ´¡. (4x6 π‘ú«) ≈ß„π∂“¥
Memuatkan kertas Foto 10x15 cm (4x6 inci)
Load 10x15 cm (4x6 inch) photo paper
1. ¬°Ω“§√Õ∫∂“¥°√—¥“…ÕÕ°¢÷Èπ
2. ¥Ÿ„Àá·πã„®«ã“ ‰¥á¥÷ßµ–«‡≈◊ËÕπ∂“¥°√—¥“…∂㓬¿“æÕÕ°
À“°®“°‡§√◊ËÕßæ‘¡æè·≈á«
3. ¥÷ßµ–«°–È𧫓¡¬“«¢Õß°√—¥“…„π∂“¥°√—¥“…∂㓬
¿“æÕÕ° ·≈—‡≈◊ËÕπµ–«°–È𧫓¡°«á“ߢÕß°√—¥“…
„π∂“¥°√—¥“…∂㓬¿“æÕÕ°¡“∑“ߥá“π´á“¬®π›ÿ¥
4. «“ß°√—¥“…∂㓬¿“æ¢π“¥ 10x15 ´¡. (4x6 π‘ú«)
√«¡ 20 ·ºãπ‡¢á“‰ª„π∂“¥°√—¥“…∂㓬¿“æ
‚¥¬„Àá¥á“π∑’˵áÕß°“√æ‘¡æ觫˔≈ß
5. ª√–∫µ–«°–È𧫓¡°«á“ߢÕß°√—¥“…„π∂“¥°√—¥“…
∂㓬¿“æ ·≈—µ–«°–È𧫓¡°«á“ߢÕß°√—¥“…„ÀáæÕ¥’°–∫
¢Õ∫°√—¥“… ·µã‰¡ã∑”„Àá°√—¥“…ßÕ
6. ¥÷ßµ–«‡≈◊ËÕπ∂“¥°√—¥“…∂㓬¿“殓°¥á“πÀ≈–ߢÕß
‡§√◊ËÕßæ‘¡æ臢ᓡ“ ®π°√—∑–ËßÀ¬ÿ¥ §ÿ≥®—‰¡ã‡ÀÁπ
∂“¥°√—¥“…∂㓬¿“æ„πÀπᓵã“ß ∂“¥°√—¥“…
∂㓬¿“æ
7. ª‘¥∂“¥°√—¥“…ÕÕ°
1. Raise the Out tray.
2. Ensure that the photo tray slider is pulled away from the printer.
3. Pull out the Photo tray paper-length guide and slide the Photo tray paper-width guide as far to the left as it will go. 4. Place up to 20 sheets of 10x15 cm
(4x6 inch) photo paper in the Photo tray so the side to be printed on faces down. 5. Adjust the Photo tray paper-length guide and paper-width guide to fit close to the edges of the paper without bending the paper.
6. Push the Photo tray slider toward the back of the printer until it stops. The Photo tray disappears from view in the Photo tray window.
7. Lower the Out tray. 1. Angkat baki Keluar.
2. Pastikan, bahwa geseran baki Foto ditarik menjauhi pencetak.
3. Tarik keluar penuntun panjang kertas pada baki Foto dan geser penuntun lebar kertas baki Foto sejauh mungkin ke kiri. 4. Taruh hingga 20 lembar kertas Foto
10x15 cm (4x6 inci) di dalam baki Foto,
sisi halaman yang akan dicetak menghadap ke bawah.
5. Atur penuntun panjang kertas dan penuntun lebar kertas baki Foto sehingga pas dekat tepi kertas tanpa menekuk kertas.
6. Dorong geseran baki Foto ke arah belakang pencetak sampai berhenti. Baki Foto menghilang dari tampilan di jendela baki Foto.
7. Turunkan baki Keluar.
3
∂“¥°√—¥“…ÕÕ°
Baki KeluarOut tray
µ–«°–È𧫓¡¬“«¢Õß°√—¥“…
Penuntun panjang kertasPaper-length guide
µ–«°–È𧫓¡°«á“ߢÕß°√—¥“…
Penuntun lebar kertas Paper-width guide
‡¡◊ËÕ„™áµ–«‡≈◊ËÕπ∂“¥°√—¥“…∂㓬¿“æ
Geseran baki Foto terpasang Photo tray slider engaged1. ¥Ÿ„Àá·πã„®«ã“ ¿“æ∑’˧ÿ≥µáÕß°“√æ‘¡æèª√“°Ø∫π
Àπá“®Õ¢Õ߇§√◊ËÕßæ‘¡æè·≈á«
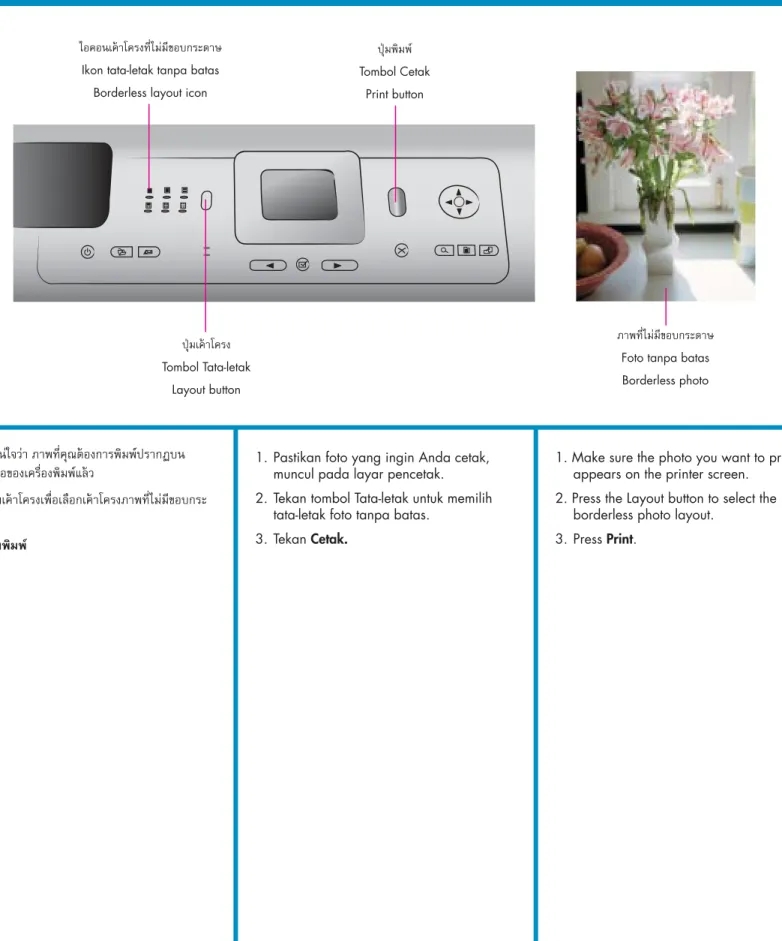
2. °¥ªÿÜ¡‡§á“‚§√߇æ◊ËÕ‡≈◊Õ°‡§á“‚§√ß¿“æ∑’ˉ¡ã¡’¢Õ∫°√—
¥“…
3. °¥ªÿÜ¡
æ‘¡æè
1. Make sure the photo you want to print appears on the printer screen. 2. Press the Layout button to select the
borderless photo layout. 3. Press Print.
1. Pastikan foto yang ingin Anda cetak, muncul pada layar pencetak. 2. Tekan tombol Tata-letak untuk memilih
tata-letak foto tanpa batas. 3. Tekan Cetak.
°“√æ‘¡æè¿“æ∂㓬∑’ˉ¡ã¡’¢Õ∫°√—¥“…
Mencetak foto tanpa batas
Print a borderless photo
4
‰Õ§Õπ‡§á“‚§√ß∑’ˉ¡ã¡’¢Õ∫°√—¥“…
Ikon tata-letak tanpa batasBorderless layout icon
¿“æ∑’ˉ¡ã¡’¢Õ∫°√—¥“…
Foto tanpa batas Borderless photoªÿÜ¡æ‘¡æè
Tombol Cetak Print buttonªÿÜ¡‡§á“‚§√ß
Tombol Tata-letak Layout button‡§≈Á¥≈–∫
Saran kilat
Quick tips
‡§√◊ËÕßæ‘¡æè√ÿÜπ HP Photosmart 8400 series ™ã«¬„Àá
§ÿ≥æ‘¡æè¿“æ∂㓬›«¬ Ê ®“°°≈áÕߥ‘®‘∑Õ≈∑’Ëæ‘¡æèºã“π HP
‰¥á‚¥¬µ√ß‚¥¬‰¡ãµáÕ߇™◊ËÕ¡µãÕ°–∫§Õ¡æ‘«‡µÕ√è ‡æ’¬ß·§ã
„›ã°“√襧«“¡®”‡¢á“‰ª„π›≈ÁÕµ°“√è¥∑’ËÕ¬Ÿã∫π‡§√◊ËÕßæ‘¡æè
‚¥¬µ√ß ‚¥¬µáÕ߇≈◊Õ°¿“殓°·ºß§«∫§ÿ¡¢Õ߇§√◊ËÕßæ‘¡æè
°ãÕπæ‘¡æè¿“æπ–Èπ
›”À√–∫¢áÕ¡Ÿ≈‡æ‘Ë¡‡µ‘¡‡°’ˬ«°–∫°“√æ‘¡æ迓殓°°≈áÕß
¥‘®‘∑Õ≈ À√◊Õ°“√襧«“¡®”‚¥¬‰¡ã„™á‡§√◊ËÕߧա摫‡µÕ√è
‚ª√¥¥Ÿ∑’˧Ÿã¡◊ÕºŸá„™á
The HP Photosmart 8400 series printer allows you to print beautiful photos from an HP direct-printing digital camera without connecting to a computer. Simply insert a memory card directly into the appropriate card slot on the printer, make your selections on the control panel, then print the photo. For more information about printing photos from a digital camera or memory card without using a computer, see the User’s Guide.
Dengan pencetak HP Photosmart 8400 series, Anda dapat mencetak foto-foto yang indah dari kamera digital cetak-langsung HP tanpa terhubung ke komputer. Sisipkan kartu memori langsung ke dalam slot kartu yang sesuai pada pencetak, pastikan pemilihan Anda pada panel kendali, kemudian cetak fotonya.
Untuk informasi selengkapnya tentang cara mencetak foto dari kamera digital atau kartu memori tanpa menggunakan komputer, lihat Petunjuk Pemakai.
æ‘¡æè¿“æ‚¥¬‰¡ã„™á‡§√◊ËÕߧա摫‡µÕ√è
Mencetak foto tanpa komputer
Print photos without a computer
°“√æ‘¡æè¥á«¬§Õ¡æ‘«‡µÕ√è·≈— HP Image Zone
Mencetak dengan komputer dan HP Image Zone
Print with a computer and HP Image Zone
¡’§«“¡‡ªÁπ‰ª‰¥á∑’ˉ¡ã›‘úπ›ÿ¥‡¡◊ËÕ§ÿ≥„™á´Õøµè·«√è HP’s
Image Zone ‡æ◊ËÕ›√á“ß‚§√ß°“√¿“æ∂㓬¢Õߧÿ≥‡Õß
ï
ÕÕ°·∫∫ªØ‘∑‘π ·ºãπæ–∫ ·≈—„∫ª≈‘«‚¥¬„™á¿“æ
∂㓬¥‘®‘∑Õ≈¢Õߧÿ≥
ï
®–¥∑”Õ–≈∫–È¡¿“æ∂㓬¢Õߧÿ≥‡Õß ‡æ◊ËÕ‡°Á∫‰«á¥Ÿ„π
¿“¬À≈–ß
ï
∑”‡›◊úÕ∑’‡™‘√èµ ª°·ºãπ´’¥’ ·≈—‡ø√¡¿“æ∂㓬
ï
„™á´Õøµè·«√è HP Instant Share ‡æ◊ËÕÕ’‡¡≈¿“æ
∂㓬·≈—„™á¿“æ∂㓬µã“ß Ê √ã«¡°–π·∫∫ÕÕπ‰≈πè
›”À√–∫¢áÕ¡Ÿ≈‡æ‘Ë¡‡µ‘¡‡°’ˬ«°–∫°“√›√á“ß‚§√ß°“√›πÿ° Ê
¢Õߧÿ≥‡Õß ‚ª√¥¥Ÿ∑’Ë«‘∏’„™á´Õøµè·«√è HP Image Zone
∫πÀπá“®Õ
À¡“¬‡Àµÿ:
´Õøµè·«√è HP Image Zone §ÿ≥›¡∫–µ‘¢ÕߪÿÜ¡
HP Instant Share ·≈—«‘∏’„™á∫πÀπá“®Õ≈á«π‰¥á√–∫°“√µ‘¥
µ–Èß‚¥¬Õ–µ‚π¡–µ‘ ‡¡◊ËÕ§ÿ≥‡≈◊Õ°°“√µ‘¥µ–Èß·∫∫ Typical
(·∫∫ª°µ‘) ¢Õß´Õøµè·«√臧√◊ËÕßæ‘¡æè HP Photosmart
The possibilities are endless when you use HP’s Image Zone software to create your photo projects.
• Design calendars, brochures, and flyers using your digital photos.
• Create your own photo albums and keepsakes.
• Craft custom T-shirts, CD covers, and picture frames.
• Use HP Instant Share to e-mail photos and to share photos online.
For more information about creating your own fun projects, see the HP Image Zone onscreen Help.
Note: HP Image Zone software, the HP Instant Share button feature, and onscreen help are installed automatically when you choose the Typical installation of the HP Photosmart printer software.
Apapun dapat dikerjakan bila Anda menggunakan perangkat lunak HP Image Zone untuk menciptakan proyek foto Anda. • Mendesain kalender, brosur, dan
selebaran dengan menggunakan foto digital Anda.
• Menciptakan album foto dan buku kenangan Anda sendiri.
• Merancang T-shirt, sampul CD, dan bingkai gambar kreasi sendiri. • Perangkat lunak HP Instant Share untuk
mengirim foto lewat e-mail dan berbagi foto secara online.
Untuk informasi selengkapnya tentang cara menciptakan proyek seru Anda, lihat Bantuan HP Image Zone pada layar.
Catatan: Perangkat lunak HP Image Zone, fitur tombol HP Instant Share, dan bantuan pada layar diinstal secara otomatis bila Anda memilih instalasi Typical dari perangkat lunak pencetak HP Photosmart.
www.hp.com
§Ÿã¡◊ÕºŸá„™á
Petunjuk PemakaiUser’s Guide
«‘∏’„™á‡§√◊ËÕßæ‘¡æè Photosmart ∫πÀπá“®Õ
Bantuan Pencetak Photosmart Pada LayarOnscreen Photosmart Printer Help
www.hp.com/support
¢áÕ›”§–≠:
‡°Á∫µ≈–∫À¡÷°∑’ˬ–߉¡ã‰¥á„™á‰«á„π«–›¥ÿªáÕß°–πµ≈–∫À¡÷°æ‘¡æè∑’Ë¡“æ√áÕ¡°–∫‡§√◊ËÕßæ‘¡æ臛¡Õ
Penting: Selalu menyimpan kartrid yang tidak digunakan di dalam pelindung kartrid cetak yang disertakan dengan pencetak.
Important: Always store the unused cartridge in the print cartridge protector that came with the printer.
*Q3388-90166*
*Q3388-90166*
Q3388-90166
°“√µ‘¥µ–Èßµ≈–∫À¡÷°æ‘¡æè∑’Ë¥’∑’Ë›ÿ¥›”À√–∫‚§√ß°“√¢Õߧÿ≥
Menginstal kartrid cetak yang terbaik untuk proyek Anda.
Install the best print cartridges for your project
À“°µáÕß°“√√“¬≈—‡Õ’¬¥‡æ‘Ë¡‡µ‘¡
Perlu informasi lagi?
Need more information?
æ‘¡æè„π›‘ߧ‚ª√è 07/04 ï v1.0.1 ï æ‘¡æè∫π°√—¥“…À¡ÿπ‡«’¬π
© 2004 Hewlett-Packard Development Company, L.P.
Dicetak di Singapura 07/04 • v1.0.1 • Dicetak pada kertas daur-ulang © 2004 Hewlett-Packard Development Company, L.P.
Printed in Singapore 07/04 • v1.0.1 • Printed on recycled paper
›“¡›’ ¿“æ∂㓬 ·≈—¿“æ∂㓬›’‡∑“
Tri-color (Tiga-Warna), Photo (Foto), dan Gray Photo (Foto Kelabu) Tri-color, Photo, and Gray Photo
›“¡›’ ¿“æ∂㓬 ·≈—›’¥”
Tri-color (Tiga-Warna), Photo (Foto), dan Black (Hitam) Tri-color, Photo, and Black
›“¡›’ ¿“æ∂㓬 ·≈—¿“æ∂㓬›’‡∑“
Tri-color (Tiga-Warna), Photo (Foto), dan Gray Photo (Foto Kelabu) Tri-color, Photo, and Gray Photo