Moodle as a Curriculum and
Information Management System
Beginner's Guide
Use Moodle to manage and organize your administrative
duties, monitor attendance records, manage student
enrollment, record exam results, and much more
Jason Hollowell
Moodle as a Curriculum and Information
Management System
Beginner's Guide
Copyright © 2011 Packt Publishing
All rights reserved. No part of this book may be reproduced, stored in a retrieval system, or transmitted in any form or by any means, without the prior written permission of the publisher, except in the case of brief quotations embedded in critical articles or reviews.
Every effort has been made in the preparation of this book to ensure the accuracy of the information presented. However, the information contained in this book is sold without warranty, either express or implied. Neither the author, nor Packt Publishing, and its dealers and distributors will be held liable for any damages caused or alleged to be caused directly or indirectly by this book.
Packt Publishing has endeavored to provide trademark information about all of the companies and products mentioned in this book by the appropriate use of capitals. However, Packt Publishing cannot guarantee the accuracy of this information.
First published: January 2011
Production Reference: 1311210
Published by Packt Publishing Ltd. 32 Lincoln Road
Olton
Birmingham, B27 6PA, UK.
ISBN 978-1-849513-22-7
www.packtpub.com
About the Author
Acknowledgement
No book is the product of just the author—he just happens to be the one with his name on the cover.
Many people contributed to the success of this book, and it would take more space than I have to thank each one individually.
A very special thanks goes to Sarah Cullington, my editor, who is the reason that this book exists. Thank you, Sarah, for understanding the idea and helping me to develop it into something worthy of print, and for being a wonderful guide through this process. Thank you also to the entire Packt Publishing team for working so diligently to help bring out a high quality product.
I would also like to thank those people who helped me, with support, ideas, and feedback, as I experimented with Moodle as an educational program administration tool. They include Richard McMahon, Jason Myrick, George Harrison, and Yusuke Itamiya. A special thanks also goes out to Hiroko Nagasawa, without your help I would never have been able to get the grant funding that made the registration enrollment plugin, which was the final motivation to write this book, possible.
The many users of Moodle who participate in the forums on the Moodle.org site also deserve a very heartfelt thanks. You helped me discover the possibilities Moodle has to offer and rescued me when I got lost as I experimented and explored.
About the Reviewers
Anthony Borrow, S.J is a Jesuit of the New Orleans Province who has been active in the
Moodle community for the past five years. Anthony has an M.A. degree in Counseling from Saint Louis University and a Masters of Divinity from the Jesuit School of Theology of Santa Clara University. Anthony has worked on the design and implementation of various database systems since 1992.Anthony serves the Moodle community as its CONTRIB Coordinator. In that role, Anthony has presented at various MoodleMoots (conferences) across the United States and provided in-house training opportunities for institutions learning how to implement Moodle. Anthony has taught at Dallas Jesuit College Preparatory and provides technical advise to the Jesuit Secondary Education Association (http://jsea.org) and the Jesuit Virtual Learning Academy (http://jvla.org/). Anthony is currently serving the community at Cristo Rey Jesuit College Preparatory of Houston (http://cristoreyjesuit.org) as their Campus Minister.
He is the co-author of the Honduras chapter of Teen Gangs: A Global View. He has also been the technical reviewer of various Packt books (0141, 1001, 1902, 4244).
Brian Mattson is a history teacher from Lapeer, Michigan with a passion for Moodle and
its use in both blended and remote learning environments. After teaching at an American school in Torreon, Mexico for four years he moved to Bulgaria where he and his colleagues pioneered the use of Moodle at the Anglo American School of Sofia. Currently he resides in Amsterdam, the Netherlands where he runs a Moodle consulting business that provides training and workshops for international schools throughout Europe and beyond. He can be contacted at [email protected].I would like to thank two members of the Anglo American School of Sofia; Linda Dimitrov for her past and continued assistance with all things technical, and Jim Leahy who has provided me with constant encouragement in my professional endeavors. I am also grateful to all the students at the Anglo American School of Sofia who taught me as much as I taught them. Finally a special thanks to my wife Anette and my son Tijs for everything.
Kent Villard is a twenty-year veteran of the IT industry and currently is the E-Learning
Coordinator for the University of Prince Edward Island. He has been administering Moodle for almost five years. Kent particularly enjoys the process of converting traditional curriculum to work in an online form. He has acted as a technical reviewer for Packt on Moodle 1.9 for Design and Technology and Moodle 1.9 Teaching Techniques.When not administering Moodle or evangelizing the Mac platform, Kent can be found spending quality time with his beautiful wife Denise and awesome kids, Maxwell and Samantha.
www.PacktPub.com
Support files, eBooks, discount
offers, and more
You might want to visit www.PacktPub.com for support files and downloads related to your book.
Did you know that Packt offers eBook versions of every book published, with PDF and ePub files available? You can upgrade to the eBook version at www.PacktPub.com and as a print book customer, you are entitled to a discount on the eBook copy. Get in touch with us at [email protected] for more details.
At www.PacktPub.com, you can also read a collection of free technical articles, sign up for a range of free newsletters and receive exclusive discounts and offers on Packt books and eBooks.
http://PacktLib.PacktPub.com
Do you need instant solutions to your IT questions? PacktLib is Packt's online digital book library. Here, you can access, read and search across Packt's entire library of books.
Why Subscribe?
• Fully searchable across every book published by Packt • Copy and paste, print and bookmark content
• On demand and accessible via web browser
Free access for Packt account holders
My wife Hitomi, you fulfill me with peace, love, and happiness; my daughter Hana, you are my sunshine and my daily reminder of the beauty of life.
This book would not have been possible without your love and understanding.
Table of Contents
Preface
1
Chapter 1: Welcome to Moodle as a Curriculum and Information
Management System (CIMS)!
5
What is Moodle? 5
A VLE, LMS, and CMS 6
Using Moodle as a CIMS 6
Installing Moodle 7
Installing MAMP and XAMPP packages 8
Time for action – installing the Mac OS X package 8
Time for action – installing the Windows package 10
Basic setup and customization of your Moodle site 18
Time for action – basic customization 19
Time for action – customizing the label area of the front page 23
Time for action – adding the Main Menu block 26
Installing third party contributions 27
Blocks and modules 27
Time for action – installing the My Courses block 28
Time for action – installing the Attendance package 31
Installing other plugins (themes) 34
Time for action – installing the Aardvark Pro original theme 34
Summary 37
Chapter 2: Building the Foundation—Creating Categories and Courses
39
Course categories 40
Manual creation of course categories 40
Time for action – manually creating course categories 40
Teacher account creation 46
Time for action – creating teacher accounts 46
Table of Contents
[ ii ]
Time for action – installing the Bulk Course Upload tool 53
Summary 61
Chapter 3: Student Account Creation and Enrollment
63
Bulk account creation and course enrollment 64
Time for action – enrolling students when creating their accounts 64
Time for action – checking the enrollment status from the course context 70
Time for action – checking enrollment status from the user's profile page 73
Bulk enrollment for existing users 76
Time for action – preparing the CSV file 76
Time for action – enroll existing users 77
Other enrollment options 80
Enrollment plugins 81
CIMS enrollment review 84
Summary 84
Chapter 4: Incorporating Educational Standards
85
Implementing standard policies and procedures in your Moodle site 85
Attendance standards 86
Bulk setup of the attendance module 86
Time for action – creating a template course 87
Time for action – setting up the attendance template 89
Time for action – importing the attendance template to other courses 94
Grading standards 98
Time for action – creating a standard grading scale 98
Time for action – creating a Gradebook template 100
Time for action – preparing the target course 103
Time for action – importing the Gradebook template 104
Implementing a final grade submission process 105
The policy 106
The process 106
Time for action – locking courses for grade retrieval 107
Setting up a program-wide testing procedure 109
Time for action – an exam administered outside of Moodle 109
An exam administered via the Moodle quiz module 113
Summary 113
Chapter 5: Enabling your Moodle Site to Function as an Information Portal 115
Modifying display settings 116
Time for action – removing course lists from the category page 116
Time for action – increasing the detailed summary setting 119
Table of Contents
[ iii ]
Expanding content display possibilities 122
Time for action – installation of Content Pages block 122
Time for action – customizing the Content Pages block 126
Customization of third party themes 128
Time for action – customizing the menu bar 129
Time for action – customizing the submenus 130
Time for action – adding links to the submenu items 132
Time for action – adjusting the display style of the Content 134
Pages admin block 134
Time for action – customizing the logo 136
Summary 137
Chapter 6: Customized Roles
139
Permissions and roles 140
Creating a censored student role 142
Time for action – creating and using a censored student role 142
Assistant administrator role 146
Time for action – creating and using an assistant administrator role 146
Time for action – testing the role 148
Administrative monitor role 152
Time for action – creating and using an administrative monitor role 153
Time for action – assigning and testing the role 154
The Mentor, Advisor, and Parental Monitor role 157
Time for action – creating and using the Parental Monitor role 157
Time for action – creating a new account and assigning the role to it 158
Time for action – installing the Mentees block 161
Time for action – checking the role functionality 163
Summary 166
Chapter 7: Advanced Data Access and Display
167
The Enhanced User Administration block 168
Time for action – installation and use of the Enhanced User Admin block 168
Installation and use of PHPMyAdmin 173
Time for action – installing and using PHPMyAdmin 173
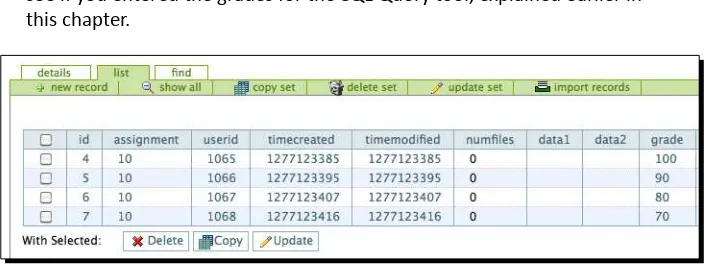
Installation and basic use of the Custom SQL query tool 176
Time for action – install and experiment with the Custom SQL query tool 176
SQL queries 178
Time for action – creating a sample query 178
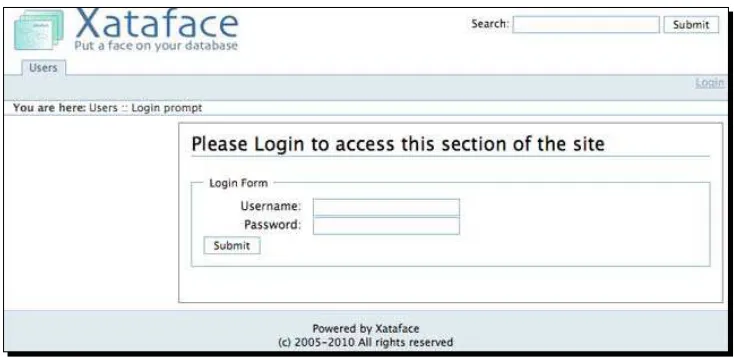
Installation and basic setup of the embedded Xataface database application 181
Time for action – installation and basic setup of Xataface 181
Table of Contents
[ iv ]
Time for action – limiting database table access 190
Time for action – another Xataface security measure 192
Summary 195
Chapter 8: Setting Up a Mini SIS
197
Custom user profile fields 198
Time for action – setting up a user profile field for assessment test scores 198
Time for action – a profile field for program enrollment information 201
Time for action – populating the fields 202
Using the user profile fields as the search criteria 206
Time for action – searching using the Bulk user actions tool 206
Time for action – searching using PHPMyAdmin 209
The Xataface database 'backside' application 211
Time for action – customizing the Xataface table display 212
Time for action – setting up relationships in Xataface 215
Time for action – using Xataface to modify core Moodle data 218
Time for action – Xataface as an enrollment table maintenance tool 222
Summary 225
Chapter 9: Promoting Efficient Communication
227
Using Moodle as a hub for internal information
distribution, collaboration, and communication 228
Facilitating intra- or inter-departmental or program communication,
collaboration, and information flow 228
Time for action – setting up the meta course 229
Time for action – creating a group inside the meta course 231
Time for action – setting up the forums inside the meta course 234
Building a mentor, homeroom, advisor, or counselor system 237
Time for action – setting up a mentor, advisor, or counseling system 238
Feedback systems—using the questionnaire module 243
Time for action – installing and using the questionnaire module 243
Summary 249
Chapter 10: Advanced Enrollment Plugin
251
Introducing the Registration Enrollment plugin 252
Time for action – installing the Registration Enrollment plugin 252
Time for action – creating and populating the user profile fields 253
Time for action – setting up the Registration Enrollment plugin
(default site-wide settings) 256
Time for action – registration enrollment system settings (course level) 261
Testing the Registration Enrollment plugin 264
Time for action – testing the priority enrollment period setting
Table of Contents
[ v ]
Time for action – testing the priority enrollment period for
an ineligible student 267
Time for action – testing the Registration Enrollment plugin
for a non-eligible student 268
Time for action – testing the course capacity setting of the
Registration Enrollment plugin 269
Time for action – testing the Registration Enrollment plugin base criteria 270
Time for action – testing the Registration Enrollment plugin
after the period has ended 271
Time for action – testing the Registration Enrollment plugin Allowed
Enrollments setting 272
Testing the Registration Enrollment Plugin—a review 274
A note on Moodle customization 275
Summary 276
Pop Quiz Answers
277
Chapter 3 277
Chapter 5 277
Chapter 6 277
Chapter 7 278
Chapter 8 278
Chapter 10 278
Preface
Moodle is the most widely used Learning Management System in the world. Moodle is primarily used as an online learning course platform and few people know how to use it in any other way. However, Moodle can also be used as a management system. By adapting Moodle to become a curriculum and information management system, you can keep your administrative tasks in the same place as your lesson plans by managing student attendance records, recording grades, sharing reports between departments, and much more.
Moodle as a Curriculum and Information Management System will show you how you can use Moodle to set up an environment that enables you to disseminate information about your educational program, provide a forum for communication among all those involved in your institution, and even to control your course registration and enrollment.
This book will show you how to create courses and organize them into categories. You will learn to assign teachers to each course, which will greatly help you to manage timetables and student enrollment, which can otherwise be a very frustrating and time consuming task. You will learn how to display the different aspects of your Curriculum and Information Management System to make it easily accessible and navigable for staff and students alike, ensuring that everyone knows what they are doing and where they are meant to be.
This book is a practical step-by-step guide to expand the functionality of your Moodle Learning Management System.
What this book covers
Preface
[ 2 ]
Chapter 2, Building the Foundation—Creating Categories and Courses, explains and demonstrates how to create and organize the courses offered in your curriculum, within Moodle.
Chapter3, Student Account Creation and Enrollment, explains how to create student accounts in bulk and experiment with different ways of enrolling those students in courses on the Moodle site.
Chapter4, Incorporating Educational Standards, introduces and explains some tasks that will enable you to incorporate educational standards in your Moodle CIMS site.
Chapter5, Enabling your Moodle Site to Function as an Information Portal, explores some of the possibilities such as modifying display settings, removing course lists from the category page, increasing the detailed summary settings, and others, through discussion and experimentation.
Chapter 6, Customized Roles, explores various methods for monitoring and reporting on student access and performance in the Moodle site.
Chapter 7, Advanced Data Access and Display, explores the installation and use of several tools that allow for more advanced methods of accessing data generated and used by your Moodle site.
Chapter 8, Setting Up a Mini SIS, explores two different methods of setting up Moodle to function as an SIS.
Chapter 9, Promoting Efficient Communication, introduces and explains the strategies for establishing an efficient communication portal through your Moodle CIMS.
Chapter 10, Advanced Enrollment Plugin, covers how to enable your site to function as a registration and enrollment system that will allow you to regulate how students matriculate through the set of courses that make up your curriculum.
What you need for this book
A web browser (Firefox preferred)
A text editor
Who this book is for
Preface
[ 3 ]
Conventions
In this book, you will find a number of styles of text that distinguish between different kinds of information. Here are some examples of these styles, and an explanation of their meaning.
Code words in text are shown as follows: "This will download a compressed package containing all of the files for the block called myCourses.zip."
A block of code is set as follows:
if (!defined('FRONTPAGECOURSELIMIT')) { define('FRONTPAGECOURSELIMIT', 200);
New terms and important words are shown in bold. Words that you see on the screen, in menus or dialog boxes for example, appear in the text like this: "Select your language and click on the Next button found at the bottom of the screen."
Warnings or important notes appear in a box like this.
Tips and tricks appear like this.
Reader feedback
Feedback from our readers is always welcome. Let us know what you think about this book—what you liked or may have disliked. Reader feedback is important for us to develop titles that you really get the most out of.
To send us general feedback, simply send an e-mail to [email protected], and mention the book title via the subject of your message.
If there is a book that you need and would like to see us publish, please send us a note in the SUGGEST A TITLE form on http://www.packtpub.com
or e-mail [email protected].
Preface
[ 4 ]
Customer support
Now that you are the proud owner of a Packt book, we have a number of things to help you to get the most from your purchase.
Downloading the example code for this book
You can download the example code files for all Packt books you have purchased from your account at http://www.PacktPub.com. If you purchased this book elsewhere, you can visit http://www.PacktPub.com/support and register to have the files e-mailed directly to you.
Errata
Although we have taken every care to ensure the accuracy of our content, mistakes do happen. If you find a mistake in one of our books—maybe a mistake in the text or the code—we would be grateful if you would report this to us. By doing so, you can save other readers from frustration and help us improve subsequent versions of this book. If you find any errata, please report them by visiting http://www.packtpub.com/support, selecting your book, clicking on the errata submission form link, and entering the details of your errata. Once your errata are verified, your submission will be accepted and the errata will be uploaded on our website, or added to any list of existing errata, under the Errata section of that title. Any existing errata can be viewed by selecting your title from http://www.packtpub.com/support.
Piracy
Piracy of copyright material on the Internet is an ongoing problem across all media. At Packt, we take the protection of our copyright and licenses very seriously. If you come across any illegal copies of our works, in any form, on the Internet, please provide us with the location address or website name immediately so that we can pursue a remedy.
Please contact us at [email protected] with a link to the suspected pirated material.
We appreciate your help in protecting our authors, and our ability to bring you valuable content.
Questions
1
Welcome to Moodle as a
Curriculum and Information
Management System (CIMS)!
You are on your way to learn how to expand the use of the Moodle system to function as a portal for information exchange, professional collaboration, and curriculum management.
This chapter will start with the basics by introducing the concepts and helping you to get your site installed and configured. The following topics will be addressed in this chapter:
A brief explanation of Moodle, its underlying philosophy, and design
Introduction of the CIMS idea
Moodle installation
Basic setup, configuration, and customization of your Moodle site
What is Moodle?
Welcome to Moodle as a Curriculum and Information Management System (CIMS)!
[ 6 ]
A VLE, LMS, and CMS
There are a multitude of acronyms out there today that claim Moodle as a member of their 'group'. Moodle is categorized as a VLE (Virtual Learning Environment) or LMS (Learning Management System) due to its focus on learning and education. Additionally, Moodle is described to be a CMS (Course Management System), an LCMS (Learning Content Management System), and sometimes even a CMS (Content Management System).
Each of these categories of systems has its own unique and defining characteristics but for most of them, there are arguably more similarities than differences. Each is a software package that is installed on a server and set up to be accessed via the Internet or, in some business settings, through an intranet (an in-house network). The majority of them are designed to allow for the creation and maintenance of online learning environments. Two of the most widely used categories of systems that are used to describe Moodle, LMSs, and VLEs, are often used interchangeably, although the term LMS is generally used to describe a system of wider scope that includes the ability to perform administrative tasks involved in education such as reporting, documenting, and analyzing. Moodle's flexibility, in terms of how it can be set up and maintained, is one of the main reasons for its inclusion in virtually every category of online learning software package. In this sense, Moodle is similar to a chameleon that is capable of 'changing its color', or shifting its focus, in order to meet the needs of each institution and user.
Using Moodle as a CIMS
In most institutions, there is a need to maintain data and information related to the education taking place as well as to perform various peripheral tasks that are not directly related to, or are at a macro level to the education itself.
Some examples of this type of peripheral work are:
Monitoring of student attendance records
Presenting information of course offerings to students in order that they may make decisions about what courses to take
Assigning courses to students in programs where students are not allowed to select their own courses
Controlling which courses, and how many courses, students can register for or enroll in
Establishing limits on how many students can enroll in a single course
Chapter 1
[ 7 ]
As Moodle is designed to be extremely flexible and is provided as an open source package, it is fairly easy to extend, and even stretch Moodle through imaginative uses, installation of third-party contributed plugins, and minor code manipulations to enable it to function as a system that helps to manage an educational curriculum and to support the flow and use of information that is accumulated and digested in such educational settings. As such, Moodle will function as what I call a Curriculum and Information Management System (CIMS), while simultaneously functioning as an LMS. The CIMS idea encapsulates the various tasks that surround an educational institution and includes functions that are often performed by Portals, Student Information Systems (SIS), and Content Management Systems (CMS). As a CIMS, Moodle can perform all of the tasks listed in the previous paragraph as well as a host of others that will be introduced in subsequent chapters. Get ready for an exciting adventure in setting up Moodle as your core CIMS and LMS!
Installing Moodle
Moodle installations can be roughly categorized into the following three categories:
Installation of the XAMPP or MAMP packages
Simple installation on a hosted web server
Installation of a LAMP package on an in-house server
Welcome to Moodle as a Curriculum and Information Management System (CIMS)!
[ 8 ]
Installing MAMP and XAMPP packages
One of the quickest and easiest ways to get a Moodle site up and running for experimental purposes is to install a MAMP or XAMPP package. These packages consist of web server software (Apache), database server software (MySQL), and PHP and Perl programming language 'interpreters', that all run on your personal computer. This will allow you to run Moodle locally on your own computer. The following instructions will help you get one of these prepackaged local servers running on your desktop or laptop computer.
Time for action – installing the Mac OS X package
We will install the MAMP variety for Macintosh OS X because it is much more portable than the XAMPP variety. This means that once you have the MAMP folder in your Applications
folder, all you need to do to use the MAMP package on a different computer is to copy the contents of the directory to the Applications folder of another machine running OS X. To install the Mac OS MAMP package, follow these steps:
1.
First, go to www.moodle.org and move your mouse over the Downloadsmenu item.
2.
Mouse over and click on the Moodle for Mac OS X link.3.
Then click on the MAMP package to start the download as shown in the following screenshot:Chapter 1
[ 9 ]
5.
Copy the contents of the MAMP package to your Applications folder, as instructed in the window.6.
Once all of the contents of the MAMP folder have been copied to your Applicationsfolder, double-click on the MAMP application, shown in the following screenshot to launch the server control tool:
Welcome to Moodle as a Curriculum and Information Management System (CIMS)!
[ 10 ]
8.
The red light, to the left of the server name, will turn green signifying that it is running. The MAMP control tool will automatically open the MAMP startup page in your browser. Click on the Moodle tab, shown in the following screenshot, to open your Moodle site in a new page:What just happened?
You have now installed all of the components necessary to turn your computer into an experimental server for your Moodle site. You also have a prepackaged instance of Moodle that is ready to use the servers you have installed and turned on. You can now jump forward to the Basic setup and customization of your Moodle site section in this chapter.
Time for action – installing the Windows package
If you want to install a local instance of Moodle and the required server on a Windows machine, the XAMPP package is the only prepackaged variety available. The installation involves a few more steps than the Mac version but it is a straightforward process. To download and install the Windows version, follow these steps:
1.
Click on Moodle for Windows from the Downloads drop-down menu from Moodle.org, and download the latest version.Chapter 1
[ 11 ]
3.
Double-click on the Start Moodle icon to start the Apache and database servers. A command prompt window with the message "Starting XAMPP" will appear and then after a few seconds the window will disappear. This means the servers are now running. Then proceed to the next step.4.
Navigate to your Moodle site by entering http://localhost/ into your browser address window.5.
After having started the servers by clicking on Start Moodle and typing the local host address into your browser address window, you may get a warning from Windows depending on the browser you are using and how the operating system is configured, about firewall protection. Go ahead and allow the content and bypass any warnings in order to access the site. You have installed the site and are the only one accessing it, so there is no need to worry about it containing possibly malicious content.6.
You will now be taken to the Moodle installer script. This installation process is the biggest difference between the Mac OS and Windows XAMPP package installations for Moodle. In Windows, you will go through the exact same installation process that you would go through if you were setting up a Moodle site on a hosted or dedicated server. The first screen will prompt you to select a language and provide information about the XAMPP package being used.Welcome to Moodle as a Curriculum and Information Management System (CIMS)!
[ 12 ]
8.
The next screen, shown in the following screenshot, will display the results of a PHP settings check. Everything should be OK as evidenced by the Pass message in green text to the right of each check item. If you get a Fail message in red text, you will need to determine the cause of the problem and fix it before you may proceed.9.
Click on the Next button to proceed with the installation.10.
The next screen, shown in the following screenshot, will ask you to confirm the locations of the Moodle installation. These will include: The web address
The Moodle directory (where Moodle files are contained) The data directory (where Moodle will store data files)
These should be automatically filled in and it is not recommended to change the locations of the two directories unless you know what you are doing
Chapter 1
[ 13 ]
Welcome to Moodle as a Curriculum and Information Management System (CIMS)!
[ 14 ]
13.
The next screen you will be presented with is a Server Checks screen informing you of the results of a check that was performed to ensure that the environment necessary for hosting Moodle is complete. These should all pass with a status of OK in the case of a XAMPP installation, as shown in the following screenshot:Chapter 1
[ 15 ]
15.
Click on the Next button and you will be presented with a Configuration completedmessage informing you that the config.php file was successfully created.
16.
Click on the Continue button, which will display the copyright notice. Read quickly through the open source GNU public license message and then acknowledge that you understand, by clicking on the Yes button.Welcome to Moodle as a Curriculum and Information Management System (CIMS)!
[ 16 ]
18.
Click on the Continue button found at the bottom of this screen to start the database table creation process. This may take several minutes as all of the tables, in which Moodle stores data, are created in the database.19.
Scroll down in your browser window to watch as the tables are created and then click on the Continue button found at the bottom of the page when the creation process is completed. You will see tables being created again, this time for the various activities that come prepackaged in Moodle. Click Continue at the bottom of the page when the table creation process is finished. This process will be repeated multiple times before the database table creation portion of the installation is complete. Click on Continue at the bottom of the screen each time the option appears.20.
When the database table creation process has been completed you will be presented with a screen, shown in the following screenshot, that allows you to set the password and other profile settings for the administrator account. For our experimental server, leave the username admin and enter a password. The default on the Mac OS version is a very simple 12345 but you will need to create a more complicated password for this Windows install as the Moodle password policy is turned on by default in a standard Moodle Windows XAMPP install. Your password should: be eight characters long
Chapter 1
[ 17 ]
21.
You can change the password settings once you have finished the installation process, if you want to use a simpler password. You will also need to enter the required fields for creating Moodle user accounts, which are: an e-mail address a city/town a country
22.
After entering information in the required fields, click on the Update Profile button found at the bottom of the page.Welcome to Moodle as a Curriculum and Information Management System (CIMS)!
[ 18 ]
What just happened?
You have successfully installed and configured your XAMPP package to run on your Windows machine. By following the process that has been explained here, you have:
Set the default language for your Moodle site
Confirmed that your version of PHP is up-to-date
Set the site address and locations for Moodle and its data
Specified settings for the database
Checked to make sure your server environment is sufficient to run Moodle
Created all of the primary tables in the database required by Moodle
Set up login information for the admin account
Entered preliminary front page information for your site
Basic setup and customization of your Moodle site
Once you've managed to get your site up and running, you are ready to log in to your Moodle site and begin the initial customization process. As stated earlier, we'll be using the XAMPP package in Mac OS with Moodle 1.9.8+ installed for screenshots and explanation. So if you are using a Windows version, a hosted server, or have installed on your own server, the screen you see may be slightly different. The process however, will be identical as long as you are using the same version of Moodle. The latest 1.9 version is recommended and will look the same.
Chapter 1
[ 19 ]
In the MAMP package for the Mac, you will see the Username and Password for the administrator account on the front page of Moodle. This is only acceptable because this site is not being served to the public and is only accessible by the user of the machine it is installed on. If you install Moodle on a hosted server, or on your own server, you will select a user name and password for the admin account when installing the system. In all public server situations, make sure you protect the privacy of your administrator login information. Access to the admin account is one of the easiest ways for an individual with malicious intent to abuse your site.
Time for action – basic customization
We'll start with some basic customization by changing some settings on and adding some of our own content to the front page. One of the uses we are proposing for Moodle is as a curriculum management system, so we should start by customizing the front page of Moodle so that it can better function as an "entry way" for students and teachers who will be interacting with our curriculum. To change the appearance of the front page follow these steps:
Welcome to Moodle as a Curriculum and Information Management System (CIMS)!
[ 20 ]
2.
There are actually two ways to customize much of the content you see from the front page. The first is by turning on editing, as we have just done, and then by clicking on the editing icon mentioned earlier. The second method we are going to use is to click on the Front Page link found in the Site Administration block located on the left side of the screen when you log in as admin.3.
Next, click on the Front Page settings link as shown in the following screenshot:4.
This will take you to a page that allows you to modify various settings that govern how the front page looks and also allows you to change content that is presented on the front page. A description of the settings, followed by a screenshot of the Front Page settings window, is as follows: Full site name is the name that appears at the top-left of the front page of
your Moodle site. Enter Welcome to Moodle as a CIMS for our test site.
Short name is the name that is used as the leftmost breadcrumb when
Chapter 1
[ 21 ]
Front Page Description is what is displayed in the Course/Site Description
block that is installed by default and displayed at the top-left of the front page. This information can be edited by clicking on the editing icon after turning editing on from the front page but we are editing it here from the Front Page settings in order to show the other settings that can be modified. We'll use, This is the demonstration site for the Packt book "Moodle as a CIMS".
Front Page is for selecting items that are to be displayed to individuals who
are not logged in to your Moodle site. There are four different items to choose from and thus four drop-down menus. The display order from top to bottom is determined by the order you place them in using the drop-down menus.
Front page items when logged in is, just as it is written, for selecting items
that you want to be displayed to the users after they have logged into the site. This allows you to customize how information will be displayed based upon whether an individual is logged into Moodle or not. We are going to use our Moodle front page to post news that is relevant to our curriculum and thus, have set News Items to be visible to both users who are logged in and to those who are not.
Maximum Category Depth allows you to set how much category depth
will be displayed on the front page. If you have many categories embedded within categories you may want to consider limiting this to keep your front page's appearance clean. Notice that I have not opted to have courses displayed via the front page, so this unlimited setting will have no impact on the appearance of the front page.
Include a topic section provides us with a block at the top of the front page
that can be used for posting a picture, logo, or textual information. In the MAMP package, there is a large picture of the Moodle logo, which was made from many small user pictures, in this topic section. We'll remove that and replace it with our own custom logo later.
News items to show can also be selected here. This controls how many
news items will be displayed on the front page. News items will be displayed in the order of posting, from the most recent one. Items beyond the number chosen here can be easily accessed by, for example, adding a
Main Menu block to your front page, which we will do shortly.
Courses per page allows you to set the number of courses that will be
Welcome to Moodle as a Curriculum and Information Management System (CIMS)!
[ 22 ]
Allow visible courses in hidden categories allows you to force courses that
are inside categories that have been hidden, to show up on the front page, if you have opted to have courses displayed. The default here is No because it is assumed that the reason for hiding a category is to hide courses contained in that category but, as was stated earlier, Moodle is a very flexible tool and as there may be cases where you want courses contained in a hidden category to be displayed, you have the option here.
Default frontpage role changes the default role setting for the front page
Chapter 1
[ 23 ]
5.
Once you have made all the desired changes, click on the Save Changes button at the bottom of the page and then navigate back to your front page using the leftmost breadcrumb at the top of the page. In the following screenshot this would be CIMS:6.
You should notice that the breadcrumb has changed to the short name you entered in the Short name for site field and, once back to your front page, that the changes you just made have been updated on the front page.What just happened?
You have just successfully changed the appearance of your front page by simply changing some of the content via the front page settings. We have just started to scrape the surface and will continue to customize our site with our own content and appearance.
Time for action – customizing the label area of the front page
Next, let's get rid of that big Moodle logo and replace it with a different graphic. Follow these steps to edit the image that appears on the front page:1.
Click on the editing icon located at the bottom-left of the picture we want to remove and before clicking, notice that hovering your mouse over this icon makes the message Edit summary appear.Welcome to Moodle as a Curriculum and Information Management System (CIMS)!
[ 24 ]
3.
Next, enter the information you want to display on the front page. Use Welcome to the "Moodle as a CIMS" Demonstration Site for our test site.4.
To add an image, click on the picture frame icon located in the menu bar of the HTML editor. The blue arrow is pointing to the insert image icon in the preceding screenshot. Hovering over this icon will make the Insert Image message appear. Clicking on the picture icon will make the Insert Image tool appear. You can provide an URL for the image you want to appear here but, unless you have a repository of images already up on the Internet, the easiest way to use this tool is to click on theBrowse... button located at the bottom of the window and then locate and select an image from your computer.
5.
After selecting the image, click on the Upload button. The image file name will now be displayed in the File Browser list and clicking on the file name will make the image appear in the Preview pane on the right.Chapter 1
[ 25 ]
7.
Finally, click on OK and the image will appear in the HTML editor window as shown in the following screenshot. Click on the Save changes button and you will be redirected back to the front page of your site and will be able to see the new description and image.What just happened?
You just changed the image that appears in the top-center section of your Moodle site by deleting the old image and uploading a new image in its place. We did this by accessing the
Welcome to Moodle as a Curriculum and Information Management System (CIMS)!
[ 26 ]
Time for action – adding the Main Menu block
We'll finish out this very basic customization of the front page by adding a block that provides access to activities that appear on the front page. This will allow you easy access, via HTML links, to all of the activities and resources that appear on the page. To add the
Main Menu block to your Moodle front page, follow these steps:
1.
Turn editing on and on the lower right side of the page a drop-down menu titledBlocks will appear.
2.
Click on the Add... drop-down menu and select Main Menu.Chapter 1
[ 27 ]
What just happened?
You have just added the Main Menu block to the front page of your Moodle site. As you add activities to the front page, they will be easily accessible via the Main Menu block. News items, for example, can all be viewed by clicking on the Site News link from within the Main Menu. Therefore, if you set your front page to display only three news items and regularly post news items, all past news items will be accessible from the Main Menu block.
Installing third party contributions
As mentioned earlier, one of Moodle's strengths is the ease with which you can install and use third party add-ons. There are a multitude of blocks, modules, and other plugins available from the Moodle.org download area that you can use to enable Moodle to perform all sorts of tasks. One word of caution on third-party blocks, modules, and other plugins; they are not maintained by Moodle headquarters and as such you should check the forums on Moodle.org for any known issues the plugin you are planning to install might have. Likewise, it is a good idea to install these types of plugins on a test site, like the one we've set up in this chapter, to experiment with them and make sure they function as desired. Once you are confident in using the features offered by a plugin and assured that it is what you want, you can install it on your production site.
Blocks and modules
As mentioned at the beginning of this chapter, blocks and modules comprise the majority of feature add-ons available for Moodle. They are also almost always very easy to install provided that you have the necessary level of access to the system that your Moodle site is being served from. Installation on a local XAMPP or MAMP package is extremely easy as it simply involves downloading the add-on from Moodle.org, decompressing it, and placing the folder of components into the appropriate folder/directory within the Moodle directory.
We will install the following block and module to continue to build our CIMS and to demonstrate the installation process:
My Courses block: This provides students with an easy way to navigate to courses in which they are enrolled, and more importantly from the CIMS perspective, it provides an administrator with easy access to all of the courses on the site.
Welcome to Moodle as a Curriculum and Information Management System (CIMS)!
[ 28 ]
Time for action – installing the My Courses block
To install the My Courses block, which is a block that allows users and the site administrator to access the courses they are enrolled in or are permitted to access, follow these steps:
1.
First go to Modules and plugins in the Downloads tab of Moodle.org and search for My Courses.2.
If the search does not return an entry for My Courses and instead only lists My Courses 2 and other similar items, navigate to the forum found at the following link and download the block from the forums. A packaged version will appear towards the bottom of the forum dated sometime in October 2010. Forum thread title: New myCourses block released
Link: http://moodle.org/mod/forum/discuss.php?d=67494
3.
If the My Courses block, contributed by Rosario Carcò, is listed in the Modules and plugins area, proceed to step 4. (Note—The MyCourses block is scheduled to appear in the Modules and plugins database on Moodle.org sometime in December 2010).4.
Click on My Courses and then click on the Download latest version link to download the block files.5.
This will download a compressed package containing all of the files for the block called myCourses.zip. To install the block on your local MAMP package, expand the package with a compression/expansion tool.6.
Expanding the package will create a folder titled myCourses that must be placed in the blocks folder located in your Moodle directory. For a MAMP package on the Mac OS, you can find the appropriate folder by opening the folder that contains your MAMP directory and then navigating to the blocks folder. The path is as follows: Applications/MAMP/htdocs/moodle19/blocks.7.
Drag-and-drop or copy the myCourses folder into the blocks folder.Chapter 1
[ 29 ]
9.
Next you must log in to your site as admin and click on the Notifications link found in the Site Administration block. This will start the installation of the block components and create tables in the database that will be used by the block.10.
You will see a message informing you that the tables have been set up correctly. Click the Continue button, shown in the following screenshot, to proceed:Welcome to Moodle as a Curriculum and Information Management System (CIMS)!
[ 30 ]
12.
Now that the My Courses block has been installed it can be inserted into the front page by turning on editing and selecting it from the drop-down Blocks menu. Our front page, with the My Courses added and moved to the top-left of the page, now looks like the following screenshot:13.
Finally, we can access the configuration settings for the My Courses block by clicking on the Modules link found in the Site Administration block.14.
Next, click on Blocks and then on the MyCourses link. The various configuration settings are modifiable from this screen. You can toggle these settings at any time to see how they affect the appearance of the My Courses block by returning to this page. Use the following settings for our test site: Show scrollbars: Untick this because we will set up the site with the
Chapter 1
[ 31 ]
Show all courses: Tick this to provide a link at the bottom of the block for
easy access to all of the courses on the site.
Show long names: Leave unticked to keep long course names from
cluttering the block.
Show category links: Tick to make each category title a link that will take
you to the list of courses offered in that category.
Show flat list: Untick this or your courses will not be displayed in their
categories.
Show course search box: Leave this unticked as we won't use the Course
Search box.
Toggle own courses: Tick this to allow the admin to toggle between his or
her own courses and all courses.
Toggle active courses: Tick this to allow the admin to toggle active course
visibility off and on.
Toggle inactive courses: Tick this to allow the admin to toggle inactive
course visibility off and on.
15.
Return to the front page of your site to view the block. Note however, it will not fill with categories and courses until we have them, which we will work on in Chapter 2,Building the Foundation—Creating Categories and Courses and Chapter 3, Student Account Creation and Enrollment.
What just happened?
We have just installed the My Courses block and modified the settings that control how it will display categories and courses to the site administrator. As we fill our site with both categories and courses in subsequent chapters, the convenience of this block will become more and more obvious as we'll be using it regularly to access specific courses in the site.
Time for action – installing the Attendance package
Module installation is basically the same process as that for blocks with the obvious difference being in where the package contents are installed. In the case of modules, the package contents are placed in the mod folder. Next, we will install the Attendance package, which is actually a combination of both a module and a block so we'll be placing items in both of these folders. To install the package, follow these steps:
1.
Using the same process that was explained for the My Courses block, from theModules and plugins download page on Moodle.org, search for Attendance.
Welcome to Moodle as a Curriculum and Information Management System (CIMS)!
[ 32 ]
3.
From the detailed explanation menu click on the Download for Moodle 1.9 link to download the package. The resulting download will be a zipped package titled attendance_package.zip.4.
Decompress this package and note that there are both blocks and mod folders contained in the package. This is because, as previously mentioned, this package contains both a block and a module.5.
Place the Attendance folder found in the blocks folder of your Moodle instance the same way you did with the My Menu package.6.
In the same manner, place the attforblock folder in the mod folder in your Moodle directory. The paths for installing the two components on the Mac OS MAMP are as follows:attendance goes to MAMP/htdocs/blocks. attforblock goes to MAMP/htdocs/mod.
7.
Log in to your site as admin after placing the two folders in their appropriate places and click on the Notifications link. You will receive a series of Success messages and should click on Continue after everything is successfully installed.Chapter 1
[ 33 ]
9.
The subsequent screen is the Sessions display and will indicate that there are no sessions for the course. You can add sessions one at a time or in bulk by clicking on the Add tab. Other features of the Attendance module can be accessed by clicking on the corresponding tabs.What just happened?
We have just installed the Attendance package, which includes both a module and a block. This tool, along with the My Courses block, will be utilized as we position our Moodle as a CIMS. Detailed explanation of the use of these tools in this context will be presented in Chapter 4, Incorporating Educational Standards (Attendance module) and Chapter 6,
Welcome to Moodle as a Curriculum and Information Management System (CIMS)!
[ 34 ]
Installing other plugins (themes)
The process for installing themes is basically the same as for modules and blocks with, again, the difference being in the location that the package is installed. In the case of some plugins, there may be a need to make minor, or in the case of some contributed plugins, even major modifications to files in the Moodle directory. If the changes are minor and you are comfortable experimenting, then give it a try. This is why you are using a test site right! Some plugins however, require a patch, which is a modification to a core Moodle file or files. In addition to being undesirable, because it makes upgrading to a new version of Moodle more difficult, it can also be technically demanding. You can determine whether a plugin is a patch or not and also determine the installation requirements by viewing its entry in the Modules and plugins database found on the Moodle.org website. If the plugin requires a major patch or some other type of manual modification of code, and you are not a professional programmer, please proceed with caution. Make sure you have tested everything thoroughly on your experimental site before moving it over to your live server.
Time for action – installing the Aardvark Pro original theme
Now let's walk through the installation of a theme before bringing this introductory chapter to a close. Themes allow you to customize the look and feel of your Moodle site to an almost endless degree. In order to effectively utilize Moodle as a CIMS, we will need to install a theme that provides us with more content display capabilities. There are several themes that use a menu bar at the top of the screen that can include links to all sorts of content on your site. The current Moodle.org theme is a good example of one such theme. For our experimental site, we are going to download a flashy theme available from the Themesdownload area on Moodle.org called the "Aardvark Pro Original". It is a theme created by
Shaun Daubney of Newbury College in the U.K. Follow these steps to download and install the theme:
1.
Access www.Moodle.org from your browser and navigate to the Themes area of the Download section using the menu bar.2.
From the Themes section, the easiest way to find the theme we are looking for is to use the search string Shaun Daubney. This search will return several themes. Find the Aardvark Pro Original theme and download it to your computer. This will download a zipped package called aardvar_pro1_2.zip. Note that the version may be different by the time this book goes to print.3.
Decompress the package to get the aardvark_pro folder.Chapter 1
[ 35 ]
5.
After moving the theme into your theme folder, visit your site as admin and click on the Appearance link found in the Site Administration block.6.
Next click on Themes and then Theme Selector. The path can be seen in the Site Administration block and in the breadcrumb trail as shown in the following screenshot:7.
You are now viewing the theme selector window. It allows you to scroll through all of the themes that have been installed in the Theme folder in your Moodle main directory. You can click on the Preview link found beside each theme prior to selecting it if you want to see what it is going to look like before making changes.Welcome to Moodle as a Curriculum and Information Management System (CIMS)!
[ 36 ]
Chapter 1
[ 37 ]
What just happened?
We have just installed and selected the Aardvark theme for our Moodle site and as a result you can now see the menu bar located at the top of the screen just below the Aardvark theme title. Through the use of this menu bar, this theme will allow us to provide quick access to much more information than was possible with the standard default theme. We will explore all the possibilities of this and other information portal capabilities in
Chapter 5, Enabling your Moodle Site to Function as an Information Portal, so if you cannot wait to continue polishing the appearance and more importantly the informational value of the front page, then take a quick peek ahead.
Summary
2
Building the Foundation—Creating
Categories and Courses
Now that you have explored the basics of Moodle, developed a concept of how it is designed and most often used, and walked through the installation process and initial customization process, it is time to work on further building Moodle into a CIMS. The C in CIMS stands for curriculum and the fundamental unit within curriculum, as I will use it in this chapter, is the course.
This chapter will explain and demonstrate how to create and organize the courses offered in your curriculum, within Moodle. The following topics will be covered in this chapter:
The creation of course categories
Creation of teacher accounts
Building the Foundation—Creating Categories and Courses
[ 40 ]
Course categories
Categorization is an innate human behavior that allows us to perceive and understand the environment that surrounds us. Moodle designers must have recognized our tendency to categorize, because Moodle contains a flexible categorization system that allows for the creation of categories in which you may house additional categories and courses. Any educational program that offers courses of various varieties will invariably be using a categorization system like this for grouping courses into specific categories. A language program, for example, might group courses into skill-specific categories such as those of listening, speaking, reading, and writing. A larger entity, such as a college, would likely group courses into content-specific categories such as literature, sciences, speech communications, and the like, with additional subcategories used inside each of those main categories. No matter what the categorization system, Moodle is well-equipped to accommodate via its intuitive user-friendly course category creation interface.
Manual creation of course categories
We will quickly walk through the manual creation of a simple categorization system in the next few pages. It should be noted however, that course categories can be created automatically via the use of the Bulk Course Upload tool that will be introduced later in this chapter. While the automated creation process is certainly a more efficient one, it is a good idea to understand how to create, edit, and adjust categories manually as the need to make adjustments may arise after categories have been created automatically, and at that point, the only practical method may be via the manual process.
Using the language program sample as an example, we will set up a categorization system that uses the traditional language skills (listening, speaking, reading, and writing) as the highest level in the categorization system with subcategories for levels. In our example, our program will have four levels: Advanced, Intermediate, Beginner, and Basic, so we will set up each skill category such that it contains subcategories that coincide with the four levels.
Time for action – manually creating course categories
Let's get started by first taking a look at the courses and categories that exist in the default installation of our MAMP package. We'll proceed by manually creating the categories and subcategories we need for our language program example.
Chapter 2
[ 41 ]
An alternative method for accessing the Course category window is to simply type the word 'course' into your browser at the end of your website address from the front page of your Moodle site. This will direct your browser to the default file, index.php, located in the course directory (for example, for the XAMPP package, it will look like this http://localhost/moodle19/ course).
2.
The block should look like the following screenshot if you followed all theinstructions from Chapter 1, Welcome to Moodle as a Curriculum and Information Management System (CIMS)! The following screenshot is of a default MAMP installation. For Windows XAMPP installations, no courses or categories will exist.
Building the Foundation—Creating Categories and Courses
[ 42 ]
4.
Click on the Turn editing on button from the All courses screen, shown in the previous screenshot, to reveal the course category as shown in the next screenshot. This editing screen displays the categories and the number of courses contained in each category. The category was not listed in the course view window in the previous screenshot because there is currently only one category.Chapter 2
[ 43 ]