ANTI-HACKER TOOL KIT
Fourth Edition
ANTI-HACKER TOOL KIT
Anti-Hacker Tool Kit and Hacking Exposed: Web Applications, and is the author of Hacking Web Applications. Mike is Director of Engineering for Qualys, where he writes software to automate security testing for web sites. He has taught hacking classes and continues to present research at security conferences around the world. Check out his blog at http://deadliestwebattacks.com.
About the Technical Editors
Eric Heitzman is an experienced security consultant (Foundstone, McAfee, Mandiant) and static analysis and application security expert (Ounce Labs, IBM). Presently, Eric is working as a Technical Account Manager at Qualys, supporting customers in their evaluation, deployment, and use of network vulnerability management, policy compliance, and web application scanning software.
ANTI-HACKER TOOL KIT
Fourth Edition
ANTI-HACKER TOOL KIT
Fourth Edition
M i k e
Shema
ISBN: 978-0-07-180015-0 MHID: 0-07-180015-8
e-Book conversion by Cenveo® Publisher Services Version 1.0
The material in this eBook also appears in the print version of this title: ISBN: 978-0-07-180014-3, MHID: 0-07-180014-X.
McGraw-Hill Education eBooks are available at special quantity discounts to use as premiums and sales promotions, or for use in corporate training programs. To contact a representative, please visit the Contact Us pages at www.mhprofessional.com. All trademarks are trademarks of their respective owners. Rather than put a trademark symbol after every occurrence of a trademarked name, we use names in an editorial fashion only, and to the benefit of the trademark owner, with no intention of infringement of the trademark. Where such designations appear in this book, they have been printed with initial caps. Information has been obtained by McGraw-Hill Education from sources believed to be reliable. However, because of the possibility of human or mechanical error by our sources, McGraw-Hill Education, or others, McGraw-Hill Education does not guarantee the accuracy, adequacy, or completeness of any information and is not responsible for any errors or omissions or the results obtained from the use of such information.
TERMS OF USE
This is a copyrighted work and McGraw-Hill Education (“McGraw Hill”) and its licensors reserve all rights in and to the work. Use of this work is subject to these terms. Except as permitted under the Copyright Act of 1976 and the right to store and retrieve one copy of the work, you may not decompile, disassemble, reverse engineer, reproduce, modify, create derivative works based upon, transmit, distribute, disseminate, sell, publish or sublicense the work or any part of it without McGraw-Hill’s prior consent. You may use the work for your own noncommercial and personal use; any other use of the work is strictly prohibited. Your right to use the work may be terminated if you fail to comply with these terms.
At a Glance
●
–
Part I
The Best of the Basics
●
–
1
Managing Source Code and Working
with Programming Languages . . . 3
2
Command-Line Environments . . . 35
3
Virtual Machines and Emulators . . . 83
●
–
Part II
Systems
●
–
4
Vulnerability Scanning . . . 111
5
File System Monitoring . . . 159
6
Windows Auditing . . . 181
●
–
Part III
Networks
●
–
7
Netcat . . . 217
8
Port Forwarding and Redirection . . . 249
9
Network Reconnaissance . . . 269
10
Network Sniffers and Injectors . . . 315
11
Network Defenses . . . 371
●
–
Part IV
Applications
●
–
13
Binary Analysis . . . 429
14
Web Application Hacking . . . 459
15
Password Cracking and Brute-Force Tools . . . 497
●
–
Part V
Forensics
●
–
16
Basic Forensics . . . 533
17
Privacy Tools . . . 551
Contents
Acknowledgments . . . xvii
Introduction . . . xix
●
–
Part I
The Best of the Basics
●
–
1 Managing Source Code and Working with Programming Languages . . . 3SCM Concepts . . . 4
Git . . . 10
Working with Repositories . . . 10
Working with Subversion . . . 16
Mercurial . . . 19
Subversion . . . 20
Creating a Repository . . . 20
Working with Repositories . . . 21
Working with Revisions . . . 22
Eclipse Integrated Developer Environment . . . 25
Working with Source Control . . . 25
Programming Languages . . . 27
Common Terms . . . 27
Security . . . 28
C++ . . . 29
Java . . . 29
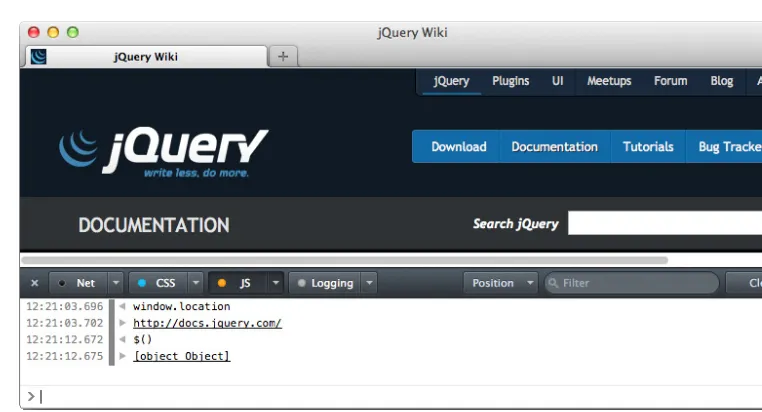
JavaScript . . . 29
Perl . . . 31
Python . . . 32
●
–
Part II
Systems
●
–
4 Vulnerability Scanning . . . 111
Overview of Vulnerability Scanning . . . 112
Open Port/Service Identification . . . 113
Banner/Version Check . . . 114
Traffic Probe . . . 114
Vulnerability Probe . . . 115
Vulnerability Examples . . . 116
OpenVAS . . . 120
Installation . . . 121
Implementation . . . 125
Working with Vulnerability Standards . . . 138
OpenVAS Summary . . . 140
Metasploit . . . 140
Getting Started . . . 140
Hunting for Vulns . . . 142
Compromising a System . . . 144
More Resources . . . 157
5 File System Monitoring . . . 159
File System Metadata . . . 160
Windows File Metadata . . . 162
File Integrity . . . 164
AIDE . . . 165
Installation . . . 166
Implementation . . . 166
Samhain . . . 170
Tripwire . . . 170
Implementation . . . 171
Securing Your Files with Tripwire . . . 180
6 Windows Auditing . . . 181
Evolution of Windows Security . . . 182
Nbtstat . . . 184
Implementation . . . 184
Retrieving a MAC Address . . . 187
Cain & Able . . . 189
Implementation . . . 189
Microsoft Baseline Security Analyzer . . . 191
Using the MBSA Command-Line Interface . . . 192
Implementation . . . 192
PsTools . . . 195
●
–
Part III
Networks
●
–
7 Netcat . . . 217
Network Communication Basics . . . 218
Netcat . . . 219
Implementation . . . 219
Netcat’s 101 Uses . . . 225
Cryptcat . . . 244
Ncat . . . 245
Compile for Windows . . . 245
Options . . . 246
Socat . . . 247
Implementation . . . 247
8 Port Forwarding and Redirection . . . 249
Understanding Port and Services . . . 250
Secure Shell (SSH) . . . 252
Datapipe . . . 253
Implementation . . . 254
FPipe . . . 256
Implementation . . . 256
WinRelay . . . 258
Implementation . . . 258
9 Network Reconnaissance . . . 269
Nmap . . . 270
Implementation . . . 271
Nmap Scripting Engine (NSE) . . . 295
THC-Amap . . . 296
Implementation . . . 296
System Tools . . . 302
Whois . . . 302
Host, Dig, and Nslookup . . . 307
Traceroute . . . 311
10 Network Sniffers and Injectors . . . 315
Sniffers Overview . . . 317
Tcpdump and WinDump . . . 318
Implementation . . . 319
Wireshark . . . 332
Implementation . . . 332
Ettercap . . . 341
Installation . . . 341
Implementation . . . 342
Hping . . . 347
Implementation . . . 347
Wireless Networks . . . 356
Kismet . . . 358
Implementation . . . 358
Expanding Kismet’s Capabilities . . . 363
Aircrack-ng . . . 365
Implementation . . . 365
11 Network Defenses . . . 371
Firewalls and Packet Filters: The Basics . . . 372
What Is a Firewall? . . . 372
Packet Filter vs. Firewall . . . 374
How a Firewall Protects a Network . . . 375
Packet Characteristics to Filter . . . 375
Stateless vs. Stateful Firewalls . . . 377
Network Address Translation (NAT) and Port Forwarding . . . 378
The Basics of Virtual Private Networks . . . 381
Inside the Demilitarized Zones . . . 382
Linux System Firewall . . . 384
OS X System Firewall . . . 385
Windows System Firewall . . . 387
Snort: An Intrusion-Detection System . . . 388
Installation and Implementation . . . 389
Snort Plug-ins . . . 397
So Much More… . . . 399
12 War Dialers . . . 401
ToneLoc . . . 402
Implementation: Creating the tl.cfg File . . . 403
Implementation: Running a Scan . . . 407
Implementation: Navigating the ToneLoc Interface . . . 409
.dat File Techniques . . . 409
THC-Scan . . . 414
Implementation: Configuring THC-Scan . . . 414
Implementation: Running THC-Scan . . . 417
Implementation: Navigating THC-Scan . . . 417
Implementation: Manipulating THC-Scan .dat Files . . . 419
WarVOX . . . 420
Inter-Asterisk Exchange . . . 420
Installation . . . 421
Implementation . . . 422
Analysis . . . 424
●
–
Part IV
Applications
●
–
13 Binary Analysis . . . 429
The Anatomy of a Computer Program . . . 430
Determining a Binary File Type . . . 433
Identifying Binary Obfuscation . . . 434
Black Box Analysis . . . 435
Creating a Sandboxed System . . . 436
Finding Text Clues . . . 436
Conducting Unix-based Run-time Analysis with lsof . . . 438
Using a Sniffer to Examine Network Traffic . . . 438
Identifying Unix-based System Calls . . . 439
Obtaining Memory . . . 441
Generating Assembly Instructions . . . 442
Analyzing Run-time Binaries with Debuggers . . . 445
Debugging Tools for Windows . . . 445
OllyDbg . . . 447
Interactive Disassembler (IDA) . . . 449
GNU Debugger (GDB) . . . 450
14 Web Application Hacking . . . 459
Scanning for Web Vulnerabilities . . . 460
Nikto . . . 461
HTTP Utilities . . . 469
Curl . . . 469
OpenSSL . . . 472
Stunnel . . . 477
Application Inspection . . . 482
Zed Attack Proxy . . . 482
Sqlmap . . . 489
15 Password Cracking and Brute-Force Tools . . . 497
We’re Doomed . . . 499
Alternate Deployment Schemes . . . 501
Password OpSec . . . 502
John the Ripper . . . 503
Implementation . . . 504
L0phtcrack . . . 518
Hashcat . . . 521
Grabbing Windows Password Hashes . . . 522
Pwdump . . . 522
Active Brute-Force Tools . . . 523
●
–
Part V
Forensics
●
–
16 Basic Forensics . . . 533
Data Collection . . . 534
Drive Imaging . . . 535
dd for Duplication . . . 536
Forensic Tools . . . 541
The Sleuth Kit . . . 541
Autopsy . . . 541
Security Onion . . . 548
Learning More . . . 550
17 Privacy Tools . . . 551
Improving Anonymity and Privacy . . . 553
Private Browsing Mode . . . 553
Ghostery . . . 554
The Onion Router (Tor) . . . 558
Installation . . . 560
Implementation . . . 561
GnuPG . . . 564
Installation . . . 564
Implementation . . . 565
Verify a Package . . . 570
Disk Encryption . . . 572
Off-the-Record (OTR) Messaging and Pidgin . . . 573
Installation . . . 574
Implementation . . . 574
Acknowledgments
T
hanks to Amy Eden for starting the engines on this new edition, and to Amanda Russell for making sure it reached the finish line. Everyone at McGraw-Hill who worked on this book provided considerable support, not to mention patience. Rob and Eric provided insightful suggestions and important corrections during the tech editing process. If there are any mistakes, it’s because I foolishly ignored their advice.Thanks to all the readers who supported the previous editions of this title. It’s your interest that brought this book back.
I’d like to include a shout-out to Maria, Sasha, Melinda, and Victoria for their help in spreading the word about my books. Your aid is greatly appreciated.
Introduction
W
elcome to the fourth edition of the Anti-Hacker Tool Kit. This is a book about the tools that hackers use to attack and defend systems. Knowing how to conduct advanced configuration for an operating system is a step toward being a hacker. Knowing how to infiltrate a system is a step along the same path. Knowing how to monitor an attacker’s activity and defend a system are more points on the path to hacking. In other words, hacking is more about knowledge and creativity than it is about having a collection of tools.Computer technology solves some problems; it creates others. When it solves a problem, technology may seem wonderful. Yet it doesn’t have to be wondrous in the sense that you have no idea how it works. In fact, this book aims to reveal how easy it is to run the kinds of tools that hackers, security professionals, and hobbyists alike use.
A good magic trick amazes an audience. As the audience, we might guess at whether the magician is performing some sleight of hand or relying on a carefully crafted prop. The magician evokes delight through a combination of skill that appears effortless and misdirection that remains overlooked. A trick works not because the audience lacks knowledge of some secret, but because the magician has presented a sort of story, however brief, with a surprise at the end. Even when an audience knows the mechanics of a trick, a skilled magician may still delight them.
Why This Book?
By learning how security defenses can be compromised, you also learn how to fix and reinforce them. This book goes beyond brief instruction manuals to explain fundamental concepts of information security and how to apply those concepts in practice using the tools presented in each chapter. It’s a reference that will complement every tool’s own documentation.
Who Should Read This Book
Anyone who has ever wondered if their own computer is secure will find a wealth of information about the different tools and techniques that hackers use to compromise systems. This book arms the reader with the knowledge and tools to find security vulnerabilities and defend systems from attackers. System administrators and developers will gain a better understanding of the threats to their software. And anyone who has ever set up a home network or used a public Wi-Fi network will learn the steps necessary to discover if it is insecure and, if so, how to make it better.
What This Book Covers
This book describes how to use tools for everything from improving your command-line skills to testing the security of operating systems, networks, and applications. With only a few exceptions, the tools are all free and open source. This means you can obtain them easily and customize them to your own needs.
How to Use This Book
This book is separated into four parts that cover broad categories of security. If you’re already comfortable navigating a command line and have different operating systems available to you, then turn to any topic that appeals most to you. If you’re just getting started with exploring your computer, be sure to check out Part I first in order to build some fundamental skills needed for subsequent chapters.
In all cases, it’s a good idea to have a handful of operating systems available, notably a version of Windows, OS X, and Linux. Each chapter includes examples and instructions for you to follow along with. Most of the tools work across these operating systems, but a few are specific to Linux or Windows.
Tools
Videos
You’ll also find references throughout the book to several videos that further discuss various topics. The videos may be obtained from McGraw-Hill Professional’s Media Center at www.mhprofessional.com/mediacenter. Enter this ISBN, 978-0-07-180015-0, plus your e-mail address at the Media Center site to receive an e-mail message with a download link.
How Is This Book Organized?
Part I: The Best of the Basics The material in this part walks you through fundamental tools and concepts necessary to build and manage systems for running hacking tools as well as hacking on the tools themselves to modify their code. Chapter 1 explains how to use the different source control management commands necessary to obtain and build the majority of tools covered in this book. It also covers simple programming concepts to help you get comfortable dealing with code. Chapter 2 helps you become more familiar with using systems, such as discovering the flexibility and power of the Unix command line. Chapter 3 introduces virtualization concepts and tools to help you manage a multitude of systems easily—you’ll find virtualization a boon to setting up test environments and experimenting with attacks.
Part II: Systems This part covers tools related to addressing security for operating systems like Windows, Linux, and OS X. Chapter 4 introduces the vulnerability testing leviathans, OpenVAS and Metasploit. These are the all-encompassing tools for finding and exploiting flaws in systems. Chapter 5 goes into more detail on how to conduct file system monitoring to help alert administrators to suspicious activity. Chapter 6 covers more Windows-specific system auditing tools.
Part III: Networks This part shows how different tools attack and defend the
Part IV: Applications This part shifts the book’s focus to tools that aid in the analysis and defense of the software that runs on systems and drives web applications. Chapter 13 catalogs some tools necessary to start reverse engineering binary applications in order to understand their function or find vulnerabilities (vulns) within them. Chapter 14 explains how to use command-line and proxy tools to find vulns in web applications. Chapter 15 delves into the techniques for successful, optimal password cracking.
1
PART
PART
I
THE BEST OF THE
BASICS
1
3
CHAPTER
CHAPTER
1
MANAGING SOURCE CODE
AND WORKING WITH
PROGRAMMING LANGUAGES
MANAGING SOURCE CODE
AND WORKING WITH
W
hether they like it or not, we tell computers what to do. Decades ago programmers wrote instructions on physical punch cards, heavy paper with tiny holes. Development principles haven’t changed much, although the methods have. We have replaced punch cards with sophisticated assembly instructions, system languages like C and C++, and higher-level languages like Python and JavaScript. Programming guides typically introduce new developers to a language with the standard “Hello, World!” demonstration before they dive into the syntax and grammar of the language. If you’re lucky, you’ll learn to write a syntactically correct program that doesn’t crash. If you’re not lucky...well, bad things happen. Nothing of much consequence happens should a “Hello, World!” example fail, but the same is not true when your voice-activated computer refuses to respond to a command like, “Open the pod bay doors, HAL.”Regardless of whether you’re programming an artificial intelligence for a parallel hybrid computer, a computer that communicates via a tarriel cell, or a shipboard computer to assist a crew on a five-year mission destined to explore strange, new worlds, you’ll need to keep track of its source code.
You will likely also be tracking the source code for many of the tools covered throughout this book. Some developers provide packaged binaries that you can download and install. Some tools require compilation from source in order to be customized to your particular system. In other cases, a packaged release might be out of date, missing bug fixes only present in the “trunk” of its source tree. Finally, you might find yourself impressed, frustrated, or curious enough to want to modify a tool to suit your needs. In each of these cases, familiarity with SCM comes in handy for managing changes, sharing patches, and collaborating with others.
This chapter covers source control management (SCM) as well as a brief introduction to programming languages in order to help you understand and, ideally, be able to modify and hack the tools throughout this book. One definition of hacking is the ability to imagine, modify, and create software. On the hierarchy of hacking, blindly running a tool someone else wrote ranks low, whereas understanding and creating your own tools is a commendable goal.
SCM Concepts
Documents go through all sorts of changes as we work on them, from fixing typos to adding footnotes to rewriting complete sections. In programming terms, such edits are a diff (or difference) from one version to the next. If two people are working from the same original text, a diff for one text may be shared and applied as a patch to the other. This synchronizes changes so that multiple texts can be brought to the same version as different people work on them, or piecemeal changes can be applied to texts that are diverging. A diff works on a line-by-line basis. So, if one character in a line changes, then a diff algorithm will “remove” the old line and “add” a new replacement line with the troublesome character fixed.
filenames, line numbers, and surrounding text. These algorithms have improved over decades of experience with handling source code. However, if a document has changed too much from the original version on which the patch is based, then the diff will result in a conflict. A programmer must resolve a conflict manually by inspecting the two different texts and deciding which changes to keep or reject based on the context of the text in conflict.
Not all edits are good. Sometimes they have typos, introduce bugs, or implement a poor solution to a problem. In this case you would revert a diff, removing its changes and returning the document to a previous state.
At the moment it’s not necessary to know the details of the patch or diff
commands available from the Unix command line. The intent of a diff is somewhat evident in terms of which lines it adds or removes. The following diff adds a <meta>
tag to an HTML document. The new line is distinguished by a single plus symbol (+) at the beginning of a line. The name of the file to be changed is “index.html” (compared from two repositories called “a” and “b”). The line starting with the @@ characters is a “range” hint that the diff and patch algorithms use to deduce the context where a change should be applied. This way a patch can still be applied to a target file even when the target has changed from the original (such as having a few dozen new lines of code unrelated to the diff).
diff a/index.html b/index.html index 77984c8..57c583e 100644 --- a/index.html
+++ b/index.html @@ -1,6 +1,7 @@ <!doctype html> <html>
<body>
+<meta charset="utf-8"> <title>My Web Page</title> </body>
<head>
This section focuses on the “unified” diff format. This is the most common format generated by SCM tools. Include the -u or --unified option to ensure that your system’s diff command produces this format.
The developer might choose to set the charset via a header, deciding it’s unnecessary to use a <meta> tag. In that case the line would be removed, as indicated by a single minus symbol (-) at the beginning. The deletion is shown here:
diff a/index.html b/index.html index 57c583e..77984c8 100644 --- a/index.html
@@ -1,7 +1,6 @@ <!doctype html> <html>
<body>
-<meta charset="utf-8"> <title>My Web Page</title> </body>
<head>
Or the developer might decide that since the web site is going to be translated into Russian, it’s a better idea to use a different character set. In this case the diff removes a line and adds a line to resolve the edit:
diff a/index.html b/index.html index 57c583e..504db3f 100644 --- a/index.html
+++ b/index.html @@ -1,7 +1,7 @@ <!doctype html> <html>
<body>
-<meta charset="utf-8"> +<meta charset="koi8-r"> <title>My Web Page</title> </body>
<head>
By now you may have noticed that diffs apply to each line of a document rather than to just a few specific characters in a line. Changing the charset from “utf-8” to “koi8-r” required removing the original line and replacing it with a new one. Often a diff affects multiple lines of a document. In the previous examples there was an embarrassing error: the <body> and <head> elements were created backwards. The following diff fixes the error:
diff a/index.html b/index.html index 57c583e..65e5856 100644 --- a/index.html
+++ b/index.html @@ -1,9 +1,9 @@ <!doctype html> <html>
-<body> +<head>>
-<head> </head> +<body> +</body> </html>
An SCM keeps track of all these kinds of changes in a repository. After a while of referring to it as such (about twice), you’ll start calling it a repo. Each diff is marked with a revision that serves as an identifier to help distinguish when (relative to the application of other diffs) or where (in a branch, trunk, or tag—we’ll get to this in a bit) it was applied. The repository manages each change to make sure files don’t get out of sync or to warn developers when a diff is too ambiguous to be applied (for example, if someone else also changed the same area of the document). The way a repository manages content falls into two broad categories:
• Centralized Version control is maintained at a single location or origin
(sometimes called master) server. Developers retrieve code from and commit code to this master server, which manages and synchronizes each change. As a consequence, developers must have network connectivity to the server in order to save or retrieve changes, but they always know what the latest revision is for the code base.
• Distributed Version control is managed locally. Developers may retrieve patches from or commit patches to another copy of the repository, which may be ahead of or behind the local version. There is technically no master server, although a certain repository may be designated the official reference server. As a consequence, developers may work through several revisions, trunks, or branches on their local system regardless of network connectivity.
Always use the https:// scheme instead of http:// (note the s) to encrypt the communication between the client and repository. It’s a good habit that protects your passwords. Even anonymous, read-only access to repositories should use HTTPS connections to help prevent the kinds of attacks covered in Chapter 10.
Users commit diffs to the repository in order to store the changes for later reference and for access by other developers. For a centralized repo, such changes are immediately available to other developers since the centralized repo is considered the primary reference point for the code base (and all developers are assumed to have access to it). For a distributed repo, the changes aren’t available to others until the developer shares the patch, “pushes” the revision to a shared, nonlocal repo, or invites another developer to “pull” the revision. (This represents two different styles of development, not that one or the other is superior.) Each commit produces a revision that is referenced by a name or number. Revision numbers are how repositories keep track of their state.
file has diverged too much from the original. Conflicts should be resolved by hand, which means using an editor to resolve the problem (or actual hand-to-hand combat, because developers too often disagree on coding styles or solutions to a problem). The following example shows a merge conflict within a file. The text between <<<<<<< and
======= typically represents your local changes, while the text below it indicates the incoming conflict.
</head> <body> <<<<<<<
"For there to be betrayal, there would have to have been trust first." =======
"And trust has not been part of the agreement." >>>>>>>
</body> </html>
The state of a repository may also be broken out by revisions to the trunk, branches, or tags. A repository’s trunk typically represents the mainline or most up-to-date state of its contents. Branches may represent version numbers or modifications with a distinctive property. A branch creates a snapshot of the repository’s state that, for example, represents a stable build. New commits may be made to the trunk, keeping the project moving forward but also keeping the branch in a predictable state for testing and release. Tags may be used to create functional snapshots of the state, or capture the state in a certain revision for comparison against another. From a technical perspective, there’s no real difference between branches and tags in terms of how the repository handles commits. The terms exist more for developers to conceptualize and track the status of a project over time.
SCM commands that operate on a file or directory usually also operate on a label that represents the trunk, a branch, or a tag. For example, a command may generate diffs between a branch and the trunk, or from a master source and a local repository. Learn the label syntax for your SCM of choice; it makes working with revisions much easier.
Development rarely progresses in a linear manner. Developers may use different branches to test particular features. Different commits may affect the same areas of code. Bug fixes applied to the trunk may need to be back-ported to an old release branch. SCM tools have commands for conducting a merge that brings together different commits. Merge operations are not immune to conflicts. When problems do arise, the tool usually prompts for instructions on how to automatically resolve a conflict (e.g., which changes take precedence over others) or has a means to manually resolve the merge.
communication within the project and avoiding or resolving conflicts that arise from design and implementation decisions.
Just as coding style guidelines evoke strong feelings based on preference, bias, and subjective measures, so does documenting code and making comments for a commit. The following example comes from the Linux Kernel Newbies development policies. Whether you agree or not may reflect, once again, your preference, or may be due to differences between your project (no legacy of years of code, no requirements for broad platform support), or differences in your developers (no global distribution, no diversity of contributors’ spoken language). On the other hand, it can’t hurt to emulate the practice of coders who are creating high-quality, high-performance code for millions of users from contributors in dozens of countries.
That’s a long preamble for simple advice. Here are the guidelines from http:// kernelnewbies.org/UpstreamMerge/SubmittingPatches:
Describe the technical detail of the change(s) your patch includes.
Be as specific as possible. The WORST descriptions possible include things like “update driver X”, “bug fix for driver X”, or “this patch includes updates for subsystem X. Please apply.”
If your description starts to get long, that’s a sign that you probably need to split up your patch.
In other words, there’s nothing wrong with a brief comment. However, it should be informative for someone else who looks at the commit. It’s often helpful to explain why or how a fix improves code (e.g., “Normalize the string to UTF-8 first”) as opposed to stating what it fixes (e.g., “Prevent security vuln” or “Missing check”). If you have a bug-tracking system in which you create helpful comments, test cases, and other annotations, then it’s more acceptable to have comments like “Bug XYZ, set ptr to NULL after freeing it.” You can find more suggestions at http://kernelnewbies.org/UpstreamMerge.
UTF-8 is an ideal character set for comments, regardless of what other character sets may be present in a project. Developers may share a programming language but not a spoken (or written) one. There are dozens of character sets with varying support for displaying words in Cyrillic, Chinese, German, or English, to name just a few examples. UTF-8 has the developer-friendly properties of being universally supported, able to render all written languages (except Klingon and Quenya), and NULL-terminated (which avoids several programming and API headaches).
commits the changes for a single file named mydocument.code, leaving any other changes untracked for the moment.
$ scmtool commit
$ scmtool commit mydocument.code
If you get lost following any of the upcoming examples, or you’d like to know more details about a task, use the helpaction. The tool will be happy to provide documentation.
$ scmtool help $ scmtool help action
See? Even if we’re always telling computers what to do, they’re ever-ready to help. Except when it comes to those pod bay doors.
Git
Git (http://git-scm.com) originated from Linus Torvalds’ desire to create a source control system for the Linux kernel. In 1991, Linus released the first version of what is arguably the most famous, and perhaps most successful, open source project. More than 10 years later the kernel had grown into a globally distributed programming effort with significant branches, patches, and variations in features. Clearly, having an effective mechanism to manage this effort was needed. In 2005 Linus released Git to help manage the kernel in particular, and manage distributed software projects in general.
Git works the familiar primitives of source control management systems such as commits, diffs, trunks, tags, branches, and so on. However, Git has the intrinsic property of being a distributed system—a system in which there is no official client/ server relationship. Each repository contains its entire history of revisions. This means that there’s no need to have network access or synchronization to a central repository. In essence, a Git repository is nonlinear with regard to revisions. Two different users may change source code in unique, independent ways without interfering with each other. One benefit of this model is that developers are more free to independently work with, experiment with, and tweak code.
Of course, a software project like the Linux kernel requires collaboration and synchronization among its developers. Any project needs this. So, while Git supports independent development and revision management, it also supports the means to share and incorporate revisions made in unsynchronized (i.e., distributed) repositories. This section walks through several fundamental commands to using Git.
The GitHub (https://github.com) and Gitorious (https://gitorious.org) web sites provide hosting and web interfaces for Git-based projects.
Working with Repositories
the local repository and will be unknown to others until the revisions are explicitly shared. To create your own repository, use the init action, as follows:
$ mkdir my_project $ cd my_project $ git init $ cd .git $ ls
HEAD branches/ config description hooks/ info/ logs/ objects/ packed-refs refs/
The repository is created within the current working directory. All of its management files are maintained in the top-level .git directory. It’s never a good idea to edit or manipulate these files directly; doing so will likely corrupt the repository beyond repair. Instead, use any of the plentiful Git actions. Also note that the repository exists in this one directory. It’s still a good idea to have a backup plan for these files in case they are deleted or lost to a drive failure (or the occasional accident of typing rm -rf file *).
With the repository created, the next step is to add files to be tracked and commit them at desired revision points. These steps are carried out with the appropriately named add and commit actions:
$ cd my_project $ touch readme.md $ git add readme.md $ git commit readme.md
One quirk of Git that may become apparent (or surprising) is that it works only with files, not directories. In an SCM like Subversion, it’s possible to commit an empty directory to a repository. Git won’t commit the directory until there’s a file within it to be tracked. After all, a diff needs to operate on the contents of a file.
Sometimes you’ll have present in a repository particular files that you don’t wish to track at all. Git will look for a .gitignore file with a manifest of files or directories to be ignored. Merely create the .gitignore file and manage it like you would any other commit. You may use explicit names for the entries in this file or use globs (e.g., *.exe is a glob that would ignore any name with a suffix of .exe; whereas tmp* would ignore any name that starts with tmp).
$ touch .gitignore $ git add .gitignore
If you do wish to assign a repository as the master and consider it the “central” server, consider creating a bare repository. This creates the management files normally found in the .git subdirectory right in the current working directory:
$ mkdir central $ cd central $ git init --bare $ ls
HEAD branches/ config description hooks/ info/ objects/ refs/
If you’ll be working from someone else’s repository, then you’ll need to create a local copy on your development system by using the clone action. This creates the top-level working directory of the repository, the .git subdirectory, and a copy of the repository’s revision history. This last point, the revision history, is important. In a centralized model, you’d query the changes for a file from the central server. In Git’s distributed model, you already have this information locally. The benefit of this model is that you can review the history and make changes without having access to the server from which it was originally cloned—a boon to developers’ independence and a reduction in bandwidth that a server would otherwise have to support.
When working with large projects, consider using the --depth 1 or --single-branch option to clone only the primary “top” (or HEAD) branch of the project.
The clone action requires a path to the repository. The path is often an HTTP link. The following example clones the entire development history of the Linux kernel. We’ll return to this repo for some later examples. However, the repo contains about 1.2GB of data, so the cloning process may take a significant amount of time (depending on the bandwidth of your network connection) and occupy more disk space than you desire. If you’re hesitant to invest time and disk space on a repo that you’ll never use, you should still be able to follow along with the concepts that refer to this repo without having a local copy. In fact, you should be able to interact with the web-based interface to the kernel’s Git repo at https://git.kernel.org/cgit/linux/kernel/git/torvalds/linux.git/.
$ git clone https://git.kernel.org/pub/scm/linux/kernel/git/torvalds/linux.git Cloning into 'linux'...
remote: Counting objects: 2622145, done.
remote: Compressing objects: 100% (402814/402814), done.
remote: Total 2622145 (delta 2198177), reused 2617016 (delta 2193622) Receiving objects: 100% (2622145/2622145), 534.73 MiB | 2.07 MiB/s, done. Resolving deltas: 100% (2198177/2198177), done.
Now that you have created or cloned a repository, it’s time to work with the files. Use the status action to check which files are tracked, untracked, and modified. The
used to demonstrate the diff concepts when changing the contents of an index.html file. In this case, we have uncommitted changes to the index.html file. Plus, we’ve created a file called new_file in order to demonstrate how Git reports the status for a file it isn’t tracking.
$ cd my_project $ git status -s M index.html ?? new_file
Use git help status to find out the meaning of status indicators. In the previous example, the M indicates a tracked file that has been modified but whose changes haven’t been committed. The ?? indicates an untracked file.
As noted earlier, Git tracks individual files. Should you need to rename a file, use the Git action to do so rather than a raw file system command. This preserves the revision history for the file.
$ cd my_project
$ git mv readme.md readme $ git commit -a
rename readme.md => readme (100%)
Because Git tracks the repo’s entire revision history, the file store used to track changes can become very large. Running the occasional clean action (e.g., git clean) will keep the file store tidy by compressing references to old revisions or removing redundant information that has accumulated over time. Try adding the
-d, -f, or -x flags (or include all three at once) to this action to return the repository to a pristine condition.
Git works with the master branch by default. Branching and tagging are lightweight operations; they induce very little overhead in terms of file copies. Consequently, it’s common for developers to create branches for testing different configurations or code changes. The lightweight nature of branches makes it easy to switch between them as well. The following example shows the creation of a new branch, a checkout action to switch to it, and then a merge action to bring the branch’s changes back into the master branch:
$ cd my_project $ git branch html5 $ git branch html5 * master
$ git checkout html5 Switched to branch 'html5'
$ git add index.html $ git commit index.html $ git checkout master Switched to branch 'master' $ git merge html5
Updating bb81801..ea2f1e4 Fast-forward
index.html | 1 +
1 file changed, 1 insertion(+)
One of the most important aspects of a shared repository is being able to review different commits in order to understand why a developer made certain changes. Crafting useful commit messages requires a balance of brevity and detail that varies by project and team. Even if you believe that well-written code should be self-documenting and have minimal comments, commit messages should still be considered important. Comments within source code often go stale or merely repeat obvious items like parameter names. In the worst case, they are incorrect, such as making a claim that an input parameter will be validated against a security control or that an output parameter will not be NULL.
We’ll start with an example of a very verbose commit message from the Linux kernel. (This repository was cloned in a previous example.) The details of the following message were necessary because it fixed a subtle, complicated security bug. Return to the kernel repository and review the message by using the show action against the commit label:
$ cd linux
$ git show 1a5a9906d4e8d1976b701f889d8f35d54b928f25
Include the --oneline flag to review a summary from the commit along with its diffs:
$ git show --oneline 30b678d844af3305cda5953467005cebb5d7b687
And for good measure, here’s another example of a commit message for a security issue:
$ git show bcc2c9c3fff859e0eb019fe6fec26f9b8eba795c
Git’s show action is not limited to specific blobs (e.g., a commit). Different arguments display changes based on tree labels or temporal information. The following command enumerates changes to the master branch from one, five, and ten commits ago; master
indicates the branch name, and the number after the tilde (~) is the recent commit. In the example of ten commits ago, only a specific file is being reviewed.
$ git show master~1 $ git show master~5
Instead of reviewing diffs by an index of when they were committed, you can review them based on human-friendly time ranges. The following examples enumerate diffs for the current working branch that were made at relative times rather than at specific revisions:
$ git show @{yesterday} $ git show @{"1 month ago"} $ git show @{"last year"}
Use the log action to obtain a list of the revision history for the repository or specific files. It displays commit labels, authors, dates, and summary messages. This is one way of finding commit labels to investigate further with the show action. The arguments shown previously for the show action may also be applied to log.
$ git log
As you review others’ commits and incorporate them into your repository, it’s inevitable that you’ll encounter a conflict. Git has a clever mechanism for storing your changes temporarily when pulling new commits. This storage space is managed with the stash action.
Look into obtaining a code review tool such as Gerrit (http://code.google.com/p/ gerrit/) for managing the process of reviewing and committing changes to large projects or working with developers of differing experience and capabilities. It is designed to integrate well with Git.
Place uncommitted changes into the stash by calling the action without arguments. You can stash multiple files as well as create multiple stashes.
$ git stash
Saved working directory and index state WIP on master: 859e80f Tests. HEAD is now at 859e80f Tests.
$ git stash list
stash@{0}: WIP on master: 859e80f Tests.
The most recent stash entry is retrieved with either the apply or pop sub-action. If the stashed change may be merged without conflict, then pop will remove it from the stash upon merge, whereas apply will leave it in the stash list.
$ git stash pop
Dropped refs/stash@{0} (dd24b6a806c23bd34117a78c3da821054836251a)
occasionally running the gc action keeps the repository in shape by running garbage collection (hence the action’s name):
$ git gc
Counting objects: 682712, done.
Delta compression using up to 2 threads.
Compressing objects: 100% (122746/122746), done. Writing objects: 100% (682712/682712), done.
Total 682712 (delta 560093), reused 676709 (delta 554418) Removing duplicate objects: 100% (256/256), done.
Checking connectivity: 682712, done.
Additional information for the git command is found not only with the help action, but in the tutorial man pages:
$ man gittutorial $ man gittutorial-2
Working with Subversion
One of the coolest aspects of Git is how it works as an overlay for Subversion repositories. (Subversion is a centralized SCM. You’ll find a section on it later in this chapter.) The benefit of having a Git overlay is that developers may elect to work in a
Case Study: Obtain Qt Project Source Code
The Qt project (http://qt.digia.com) is a venerable C++ project for building cross-platform applications. It provides the frameworks necessary to build anything from a command-line tool to a web browser to a complex GUI on Windows, Unix, OS X, or a mobile device. The code base is also quite a behemoth. And it’s managed quite successfully with Git. The Qt5 project represents a significant amount of collaboration, modules, branches, and states of stability.
Even if neither C++ nor Qt interests you, you may find the project’s adoption of Git instructive. The main developer resources, such as documentation and forums, are hosted at http://qt.gitorious.org. The primary repository is hosted at http://qt.gitorious.org/qt. As you explore Qt5, you’ll encounter scripts that demonstrate submodules, multiple repositories, code review protocols (using Gerrit, http://code.google.com/p/gerrit/), and plenty of helpful documentation. As a starting point, check out the qtrepotools/bin/qt5_tool command. Among other things, this command wraps useful actions to save you typing:
$ git submodule foreach --recursive "git clean -dfx" $ git submodule update --recursive
distributed manner while still sharing select commits with a central server that acts as the primary reference for all developers. Use the svn action to clone a Subversion repository. You may instruct Git to clone a specific branch, a specific tag, or the trunk. If you do so, specify the Subversion path to the desired portion of the repository. You may also instruct Git to clone every component of the Subversion repo, which would include each branch, each tag, and the trunk. Use the --stdlayout option with the
svn clone action to copy a Subversion repo that has been created with the standard /trunk, /tags, and /branches subdirectories.
The following example clones the Zed Attack Proxy project, which uses Subversion, into a zap directory that can be locally managed as a Git repo. Notice how Git clones the Subversion repository’s entire revision history in incremental steps starting with r1. Git assigns its own revision label to correspond with each Subversion commit.
$ git svn clone --stdlayout https://zaproxy.googlecode.com/svn/ zap Initialized empty Git repository in /Users/mike/tmp/zap/.git/ r1 = 7fd35e3ea8400b0e4cbc5d53abb7e35ec93055a1 (refs/remotes/trunk) A src/test
r2 = 1a71319e20007c0d7bc640d3829d123baebef29f (refs/remotes/trunk) ...
Later on, the clone encounters a tag, which it records for Git. Keep in mind that Git must check out the entire history of the Subversion repository in order to decentralize the source management. Each tag and branch receives a Git revision label, just like trunk revisions.
...
r376 = 3fd0b865b505c834e7aa8a7847ba894e1d56c3f2 (refs/remotes/trunk) Found possible branch point: https://zaproxy.googlecode.com/svn/trunk => https://zaproxy.googlecode.com/svn/tags/1.2.0, 378
Found branch parent: (refs/remotes/tags/1.2.0) 3fd0b865b505c834e7aa8a7847ba894e1d56c3f2
Following parent with do_switch Successfully followed parent
r379 = 7ef7a64762487a54009bea01fb485b18240f7685 (refs/remotes/tags/1.2.0) ...
r2426 = 582dbddc1294064c3549189908cff7567bacf6a5 (refs/remotes/1.4) Counting objects: 11607, done.
Delta compression using up to 2 threads. Compressing objects: 100% (11370/11370), done. Writing objects: 100% (11607/11607), done. Total 11607 (delta 8908), reused 0 (delta 0) Removing duplicate objects: 100% (256/256), done. Checking out files: 100% (4327/4327), done. Checked out HEAD:
Depending on how you expect to work with the Subversion repository, you may wish to just clone the trunk. This may result in fewer checkouts and a smaller local repository since branch and tag information remains on the server.
$ git svn clone https://zaproxy.googlecode.com/svn/trunk/ zap Initialized empty Git repository in /Users/mike/tmp/zap/.git/
r1 = 7fd35e3ea8400b0e4cbc5d53abb7e35ec93055a1 (refs/remotes/git-svn) A src/test
r2 = 1a71319e20007c0d7bc640d3829d123baebef29f (refs/remotes/git-svn) ...
From this point on you could interact with the local repository as if it were a native Git clone (which it is). The svn action has several sub-actions. When you’re ready to push changes to the central repository, use the dcommit sub-action. It creates revision numbers for each commit, making sure they (the Subversion revision numbers) are synchronized between the server and your local clone.
$ git svn dcommit
Even though Git works well with Subversion, there are hazards to combining the two repository models. The best way to retrieve commits from the server is to use the
rebase sub-action (which handles local modifications more gracefully than its lesser relation, the fetch sub-action):
$ git svn rebase
Use the info sub-action to display Subversion’s information about a particular item. This is helpful should you wish to clone the repository with Subversion or determine revision numbers as opposed to Git labels.
$ git svn info Path: .
URL: https://zaproxy.googlecode.com/svn/trunk Repository Root: https://zaproxy.googlecode.com/svn Repository UUID: 0fcac13d-f916-6cb6-7431-acacdca54389 Revision: 2425
Node Kind: directory Schedule: normal
Last Changed Author: [email protected] Last Changed Rev: 2425
Last Changed Date: 2012-11-05 02:25:31 -0800 (Mon, 05 Nov 2012)
Mercurial
Mercurial (http://mercurial.selenic.com) is another distributed SCM in the manner of Git. The primary difference is that Mercurial is written in Python (with a smattering of C), whereas Git is written in C. Python provides the benefit of being cross-platform and easily extensible by programmers who prefer dynamic languages. (Git does not have a cross-platform problem; its developer community ensures it exists on all major platforms. These differences are more philosophical than practical.)
If you are already familiar with Git (or have skipped ahead to Subversion), then there’s little to Mercurial that will surprise you. Its core command is hg (a nod to the symbol for the element Mercury). Its behavior is influenced by actions such as clone, commit, and pull—as is true for the other tools.
To create a repository, move the top-level directory to contain the project and execute the init action. This creates a .hg directory that contains Mercurial’s management files, much like the .git and .svn directories, respectively, for Git and Subversion.
$ mkdir alchemy $ cd alchemy $ hg init $ cd .hg $ ls
00changelog.i requires store/
If you’ll be working with someone else’s repository, use the clone action to create a local copy. Since Mercurial is a distributed SCM, you’ll end up cloning the entire revision history of the project. (A centralized SCM like Subversion would only take a snapshot of the revision you checked out, and make requests to the central server each time you queried its revision history.) The following example clones a Python project. Mozilla’s SpiderMonkey is another example of a large, open source project that uses Mercurial.
$ hg clone http://hg.python.org/cpython destination directory: cpython
requesting all changes adding changesets adding manifests adding file changes
added 79229 changesets with 176113 changes to 9762 files (+1 heads) updating to branch default
3743 files updated, 0 files merged, 0 files removed, 0 files unresolved
From here on edit files and commit them as you would in another SCM. Use the push and pull actions to share revisions with other developers.
The following example shows how to review a revision. The --graph flag produces a simple ASCII diagram of changes as they relate to the trunk and branches.
$ hg log
$ hg log -r69046 $ hg log -r69046 -p $ hg log --graph
Extensive documentation for Mercurial is available at http://mercurial.selenic.com/ guide/.
Subversion
Subversion (http://subversion.apache.org) is a centralized SCM. All revisions are maintained and synchronized by a single server, from which developers retrieve and commit changes. Revision numbers increase monotonically—an impressive way of saying that every commit increases the revision list by one. The syntax of the svn
command, Subversion’s command-line implementation, has the familiar actions of Mercurial and Git. Its aptly named actions reflect common activities. Several actions have flags that modify behavior. The help action will summarize flags and behavior for an action (e.g., svn help commit).
Most of the projects on SourceForge (http://sourceforge.net) use Subversion to manage their source code. One notable project that uses Subversion is the Clang compiler (http://clang.llvm.org/get_started.html), which is part of the LLVM project—an important piece of software that we’ll encounter again when it’s time to compile some tools.
The ancestor to today’s SCM tools is Concurrent Versioning System (CVS), by Dick Grune. In July 1984 Grune started work on a software tool to track the modifications made to files and directories for a project, which led to the first commit of CVS to CVS (i.e., to manage its own source) in November 1985. A summary is available at http://dickgrune.com/Programs/CVS.orig/.
CVS has almost disappeared completely from use in open source projects. Most notably, the OpenSSL project continued to rely on it through 2012 until it (thankfully!) converted the repo to Git (www.openssl.org/source/repos.html). CVS has severe shortcomings compared to the tools covered in this chapter; it should be avoided in terms of both security and usability. Subversion was the first effort to seriously improve repository management for the open source community.
Creating a Repository
have traditionally used a base directory structure of trunk, tags, and branches. Hence, you’ll need to create this base structure and then import it into the new repository.
$ svnadmin create /some/path/to/repository_name $ cd /usr/local/src/
$ mkdir repository_name $ mkdir branches
$ mkdir tags $ mkdir trunk
$ svn import . file:///some/path/to/repository_name -m "Initial import."
Local file repositories are fine for personal use. Shared repositories are typically accessed via web servers. Most operating systems have prebuilt packages that install and configure the basic structure for serving Subversion over Apache. Remember to follow good security practices by using encrypted HTTPS links to access the repository.
Working with Repositories
All of the capabilities you expect from an SCM are accessed via predictable actions, such as add, commit, and update. Files and directories must be explicitly added to a repository in order to be tracked:
$ svn add file
Commit the files when you’re ready to save a revision point. Note that the commit action applies to the current working directory and its subdirectories. It will not affect files added or modified in a higher-level or peer directory.
$ svn commit
Since Subversion is a centralized SCM, it requires that your local repository be relatively up to date before sending commits. The svn command will indicate this and prompt you to update your tree. Of course, you’ll also want to update from the central repository in order to obtain the latest version of the software. The update action does this for you. Subversion will do its best to merge changes to local files you have modified. When it runs into a conflict, it’ll prompt you for instructions on how to resolve the merge.
$ svn update
The update action operates on the current working directory, unlike Git’s pull
action, which operates on the entire repository. This difference, the current working directory vs. the entire repository, is common to many actions for the svn
There is one quirk of Subversion that tends to confuse new users: properties. It’s possible to define on files or directories properties that the repository will track but that aren’t evident to text editors or the file system. For example, to ignore files within a repository, you must edit the svn:ignore property for the directory in question. This is done via the propedit action, as follows:
$ svn propedit svn:ignore .
The action launches an editor for you to modify the text-based property. The
svn:ignore property checks each line for a match against files or directories. It supports globs. For example, an ignore list might look like this:
a.out tmp *.o
Property changes must be committed (via the usual commit action) in order for the repository to track them. You don’t need to specify the property when you commit it, just the file or directory that it affected.
Sometimes, Subversion’s centralized nature can cause version headaches, merge problems, and conflicts. Subversion will usually prompt you for instructions on how to resolve a conflict, such as apply your (i.e., “my”) full changes, the repository’s (i.e., “their”) full changes, discard changes, or manually edit the conflicting files before the merge.
The centralized nature of Subversion implies that a project will have only one point of reference for the canonical version of its source code. The URL used to access the repo ties it to a specific host. If the repo needs to be moved to a different host, then clients would have to re-clone the repo based on the new URL that references it. However, clients can shortcut the need for a new checkout by using the switch action. The following example shows how to switch a project from a repo that used a URL that relied on an IP address to a more manageable repo based on a hostname:
$ svn switch --relocate https://10.0.1.12/svn/project https://code.site/ svn/project
Switching a repo in this manner should be a rare occurrence. As with any server, make sure the repo’s system administrator runs regular backups and diligently applies security patches.
Working with Revisions
The following examples use Debian’s Subversion repository for OpenSSL. Check it out with the following command. Note that the URL is svn:// as opposed to other repositories accessed via https://.
Every revision within a repository contains a collection of diffs. Since revisions are numeric, it’s easy to review the changes from one commit to another. All you need to do is define a revision range using the -r flag to the diff action. The following example shows the diffs related to the infamous not-all-random randomness bug in Debian OpenSSL:
$ svn diff -r 140:141
Index: trunk/debian/changelog
=================================================================== --- trunk/debian/changelog (revision 140)
+++ trunk/debian/changelog (revision 141) @@ -23,6 +23,9 @@
- Make use of invoke-rc.d
* Add comment to README.Debian that rc5, mdc2 and idea have been disabled (since 0.9.6b-3) (Closes: #362754)
+ * Don't add uninitialised data to the random number generator. This stop + valgrind from giving error messages in unrelated code.
+ (Closes: #363516)
-- Kurt Roeckx <[email protected]> Thu, 6 Apr 2006 20:34:07 +0200
Index: trunk/rand/md_rand.c
=================================================================== --- trunk/rand/md_rand.c (revision 140)
+++ trunk/rand/md_rand.c (revision 141) @@ -271,7 +271,10 @@
else
MD_Update(&m,&(state[st_idx]),j);
+/*
+ * Don't add uninitialised data. MD_Update(&m,buf,j); +*/
MD_Update(&m,(unsigned char *)&(md_c[0]),sizeof(md_c)); MD_Final(&m,local_md);
md_c[1]++; @@ -465,7 +468,10 @@
MD_Update(&m,local_md,MD_DIGEST_LENGTH);
MD_Update(&m,(unsigned char *)&(md_c[0]),sizeof(md_c)); #ifndef PURIFY
+/*
+ * Don't add uninitialised data.
MD_Update(&m,buf,j); /* purify complains */ +*/
#endif
Subversion expects you to be performing this kind of review often. And since good developers are productively lazy (aka efficient), the diff action has a -c flag that is equivalent to -rM-1:M (where M is a revision number). Here’s an example of another OpenSSL changeset that’s also related to security:
$ svn diff -c 560
Let’s revisit the bug introduced from revision 140 to 141 (the “randomness” bug). Imagine you wanted to revert the changes. You could generate a diff that represents a change from revision 141 to 140 by specifying a negative number for the -c flag. For example, the following command produces a diff to back out the undesired changes from revision 141 to its previous state, hence the negative value:
$ svn diff -c -141 ...
Index: trunk/rand/md_rand.c
=================================================================== --- trunk/rand/md_rand.c (revision 141)
+++ trunk/rand/md_rand.c (revision 140) @@ -271,10 +271,7 @@
else
MD_Update(&m,&(state[st_idx]),j); -/*
- * Don't add uninitialised data. MD_Update(&m,buf,j); -*/
MD_Update(&m,(unsigned char *)&(md_c[0]),sizeof(md_c)); MD_Final(&m,local_md);
md_c[1]++; @@ -468,10 +465,7 @@
MD_Update(&m,local_md,MD_DIGEST_LENGTH);
MD_Update(&m,(unsigned char *)&(md_c[0]),sizeof(md_c)); #ifndef PURIFY
-/*
- * Don't add uninitialised data.
MD_Update(&m,buf,j); /* purify complains */ -*/
#endif
Once you’ve identified patches or revision numbers, use the merge action to apply them to different branches or back to the trunk. The following example shows a merge from the trunk to a branch for a revision that affects files in a specific subdirectory. The
merge path uses a shortcut, the caret (^), to refer to the source of the merge.
$ svn co some_branch $ cd src/parsers
$ svn merge -c 1337 ^/trunk/src/parsers
Keep your fingers crossed with the merge. Source code is highly dynamic; consider yourself lucky any time a merge does not induce conflicts. Also remember to use the
cp, mv, and rm actions (e.g., svn mv foo bar) instead of the native filesystem commands. This ensures that Subversion preserves the file’s history. It also makes reviewing revision logs far easier.
Comprehensive documentation is online at http://svnbook.red-bean.com.
Eclipse Integrated Developer Environment
Many complex applications have been written using no other tools than vi (a text editor), GCC (a compiler), and GDB (a debugger). With these tools, a developer barely needs to leave the command line or keyboard, while the mouse remains sleepily to the side.
However, an integrated developer environment (IDE) like Eclipse (www.eclipse.org) provides a wealth of features that are unavailable or too cumbersome to use from the command line. Features like syntax highlighting might be found in a text editor, but an IDE provides features like code summarization, linking between definitions and declarations, code checking, and refactoring tools. While none of these guarantees better code, each contributes to more efficient development. And happy developers are less likely to make buggy code…or so we hope.
Working with Source Control
Eclipse is written in Java but is not limited to Java development. Our concern for this chapter is source control. Therefore, we’ll just focus on the IDE’s configuration options for source control. Eclipse has many features that aid developers in writing, analyzing, refactoring, and debugging software for a number of programming languages.
Eclipse integrates Git and CVS support by default.
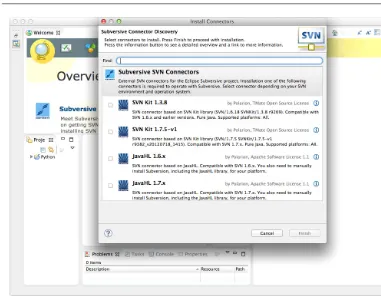
www.eclipse.org/subversive/installation-instructions.php for more detailed instructions if you run into problems.) The name of the plug-in is “Subversive”—look for the tell-tale subversion abbreviation SVN in the plug-in’s name to make sure you’re installing the correct one. The installation will prompt you for a Subversion connector. Figure 1-1 shows the recommended choices at the time of writing.
To obtain Mercurial, select the Help | Install New Software menu to open the Install window (just like the previous step for Subversion). In the Install window, click the Add… button to add the following resource:
http://mercurialeclipse.eclipselabs.org.codespot.com/hg.wiki/update_site/stable
The resource makes a Mercurial plug-in available for installation. Refer to https:// bitbucket.org/mercurialeclipse/main/wiki/Home for more details on the integration with Eclipse.
Once you’ve installed your desired SCM tool, open the Eclipse | Preferences menu. Figure 1-2 shows the configuration options available under the Team preferences. Change the values to reflect your environment and the repository you wish to work with.
Programming Languages
The rest of the chapters in this book focus on the tools and techniques for putting together a security toolkit and exploring the security of networks, systems, and software. I chose to start this book and this chapter by covering SCM commands because the tools in upcoming chapters are largely open source with public repos that encourage collaborative development. This means you can download the bleeding-edge versions from “top of the tree” or “trunk” source code or even modify the tools to suit your needs.
You don’t need a programming background to use security tools. Some of them are so user-friendly that you hardly need any knowledge of computers in the first place. However, even a basic understanding of programming and software will help you grasp the security concepts being covered. This section covers a few basic programming concepts and popular languages that you’re likely to encounter.
Common Terms
As the rest of this book demonstrates, you don’t have to be a programmer to explore hacking tools (although you do have to rely on the programming skills of whoever