prePress
t
Mic
ro
sof
PUBLISHED BY Microsoft Press
A Division of Microsoft Corporation One Microsoft Way
Redmond, Washington 98052-6399
With
Microsoft prePress
, you can access just-written content from
upcoming books. The chapters come straight from our respected authors,
before they’re fully polished and debugged—
for critical insights now, when
you need them.
This document contains one or more portions of a preliminary version of a Microsoft Press title and is
provided “as is.” The content may be changed substantially upon final publication. In addition, this document may make reference to pre-released versions of software products that may be changed substantially prior to final commercial release. This document is provided for informational purposes only. MICROSOFT MAKES NO WARRANTIES, EITHER EXPRESS OR IMPLIED, IN THIS DOCUMENT. Information and views expressed in this document, including URL and other Internet website references may be subject to change without notice. You bear the risk of using it.
Complying with all applicable copyright laws is the responsibility of the user. Without limiting the rights under copyright, no part of this document may be reproduced, stored in or introduced into a retrieval system, or transmitted in any form or by any means (electronic, mechanical, photocopying, recording, or otherwise), or for any purpose, without the express written permission of Microsoft Corporation.
Some examples are for illustration only and are fictitious. No real association is intended or inferred. This document does not provide you with any legal rights to any intellectual property in any Microsoft product, service, or other offering.
© 2012 Microsoft Corporation. All rights reserved.
Microsoft and the trademarks listed at
Contents at a glance
Chapter 1
Install and configure servers
Chapter 2
Configure server roles and features
Chapter 3
Configure Hyper-V
Chapter 4
Install and administer Active Directory
Chapter 5
Deploy, manage, and maintain servers
Chapter 6
Configure network services and access
Chapter 7
Configure a network policy server infrastructure
Chapter 8
Configure and manage Active Directory
Chapter 9
Configure and manage Group Policy
Chapter 10
Configure and manage high availability
Chapter 11
File and storage solutions
Chapter 12
Implement business continuity and disaster recovery
Chapter 13
Configure network services
Chapter 14
Configure identity and access solutions
C H A P T E R 1
Install and configure servers
The Install and Configure Servers domain originates from the 70-410 exam. Unlike that exam, the 70-417 upgrade exam avoids basic installation concepts that aren’t new to Windows Server 2012. Instead, you’ll see questions about only new features related to the initial configuration of Windows Server (such as Features on Demand, full installation/Server Core convertibility, and the remote deployment of server roles) or to server hardware (such as NIC teaming and Storage Spaces).What these new features have in common is that they represent key improvements to Windows Server. As a result, you should expect them to be heavily tested on the 70-417 exam.
Objectives in this chapter:
Objective 1.1: Install servers
Objective 1.2: Configure servers
Objective 1.3: Configure local storage
Objective 1.1: Install servers
Installing servers might sound like an easy topic that you don’t need to study, but there’s a bit more to this objective than meets the eye. Yes, you should certainly review the hardware requirements for Windows Server 2012, but more important, a new feature makes an appearance here that you are likely to see on the 70-417 exam: Features on Demand.
This section covers the following topics:
Windows Server 2012 minimum hardware requirements
Migrating roles from previous versions of Windows Server
Optimizing resource utilization by using Features on Demand
Minimum hardware requirements
You already know you won’t see questions on any Microsoft exam that ask you, for example,
“What are the processor requirements for Windows?” But sometimes hardware requirements
hardware (based on, say, an x86 processor) requires an upgrade to support the new operating system. Fortunately, in this case the hardware requirements are easy to learn: the minimum hardware requirements for Windows Server 2012 are the same as those for Windows Server 2008 R2. Here’s a recap:
Processor: 1.4 GHz 64-bit processor
RAM: 512 MB (allocate more for the Chinese version)
Disk space: 32 GB
Don’t miss the obvious here. Windows Server 2012 requires a 64-bit processor, unlike Windows Server 2008 (but like Windows Server 2008 R2).
Migrating server roles by using the Windows Server
Migration Tool
Don’t forget about the Windows Server Migration Tool (WSMT), a command-line tool that helps you migrate certain roles to servers running Windows Server. WSMT is a built-in, installable feature of Windows Server 2012. When you use WSMT, the source computer can be running Windows Server 2003 (SP2 or later), Windows Server 2008, Windows Server 2008 R2, or Windows Server 2012.
You don’t need to remember the specifics of how to use WSMT for the 70-417 exam. However, it’s a good idea to review the procedure for setting up a role migration from a server running Windows Server 2008 R2. Some of these elements, such as Install-WindowsFeature Migration, SmigDeploy.exe, or Get-SmigServerFeature, could possibly appear in a test question.
To set up a role migration from a server running Windows Server 2008 R2, take the following steps:
1. Install WSMT on the destination server running Windows Server 2012. At an elevated Windows PowerShell prompt, type the following:
2. Create deployment folders on the destination server running Windows Server 2012. For this step, use the SmigDeploy.exe command at an elevated command prompt. For example, to create a deployment folder to migrate from Windows Server 2008 R2, type the following:
3. Copy the deployment folders from the destination server to the source server.
5. Load WSMT into your Windows PowerShell session. To load WSMT, type the following and then press Enter.
6. Type Get-SmigServerFeature at an elevated Windows PowerShell prompt to find out which features can be exported from the local server.
At this point, you would use cmdlets such as Export-SmigServerSettings, Import-SmigServerSettings, Send-SmigServerData, and Receive-SmigServerData to migrate data and settings to the destination server.
For more information about using WSMT to migrate to Windows Server 2012, visit http://technet.microsoft.com/en-us/library/jj134202. For cmdlets that apply to Windows Server 2008 R2, visit http://technet.microsoft.com/en-us/library/dd871125.
Features on Demand
A copy of the binary files for all features and roles that are installed during Windows Setup is stored in a directory called the side-by-side store, located in Windows\WinSxS. Keeping a copy of the feature files available on disk in this way enables you to add a role or enable a feature after Windows Server installation without needing to access Windows Server media. In previous versions of Windows Server, these features files remained on disk for the life of the operating system. The disadvantage of this approach was that these files took up space on the disk even if you never wanted to install the associated feature or role. In addition, you weren’t able to reduce the size of the installation image, which you might want to do when creating custom installation media for your organization.
In Windows Server 2012, you can minimize the footprint of your installation by deleting the files for features you’re not using from the side-by-side store. This ability to delete feature files is called Features on Demand. To later reinstall a role or feature for which files have been deleted, you need access to the Windows Server 2012 source files.
To completely remove all files for a role or feature from disk, use the
Uninstall-WindowsFeature cmdlet of Windows PowerShell and specify the name of the feature by using the –Remove option. For example, to delete the DHCP server binaries from server storage, run the following Windows PowerShell command:
many of these Windows PowerShell command names. You can do this by typing
Get-WindowsFeature at a Windows PowerShell prompt and reviewing the output.
Figure 1-1 shows the result after you run the Get-WindowsFeature cmdlet. The DHCP Server install state is described as Removed.
FIGURE 1-1 Removing feature files.
You can reinstall these feature files at any point. To install a role or feature for which the binaries have been deleted, you can use the Install-WindowsFeature cmdlet in Windows PowerShell with the –Source option to specify any of the following:
A path to a local Windows Imaging (WIM) file (for example, the product DVD) The path for a WIM file should be in the following format: WIM:[drive
letter]:\sources\install.wim:[image index], for example, WIM:e:\sources\install.wim:4.
A Universal Naming Convention (UNC) path to a WIM file on a network share, using the WIM: prefix before the path
A UNC path to a network share that contains the WinSxS folder for the appropriate version of Windows Server 2012
If you do not specify a –Source option, Windows will attempt to access the files by performing the following tasks in order:
1. Searching in a location that has been specified by users of the Add Roles And Features Wizard or Deployment Image Servicing and Management (DISM) installation
commands.
2. Evaluating the configuration of the Group Policy setting, Computer
Configuration\Administrative Templates\System\Specify settings for optional component installation and component repair.
3. Searching Windows Update. (Note that this can be a lengthy process for some features.)
FIGURE 1-2 Reinstalling feature files that have been removed.
The source path or file share must grant Read permissions either to the Everyone group (not recommended for security reasons) or to the computer account of the destination server; granting user account access is not sufficient.
Remember that last point for the 70-417 exam.
For more information on Features on Demand, visit
http://technet.microsoft.com/en-us/library/jj127275.aspx.
Objective summary
The minimum hardware requirements for Windows Server 2012 are the same as those for Windows Server 2008 R2: a 1.4 GHz 64-bit processor, 512 MB of RAM, and 32 GB of storage.
The Uninstall-WindowsFeature cmdlet uninstalls and removes specified roles, role services, and features from a computer that is running Windows Server 2012 or an offline VHD that has Windows Server 2012 installed on it.
removing from disk the files for unused roles or features. To remove feature files, use the following Windows PowerShell command:
feature name
To reinstall a feature for which files have been removed from the local disk, use the following Windows PowerShell command:
feature name path to a WIM file or share containing a WinSxS folder
from an appropriate version of Windows Server 2012
Objective review
Answer the following questions to test your knowledge of the information in this objective. You can find the answers to these questions and explanations of why each answer choice is correct or incorrect in the “Answers” section at the end of the chapter.
1. You work for a large company named Contoso.com. A server in the finance department named Server1 is running Windows Server 2008. The server includes a 2.0 GHz 32-bit CPU and 4 GB of RAM.
Management has issued the requirement that every server should be reduced to a minimal footprint and the files of all unused features should be completely removed from server storage. What should you do? (Choose all that apply.)
A. Keep the existing server and install Windows Server 2012.
B. Replace the existing server and install Windows Server 2012.
C. Use the Uninstall-WindowsFeature cmdlet.
D. Use the DISM utility.
2. You want to reduce the amount of space taken up by Windows Server 2012 for a Server Message Block (SMB) file server named Server1. Server1 is a member of the
Contoso.com domain but doesn’t perform any functions beyond those of an SMB file server. Which of the following commands, entered at a Windows PowerShell prompt, are acceptable methods to reduce the size of the Windows Server 2012 installation on Server1? (Choose all that apply.)
A. Uninstall-WindowsFeature Web-Server -Remove
B. Dism /online /disable-feature /featurename:iis-webserverrole /remove
C. Uninstall-WindowsFeature FS-FileServer -Remove
D. Dism /online /disable-feature /featurename:File-Services /remove
A. Install-WindowsFeature –Source WIM:D:\sources\install.wim:1
B. Install-WindowsFeature –Source D:\sources\install.wim:1
C. Install-WindowsFeature –Source WIM:D:\sources\install.wim
D. Install-WindowsFeature –Source D:\sources\install.wim
Objective 1.2: Configure servers
Within this objective, there are three major feature changes in Windows Server 2012. First are the improvements to the process of adding or removing server roles and features. You can now perform these functions locally or remotely, through the GUI or by using Windows PowerShell. Next is the new possibility of converting between a Server Core installation of Windows Server 2012 and full installation of Windows Server 2012. Finally, Windows Server 2012 introduces network interface card (NIC) teaming, a fault resiliency feature that you are likely to configure soon after installation.
This section covers the following topics:
Deploying roles on remote servers.
Configuring online and offline images by using the DISM.exe utility
Converting between Server Core and full graphical user interface (GUI)
Configuring the Minimal Server Interface
Configuring NIC teaming
Installing roles and features
You already know you can use Server Manager to add or remove roles or features locally. As we saw in the last objective, you can also now use the new Install-WindowsFeature and Uninstall-WindowsFeature cmdlets to achieve these same tasks in Windows PowerShell.
Even more interesting, you can now use either Windows PowerShell or Server Manager to perform these tasks remotely.
Deploying features and roles on remote servers through
Windows PowerShell
In Windows Server 2012, you can deploy roles and features on remote servers. This feature is an important new functionality that is sure to be tested on the 70-417 exam.
For the following procedures, it is assumed that the remote computer is
the source and destination computers are located in the same Active Directory Domain Services domain.
For information on how to manage remote servers from Server Manager in
a workgroup environment, see “Add Servers to Server Manager” at http://technet.microsoft.com/en-us/library/hh831453.
To install roles and features on a remote server by using Windows PowerShell, follow these steps:
1. Type Get-WindowsFeature and then press Enter to view a list of available and installed roles and features on the local server. If the local computer is not a server, run Get-WindowsFeature -ComputerName <computer_name>, where computer_name represents the name of a remote computer that is running Windows Server 2012.The results of the cmdlet contain the command names of roles and features that you add to your cmdlet in step 4.
2. Type Get-Help Install-WindowsFeature and then press Enter to view the syntax and accepted parameters for the Install-WindowsFeature cmdlet.
3. Type the following and then press Enter, where feature_name represents the command name of a role or feature that you want to install (obtained in step 2), and computer_name represents a remote computer on which you want to install roles and features. Separate multiple values for feature_name by using commas. The Restart parameter automatically restarts the destination server if required by the role or feature installation.
Figure 1-3 shows an example of using this cmdlet to install a feature (NFS-Client) on a remote server (WS12-B).
Deploying features and roles on remote servers by using Server
Manager
If you prefer to use Server Manager to deploy roles and features to a remote server, you must first add the remote server to the Server Manager server pool.
To add a remote server in Server Manager, follow these steps:
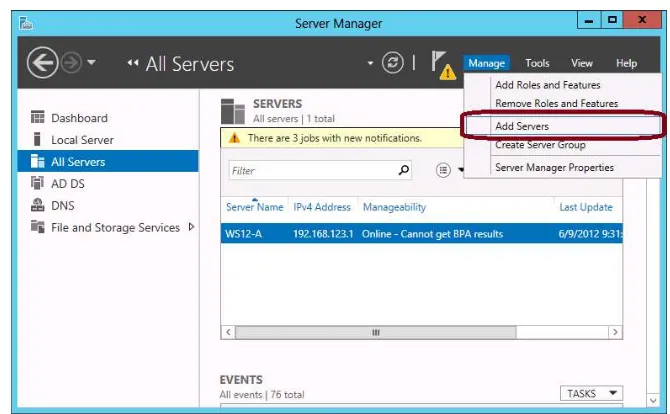
1. From the Manage menu, select Add Servers, as shown in Figure 1-4.
FIGURE 1-4 Adding a remote server to manage in Server Manager.
2. Do one of the following:
On the Active Directory tab, select servers that are in the current domain. Press Ctrl while selecting multiple servers. Click the right-arrow button to move selected servers to the Selected list.
On the DNS tab, type the first few characters of a computer name or IP address and then press Enter or click Search. Select servers that you want to add and then click the right-arrow button.
On the Import tab, browse for a text file that contains the DNS names or IP addresses of computers that you want to add, one name or IP address per line.
3. On the Active Directory tab, select servers that are in the current domain. Press Ctrl while selecting multiple servers. Click the right-arrow button to move selected servers to the Selected list.
4. When you are finished adding servers, click OK.
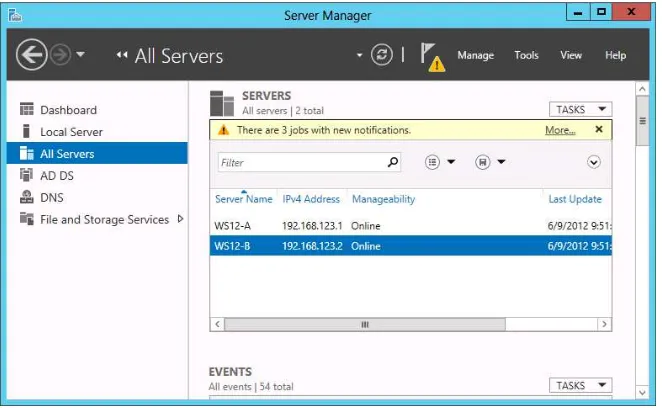
FIGURE 1-5 The remote server WS12-B has been added in Server Manager.
After you have added the remote server to the server pool, you can deploy features to it as you would to the local server.
To install roles and features on a remote server by using Server Manager, follow these steps:
1. From the Manage menu of Server Manager, select Add Roles And Features.
2. On the Before You Begin page, verify that your destination server and network environment are prepared for the role and feature you want to install. Click Next.
3. On the Select Installation Type page, select Role-Based Or Feature-Based Installation to install all parts of roles or features on a single server, or Remote Desktop Services Installation to install either a virtual machine–based desktop infrastructure or a session-based desktop infrastructure for Remote Desktop Services. The Remote Desktop Services Installation option distributes logical parts of the Remote Desktop Services role across different servers as needed by administrators. Click Next.
4. On the Select Destination Server page, select a server from the server pool. After you have selected the destination server, click Next.
5. Select roles, select role services for the role if applicable, and then click Next to select features.
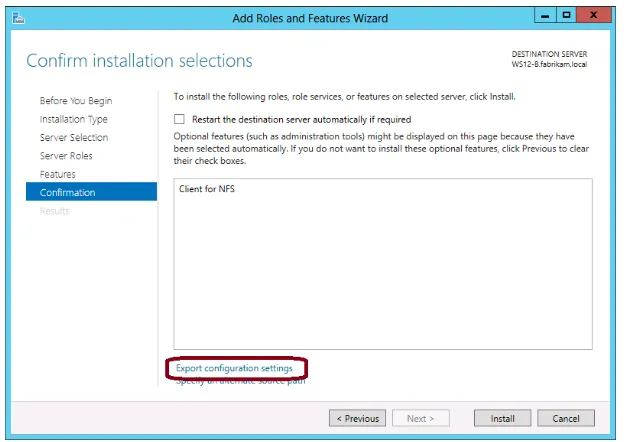
You can also export your selections to an XML-based configuration file that you can use for unattended feature installations with Windows PowerShell. To export the
configuration you specified in this Add Roles And Features Wizard session, click Export Configuration Settings, as shown in Figure 1-6, and then save the XML file to a convenient location.
FIGURE 1-6 Exporting an XML configuration file for use with Windows PowerShell.
Remember that you can use the Add Roles And Features Wizard to create server
configuration files that can later be used to perform unattended feature installations with Windows PowerShell.
7. After you click Install, the Installation Progress page displays installation progress, results, and messages such as warnings, failures, or postinstallation configuration steps that are required for the roles or features that you installed. In Windows Server 2012, you can close the Add Roles And Features Wizard while installation is in progress and view installation results or other messages in the Notifications area at the top of the Server Manager console. Click the Notifications flag icon to see more details about installations or other tasks that you are performing in Server Manager.
Deployment Image Servicing and Management
Servicing and Management (DISM) utility. DISM is an image configuration tool that first appeared in Windows 7 and Windows Server 2008 R2, and its functionality has expanded in Windows Server 2012. DISM replaces several deployment tools that were used in Windows Server 2008 and Windows Vista, including PEimg, Intlcfg, ImageX, and Package Manager.
In Windows 8 and Windows Server 2012, DISM helps you service WIM, VHD, and the new VHDX file types.
You can use DISM with .wim files to do the following:
Capture and apply Windows images
Append and delete images in a .wim file
Split a .wim file into several smaller files
You can use DISM with .wim, .vhd, or .vhdx files to do the following:
Add, remove, and enumerate packages
Add, remove, and enumerate drivers
Enable or disable Windows features
Upgrade a Windows image to a different edition
Prepare a Windows PE image
An important thing to know about DISM is that you can use it to service online images and offline images. Servicing online images is essentially the same as configuring the local running installation of Windows.
Windows PowerShell in Windows 8 and Windows Server 2012 includes a new module for DISM. You can review the cmdlets in this new module by typing the command Get-Command -Module Dism at a command prompt. For more information about the new DISM module in Windows 8 and Windows Server 2012, visit http://technet.microsoft.com/en-us/library/hh852126.
Add features to and remove features from an offline image with DISM
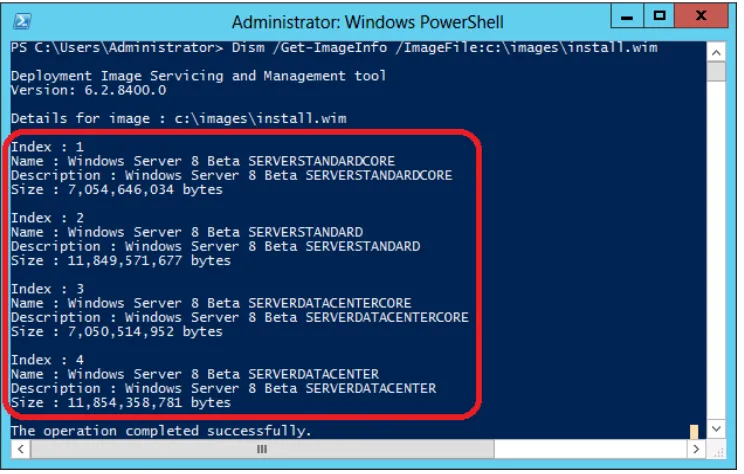
Before you can service an offline image, you need to mount the image in the file structure, specifying the image by index or name. In Windows Server 2012, you can find the image names and indexes within an image file by using DISM with the /Get-ImageInfo switch. For example, to see the images within an image file named Install.wim that is stored in C:\images, type the following:FIGURE 1-7 Obtaining image information from an image file.
Once you know the name or index of the desired image, you can mount it in a specified directory. For example, use the following command to mount the image with index 2 in the C:\images\offline directory:
At this point, you can use the /Get-Features switch if necessary to determine the command name of the relevant features or to determine which features are enabled on the image:
Finally, you can use DISM to point to the mounted image and enable a desired feature. You can use the /All argument to enable all the parent features in the same command. For
example, to enable the Remote-Desktop-Services role and all parent features, type the following:
If you want to remove a feature from or disable a feature on an offline image, use the /Disable-Feature switch. For example:
For more information on DISM in Windows Server 2012, visit
Converting a server with a GUI to or from Server Core
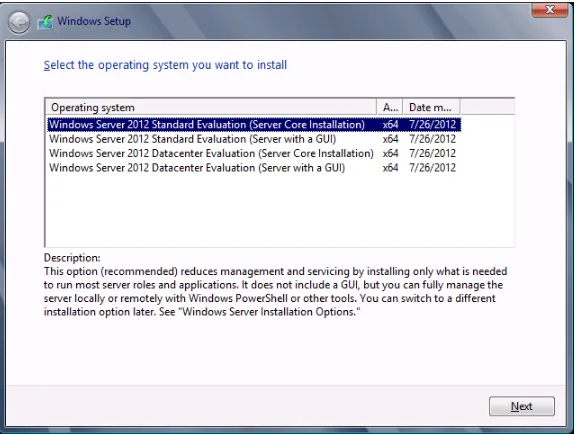
As in Windows Server 2008 and Windows Server 2008 R2, Windows Setup in Windows Server 2012 allows you to choose one of two installation types: Server Core Installation or Server With A GUI (also called a full installation), as shown in Figure 1-8. One of the more interesting new features in Windows Server 2012 is the ability to convert a full installation to a Server Core Installation and vice versa.
FIGURE 1-8 Windows Server 2012 includes a Server Core option and a Server with a GUI option.
You can switch between a Server Core installation and full installation in Windows Server 2012 because the difference between these installation options is contained in two specific Windows features that can be added or removed. The first feature, Graphical Management Tools and Infrastructure (Server-Gui-Mgmt-Infra), provides a minimal server interface and server management tools such as Server Manager and the Microsoft Management Console (MMC). The second feature, Server Graphical Shell (Server-Gui-Shell), is dependent on the first feature and provides the rest of the GUI experience, including Windows Explorer. In Figure 1-9, you can see these two features in the Add Roles And Features Wizard, on the Select Features page, beneath User Interfaces And Infrastructure.
FIGURE 1-9 Two features are responsible for the difference between the full installation and Server Core installation.
As shown in Figure 1-9, Desktop Experience is a third available GUI feature. It builds on the Server Graphical Shell feature and is not installed by default in the Server with a GUI installation of Windows Server 2012. Desktop Experience makes available Windows 8 client features such as Windows Media Player, desktop themes, and photo management.
You can also remove these graphical interface features in Windows PowerShell. If you have deployed a full installation of Windows Server 2012 and want to convert it to a Server Core installation, run the following Windows PowerShell command:
Remember that you only need to specify Server-Gui-Mgmt-Infra for removal to remove both this feature and Server-Gui-Shell. Once the graphical management tools and graphical shell have been removed, the server restarts. When you log back on, you are presented with the Server Core user interface.
Note that when you install these two features from Windows PowerShell, you must specify them both.
If you just want to configure basic settings in a Server Core installation of Windows Server 2012 as opposed to adding or removing entire features, you can use the Sconfig utility. This utility, which appeared in Windows Server 2008 R2, enables you to set the domain/workgroup, computer name, Remote Desktop, network settings, date and time, Windows activation, Windows Update, and other similar settings.
Configuring a server with Minimal Server Interface
The Server With A GUI option is made of two cumulative features in Windows Server 2012 that are built on top of Server Core. You have the option of installing only the first of these
FIGURE 1-10 The new Minimal Server Interface option makes Server Manager and other administrative tools available without a desktop or Start screen.
The relationship between the Minimal Server Interface and the Server with a GUI installation levels is illustrated in Figure 1-11.
FIGURE 1-11 Server-Gui-Shell is the difference between Server with a GUI and Minimal Server Interface.
When you configure the Minimal Server Interface, the following elements are removed from the full installation:
Desktop
Start screen
Windows Explorer
Windows Internet Explorer
The following management tools are available in the Minimal Server Interface:
Server Manager
Microsoft Management Console (MMC) and snap-ins
Subset of Control Panel
The Minimal Server Interface is a good option if you want to reduce the footprint of your installation but prefer not to be restricted to command-line-based management.
For more information about converting between installation options in Windows Server 2012, see “Server Core and Full Server Integration Overview” at
http://technet.microsoft.com/en-us/library/hh831758.aspx and “Windows Server Installation Options” at http://technet.microsoft.com/en-us/library/hh831786.aspx.
Configuring NIC teaming
NIC teaming, also known as Load Balancing and Failover (LBFO) is a new feature included in Windows Server 2012 that enables multiple network adapters on a server to be grouped into a team. NIC teaming has two purposes:
Ensuring the availability of network connectivity if one adapter fails
Aggregating network bandwidth across multiple network adapters
Before Windows Server 2012, implementing network adapter teaming on Windows Server required using third-party solutions from independent hardware vendors. However, network adapter teaming is now built into the Windows Server operating system and can therefore work across different NIC hardware types and manufacturers.
Windows NIC teaming supports up to 32 network adapters in a team and runs in three modes:
Static Teaming Also called Generic Teaming, this mode is based on IEEE 802.3ad draft v1 and is supported by most server-class Ethernet switches. It requires manual configuration of the switch and the server to identify which links form the team.
Switch Independent This mode allows each NIC in a team to connect to different switches.
LACP Also called Dynamic Teaming, this mode is based on IEEE 802.1ax and is supported by most enterprise-class switches. It allows teams to be automatically created through the Link Aggregation Control Protocol (LACP). LACP dynamically identifies links between the server and a specific switch. To use this mode, you generally need to enable LACP manually on the port of the switch.
FIGURE 1-12 Configuring NIC teaming in Server Manager.
In the NIC Teaming dialog box that opens, select the network adapters you want to team and then right-click and select Add To New Team, as shown in Figure 1-13.
In the New Team dialog box, shown in expanded mode in Figure 1-14, you can configure the teaming mode and other settings.
FIGURE 1-14 Configuring team properties.
FIGURE 1-15 A newly configured network team.
FIGURE 1-16 Cmdlets for NIC teaming.
For more information about NIC teaming in Windows Server 2012, see the NIC teaming overview at http://technet.microsoft.com/en-us/library/hh831648.aspx. For more in-depth information, search for the white paper titled “NIC Teaming (LBFO) in
Windows Server 8 Beta” on http://technet.microsoft.com.
Objective summary
The Dism.exe utility was introduced in Windows 7 and Windows Server 2008 R2. It enables you to service WIM files, VHD files, VHDX files, and online installations of Windows, including adding and removing features, packages, and drivers.
New to Windows Server 2012 is the ability to deploy roles and features to remote servers.
To perform this task in Windows PowerShell, use the following command:
To perform this task in Server Manager, you first need to add the remote server to the server pool. Then install the role or feature as you would to the local server.
In Windows Server 2012, you can convert between a Server Core installation and a full (Server With A GUI) installation. To do so, you can begin from a full installation and then type the following command in Windows PowerShell:
NIC teaming is a new feature in Windows Server 2012 that allows you to group two or more NICs to aggregate bandwidth and help ensure the availability of network connectivity. You can configure NIC teaming by using Server Manager or the New-NetLbfoTeam cmdlet.
Objective review
Answer the following questions to test your knowledge of the information in this objective. You can find the answers to these questions and explanations of why each answer choice is correct or incorrect in the “Answers” section at the end of the chapter.
1. You work in the IT department for Contoso.com, which has approximately 200 employees. Your manager has created a new image named Basic.wim that will be used to deploy Windows Server 2012. She has asked you to modify the image with an index of 1 within this image file so that the IIS-WebServer feature is disabled. You move the Basic.wim file from network storage to your server, which is running Windows Server 2012. Which of the following actions should you take next?
A. Use DISM with the /Mount-Image option.
B. Use DISM with the /Disable-Feature option.
C. Use the Uninstall-WindowsFeature cmdlet without the –Remove option.
D. Use the Uninstall-WindowsFeature cmdlet with the –Remove option.
2. You want to install Windows Server 2012 and configure an interface that includes Server Manager but not Windows Explorer. What should you do? (Choose two.)
A. Choose the Server Core installation of Windows Server 2012.
B. Choose the Server with a GUI installation of Windows Server 2012.
C. Remove the Graphical Management Tools and Infrastructure feature.
D. Add the Graphical Management Tools and Infrastructure feature.
3. You have built a new server with network adapters from two different manufacturers. You want to use these two adapters to provide resiliency for the server’s network connectivity, so that if one adapter fails, the other will continue to operate with the same configuration settings. What should you do?
A. Install the Network Load Balancing feature.
B. Install the Multipath I/O feature.
C. Use the New-NetLbfoTeam cmdlet.
Objective 1.3: Configure local storage
For the 70-417 exam, this objective is likely to focus on Storage Spaces, an interesting new feature that adds SAN-like flexibility to your storage. The topic of Storage Spaces can be broken down into primordial pools, new storage pools, and virtual disks.
This section covers the following topics:
Creating and configuring storage pools
Provisioning virtual disks
Designing Storage Spaces
Introducing Storage Spaces
Storage Spaces is a new feature in Windows Server 2012 that provides for a single server the same storage flexibility provided by a storage area network (SAN) by using inexpensive locally attached disks. Storage Spaces enables you to create storage pools from which you can provision storage as needed.
Once you’ve created a storage pool by using Storage Spaces, you can provision storage from the pool by creating virtual disks, also called logical unit numbers (LUNs). A virtual disk behaves like a physical disk except that it can span multiple physical disks within the storage pool.
Storage Spaces has the following requirements:
Windows Server 2012.
One physical drive is required to create a storage pool; a minimum of two physical drives is required to create a resilient mirror storage space.
A minimum of three physical drives is required to create a storage space with resiliency through parity or three-way mirroring.
Drives must be unpartitioned and unformatted.
Drives must have at least 10 GB capacity.
Drives can be attached either internally or externally (individually or in a just-a-bunch-of-disks [JBOD] enclosure). The following bus technologies are supported:
SATA (not possible to use in a failover cluster)
SCSI (not supported in a failover cluster)
Serial Attached SCSI (SAS) arrays that support SCSI Enclosure Services (SES)
Installing Storage Spaces
To install Storage Spaces, use the Add Roles And Features Wizard to add the File Server role service. This role service is found under File and iSCSI Services in the File and Storage Services role. You can also install the File Server role service by using Windows PowerShell as follows:
Storage Services, another role service of the File and Storage Services role, is always installed by default on Windows Server 2012 and provides general storage management functionality needed by other server roles.
To create a storage pool, Storage Spaces requires a server to have at least one attached physical disk of at least 10 GB without any partitions or volumes. Any physical disks that meet these two criteria are automatically added to what is called the server’s primordial pool. The primordial pool is the complete set of locally available disks from which a storage pool can be created. Figure 1-17 shows in Server Manager the primordial pools available to the server named WS12-A and WS12-B, respectively.
You can use Server Manager or Windows PowerShell to configure your storage pools from a primordial pool. To create a storage pool in Windows PowerShell, use the New-StoragePool cmdlet. To create a new storage pool by using Server Manager, first make sure that you have navigated to File and Storage Services\Volumes\Storage Pools. Then select New Storage Pool from the Tasks menu in the Storage Pools area, as shown in Figure 1-18.
FIGURE 1-18 Creating a new storage pool.
FIGURE 1-19 Selecting the physical disks to add to the storage pool.
Remember that if you want the storage pool to support failover clusters, you have to use SAS storage arrays that support SES.
For each disk that you add to the pool, you can choose one of the following allocation types:
Automatic This is the default setting. For this allocation type, the capacity on drives is set automatically.
Hot Spare Physical disks added as hot spares to a pool act as reserves that are not available for provisioning in the creation of virtual disks. If a failure occurs on a drive in a pool that has an available hot spare, the spare will be brought online to replace the failed drive.
Remember that hot spares are not available later for disk provisioning. If you want to add a hot spare to your storage pool and plan to create a mirrored drive later, you need at least three physical disks in the storage pool: one for the hot spare and two to support the mirror.
Creating virtual disks
Management, from which you can then create volumes. Note that a virtual disk is the representation of virtualized storage and should not be confused with the VHD that is used in the context of Hyper-V or the iSCSI Target Server.
To create a virtual disk in Windows Powershell, use the New-VirtualDisk cmdlet.
To create a virtual disk in Server Manager, complete the following steps:
1. In Server Manager, choose File And Storage Services and then Storage Pools.
2. Locate a storage pool (not a primordial pool) that you want to use to support the new virtual disk.
3. Right-click the storage pool and select New Virtual Disk to start the New Virtual Disk Wizard, as shown in Figure 1-20.
FIGURE 1-20 Creating a new virtual disk in a storage pool.
4. On the first pages of the wizard, verify that the correct server and storage pool are selected and provide a name and description for the new virtual disk.
5. On the Select The Storage Layout page (Figure 1-21), specify one of the following three data redundancy types for the virtual disk:
Parity A parity virtual disk is similar to a hardware Redundant Array of Inexpensive Disks (RAID5). Data, along with parity information, is striped across multiple physical disks. Parity enables Storage Spaces to continue to service read and write requests even when a drive has failed. A minimum of three physical disks is required for a parity virtual disk. Note that a parity disk cannot be used in a failover cluster.
Mirror A mirror virtual disk maintains either two or three copies of the data it hosts: two data copies for two-way mirror spaces and three data copies for three-way mirror spaces. All data writes are repeated on all physical disks to ensure that the copies are always current. Mirror spaces are attractive due to their greater data throughput and lower access latency compared to parity disks.
FIGURE 1-21 Selecting a storage layout.
6. On the Specify The Provisioning Type page, choose one of the following provisioning types:
Thin Thin provisioning is a mechanism that enables storage capacity to remain unallocated until datasets require the storage. You specify a maximum size for the virtual disk, and the capacity of the virtual disk grows as needed. Thin provisioning optimizes utilization of available storage, but it adds a few extra I/Os that can cause an occasional latency increase.
Expect to see a question about thin provisioning on the 70-417 exam.
7. On the Specify The Size Of The Virtual Disk page, choose a size for the virtual disk.
8. Confirm all the selections and then click Create.
The new virtual disk appears in both Server Manager and Disk Management. The view in Server Manager is shown in Figure 1-22.
FIGURE 1-22 A new virtual disk created from a storage pool in Server Manager.
Objective summary
Storage Spaces is a new feature in Windows Server 2012 that provides flexible provisioning of local storage to a server.
All locally attached, unpartitioned physical disks with a capacity of at least 10 GB are automatically added to a server’s primordial pool. A primordial pool is the complete set of locally available disks from which a storage pool can be created.
with parity later from a storage pool, you need to add at least three physical disks to that storage pool. In addition to these requirements, you need to add one physical disk to a storage pool for each hot spare you want to be available to the storage.
Thin provisioning is a new feature in Windows Server 2012 that enables you to create drives that don’t require all their storage capacity to be allocated immediately. Thin provisioning optimizes available storage capacity for virtual disks.
When you create new virtual disks from a storage pool, they appear in Disk Management as new, unallocated disks.
Objective review
Answer the following questions to test your knowledge of the information in this objective. You can find the answers to these questions and explanations of why each answer choice is correct or incorrect in the “Answers” section at the end of the chapter.
1. You want to create a storage pool that can be used with a failover cluster. Which of the following disk types can you use?
A. Internal SCSI
B. Serial Attached SCSI
C. Internal SATA
D. iSCSI
2. You want to create a storage pool that maximizes available storage capacity and includes built-in fault tolerance and data resiliency. You also want to include a hot spare so that if a physical disk fails, another will be brought online to replace it.
Which configuration should you choose for your storage pool? Assume you want to use the minimum number of physical disks possible.
A. Three physical disks and a mirror layout
B. Three physical disks and a parity layout
C. Four physical disks and a mirror layout
D. Four physical disks and a parity layout
3. You want to increase the size of a server’s primordial pool. Which of the following disks can you use? (Choose all that apply.)
A. A 20 GB external USB drive
B. A 12 GB internal SCSI drive
C. An 8 GB SATA drive
Thought experiment
You work as a network administrator in a company named Fabrikam.com. The Fabrikam Finance department requires a new server to support a web application that runs on Windows Server 2012. Your manager asks you to help design and plan for the server. She specifies the following requirements:
Operating system installation and configuration The application requires a GUI to be installed. The server should not be limited to command-line administration, but it can be managed through remote administration. Within these limitations, the attack surface of the server must be minimized, and performance must be optimized.
Network The network requires a single network connection with fault tolerance, so if one adapter fails there will be no loss in connectivity, and the IP address will not change.
Storage You have an eight-bay disk array and eight 1 TB SATA disks available to attach to the new server. The disk array will be reserved for data storage. Your manager wants to use as few of these disks as possible while using the Storage Spaces feature to meet the following storage requirements:
Virtual Disk 1: Triple mirrored with a capacity of 100 GB
Virtual Disk 2: Parity disk with a capacity of 200 GB
One hot spare for each storage pool
How do you answer the following design questions from your manager? You can find the answers to these questions in the “Answers” section at the end of the chapter.
1. How should you reconcile the requirement for a GUI during installation with the need to minimize the attack surface?
2. Is this server an ideal candidate for a Minimal Server Interface configuration? Why or why not?
3. What are two possible solutions to meet the needs for fault-tolerant network connectivity?
4. What is the minimum number of physical disks you need to reserve for the application? What is the minimum number of storage pools you need?
Answers
Objective 1.1: Review
1. Correct Answers: B and C
A. Incorrect: You cannot install Windows Server 2012 on the existing server because Windows Server 2012 requires a 64-bit CPU.
B. Correct: You need to replace the existing server with another that has a 64-bit CPU.
C. Correct: You can use the Uninstall-WindowsFeature cmdlet with the –Remove option in Windows PowerShell to delete the binaries of unused roles and features.
D. Incorrect: The DISM utility does not completely remove feature files from disk.
2. Correct Answers: A and B
A. Correct: This command will delete from disk all the feature files for the Web Server role.
B. Correct: This command will delete from disk all the feature files for the Web Server role except the Manifest file.
C. Incorrect: You should not execute this command because it will remove the File Server role service from the server, and the server’s only stated function is that of a file server.
D. Incorrect: You should not execute this command because it will remove the File Server role service from the server, and the server’s only stated function is that of a file server.
3. Correct Answer: A
A. Correct: When you specify a path to source files with the Install-WindowsFeature cmdlet, you need to use the WIM: prefix at the beginning and specify an image index at the end.
B. Incorrect: You need to use the WIM: prefix before the path to the source.
C. Incorrect: You need to specify an image index after the path.
D. Incorrect: You need to use the WIM: prefix before the path and specify an image index after the path.
Objective 1.2: Review
1. Correct Answer: A
A. Correct: You need to mount the image file before you can service it.
B. Incorrect: You need to mount the image before you can disable any feature in it.
D. Incorrect: You can use Uninstall-WindowsFeature on a VHD file, but not on a WIM file.
2. Correct Answers: A and D
A. Correct: The interface requirements describe the Minimal Server Interface. To configure this interface type, you can either start with a Server Core installation and add Graphical Management Tools and Infrastructure or start with a Server with a GUI and remove Server Graphical Shell. Removing Server Graphical Shell is not an answer choice, so you have to start with a Server Core.
B. Incorrect: Removing Server Graphical Shell is not an answer choice, so you cannot start with a full installation of Windows Server 2012.
C. Incorrect: Removing the Graphical Management Tools and Infrastructure feature would transform a full installation into a Server Core installation. The Server Core installation would not make Server Manager available.
D. Correct: The Graphical Management Tools and Infrastructure feature includes Server Manager and some other basic administrative tools, but it does not include Windows Explorer. Adding this feature to a Server Core installation would result in the desired configuration.
3. Correct Answer: C
A. Incorrect: Network Load Balancing is used to configure many different servers to answer requests for a service at a single address.
B. Incorrect: Multipath I/O is used to provide multiple data paths to a storage device.
C. Correct: This cmdlet is used to create a new NIC team. NIC teaming is used to provide failure resiliency to physical network connections.
D. Incorrect: This cmdlet is used to set a profile to a network connection. It is not used to provide failure resiliency to physical network connections.
Objective 1.3: Review
1. Correct Answer: B
A. Incorrect: SCSI disks cannot be used in failover clusters.
B. Correct: Serial-attached SCSI (SAS) disks can be used to create a storage pool that can support a failover cluster.
C. Incorrect: SATA disks cannot be used in failover clusters.
2. Correct Answer: D
A. Incorrect: You want a parity layout so that the storage capacity is maximized.
B. Incorrect: You need four physical disks: three to support the parity layout and a fourth for the hot spare.
C. Incorrect: You want a parity layout so that the storage capacity is maximized.
D. Correct: You want a parity layout so that the storage capacity is maximized, and you need four physical disks: three to support the parity layout and a fourth for the hot spare.
3. Correct Answers: A and B
A. Correct: You can use external USB drives in storage pools as long as they are at least 10 GB.
B. Correct: You can use SCSI drives in storage pools as long as they are at least 10 GB.
C. Incorrect: You can use SATA drives in storage pools, but they need to be at least 10 GB.
D. Incorrect: You can use Serial-attached SCSI drives in storage pools, but they need to be at least 10 GB.
Thought experiment
1. You can first install Windows Server 2012 with a full GUI and then install the application. After you install the application, you can remove the GUI features.
2. This is not an ideal candidate for a Minimal Server Interface configuration because even though its administration should not be restricted to the command line, it can be managed through a GUI on remote computers. The requirements of a minimal attack surface and optimal performance suggest that a Server Core installation is a better fit for this scenario.
3. Two possible solutions to meet the requirements for network fault tolerance are the built-in NIC teaming feature of Windows Server 2012 and NIC teaming provided by an independent hardware vendor of network adapters.
C H A P T E R 2
Configure server roles and
features
The 70-417 exam distills three other exams (70-410, 70-411, and 70-412) into one exam that is concentrated on new features. This chapter is a case in point. The Configure Server Roles and Features domain is taken from the 70-410 exam, but only one of the three original objectives in this domain includes significant changes since the last version of Windows Server. Therefore, the questions you see from the Configure Server Roles and Features domain on the 70-417 exam will fall only within Objective 2.1: the topic of remote management.
Objectives in this chapter:
Objective 2.1: Configure servers for remote management.
Objective 2.1: Configure servers for remote
management
Windows Server 2012 is much better suited to administering remote servers on the network than any of its predecessors. It’s not only because Windows Server 2012 offers new capabilities in remote management, it’s also because, behind the scenes, technologies have been revised to simplify remote management.
As you study this section for the exam, above all do not rely on what you learned for Windows Server 2008 and Windows Server 2008 R2. Some features might look the same, but they have changed. Examples include the inbound rules you may use to enable various types of remote management, the function of a particular command, and the names of the relevant Group Policy settings.
This section covers the following topics:
Remote management with Server Manager
Configuring various server types for remote management
Managing multiple servers by using Server Manager
The new Server Manager in Windows Server 2012 reveals big changes, both cosmetic and functional, and some of these changes are relevant for the 70-417 exam. The most significant of these new features is that you can now use Server Manager to manage multiple servers, as shown in Figure 2-1. You can manage multiple servers through the All Servers option in the navigation pane. You can also create server groups, which are custom pages in Server Manager that allow you to manage subsets of your servers, such as all your DNS servers. You can also multiselect servers on Server Manager pages, which enables you to perform some actions simultaneously on all the servers you selected.
FIGURE 2-1 Server Manager is a multiserver management tool in Windows Server 2012.
See Chapter 1, “Install and configure servers,” for information about how to
add servers to the All Servers page in Server Manager.
Remote management tasks through All Servers
FIGURE 2-2 Remote management tasks in Server Manager.
FIGURE 2-3 Remote management options on a domain controller.
None of the utilities shown in the shortcut menu in Figure 2-3 are new to Windows Server 2012. However, it’s a good idea to review them before the exam. You probably have seen exam questions that try to intimidate you by putting an obscure tool in an incorrect answer choice. If you review these tools, you will be able to recognize and eliminate these choices without stress.
On the All Servers page in Server Manager, you can use the following sections to perform everyday maintenance on the status of your servers:
Events Use this section to check for errors and warnings on your servers without having to open a console on the remote machine.
Services Use this section to check for stopped services.
Best Practices Analyzer Use this section to compare the server configuration to a Best Practices standard.
over time. To start CPU and memory performance monitoring, first right-click a server and select Start Performance Counters, as shown in Figure 2-4.
FIGURE 2-4 Monitoring CPU and memory performance.
Roles And Features Use this section to verify the installed roles and features on your servers. You can also use this section to remove roles and features.
The good news about remote management in Windows Server 2012 is that it’s enabled and configured by default. You can start remotely managing servers out of the box, as long as they are running Windows Server 2012, they are in the same domain, and you have the proper administrative privileges. This ease of remote management is a welcome change from both Windows Server 2008 and Windows Server 2008 R2, in which you needed to configure a server to manage it remotely with administrative tools.
Now the bad news. The fact that remote management is easy in Windows Server 2012 doesn’t mean that questions about this topic on the exam will be easy. It’s the exam writers’ job to think of problems that require a reasonable amount of expertise to solve. For remote management, these problems are likely to include scenarios in which you need to reenable Windows Server 2012 for remote management at the command line, enforce remote management settings through Group Policy, and create proper firewall settings on downlevel servers such as those running Windows Server 2008.
Remote management types: DCOM and WinRM
For both local and remote management, Windows Management Instrumentation (WMI) provides an administrative interface to scripts, programs, and built-in Windows tools. For remote management, WMI-based queries and configuration commands are typically passed through one of two protocols, Distributed Component Object Model (DCOM) or Windows Remote Management (WinRM). DCOM is an older, proprietary technology for software component communication across networks, and WinRM is the Microsoft implementation of an independent standard called WS-Management Protocol.
WMI OVER DCOM
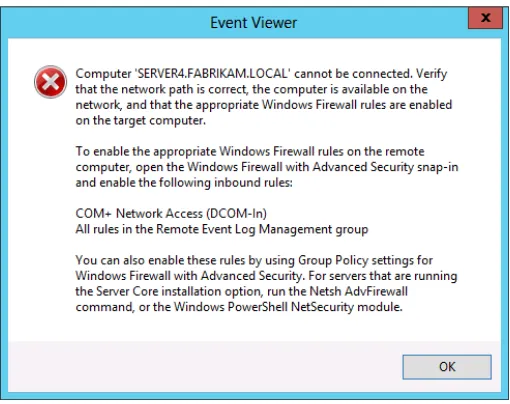
Traditional console-based tools such as Microsoft Management Console (MMC) snap-ins and Computer Management rely on WMI over DCOM when used for remote management. When used remotely, DCOM tools require only that you open certain ports on the firewall of the server you want to manage. If you don’t open those ports, you get a message like the one shown in Figure 2-5. This particular error message is helpful because it informs you exactly which predefined inbound rules you need to enable in the Windows Firewall with Advanced Security tool on the remote server:
COM+ Network Access (DCOM-In)
All rules in the Remote Event Log Management group
These two sets of rules enable you to connect to most MMC consoles in Windows Server 2012. Other inbound rules you might need to create are Remote Volume Management (to use Disk Management remotely) and Windows Firewall Remote Management (to use Windows Firewall with Advanced Security remotely).
FIGURE 2-5 If you get this message, you have likely tried to use an MMC console for remote management without opening the proper ports.
WMI OVER WINRM
The second type of protocol for accessing WMI is WinRM. WinRM isn’t new, but within Windows Server there’s been a movement toward WinRM-based tools and away from DCOM since Windows Server 2008. WinRM, as you might remember, is a Windows service. The most notable tools that use WinRM for remote management are Windows PowerShell, WinRS (Windows Remote Shell), and Server Manager in Windows Server 2012.
From an exam standpoint, it’s important to know that because WinRM is a service, when a WinRM tool fails, the underlying cause could be that the WinRM service has stopped. (Note that WinRM by default starts automatically in Windows Server 2008, Windows Server 2008 R2, and Windows Server 2012.)
Reenabling Windows Server 2012 for remote management through
Server Manager
As mentioned earlier in this chapter, remote management is enabled by default in Windows Server 2012. This behavior is governed in the GUI by the Remote Management property in Server Manager. However, this property enables only WinRM-based remote management, not DCOM-based administration. As a result, by default you can open a Windows PowerShell prompt on a remote server running Windows Server 2012 or restart a remote server running Windows Server 2012 because both of these options rely on WinRM. However, you receive an error message if you attempt to open Computer Management without opening the needed ports on the remote server, even though this option appears on the shortcut menu of a server that has been added to Server Manager (as shown in Figure 2-2 and Figure 2-3).
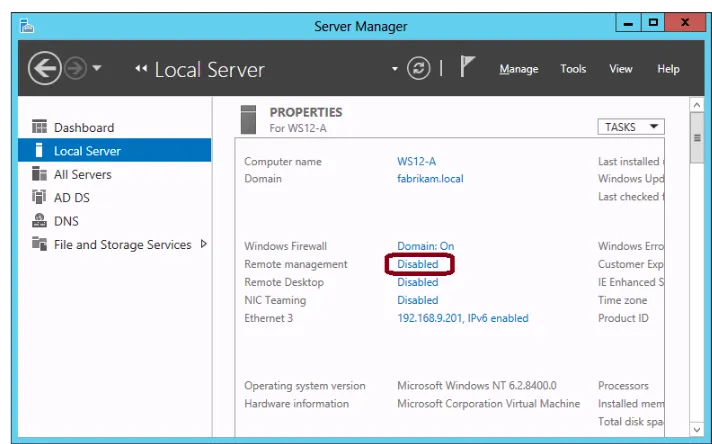
If you discover that you aren’t able to use Server Manager to remotely manage a server running Windows Server 2012, it’s possible that remote management has been disabled manually. If the server is running either a Server with a GUI installation or Minimal Server Interface, you can reenable this functionality in the Server Manager interface on that remote server. To do so, perform the following steps:
1. In Server Manager, in the Properties area of the Local Server page, click the hyperlink for the Remote Management property, as shown in Figure 2-6.
FIGURE 2-6 Reenabling remote management for Server Manager.
Although you need to know how to perform this quick procedure, it might be a bit too straightforward to appear in an exam question. It’s more likely you will see a question in which you need to know how to reenable remote management at the command prompt:
If you want to disable remote Server Manager management, type the following:
You can also use Configure-SMRemoting -Get to view the current remote management setting on the server.
Note also that in previous versions of Windows Server, remote Server Manager management required many open ports, and Configure-SMRemoting was a Windows
PowerShell script that opened all those ports. In Windows Server 2012, remote Server Manager management relies only on WinRM for most features (such as deploying roles, restarting, and Windows PowerShell) and on DCOM for some additional features (such as Computer Management). Consistent with this more efficient remote management method, Configure-SMRemoting configures only WinRM in Windows Server 2012, and is now the equivalent of the command Winrm Quickconfig. Like when you enable remote management in the interface or by using Winrm Quickconfig, if you enable remote management by using Configure-SMRemoting, you still need to enable the DCOM ports manually later if you want more complete remote management functionality by using MMC consoles.
ENABLING REMOTE MANAGEMENT ON SERVER CORE WITH SCONFIG
Sconfig is a text-based configuration tool that is available in the Server Core version of Windows Server. Sconfig first appeared in Windows Server 2008 R2, so if you received your MCTS in Windows Server 2008, you might have missed this handy utility.
FIGURE 2-7 The Sconfig tool makes it easy to enable remote management in Server Core.
Again, like Winrm Quickconfig and Configure-SMRemoting, enabling remote management in Sconfig configures only WinRM-based remote management.
Local administrator accounts other than the built-in Administrator account might not have rights to manage a server remotely, even if remote management is enabled. The Remote User Account Control (UAC) LocalAccountTokenFilterPolicy registry setting must be configured to allow local accounts of the Administrators group other than the built-in Administrator account to remotely manage the server.
Configuring remote management of earlier versions of
Windows Server
Server Manager can be used to remotely administer computers running versions of Windows Server older than Windows Server 2012. For Windows Server 2008 and Windows Server 2008 R2, Server Manager can be used to perform many of the tasks available in Server Manager, with the notable exception of adding or removing roles. To manage remote servers that are running Windows Server 2008 or Windows Server 2008 R2, you must first install the following updates, in the order shown:
1. .NET Framework 4
2. Windows Management Framework 3.0
3. The performance update associated with Knowledge Base (KB) article 2682011 (or a superseding update), which enables Server Manager to collect performance data from Windows Server 2008 and Windows Server 2008 R2.
Installing these updates makes these operating systems compatible with Server Manager in Windows Server 2012. To configure the servers for remote management, run the winrm quickconfig command and (optionally) create the inbound firewall rules needed to support MMC traffic.
For servers running Windows Server 2003 SP2, Server Manager can indicate only whether a server is online or offline.
Using Group Policy to enable remote management
The most efficient way to configure remote management on multiple servers is to use Group Policy. Through Group Policy you can achieve two things: create WinRM listeners on IP address ranges of your choice and create inbound firewall rules allowing WinRM and DCOM traffic. These steps are described in the following procedure:
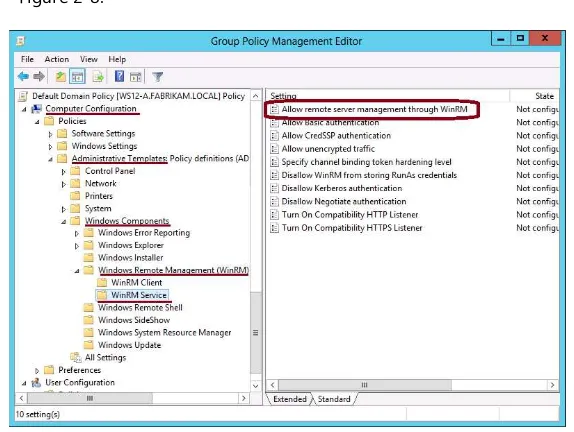
1. In a Group Policy object (GPO) editor, navigate to Computer
Configuration\Administrative Templates\Windows Components\Windows Remote Management and then select WinRM Service. This location within a GPO is shown in Figure 2-8.
FIGURE 2-8 Configuring WinRM listeners by using Group Policy.
A similar policy with a different name existed in previous versions of Windows Server. This policy is new and expanded in Windows Server 2012. Expect to see a question about it on the 70-417 exam.
3. In the dialog box that opens (shown in Figure 2-9), select Enabled.
FIGURE 2-9 Configuring WinRM in Group Policy.
4. In the IPv4 Filter and IPv6 Filter text boxes, type the IP addresses on which you want to enable remote management through WinRM. If you want to enable remote
management on all IP addresses, type *.
5. Click OK.
6. In the GPO console tree, navigate to Computer Configuration\Windows
Settings\Security Settings\Windows Firewall With Advanced Security\Windows Firewall With Advanced Security.
7. Right-click Inbound Rules and then click New Rule.
8. In the New Inbound Rule Wizard, on the Rule Type page, select Predefined.
10. On the Predefined Rules page, click Next to accept the new rules.
11. On the Action page, leave Allow The Connection as the default selection and then click Finish.
12. Repeat steps 7 through 11 to create new inbound rules for the following predefined rule types:
Windows Remote Management
COM+ Network Access
Remote Volume Management
Windows Firewall Remote Management
A GPO configured with these inbound firewall rules is shown in Figure 2-10.
FIGURE 2-10 Firewall rules for remote management.
Remote Server Administration Tools for Windows 8
Objective summary
Remote management based on the WinRM service is enabled and configured by default in Windows Server 2012. This is a change from earlier versions of Windows Server.
Server Manager in Windows Server 2012 enables you to manage multiple servers, including deploying roles to remove servers and opening a remote Windows PowerShell session.
MMC consoles rely on DCOM as opposed to WinRM, so you need to enable different inbound firewall rules to use them for remote management. The number of inbound rules you need to enable has been greatly reduced in Windows Server 2012.
Servers running previous versions of Windows Server can be managed remotely in Server Manager. To take full advantage of the administrative tasks and information available, you need to update these servers with .NET Framework 4 and Windows Management Framework 3.0.
The best way to configure multiple servers for remote management is to use Group Policy. By using Group Policy, you can configure WinRM and create all the inbound firewall rules you need to support your remote management.
Objective review
Answer the following questions to test your knowledge of the information in this objective. You can find the answers to these questions and explanations of why each answer choice is correct or incorrect in the “Answers” section at the end of the chapter.
1. A server named SC2012 is running a Server Core installation of Windows Server 2012. You want to manage SC2012 remotely by using Server Manager.
Which of the following will not help you achieve your goal?
A. Configure-SMRemoting.exe
B. Sconfig.exe
C. winrm quickconfig
D. Repadmin.exe
2. Your company network includes 25 servers running either Windows Server 2012 or Windows Server 2008 R2 in a single domain. The servers running Windows Server 2008 R2 have been updated with Windows Management Framework 3.0. You want to configure all these servers for remote management by using Windows PowerShell. What should you do? (Choose all that apply.)
A. Enable the Allow Remote Server Management Through WinRM setting in Group Policy.