Building Dynamic Web 2.0
Websites with Ruby on Rails
Create database-driven dynamic websites with this
open-source web application framework
Building Dynamic Web 2.0 Websites with Ruby on Rails
Copyright © 2008 Packt Publishing
All rights reserved. No part of this book may be reproduced, stored in a retrieval system, or transmitted in any form or by any means, without the prior written permission of the publisher, except in the case of brief quotations embedded in critical articles or reviews.
Every effort has been made in the preparation of this book to ensure the accuracy of the information presented. However, the information contained in this book is sold without warranty, either express or implied. Neither the author, Packt Publishing, nor its dealers or distributors will be held liable for any damages caused or alleged to be caused directly or indirectly by this book.
Packt Publishing has endeavored to provide trademark information about all the companies and products mentioned in this book by the appropriate use of capitals. However, Packt Publishing cannot guarantee the accuracy of this information.
First published: March 2008
Production Reference: 1200308
Published by Packt Publishing Ltd. 32 Lincoln Road
Olton
Birmingham, B27 6PA, UK.
ISBN 978-1-847193-41-4
www.packtpub.com
Credits
Author
A.P. Rajshekhar
Reviewer
Walt Stoneburner
Senior Acquisition Editor
Douglas Paterson
Development Editor
Ved Prakash Jha
Technical Editor
Mithun Sehgal
Editorial Team Leader
Mithil Kulkarni
Project Manager
Abhijeet Deobhakta
Project Coordinator
Zenab Kapasi
Indexers
Hemangini Bari Monica Ajmera
Proofreader
Angie Butcher
Production Coordinator
Shantanu Zagade
Cover Work
About the Author
A.P. Rajshekhar
, Senior Developer with Vectorform, has worked onenterprise-level web applications and game development. His endeavors include the development of a Learning Management System, Supply Management Solution, and Xbox-based games. He holds a Masters Degree in Computer Applications. He is a regular contributor to the Devshed Portal on topics ranging from server-side development (JEE/.Net/RoR) to mobile (Symbian-based development) and game development (SDL and OpenGL) with a total readership of more than 1.4 million.
Authoring a book is not an easy feat. However, the help and
About the Reviewer
Walt Stoneburner
is a software architect with over 20 years of commercial application development and consulting experience. Fringe passions involve quality assurance, configuration management, and security. If cornered, he may actually admit to liking statistics and authoring documentation as well.He's easily amused by programming language design, collaborative applications, and ASCII art. Self-described as a closet geek, Walt also evaluates software products and consumer electronics, draws cartoons, produces photography, writes humor pieces, performs slight of hand, enjoys game design, and can occasionally be found on ham radio.
Walt may be reached directly via email at [email protected]. He publishes a tech and humor blog called the Walt-O-Matic at http://www.wwco.com/~wls/blog/. Rumors suggest that some of his strange videography may be found on iTunes.
Currently he is employed at Business & Engineering Systems Corporation as a lead engineer developing advanced software solutions for knowledge management.
Table of Contents
Preface
1
Chapter 1: Getting Started with Ruby and RoR
5
Ruby and RoR—The Next Level in Dynamic Web Development 5
Ruby 6
Ruby on Rails (RoR) 7
Philosophy 7
Features 8
Installing and Configuring Ruby and RoR 9
Manual Installation 9
Downloading and Installing Ruby 10
Updating Gem 13
Installing RoR 14
One-Click RoR Installation 15
Download and Unzip the Instant Rails 16
Configure Instant Rails Installation 16
Testing the Installation 19
Ruby 19
RoR 19
Summary 24
Chapter 2: Getting to Know Ruby and RoR
25
Ruby—the Basics 25
Classes, Attributes, Methods, and Objects 26
Classes 26
Attributes 27
Methods 28
Objects 30
Inheritance 31
Modules 32
Data Types 32
Number 33
Float 33
Blocks and Iterators 34
RoR—Concepts and Components 39
RoR is a Ruby-Based Framework 39
RoR Implements MVC Pattern 40
Active Record 40
Action View 42
Action Controller 43
Hello World—the RoR Way 45
Setting up the Application Structure 45
Adding the First Controller Class 47
Defining the Action Method 48
Adding the View Template 49
Testing the Application 50
Summary 51
Chapter 3: TaleWiki—The Basic Setup
53
Understanding the Requirements 53
System Requirements 54
Module-Specific Requirements 55
Managing the Stories 55
Designing the Database 56
Understanding the Conventions 57
Designing the E-R Model 58
Defining the Schema 61
Creating the Tables 62
TaleWiki—Developing the Tale Management Module 64
Creating the Application Structure 64
Generating the Scaffolds 65
Customizing the Model 68
Customizing the Controller 73
Refining the View 75
Testing the Application 79
Summary 84
Chapter 4: Managing the Users
85
Understanding the Requirements 85
Managing the User 86
Deriving the Schema 92
Creating the Tables 93
Developing the User Management 94
Developing the Role Management 95
Developing the User Management Functionality 98
Testing the Functionalities 104
Summary 109
Chapter 5: Gathering User Comments
111
Understanding the Requirements 111
Login Management 112
Managing the Comments 112
Designing the Database 113
Designing the E-R Model 113
Deriving the Schema 115
Creating the Tables 116
Developing the Login Management Module 116
Creating the Login Page 117
Implementing the Authenticate method 118
Setting up the Session 120
Applying Authorization 121
Tying Up the Loose Ends 123
Developing the Comment Management Module 124
Generating the Scaffold 125
Modifying the Model 125
Refining the View 127
Customizing the Controller 129
Testing the Module 130
Summary 135
Chapter 6: Setting up the Template
137
Understanding Migration 137
Generating Migration Classes 138
Editing the Generated Classes 139
Running the Migration 142
Customizing the Template 143
Defining the Layout 143
Customizing the Layout of the Login Page 143
Defining the Master Layout 148
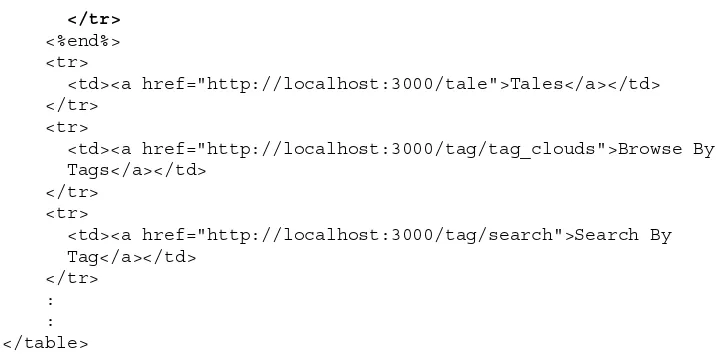
Setting up the Navigation 152
Testing the Application 155
Summary 156
Chapter 7: Tagging the Tales
157
Selecting a Plug-in for Tag Management 159
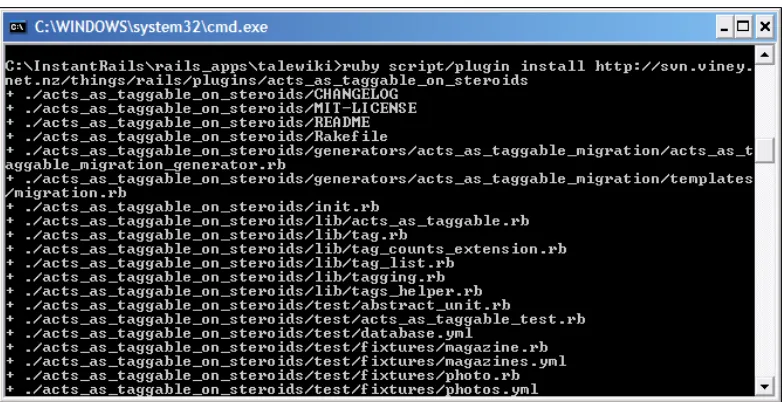
Installing the Plug-in 159
Setting up Tables Required by the Plug-in 161
Developing the Tag Management Module 163
Adding a Tag 163
Visualizing the Tag Cloud 166
Searching By Tag 169
Testing the Modifications 172
Summary 175
Chapter 8: Enhancing User Experience with Ajax
177
Understanding the Requirements 177
Implementing Ajax 178
What is Ajax? 178
How Ajax and RoR are Related 179
Implementing the Live Search 180
Specify the Location to Display the Result 180
Use the observe_field Helper 181
Modify the Action Method 183
Implementing the In-line Editing 183
Marking the Fields for In-line Editing 184
Set up the Controller 187
Testing the Modifications 188
Summary 190
Chapter 9: Developing the Interface for Administration
191
Understanding the Requirements 191 Implementing the Functionalities 192
Modification of the Deletion of Tales 192
Providing Access to All the Functionalities of the Comment Management
Module 194
Implementing Auto-Complete for the User name 195
Implementing Search 197
Testing the Modifications 199
Summary 204
Chapter 10: Deploying the TaleWiki
205
Understanding the Production Environment 205
Development Mode 206
Test Mode 206
Production Mode 206
Changing to the Production Environment 207
Points to Consider 210
Summary 210
Preface
Ruby on Rails is an open-source web application framework ideally suited to building business applications, accelerating and simplifying the creation of database-driven websites. It has been developed on the Ruby platform.
This book is a tutorial for creating a complete website with Ruby on Rails (RoR). It will teach you to develop database-backed web applications according to the Model-View-Controller pattern. It will take you on a joy ride right from installation to a complete dynamic website. All the applications discussed in this book will help you add exciting features to your website. This book will show you how to assemble RoR's features and leverage its power to design, develop, and deploy a fully
featured website.
What This Book Covers
Chapter1 gives you an overview of the features of Ruby and RoR, as well as providing the various ways of installing, configuring, and testing both Ruby and RoR.
Chapter2 introduces you to the basics of Ruby as well as the main concepts and components of RoR.
Chapter3 makes you understand the design of tables according to the conventions of RoR, creation of scaffolds for tables, and changing the scaffolds according to the requirements.
Chapter4 gives you details about how to set up the User Management module for the website called TaleWiki.
Chapter6 introduces you to the Migrations and Layouts involved in setting up the template for TaleWiki.
Chapter7 describes the tagging functionality being implemented for the enhanced search usability.
Chapter8 provides you with the implementation of AJAX for TaleWiki.
Chapter 9deals with the development of an interface for the administration.
Chapter10 gives you the steps for deploying the website.
What You Need for This Book
Operating System: Windows 2000 or above / Redhat Fedora core 1.0 or above
Database: MySQL 4.9 or above Editor: Notepad/Vim or Emacs
Browser: Firefox 1.5 or above/ Internet Explorer 6.0 or above
Conventions
In this book, you will find a number of styles of text that distinguish between different kinds of information. Here are some examples of these styles, and an explanation of their meaning.
There are three styles for code. Code words in text are shown as follows: "For example, to add instance attributes named author and genre to the Tale class, you will do it as follows:"
A block of code will be set as follows:
class Tale @author @genre @tale_body end
When we wish to draw your attention to a particular part of a code block, the relevant lines or items will be made bold:
Any command-line input and output is written as follows: c:\InstantRails\rails_apps\ > rails talewiki
New terms and important words are introduced in a bold-type font. Words that you see on the screen, in menus or dialog boxes for example, appear in our text like this: "In the next page, without entering any data, click on theIn the next page, without entering any data, click on the Create button.""
Important notes appear in a box like this.
Tips and tricks appear like this.
Reader Feedback
Feedback from our readers is always welcome. Let us know what you think about this book, what you liked or may have disliked. Reader feedback is important for us to develop titles that you really get the most out of.
To send us general feedback, simply drop an email to [email protected], making sure to mention the book title in the subject of your message.
If there is a book that you need and would like to see us publish, please send us a note in the SUGGEST A TITLE form on www.packtpub.com or
email [email protected].
If there is a topic that you have expertise in and you are interested in either writing or contributing to a book, see our author guide on www.packtpub.com/authors.
Customer Support
Now that you are the proud owner of a Packt book, we have a number of things to help you to get the most from your purchase.
Downloading the Example Code for the Book
Visit http://www.packtpub.com/files/code/3414_Code.zip to directlydownload the example code.
Errata
Although we have taken every care to ensure the accuracy of our contents, mistakes do happen. If you find a mistake in one of our books—maybe a mistake in text or code—we would be grateful if you would report this to us. By doing this you can save other readers from frustration, and help to improve subsequent versions of this book. If you find any errata, report them by visiting http://www.packtpub. com/support, selecting your book, clicking on the Submit Errata link, and entering the details of your errata. Once your errata are verified, your submission will be accepted and the errata added to the list of existing errata. The existing errata can be viewed by selecting your title from http://www.packtpub.com/support.
Questions
Getting Started with
Ruby and RoR
'Which is the best framework for web application development?' This question is asked in different ways and forms. The answer, however, always remains the same—'The one that enhances productivity'. The next obvious query would be 'In that case which is the framework that enhances productivity?' After some debates and deliberations, we can conclude, 'A framework that reduces Boilerplate code and also reduces the learning curve is the one that increases productivity.'
If you look around, there are an abundance of frameworks that cater to web
application development. But most of them fail in one of the two points that govern productivity. Either the framework reduces the Boilerplate code or it is easier to learn. Achieving a balance between the two is seen as a tough task. It is here that Ruby and Ruby on Rails (or RoR as it is fondly called), score above most of their contemporaries. How they achieve this balance is what we will be looking at in this book.
We will be developing a website throughout the book, each chapter adding
something new to the website. This chapter will lay the groundwork of introducing you to Ruby and RoR. It will also tell you the ways to install and configure Ruby and RoR—one-click as well as manual installation, and finishing with techniques to test your installation.
Ruby and RoR—The Next Level in
Dynamic Web Development
Ruby
In 1995, Yukihiro Matsumoto released the first version of Ruby and this added one more language to the ever-growing toolkit of application developers. The current stable version is 1.8.6. According to the TIOBE Programming Community Index, it is the fastest growing language. So, what makes it the fastest growing one among the languages? To understand this, let us first understand the reason behind the creation of Ruby. The main reason given by Mr. Matsumoto for creating Ruby was that he wanted a scripting language that would optimize the way a programmer would develop the software. This means that the features of Ruby are such that they optimize the way the software is developed. What are these features? Let us have a look at them:
Interpreted: Ruby is an interpreted language. Therefore, whenever you make a change to the source code, you need not compile the code and then run it to see the effect of the change. As a result of this feature, the code-compile-run cycle becomes the code-run cycle.
PurelyObject-Oriented: Ruby is purely object-oriented. That means that everything in Ruby is an object which includes primitive data-types and numbers. In addition, it supports all the features required by an Object
-OrientedLanguage.
Functional: Ruby supports functional programming using blocks.
DuckTyping: It is also known as Dynamic Typing. Ruby decides about the type of variable while the program is running by looking at the value contained in the variable at that instant. In other words, if an object looks like a duck, sounds like a duck, then it is a duck!
AutomaticMemoryManagement: You would know it as Garbage Collection. As in any Very High-Level Language (VHLL), Ruby provides Garbage Collection out-of-the-box, thus you need not worry about physical memory leaks.
Threading: The current stable version of Ruby provides 'almost' platform independent threading using green threads (threads used at the user-space level are known as green threads.) I said 'almost' because Ruby threads are simulated in the VM rather than running as native OS threads.
Reflection: Ruby provides a program with the ability to 'look at itself' while running. This ability is known by different terms, such as reflection, introspection, and so on. Using reflection, a program can modify certain aspects of itself during execution, or create a completely new object at runtime based on the requirements at that time.
Looking at the features we just discussed, you could definitely see that the creator's reason holds true. The way imperative programming features have been balanced with functional programming is the proof of that. It is on such a foundation that RoR has been built.
Ruby on Rails (RoR)
RoR is a recent entrant in the world of web application frameworks. So how come such a new player on the block not only stands on its own but can also challenge veteran players of the likes of J2EE/JEE? The answer does not just lie in the functionalities. The other aspect that governs the acceptance of a framework is its philosophy. Hence, we will have to look at both the aspects of RoR—functionality as well as philosophy. Keep in mind that the philosophy holds true for all the versions of RoR.
Philosophy
The philosophy of RoR depends on two principles:
DRY: Don't Repeat Yourself or the DRY principle, if applied properly, reduces the duplication of tasks within a project. Duplication of any kind, within a project, leads to difficulty in modification and maintenance and inconsistency. In RoR, you can see this principle at work in almost everything—from the reusable components in the form of plug-ins to the way database tables are mapped.
Convention-over-Configuration (CoC): Configuration has taken over
the web application frameworks so much that even a simple task such as applying 'compulsory field' validation for just one field requires entries in an XML file. In RoR, the principle is to supply information about only those aspects that are different from usual application settings. The ORM (Object Relational Mapping) framework provided by RoR is an example of the Convention-over-Configuration principle. Unless you specify a different name for an ORM object, the object uses the name of the table to which it is mapped. Whereas in the case of configuration-based ORM frameworks, such as Hibernate, the mapping of each table along with its columns has to be given in the configuration file. So, a change in the schema means a change in the configuration file. However, in the case of RoR, a change in the schema doesn't mean a change in the object unless the name of the table itself changes. We will see more about the ORM framework in Chapter 2.
•
Features
The features based on the philosophy of DRY and Convention-over-Configuration principles are what make RoR so attractive for the development of dynamic web-sites. The features that showed the way for alternative methods for implementation of various server-side techniques are:
AutomaticsetupofApplicationstructure: If you have worked with J2EE technologies, this would come as a pleasant surprise. The structure of any application need not be created manually. Just one command and the complete structure including folders and basic web files such as index.html will be generated for you. Therefore, no more hunting for third party
tools such as those that provide the initial setup or setting up the structure manually.
GenerationofBoilerplateCode: Every application has certain blocks of code that are essentially the same for all other applications of the same type or category. Such blocks are called Boilerplate code. One of the examples of Boilerplate code is the code block setting up a connection to the database. The same code can be used with different applications with only a little change. Though this is the case, most of the frameworks do not provide any inbuilt mechanism to reduce this 're-invention of the wheel'. RoR avoids the duplication using scaffolding. In essence, a scaffold contains the bare minimum of code to accomplish tasks such as connecting to the database, setting up a log, and so on. Scaffolds reflect the DRY principle that RoR adheres to.
Dynamicmappingofclassestodatabaseschemas: No web application can go online without having a database as its back-end. ORM frameworks have eased the database access. However, the configuration aspect reduces any advantage to the developer. In the case of RoR, ORM does not need any configuration. At runtime, RoR reads and maps the schema based on the names of classes and corresponding tables using reflection and meta-programming. Moreover, what the developer gets is more productivity.
Ajaxatthecoreofpresentation: Ajax is the technology that provides interactivity to websites without becoming intrusive. All the current
server-side technologies claim to support Ajax, but the support is peripheral and not at the core. You would have to download new libraries, configure them, and then start the develop-compile-deploy-test cycle again. Whereas in RoR, Ajax is part of the core libraries. So when you install RoR, Ajax support is also made available to you. Using them is as easy as when you use any other library provided by RoR.
•
•
•
Batteriesincluded: RoR contains many more libraries that provide for essentially all the requirements of a dynamic website including layout management, mailing, and so on. If you look at these libraries, you will understand that they are, in fact, fully-fledged components in themselves, representing different services provided by a website or a portal.
That completes the roundup of features of the 'tools' that we are going to use to build our website. The next step is to install and configure our 'tools' so that we can get started with our task.
Installing and Configuring Ruby and RoR
RoR can be installed in two ways:1. Manual installation after installing Ruby
2. One-click installer that installs Ruby and RoR, which includes Apache web-server and MySQL database server
If you already have Apache and MySQL installed, then manual installation is the better way as it installs only RoR.
Manual Installation
There are three main steps for manually installing RoR, which are:
Downloading and installing Ruby Updating gem
Installing RoR using gem
In this case, the RoR installation is done over the internet. So from the second step itself, ensure that the internet is connected throughout the installation.
•
Downloading and Installing Ruby
First, grab the Ruby installer for windows athttp://rubyinstaller.rubyforge.org/wiki/wiki.pl.
The previous figure shows the main page for the one-click Ruby installer (do not confuse it with one-click RoR installer). It provides a list of links that provide details about the one-click installer. Here are the steps for downloading and installing Ruby:
From the list, select [Download] link..
On clicking the [Download] link, you will be taken to the page listing the downloadable release version of the installers.
From the given list, select the .exe link for the latest release and save the file in your preferred location. In our case the version to be downloaded is
ruby186-25.exe.
Double click on the file to be installed to start the installation process. The first screen that will be presented to you should be the License Agreement. Read the license carefully and click on IAgree.
•
•
The next screen will present you with the components to be installed.
Keep the default choices and click Next. Of these SciTE is a programmer's editor and RubyGems is Ruby's package manager and updater.
Next, choose where Ruby should be installed. It's always advisable to install in the root of any drive instead of a sub-folder. Ruby commands may not work correctly if the sub-folder is deeply nested. For example, if you want to install it in drive C:, then give c:\rubyas the value for DestinationFolder. Also keep in mind not to specify any folder name with spaces in it, as it may create problems while installing RoR.
Next, provide the name for the Start Menu entry for Ruby installation. Keep the default name and click Install.
•
•
If the installation completes without any problem, then you will see the following screen:
Click on the Next> button to complete the installation process. to complete the installation process.
The last screen presented by the installer should give you an option to view the Readme file. If you wish to read it, check the ShowReadme checkbox and then click on Finish to complete the installation.
That completes the Ruby installation. The next step is to update the installation using gem.
Updating Gem
Gem is the name of the utility supplied with Ruby in order to manage, install, and update the Ruby installation in an easy way. The second step in the manual installation of RoR is updating the Ruby installation so that if a new package or an update for any of the package is available, then the complete installation can be made up-to-date.
Before we begin, if you are behind a proxy, open the command prompt and give the following command:
>Set HTTP_PROXY=http://<proxy_address>:<proxy_port>
For example, if the address of the proxy server is 192.168.1.1 and the port number is 9090, then you would have to give the following at the command prompt:
>set HTTP_PROXY=http://192.168.1.1:9090
Next, give the following command at the prompt:
>gem update
You will get the following reply after the last step:
Select the compatible version for your platform. Here I choose option 2 which is the latest for Windows. The difference between <ruby> and <mswin32> is that the former is a pure Ruby-based package and the latter is the packages natively compiled for Windows. If there is more than one package to be updated, then more 'choice menus' will be presented to you. The point to remember is to choose the number corresponding to the latest version of the package natively compiled for Windows.
That completes the update gem step. Next, let us install RoR.
Installing RoR
This is the last and the easiest part of the installation process. Just one command and RoR shall be installed. At the prompt, issue the following command:
The command should give the messages as shown in the previous figure. Congrats! RoR is now installed on your system.
For those working on GNU/Linux, only the first step would differ. To install Ruby, grab the latest tar file from http://www.ruby-lang.org/ en/. Then give the following command at the prompt:
tar –zxvf <ruby_tar_file>
Then go into the directory created by the tar command. Inside the directory issue following commands:
./configure; make; make install
That's it. Ruby is ready to be explored.
One-Click RoR Installation
Download and Unzip the Instant Rails
First, go to the following address:http://instantrails.rubyforge.org/wiki/wiki.pl.
From the links listed on the page click on the [Download]link.
On the next page, select the package corresponding to the latest release from the list.
Once the download has completed, unzip the package into the directory of your choice. I use the InstantRails directory.
Configure Instant Rails Installation
The first step is to configure the environment of the installation. To do so, click on the InstantRails.exe file within the directory of Instant Rails. You will be presented with the following dialog box:
When the dialog box just shown appears, click OK. It will configure the environment
variables for the Instant Rails directory.
Once configuration is done, you will be presented with the main application
window. What the configuration does is that it updates the configuration files for the Apache web-server and the MySQL database server. It also starts these servers.
•
• •
Next, we have to tell Windows about how to find and launch our application. To achieve this we have to change the Window'sHostsFile. Click on the button labelled
I and chooseand choose Configure|Window'sHostsfile.
The host file will be opened in NOTEPAD. The file should contain the following line:
127.0.0.1 localhost
If it is not there, it has to be added manually. Save the changes and exit Notepad.
case of Windows 2000, %WINDIR% refers to WINNT folder, and in the case of Windows XP, it is the Windows folder. By doing this, giving the command use_ruby enables you to use Instant Rails without changing anything in the installation directory. After the addition, the content of the file will be as follows:
Testing the Installation
The installation is successful as much as the process is concerned. However, it is always a good idea to test the installation. From this point onwards, I will be using the rails_apps directory as the base directory for the RoR application that will be developed within this book. The installation has to be tested for two components:
Ruby
Fire up the editor of your choice (I will be using ScITE) and enter the following code: print 'Hello Ruby'. Save it in a file named first.rb, and place the file in the rails_apps directory. Then drop into the command prompt and change into the rails_app directory (if you are using Instant Rails, then the rails_app directory would be inside the Instant Rails directory). Then run the file with the following command:
>ruby first.rb
The result should be as shown below.
Anything apart from the output shown means you will have to check the installation and configuration of Ruby. This test is more important in the case of an Instant Rails installation. The reason is that in the case of any manual installation, if Ruby does not work, then the RoR installation would not be successful. However, in the case of Instant Rails, everything comes as a bundle. If it succeeds, then Ruby supplied with the bundle is working fine. That completes the first part of 'Testing the Installation'.
RoR
If you get the screen shown next, then your RoR installation is OK. What has
happened is that RoR has generated the whole file structure for the application. Even certain files that work as placeholders have been generated by just one command. Impressive, isn't it?
The next step is to check the server provided by RoR. Give the following command after changing into the test_app folder..
> ruby script/server
WebRick is a project embeddable server provided by RoR that resides in the script folder of the application which in this case is test_app.
Next, open the browser of your choice and provide the following URL: http://localhost:3000.
You will be presented with the following screen. If you get anything else, then it means that you need to go through the steps for installation and configuration once again. That covers testing the manual installation of RoR. So what about Instant Rails? That is what is coming up next.
To test Instant Rails's RoR installation, first stop the Apache server by selecting
Click on the CreateNewRailsApp… button. It will drop you into the shell at the rails_app directory of the Instant Rails install folder as shown in the of the Instant Rails install folder as shown in the following screen:
Then give the rails command as follows: >rails test_app
Now, select I|RailsApplications|ManageRailsApplications..., and in the and in the pop-up window, select the check box corresponding tocorresponding to test_app. Then clickThen click Start withMongrel. The popup window will appear as the following screen:
This completes the testing phase of the installation. From here on, I will be using Instant Rails as the development environment.
Summary
That brings us to the end of the first chapter. In this chapter, you have had an
overview of the features of Ruby and RoR. It also took you through the various ways of installing, configuring, and testing of both Ruby and RoR.
Getting to Know Ruby
and RoR
In the last chapter, the focus was on the specifications and installation of the 'tools', if I continue using the analogy of 'tools.' By the same analogy—until the user understands which control provides what functionality—the tool cannot be used to its maximum potential. So it is necessary to understand which library provides what functionality and which component maps to what specification for each and every tool. Ruby and RoR is no exception to this.RoR builds upon the functionalities provided by Ruby. Thus, by understanding how Ruby works, you can know about the building blocks of RoR. That in turn, will help you to have a clearer picture of how the different components of RoR fit into the bigger picture. The chapter will first introduce you to the basic concepts of Ruby. Then it will move on to the basic concepts and components of RoR. Finally, the chapter will be completed with an example of RoR, which can be considered as 'Hello World' in RoR.
Ruby—the Basics
To understand Ruby, you will have to understand the concepts that are fundamental to Ruby. These concepts are:
Classes Inheritance Module Data Types
Blocks and Iterators Exception Handling Data Structures
Of these, the first two are Object-Oriented concepts. Let us have a look at each of these concepts and the way Ruby implements them. However, you will have to keep one point in mind. The discussion in this section is not 'the definitive guide' to Ruby. The focus of this section is to provide you with the fundamentals of Ruby so that you can understand RoR better.
Classes, Attributes, Methods, and Objects
Classes, attributes, methods, and objects are the core of any Object-Oriented language. How they are implemented and how they can be used, differs from language to language. How they are implemented in Ruby?—that's what I am going to discuss now.Classes
A class is a blueprint that represents a section of the real world objects. For example, a class 'Tale' would represent a real world tale (or a story). A class is an abstract representation of a real world object, including its characteristics and functionalities. Hence, it doesn't occupy space in memory during the execution of the program that contains the class.
There are two types of classes—close-ended and open-ended. If a class is close-ended, then new functionalities cannot be added to it without inheriting the class. A C++ or a Java class is close-ended because you cannot add a new functionality to it without inheriting or subclassing it.
On the other hand, if a class is open-ended, then new functionalities can be added to it without inheriting it. One of the important aspects of the Ruby class is that it is open-ended. It means you can add new functionalities at any point of time.
In Ruby, the class declaration and definition happens at the same time. A class is declaredusing a class keyword. The definition goes between class<class_name> and
end. Forexample, to declare and define a class named Tale, you have to write:
class Tale end
The name of a class should always begin with a capital letter.
Attributes
Like all other Object-Oriented languages, Ruby too has the provision for defining the fields or attributes for a class. The attributes are the variables that describe the qualities of a class. To continue with our 'Tale' example, a real world 'Tale' will have an author, a genre, and so on. So, the name of the author and genre are the qualities that describe a 'Tale.' Now if we compare a 'Tale' to a class, then author and genre will become its attributes.
A class can have two kinds of attributes—instance attributes and class-level
attributes. Instance attributes describe the qualities of an instance of a class, whereas the class-level attributes describe the qualities of all the current instances of a class. In other words, the instance attributes are bound to a specific instance of the class but the level attributes are bound to the class itself. So the value of a class-level attribute will be same across all the instances of that class and the value of an instance attribute will differ with each instance. The static variable is like a global variable stored in a class that can be accessed by all the instances of that class. The change done to the static variable by one of the instances will be seen by the other instances. Another term for an instance attribute is instance variable and for class-level attribute is class-class-level variable.
In Ruby, you must define the instance attributes using the @ symbol. To define the class-level attributes you will have to use the @@ symbol. For example, to add instance attributes named author and genre to the Tale class, you will do it as follows:
class Tale
@author @genre @tale_body
Methods
Methods define the functionality provided by a class. Simply stated, methods tell about what a class can do. You can define three types of methods—one that neither accepts any parameter nor returns any value, one that accepts parameters but doesn't return any value, and lastly, one that accepts parameters as well as returns values. Let's say that every 'Tale' can tell the way through which that 'Tale' is told to others, then 'Tale' will have a method 'tell'.
You can add a method to the class using the def keyword. The end of the method is denoted by the end keyword. For example, you would add a method tell to the class Tale inthe following way:
class Tale @author @genre @tale_body
#method to display the tale def tell
print @tale_body end
end
A method can accept values through parameters. Parameters are declared as variables in parenthesis. If there is only one parameter then parenthesis is not required. If thetell method takes only partofthetale to be told then the method would be like:
start_index=@tale_body.index(part_to_be_told) print @tale_body\
[start_index+part_to_be_told.length,@tale_body.length] end
end
A method can return a value by using thereturn keyword. If the Tale class contains amethod that returns the name of the author, it would be:
def tell part_to_be_told
start start_index=@tale_body.index(part_to_be_told) print @tale_body\
[start_index+part_to_be_told.length,@tale_body.length] end
def get_author return @author end
end
There is a special type of method that is used to initialize the instance attributes of a class. Such a method is known as constructor. The specialty of the constructor is that it is called when an instance of that class is created. Also, it doesn't return any value. In Ruby, the constructor is denoted by the initialize method. Let's add a constructor to our Tale class. The instance attributes are moved to the constructor.
class Tale
def initialize(author, genre, body) @author=author
@genre=genre @tale_body=body end
def tell part_to_be_told
start_index=@tale_body.index(part_to_be_told) print @tale_body\
[start_index+part_to_be_told.length,@tale_body.length] end
def get_author return @author end
end
Another special kind of method is related to attributes. Attributes can be read and written using gettersandsetters. A Getter is a method that has the same name as that ofthe attribute whose value it is to get. To make it clearer I will rewriteget_author to make it a getter as follows:
class Tale
def initialize(author, genre, body) @author=author
@genre=genre @tale_body=body end
def tell part_to_be_told
start_index=@tale_body.index(part_to_be_told) print @tale_body\
end
#getter for author attribute def author
@author end
end
Next is the setter. A setter is a method having the same name as that of the attribute followed by the variable containing the value to be set. The variable containing the value is kept in parenthesis and is assigned to the attribute name. A setter for the author attribute of our Tale class will be:
class Tale
def initialize(author, genre, body) @author=author
@genre=genre @tale_body=body end
#method to display part of the tale def tell part_to_be_told
start_index=@tale_body.index(part_to_be_told) print @tale_body\
[start_index+part_to_be_told.length,@tale_body.length] end
#getter for author attribute def author
@author end
#setter for author attribute def author=(newAuthor) @author=newAuthor end
end
Objects
Until now, I have been using the term 'instance of a class'. What does this actually mean? As already said, a class doesn't occupy any memory. Memory is only allocated when an instance of the class is created. The instance of a class is another term for an object of the class. If the class is a blueprint then an object is the
A new Ruby object is created by calling a new method on the class. The new method is an implicit method. It means that each class will be supplied with the new method by the Ruby Interpreter. You don't have to define the new method on your own. It automatically calls the initialize method. Therefore, the following code will create an object of the Tale class named mermaid_tale
mermaid_tale=Tale.new("unknown","fairy_tale", "once upon a time….")
Once you create the instance of a class, you can call its methods. If you want to tell only the first part of the Cinderella tale you will call:
mermaid_tale.tell("first")
Similarly, attributes can be get and set by calling getters and setters on the object of the Tale class. So, if you want to set the name of the author to JimHenson, then you willcall the setter as:
mermaid_tale.author= "Jim Henson"
And to get the name of the author you can call the getter on the object. The # sign is used to replace the value of the variable that comes after it. In the following statement, mermaid_tale.author will be replaced by its value as it comes after #.
print "Author is #mermaid_tale.author"
Inheritance
In general, inheritance is something that is transferred from parents to children. The inheritance can be of any type. The physical attributes of parents and the mental faculties of parents are some of the qualities in our parents that we have inherited. In the same way, a class can inherit methods and attributes of another class. In an Object-Oriented approach, this is known as Inheritance. Inheritance is also known as specialization.
Let's say you want to have a class that deals specifically with fantasytales. Let's name the new class FantasyTale. Apart from the attributes specified in the Tale class, the FantasyTale class will have the type of creature that the Tale focuses on. Following is the definition of the FantasyTale class:
class FantasyTale < Tale
def initialize (author, genre, body, creature) super (author, genre, body)
@creature = creature end
The <Tale tells Ruby that the FantasyTale class inherits from the Tale class. Hence, FantasyTale will have all the methods that we have defined in the Tale class. Here, the Tale class is the super class and FantasyTale is the subclass. To pass values to the super class, the keyword super needs to be used. When you create an object of a subclass, the object can access the methods of the super class. The following code creates an instance of FantasyTale. Then it calls the tell method of Tale (which is FantasyTale's super class) to display part of the tale.
fantasy = FantasyTale.new("Jim Henson", "Fantasy", "Once upon a time….", "mermaid")
fantasy.tell ("Once")
Ruby supports multiple inheritance through mixins. However, it is out of the scope of this chapter to discuss mixins.
Modules
Modules are the collection of classes or methods. The main use of modules is to prevent namespace clashes that may occur when you try to use different classes with the same name. Modules are defined by the module and end keywords. For example, Tale and FantasyTale classes can be encapsulated in a module as follows:
module Tales class Tale end
class FantasyTale < Tale end
end
To call a module, you will need to use the :: operator. For example, to call the Tale class you will need to use the following statement:
T1 = Tales :: Tale.new("Jim Henson", "Fantasy", "Once upon a time…."))
Next, let us look at data types.
Data Types
Number
Number represents an integer. It can be any integer—positive or negative. Places within the numbers can be demarcated using an underscore. For example:
tale_age=1000 or
tale_age=1_000
Both the above forms are valid.
Float
Any decimal number is a float data type. A variable of a float type can have a number with decimal points as well as scientific notation. Hence you can define a float variable in either of the following ways:
diameter=3.145
or
diameter=3.14e-05
String
Any alphanumeric character surrounded by quotes is considered a string. Both single as well as double quotes denote a string. Both the following codes are valid strings:
s= "It's a beautiful life" or
s1= 'It's a beautiful life'
If you observe, when the alphanumeric sequence contains a single quoted
character or characters, they need to be enclosed in double quotes. The string can be accessed as a list as you have seen in the tell method.
There is a special kind of string called Symbol. It can be considered as a lightweight string. It is mostly used when the string need not be shown on the screen. A Symbol is like a common variable except that it is prefixed with a colon ( : ). For example, both the following are valid symbols:
:part_of_story or
:next_part
Blocks and Iterators
Ruby provides unnamed blocks to group a set of statements together. It also provides a technique known as an iterator to go through a collection. Let's see how they can be used to make development simpler.
Blocks
Code blocks are of two kinds—named and unnamed (or anonymous). Classes and methods come under named blocks. Anonymous blocks are denoted with curly braces ({}). They can also start with the do keyword and end with the end keyword. You can use either curly braces ({}) or do/end. Loops also come under anonymous blocks. An example of anonymous block can be opening a file. In code it will be:
5.times{
print "Hello \n" }
Blocks can have arguments too. In other words, they can work like a slimmed down version of methods. Throughout this chapter, I will be using methods and functions interchangeably. The block arguments are surrounded by pipe characters and separated by comma. So to pass the message to be printed inside the block, you can rewrite the above code as:
5.times{|msg| print msg
}
Use of blocks will become clearer when we discuss iterators, and that is coming up next.
Iterators
Iterators do what their name suggests—they iterate over a collection. Iteration can be done using the each keyword. The way in which iterator is used is:
<collection>.each {|<var>| <operation on var>}
Here, <collection> can be an array or a list of any kind and var is the variable. For example, let's say that array alist has been defined as follows:
alist=[1,2,3.4,"foo"]
It will give you the following result:
So how do blocks and iterators help in more common contexts such as reading and writing to a file? As an answer to this question let us come back to the Tale class. Everything is fine and dandy until now. You can create different tale objects, get and set author's name, and display a part of the tale. However, once the object is destroyed, the values of that object are lost. In other words, the values present in individual instance attributes are not saved. This is where reading and writing of a file (such as file I/O) comes into the picture. Using blocks and iterators, file I/O can become really easy. Let's add a method that writes the values to a file.
class Tale #constructor
def initialize(author, genre, body) @author=author
@genre=genre @tale_body=body end
#method to display part of the tale def tell part_to_be_told
start_index=@tale_body.index(part_to_be_told) print @tale_body\
[start_index+part_to_be_told.length,@tale_body.length] end
#getter for author attribute def author
@author end
#setter for author attribute def author=(newAuthor) @author=newAuthor end
def write_to_file
Here everything is done within the block. Now let's add a read_from_file method that will read a file and print the contents onto the screen.
class Tale #constructor
def initialize(author, genre, body) @author=author
@genre=genre @tale_body=body end
#method to display part of the tale def tell part_to_be_told
start_index=@tale_body.index(part_to_be_told) print @tale_body\
[start_index+part_to_be_told.length,@tale_body.length] end
#getter for author attribute def author
@author end
#setter for author attribute def author=(newAuthor) @author=newAuthor end
#method to write the attribute values to a file def write_to_file
#opens a file and does the writing within it def read_from_file
File.readlines('tale.txt').each { |line| puts line
} end
end
Exception Handling
Exceptions are error conditions that interrupt the normal execution of a program. Exceptions can occur due to many reasons including I/O errors and trying to divide by zero. It is always a good practice to handle exceptions. To handle exceptions, Rubyprovides theraise and rescue clauses.Every block containing a logic that can give raise exceptions is kept inside a begin/end block as
shown below
begin #logic rescue
#handle error condition end
For example, to catch all the exceptions that can occur within a block, you will have to write:
begin #logic
rescue Exception
#handle error condition end
Let's say that in the read_from_file method of the Tale class, while opening the file, an exception can occur. The exception can occur due to many reasons, such as the file does not exist, the path to the file is wrong or the user does not have permission to access it. So, let's add an error handling block. For that you will have to rewrite the read_from_file method as follows:
def write_to_file
#opens a file and does the writing within it
begin
$stderr.print "File open failed " end
end
Data Structures
Most of the power and ease that Ruby provides to the developers comes from its inbuilt data structures. The most commonly used data structures are:
Arrays Hashes
Of these the former is index-based and the latter is key-based.
Arrays
An array is a list that holds a collection of items. The Array class of Ruby provides the array related functionalities. The main difference between an array in Ruby and an array in a language—such as Java—is that an array in Ruby is a dynamic data structure. A list of books is an example where an array can be used. An array containing a list of books can be created as follows:
books = ["The Treasure Island", "Don Quixote"]
The books array can be accessed using the index or a number starting at 0. For example, using the following statement, you can access the first element of the array, TheTreasureIsland.
books[0]
You have to keep in mind that arrays in Ruby are zero indexed. An interesting relationship between arrays and strings is that strings can be accessed as arrays. If you remember the definition of the tell method, we have accessed the body variable as an array. Next, let us look at hashes.
Hashes
Arrays are useful as long as you do not want to associate the values with any other type other than the numeric index. Let us say that you would like to use the name of the author as the index instead of a number. In such a case, you will need to use author as the index instead of a number. In such a case, you will need to use as the index instead of a number. In such a case, you will need to use a hash instead of an array. Similar to array, hash is also a class. To define a hash as having the details of a book including title, author, and genre, the statementthe statement will be:
book = {"title" => "The Treasure Island" , "author" => "R.L.Stevenson" "genre" => "Adventure" }
To access the title of the book, you will do as follows:
book["title"]
The last statement will give TheTreasureIsland as output. That completes the fast track introduction to the basic concepts of Ruby. Next, let us see how RoR builds itself on Ruby.
The # is an interesting character. When used outside single or double quotes, the line following it is treated as a comment. However, inside single or double quotes, it is treated as a value replacement.
RoR—Concepts and Components
Now that the basics of Ruby have been introduced, let us move on to the next stage—RoR. If you ask the question, 'What is RoR?', the most common answer will be, 'RoR is a Ruby-based framework that implements the MVC pattern'. There are two key points in this answer:
It is a Ruby-based Framework It Implements the MVC pattern
Let us have a look at these points in detail.
RoR is a Ruby-Based Framework
The dynamic and open-ended nature of Ruby makes it an attractive option to build frameworks. Given the ease of meta-programming and reflection, blocks and iterators along with the exception handling, you have a language that could service any tier of a web application. That's what Mr. Hansson did. He took the different services provided by Ruby and created RoR out of it.
How Ruby eases the meta-programming is evident from Active Record, the ORM framework within RoR. Based on the name of the class, RoR (basically Ruby constructs) reads the schema and creates the objects of the class based on the data retrieved from the table on-the-fly. An action method communicates with the corresponding view using an instance variable and not through the explicit usage parameters sent through request objects or session objects. Apart from these, RoR makes heavy use of hash like structures and anonymous code blocks to reduce configuration.
Now that you have had a taste of how RoR makes use of Ruby, let us go the next aspect of RoR.
RoR Implements MVC Pattern
You will have definitely heard the term MVC being used with different frameworks. But what is MVC and how is RoR concerned with it? MVC is a design pattern that provides a clear-cut demarcation between three aspects of an application—data access logic, the control flow logic, and the presentation logic. These three aspects have been deemed as M, V, and C. They stand for:
Model—It represents the data processed by the application. It provides a link to the persistent storage (data store).
View—the logic corresponding to the display of the data held by the Model is provided by the View. It is the only aspect of MVC that directly interacts with the user.
Controller— It represents the control flow logic. The decisions about which View has to be called to display the current data, which part of the Model has to be updated are taken care of by the Controller. It sits at the boundary of your application and intercepts each request. It then calls the corresponding Model to update or retrieve data, and then chooses the appropriate View to display the data.
Coming to the question of how RoR is concerned with it, RoR implements MVC by providing three layers or components as a part of the framework. They are:
Active Record Action View Action Controller
Action Controller and Action View together are known as Action Pack.
Understanding more about these components will help you in not only finding an answer to the question of RoR's implementation of MVC, but will also tell you a great deal about how Ruby forms the base of RoR. So here it goes.
Active Record
Active Record is the 'Model' in RoR. The Model component stores data and provides functionality to work with the data. Apart from being the Model component, Active Record is also an ORM framework. ORM stands for Object Relational Mapping. Hence, Active Record does the following, which constitutes functionalities of both a Model as well as an ORM framework:
TabletoClassMapping: Each table is mapped to one or more classes. This is mapped to one or more classes. This is the default mapping, and the default mapping is based on convention rather than configuration. Having the name of the table plural and the name of the class singular is one of such conventions. As Active Record follows the Active Record data mapping pattern, the table attributes are mapped to the instance attributes at runtime. Hence, the classes don't need to provide the getters and setters for the table attributes, as you would have done in other ORM frameworks such as Hibernate. Once mapping is done, each object of the ORM class represents a specific row of the table with which the class has been mapped.
DatabaseConnectivity: You can connect to the database by making calls to the database by making calls to the generic API that Active Record provides. The API then delegates the task to the database specific adaptor. In short, Active Record provides an abstraction over the process of connecting to a database. Active Record has adaptors for MySQL, Postgres, MS SQLServer, DB2, and SQLite databases. The connection aspect of Active Record comes into the picture only when you are not using Active Record with RoR. Yes, you can use Active Record even for Ruby projects that don't need to be web-enabled. In the case of RoR, you have to provide the parameters for connecting to the database in the database.yml file that resides in the config director of your RoR application. YML provides a way to describe data in a structured manner.
CRUDOperations: CRUD stands for create, retrieve, update, and delete operations on a table. In terms of SQL, it means insertion, selection, updation, and deletion operations that are the basis of any application capable of saving user's choices. Because Active Record is an ORM framework, you always work with objects. To insert a new row, you will create an object of the class and populate its instance attributes with values. When a select statement is executed at the database side, Active Record creates objects corresponding to each row and provides them to you. Similarly, when an object is deleted, the corresponding row is also deleted. For retrieving existing data, Active Record provides a find() method. Thus, you can perform CRUD operations without worrying about the vendor of the database or the variation of SQL to be used.
DataValidation: Validating the data before persisting it to the database is the first step in ensuring security of your website. To make it easier, Active Record provides validation of the Model component, also known as the Data Model. Data can be validated automatically when saved. You can also ensure that data is validated after an object is created or values are updated by using validate_on_create() and validate_on_update() methods. All the validation methods need to be overridden.
•
•
•
To create a model object from a table, you have to give the following command at the prompt of your application's directory:
ruby script/generate model <tablename_in_singular>
For example, to create model from a table named Tale, you have to issue the following command at the prompt:
c:\InstantRails\rail_apps\test_app\> ruby script/generate model Tale
Action View
View component encompasses the logic for the presentation of the data present in the Model component. Action View is the View component of RoR. The
functionalities provided by Action View range from template creation to Ajaxifying the web page. The most often used functionalities of Action View are:
Templates: Templates are the files containing placeholders that will
be replaced with content or expanded at runtime. The basic template functionality is provided by RHTML templates. They are HTML files in which you can embed Ruby code. When the template is called either through the browser or by the Controller component, the RUBY code is executed and its result is placed in place of the code itself. The final output is then sent to the browser. In RHTML templates, you can embed any kind of Ruby code.
FormHelper: Even though you can embed Ruby code in RHTML, large chunks of code make the page unreadable and less maintainable. So you can place the code in Ruby files and call the relevant functions from within your RHTML page. This process is made simpler through Helpers. One of the commonly used Helpers is the Form Helper. It provides methods to create form elements such as checkboxes and textboxes. While using Form Helpers, you should start placing the element methods in the form of form_tag().
FormattingHelper: Formatting of the data to be presented is one of the major concerns in the presentation logic. Using Formatting Helpers you can easily format the data in the way you require it. It contains Helpers for the formatting of date, currency, and string.
Layout: Layout defines how the various contents of a page are arranged. A
dynamically created page may contain nesting of different pages. This can be the case even without using tables or frames. Action View helps in this case by providing a Layout service. Using the Layout API, you can create a page by nesting different pages. For example, if the pages of your site contain a header, body, and footer, then, only the body part will change with each page. By using Layout API, you can pass the content of the body without
•
•
•
A basic RHTML template can be created either by hand or through a command. The command is closely linked with the Controller component. We will look at it in the next section. Let's have a view of an RHTML file. As you already know, RHTML is an HTML file having embedded Ruby code. Let's say that you want to display a set of combo boxes, one each for day, month, and date, then the RHTML file will contain:
<html> <head>
<title>Select Date</title> </head>
<body>
<h3> Please select the date of the publication of the Tale</h1>
date_select("post", "written_on", :start_year => 1855)
</body> </html>
You will see the details of this helper and many other such helpers in the coming chapters.
Action Controller
The controller orchestrates the flow of logic. In a web-application, it is the Controller that regulates and orchestrates the flow of application logic. The controller sits at the boundary of an application and intercepts all the requests. Based on the request, it updates the corresponding Model object and calls the View logic to display the updated data. In RoR, the Action Controller provides the functionalities of the Controller. The main functionalities provided by the Action Controller, apart from the flow control logic, are:
SessionHandling: A session is the time period spent by a single user at a website. A session can be tracked in two ways—by cookies or by using a session object. Cookies are small files saved at the client side either for a definite time period such as a day or a week, or for the period of the user's stay at the website. The file contains the required user information. You can use a cookies object which is a hash like object to track the user session. However, cookies cannot hold objects. For that you need to use the session object. The session object is also a hash like structure that can store objects. By using cookies and session objects you can track the user session.
Filtering: There are situations where you would like to call a particular set of statements before executing the logic in the Controller. Logging, user authentication and providing personalized response based on user are examples of such situations. To handle these situations, the Action Controller provides filters. There are three main filters—before, after, and around. These filters work as their name suggests. The before filter is executed before the logic within the Controller is executed. The after filter is called once the Controller logic is executed. And the around filter is a combination of the before and after filters. They wrap around the complete logic. So they are called before the execution as well as after the execution of the Controller logic.
Caching: Caching is the process in which the most requested content is saved in a cache so that it need not be generated again and again. By using the Action Controller you can implement either page caching or action caching. Actions are the methods within the Controllers that correspond to a particular URL. In page caching, once generated, the content is not regenerated for the next request having the same URL. Instead, the already generated content is sent to the user. This is simple caching. The catch here is that the filter, if any defined, is executed only once. If you want to ensure that the filter is executed every time along with having the caching functionality, then you will have to use the action caching. It ensures that even though the content is not regenerated, the filter is executed for each request.
To create a controller you have to give the following command at the prompt:
ruby script/generate controller <controller_name> [<view_name>]
For example, to create a controller named AddTale, you have to give the following at the prompt:
c:\InstantRails\rail_apps\test_app\> ruby script/generate controller AddTale
The created Controller file is a Ruby file just like the files created for the Model. However, the methods contained within this file are action methods that are mapped at the Controller level to the View templates, using the hash like structures. So you don't need to provide the XML configuration file for mapping them.
That completes the concepts and components of RoR. Now let's have a look at an application that uses the basic concepts discussed here.
•