From Web Education Community Group
1 Introduction
2 A picture says more than a thousand words — or does it?
3 Different types of images on the web — content and background images 4 The img element and its attributes
4.1 Providing a text alternative with the alt attribute
4.2 Adding nice-to-have information using the title attribute 4.3 Using longdesc to provide an alternative for complex images
4.4 Faster image display by defining the dimensions using width and height 5 Containing images properly using HTML5 <figure>
6 Proper captions using HTML5 <figcaption> 7 Background images with CSS
7.1 How to apply backgrounds with CSS 8 Summary
9 Exercise Questions
In this article we will discuss one of the things that makes web design pretty — images. At the end of this tutorial you’ll know how to add imagery to web documents in an accessible way (so that people with visual impairments can still use the information on your site) and how and when to use inline images for delivering information or background images for page layout. You can download the example files used in this article here (http://dev.opera.com/articles/view/17-images-in-html/code.zip) — we'll look at these files over the course of the tutorial.
It is very tempting to use a lot of imagery on your web sites. Images are a great way to set the mood for the visitor and illustrations are a nice way to make complex information easier to take in for visual learners.
The drawback of images on the web is that not everybody who surfs the web can see them. Back in the days when images were first supported by browsers, many site visitors had images turned off to save on
download costs and get a faster surfing experience — web connections used to be very slow, and you’d pay a lot of money for each minute you were online. While this is not very common these days, there are still other problems to consider:
People surfing on mobile devices might still have images turned off because of small screens and the cost of downloading data.
Visitors of your site might be blind or visually impaired to such a degree that they cannot see your images properly or at all.
Search engines only index text — they don’t analyze images (yet), which means that information stored in images cannot be found and indexed.
It is therefore very important to choose images wisely and only use them when appropriate. It is even more important to make sure you always offer a fallback for those who cannot see your images. There is more on the problems of wrongly used icons and images in the Creating multiple pages with navigation menus tutorial later on in the series. For now, let’s see what technologies are available to add images to an HTML document.
There are two main ways to add images to a document: content images using the <img> element and
background images applied to elements using CSS. When to use what is dependent on what you want to do:
If the image is crucial to the content of the document, for example a photo of the author or a graph showing some data, it should be added as an <img> element with proper alternative text.
1.
If the image is there as “eye candy” you should use CSS background images. These images should not have any alternative text (what use is “round green corner with a twinkle” to a blind person?) and you have a lot more options to deal with image styling in CSS than in HTML.
2.
Adding an image to an HTML document is very easy using the <img> element: you include the location of
the image you want to display inside a src (source) attribute, and away you go. The following HTML
document (inlineimageexample.html (http://dev.opera.com/articles/view/17-images-in-html
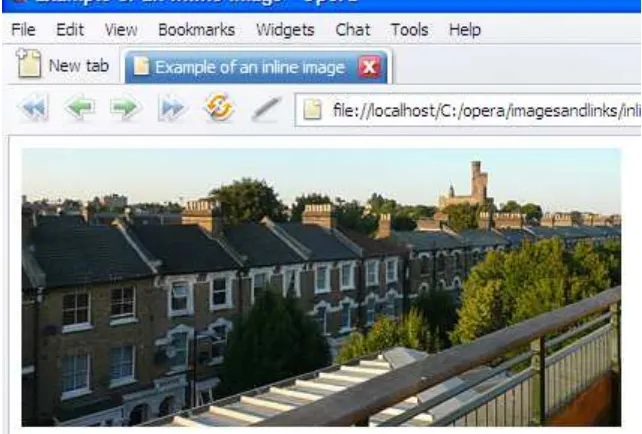
/inlineimageexample.html) in the zip file) displays the photo balconyview.jpg in a browser (provided that you have the image in the same folder as the HTML file.)
<!DOCTYPE html>
<html lang="en-GB"> <head>
<meta charset="utf-8">
<title>Example of an inline image</title> </head>
<body>
<img src="balconyview.jpg"> </body>
</html>
Figure 1: The image as it is shown in a browser.
Providing a text alternative with the alt attribute
This displays the image fine, however, it is invalid HTML because the <img> element needs an alt attribute.
This attribute contains text that is displayed if the image is not available for some reason. The image may not be available because it could not be found, loaded or because the user agent (normally a browser) does not support images. In addition, people with visual impairments use assistive technologies to read web pages to them. These technologies will read the contents of the alt attribute of <img> elements out to their users. It
is therefore important to write good alternative text to describe the contents of the image and put it in the
alt attribute.
You’ll find a lot of texts on the web talking about “alt tags”. This is factually wrong as there is no tag (or element) with that name. It is an attribute of the <img> element and amazingly important both for
accessibility and search engine optimization.
In order to make the image understandable for everybody you need to add a proper alternative text, for example in this case “View from my balcony, showing a row of houses, trees and a castle”
(inlineimageexamplealt.html (http://dev.opera.com/articles/view/17-images-in-html /inlineimageexamplealt.html) ):
<!DOCTYPE html>
<html lang="en-GB"> <head>
<meta charset="utf-8">
<title>Example of an inline image</title> </head>
<body>
<img src="balconyview.jpg" alt="View from my balcony, showing a row of houses, trees and a castle"> </body>
</html>
The alt attribute contains the text that should be displayed when the image is not available. The information
in the alt attribute should not be displayed when the image was successfully loaded and shown; Internet
Explorer gets this wrong, and shows it as a tooltip when you hover your mouse pointer over the image for a while. This is a mistake, as it leads a lot of people to add additional information about the image into the alt
get on to in the next section.
Adding nice-to-have information using the title attribute
Most browsers will display the value of an <img> element’s title attribute as a tool-tip when you hover
your mouse cursor over it (see Figure 2.) This can help a visitor learn more about the image, but you cannot rely on each visitor to have a mouse. The title attribute can be very useful, but it is not a safe way of
providing crucial information. Instead it offers a good way to provide non-essential information, for
example the mood of the image, or what it means in context (inlineimagewithtitle.html (http://dev.opera.com /articles/view/17-images-in-html/inlineimagewithtitle.html) ):
<!DOCTYPE html>
<html lang="en-GB"> <head>
<meta charset="utf-8">
<title>Example of an inline image with alternative text and title</title> </head>
<body>
<img src="balconyview.jpg" alt="View from my balcony, showing a row of houses, trees and a castle" title="Wha </body>
</html>
If you load this code in your browser, you will see the display shown in Figure 2.
Figure 2: title attributes are shown as tool tips in a lot of browsers.
Using longdesc to provide an alternative for complex images
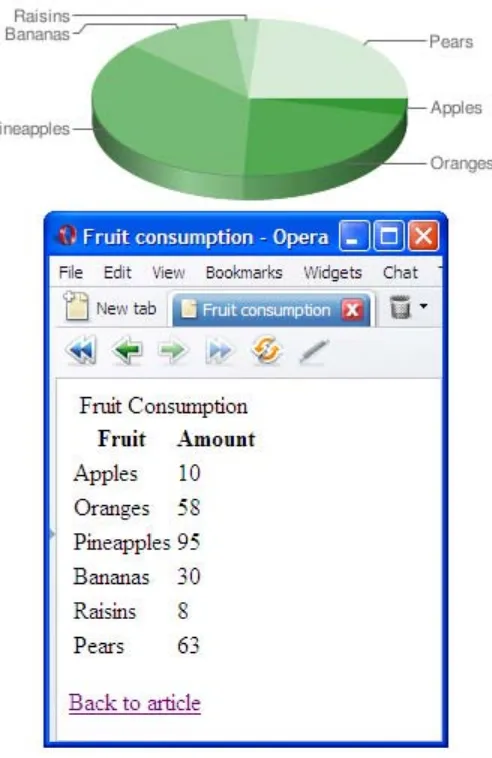
If the image is a very complex image, like for example a chart, you can offer a more lengthy description of it using the longdesc attribute, so that people using screen readers or browsing with images turned off can still
access the information conveyed by the image.
This attribute contains a URL that points to a document containing the same information. For example, if you have a chart showing a set of data, you can link it to a data table with the same information using
<longdesc> (inlineimagelongdesc.html (http://dev.opera.com/articles/view/17-images-in-html
/inlineimagelongdesc.html) ):
<!DOCTYPE html>
<html lang="en-GB"> <head>
<meta charset="utf-8">
<body>
<img src="chart.png" width="450" height="150" alt="Chart showing the fruit consumption amongst under 15 year </body>
</html>
The data file fruitconsumption.html (http://dev.opera.com/articles/view/17-images-in-html /fruitconsumption.html) contains a very simple data table that represents the same data:
<!DOCTYPE html>
<html lang="en-GB"> <head>
<meta charset="utf-8">
<title>Fruit consumption</title> </head>
<body>
<table summary="Fruit Consumption of under 15 year olds, March 2007"> <caption>Fruit Consumption</caption>
<thead>
<tr><th scope="col">Fruit</th><th scope="col">Amount</th></tr> </thead>
<tbody>
<tr><td>Apples</td><td>10</td></tr> <tr><td>Oranges</td><td>58</td></tr> <tr><td>Pineapples</td><td>95</td></tr> <tr><td>Bananas</td><td>30</td></tr> <tr><td>Raisins</td><td>8</td></tr> <tr><td>Pears</td><td>63</td></tr> </tbody>
</table>
<p><a href="inlineimagelongdesc.html">Back to article</a></p> </body>
</html>
Figure 3: You can link a document with complex data to an image by using the longdesc attribute.
Note that there is no visual clue that there is a long description file connected with this image. Assistive technologies however will let their users know there is an alternative available. Some people think that
longdesc is pointless, and that you should just provide an alternative linked via a normal link. This may be
appropriate sometimes, as it is often useful to give all users a choice of how they consume your information. There are situations however where you'll want to not show the text link by default.
Faster image display by defining the dimensions using width and height
When the user agent finds an <img> element in the HTML, it starts loading the image the src attribute
points to. By default, it doesn’t know the image’s dimensions, so it’ll just display all the text lumped together, then shift the rest of the document around when the images finally load and appear. This can slow down page loading and looks a bit confusing and unsightly to page visitors that see it happening. To stop this you can tell the browser to allocate the right amount of space for the images before they load by giving it the image’s dimensions using the width and height attributes (inlineimagewithdimensions.html
(http://dev.opera.com/articles/view/17-images-in-html/inlineimagewithdimensions.html) ):
<!DOCTYPE html>
<html lang="en-GB"> <head>
<meta charset="utf-8">
<title>Example of an inline image with dimensions</title> </head>
<body>
</body> </html>
This will display a placeholder the same size as the image until the image loads and takes up its place, therefore avoiding the unsightly page shift. You can also resize images using these attributes (try halving the attribute values in the above example, saving it, and then reloading the page), but this is not a good idea as the quality of resizing is not smooth in all browsers. It is especially bad to resize images to become
thumbnails, as the idea of thumbnails is that you not only have a smaller image in physical size, but also in file size. Nobody wants to load a 300KB photo just to see a small image that could be 5KB.
One problem that has always existed with HTML images is the choice of what container element to put them in. After all, images are inline elements by default: they won't force line breaks between the content before and after them. This is fine for cases where you, say, want to put a small icon next to a piece of text, but you'll more commonly want an image to sit on its own line in its containing column, for example in a blog post or image gallery. You could describe this as making the image into a separate Figure.
In HTML4, the most common thing to do to achieve this is put the image inside a <p> or <div>, but neither
of these is ideal - an image isn't a paragraph, and a division is semantically anonymous. Taking this on board, the creators of HTML5 introduced a special element to take care of this: <figure>. This element is
designed to contain a figure, which could be an image, two images, or a combination of several multimedia elements, text, or other stuff. Let's look at an example:
<html lang="en-GB"> <head>
<meta charset="utf-8">
<title>Figure element with figcaption example</title> <style> document.createElement('figcaption'); </script>
</head> <body> <figure>
<img src="balconyview.jpg" alt="View from my balcony, showing a row of houses, trees and a castle" width="400" height="186">
<figcaption>The view from outside my window.</figcaption> </figure>
</body> </html>
Another new addition to HTML5 is an element for containing figure captions. Previously this was done using <p>, or some other not wholly appropriate element, but now we have the <figcaption> element.
Nested inside a <figure>, it says "this is the caption to go along with the contents of this figure." For
example:
...
<figure>
<img src="balconyview.jpg" alt="View from my balcony, showing a row of houses, trees and a castle" width="400" height="186">
<figcaption>The view from outside my window.</figcaption> </figure>
...
</html>
Note that the contents of the figure caption do not necessarily act as a replacement for the contents of the
alt attribute or the title attribute: it depends on whether the caption accurately describes everything in the
image or not, or provides the same supplementary information that the title attribute does. In this case, we
need an alt attribute as well, as sighted users can see what is in the image by looking at it. The alt attribute
says exactly what the image contains for the benefit of people who can't see it, while the caption gives some more context.
It is pretty safe to say that web design became a lot more fun when browsers started supporting CSS. Instead of hacking around in the HTML using table cells for positioning items on the page, non-breaking-spaces ( ) to preserve spacing, and spacer GIFs (transparent 1x1 pixel GIF images that were resized to create margins) we can now use padding, margin, dimensions and positioning in CSS and leave the HTML free to just worry about the content structure.
CSS also means you can use background images in a very versatile way — you can position them behind and around your text any way you want, and also repeat images in regular patterns to create backgrounds. We’ll only cover CSS images briefly here, as a proper treatment is provided by CSS background images.
How to apply backgrounds with CSS
The CSS to apply images as backgrounds is pretty easy. Before you look at the CSS code below, load the imagesandcss.html (http://dev.opera.com/articles/view/17-images-in-html/imagesandcss.html) example file in your browser, or look at Figure 4 to get an idea of all the different things that are possible with
Figure 4: Backgrounds with CSS.
The different boxes are actually styled <h2> heading elements with some padding and borders applied
through CSS to give us enough space to show the background image. If you check out the HTML file, you’ll see that each <h2> element has a unique <id> so each one can have a different CSS rule applied to it. The
CSS for the first example is the following:
background-image:url (ball.gif);
You add the image with the <background-image> property and give it a URL in parenthesis to specify the
image to be included. By default, background images will be repeated both horizontally and vertically to fill up the whole element space. You can however define a different repetition with the <background-repeat>
property:
Don’t repeat the image at all: <background-repeat:no-repeat;>
Just repeat the image horizontally: <background-repeat:repeat-x; >
Just repeat the image vertically: <background-repeat:repeat-y; >
By default the background image (if not repeated) will be positioned at the top and left corner of the
element. You can however use <background-position> to move the background image around. The easiest
values to choose are <top>, <center>, and <bottom> for the vertical alignment and <left>, <center>, and <right> for the horizontal alignment. For example, to position the image on the bottom right you need to
use <background-position:bottom-right; >, while to centre the image vertically and apply it to the right
you would use <background-position:center-right;>.
of code. This will all be covered later on.
That’s all you need to know to get you going when it comes to adding images to HTML. There are a lot more tricks available using images and CSS, but for now have a go with what you learnt here and concentrate on best-practice application of images.
Why is it important to add good text to an image in an alt attribute? Are there any situations in which
you don't need to?
If you have an image that is 1280x786 pixels large and you want to display it as a 40x30 pixel thumbnail, can you do that in HTML and is it wise to do so?
What does the longdesc attribute do, and how do browsers show it?
What do the valign and the align attributes do and why weren’t they covered here?
Where are CSS background images positioned inside an element by default, and how do they get repeated by default?
Note: This material was originally published as part of the Opera Web Standards Curriculum, available as 17: Images in HTML (http://dev.opera.com/articles/view/17-images-in-html/) , written by Christian Heilmann. Like the original, it is published under the Creative Commons Attribution, Non Commercial -Share Alike 2.5 (http://creativecommons.org/licenses/by-nc-sa/2.5/) license.
Retrieved from "http://www.w3.org/community/webed/wiki/Images_in_HTML" Categories: Tutorials | WSC | HTML