Learning
React
Native
BUILDING NATIVE MOBILE APPS WITH JAVASCRIPT
Learning
React
Native
2n
d
E
di
tio
978-1-491-98914-2 [LSI]
Learning React Native
by Bonnie Eisenman
Copyright © 2018 Bonnie Eisenman. All rights reserved. Printed in the United States of America.
Published by O’Reilly Media, Inc., 1005 Gravenstein Highway North, Sebastopol, CA 95472.
O’Reilly books may be purchased for educational, business, or sales promotional use. Online editions are also available for most titles (http://oreilly.com/safari). For more information, contact our corporate/insti‐ tutional sales department: 800-998-9938 or [email protected].
Editor: Meg Foley
Production Editor: Nicholas Adams
Copyeditor: Rachel Monaghan
Proofreader: Gillian McGarvey
Indexer: Judith McConville
Interior Designer: David Futato
Cover Designer: Karen Montgomery
Illustrator: Rebecca Demarest
December 2015: First Edition
November 2017: Second Edition
Revision History for the Second Edition
2017-10-23: First Release
See http://oreilly.com/catalog/errata.csp?isbn=9781491989142 for release details.
The O’Reilly logo is a registered trademark of O’Reilly Media, Inc. Learning React Native, the cover image, and related trade dress are trademarks of O’Reilly Media, Inc.
Table of Contents
Preface. . . ix
1.
What Is React Native?. . . 1
Advantages of React Native 2
Developer Experience 2
Code Reuse and Knowledge Sharing 3
Risks and Drawbacks 4
Summary 4
2.
Working with React Native. . . 5
How Does React Native Work? 5
Rendering Lifecycle 7
Creating Components in React Native 8
Working with Views 8
Using JSX 9
Styling Native Components 10
Host Platform APIs 11
Summary 12
3.
Building Your First Application. . . 13
Setting Up Your Environment 13
Developer Setup: Create React Native App 14
Creating Your First Application with create-react-native-app 14
Previewing Your App on iOS or Android 15
Developer Setup: The Traditional Approach 16
Creating Your First Application with react-native 16
Running Your App on iOS 17
Persisting Data with AsyncStorage 203
Summary and Homework 206
Conclusion. . . 207
A.
Modern JavaScript Syntax. . . 209
B.
Deploying Your Application. . . 215
C.
Working with Expo Applications. . . 219
Preface
This book is an introduction to React Native, Facebook’s JavaScript framework for building mobile applications. Using your existing knowledge of JavaScript and React, you’ll be able to build and deploy fully featured mobile applications for both iOS and Android that truly render natively. There are plenty of advantages to working with React Native over traditional means of mobile development without needing to sacri‐ fice the native look and feel.
We’ll start with the basics and work our way up to creating a full-fledged application with 100% code reuse between iOS and Android. In addition to the essentials of the framework, we’ll discuss how to work beyond it, including how to make use of third-party libraries and even how to write your own Java or Objective-C libraries to extend React Native.
If you’re coming to mobile development from the perspective of a frontend software engineer or web developer, this is the book for you. React Native is a pretty amazing thing, and I hope you’re as excited to explore it as I am!
Prerequisites
This book is not an introduction to React, in general. We’ll assume that you have some working knowledge of React. If you’re brand new to React, I suggest reading through a tutorial or two before coming back to take the plunge into mobile develop‐ ment. Specifically, you should be familiar with the role of props and state, the com‐ ponent lifecycle, and how to create React components.
We’ll also be using some modern JavaScript syntax, as well as JSX. If you aren’t famil‐ iar with these, don’t worry; we’ll cover JSX in Chapter 2, and modern JavaScript syn‐ tax in Appendix A. These features are essentially 1:1 translations of the JavaScript code you’re already accustomed to writing.
Windows, and macOS. Linux and Windows users can use React Native to develop Android applications, but in order to write iOS applications, you will need to develop on macOS.
Conventions Used in This Book
The following typographical conventions are used in this book:
Italic
Indicates new terms, URLs, email addresses, filenames, and file extensions.
Constant width
Used for program listings, as well as within paragraphs to refer to program ele‐ ments such as variable or function names, databases, data types, environment variables, statements, and keywords.
Constant width bold
Shows commands or other text that should be typed literally by the user.
Constant width italic
Shows text that should be replaced with user-supplied values or by values deter‐ mined by context.
This element signifies a tip or suggestion.
This element signifies a general note.
Using Code Examples
Supplemental material (code examples, exercises, etc.) is available for download at https://github.com/bonniee/learning-react-native.
This book is here to help you get your job done. In general, if example code is offered with this book, you may use it in your programs and documentation. You do not need to contact us for permission unless you’re reproducing a significant portion of the code. For example, writing a program that uses several chunks of code from this book does not require permission. Selling or distributing a CD-ROM of examples from O’Reilly books does require permission. Answering a question by citing this book and quoting example code does not require permission. Incorporating a signifi‐ cant amount of example code from this book into your product’s documentation does require permission.
We appreciate, but do not require, attribution. An attribution usually includes the title, author, publisher, and ISBN. For example: “Learning React Native, Second Edi‐ tion, by Bonnie Eisenman (O’Reilly). Copyright 2018 Bonnie Eisenman, 978-1-491-98914-2.”
If you feel your use of code examples falls outside fair use or the permission given above, feel free to contact us at [email protected].
O’Reilly Safari
Safari (formerly Safari Books Online) is a membership-based training and reference platform for enterprise, government, educators, and individuals.
Members have access to thousands of books, training videos, Learning Paths, interac‐ tive tutorials, and curated playlists from over 250 publishers, including O’Reilly Media, Harvard Business Review, Prentice Hall Professional, Addison-Wesley Profes‐ sional, Microsoft Press, Sams, Que, Peachpit Press, Adobe, Focal Press, Cisco Press, John Wiley & Sons, Syngress, Morgan Kaufmann, IBM Redbooks, Packt, Adobe Press, FT Press, Apress, Manning, New Riders, McGraw-Hill, Jones & Bartlett, and Course Technology, among others.
How to Contact Us
Please address comments and questions concerning this book to the publisher:
O’Reilly Media, Inc.
1005 Gravenstein Highway North Sebastopol, CA 95472
800-998-9938 (in the United States or Canada) 707-829-0515 (international or local)
707-829-0104 (fax)
We have a web page for this book, where we list errata, examples, and any additional information. You can access this page at http://bit.ly/learning-react-native-2e.
To comment or ask technical questions about this book, send email to bookques‐ [email protected].
For more information about our books, courses, conferences, and news, see our web‐ site at http://www.oreilly.com.
Find us on Facebook: http://facebook.com/oreilly
Follow us on Twitter: http://twitter.com/oreillymedia
Watch us on YouTube: http://www.youtube.com/oreillymedia
Resources
It’s dangerous to go alone! Well, not really, but that doesn’t mean you have to. Here are some resources you may find useful as you work through the book:
• The GitHub repository for this book contains all of the code samples we’ll be dis‐
cussing. If you get stumped or want more context, try looking here first.
• Join the mailing list at LearningReactNative.com for follow-up articles, sugges‐ tions, and helpful resources.
• The official documentation has a lot of good reference material.
Additionally, the React Native community is a useful resource:
• The react-native tag on Stack Overflow
• The Reactiflux chat group includes many core contributors and other helpful folks
Acknowledgments
As is traditional: this book would not have been possible without the help and sup‐ port of many others. Thank you to my editor, Meg Foley, and the rest of the O’Reilly team for bringing this project into the world. Thank you also to my technical review‐ ers for your time and insightful feedback: Ryan Hurley, Dave Benjamin, David Bieber, Jason Brown, Erica Portnoy, and Jonathan Stark. I would also like to thank the React Native team, without whose stellar work this book would naturally be impossible. Thanks also to Zachary Elliott for his help with the Flashcard application, Android testing, and support throughout. Mi estas dankplena pro via subteno.
CHAPTER 1
What Is React Native?
React Native is a JavaScript framework for writing real, natively rendering mobile applications for iOS and Android. It’s based on React, Facebook’s JavaScript library for building user interfaces, but instead of targeting the browser, it targets mobile platforms. In other words, it enables web developers to write mobile applications that look and feel truly “native,” all from the comfort of a familiar JavaScript library. Plus, because most of the code you write can be shared between platforms, React Native makes it easy to simultaneously develop for both Android and iOS.
Similar to React for the web, React Native applications are written with a mixture of JavaScript and XML-esque markup, known as JSX. Then, under the hood, the React Native “bridge” invokes the native rendering APIs in Objective-C (for iOS) or Java (for Android). Thus, your application will render using real mobile UI components, not webviews, and will look and feel like any other mobile application. React Native also exposes JavaScript interfaces for platform APIs, so your React Native apps can access platform features like the phone camera or the user’s location.
The core React Native project supports writing mobile applications for both iOS and Android. Community implementations also provide support for Windows, Ubuntu, the web, and more.
In this book, we’ll build both Android and iOS apps with React Native. The vast majority of the code we write will be cross-platform.
Advantages of React Native
The fact that React Native renders using its host platform’s standard rendering APIs distinguishes it from most existing methods of cross-platform application develop‐ ment, like Cordova or Ionic. Existing methods of writing mobile applications use combinations of JavaScript, HTML, and CSS and typically render using webviews. While this approach can work, it also comes with drawbacks, especially around per‐ formance. Additionally, these methods do not usually have access to the host plat‐ form’s set of native UI elements. When these frameworks do try to mimic native UI elements, the results usually feel just a little off. In addition, reverse-engineering all the fine details of things like animations takes an enormous amount of effort, and they can quickly become outdated.
In contrast, React Native actually translates your markup to real, native UI elements, leveraging existing means of rendering views on whatever platform you are working with. Additionally, React works separately from the main UI thread, so your applica‐ tion can maintain high performance without sacrificing capability. The update cycle in React Native is the same as in React: when props or state change, React Native re-renders the views. The major difference between React Native and React in the browser is that React Native does this by leveraging the UI libraries of its host plat‐ form, rather than using HTML and CSS markup.
For developers accustomed to working on the web with React, this means you can write mobile apps with the performance and look and feel of a native application, while using familiar tools. React Native also represents an improvement over normal mobile development in two other areas: developer experience and cross-platform development potential.
Developer Experience
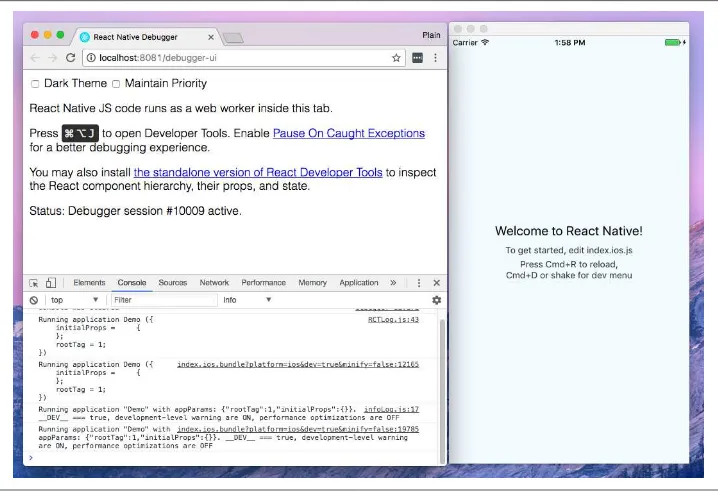
If you’ve developed for mobile before, you might be surprised by how easy React Native is to work with. The React Native team has baked strong developer tools and meaningful error messages into the framework so that working with robust tools is a natural part of your development experience.
For instance, because React Native is “just” JavaScript, you don’t need to rebuild your application in order to see your changes reflected; instead, you can refresh your appli‐ cation just as you would any other web page. All of those minutes spent waiting for your application to build can really add up, and in contrast React Native’s quick itera‐ tion cycle feels like a godsend.
editing. React Native does not force you to work in Xcode to develop for iOS or in Android Studio for Android development.
Figure 1-1. Using the Chrome Debugger with React Native
Besides the day-to-day improvements to your development experience, React Native also has the potential to positively impact your product release cycle. For instance, Apple and Google both permit you to load JavaScript-only changes to an app’s behav‐ ior without going through the standard review process. This is particularly nice on iOS, where application updates typically require several days or weeks of review.
All of these small perks add up to saving you and your fellow developers time and energy, allowing you to focus on the more interesting parts of your work and be more productive overall.
Code Reuse and Knowledge Sharing
Working with React Native can dramatically shrink the resources required to build mobile applications. Any developer who knows how to write React code can target the web, iOS, and Android, all with the same skill set. By removing the need to “silo” developers based on their target platform, React Native lets your team iterate more quickly and share knowledge and resources more effectively.
need on a specific platform, you may occasionally need to dip into Objective-C or Java (we’ll cover how so-called native modules work in Chapter 7). But reusing code across platforms is surprisingly easy with React Native. For example, the Facebook Ads Manager application for Android shares 87% of its codebase with the iOS ver‐ sion. The final application we’ll look at in this book, a flashcard app, has total code reuse between Android and iOS. It’s hard to beat that!
Risks and Drawbacks
As with anything, using React Native is not without its downsides, and whether or not it is a good fit for your team really depends on your individual situation.
Because React Native introduces another layer to your project, it can make debugging hairier, especially at the intersection of React and the host platform. We’ll cover debugging for React Native in more depth in Chapter 9 and try to address some of the most common issues.
Along the same lines, when updates are released for the host platform—say, a new suite of APIs in a new version of Android—there will be a lag before they are fully supported in React Native. The good news is that in the vast majority of cases, you can implement support for missing APIs yourself, which we’ll cover in Chapter 7. Also, if you do hit a roadblock, you won’t be locked in to using React Native—many companies have successfully implemented hybrid approaches to app development.
Changing the platform you use to write your applications is a big choice. Still, I think you’ll see that the benefits of React Native outweigh the risks.
Summary
React Native is an exciting framework that enables web developers to create robust mobile applications using their existing JavaScript knowledge. It offers faster mobile development and more efficient code sharing across iOS, Android, and the web without sacrificing the end user’s experience or application quality. The tradeoff is that it adds some complexity to your application setup. If your team can handle that and wants to develop mobile applications for more than just one platform, you should be looking at React Native.
CHAPTER 2
Working with React Native
In this chapter, we’ll cover the bridge, and review how React Native works under the hood. Then, we’ll look at how React Native components differ from their web coun‐ terparts, and cover what you’ll need to know in order to create and style components for mobile.
If you’d prefer to dig into the development process and see React Native in action, feel free to jump ahead to Chapter 3.
How Does React Native Work?
The idea of writing mobile applications in JavaScript feels a little odd. How is it possi‐ ble to use React in a mobile environment? In order to understand the technical underpinnings of React Native, we first need to recall one of React’s concepts: the Vir‐ tual DOM.
Figure 2-1. Performing calculations in the Virtual DOM limits rerendering in the brows‐ er’s DOM
In the context of React on the web, most developers think of the Virtual DOM as a performance optimization. The Virtual DOM certainly has performance benefits, but its real potential lies in the power of its abstraction. Placing a clean abstraction layer between the developer’s code and the actual rendering opens up a lot of interesting possibilities. What if React could render to a target other than the browser’s DOM? After all, React already “understands” what your application is supposed to look like.
Indeed, this is how React Native works, as shown in Figure 2-2. Instead of rendering to the browser’s DOM, React Native invokes Objective-C APIs to render to iOS com‐ ponents, or Java APIs to render to Android components. This sets React Native apart from other cross-platform app development options, which often end up rendering web-based views.
This is all possible because of the bridge, which provides React with an interface into the host platform’s native UI elements. React components return markup from their render function, which describes how they should look. With React for the web, this translates directly to the browser’s DOM. For React Native, this markup is translated to suit the host platform, so a <View> might become an iOS-specific UIView.
The core React Native project supports iOS and Android. Because of the abstraction layer provided by the Virtual DOM, React Native can target other platforms, too— someone just needs to write the bridge. For example, there are community imple‐ mentations of React Native for Windows and Ubuntu, so you can also use React Native to create desktop applications.
Rendering Lifecycle
If you are accustomed to working in React, the React lifecycle should be familiar to you. When React runs in the browser, the render lifecycle begins by mounting your React components (Figure 2-3).
Figure 2-3. Mounting components in React
After that, React handles the rendering and rerendering of your component as neces‐ sary (Figure 2-4).
Figure 2-4. Rerendering components in React
For the render stage, the developer returns HTML markup from a React component’s render method, which React then renders directly into the page as necessary.
Creating Components in React Native
All React code lives in React components. React Native components are largely the same as ordinary React components, with some important differences around ren‐ dering and styling.
Working with Views
When writing in React for the web, you render normal HTML elements (<div>, <p>, <span>, <a>, etc.). With React Native, all of these elements are replaced by platform-specific React components (see Table 2-1). The most basic is the cross-platform <View>, a simple and flexible UI element that can be thought of as analogous to the <div>. On iOS, for instance, the <View> component renders to a UIView, whereas on Android it renders to a View.
Table 2-1. Basic React elements for the web compared with React Native
React React Native
<div> <View>
<span> <Text>
<li>, <ul> <FlastList>, child items <img> <Image>
Other components are platform-specific. For instance, the <DatePickerIOS> compo‐ nent (predictably) renders the iOS standard date picker (Figure 2-5). Here is an excerpt from the RNTester sample app, demonstrating an iOS date picker. The usage is straightforward, as you would expect:
<DatePickerIOS
date={this.state.date} mode="time"
/>
Because all of our UI elements are now React components rather than basic HTML elements like the <div>, you will need to explicitly import each component you want to use. For instance, we need to import the <DatePickerIOS> component like so:
import { DatePickerIOS } from "react-native";
The RNTester application, which is bundled into the React Native GitHub project, allows you to view all of the supported UI elements. I encourage you to examine the various elements included in the RNTester app. It also demonstrates many styling options and interactions.
Platform-specific components and APIs have special tags in the documentation, and typically use the platform name as a suffix —for example, <TabBarIOS> and <ToolbarAndroid>.
Because these components vary from platform to platform, how you structure your React components becomes even more important when you’re working in React Native. In React for the web, we often have a mix of React components: some manage logic and their child components, while others render raw markup. If you want to reuse code when working in React Native, maintaining separation between these types of components becomes critical. A React <DatePickerIOS> component obvi‐ ously cannot be reused for Android. However, a component that encapsulates the associated logic can be reused. Then the visual component can be swapped out based on your platform. You can also designate platform-specific versions of components if you want, so you could have a picker.ios.js and a picker.android.js file, each with a sep‐ arate implementation of the same component. We’ll cover this in “Components with Platform-Specific Implementations” on page 134.
Using JSX
In React Native, just as in React, we write our views using JSX, combining markup and the JavaScript that controls it into a single file. JSX met with strong reactions when React first debuted. For many web developers, the separation of files based on technologies is a given: you keep your CSS, HTML, and JavaScript files separate. The idea of combining markup, control logic, and even styling into one language can be confusing.
If you’ve never seen JSX before, don’t worry: it’s pretty simple. As an example, a pure-JavaScript React component for the web might look something like this:
class HelloMessage extends React.Component { render() {
We can render this more succinctly by using JSX. Instead of calling React.createElement and passing in a list of HTML attributes, we use XML-like markup:
class HelloMessage extends Component { render() {
// Instead of calling createElement, we return markup
return <div>Hello {this.props.name}</div>;
} }
// We no longer need a createElement call here
ReactDOM.render(<HelloMessage name="Bonnie" />, mountNode);
Both of these will render the following HTML onto the page:
<div>Hello Bonnie</div>
Styling Native Components
On the web, we style React components using CSS, just as we would any other HTML element. Whether you love it or hate it, CSS is a necessary part of the web. React usu‐ ally does not affect the way we write CSS. It does make it easier to dynamically build class names based on props and state, but otherwise React is mostly agnostic about how we handle styles on the web.
elements, you can see many examples of supported styles in the RNTester application, which is one of the examples that ships with React Native.
React Native also insists on the use of inline styles, which exist as JavaScript objects. The React team has advocated for this approach before in React for web applications. If you have previously experimented with inline styles in React, the syntax will look familiar to you:
React Native also provides some utilities for creating and extending style objects that make dealing with inline styles a more manageable process. We will explore those later in Chapter 5.
Does looking at inline styles make you twitch? If you’re coming from a web-based background, this is a break from standard practices. Working with style objects, as opposed to stylesheets, takes some mental adjustments and changes the way you need to approach writing styles. However, in the context of React Native, it is a useful shift. We will be discussing styling best practices and workflow in Chapter 5. Just try not to be surprised when you see them in use!
Host Platform APIs
Perhaps the biggest difference between React for the web and React Native is the way we think about host platform APIs. On the web, we often deal with fragmentation and inconsistent adoption of standards; still, most browsers support a common core of shared features. With React Native, however, platform-specific APIs play a much larger role in creating an excellent, natural-feeling user experience. There are also many more options to consider. Mobile APIs include everything from data storage to location services to accessing hardware such as the camera. Unconventional plat‐ forms lead to even more interesting APIs—what should the interface look like between React Native and a virtual reality headset, for instance?
think about what feels right for your target platform, and design with natural interac‐ tions in mind.
Inevitably, the React Native bridge will not expose all host platform functionality. If you find yourself in need of an unsupported feature, you have the option of adding it to React Native yourself. Alternatively, chances are good that someone else has done so already, so be sure to check for community implementations. We’ll cover this in Chapter 7.
It is also worth noting that utilizing host platform APIs has implications for code reuse. React components that need specific functionality will be platform-specific as well. Isolating and encapsulating those components will bring added flexi‐ bility to your application. Of course, this applies for the web, too: if you plan on sharing code between React Native and React, keep in mind that things like the DOM do not actually exist in React Native.
Summary
CHAPTER 3
Building Your First Application
In this chapter, we will cover how to set up your local development environment for working with React Native. Then we will go through the basics of creating a simple application that you can deploy to your own iOS or Android device.
Setting Up Your Environment
Setting up your development environment will enable you to follow along with the examples in the book and write your own applications.
There are two general approaches to setting up a development environment for React Native. The first, a tool called Create React Native App, gives you a quicker, easier installation but supports only pure-JavaScript applications. The second, more tradi‐ tional approach involves fully installing React Native and all of its dependencies. Think of Create React Native App as a shortcut for easier testing and prototyping.
Information on migrating from Create React Native App to a full React Native project can be found in Appendix C.
Which approach should you take? I recommend that beginners use Create React Native App for educational purposes and quick proto‐ typing.
Both approaches are described next. The example code in subsequent chapters will typically work with either approach; when something is incompatible with Create React Native App and requires a full React Native project, it will be noted.
Developer Setup: Create React Native App
Create React Native App is a command-line tool that allows you to quickly create and run React Native applications without needing to install Xcode or Android Studio.
If you want to get up and running quickly, then Create React Native App is the right choice.
Create React Native App is a great tool, but as mentioned earlier it supports only pure-JavaScript applications. Later in this book, we’ll discuss ways of integrating React Native applications with native code written in Java or Objective-C. Don’t worry: if you begin with Create React Native App, you can still “eject” into a full React Native project.
Let’s start by installing the create-react-native-app package from npm. React Native uses npm, the Node.js package manager, to manage dependencies. The npm registry includes packages for all sorts of JavaScript projects, not just Node.
npm install -g create-react-native-app
Creating Your First Application with create-react-native-app
To create a new project with Create React Native App, run the following command:
create-react-native-app first-project
This will install some JavaScript dependencies, as well as create the boilerplate for your application. Your project directory will look something like this:
.
├── App.js ├── App.test.js ├── README.md ├── app.json ├── node_modules ├── package.json └── yarn.lock
App.js. To modify this project and build out your own application, you would begin with App.js.
We will cover what this code is doing in more detail once we start building our weather application in “Building a Weather App” on page 22.
Previewing Your App on iOS or Android
Great—now your application is ready for testing. To launch your application, run:
cd first-project npm start
You should see the screen shown in Figure 3-1.
In order to view your application, you’ll need the Expo app for iOS or Android. Once you have it installed, point your phone’s camera at the QR code, and your React Native app will load. Note that your phone and computer will need to be on the same network, and able to communicate with each other.
Congrats! You’ve created your first React Native app, compiled it, and gotten it run‐ ning on a real device.
In the next section, we’ll cover how to do a full, traditional installation of React Native. You can skip to “Exploring the Sample Code” on page 19 instead if you’d like to get started programming.
Developer Setup: The Traditional Approach
Instructions for installing React Native and all of its dependencies can be found in the official React Native documentation.
You can use Windows, macOS, or Linux to develop applications with React Native. However, macOS is required to develop iOS applications. Linux and Windows users can still use React Native to write Android applications.
Because the setup instructions vary by platform and React Native version, we won’t go into them in detail here, but you’ll need to set up the following:
• node.js
• React Native
• iOS development environment (Xcode)
• Android development environment (JDK, Android SDK, Android Studio)
If you don’t want to install developer tools for both iOS and Android, that’s fine—just make sure that you have at least one of them set up.
Creating Your First Application with react-native
You can use the React Native command-line tools to create a new application. Run the following command to install the command-line tools:
npm install -g react-native-cli
Now we can generate a fresh project with all of the React Native, iOS, and Android boilerplate we’ll need by running:
The resulting directory structure should look similar to the following:
.
├── __tests__ ├── android ├── app.json
├── index.android.js ├── index.ios.js ├── ios
├── node_modules ├── package.json └── yarn.lock
The ios/ and android/ directories contain boilerplate relevant to those platforms. Your React code is located in the index.ios.js and android.ios.js files, which are the respec‐ tive entry points for your React application. Dependencies installed via npm can, as usual, be found in the node_modules/ folder.
Running Your App on iOS
To run your app on iOS, start by navigating into your newly created project’s direc‐ tory. Then you can run your React Native application like so:
cd FirstProject react-native run-ios
Alternatively, you can open your application in Xcode and launch the iOS simulator from there:
open ios/FirstProject.xcodeproj
You can also use Xcode to upload your application to a real device for testing. In order to do this, you will need a free Apple ID so that you can configure code signing.
Figure 3-2. Setting the Team in Xcode will allow you to test your application on a physi‐ cal device
The first time you attempt to run your application on any particular device, Xcode will prompt you to sign into your Apple account and register your device for develop‐ ment.
For more details on how to run your app on a real iOS device, check out Apple’s offi‐ cial documentation.
Note that your iOS device and your computer must be on the same network in order for your application to run.
Running Your App on Android
In order to run your application on Android, you need a fully functioning Android developer setup, including Android Studio and the Android SDK. See the Getting Started documentation for a list of Android dependencies.
To launch your React Native platform on Android, run:
react-native run-android
You can also open your application in Android Studio and compile and run it from there.
Exploring the Sample Code
Now that you have launched and deployed the default application, let’s figure out how it works. In this section, we will dig into the source code of the default application and explore the structure of a React Native project.
If you are using Create React Native App, open the file App.js (see Example 3-1). If you are using a full React Native project, open up index.ios.js or index.android.js (see Example 3-2).
Example 3-1. The starter code in App.js, for Create React Native App projects
import React from "react";
import { StyleSheet, Text, View } from "react-native";
export default class App extends React.Component { render() {
const styles = StyleSheet.create({ container: {
Example 3-2. The starter code in index.ios.js and index.android.js, for full React Native projects
export default class FirstProject extends Component { render() {
return (
<Text style={styles.welcome}>
const styles = StyleSheet.create({ container: {
AppRegistry.registerComponent('FirstProject', () => FirstProject);
Either way, let’s talk about what’s going on here.
As you can see in Example 3-3, the import statements used are a bit different than what you might expect from a web-based React project.
Example 3-3. Importing UI elements in React Native
There’s some interesting syntax going on here. React is imported as usual, but what is happening on the next line?
One quirk of working with React Native is that you need to explicitly import every Native-provided module you work with. Elements like <div> don’t simply exist; instead, you need to explicitly import components such as <View> and <Text>. Library functions such as Stylesheet and AppRegistry also must be explicitly imported with this syntax. Once we start building our own applications, we will explore the other React Native functions that you may need to import.
If the syntax is unfamiliar to you, check out Example A-4 in Appendix A for an explanation of destructuring in ES6.
Next, let’s look at the component class in Example 3-4. This should all look comforta‐ bly familiar because it’s an ordinary React component. The main difference is its use of <Text> and <View> components instead of <div> and <span>, and the use of style objects.
Example 3-4. FirstProject component, with styles
export default class FirstProject extends Component { render() {
margin: 10,
},
instructions: { textAlign: 'center',
color: '#333333',
marginBottom: 5,
},
});
As I mentioned earlier, all styling in React Native is done with style objects rather than stylesheets. The standard method of handling styling is by utilizing the Style Sheet library. You can see how the style objects are defined toward the bottom of the file. Note that only <Text> components can take text-specific styles like fontSize, and that all layout logic is handled by flexbox. We will discuss how to build layouts with flexbox at greater length in Chapter 5.
The sample application is a good demonstration of the basic functions you will need to create React Native applications. It mounts a React component for rendering and demonstrates the basics of styling and rendering in React Native. It also gives us a simple way to test our development setup and try deploying to a real device. How‐ ever, it’s still a very basic application with no user interaction. So now let’s try building a more full-featured application.
Building a Weather App
In this section, we will be building off of the sample application to create a weather app. This will give us a chance to explore how to utilize and combine stylesheets, flex‐ box, network communication, user input, and images into a useful app we can then deploy to an Android or iOS device.
This section may feel like a bit of a blur, as it will be giving you an overview of these features rather than deep explanations of them. The weather app will serve as a useful reference in future sections as we discuss these features in more detail, however, so don’t worry if it feels like we’re moving quickly!
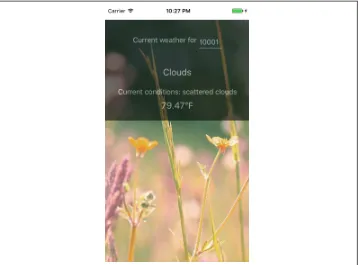
Figure 3-3. The finished weather app
The first thing we’ll do is replace the default code from our sample app. Move the ini‐ tial component out into its own file, WeatherProject.js.
If you created a full React Native project, you will need to replace the contents of index.ios.js and index.android.js, as shown in Example 3-5.
Example 3-5. Simplified contents of index.ios.js and index.android.js (they should be identical)
import { AppRegistry } from "react-native";
import WeatherProject from "./WeatherProject";
AppRegistry.registerComponent("WeatherProject", () => WeatherProject);
Similarly, if you created a React Native project with Create React Native App, you will need to replace the contents of App.js, as shown in Example 3-6.
Example 3-6. Simplified contents of App.js for Create React Native App projects
Handling User Input
We want the user to be able to enter a zip code and get the forecast for that area, so we need to add a text field for user input. We can start by adding zip code information to our component’s initial state (see Example 3-7).
Example 3-7. Adding zip code information to your component, before the render function
constructor(props) { super(props);
this.state = { zip: "" }; }
If you’re accustomed to using React.createClass() to create components instead of JavaScript classes, this may seem odd. When creating component classes, we set the initial state values for React components by mutating the this.state variable in the constructor method. If you need a review of the React component lifecycle, see the React docs.
Next, we should also change one of the <Text> components to display this.state.zip, as shown in Example 3-8.
Example 3-8. Adding a <Text> component that displays the current zip code
<Text style={styles.welcome}>
You input {this.state.zip}.
</Text>
With that out of the way, let’s add a <TextInput> component (see Example 3-9). This is a basic component that allows the user to enter text.
Example 3-9. The <TextInput> component is used for entering text
<TextInput
style={styles.input}
onSubmitEditing={this._handleTextChange}/>
The <TextInput> component is documented in the React Native docs, along with its properties. You can also pass the <TextInput> additional callbacks in order to listen to other events, such as onChange or onFocus, but we do not need them at the moment.
const styles = StyleSheet.create({ ...
input: { fontSize: 20,
borderWidth: 2,
height: 40 }
... });
The callback we passed as the onSubmitEditing prop should be added as a function on the component, as shown in Example 3-10.
Example 3-10. The handleText callback for our <TextInput>
_handleTextChange = event => {
this.setState({zip: event.nativeEvent.text}) }
By using fat-arrow syntax, we ensure that our callback is properly bound to the com‐ ponent instance. React autobinds lifecycle methods such as render, but for other methods we need to pay attention to binding. Fat-arrow functions are covered in Example A-8.
You will also need to update your import statements, as shown in Example 3-11.
Example 3-11. Importing UI elements in React Native
import { ... TextInput ...
} from "react-native;
Now try running your application using either the iOS simulator or the Android emulator. It won’t be pretty, but you should be able to successfully submit a zip code and see it reflected in the <Text> component.
If we wanted, we could add some simple input validation here to ensure that the user typed in a five-digit number, but we will skip that for now.
Example 3-12 shows the full code for the WeatherProject.js component thus far.
Example 3-12. This version of WeatherProject.js simply accepts and records user input
import React, { Component } from "react";
class WeatherProject extends Component {
const styles = StyleSheet.create({ container: {
export default WeatherProject;
Displaying Data
Now let’s work on displaying the forecast for that zip code. We will start by adding some mock data to our initial state value in WeatherProject.js:
this.state = { zip: "", forecast: null }; }
For sanity’s sake, let’s also pull the forecast rendering into its own component. Make a new file called Forecast.js (see Example 3-13).
Example 3-13. <Forecast> component in Forecast.js
import React, { Component } from "react";
import { StyleSheet, Text, View } from "react-native";
class Forecast extends Component { render() {
const styles = StyleSheet.create({ container: { height: 130 },
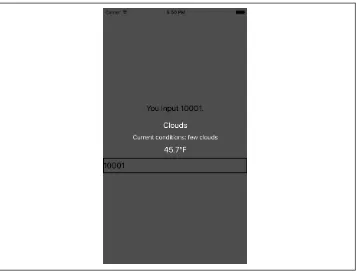
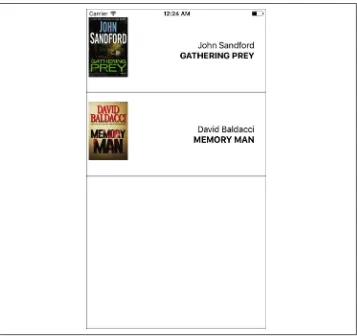
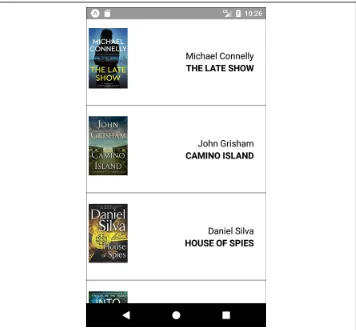
The <Forecast> component just renders some <Text> based on its props. We’ve also included some simple styles at the bottom of the file to control things like text color.
issues with layout and styling later. You can see how the <Forecast> component appears in the resulting application in Figure 3-4.
Example 3-14. WeatherProject.js, updated to include the <Forecast> component
import React, { Component } from "react";
import { StyleSheet, Text, View, TextInput } from "react-native";
import Forecast from "./Forecast";
class WeatherProject extends Component { constructor(props) {
const styles = StyleSheet.create({ container: {
flex: 1,
alignItems: "center",
backgroundColor: "#F5FCFF" },
welcome: { fontSize: 20, textAlign: "center", margin: 10 },
input: { fontSize: 20,
borderWidth: 2,
padding: 2,
height: 40,
width: 100,
textAlign: "center" }
});
export default WeatherProject;
Because we still don’t have a forecast to render, nothing should change visually yet.
Fetching Data from the Web
Next, let’s explore using the networking APIs available in React Native. You won’t be using jQuery to send AJAX requests from mobile devices. Instead, React Native implements the Fetch API. The Promise-based syntax, shown in Example 3-15, is fairly simple.
Example 3-15. Using the React Native Fetch API
fetch('http://www.somesite.com') .then((response) => response.text()) .then((responseText) => {
console.log(responseText); });
If you’re not accustomed to working with Promises, see “Working with Promises” on page 212.
We will be using the OpenWeatherMap API, which provides us with a simple end‐ point that returns the current weather for a given zip code. A small library for this API is provided in open_weather_map.js, shown in Example 3-16.
Example 3-16. The OpenWeatherMap library, from src/weather/open_weather_map.js
const WEATHER_API_KEY = "bbeb34ebf60ad50f7893e7440a1e2b0b";
const API_STEM = "http://api.openweathermap.org/data/2.5/weather?";
function zipUrl(zip) {
return `${API_STEM}q=${zip}&units=imperial&APPID=${WEATHER_API_KEY}`;
function fetchForecast(zip) {
export default { fetchForecast: fetchForecast };
Let’s import it now:
import OpenWeatherMap from "./open_weather_map";
To integrate it into our application, we can change the callback on the <TextInput> component to query the OpenWeatherMap API, as shown in Example 3-17.
Example 3-17. Fetching data from the OpenWeatherMap API
_handleTextChange = event => { let zip = event.nativeEvent.text;
Logging the forecast here is a nice sanity check for us; for more detailed information on how to view the console output, see “Debugging with console.log” on page 141.
Finally, we also need to update the styling for our container so that we can see the forecast text render:
container: { flex: 1,
justifyContent: "center", alignItems: "center", backgroundColor: "#666666" }
Figure 3-4. The weather app so far
The updated code for WeatherProject.js is shown in Example 3-18.
Example 3-18. WeatherProject.js: now with real data!
import React, { Component } from "react";
import { StyleSheet, Text, View, TextInput } from "react-native";
import OpenWeatherMap from "./open_weather_map";
import Forecast from "./Forecast";
class WeatherProject extends Component { constructor(props) {
super(props);
this.state = { zip: "", forecast: null }; }
_handleTextChange = event => { let zip = event.nativeEvent.text;
OpenWeatherMap.fetchForecast(zip).then(forecast => { this.setState({ forecast: forecast });
render() {
const styles = StyleSheet.create({ container: {
export default WeatherProject;
Adding a Background Image
Image assets are managed much like any other code asset: you can include them with a require call. We are going to use a file called flowers.png as our background image. It can be required like so:
<Image source={require('./flowers.png')}/>
The image file is available in the GitHub repository.
Just like JavaScript assets, if you have a flowers.ios.png and a flowers.android.png file, the React Native packager will load the appropriate image based on the platform. Likewise, you can use the @2x and @3x suffixes to provide different image files for dif‐ ferent screen densities. So, hypothetically, we could structure our project directory like so:
To add a background image to a <View>, we don’t set a background property on a <div> like we do on the web. Instead, we use an <Image> component as a container:
<Image source={require('./flowers.png')} resizeMode='cover'
style={styles.backdrop}>
// Your content here
</Image>
The <Image> component expects a source prop, which we get by using require.
Don’t forget to style it with flexDirection so that its children render as we’d like them to:
backdrop: { flex: 1,
flexDirection: 'column' }
Now let’s give the <Image> some children. Update the render method of the <Weather Project> component to return the following:
<TextInput
style={[styles.zipCode, styles.mainText]}
onSubmitEditing={event => this._handleTextChange(event)} />
</View> </View> {content} </View> </Image>
</View>
You’ll notice that I’m using some additional styles that we haven’t discussed yet, such as row, overlay, zipContainer, and zipCode. You can skip ahead to Example 3-19 to see the full stylesheet.
Putting It All Together
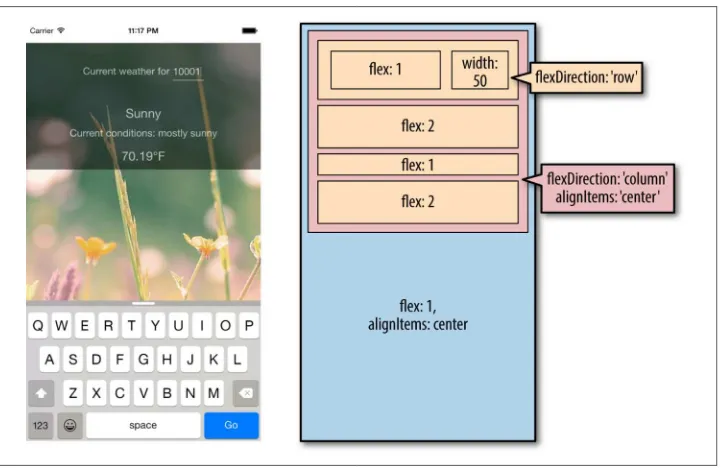
For the final version of the application, I’ve reorganized the <WeatherProject> com‐ ponent’s render function and tweaked the styles. The main change is to the layout logic, which is diagrammed in Figure 3-5.
Figure 3-5. Layout of the finished weather application
Example 3-19. Finished code for WeatherProject.js
import React, { Component } from "react";
import { StyleSheet, Text, View, TextInput, Image } from "react-native";
import Forecast from "./Forecast";
import OpenWeatherMap from "./open_weather_map";
</View>
const baseFontSize = 16;
const styles = StyleSheet.create({
container: { flex: 1, alignItems: "center", paddingTop: 30 },
export default WeatherProject;
Now that we’re done, try launching the application. It should work on both Android and iOS, in an emulator or on your physical device. What would you like to change or improve?
You can view the completed application in the GitHub repository.
Summary
the user. We demonstrated how to implement basic styling in React Native, as well as how to use images and include assets in our application. Finally, we learned how to use the React Native networking API to request data from external web sources. Not bad for a first application!
Hopefully, this chapter has demonstrated how quickly you can build React Native applications with useful features that feel at home on a mobile device.
If you want to extend your application further, here are some things to try:
• Add more images and change them based on the forecast
• Add validation to the zip code field
• Switch to using a more appropriate keypad for the zip code input
• Display the five-day weather forecast
Once we cover more topics, such as geolocation, you will be able to extend the weather application even further.
CHAPTER 4
Components for Mobile
In Chapter 3, we built a simple weather app. In doing so, we touched upon the basics of building interfaces with React Native. In this chapter, we will take a closer look at the mobile-based components used for React Native, and how they compare to basic HTML elements. Mobile interfaces are based on different primitive UI elements than web pages, and thus we need to use different components.
This chapter starts with a more detailed overview of the most basic components: <View>, <Image>, and <Text>. Then, we will discuss how touch and gestures factor into React Native components, and how to handle touch events. Next, we will cover higher-level components, such as the tab bars, navigators, and lists, which allow you to combine other views into standard mobile interface patterns.
Analogies Between HTML Elements and Native
Components
When developing for the web, we make use of a variety of basic HTML elements. These include <div>, <span>, and <img>, as well as organizational elements such as <ol>, <ul>, and <table>. (We could include a consideration of elements such as <audio>, <svg>, <canvas>, and so on, but we’ll ignore them for now.)
Table 4-1. Analogous HTML and Native components
HTML React Native
div <View>
img <Image>
span, p <Text>
ul/ol, li <FlatList>, child items
Although these elements serve roughly the same purposes, they are not interchangea‐ ble. Let’s take a look at how these components work on mobile with React Native and how they differ from their browser-based counterparts.
Can I Share Code Between React Native and My Web App?
Out of the box, React Native supports rendering to Android and iOS. If you want to render web-compatible views with React Native, check out react-native-web.
Regardless of your approach, any JavaScript code—including React components— that doesn’t render basic elements can be shared. So, if your business logic is isolated from your rendering code, you’ll be able to reuse it.
The <Text> Component
Rendering text is a deceptively basic function; nearly any application will need to ren‐ der text somewhere. However, text within the context of React Native and mobile development works differently from text rendering for the web.
When working with text in HTML, you can include raw text strings in a variety of elements. Furthermore, you can style them with child tags such as <strong> and <em>. So, you might end up with an HTML snippet that looks like this:
<p>The quick <em>brown</em> fox jumped over the lazy <strong>dog</strong>.</p>
In React Native, only <Text> components may have plain-text nodes as children. In other words, this is not valid:
<View>
Text doesn't go here!
</View>
Instead, wrap your text in a <Text> component:
<View>
When dealing with <Text> components in React Native, you no longer have access to subtags such as <strong> and <em>, though you can apply styles to achieve similar effects by using attributes such as fontWeight and fontStyle. Here’s how you might achieve a similar effect by making use of inline styles:
<Text>
The quick <Text style={{fontStyle: "italic"}}>brown</Text> fox jumped over the lazy <Textstyle={{fontWeight: "bold"}}>dog</Text>.
</Text>
This approach could quickly become verbose. You’ll likely want to create styled com‐ ponents as a sort of shorthand when dealing with text, as shown in Example 4-1.
Example 4-1. Creating reusable components for styling text
const styles = StyleSheet.create({ bold: {
class Strong extends Component { render() {
Once you have declared these styled components, you can freely make use of styled nesting. Now the React Native version looks quite similar to the HTML version (see Example 4-2).
Example 4-2. Using styled components for rendering text
<Text>
over the lazy <Strong>dog</Strong>.
</Text>
Similarly, React Native does not inherently have any concept of header elements (h1, h2, etc.), but it’s easy to declare your own styled <Text> elements and use them as needed.
In general, when dealing with styled text, React Native forces you to change your approach. Style inheritance is limited, so you lose the ability to have default font set‐ tings for all text nodes in the tree. Once again, the React Native documentation rec‐ ommends solving this by using styled components:
You also lose the ability to set up a default font for an entire subtree. The recom‐ mended way to use consistent fonts and sizes across your application is to create a component MyAppText that includes them and use this component across your app. You can also use this component to make more specific components like MyAppHeader Text for other kinds of text.
The <Text> component documentation has more details on this.
You’ve probably noticed a pattern here: React Native is very opinionated in its prefer‐ ence for reusing styled components over inheriting or reusing styles. While it can be time-consuming initially, this approach leads to better isolation so that you can ren‐ der a component anywhere in your application and get the same result. This in turn makes it easier to maintain the styling code in your application. We’ll discuss this approach further in the next chapter.
The <Image> Component
If text is the most basic element in an application, images are a close contender for both mobile and the web. When writing HTML and CSS for the web, we include images in a variety of ways: sometimes we use the <img> tag whereas at other times we apply images via CSS, such as when we use the background-image property. In React Native, we have a similar <Image> component, but it behaves a little differently.
The basic usage of the <Image> component is straightforward; just set the source prop:
<Image source={require("./puppies.png")} />
The image path is resolved exactly as JavaScript modules are resolved. So, in the pre‐ ceding example, puppies.png should be provided in the same folder as the component that requires it.
It is also possible to include web-based image sources instead of bundling your assets with your application. For example:
<Image source={{uri: "https://facebook.github.io/react/img/logo_og.png"}} style={{width: 400, height: 400}} />
When utilizing network resources, you will need to specify dimensions manually.
Downloading images via the network rather than including them as assets has some advantages. During development, for instance, it may be easier to use this approach while prototyping rather than carefully importing all of your assets ahead of time. It also reduces the size of your bundled mobile application so that users do not need to download all of your assets. However, it means that instead you’ll be relying on their data plan whenever they access your application in the future. For most cases, you’ll want to avoid using the URI-based method.
If you’re wondering about working with the user’s own images, we’ll cover the camera roll in Chapter 6.
Because React Native emphasizes a component-based approach, images must be included as <Image> components instead of being referenced via styles. For instance, in Chapter 3, we wanted to use an image as a background for our weather application. Whereas in plain HTML and CSS you would likely use the background-image prop‐ erty to apply a background image, in React Native you instead use the <Image> as a container component, like so:
<Image source={require("./puppies.png")}>
{/* Your content here... */}
</Image>
Figure 4-1. The difference between resize, cover, and contain
The <Image> component is very flexible. You will likely make extensive use of it in your own applications.
Working with Touch and Gestures
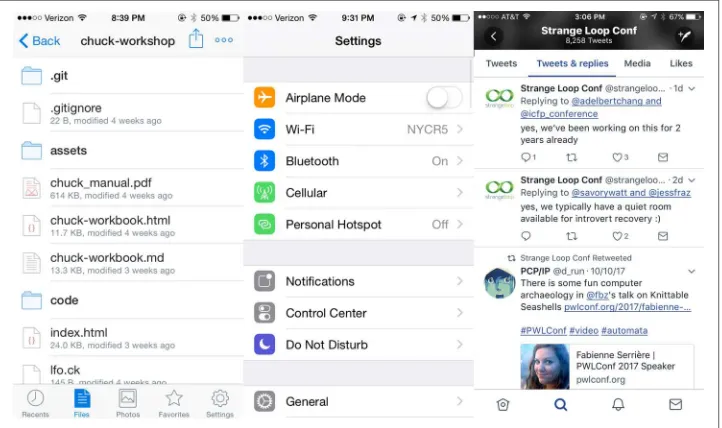
Web-based interfaces are usually designed for mouse-based controllers. We use things like hover state to indicate interactivity and respond to user interaction. For mobile, it’s touch that matters. Mobile platforms have their own norms around interactions that you’ll want to design for. This varies somewhat from platform to platform: iOS behaves differently from Android, which behaves differently yet again from Windows Phone.
React Native provides a number of APIs for you to leverage as you build touch-ready interfaces. In this section, we’ll look at the humble <Button> component and the <TouchableHighlight> container component, as well as lower-level APIs that give you direct access to touch events.
Creating Basic Interactions with <Button>
If you’re just getting started and need a basic, interactive button, the default <Button> component has you covered. It provides a simple API, which allows you to set the color, label text, and callback function.
<Button
onPress={this._onPress} title="Press me" color="#841584"
accessibilityLabel="Press this button"
This <Button> component is a decent starting point, but you’ll probably want to cre‐ ate your own interactive components. For that, we’ll need to use <TouchableHigh light>.
Using the <TouchableHighlight> Component
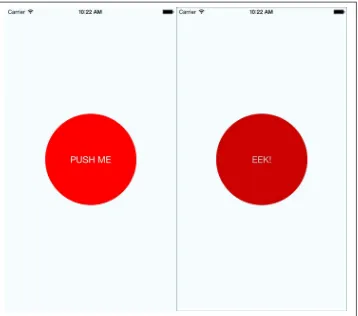
Any interface elements that respond to user touch (buttons, control elements, etc.) should usually have a <TouchableHighlight> wrapper. <TouchableHighlight> causes an overlay to appear when the view is touched, giving the user visual feedback. This is one of the key interactions that causes a mobile application to feel native, as opposed to a mobile-optimized website, where touch feedback is limited. As a general rule of thumb, you should use <TouchableHighlight> anywhere there would be a button or a link on the web.
At its most basic usage, you just need to wrap your component in a <TouchableHigh light>, which will add a simple overlay when pressed. The <TouchableHighlight> component also gives you hooks for events such as onPressIn, onPressOut, onLong Press, and the like, so you can use these events in your React applications.
Example 4-3 shows how you can wrap a component in a <TouchableHighlight> in
order to give the user feedback.
Example 4-3. Using the <TouchableHighlight> component
<TouchableHighlight
onPressIn={this._onPressIn} onPressOut={this._onPressOut} accessibilityLabel={'PUSH ME'} style={styles.touchable}>
<View style={styles.button}>
<Text style={styles.welcome}>
{this.state.pressing ? "EEK!" : "PUSH ME"} </Text>
</View>
</TouchableHighlight>
Figure 4-2. Using <TouchableHighlight> to give the user visual feedback—the unpressed state (left) and the pressed state, with highlight (right)
This is a contrived example, but it illustrates the basic interactions that make a button “feel” touchable on mobile. The overlay is a key piece of feedback that informs the user that an element can be pressed. Note that in order to apply the overlay, we don’t need to apply any logic to our styles; the <TouchableHighlight> handles the logic of that for us.
Example 4-4 shows the full code for this button component.
Example 4-4. PressDemo.js illustrates the use of <TouchableHighlight>
import React, { Component } from "react";
import { StyleSheet, Text, View, TouchableHighlight } from "react-native";
class Button extends Component { constructor(props) {
this.state = { pressing: false };
const styles = StyleSheet.create({ container: {
Try editing this button to respond to other events, by using hooks like onPress and onLongPress. The best way to get a sense for how these events map onto user interac‐ tions is to experiment using a real device.
Using the PanResponder Class
Unlike <TouchableHighlight>, PanResponder is not a component but rather a class provided by React Native. A PanResponder gestureState object gives you access to raw position data as well as information such as velocity and accumulated distance of the current gesture.
To make use of PanResponder in a React component, we need to create a PanRes ponder object and then attach it to a component’s render method.
Creating a PanResponder requires us to specify the proper handlers for PanResponder events (Example 4-5).
Example 4-5. Creating a PanResponder requires us to register several callbacks
this._panResponder = PanResponder.create({
onStartShouldSetPanResponder: this._handleStartShouldSetPanResponder,
onMoveShouldSetPanResponder: this._handleMoveShouldSetPanResponder,
onPanResponderGrant: this._handlePanResponderGrant,
onPanResponderMove: this._handlePanResponderMove,
onPanResponderRelease: this._handlePanResponderEnd,
onPanResponderTerminate: this._handlePanResponderEnd,
});
These six functions give us access to the full lifecycle of a touch event. onStartShould SetPanResponder and onMoveShouldSetPanResponder determine whether or not we should respond to a given touch event. onPanResponderGrant will be invoked when a touch event begins, and onPanResponderRelease and onPanResponderTerminate will be invoked when a touch event ends. We’ll be able to access data about the ongoing touch event during onPanResponderMove.
We use spread syntax to attach the PanResponder to the view in our component’s render method (Example 4-6).
Example 4-6. Attaching the PanResponder using spread sytax
render: function() { return (
<View
{...this._panResponder.panHandlers}>
); }
After this, the handlers that you passed to the PanResponder.create call will be invoked during the appropriate move events if the touch originates within this view.
Figure 4-3 renders a circle that you can drag around the screen. Its coordinates will be updated as you move it.
Figure 4-3. PanResponder demo
Example 4-7. For the first two callbacks, we simply return true
_handleStartShouldSetPanResponder = (event, gestureState) => {
// Should we become active when the user presses down on the circle?
return true; };
_handleMoveShouldSetPanResponder = (event, gestureState) => {
// Should we become active when the user moves a touch over the circle?
return true; };
Then we’ll want to use the location data in _handlePanResponderMove to update the coordinates of our circle view (Example 4-8).
Example 4-8. Updating the circle’s position in _handlePanResponderMove
_handlePanResponderMove = (event, gestureState) => { // Calculate current position using deltas
this._circleStyles.style.left = this._previousLeft + gestureState.dx;
this._circleStyles.style.top = this._previousTop + gestureState.dy;
this._updatePosition(); };
_updatePosition = () => {
this.circle && this.circle.setNativeProps(this._circleStyles); };
Note that we’re calling setNativeProps here in order to update the position of the circle view.
When working with animations, you can use setNativeProps to directly modify a component instead of the typical approach of set‐ ting state and props. This lets you bypass the overhead of re-rendering the component hierarchy, but it should be used sparingly.
Next, let’s implement _handlePanResponderGrant and _handlePanResponderEnd so that the circle changes color when a touch is active (Example 4-9).
Example 4-9. Implementing highlight behavior
_highlight = () => { this.circle &&
this.circle.setNativeProps({
style: { backgroundColor: "blue" } });
_unHighlight = () => { this.circle &&
this.circle.setNativeProps({ style: { backgroundColor: "green" } }); };
_handlePanResponderGrant = (event, gestureState) => { this._highlight();
};
_handlePanResponderEnd = (event, gestureState) => { this._unHighlight();
};
Let’s put it all together to build an interactive view using PanResponder, as shown in Example 4-10.
Example 4-10. PanDemo.js illustrates the use of PanResponder
// Adapted from https://github.com/facebook/react-native/blob/master/ // Examples/UIExplorer/PanResponderExample.js
"use strict";
import React, { Component } from "react";
import { StyleSheet, PanResponder, View, Text } from "react-native";
const CIRCLE_SIZE = 40;
const CIRCLE_COLOR = "blue";
const CIRCLE_HIGHLIGHT_COLOR = "green";