Ethan Brown
Learning
JavaScript
JAVASCRIPT ESSENTIALS FOR MODERN
APPLICATION DEVELOPMENT
3rd
E
di
tio
Ethan Brown
Learning JavaScript
THIRD EDITION
978-1-491-91491-5
[LSI]
Learning JavaScript by Ethan Brown
Copyright © 2016 Ethan Brown. All rights reserved.
Printed in the United States of America.
Published by O’Reilly Media, Inc., 1005 Gravenstein Highway North, Sebastopol, CA 95472.
O’Reilly books may be purchased for educational, business, or sales promotional use. Online editions are also available for most titles (http://safaribooksonline.com). For more information, contact our corporate/ institutional sales department: 800-998-9938 or [email protected].
Editor: Meg Foley
Production Editor: Kristen Brown Copyeditor: Rachel Monaghan Proofreader: Jasmine Kwityn
Indexer: Judith McConville Interior Designer: David Futato Cover Designer: Karen Montgomery Illustrator: Rebecca Demarest October 2006: First Edition
December 2008: Second Edition March 2016: Third Edition
Revision History for the Third Edition 2016-02-12: First Release 2016-04-15: Second Release 2016-05-13: Third Release
See http://oreilly.com/catalog/errata.csp?isbn=9781491914915 for release details.
The O’Reilly logo is a registered trademark of O’Reilly Media, Inc. Learning JavaScript, the cover image of a baby rhino, and related trade dress are trademarks of O’Reilly Media, Inc.
Table of Contents
Preface. . . xv
1.
Your First Application. . . 1
Where to Start 2
The Tools 2
A Comment on Comments 4
Getting Started 5
The JavaScript Console 7
jQuery 8
Drawing Graphics Primitive 9
Automating Repetitive Tasks 11
Handling User Input 12
Hello, World 13
2.
JavaScript Development Tools. . . 15
Writing ES6 Today 15
ES6 Features 16
Installing Git 17
The Terminal 17
Your Project Root 18
Version Control: Git 18
Package Management: npm 21
Build Tools: Gulp and Grunt 23
Project Structure 24
The Transcompilers 25
Running Babel with Gulp 25
Linting 27
Conclusion 30
3.
Literals, Variables, Constants, and Data Types. . . 33
Variables and Constants 33
Variables or Constants: Which to Use? 35
Identifier Names 35
Literals 36
Primitive Types and Objects 37
Numbers 38
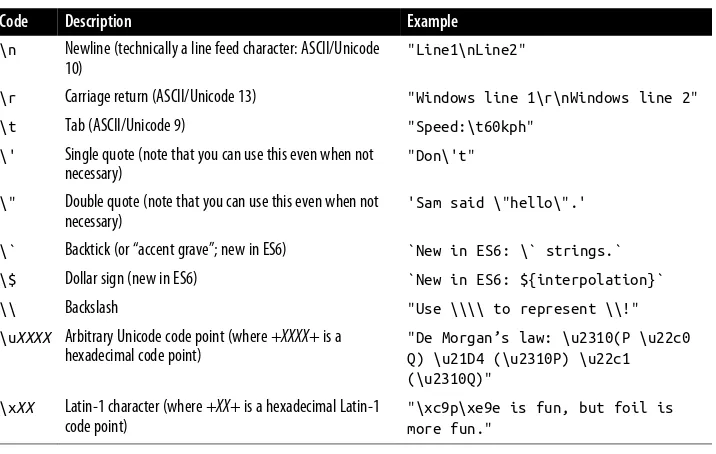
Strings 40
Escaping 40
Special Characters 41
Template Strings 42
Multiline Strings 43
Numbers as Strings 44
Booleans 44
Symbols 44
null and undefined 45
Objects 45
Number, String, and Boolean Objects 48
Arrays 48
Trailing Commas in Objects and Arrays 50
Dates 51
Regular Expressions 51
Maps and Sets 52
Data Type Conversion 52
Converting to Numbers 52
Converting to String 53
Converting to Boolean 53
Conclusion 54
4.
Control Flow. . . 55
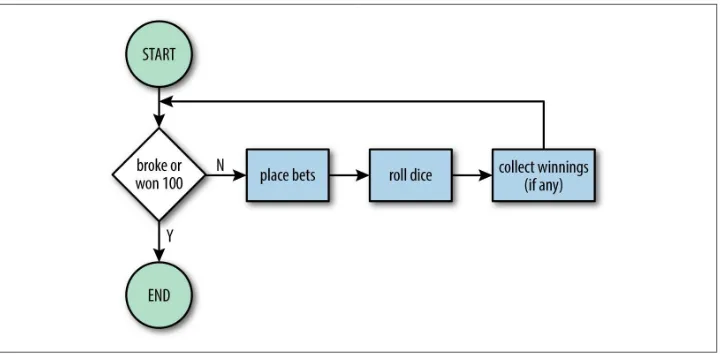
A Control Flow Primer 55
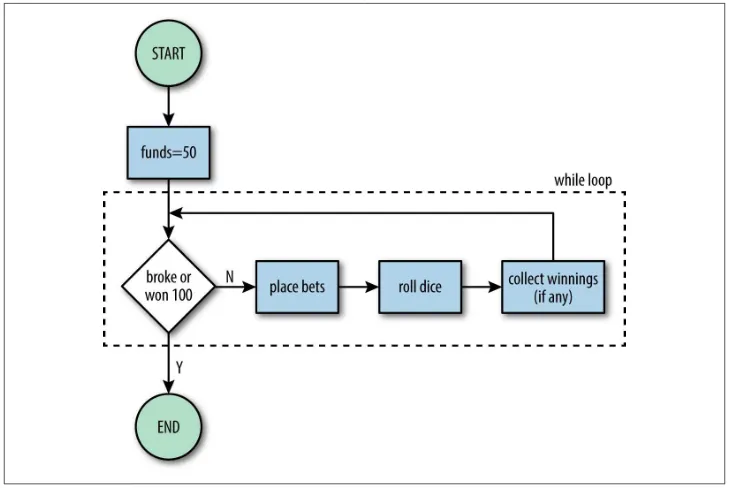
while Loops 59
Block Statements 59
Whitespace 60
Helper Functions 61
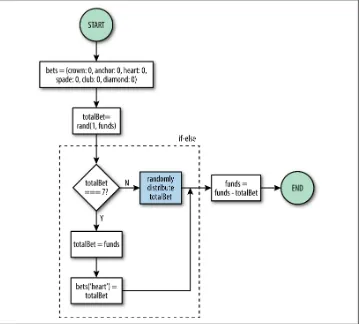
if…else Statement 62
do…while Loop 63
for Loop 64
if Statement 65
Putting It All Together 66
Control Flow Statements in JavaScript 68
Chaining if...else Statements 69
Metasyntax 69
Additional for Loop Patterns 71
switch Statements 72
for...in loop 75
for...of loop 75
Useful Control Flow Patterns 76
Using continue to Reduce Conditional Nesting 76
Using break or return to Avoid Unnecessary Computation 76
Using Value of Index After Loop Completion 77
Using Descending Indexes When Modifying Lists 77
Conclusion 78
5.
Expressions and Operators. . . 79
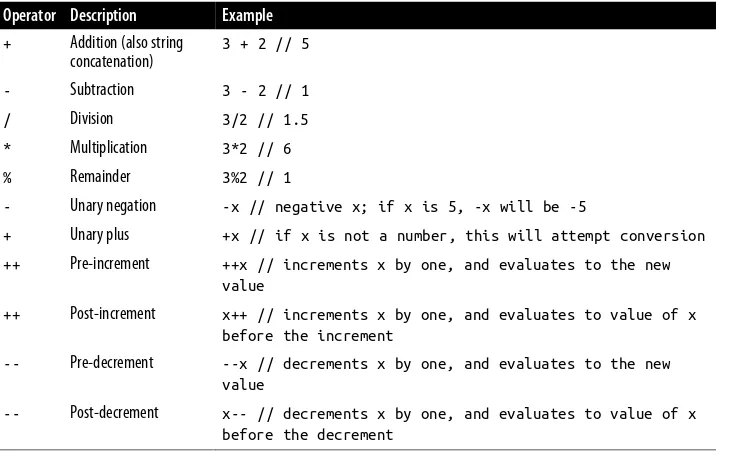
Operators 81
Arithmetic Operators 81
Operator Precedence 83
Comparison Operators 85
Comparing Numbers 87
String Concatenation 88
Logical Operators 88
Truthy and Falsy Values 89
AND, OR, and NOT 89
Short-Circuit Evaluation 91
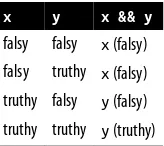
Logical Operators with Nonboolean Operands 91
Conditional Operator 92
Comma Operator 93
Grouping Operator 93
Bitwise Operators 93
typeof Operator 95
void Operator 96
Assignment Operators 96
Destructuring Assignment 97
Object and Array Operators 99
Expressions in Template Strings 99
Expressions and Control Flow Patterns 99
Converting if...else Statements to Conditional Expressions 100
Converting if Statements to Short-Circuited Logical OR Expressions 100
Conclusion 100
6.
Functions. . . 101
Return Values 102
Calling Versus Referencing 102
Function Arguments 103
Do Arguments Make the Function? 105
Destructuring Arguments 106
Default Arguments 107
Functions as Properties of Objects 107
The this Keyword 108
Function Expressions and Anonymous Functions 110
Arrow Notation 111
call, apply, and bind 112
Conclusion 114
7.
Scope. . . 115
Scope Versus Existence 116
Lexical Versus Dynamic Scoping 116
Global Scope 117
Block Scope 119
Variable Masking 119
Functions, Closures, and Lexical Scope 121
Immediately Invoked Function Expressions 122
Function Scope and Hoisting 123
Function Hoisting 125
The Temporal Dead Zone 126
Strict Mode 126
Conclusion 127
8.
Arrays and Array Processing. . . 129
A Review of Arrays 129
Array Content Manipulation 130
Adding or Removing Single Elements at the Beginning or End 131
Adding Multiple Elements at the End 131
Getting a Subarray 132
Adding or Removing Elements at Any Position 132
Cutting and Replacing Within an Array 132
Filling an Array with a Specific Value 133
Reversing and Sorting Arrays 133
Array Searching 134
The Fundamental Array Operations: map and filter 136
Array Magic: reduce 138
Array Methods and Deleted or Never-Defined Elements 141
String Joining 141
9.
Objects and Object-Oriented Programming. . . 145
Property Enumeration 145
for...in 146
Object.keys 146
Object-Oriented Programming 147
Class and Instance Creation 148
Dynamic Properties 149
Classes Are Functions 150
The Prototype 151
Static Methods 153
Inheritance 154
Polymorphism 155
Enumerating Object Properties, Revisited 156
String Representation 157
Multiple Inheritance, Mixins, and Interfaces 157
Conclusion 159
10.
Maps and Sets. . . 161
Maps 161
Weak Maps 163
Sets 164
Weak Sets 165
Breaking the Object Habit 165
11.
Exceptions and Error Handling. . . 167
The Error Object 167
Exception Handling with try and catch 168
Throwing Errors 169
Exception Handling and the Call Stack 169
try...catch...finally 171
Let Exceptions Be Exceptional 172
12.
Iterators and Generators. . . 173
The Iteration Protocol 175
Generators 177
yield Expressions and Two-Way Communication 178
Generators and return 180
Conclusion 180
13.
Functions and the Power of Abstract Thinking. . . 181
Functions as Subroutines 181
Functions as Subroutines That Return a Value 182
Functions as…Functions 183
So What? 185
Functions Are Objects 186
IIFEs and Asynchronous Code 187
Function Variables 189
Functions in an Array 191
Pass a Function into a Function 192
Return a Function from a Function 193
Recursion 194
Conclusion 195
14.
Asynchronous Programming. . . 197
The Analogy 198
Callbacks 198
setInterval and clearInterval 199
Scope and Asynchronous Execution 200
Error-First Callbacks 201
Callback Hell 202
Promises 203
Creating Promises 204
Using Promises 204
Events 206
Promise Chaining 208
Preventing Unsettled Promises 209
Generators 210
One Step Forward and Two Steps Back? 213
Don’t Write Your Own Generator Runner 214
Exception Handling in Generator Runners 214
Conclusion 215
15.
Date and Time. . . 217
Dates, Time Zones, Timestamps, and the Unix Epoch 217
Constructing Date Objects 218
Moment.js 219
A Practical Approach to Dates in JavaScript 220
Constructing Dates 220
Constructing Dates on the Server 220
Constructing Dates in the Browser 221
Transmitting Dates 221
Displaying Dates 222
Date Components 223
Date Arithmetic 224
User-Friendly Relative Dates 225
Conclusion 225
16.
Math. . . 227
Formatting Numbers 227
Fixed Decimals 228
Exponential Notation 228
Fixed Precision 228
Different Bases 229
Advanced Number Formatting 229
Constants 229
Algebraic Functions 230
Exponentiation 230
Logarithmic Functions 230
Miscellaneous 231
Pseudorandom Number Generation 232
Trigonometric Functions 232
Hyperbolic Functions 233
17.
Regular Expressions. . . 235
Substring Matching and Replacing 235
Constructing Regular Expressions 236
Searching with Regular Expressions 237
Replacing with Regular Expressions 237
Input Consumption 238
Alternation 240
Matching HTML 240
Character Sets 241
Named Character Sets 242
Repetition 243
The Period Metacharacter and Escaping 244
A True Wildcard 244
Grouping 245
Lazy Matches, Greedy Matches 246
Backreferences 247
Replacing Groups 248
Function Replacements 249
Anchoring 251
Word Boundary Matching 251
Lookaheads 252
Constructing Regexes Dynamically 253
Conclusion 254
18.
JavaScript in the Browser. . . 255
ES5 or ES6? 255
The Document Object Model 256
Some Tree Terminology 259
DOM “Get” Methods 259
Querying DOM Elements 260
Manipulating DOM Elements 261
Creating New DOM Elements 261
Styling Elements 262
Data Attributes 263
Events 264
Event Capturing and Bubbling 265
Event Categories 268
Ajax 269
Conclusion 272
19.
jQuery. . . 273
The Almighty Dollar (Sign) 273
Including jQuery 274
Waiting for the DOM to Load 274
jQuery-Wrapped DOM Elements 275
Manipulating Elements 275
Unwrapping jQuery Objects 277
Ajax 278
Conclusion 278
20.
Node. . . 279
Node Fundamentals 279
Modules 280
Core Modules, File Modules, and npm Modules 282
Customizing Modules with Function Modules 284
Filesystem Access 286
Process 289
Operating System 291
Child Processes 292
Streams 293
Web Servers 294
21.
Object Property Configuration and Proxies. . . 297
Accessor Properties: Getters and Setters 297
Object Property Attributes 299
Protecting Objects: Freezing, Sealing, and Preventing Extension 301
Proxies 304
Conclusion 306
22.
Additional Resources. . . 307
Online Documentation 307
Periodicals 308
Blogs and Tutorials 308
Stack Overflow 309
Contributing to Open Source Projects 311
Conclusion 311
A.
Reserved Words. . . 313
B.
Operator Precedence. . . 317
Index. . . 319
Preface
Even though this is my second book on technologies in the JavaScript ecosystem, I still find myself somewhat surprised at my role as a JavaScript expert and evangelist. Like so many programmers, I held a strong prejudice against JavaScript up until about 2012. To do such an about-face still feels a little disorienting.
My prejudice was for the usual reasons: I considered JavaScript a “toy” language (without really learning it properly, and therefore not knowing of what I spoke) that was practiced by dangerous, sloppy, untrained amateur programmers. There is a little truth in both of these reasons. ES6 was developed quickly, and even its inventor Bren‐ dan Eich admits there are things that he didn’t get right the first time around—and by the time he realized it, too many people were relying on the problematic behavior for him to effectively change it (show me the language that doesn’t suffer from this prob‐ lem, however). As for the second reason, JavaScript did make programming suddenly accessible. Not only did everyone have a browser, but with only a little effort, they could see the JavaScript that enabled the websites that were rapidly proliferating on the Web. People learned by trial and error, by reading each other’s code and—in so many cases—emulating poorly written code with insufficient understanding.
I’m glad I have learned enough about JavaScript to recognize that—far from being a toy language—it is based on extremely solid foundations, and is powerful, flexible, and expressive. I’m also glad I have come to embrace the accessibility that JavaScript brings. I certainly hold no animosity toward amateurs: everyone has to start some‐ where, programming is a profitable skill, and a career in programming has many advantages.
To the new programmer, the amateur, I say this: there is no shame in being an ama‐ teur. There is some shame in staying an amateur (if you make programming your profession, certainly). If you want to practice programming, practice it. Learn every‐ thing you can, from every source you can. Keep an open mind and—perhaps most importantly—question everything. Question every expert. Question every experi‐ enced programmer. Constantly ask “Why?”
1Eich confessed in a 2014 interview to enjoying thumbing his nose at Sun Microsystems, who “hated Java‐ Script.”
For the most part, I have tried to keep this book to the “facts” of JavaScript, but it is impossible to completely avoid opinion. Where I offer opinions, take them for what they are. You are welcome to disagree, and you are encouraged to seek out the opin‐ ions of other experienced developers.
You are learning JavaScript at a very exciting time. The Web is leaving its infancy (technically speaking), and web development isn’t the confusing, complicated Wild West that it was 5 and 10 years ago. Standards like HTML5 and ES6 are making it easier to learn web development, and easier to develop high-quality applications. Node.js is extending the reach of JavaScript beyond the browser, and now it is a viable choice for system scripting, desktop application development, backend web develop‐ ment, and even embedded applications. Certainly I haven’t had this much fun pro‐ gramming since I started in the mid-1980s.
A Brief History of JavaScript
JavaScript was developed by Brendan Eich, a developer at Netscape Communications Corporation, in 1995. Its initial development was very rapid, and much of the criti‐ cism leveled at JavaScript has cited the lack of planning foresight during its develop‐ ment. However, Brendan Eich was not a dabbler: he had a solid foundation in computer science, and incorporated remarkably sophisticated and prescient ideas into JavaScript. In many ways, it was ahead of its time, and it took 15 years for main‐ stream developers to catch on to the sophistication the language offered.
JavaScript started life with the name Mocha, and was briefly named LiveScript before being officially renamed to JavaScript in a Netscape Navigator release in 1995. The word “Java” in “JavaScript” was not coincidental, but it is confusing: aside from a common syntactic ancestry, JavaScript has more in common with Self (a prototype-based language developed at Xerox PARC in the mid-’80s) and Scheme (a language developed in the 1970s by Guy Steele and Gerald Sussman, which was in turn heavily influenced by Lisp and ALGOL) than with Java. Eich was familiar with both Self and Scheme, and used some of their forward-thinking paradigms in developing Java‐ Script. The name JavaScript was partially a marketing attempt to tie into the success Java was enjoying at the time.1
The relationship between Ecma’s specifications—which specify a language called ECMAScript—and JavaScript is mostly academic. Technically, JavaScript is an imple‐ mentation of ECMAScript, but for practical purposes, JavaScript and ECMAScript can be thought of interchangeably.
The last major ECMAScript version was 5.1 (generically referred to as ES5), pub‐ lished in June 2011. Browsers “in the wild” that are old enough not to support ECMAScript 5.1 have fallen well below the single digits, and it’s safe to say that ECMAScript 5.1 is the current lingua franca of the Web.
ECMAScript 6 (ES6)—which is the focus of this book—was published by Ecma Inter‐ national in June 2015. The working name for the specification prior to publication was “Harmony,” and you will hear ES6 referred to as “Harmony,” “ES6 Harmony,” “ES6,” “ES2015,” and “ECMAScript 2015.” In this book, we will refer to it simply as ES6.
ES6
If ES5 is the current lingua franca of the Web, the attentive reader might be wonder‐ ing why this book focuses on ES6.
ES6 represents a significant advancement in the JavaScript language, and some of ES5’s major shortcomings are addressed in ES6. I think you will find that ES6 is gen‐ erally a much more pleasant and powerful language to work with (and ES5 was quite enjoyable to start with). Also—thanks to transcompilers—you can write ES6 today and transcompile it to “web-compatible” ES5.
With ES6 finally published, browser support for it will grow steadily, and at some point, transcompilation will no longer be necessary to reach a broad audience (I am not foolish enough to make a prediction—even a rough one—about when that will happen).
What’s clear is that ES6 represents the future of JavaScript development, and by investing your time in learning it now, you will be prepared for the future, with trans‐ compilers preventing us from sacrificing portability now.
However, not every developer will have the luxury of writing ES6 today. It’s possible that you’re working on a very large existing ES5 code base that would be prohibitively expensive to convert to ES6. And some developers simply won’t wish to go through the extra effort involved in transcompilation.
With the exception of Chapter 1, this book will cover ES6, not ES5. Where appropri‐ ate, I will point out where ES6 differs from ES5, but there will not be side-by-side code examples, or extensive discussion of doing things “the ES5 way” when there is a better way in ES6. If you fall into that category of programmers who, for whatever
reason, need to stick to ES5, this may not be the book for you (though I hope you will return to it at some point in the future!).
The editorial choice to focus on ES6 was made carefully. The improvements in ES6 are significant enough that it would have been difficult to maintain a clear pedagogi‐ cal framework. In short, a book that attempts to cover ES5 and ES6 would do both topics a disservice.
Who This Book Is For
This book is primarily for readers who already have some experience with program‐ ming (even an introductory programming class, or an online course). If you’re new to programming, this book will be helpful, but you might want to supplement it with an introductory text or class.
Those who already have some JavaScript experience (especially if it’s only in ES5) will find a practical and thorough coverage of important language concepts.
Programmers who are coming from another language should feel right at home with the content in this book.
This book does attempt to comprehensively cover the language features, related tools, techniques, and paradigms that drive modern JavaScript development. Therefore, the material in this book necessarily ranges from the simple and straightforward (vari‐ ables, control flow, functions) to the complicated and esoteric (asynchronous pro‐ gramming, regular expressions). Depending on your level of experience, you may find some chapters more challenging than others: the beginning programmer will no doubt need to revisit some of the material more than once.
What This Book Is Not
This book is not a comprehensive reference to JavaScript or its related libraries. The Mozilla Developer Network (MDN) maintains an excellent, thorough, up-to-date, and free online JavaScript reference, which will be referenced liberally throughout this book. If you prefer a physical book, David Flanagan’s JavaScript: The Definitive Guide is quite comprehensive (though it does not cover ES6 at the time of this writ‐ ing).
Conventions Used in This Book
The following typographical conventions are used in this book:
Italic
Constant width
Used for program listings, as well as within paragraphs to refer to program ele‐ ments such as variable or function names, databases, data types, environment variables, statements, and keywords.
Constant width bold
Shows commands or other text that should be typed literally by the user.
Constant width italic
Shows text that should be replaced with user-supplied values or by values deter‐ mined by context.
This element signifies a tip or suggestion.
This element signifies a general note.
This element indicates a warning or caution.
Safari® Books Online
Safari Books Online is an on-demand digital library that deliv‐ ers expert content in both book and video form from the world’s leading authors in technology and business.
Technology professionals, software developers, web designers, and business and crea‐ tive professionals use Safari Books Online as their primary resource for research, problem solving, learning, and certification training.
Safari Books Online offers a range of plans and pricing for enterprise, government, education, and individuals.
Members have access to thousands of books, training videos, and prepublication manuscripts in one fully searchable database from publishers like O’Reilly Media,
Prentice Hall Professional, Addison-Wesley Professional, Microsoft Press, Sams, Que, Peachpit Press, Focal Press, Cisco Press, John Wiley & Sons, Syngress, Morgan Kauf‐ mann, IBM Redbooks, Packt, Adobe Press, FT Press, Apress, Manning, New Riders, McGraw-Hill, Jones & Bartlett, Course Technology, and hundreds more. For more information about Safari Books Online, please visit us online.
How to Contact Us
Please address comments and questions concerning this book to the publisher:
O’Reilly Media, Inc.
1005 Gravenstein Highway North Sebastopol, CA 95472
800-998-9938 (in the United States or Canada) 707-829-0515 (international or local)
707-829-0104 (fax)
We have a web page for this book, where we list errata, examples, and any additional information. You can access this page at http://bit.ly/learningJS_3E.
To comment or ask technical questions about this book, send email to bookques‐ [email protected].
For more information about our books, courses, conferences, and news, see our web‐ site at http://www.oreilly.com.
Find us on Facebook: http://facebook.com/oreilly
Follow us on Twitter: http://twitter.com/oreillymedia
Watch us on YouTube: http://www.youtube.com/oreillymedia
Acknowledgments
The opportunity to write books for O’Reilly is a tremendous honor, and I owe a debt of gratitude to Simon St. Laurent for seeing the potential in me, and bringing me on board. Meg Foley, my editor, has been supportive, encouraging, and ever-helpful (there’s a certain green T-shirt in the mail for you, Meg!). An O’Reilly book is a team effort, and my copyeditor Rachel Monaghan, production editor Kristen Brown, and proofreader Jasmine Kwityn were fast, thorough, and insightful: thank you all for your effort!
nition to Matt: his experience as an educator provided valuable insight on all matters of pedagogy, and the liberal use of Stephen Colbert images in his feedback helped me maintain my sanity!
Shelley Powers—author of previous editions of this book—deserves special thanks not just for passing this title on to me, but for providing her experienced feedback and for making this a better book (and for sparking some spirited discussions!).
I would like to thank all the readers of of my previous book (Web Development with Node and Express). If you hadn’t bought that book—and reviewed it so positively!—I would probably not have had the opportunity to write this book. Special thanks to the readers who took the time to send in feedback and corrections: I have learned a lot from your responses!
To everyone at Pop Art, where I am honored to work: you are my rock. Your support humbles me, your enthusiasm motivates me, and your professionalism and dedica‐ tion are what get me out of bed in the morning. Tom Paul in particular deserves my gratitude: his unwavering principles, innovative business ideas, and exceptional lead‐ ership inspire me not only to do my best today, but to do even better tomorrow. Thanks to Steve Rosenbaum for founding Pop Art, weathering stormy seas, and suc‐ cessfully passing the torch on to Tom. As I have taken time to finish this book, Col‐ wyn Fritze-Moor and Eric Buchmann worked extra hard to cover duties that I normally would have handled: thank you both. Thanks to Dylan Hallstrom for being the very model of reliability. Thanks to Liz Tom and Sam Wilskey for joining Team Pop Art! Thanks to Carole Hardy, Nikki Brovold, Jennifer Erts, Randy Keener, Patrick Wu, and Lisa Melogue for all of your support. Lastly, thanks always to my predeces‐ sors, from whom I learned so much: Tony Alferez, Paul Inman, and Del Olds.
My enthusiasm for this book—and the subject of programming languages in particu‐ lar—was sparked by Dr. Dan Resler, Associate Professor at Virginia Commonwealth University. I registered for his class on compiler theory with a singular lack of inter‐ est, and left that class with a passion for formal language theory. Thank you for pass‐ ing your enthusiasm—and some small part of your depth of understanding—on to me.
Thanks to all of my friends in the PSU part-time MBA cohort—it’s been such a pleas‐ ure getting to know you all! Special thanks to Cathy, Amanda, Miska, Sahar, Paul S., Cathy, John R., Laurie, Joel, Tyler P., Tyler S., and Jess: you’ve all enriched my life so much!
If my coworkers at Pop Art motivate me to greatness and inspire my days, my friends motivate me to deepness and light up my nights. Mark Booth: no friend knows me better, and there is no one I would sooner trust my deepest secrets to. Your creativity and talent put me to shame: don’t let me show you up with this stupid book. Katy Roberts is as reliable as the incoming tide, and as beautiful. Katy, thank you for your
deep and abiding kindness and friendship. Sarah Lewis: I love your face. Byron and Amber Clayton are true and loyal friends who always bring a smile to my face. Lor‐ raine, it’s been years, but you still bring out the best in me. To Kate Nahas: I’m so glad we have reconnected after so many years; I look forward to sharing a toast to Duke’s memory. To Desember: thank you for your trust, warmth, and companionship. Lastly, thanks to my new friends Chris Onstad and Jessica Rowe: you two have brought so much joy and laughter into my life in the last two years, I don’t know what I would have done without you.
CHAPTER 1
Your First Application
Often, the best way to learn is to do: so we’re going to start off by creating a simple application. The point of this chapter is not to explain everything that’s going on: there’s a lot that’s going to be unfamiliar and confusing, and my advice to you is to relax and not get caught up in trying to understand everything right now. The point of this chapter is to get you excited. Just enjoy the ride; by the time you finish this book, everything in this chapter will make perfect sense to you.
If you don’t have much programming experience, one of the things that is going to cause you a lot of frustration at first is how literal
computers are. Our human minds can deal with confusing input very easily, but computers are terrible at this. If I make a grammati‐ cal error, it may change your opinion about my writing ability, but you will probably still understand me. JavaScript—like all pro‐ gramming languages—has no such facility to deal with confusing input. Capitalization, spelling, and the order of words and punctu‐ ation are crucial. If you’re experiencing problems, make sure you’ve copied everything correctly: you haven’t substituted semicolons for colons or commas for periods, you haven’t mixed single quotation and double quotation marks, and you’ve capitalized all of your code correctly. Once you’ve had some experience, you’ll learn where you can “do things your way,” and where you have to be per‐ fectly literal, but for now, you will experience less frustration by entering the examples exactly as they’re written.
Historically, programming books have started out with an example called “Hello, World” that simply prints the phrase “hello world” to your terminal. It may interest you to know that this tradition was started in 1972 by Brian Kernighan, a computer scientist working at Bell Labs. It was first seen in print in 1978 in The C Programming
1I hope you have more compassion for your creations than Dr. Frankenstein—and fare better.
Language, by Brian Kernighan and Dennis Ritchie. To this day, The C Programming Language is widely considered to be one of the best and most influential program‐ ming language books ever written, and I have taken much inspiration from that work in writing this book.
While “Hello, World” may seem dated to an increasingly sophisticated generation of programming students, the implicit meaning behind that simple phrase is as potent today as it was in 1978: they are the first words uttered by something that you have breathed life into. It is proof that you are Prometheus, stealing fire from the gods; a rabbi scratching the true name of God into a clay golem; Doctor Frankenstein breath‐ ing life into his creation.1 It is this sense of creation, of genesis, that first drew me to
programming. Perhaps one day, some programmer—maybe you—will give life to the first artificially sentient being. And perhaps its first words will be “hello world.”
In this chapter, we will balance the tradition that Brian Kernighan started 44 years ago with the sophistication available to programmers today. We will see “hello world” on our screen, but it will be a far cry from the blocky words etched in glowing phos‐ phor you would have enjoyed in 1972.
Where to Start
In this book, we will cover the use of JavaScript in all its current incarnations (server-side, scripting, desktop, browser-based, and more), but for historical and practical reasons, we’re going to start with a browser-based program.
One of the reasons we’re starting with a browser-based example is that it gives us easy access to graphics libraries. Humans are inherently visual creatures, and being able to relate programming concepts to visual elements is a powerful learning tool. We will spend a lot of time in this book staring at lines of text, but let’s start out with some‐ thing a little more visually interesting. I’ve also chosen this example because it organi‐ cally introduces some very important concepts, such as event-driven programming, which will give you a leg up on later chapters.
The Tools
Just as a carpenter would have trouble building a desk without a saw, we can’t write software without some tools. Fortunately, the tools we need in this chapter are mini‐ mal: a browser and a text editor.
thorn in the side of programmers—has cleaned up its act, and is now on par with Chrome, Firefox, Safari, and Opera. That said, my browser of choice is Firefox, and in this text, I will discuss Firefox features that will help you in your programming jour‐ ney. Other browsers also have these features, but I will describe them as they are implemented in Firefox, so the path of least resistance while you go through this book will be to use Firefox.
You will need a text editor to actually write your code. The choice of text editors can be a very contentious—almost religious—debate. Broadly speaking, text editors can be categorized as mode editors or windowed editors. The two most popular text-mode editors are vi/vim and Emacs. One big advantage to text-text-mode editors is that, in addition to using them on your computer, you can use them over SSH—meaning you can remotely connect to a computer and edit your files in a familiar editor. Win‐ dowed editors can feel more modern, and add some helpful (and more familiar) user interface elements. At the end of the day, however, you are editing text only, so a win‐ dowed editor doesn’t offer an inherent advantage over a text-mode editor. Popular windowed editors are Atom, Sublime Text, Coda, Visual Studio, Notepad++, TextPad, and Xcode. If you are already familiar with one of these editors, there is probably no reason to switch. If you are using Notepad on Windows, however, I highly recom‐ mend upgrading to a more sophisticated editor (Notepad++ is an easy and free choice for Windows users).
Describing all the features of your editor is beyond the scope of this book, but there are a few features that you will want to learn how to use:
Syntax highlighting
Syntax highlighting uses color to distinguish syntactic elements in your program. For example, literals might be one color and variables another (you will learn what these terms mean soon!). This feature can make it easier to spot problems in your code. Most modern text editors will have syntax highlighting enabled by default; if your code isn’t multicolored, consult your editor documentation to learn how to enable it.
Bracket matching
Most programming languages make heavy use of parentheses, curly braces, and square brackets (collectively referred to as “brackets”). Sometimes, the contents of these brackets span many lines, or even more than one screen, and you’ll have brackets within brackets, often of different types. It’s critical that brackets match up, or “balance”; if they don’t, your program won’t work correctly. Bracket match‐ ing provides visual cues about where brackets begin and end, and can help you spot problems with mismatched brackets. Bracket matching is handled differ‐ ently in different editors, ranging from a very subtle cue to a very obvious one. Unmatched brackets are a common source of frustration for beginners, so I
2Microsoft’s terminology.
strongly recommend that you learn how to use your editor’s bracket-matching feature.
Code folding
Somewhat related to bracket matching is code folding. Code folding refers to the ability to temporarily hide code that’s not relevant to what you’re doing at the moment, allowing you to focus. The term comes from the idea of folding a piece of paper over on itself to hide unimportant details. Like bracket matching, code folding is handled differently by different editors.
Autocompletion
Autocompletion (also called word completion or IntelliSense2) is a convenience
feature that attempts to guess what you are typing before you finish typing it. It has two purposes. The first is to save typing time. Instead of typing, for example,
encodeURIComponent, you can simply type enc, and then select encodeURICompo nent from a list. The second purpose is called discoverability. For example, if you type enc because you want to use encodeURIComponent, you’ll find (or “dis‐ cover”) that there’s also a function called encodeURI. Depending on the editor, you may even see some documentation to distinguish the two choices. Autocom‐ pletion is more difficult to implement in JavaScript than it is in many other lan‐ guages because it’s a loosely typed language, and because of its scoping rules (which you will learn about later). If autocompletion is an important feature to you, you may have to shop around to find an editor that meets your needs: this is an area in which some editors definitely stand out from the pack. Other editors (vim, for example) offer very powerful autocompletion, but not without some extra configuration.
A Comment on Comments
JavaScript—like most programming languages—has a syntax for making comments in code. Comments are completely ignored by JavaScript; they are meant for you or your fellow programmers. They allow you to add natural language explanations of what’s going on when it’s not clear. In this book, we’ll be liberally using comments in code samples to explain what’s happening.
console.log("echo"); // prints "echo" to the console /*
In the previous line, everything up to the double forward slashes is JavaScript code, and must be valid syntax. The double
forward slashes start a comment, and will be ignored by JavaScript.
This text is in a block comment, and will also be ignored
by JavaScript. We've chosen to indent the comments of this block for readability, but that's not necessary.
*/
/*Look, Ma, no indentation!*/
Cascading Style Sheets (CSS), which we’ll see shortly, also use JavaScript syntax for block comments (inline comments are not supported in CSS). HTML (like CSS) doesn’t have inline comments, and its block comments are different than JavaScript. They are surrounded by the unwieldy <!-- and -->:
<head>
<title>HTML and CSS Example</title> <!-- this is an HTML comment...
which can span multiple lines. --> <style>
body: { color: red; } /* this is a CSS comment...
which can span multiple lines. */ </style>
<script>
console.log("echo"); // back in JavaScript...
/* ...so both inline and block comments are supported. */
</script> </head>
Getting Started
We’re going to start by creating three files: an HTML file, a CSS file, and a JavaScript source file. We could do everything in the HTML file (JavaScript and CSS can be embedded in HTML), but there are certain advantages to keeping them separate. If you’re new to programming, I strongly recommend that you follow along with these instructions step by step: we’re going to take a very exploratory, incremental approach in this chapter, which will facilitate your learning process.
It may seem like we’re doing a lot of work to accomplish something fairly simple, and there’s some truth in that. I certainly could have crafted an example that does the same thing with many fewer steps, but by doing so, I would be teaching you bad hab‐ its. The extra steps you’ll see here are ones you’ll see over and over again, and while it may seem overcomplicated now, you can at least reassure yourself that you’re learning to do things the right way.
One last important note about this chapter. This is the lone chapter in the book in which the code samples will be written in ES5 syntax, not ES6 (Harmony). This is to ensure that the code samples will run, even if you aren’t using a browser that has implemented ES6. In the following chapters, we will talk about how to write code in ES6 and “transcompile” it so that it will run on legacy browsers. After we cover that ground, the rest of the book will use ES6 syntax. The code samples in this chapter are simple enough that using ES5 doesn’t represent a significant handicap.
For this exercise, you’ll want to make sure the files you create are in the same directory or folder. I recommend that you create a new directory or folder for this example so it doesn’t get lost among your other files.
Let’s start with the JavaScript file. Using a text editor, create a file called main.js. For now, let’s just put a single line in this file:
console.log('main.js loaded');
Then create the CSS file, main.css. We don’t actually have anything to put in here yet, so we’ll just include a comment so we don’t have an empty file:
/* Styles go here. */
Then create a file called index.html: <!doctype html>
<html> <head>
<link rel="stylesheet"href="main.css"> </head>
<body>
<h1>My first application!</h1>
<p>Welcome to <i>Learning JavaScript, 3rd Edition</i>.</p>
<script src="main.js"></script> </body>
</html>
3You will learn more about the difference between a function and a method in Chapter 9.
In the head, we have the line <link rel="stylesheet" href="main.css">; this is what links the currently empty CSS file into your document. Then, at the end of the body, we have the line <script src="main.js"></script>, which is what links the JavaScript file into your document. It may seem odd to you that one goes in the head and the other goes at the end of the body. While we could have put the <script> tag in the head, there are performance and complexity reasons for putting it at the end of the body.
In the body, we have <h1>My first application!</h1>, which is first-level header text (which indicates the largest, most important text on the page), followed by a <p> (paragraph) tag, which contains some text, some of which is italic (denoted by the <i> tag).
Go ahead and load index.html in your browser. The easiest way to do this on most systems is to simply double-click on the file from a file browser (you can also usually drag the file onto a browser window). You’ll see the body contents of your HTML file.
There are many code samples in this book. Because HTML and JavaScript files can get very large, I won’t present the whole files every time: instead, I will explain in the text where the code sample fits into the file. This may cause some trouble for beginning pro‐ grammers, but understanding the way code fits together is impor‐ tant, and can’t be avoided.
The JavaScript Console
We’ve already written some JavaScript: console.log('main.js loaded'). What did that do? The console is a text-only tool for programmers to help them diagnose their work. You will use the console extensively as you go through this book.
Different browsers have different ways of accessing the console. Because you will be doing this quite often, I recommend learning the keyboard shortcut. In Firefox, it’s Ctrl-Shift-K (Windows and Linux) or Command-Option-K (Mac).
In the page in which you loaded index.html, open the JavaScript console; you should see the text “main.js loaded” (if you don’t see it, try reloading the page). console.log is a method3 that will print whatever you want to the console, which is very helpful
for debugging and learning alike.
One of the many helpful features of the console is that, in addition to seeing output from your program, you can enter JavaScript directly in the console, thereby testing
things out, learning about JavaScript features, and even modifying your program temporarily.
jQuery
We’re going to add an extremely popular client-side scripting library called jQuery to our page. While it is not necessary, or even germane to the task at hand, it is such a ubiquitous library that it is often the first one you will include in your web code. Even though we could easily get by without it in this example, the sooner you start getting accustomed to seeing jQuery code, the better off you will be.
At the end of the body, before we include our own main.js, we’ll link in jQuery:
<script src="https://code.jquery.com/jquery-2.1.1.min.js"></script> <script src="main.js"></script>
You’ll notice that we’re using an Internet URL, which means your page won’t work correctly without Internet access. We’re linking in jQuery from a publicly hosted con‐ tent delivery network (CDN), which has certain performance advantages. If you will be working on your project offline, you’ll have to download the file and link it from your computer instead. Now we’ll modify our main.js file to take advantage of one of jQuery’s features:
$(document).ready(function() { 'use strict';
console.log('main.js loaded'); });
4If you want to learn more about CSS and HTML, I recommend the Codecademy’s free HTML & CSS track.
Drawing Graphics Primitive
Among many of the benefits HTML5 brought was a standardized graphics interface. The HTML5 canvas allows you to draw graphics primitives like squares, circles, and polygons. Using the canvas directly can be painful, so we’ll use a graphics library called Paper.js to take advantage of the HTML5 canvas.
Paper.js is not the only canvas graphics library available: KineticJS,
Fabric.js, and EaselJS are very popular and robust alternatives. I’ve used all of these libraries, and they’re all very high quality.
Before we start using Paper.js to draw things, we’ll need an HTML canvas element to draw on. Add the following to the body (you can put it anywhere; after the intro para‐ graph, for example):
<canvas id="mainCanvas"></canvas>
Note that we’ve given the canvas an id attribute: that’s how we will be able to easily refer to it from within JavaScript and CSS. If we load our page right now, we won’t see anything different; not only haven’t we drawn anything on the canvas, but it’s a white canvas on a white page and has no width and height, making it very hard to see indeed.
Every HTML element can have an ID, and for the HTML to be valid (correctly formed), each ID must be unique. So now that we’ve created a canvas with the id “mainCanvas”, we can’t reuse that ID. Because of this, it’s recommended that you use IDs spar‐ ingly. We’re using one here because it’s often easier for beginners to deal with one thing at a time, and by definition, an ID can only refer to one thing on a page.
Let’s modify main.css so our canvas stands out on the page. If you’re not familiar with CSS, that’s OK—this CSS is simply setting a width and height for our HTML element, and giving it a black border:4
#mainCanvas { width: 400px; height: 400px;
border: solid 1px black; }
If you reload your page, you should see the canvas now.
Now that we have something to draw on, we’ll link in Paper.js to help us with the drawing. Right after we link in jQuery, but before we link in our own main.js, add the following line:
<script src="https://cdnjs.cloudflare.com/ajax/libs/paper.js/0.9.25/ ↩ paper-full.min.js"></script>
Note that, as with jQuery, we’re using a CDN to include Paper.js in our project.
You might be starting to realize that the order in which we link things in is very important. We’re going to use both jQuery and Paper.js in our own main.js, so we have to link in both of those first. Neither of them depends on the other, so it doesn’t matter which one comes first, but I always include jQuery first as a matter of habit, as so many things in web development depend on it.
Now that we have Paper.js linked in, we have to do a little work to configure Paper.js. Whenever you encounter code like this—repetitive code that is required before you do something—it’s often called boilerplate. Add the following to main.js, right after 'use strict' (you can remove the console.log if you wish):
paper.install(window);
paper.setup(document.getElementById('mainCanvas'));
// TODO
paper.view.draw();
The first line installs Paper.js in the global scope (which will make more sense in Chapter 7). The second line attaches Paper.js to the canvas, and prepares Paper.js for drawing. In the middle, where we put TODO is where we’ll actually be doing the inter‐ esting stuff. The last line tells Paper.js to actually draw something to the screen.
Now that all of the boilerplate is out of the way, let’s draw something! We’ll start with a green circle in the middle of the canvas. Replace the “TODO” comment with the following lines:
var c = Shape.Circle(200, 200, 50); c.fillColor = 'green';
the width and height of the canvas. The second line sets the fill color, which is distinct from the outline color (called the stroke in Paper.js parlance). Feel free to experiment with changing those arguments.
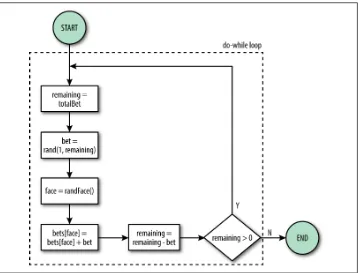
Automating Repetitive Tasks
Consider what you’d have to do if you wanted not just to add one circle, but to fill the canvas with them, laid out in a grid. If you space the circles 50 pixels apart and make them slightly smaller, you could fit 64 of them on the canvas. Certainly you could copy the code you’ve already written 63 times, and by hand, modify all of the coordi‐ nates so that they’re spaced out in a grid. Sounds like a lot of work, doesn’t it? Fortu‐ nately, this kind of repetitive task is what computers excel at. Let’s see how we can draw out 64 circles, evenly spaced. We’ll replace our code that draws a single circle with the following:
var c;
for(var x=25; x<400; x+=50) { for(var y=25; y<400; y+=50) { c = Shape.Circle(x, y, 20); c.fillColor = 'green'; }
}
If you refresh your browser, you’ll see we have 64 green circles! If you’re new to pro‐ gramming, what you’ve just written may seem confusing, but you can see it’s better than writing the 128 lines it would take to do this by hand.
What we’ve used is called a for loop, which is part of the control flow syntax that we’ll learn about in detail in Chapter 4. A for loop allows you to specify an initial condi‐ tion (25), an ending condition (less than 400), and an increment value (50). We use one loop inside the other to accomplish this for both the x-axis and y-axis.
There are many ways we could have written this example. The way we’ve written it, we’ve made the x and y coordinates the important pieces of information: we explicitly specify where the circles will start and how far apart they’ll be spaced. We could have approached this problem from another direction: we could have said what’s important is the number of circles we want (64), and let the program figure out how to space them so that they fit on the canvas. The reason we went with this solution is that it better matches what we would have done if we had cut and pasted our circle code 64 times and figured out the spacing ourselves.
5Technical reviewer Matt Inman suggested that the Paper.js developers might have been Photoshop users familiar with “hand tool,” “direct selection tool,” and so on.
Handling User Input
So far, what we’ve been doing hasn’t had any input from the user. The user can click on the circles, but it doesn’t do anything. Likewise, trying to drag a circle would have no effect. Let’s make this a little more interactive, by allowing the user to choose where the circles get drawn.
It’s important to become comfortable with the asynchronous nature of user input. An
asynchronous event is an event whose timing you don’t have any control over. A user’s mouse click is an example of an asynchronous event: you can’t be inside your users’ minds, knowing when they’re going to click. Certainly you can prompt their click response, but it is up to them when—and if—they actually click. Asynchronous events arising from user input make intuitive sense, but we will cover much less intu‐ itive asynchronous events in later chapters.
Paper.js uses an object called a tool to handle user input. If that choice of names seems unintuitive to you, you are in good company: I agree, and don’t know why the Paper.js developers used that terminology.5 It might help you to translate “tool” to
“user input tool” in your mind. Let’s replace our code that drew a grid of circles with the following code:
var tool = new Tool();
tool.onMouseDown = function(event) {
var c = Shape.Circle(event.point.x, event.point.y, 20); c.fillColor = 'green';
};
The first step in this code is to create our tool object. Once we’ve done that, we can attach an event handler to it. In this case, the event handler is called onMouseDown. Whenever the user clicks the mouse, the function we’ve attached to this handler is invoked. This is a very important point to understand. In our previous code, the code ran right away: we refreshed the browser, and the green circles appeared automati‐ cally. That is not happening here: if it were, it would draw a single green circle some‐ where on the screen. Instead, the code contained between the curly braces after function is executed only when the user clicks the mouse on the canvas.
Note that we could save ourselves a little typing by passing the point directly to the circle (instead of passing the x and y coordinates separately):
var c = Shape.Circle(event.point, 20);
This highlights a very important aspect of JavaScript: it’s able to ascertain information about the variables that are passed in. In the previous case, if it sees three numbers in a row, it knows that they represent the x and y coordinates and the radius. If it sees two arguments, it knows that the first one is a point object, and the second one is the radius. We’ll learn more about this in Chapters 6 and 9.
Hello, World
Let’s conclude this chapter with a manifestation of Brian Kernighan’s 1972 example. We’ve already done all the heavy lifting: all that remains is to add the text. Before your onMouseDown handler, add the following:
var c = Shape.Circle(200, 200, 80); c.fillColor = 'black';
var text = new PointText(200, 200); text.justification = 'center'; text.fillColor = 'white'; text.fontSize = 20;
text.content = 'hello world';
This addition is fairly straightforward: we create another circle, which will be a back‐ drop for our text, and then we actually create the text object (PointText). We specify where to draw it (the center of the screen) and some additional properties (justifica‐ tion, color, and size). Lastly, we specify the actual text contents (“hello world”).
Note that this is not the first time we emitted text with JavaScript: we did that first with console.log earlier in this chapter. We certainly could have changed that text to “hello world.” In many ways, that would be more analogous to the experience you would have had in 1972, but the point of the example is not the text or how it’s ren‐ dered: the point is that you’re creating something autonomous, which has observable effects.
By refreshing your browser with this code, you are participating in a venerable tradi‐ tion of “Hello, World” examples. If this is your first “Hello, World,” let me welcome you to the club. If it is not, I hope that this example has given you some insight into JavaScript.
CHAPTER 2
JavaScript Development Tools
While you can write JavaScript with nothing more than an editor and a browser (as we saw in the previous chapter), JavaScript developers rely on some useful develop‐ ment tools. Furthermore, because we are focusing on ES6 for the rest of this book, we’ll need a way to convert our ES6 code to portable ES5 code. The tools discussed in this chapter are very common, and you are likely to encounter them in any open source project or software development team. They are:
• Git, a version control tool that helps you manage your project as it grows, and collaborate with other developers.
• Node, which allows you to run JavaScript outside of the browser (and comes with npm, which gives you access to the rest of the tools on this list).
• Gulp, a build tool that automates common development tasks (Grunt is a popular alternative).
• Babel, a transcompiler that converts ES6 code to portable ES5 code.
• ESLint, a linter that helps you avoid common mistakes and makes you a better programmer!
Don’t think of this chapter as a distraction from the topic at hand (JavaScript). Think of it as a practical introduction to some important tools and techniques that are com‐ monly used in JavaScript development.
Writing ES6 Today
I have good news and bad news. The good news is that ES6 (aka Harmony, aka Java‐ Script 2015) is an exciting, delightful evolution in the history of JavaScript. The bad news is that the world isn’t quite ready for it. That doesn’t mean you can’t use it now,
1Some JavaScript engines (Node, for example) do compile your JavaScript, but it happens transparently. but it is going to put an extra burden on the programmer, as ES6 code has to be trans‐ compiled into “safe” ES5 to ensure that it can run anywhere.
Programmers who have been around a while might be thinking “big deal; back in my day, there was no such thing as a language that didn’t have to be compiled and linked!” I’ve been writing software long enough to remember that time, but I do not miss it: I enjoy the lack of fuss in interpreted languages like JavaScript.1
One of the advantages of JavaScript has always been its ubiquity: it became the stan‐ dard browser scripting language almost overnight, and with the advent of Node, its use broadened beyond the browser. So it is a bit painful to recognize that it will prob‐ ably be a few years before you can ship ES6 code without worrying about browsers that don’t support it. If you’re a Node developer, the situation is a little bit brighter: because you only have one JavaScript engine to worry about, you can track the pro‐ gress of ES6 support in Node.
The ES6 examples in this book can be run in Firefox, or on a web‐ site such as ES6 Fiddle. For “real-world code,” however, you will want to know the tools and techniques in this chapter.
One interesting aspect about JavaScript’s transition from ES5 to ES6 is that, unlike language releases of the past, the adoption is gradual. That is, the browser you’re using right now probably has some—but not all—features available in ES6. This gradual transition is made possible in part by the dynamic nature of JavaScript, and in part by the changing nature of browser updates. You may have heard the term evergreen used to describe browsers: browser manufacturers are moving away from the concept of having discrete browser versions that have to be updated. Browsers, they reason, should be able to keep themselves up to date because they are always connected to the Internet (at least if they are going to be useful). Browsers still have versions, but it is now more reasonable to assume that your users have the latest version—because evergreen browsers don’t give users the option not to upgrade.
Even with evergreen browsers, however, it will be a while before you can rely on all of the great features of ES6 being available on the client side. So for the time being, transcompilation (also called transpilation) is a fact of life.
ES6 Features
York–based developer kangax maintains an excellent compatibility table of ES6 (and ES7) features. As of August 2015, the most complete implementation (Babel) is only at 72%. While that may sound discouraging, it’s the most important features that have been implemented first, and all of the features discussed in this book are available in Babel.
We have a little bit of prep work to do before we can start transcompiling. We’ll need to make sure we have the necessary tools, and learn how to set up a new project to use them—a process that will become automatic after you do it a few times. In the meantime, you will probably want to refer back to this chapter as you start new projects.
Installing Git
If you don’t have Git installed on your system, you can find downloads and instruc‐ tions for your operating system on the Git home page.
The Terminal
Throughout this chapter, we’ll be working in the terminal (also known as the com‐ mand line or command prompt). The terminal is a text-based way of interacting with your computer, and is commonly used by programmers. Though it is certainly possi‐ ble to be an effective programmer without ever using the terminal, I believe it is an important skill to have: many tutorials and books assume you’re using a terminal, and many tools are designed to be used on the terminal.
The most ubiquitous terminal experience is a shell (terminal interface) called bash, and it is available by default on Linux and OS X machines. While Windows has its own command-line experience, Git (which we will install next) provides a bash com‐ mand line, which I recommend you use. In this book, we will be using bash.
On Linux and OS X, look in your programs for the Terminal program. On Windows, after you install Git, look for “Git Bash” in your programs.
When you start the terminal, you see a prompt, which is where you will type com‐ mands. The default prompt may include the name of your computer or the directory you’re in, and it will normally end with a dollar sign ($). Thus, in the code samples in this chapter, I will use a dollar sign to indicate the prompt. What follows the prompt is what you should type. For example, to get a listing of the files in the current direc‐ tory, type ls at the prompt:
$ ls
In Unix, and therefore bash, directory names are separated with a forward slash (/). Even in Windows, where directories are normally separated by backslashes (\), Git
Bash translates backslashes to forward slashes. Bash also uses the tilde (~) as a short‐ cut for your home directory (where you should normally be storing your files).
The basics you’ll need are the ability to change the current directory (cd), and make new directories (mkdir). For example, to go to your home directory, type:
$ cd ~
The command pwd (print working directory) tells you what directory you’re currently in:
$ pwd
To create a subdirectory called test, type:
$ mkdir test
To change to this newly created directory, type:
$ cd test
Two periods (..) are a shortcut for “parent directory.” So to go “up” a directory (if you’ve been following along, this will take you back to your home directory), type:
$ cd ..
There’s a lot more to learn about the terminal, but these basic commands are all you need to get through the material in this chapter. If you want to learn more, I recom‐ mend the Console Foundations course on Treehouse.
Your Project Root
You’ll want to create a directory for each project. We’ll call this directory the project root. For example, if you’re following along with the examples in this book, you could create an lj directory, which would be your project root. In all the command-line examples in this book, we’ll assume that you’re in the project root. If you try an exam‐ ple and it doesn’t work, the first thing to verify is that you’re in the project root. Any files we create will be relative to the project root. For example, if your project root is /home/joe/work/lj, and we ask you to create a file public/js/test.js, the full path to that file should be /home/joe/work/lj/public/js/test.js.
Version Control: Git
We won’t discuss version control in detail in this book, but if you’re not using it, you should be. If you’re not familiar with Git, I encourage you to use this book as an opportunity to practice.
First, from your project root, initialize a repository:
This will create a project repository for you (there’s now a hidden directory called .git
in your project root).
Inevitably, there will be some files you never want tracked in version control: build artifacts, temporary files, and the like. These files can be explicitly excluded in a file called .gitignore. Go ahead and create a .gitignore file now with the following contents:
# npm debugging logs npm-debug.log*
# project dependencies node_modules
# OSX folder attributes .DS_Store
# temporary files *.tmp
*~
If there are any other “junk” files that you know of, you’re welcome to add them here (for example, if you know your editor creates .bak files, you would add *.bak to this list).
A command you’ll be running a lot is git status, which tells you the current status of your repository. Go ahead and run it now. You should see:
$ git status On branch master
Initial commit
Untracked files:
(use "git add <file>..." to include in what will be committed)
.gitignore
nothing added to commit but untracked files present (use "git add" to track)
The important thing that Git is telling you is that there’s a new file in the directory (.gitignore), but it’s untracked, meaning Git doesn’t recognize it.
The basic unit of work in a Git repository is the commit. Currently, your repository doesn’t have any commits (you’ve just initialized it and created a file, but you haven’t registered any of that work with Git). Git doesn’t make any assumptions about what files you want to track, so you have to explicitly add .gitignore to the repository:
$ git add .gitignore
We still haven’t created a commit; we’ve simply staged the file .gitignore to go in the next commit. If we run git status again, we will see:
$ git status On branch master
Initial commit
Changes to be committed:
(use "git rm --cached <file>..." to unstage)
new file: .gitignore
Now .gitignore is to be committed. We still haven’t created a commit yet, but when we do, our changes to .gitignore will be in it. We could add more files, but let’s go ahead and create a commit now:
$ git commit -m "Initial commit: added .gitignore."
The string that follows -m is the commit message: a brief description of the work you’ve done in this commit. This allows you to look back at your commits and see the history of your project unfold.
You can think of a commit as a snapshot of your project at a moment in time. We’ve now taken a snapshot of the project (with only the .gitignore file in it), and you could go back to that at any time. If you run git status now, Git will tell you:
On branch master
nothing to commit, working directory clean
Let’s make some additional changes to our project. In our .gitignore file, we’re ignor‐ ing any files named npm-debug.log, but let’s say we want to ignore any files with the .log extension (which is standard practice). Edit the .gitignore file and change that line to *.log. Let’s also add a file called README.md, which is a standard file that explains the project in the popular Markdown format:
= Learning JavaScript, 3rd Edition
== Chapter 2: JavaScript Development Tools
In this chapter we're learning about Git and other development tools.
Now type git status:
$ git status On branch master
Changes not staged for commit:
(use "git add <file>..." to update what will be committed)
(use "git checkout -- <file>..." to discard changes in working directory)