About This E-Book
EPUB is an open, industry-standard format for e-books. However, support for EPUB and its many features varies across reading devices and applications. Use your device or app settings to customize the presentation to your liking. Settings that you can customize often include font, font size, single or double column, landscape or portrait mode, and figures that you can click or tap to enlarge. For additional information about the settings and features on your reading device or app, visit the device manufacturer’s Web site.
Many titles include programming code or configuration examples. To optimize the presentation of these elements, view the e-book in single-column, landscape mode and adjust the font size to the smallest setting. In addition to presenting code and configurations in the reflowable text format, we have included images of the code that mimic the presentation found in the print book; therefore, where the reflowable format may compromise the presentation of the code listing, you will see a “Click here to view code image” link. Click the link to view the print-fidelity code image. To return to the
Learning React
Second Edition
Learning React, Second Edition
Copyright © 2018 by Pearson Education, Inc.
All rights reserved. No part of this book shall be reproduced, stored in a retrieval system, or transmitted by any means, electronic, mechanical, photocopying, recording, or otherwise, without written permission from the publisher. No patent liability is assumed with respect to the use of the information contained herein. Although every precaution has been taken in the preparation of this book, the publisher and author assume no responsibility for errors or omissions. Nor is any liability assumed for damages resulting from the use of the information contained herein.
ISBN-13: 978-0-13-484355-1 ISBN-10: 0-13-484355-X
Library of Congress Control Number: 2017957370 1 18
Trademarks
All terms mentioned in this book that are known to be trademarks or service marks have been
appropriately capitalized. Pearson cannot attest to the accuracy of this information. Use of a term in this book should not be regarded as affecting the validity of any trademark or service mark.
Warning and Disclaimer
Every effort has been made to make this book as complete and as accurate as possible, but no warranty or fitness is implied. The information provided is on an “as is” basis. The author and the publisher shall have neither liability nor responsibility to any person or entity with respect to any loss or damages arising from the information contained in this book.
Special Sales
For information about buying this title in bulk quantities, or for special sales opportunities (which may include electronic versions; custom cover designs; and content particular to your business, training goals, marketing focus, or branding interests), please contact our corporate sales department at [email protected] or (800) 382-3419.
For government sales inquiries, please contact [email protected]. For questions about sales outside the U.S., please contact [email protected].
Krista Hansing
Indexer
Erika Millen
Proofreader
Jeanine Furino
Technical Editor
Trevor McCauley
Editorial Assistant
Vanessa Evans
Designer
Chuti Prasertsith
Compositor
Accessing the Free Web Edition
Your purchase of this book in any format includes access to the corresponding Web Edition, which provides several special online-only features:
The complete text of the book
Updates and corrections as they become available
The Web Edition can be viewed on all types of computers and mobile devices with any modern web browser that supports HTML5.
To get access to the Learning React Web Edition, all you need to do is register this book: 1. Go to www.informit.com/register.
2. Sign in or create a new account. 3. Enter the ISBN: 9780134843551.
4. Answer the questions as proof of purchase.
To my dad!
Contents at a Glance
1 Introducing React
2 Building Your First React App
3 Components in React
4 Styling in React
5 Creating Complex Components
6 Transferring Properties
7 Meet JSX…Again!
8 Dealing with State in React
9 Going from Data to UI in React
10 Events in React
11 The Component Lifecycle
12 Accessing DOM Elements in React
13 Setting Up Your React Dev Environment Easily
14 Working with External Data in React
15 Building an Awesome Todo List App in React
16 Creating a Sliding Menu in React
17 Avoiding Unnecessary Renders in React
18 Creating a Single-Page App in React Using React Router
19 Introduction to Redux
Table of Contents
APIs to Create Truly Composable UIs Visuals Defined Entirely in JavaScript Just the V in an MVC Architecture Conclusion2 Building Your First React App
Dealing with JSX Changing How We Deal with UI Meet the React Component
Creating a Hello, World! Component Specifying Properties
First Part: Updating the Component Definition Second Part: Modifying the Component Call Dealing with Children
Conclusion
4 Styling in React
Displaying Some Vowels
Just Style It Already!
Styling Content the React Way Creating a Style Object Actually Styling Our Content
Making the Background Color Customizable Conclusion
5 Creating Complex Components
From Visuals to Components
Identifying the Major Visual Elements Identifying the Components
Detailed Look at the Problem Meet the Spread Operator
A Better Way to Transfer Properties Conclusion You Can’t Specify CSS Inline Comments
Capitalization, HTML Elements, and Components Your JSX Can Be Anywhere
Conclusion
Using State
Our Starting Point Getting Our Counter On
Setting the Initial State Value
Starting Our Timer and Setting State Rendering the State Change
Optional: The Full Code Conclusion
9 Going from Data to UI in React
The Example
Your JSX Can Be Anywhere, Part II Dealing with Arrays
Conclusion
10 Events in React
Listening and Reacting to Events Starting Point
Making the Button Click Do Something Event Properties
Meet Synthetic Events
Doing Stuff with Event Properties More Eventing Shenanigans
You Can’t Directly Listen to Events on Components Listening to Regular DOM Events
The Meaning of this Inside the Event Handler React…Why? Why?
See the Lifecycle Methods in Action The Initial Rendering Phase
Getting the Default Props Getting the Default State
render
12 Accessing DOM Elements in React
The Colorizer Example Meet Refs
Using Portals Conclusion
13 Setting Up Your React Dev Environment Easily
Meet Create React
Making Sense of What Happened Creating Our HelloWorld App Creating a Production Build Conclusion
14 Working with External Data in React
Web Request 101 It’s React Time!
Getting Started Getting the IP Address
Kicking the Visuals Up a Notch Conclusion
15 Building an Awesome Todo List App in React
Getting Started
Creating the Initial UI
Building the Rest of the App Adding Items
Styling our App Removing Items
Animation! Animation! Animation! Conclusion
16 Creating a Sliding Menu in React
How the Sliding Menu Works Setting Up the Sliding Menu Getting Started
Showing and Hiding the Menu Creating the Button
Creating the Menu Conclusion
17 Avoiding Unnecessary Renders in React
About the render Method Optimizing render Calls
Getting an Example Going Seeing the render Calls
Overriding a Component Update Using PureComponent
Conclusion
18 Creating a Single-Page App in React Using React Router
The Example
It’s Redux Time
Lights! Camera! Action! Our Reducer
Store Stuff Conclusion
20 Using Redux with React
Managing React State with Redux How Redux and React Overlap Getting Started
Building the App Conclusion
About the Author
Kirupa Chinnathambi has spent most of his life trying to teach others to love web development as much as he does.
In 1999, before blogging was even a word, he started posting tutorials on kirupa.com. In the years since then, he has written hundreds of articles, penned a few books (none as good as this one, of course!), and recorded a bunch of videos you can find on YouTube. When he isn’t writing or talking about web development, he spends his waking hours helping make the web more awesome as a Program Manager at Microsoft. In his nonwaking hours, he is probably sleeping—or writing about himself in the third person.
Acknowledgments
First, none of this would be possible without the support and encouragement of my awesome wife,
Meena. If she hadn’t put her goals on hold to allow me to spend six months designing, writing, and rewriting everything you see here, writing this book would have been a distant dream.
Next, I’d like to thank my parents for always encouraging me to aimlessly wander and enjoy free time doing what I like—such as teaching complete strangers via the Internet in the late 1990s how to do cool things with programming. I wouldn’t be half the rugged indoorsman/scholar/warrior I am today without them both .
On the publishing side, writing the words you see here is the easy part. Getting the book into your hands is an amazingly complex process. The more I learn about all the moving pieces involved, the more impressed I am with all the individuals who work tirelessly behind the scenes to keep this
amazing machinery running. To everyone at Pearson who made this possible, thank you! There are a few people I’d like to explicitly call out, though. First, I’d like to thank Mark Taber for continuing to give me opportunities to work together, Chris Zahn for patiently addressing my numerous questions and concerns, Krista Hansing for turning my version of English into something humanly
1
Introducing React
Ignoring for a moment that web apps today both look and feel nicer than they did back in the day, something even more fundamental has changed. The way we architect and build web apps is very different now. To highlight this, let’s take a look at the app in Figure 1.1.
Figure 1.1 An app.
This app is a simple catalog browser for something. As with any app of this sort, you have your usual set of pages revolving around a home page, a search results page, a details page, and so on. In the following sections, let’s look at the two approaches we have for building this app. Yes, in some mysterious fashion, this leads to us getting an overview of React as well.
Onward!
Old-School Multipage Design
Figure 1.2 Multipage design.
For almost every action that changes what the browser displays, the web app navigates you to a whole different page. This is a big deal, beyond just the less-than-stellar user experience users will see as pages get torn down and redrawn. This has a big impact on how you maintain your app state. Except for storing user data via cookies and some server-side mechanism, you simply don’t need to care. Life is good.
New-School Single-Page Apps
Figure 1.3 The individual page model is a bit dated, like this steam engine.
Instead, modern apps tend to adhere to what is known as a single-page app (SPA) model. This model gives you a world in which you never navigate to different pages or ever even reload a page. In this world, the different views of your app are loaded and unloaded into the same page itself.
For our app, this looks something like Figure 1.4.
As users interact with our app, we replace the contents of the dotted red region with the data and HTML that matches what the user is trying to do. The end result is a much more fluid experience. You can even use a lot of visual techniques to have your new content transition nicely, just like you might see in cool apps on your mobile device or desktop. This sort of stuff is simply not possible when navigating to different pages.
All of this might sound a bit crazy if you’ve never heard of single-page apps, but there’s a very good chance you’ve run into some of them in the wild. If you’ve ever used popular web apps like Gmail, Facebook, Instagram, or Twitter, you’ve used a single-page app. In all those apps, the content gets dynamically displayed without requiring you to refresh or navigate to a different page.
Now, I’m making these single-page apps seem really complicated. That’s not entirely the case.
Thanks to a lot of great improvements in both JavaScript and a variety of third-party frameworks and libraries, building single-page apps has never been easier. That doesn’t mean there’s no room for improvement, though.
When building single-page apps, you’ll encounter three major issues at some point:
1. In a single-page application, you’ll spend the bulk of your time keeping your data in sync with your UI. For example, if a user loads new content, do you explicitly clear out the search field? Do you keep the active tab on a navigation element still visible? Which elements do you keep on the page, and which do you destroy?
These are all problems that are unique to single-page apps. When navigating between pages in the old model, we assumed everything in our UI would be destroyed and just built back up again. This was never a problem.
A DOM is represented as follows: a node "window" is shown as the root of the tree. Below this, the nodes: document, "html," and body are shown one below the other. The body node has three child elements: "div," "div," and script. The second "div" node has two branches. Both the branches show the cloned element "div" containing the children: "p" and "img." One of these branches is highlighted. Figure 1.5 Adding children.
3. Working with HTML templates can be a pain. Navigation in a single-page app is nothing more than you dealing with fragments of HTML to represent whatever you want to display. These
fragments of HTML are often known as templates, and using JavaScript to manipulate them and fill them out with data gets really complicated really quickly.
To make things worse, depending on the framework you’re using, the way your templates look and interact with data can vary wildly. For example, this is what defining and using a template in Mustache looks like:
Click here to view code image
var view = { title: "Joe",
return 2 + 4; }
};
var output = Mustache.render("{{title}} spends {{calc}}", view);
Sometimes your templates look like clean HTML that you can proudly show off in front of the class. Other times, your templates might be unintelligible, with a boatload of custom tags designed to help map your HTML elements to some data.
Despite these shortcomings, single-page apps aren’t going anywhere. They are a part of the present and will fully form the future of how web apps are built. That doesn’t mean you have to tolerate these shortcomings, of course. Read on.
Meet React
Facebook (and Instagram) decided that enough is enough. Given their huge experience with single-page apps, they released a library called React to not only address these shortcomings, but also change how we think about building single-page apps.
In the following sections, we look at the big things React brings to the table.
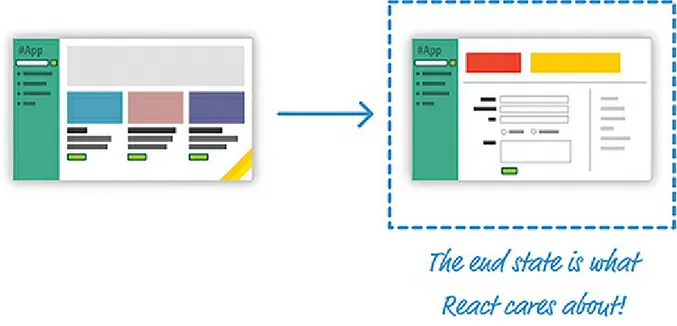
Automatic UI State Management
consuming. With React, you need to worry about only one thing: the final state of your UI. It doesn’t matter what state your UI started out in. It doesn’t matter what series of steps your users took to change the UI. All that matters is where your UI ended up (see Figure 1.6).
Figure 1.6 The final or end state of your UI is what matters in React.
React takes care of everything else. It figures out what needs to happen to ensure that your UI is represented properly so that all that state-management stuff is no longer your concern.
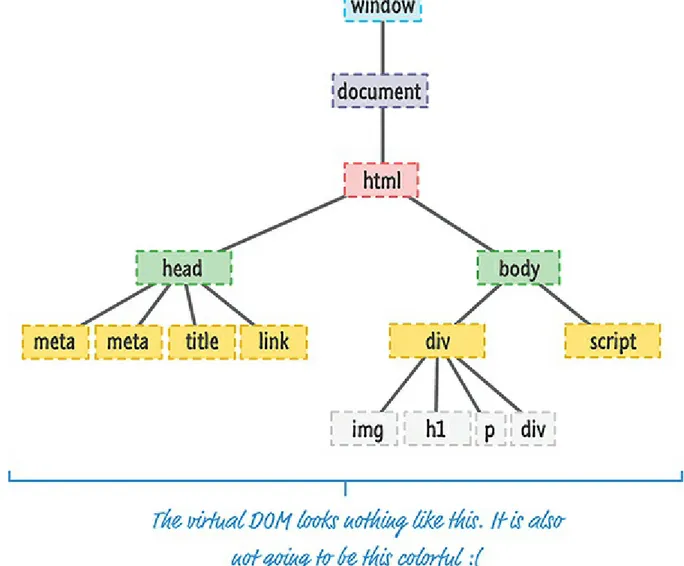
Lightning-Fast DOM Manipulation
A in-memory virtual DOM is shown, represented as follows: A node "window" is shown at the top of the tree. Below this, the nodes: document and "html" are shown one below the other. "html" branches into sub nodes: head and body. The "head" node is branched to contain the elements: meta, meta, title,
and link. The "body" node is branched to contain the elements: "div" and script. The "div" element contains the children: "img, h1, p, and div." A text label indicates that the virtual DOM looks nothing
like this, and isn't this colorful either. Figure 1.7 Imagine an in-memory virtual DOM that sort of looks like this.
Manipulating this virtual DOM is extremely fast, and React takes care of updating the real DOM when the time is right. It does so by comparing the changes between your virtual DOM and the real DOM, figuring out which changes actually matter, and making the fewest number of DOM changes needed to keep everything up-to-date in a process called reconciliation.
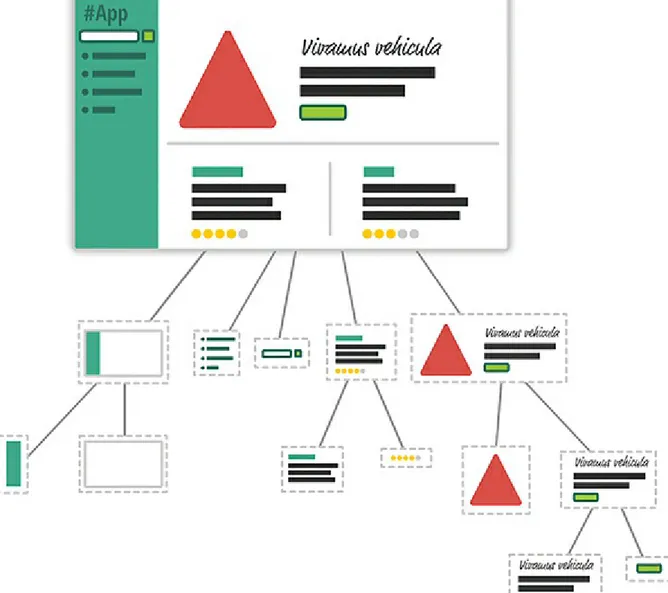
APIs to Create Truly Composable UIs
Figure 1.8 An example of how the visuals of your app can be broken into smaller pieces.
Figure 1.9 Russian matryoshka dolls.
This is one of the major ways React simplifies (and changes) how we think about building the visuals for our web apps.
Visuals Defined Entirely in JavaScript
While this sounds ridiculously crazy and outrageous, hear me out. Besides having a really weird syntax, HTML templates have traditionally suffered from another major problem: You are limited in the variety of things you can do inside them, which goes beyond simply displaying data. If you want to choose a piece of UI to display based on a particular condition, for example, you have to write
JavaScript somewhere else in your app or use some weird framework-specific templating command to make it work.
For example, here’s what a conditional statement inside an EmberJS template looks like:
Click here to view code image
{{#if person}}
Welcome back, {{person.firstName}} {{person.lastName}}!
{{else}}
Please log in. {{/if}}
the rich functionality JavaScript provides for doing all sorts of things inside your templates. You are limited only by what JavaScript supports, not limitations imposed by your templating framework. Now, when you think of visuals defined entirely in JavaScript, you’re probably thinking something horrible that involves quotation marks, escape characters, and a whole lot of createElement
calls. Don’t worry. React allows you to (optionally) specify your visuals using an HTML-like syntax known as JSX that lives fully alongside your JavaScript. Instead of writing code to define your UI, you are basically specifying markup:
Click here to view code image
ReactDOM.render( <div>
<h1>Batman</h1> <h1>Iron Man</h1> <h1>Nicolas Cage</h1> <h1>Mega Man</h1> </div>,
destination );
This same code defined in JavaScript would look like this:
Click here to view code image
ReactDOM.render(React.createElement(
Yikes! Using JSX, you are able to easily define your visuals using a very familiar syntax, while still getting all the power and flexibility that JavaScript provides.
Best of all, in React, your visuals and JavaScript often live in the same location. You no longer have to jump among multiple files to define the look and behavior of one visual component. This is
templating done right.
Just the V in an MVC Architecture
We’re almost done here! React is not a full-fledged framework that has an opinion on how everything in your app should behave. Instead, React works primarily in the View layer, where all of its worries and concerns revolve around keeping your visual elements up-to-date. This means you’re free to use whatever you want for the M and C parts of your MVC (a.k.a. Model-View-Controller) architecture. This flexibility allows you to pick and choose technologies you are familiar with, and it makes React useful not only for new web apps you create, but also for existing apps you’d like to enhance without removing and refactoring a whole bunch of code.
Conclusion
As new web frameworks and libraries go, React is a runaway success. It not only deals with the most common problems developers face when building single-page apps, but it also throws in a few
additional tricks that make building the visuals for your single-page apps much easier. Since it came out in 2013, React has also steadily found its way into popular web sites and apps that you probably use. Besides Facebook and Instagram, some notable ones include the BBC, Khan Academy, PayPal, Reddit, The New York Times, and Yahoo!, among many others.
This article was an introduction to what React does and why it does it. In subsequent chapters, we’ll dive deeper into everything you’ve seen here and cover the technical details that will help you
2
Building Your First React App
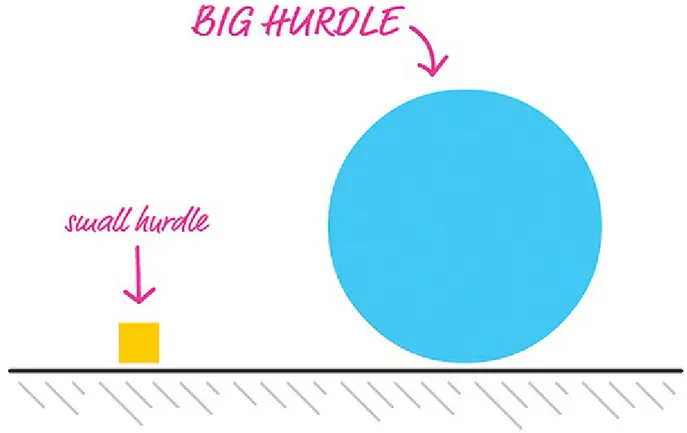
Thanks to the previous chapter, you probably now know all about the backstory of React and how it helps even your most complex user interfaces sing. For all the awesomeness that React brings to the table, getting started with it (kind of like this sentence) is not the most straightforward. It has a steep learning curve filled with many small and big hurdles, as in Figure 2.1.
Figure 2.1 Hurdles come in a variety of sizes. Some are big. Some are small.
In this chapter, we start at the very beginning and get our hands dirty by building a simple React app. You’ll encounter some of these hurdles head-on, and some of these hurdles you’ll skip over—for now. By the end of this chapter, not only will you have built something you can proudly show off to your friends and family, but you’ll have set yourself up nicely for diving deeper into all that React offers in future chapters.
Dealing with JSX
As you know, your web apps (and everything else your browser displays) are made up of HTML, CSS, and JavaScript (see Figure 2.2).
Figure 2.2 Web apps are built in HTML, CSS, and JavaScript.
It doesn’t matter whether your web app was written using React or some other library, such as Angular, Knockout, or jQuery. The end result has to be some combination of HTML, CSS, and JavaScript; otherwise, your browser really won’t know what to do.
Now, here’s where the special nature of React comes in. Besides normal HTML, CSS, and JavaScript, the bulk of your React code will be written in JSX. As I mentioned in Chapter 1,
“Introducing React,” JSX is a language that allows you to easily mix JavaScript and HTML-like tags to define user interface (UI) elements and their functionality. That sounds cool and all (and you’ll see JSX in action in just a few moments), but there’s a slight problem. Your browser has no idea what to do with JSX.
To build a web app using React, we need a way to convert our JSX into plain old JavaScript that your browser can understand (see Figure 2.3).
Figure 2.3 JSX needs to turn into something our browser understands.
1. Set up a development environment around Node and a handful of build-tools. In this
environment, every time you perform a build, all of your JSX is automatically converted into JS and placed on disk for you to reference like any plain JavaScript file.
2. Let your browser automatically convert JSX to JavaScript at runtime. You specify your JSX directly, just as you would any old piece of JavaScript, and your browser takes care of the rest. Both of these solutions have a place in our world, but let’s talk about the impact of each.
The first solution, while a bit complicated and time-consuming at first, is the way modern web
development is done these days. Besides compiling (transpiling, to be more accurate) your JSX to JS, this approach enables you to take advantage of modules, better build tools, and a bunch of other
features that make building complex web apps somewhat manageable.
The second solution provides a quick and direct path in which you initially spend more time writing code and less time fiddling with your development environment. To use this solution, all you do is reference a script file. This script file takes care of turning the JSX into JS on page load, and your React app comes to life without you having to do anything special to your development environment. For our introductory look at React, we are going to use the second solution. You might be
wondering why we don’t always use the second solution. The reason is that your browser takes a performance hit each time it translates JSX into JS. That is totally acceptable when learning how to use React, but it is totally not acceptable when deploying your app for real-life use. Because of that lack of acceptability, we will revisit all of this later, to look at the first solution and how to set up your development environment after you’ve gotten your feet comfortably wet in React.
Getting Your React On
In the previous section, we looked at the two ways you have for ensuring that your React app ends up as something your browser understands. In this section, we put all those words into practice. First, you need a blank HTML page as your starting point.
Create a new HTML document with the following contents:
Click here to view code image
<!DOCTYPE html> <html>
<head>
<meta charset="utf-8">
This page has nothing interesting or exciting going for it, but let’s fix that by adding a reference to the React library. Just below the title, add these two lines:
Click here to view code image
<script src="https://unpkg.com/react@16/umd/react.development.js"></script>
<script src="https://unpkg.com/react-dom@16/umd/react-dom.development.js"></script> These two lines bring in both the core React library and the various things React needs to work with the DOM. Without them, you aren’t building a React app at all.
Now, you aren’t done yet. You need to reference one more library. Just below these two script tags, add the following line:
Click here to view code image
<script src="https://unpkg.com/[email protected]/babel.min.js"></script>
Here you’re adding a reference to the Babel JavaScript compiler (http://babeljs.io/). Babel does many cool things, but the one we care about is its capability to turn JSX into JavaScript.
At this point, your HTML page should look as follows:
Click here to view code image
<!DOCTYPE html> <html>
<head>
<meta charset="utf-8">
<title>React! React! React!</title>
<script src="https://unpkg.com/react@16/umd/react.development.js"></script>
<script src="https://unpkg.com/react-dom@16/umd/react-dom.development.js"></script> <script src="https://unpkg.com/[email protected]/babel.min.js"></script>
</head>
If you preview your page right now, you’ll notice that this page is still blank, with nothing visible going on. That’s okay. We’re going to fix that next.
Displaying Your Name
Now you’re going to use React to display your name onscreen. You do that by using a method called
render. Inside your empty script tag in the body, add the following:
Click here to view code image
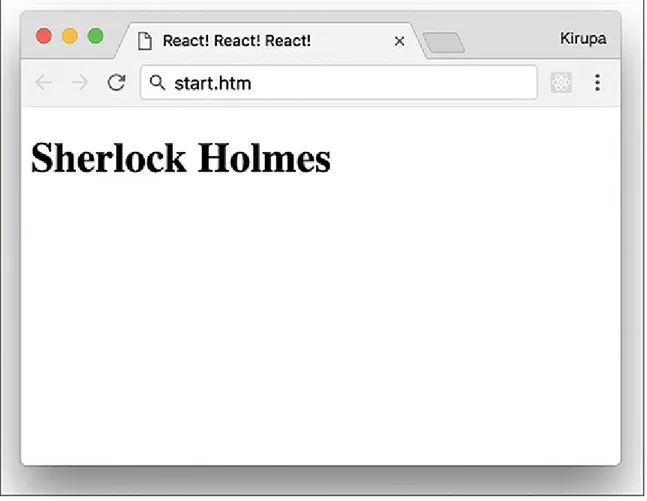
ReactDOM.render(
<h1>Sherlock Holmes</h1>, document.body
Don’t worry if none of this makes sense at this point. Our goal is to get something to display onscreen first, and we’ll make sense of what we did afterward. Now, before previewing this in the page to see what happens, you need to designate this script block as something that Babel can work its magic on. You do that is by setting the type attribute on the script tag to a value of text/babel:
Click here to view code image
<script type="text/babel"> ReactDOM.render(
<h1>Sherlock Holmes</h1>, document.body
);
</script>
After you’ve made that change, preview what you have in your browser. You’ll see the words Sherlock Holmes printed in giant letters, as in Figure 2.4.
Figure 2.4 Your browser should display Sherlock Holmes. Congratulations! You’ve just built an app using React.
As apps go, this isn’t all that exciting. Chances are, your name isn’t even Sherlock Holmes. This app doesn’t have much going for it, but it does introduce you to one of the most frequently used methods you’ll use in the React universe: the ReactDOM.render method.
The render method takes two arguments:
1. The HTML-like elements (a.k.a. JSX) you want to output
Here’s what our render method looks like:
Click here to view code image
ReactDOM.render(
<h1>Sherlock Holmes</h1>, document.body
);
Our first argument is the text Sherlock Holmes wrapped inside some h1 tags. This HTML-like syntax inside your JavaScript is what JSX is all about. We’ll spend a lot more time drilling into JSX a bit later, but I should mention this up front: It is every bit as crazy as it looks. Whenever I see brackets and slashes in JavaScript, a part of me dies on the inside because of all the string escaping and quotation mark gibberish I will need to do. With JSX, you do none of that. You just place your HTML-like content as is, just like you’ve done here. Magically (like the super-awesome kind involving dragons and laser beams), it all works.
The second argument is document.body. There’s nothing crazy or bizarre about this argument. It simply specifies where the converted markup from the JSX will end up living in our DOM. In our example, when the render method runs, the h1 tag (and everything inside it) is placed in our document’s body element.
Now, the goal of this exercise wasn’t to display a name on the screen. It was to display your name. Go ahead and modify your code to do that. In my case, the render method will look as follows:
Click here to view code image
ReactDOM.render( <h1>Batman</h1>, document.body );
Well, it would look like that if my name were Batman! Anyway, if you preview your page now, you’ll see your name displayed instead of Sherlock Holmes.
It’s All Still Familiar
The JavaScript looks new and shiny thanks to JSX, but the end result your browser sees is nice and clean HTML, CSS, and JavaScript. To see this for yourself, let’s make a few alterations to how our app behaves and looks.
Changing the Destination
First we’ll change where the JSX gets output. Using JavaScript to place things directly in your body
element is never a good idea. A lot can go wrong, especially if you’re going to be mixing React with other JS libraries and frameworks. The recommended path is to create a separate element that you will treat as a new root element. This element will serve as the destination your render method will use. To make this happen, go back to the HTML and add a div element with an id value of
Click here to view code image
<body>
<div id="container"></div> <script type="text/babel"> ReactDOM.render(
With the containerdiv element safely defined, let’s modify the render method to use it instead of
document.body. Here’s one way of doing this:
Click here to view code image
ReactDOM.render( <h1>Batman</h1>,
document.querySelector("#container") );
Another option is to do some things outside the render method itself:
Click here to view code image
var destination = document.querySelector("#container"); ReactDOM.render(
<h1>Batman</h1>, destination );
Notice that the destination variable stores the reference to your container DOM element. Inside the render method, you simply reference the same destination variable instead of writing the full element-finding syntax as part of the argument itself. The reason for this is simple: I want to show you that you’re still writing JavaScript and that render is just another boring old method that
happens to take two arguments.
Styling It Up!
Time for the last change before we call it a day. Right now, our names show up in whatever default
h1 styling the browser provides. That’s just terrible, so let’s fix that by adding some CSS. Inside your head tag, let’s add a style block with the following CSS:
Click here to view code image
After you’ve added everything, preview your page. Notice that the text appears to have a little more purpose than it did earlier, when it relied entirely on the browser’s default styling (see Figure 2.5).
Figure 2.5 The result of adding the CSS.
This works because, after running all the React code, the DOM’s body contains our container
element with an h1 tag inside it. It doesn’t matter that the h1 tag was defined entirely inside
JavaScript in this JSX syntax or that your CSS was defined well outside the render method. The end result of your React app is still going to be made up of some 100% organic (and cage-free!) HTML, CSS, and JavaScript. If we had to see what this transpiled JavaScript looks like, it would look a bit like the following:
Click here to view code image
<!DOCTYPE html> <html>
<head>
<meta charset="utf-8">
<title>React! React! React!</title>
<script src="https://unpkg.com/react@16/umd/react.development.js"></script>
<script src="https://unpkg.com/react-dom@16/umd/react-dom.development.js"></script>
<script src="https://unpkg.com/[email protected]/babel.min.js"></script>
<style>
#container { padding: 50px;
background-color: #EEE; }
#container h1 { font-size: 144px;
font-family: sans-serif; color: #0080A8;
<body>
<div id="container"></div> <script type="text/babel">
var destination = document.querySelector("#container"); ReactDOM.render(React.createElement(
"h1", null, "Batman"
), destination); </script>
</body> </html>
Notice that there’s nary a trace of React-like code in sight. (Also, we should use the word nary more often in everyday conversation!)
Conclusion
If this is your first time building a React app, we covered a lot of ground here. One of the biggest takeaways is that React is different than other libraries because it uses a whole new language called JSX to define what the visuals will look like. You got a very small glimpse of that here when we defined the h1 tag inside the render method.
JSX’s impact goes beyond how you define your UI elements. It also alters how you build your app as a whole. Because your browser can’t understand JSX in its native representation, you need to use an intermediate step to convert that JSX into JavaScript. One approach is to build your app to generate the transpiled JavaScript output to correspond to the JSX source. Another approach (the one we used here) is to use the Babel library to translate the JSX into JavaScript on the browser itself. While the performance hit of doing this is not recommended for live/production apps, when you’re familiarizing yourself with React, you can’t beat the convenience.
In future chapters, we spend some time diving deeper into JSX and going beyond the render method as we look at all the important things that make React tick.
Note: If you run into any issues, ask!
If you have any questions or your code isn’t running like you expect, don’t hesitate to ask! Post on the forums at https://forum.kirupa.com and get help from some of the friendliest and most
3
Components in React
Components are one of the pieces that make React, well, React! They’re one of the primary ways you have for defining the visuals and interactions that make up what people see when they use your app. Let’s say Figure 3.1 shows what your finished app looks like.
Figure 3.1 Your hypothetical finished app.
Figure 3.2 Diagrammatic representation of the app components.
Each dotted line represents an individual component that is responsible for both what you see and any interactions that it is responsible for. Don’t let this scare you. While this looks really complicated, you will soon see that it will start to make a whole lot of sense once you’ve had a chance to play with components and some of the awesome things they do—or, at least, try really hard to do.
Quick Review of Functions
In JavaScript, you have functions that enable you to make your code a bit cleaner and more reusable. Now, there’s reason we’re taking some time to look at functions, and it isn’t to annoy you!
Conceptually, functions share a lot of surface area with React components, and the easiest way to understand what components do is to take a quick look at functions first.
In a terrible world where functions don’t exist, you might have some code that looks as follows:
Click here to view code image
var speed = 10;
var time = 5;
alert(speed * time);
var speed1 = 85;
alert(speed1 * time1);
In a really chill world that involves functions, you can condense all that duplicated text into something simple, like the following:
Click here to view code image
function getDistance(speed, time) {
var result = speed * time;
alert(result); }
Our getDistance function removes all the duplicated code you saw earlier, and it takes speed and time as arguments to allow you to customize the calculation that gets returned.
To call this function, all you have to do is this:
Click here to view code image
getDistance(10, 5); getDistance(85, 1.5); getDistance(12, 9); getDistance(42, 21);
Doesn’t this look nicer? Functions provide another great value, too. Your functions (such as the alert inside getDistance) can call other functions as part of their running. Take a look at using a
formatDistance function to change what getDistance returns:
Click here to view code image
function formatDistance(distance) { return distance + " km";
}
function getDistance(speed, time) {
var result = speed * time;
alert(formatDistance(result)); }
This capability to have functions call other functions enables us to cleanly separate what functions do. You don’t need to have one monolithic function that does everything under the sun; you can distribute functionality across many functions that are specialized for a particular type of task.
Best of all, after you make changes to how your functions work, you don’t have to do anything extra to see the results of those changes. If the function signature didn’t change, any existing calls to that
function will just magically work and automatically pick up any new changes you made to the function itself.
has them all over the place.
Changing How We Deal with UI
I don’t think anybody will disagree with the good functions bring to the table. They really make it possible to structure the code for your apps in a sane way. That same level of care we use in writing our code isn’t always possible when it comes to writing our UIs. For various technical and
nontechnical reasons, we’ve always tolerated a certain level of sloppiness with how we typically work with our UI elements.
That’s a pretty controversial statement, so let me highlight what I mean by looking at some examples. Let’s go back and look at the render method we used in the previous chapter:
Click here to view code image
var destination = document.querySelector("#container"); ReactDOM.render(
<h1>Batman</h1>, destination );
Onscreen, you see the word Batman printed in giant letters, thanks to the h1 element. Let’s change things up a bit. Say that we want to print the names of several other superheroes. To do this, we modify our render method to look as follows:
Click here to view code image
var destination = document.querySelector("#container"); ReactDOM.render(
<div>
<h1>Batman</h1> <h1>Iron Man</h1> <h1>Nicolas Cage</h1> <h1>Mega Man</h1> </div>,
destination );
Notice what you see here. We emit a div that contains the four h1 elements with our superhero names.
Okay, so now we have four h1 elements that each contains the name of a superhero. What if we want to change our h1 element to something like an h3 instead? We can manually update all of these
elements as follows:
Click here to view code image
var destination = document.querySelector("#container"); ReactDOM.render(
<div>
<h3>Mega Man</h3> </div>,
destination );
If you preview what we have, you’ll see something that looks a bit unstyled and plain (see Figure 3.3).
Figure 3.3 Plain vanilla superhero names.
We don’t want to go crazy with the styling here. All we want to do is italicize all these names by using the i tag, so let’s manually update what we render by making this change:
Click here to view code image
var destination = document.querySelector("#container"); ReactDOM.render(
<div>
<h3><i>Batman</i></h3> <h3><i>Iron Man</i></h3> <h3><i>Nicolas Cage</i></h3> <h3><i>Mega Man</i></h3> </div>,
destination );
We went through each h3 element and wrapped the content inside some i tags. Can you start to see the problem here? What we are doing with our UI is no different than having code that looks as follows:
Click here to view code image
var time = 5;
Every change we want to make to our h1 or h3 elements needs to be duplicated for every instance of them. What if we want to do something even more complex than just modifying the appearance of our elements? What if we want to represent something more complex than the simple examples we’re using so far? What we’re doing right now won’t scale; manually updating every copy of what we want to modify is time-consuming. It is also boring.
Now, here’s a crazy thought: What if everything awesome that we looked at about functions could somehow be applied to how we define our app’s visuals? Wouldn’t that solve all the inefficiencies we’ve highlighted in this section? As it turns out, the answer to that “what if” forms the core of what React is all about. It’s time for you to say hello to the component.
Meet the React Component
The solution to all of our problems (even the existential ones we grapple with) can be found in React components. React components are reusable chunks of JavaScript that output (via JSX) HTML elements. That sounds really pedestrian for something capable of solving great things, but as you start to build components and gradually turn up the complexity, you’ll see that components are really
powerful and every bit as awesome as I’ve portrayed them.
Let’s start by building a couple of components together. To follow along, start with a blank React document:
Click here to view code image
<!DOCTYPE html> <html>
<head>
<meta charset="utf-8">
<title>React Components</title>
<script src="https://unpkg.com/react@16/umd/react.development.js"></script>
<script src="https://unpkg.com/react-dom@16/umd/react-dom.development.js"></script> <script src="https://unpkg.com/[email protected]/babel.min.js"></script>
</head> <body>
</script> </body> </html>
Nothing exciting is going on in this page. As in the last chapter, this page is pretty barebones, with just a reference to the React and Babel libraries and a div element that proudly sports an id value of container.
Creating a Hello, World! Component
Let’s start really simple. We want to use a component to help us print the famous “Hello, world!” text to the screen. As we already know, using just the render method of ReactDOM would give us code that looks as follows:
Click here to view code image
ReactDOM.render( <div>
<p>Hello, world!</p> </div>,
document.querySelector("#container") );
Let’s re-create all of this by using a component. React gives us several ways of creating components, but we are going to create them by using the class syntax. Go ahead and add the following highlighted code just above the existing render method:
Click here to view code image
class HelloWorld extends React.Component { }
ReactDOM.render( <div>
<p>Hello, world!</p> </div>,
document.querySelector("#container") );
If the class syntax is foreign to you, first check out my online tutorial Using Classes in JavaScript (https://www.kirupa.com/javascript/classy_way_to_create_objects.htm).
Getting back to our code, we have created a new component called HelloWorld. This is a component because it extends React.Component. If it didn’t do that, it would just be an empty class that doesn’t do much. Inside our class, you can put all sorts of methods to further define what HelloWorld does. Some methods that you define are special, and React uses them to help your components work their magic. One such mandatory property is render.
Go ahead and modify our HelloWorld component by adding the render method, as shown:
Click here to view code image
render() { }
}
Just like the render method you saw a few moments earlier as part of ReactDOM.render, the
render function inside a component is also responsible for dealing with JSX. Let’s modify our
render function to return Hello, componentized world!. Add the following highlighted line:
Click here to view code image
class HelloWorld extends React.Component { render() {
return <p>Hello, componentized world!</p> }
}
You’ve told the render function to return the JSX that represents the Hello, componentized world!
text. All that remains is to actually use this component. You use a component after you’ve defined it by calling it. Here we call it from our old friend, the ReactDOM.render method.
The way you call a component from it is a bit unique. Go ahead and replace the first argument to
ReactDOM.render with the following:
Click here to view code image
ReactDOM.render( <HelloWorld/>,
document.querySelector("#container") );
That isn’t a typo! The JSX we use for calling our HelloWorld component is the very HTML-like
<HelloWorld/>. If you preview your page in your browser, you’ll see the text Hello,
componentized world! showing up on your screen. If you were holding your breath in suspense, you can relax.
Figure 3.4 Just some lighthearted distraction!
Okay, back to reality. What we’ve done so far might seem crazy, but simply think of your
<HelloWorld/> component as a cool and new HTML tag whose functionality you fully have control over. This means you can do all sorts of HTML-y things to it.
For example, go ahead and modify our ReactDOM.render method to look as follows:
Click here to view code image
ReactDOM.render( <div>
<HelloWorld/> </div>,
document.querySelector("#container") );
to HelloWorld, let’s make a bunch of calls. Modify our ReactDOM.render method to now look as follows:
Click here to view code image
ReactDOM.render(
Now you’ll see is a bunch of Hello, componentized world! text instances appear. Let’s do one more thing before we move on to something shinier. Go back to our HelloWorld component declaration and change the text you return to the more traditional Hello, world! value:
Click here to view code image
class HelloWorld extends React.Component { render() {
return <p>Hello, world!</p> }
}
Make this one change and then preview your example. This time around, all the various
HelloWorld calls we specified earlier return Hello, world! to the screen. No need to manually modify every HelloWorld call—that’s a good thing!
Specifying Properties
Right now, our component does just one thing. It prints Hello, world! to the screen—and only that! That’s the equivalent of having a JavaScript function that looks like this:
Click here to view code image
function getDistance() { alert("42km");
}
Except for one very specific case, that JavaScript function doesn’t seem very useful, does it? To increase the usefulness of this function, we need to modify it to take arguments:
Click here to view code image
function getDistance(speed, time) {
var result = speed * time;
alert(result); }
Something similar applies to your components as well. Just as with functions, you can pass in
arguments that alter what your component does. There’s a slight terminology update you need to be on top of. What we call arguments in the function world are known as properties in the component world. Let’s see these properties in action!
You’re now going to modify the HelloWorld component to allow you to specify who or what you greet besides the generic World. For example, imagine being able to specify Bono as part of the
HelloWorld call and seeing Hello, Bono! appear onscreen.
To add properties to a component, you need to follow two parts of instructions.
First Part: Updating the Component Definition
Right now, our HelloWorld component is hard-coded to always send out Hello, world! as part of its return value. We first need to change that behavior by having the return statement print out the value passed in by a property. We need a name to give our property; for this example, we call our property greetTarget.
To specify the value of greetTarget as part of our component, we need to make this modification:
Click here to view code image
class HelloWorld extends React.Component { render() {
return <p>Hello, {this.props.greetTarget}!</p> }
}
You access a property by referencing it via the this.props property that every component has access to. Notice how you specify this property: You place it inside curly brackets, { and }. In JSX, if you want something to get evaluated as an expression, you need to wrap that something inside curly brackets. If you don’t do that, you’ll see the raw text this.props.greetTarget printed out.
Second Part: Modifying the Component Call
After you’ve updated the component definition, all that remains is to pass in the property value as part of the component call. This is done by adding an attribute with the same name as the property,
followed by the value you want to pass in. In our example, that involves modifying the HelloWorld
call with the greetTarget attribute and the value you want to give it.
Go ahead and modify the HelloWorld calls as follows:
Click here to view code image
ReactDOM.render( <div>
<HelloWorld greetTarget="Mega Man"/> <HelloWorld greetTarget="Bono"/> <HelloWorld greetTarget="Catwoman"/> </div>,
document.querySelector("#container") );
Each HelloWorld call now has the greetTarget attribute, along with the name of a superhero (or equivalent mythical being) that we want to greet. If you preview this example in the browser, you’ll see the greetings happily printed out onscreen.
One last point is important to call out before we move on. You are not limited to having just a single property on a component. You can have as many properties as you want, and your props property will easily accommodate any property requests you have without making any fuss.
Dealing with Children
A few sections ago, I mentioned that components (in JSX) are very similar to regular HTML elements. You saw that when you wrapped a component inside a div element or specified an
attribute and value as part of specifying properties. Just as you can have many HTML elements, your components can have children.
This means you can do something like this:
Click here to view code image
<CleverComponent foo="bar"> <p>Something!</p>
</CleverComponent>
Here you have a component very cleverly called CleverComponent, and it has a p element as a child. From within CleverComponent, you have the capability to access the p child element (and any children it has) via the children property accessed by this.props.children.
To make sense of all this, let’s look at another really simple example. This time around, we have a component called Buttonify that wraps its children inside a button. The component looks like this:
Click here to view code image
class Buttonify extends React.Component { render() {
return( <div>
<button type={this.props.behavior}>{this.props.children}</button> </div>
); } }
You can use this component by calling it via the ReactDOM.render method, as shown here:
Click here to view code image
<div>
<Buttonify behavior="submit">SEND DATA</Buttonify> </div>,
document.querySelector("#container") );
When this code runs, given what the JSX in the Buttonify component’s render method looked like, you see the words SEND DATA wrapped inside a button element. With the appropriate styling, the result could look comically large, as in Figure 3.5.
Figure 3.5 A large Send Data button.
Getting back to the JSX, notice that we specify a custom property called behavior. This property allows us to specify the button element’s type attribute, and you can see us accessing it via
this.props.behavior in the component definition’s render method.
There’s more to accessing a component’s children than what you’ve seen here. For example, if your child element is just some text, the this.props.children property returns a string. If your child element is just a single element (as in our example), the this.props.children property returns a single component that is not wrapped inside an array. We still need to call out a few more things, but instead of enumerating all the cases and boring you, we’ll bring up those points later as we look at more elaborate examples.
Conclusion
If you want to build an app using React, you can’t wander too far without having to use a component. Trying to build a React app without using a component is kind of like building a JavaScript-based app without using functions. I’m not saying that it can’t be done; it’s just one of those things you don’t do—kind of like the Bad Idea part of the popular Animaniacs Good Idea/Bad Idea sketches
(https://www.youtube.com/watch?v=2dJOIf4mdus).
what will—except for maybe a future chapter on creating complex components!
Note: If you run into any issues, ask!
If you have any questions or your code isn’t running like you expect, don’t hesitate to ask! Post on the forums at https://forum.kirupa.com and get help from some of the friendliest and most
4
Styling in React
For generations, mankind (and probably really smart dolphins) has styled HTML content using CSS. Things were good. CSS had good separation between content and presentation. The selector syntax offered a lot of flexibility in choosing which elements to style and which ones to skip. We couldn’t even find many reasons to hate the whole cascading thing CSS is all about.
Well, don’t tell React that. React doesn’t actively hate CSS, but it has a different view when it comes to styling content. As you’ve seen, one of React’s core ideas is to make an app’s visual pieces self-contained and reusable. That’s why the HTML elements and the JavaScript that impacts them are in the same bucket, called a component. You got a taste of that in the previous chapter.
What about how the HTML elements look (a.k.a. their styling)? Where should they go? You can probably guess where we’re going with this. You can’t have a self-contained piece of UI when the styling for it is defined somewhere else. That’s why React encourages you to specify how your
elements look right alongside the HTML and the JavaScript. In this tutorial, you’ll learn all about this mysterious (and possibly scandalous) approach for styling your content. Of course, we also look at how to use CSS. There’s room for both approaches, even if React might sort of, kind of not think so.
Displaying Some Vowels
To learn how to style React content, let’s work together on a (totally sweet and exciting) example that simply displays vowels on a page. First, you’ll need a blank HTML page that will host your React content. Create a new HTML document and add the following content into it:
Click here to view code image
<!DOCTYPE html> <html>
<head>
<meta charset="utf-8">
<title>Styling in React</title>
<script src="https://unpkg.com/react@16/umd/react.development.js"></script>
<script src="https://unpkg.com/react-dom@16/umd/react-dom.development.js"></script> <script src="https://unpkg.com/[email protected]/babel.min.js"></script>
</head> <body>
<div id="container"></div> </body>
</html>
To display the vowels, you need to add some React-specific code. Just below the containerdiv
element, add the following:
Click here to view code image
<script type="text/babel">
var destination = document.querySelector("#container"); class Letter extends React.Component {
render() {
<Letter>A</Letter> <Letter>E</Letter> <Letter>I</Letter> <Letter>O</Letter> <Letter>U</Letter> </div>,
destination );
</script>
From what you learned about components earlier, nothing here should be a mystery. You’re creating a component called Letter that is responsible for wrapping your vowels inside a div element.
Figure 4.1 A boring output of what you see.
Don’t worry, you’ll make it look a little less boring in a few moments. After you’ve had a run at these letters, you’ll see something that looks more like Figure 4.2.
Figure 4.2 What our result looks like with some styling applied!
The vowels will be wrapped in a yellow background, aligned horizontally, with a fancy monospace font. Let’s look at how to do all of this both in CSS and using React’s newfangled approach.
Styling React Content Using CSS
Using CSS to style React content is actually as straightforward as you can imagine it to be. Because React ends up spitting out regular HTML tags, all of the various CSS tricks you’ve learned over the years for styling HTML still apply. You just need to keep a few minor points in mind.
Understand the Generated HTML
Before you can use CSS, you need to get a feel for how the HTML that React spits out is going to look. You can easily figure that out by looking at the JSX defined inside the render methods. The parent render method is our ReactDOM-based one, and it looks as follows:
Click here to view code image
<div>
<Letter>A</Letter> <Letter>E</Letter> <Letter>I</Letter> <Letter>O</Letter> <Letter>U</Letter> </div>
We have our various Letter components wrapped inside a div. Nothing too exciting here. The
render method inside our Letter component isn’t that much different, either:
Click here to view code image
<div>
{this.props.children} </div>
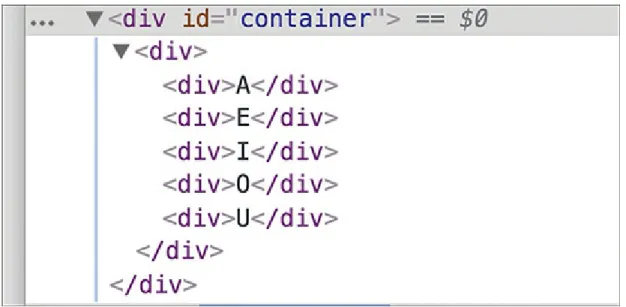
As you can see, each individual vowel is wrapped inside its own set of div tags. If you play this all out (such as previewing our example in a browser), the final DOM structure for our vowels would look like Figure 4.3.
The screenshot shows the preview of the code in the browser. The vowels: "A, E, I, O, U" are nested under "div" elements. The code reads: “<div id=“container”> == $0 <div> <div>A</div>
<div>E</div> <div>I</div> <div>O</div> <div>U</div> </div> </div>” Figure 4.3 The preview from inside the browser.
We have simply an HTML-ized expansion of the various JSX fragments you saw in the render
method a few moments ago, with our vowels nested inside a bunch of div elements.
Just Style It Already!
When you understand the HTML arrangement of the things you want to style, the hard part is done. Now comes the fun and familiar part of defining style selectors and specifying the properties you want to set. To affect the inner div elements, add the following inside the style tag:
Click here to view code image
div div div { font-family: monospace; font-size: 32px;
text-align: center; }
The div div div selector ensures that we style the right things. The end result will be our vowels styled to look exactly like we set out to. With that said, a style selector of div div div looks a bit odd, doesn’t it? It’s too generic. In apps with more than three div elements (which is common), you can end up styling the wrong things. At times like these, you will want to change the HTML that React generates to make the content more easily styleable.
We address this by giving our inner div elements a class value of letter. Here is where JSX differs from HTML. Make the following highlighted change:
Click here to view code image
class Letter extends React.Component { render() {
return (
<div className="letter">
{this.props.children}
</div> );
} }
Notice that we designate the class value by using the className attribute instead of the class
attribute. This is because the word class is a special keyword in JavaScript. If that doesn’t make any sense, don’t worry about it for now; we’ll cover it later.
After you’ve given your div a className attribute value of letter, there’s just one more thing to do. Modify the CSS selector to target the div elements more cleanly:
Click here to view code image
.letter { font-family: monospace; font-size: 32px;
As you can see, using CSS is a perfectly viable way to style the content in your React-based apps. In the next section, we look at how to style content using the approach React prefers.
Styling Content the React Way
React favors an inline approach for styling content that doesn’t use CSS. That might seem a bit strange at first, but it’s designed to make your visuals more reusable. The goal is to make your components little black boxes where everything related to how your UI looks and works is stashed. Let’s see this in action.
Continuing our example from earlier, remove the .letter style rule. Your vowels will return to their unstyled state when you preview your app in the browser. For completeness, you should also remove the className declaration from the Letter component’s render function. There’s no point having your markup contain pieces you won’t be using.
Now let’s revert the Letter component to its original state:
Click here to view code image
class Letter extends React.Component { render() {
You specify styles inside your component by defining an object whose content is the CSS properties and their values. When you have that object, you assign that object to the JSX elements you want to style by using the style attribute. This will make more sense when you perform these two steps yourself, so let’s apply all of this to style the output of the Letter component.
Creating a Style Object
Let’s get right to it by defining our object that contains the styles we want to apply:
Click here to view code image
class Letter extends React.Component { render() {
var letterStyle = {
padding: 10, margin: 10,
return (
We have an object called letterStyle, and the properties inside it are just CSS property names and their value. If you’ve never defined CSS properties in JavaScript (by setting object.style), the formula for converting them into something JavaScript-friendly is pretty simple:
1. Single-word CSS properties (such as padding, margin, and color) remain unchanged. 2. Multiword CSS properties with a dash in them (such as background-color,
font-family, and border-radius) are turned into one camel-case word, with the dash removed and the first letter of the second word capitalized. For example, using our example properties,
background-color becomes backgroundColor, font-family becomes
fontFamily, and border-radius becomes borderRadius.
Our letterStyle object and its properties are pretty much a direct JavaScript translation of the
.letter style rule we looked at a few moments ago. All that remains now is to assign this object to the element we want to style.
Actually Styling Our Content
Now that we have our object containing the styles we want to apply, the rest is easy. Find the element you want to apply the style on and set the style attribute to refer to that object. In our case, that is the
div element returned by our Letter component’s render function. Take a look at the highlighted line to see how this is done for our example:
Click here to view code image
class Letter extends React.Component { render() {
var letterStyle = {
padding: 10, margin: 10,
Our object is called letterStyle, so that’s what we specify inside the curly brackets to let React know to evaluate the expression. That’s all there is to it. Go ahead and run the example in the browser to ensure that everything works properly and that all the vowels are properly styled.
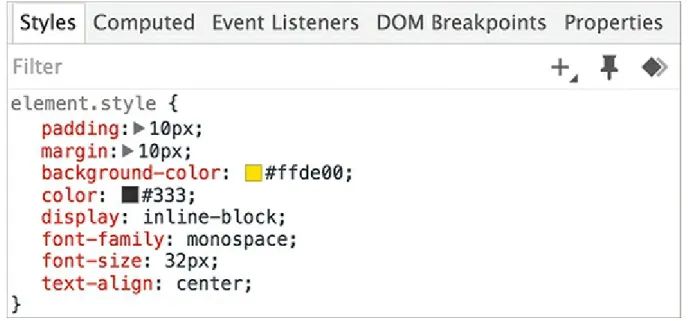
For extra validation, if you inspect the styling applied to one of the vowels using your browser developer tool of choice, you’ll see that the styles are, in fact, applied inline (see Figure 4.4).
The screenshot shows the following styles applied inline: padding set to 10 pixels from the left, margin set to 10 pixels from the left, background color set as yellow with hex code #ffde00, color set
as gray with hex code #333, display as inline-block, font-family set to monospace, font-size set to 32 pixels, and text-align set to center.
Figure 4.4 The styles are applied inline.
While this is no surprise, it might be difficult to adjust to if you’re used to styles being inside style rules. As they say, the times are a-changin’.
Making the Background Color Customizable
The last thing to do before we wrap up is take advantage of how React works with styles. By having our styles defined in the same vicinity as the JSX, we can make the various style values easily
customizable by the parent (a.k.a. the consumer of the component). Let’s see this in action.
Right now, all of our vowels have a yellow background. Wouldn’t it be cool if we could specify the background color as part of each Letter declaration? To do this in our ReactDOM.render
method, first add a bgcolor attribute and specify some colors, as shown in the following highlighted lines:
Click here to view code image
ReactDOM.render( <div>