Ten Steps to Linux Survival
Essentials for Navigating the Bash Jungle
Ten Steps to Linux Survival
by James Lehmer
Copyright © 2016 O’Reilly Media, Inc. All rights reserved. Printed in the United States of America.
Published by O’Reilly Media, Inc., 1005 Gravenstein Highway North, Sebastopol, CA 95472.
O’Reilly books may be purchased for educational, business, or sales promotional use. Online editions are also available for most titles (http://safaribooksonline.com). For more information, contact our corporate/institutional sales department: 800-998-9938 or
Revision History for the First Edition
2016-05-27: First Release
The O’Reilly logo is a registered trademark of O’Reilly Media, Inc. Ten Steps to Linux Survival, the cover image, and related trade dress are trademarks of O’Reilly Media, Inc.
While the publisher and the author have used good faith efforts to ensure that the information and instructions contained in this work are accurate, the publisher and the author disclaim all responsibility for errors or omissions, including without limitation responsibility for damages resulting from the use of or reliance on this work. Use of the information and instructions contained in this work is at your own risk. If any code samples or other technology this work contains or describes is subject to open source licenses or the
intellectual property rights of others, it is your responsibility to ensure that your use thereof complies with such licenses and/or rights.
Introduction
And you may ask yourself, “Well, how did I get here?”
Why Are We Here?
This report grew out of a series of “lunch-and-learns” on Linux that I compiled for work. During that process, I ended up writing an ebook, and then condensing it into a one-hour presentation that focuses on the essentials needed for quick problem-solving on a Linux system. I turned that
presentation into an O’Reilly webcast, and this report provides more details on those original 10 essentials.
Even in formerly “pure Windows” shops, Linux use is growing. Linux
systems are everywhere! They may appear as appliances (machines) or, more likely, virtual machine (VM) images dropped in by a vendor.
Common examples of Linux systems that may appear in your shop as VMs or in the cloud include the following:
Web servers
Apache, Nginx, Node.js
Database servers
MongoDB, PostgreSQL
Mobile device management
Various MDM solutions, such as MobileIron
Security and monitoring systems
Security information and event management (SIEM) systems, network sniffers
Source-code control systems
Git or Mercurial
As Linux use continues to grow, you need to know the basics. One day you might be the only one in the office when things go south, and you’ll have to fix them — fast. This guide will help.
don’t cover these topics:
Modifying the system, other than restarting
Forensics, other than looking at logs
Shell scripting
Distro differences — for example, Ubuntu versus CentOS
Who Is This For?
The intended audience of this book is not seasoned Linux administrators, or anyone with a passing knowledge of the Bash shell. Instead, it is for people who are working in small Windows shops, where everyone has to wear various hats. It is for Windows administrators, network admins, developers, and the like who have no knowledge of Linux but may still have to jump in during a problem. Imagine your boss rushing into your office and saying this:
The main www site is down, and all the people who know about it are out. It’s running on some sort of Linux, I think, and the credentials and IP address are scrawled on this sticky note. Can you get in, poke around, and see if you can figure it out?
How to Prepare
In small shops, sometimes things just fall on you because no one else is available. There is often no room for “It’s not my job” when production is down and the one person who knows about it is backpacking in Colorado. So you need to be prepared as the use of Linux becomes more prevalent, turning “pure Microsoft” shops more and more into hybrids. Linux is coming,
whether you like it or not. Be prepared.
First, pay close attention whenever you hear the word appliance used in terms of a system. Perhaps it will be mentioned in passing in a vendor presentation. Dig in and find out what the appliance image is running. Second, note that even Microsoft is supporting Linux, and increasing that support daily. First, it started with making Linux systems first-class citizens on Azure. Now Microsoft is partnering with Docker and Ubuntu and others, and that coordination looks like it is only going to grow.
So now is the time to start studying. This report is a quick-help guide to prepare you for limited diagnostic and recovery tasks, and to get you used to how Linux commands work. But you should dig further.
One place to turn next is my ebook. It helps you take the next steps of
Play with It!
Documentation and Instrumentation
To protect yourself in case you are thrown into the scenario outlined at the beginning of this report, you should make sure the following are in place at your shop:
The Linux systems are documented.
This should include their purpose, as-built documentation outlining the distro, virtual or physical hardware specs, packages installed, and so on.
These systems are being actively monitored.
Are they tied in to Paessler Router Traffic Grapher (PRTG), SIEM, and other monitoring and alerting systems? Make sure you have access to those alerts and monitoring dashboards, as they can be a great source of troubleshooting information.
You have access to the system credentials.
Conventions
If a command, filename, or other computer code is shown inline in a sentence, it appears in a fixed-width font:
ls --recursive *.txt
If a command and its output is shown on a terminal session, it appears as shown in Figure P-1.
Figure P-1. cat command
get you used to the ways that command output and terminal settings can differ, much more than under the default Windows Command Prompt. The examples in this book typically show something like
myuser@ubuntu-512mb-nyc3-01:~ $ before the command (as in the previous example). In other systems, you may simply see ~ # (when logged in as root) or % (when running under csh). These command prompts are not meant to be typed in as part of the command. Although they may seem
confusing in the samples, you need to get used to looking at a terminal and “parsing” what is being displayed. And in our scenarios, you won’t have control over the command prompt format. Get used to it.
Typically, the screenshots are set up with the command entered at the prompt at the top of the screen, the command output immediately following, and in most cases a new command prompt waiting for another command at the end, as in the preceding example.
In the few places, where a Linux command is shown in comparison to a DOS command run under Windows Command Prompt, the latter is shown in all uppercase to help distinguish it from the Linux equivalent, even though
Windows Command Prompt is case-insensitive. In other words, cd temp is shown for bash, and CD TEMP for CMD.EXE.
This element signifies a tip or suggestion.
This element signifies a general note.
Chapter 0. Step 0: Don’t Panic
The first, essential step is to stay calm. If you are dragged into trying to diagnose a Linux system and it isn’t your area of expertise, you can only do so much. We’re going to be careful to keep from changing system
configurations, and we’re going to restart services or the system only as a last resort.
Chapter 1. Step 1: Getting In
Before I get too far, let’s talk about how to connect to a Linux system in the first place. If you have an actual physical machine, you can use the console. In today’s day and age, this isn’t likely. If you are running VMs, you can use the VM software’s console mechanism.
But most Linux systems run OpenSSH, a Secure Shell service, which creates an encrypted terminal connection via TCP/IP, typically to port 22. So,
obviously, if you are connecting to an off-premise system, the appropriate firewall holes have to be in place on both sides. This allows you to connect from anywhere you want to work.
On Windows, you generally use PuTTY to establish SSH sessions with Linux systems. You typically need credentials as well, either from that sticky note your boss found, or preferably via your company’s secure credentials
management system.
You also could connect using public/private key pairs, but that is beyond the scope of this report.
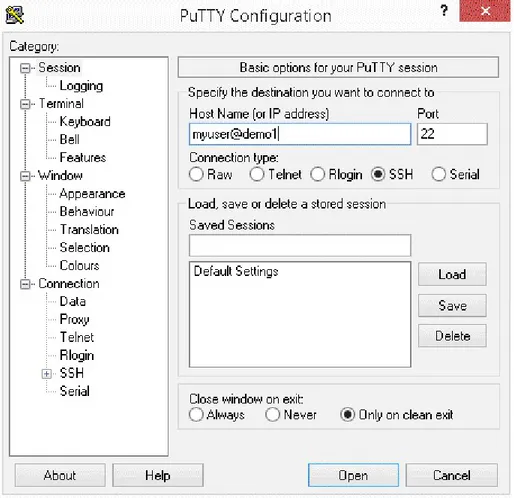
Figure 1-1. PuTTY prompt
You typically type in a user ID (in this example, myuser), followed by the at sign, @, and then the system’s domain name or IP address (in this example,
demo1).
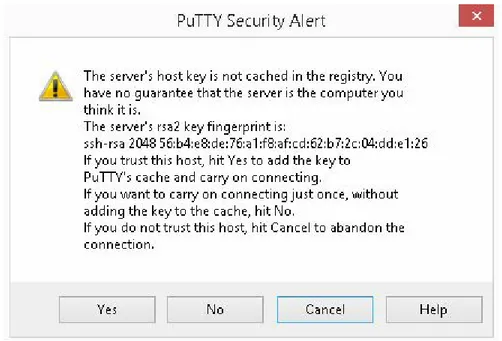
Figure 1-2. PuTTY alert
Simply click Yes, and the remote host’s key fingerprint will be stored so you don’t have to deal with this warning again. However, if you’ve already
answered that prompt when connecting from your computer and you see it again for the same remote system, that means the remote machine’s IP
address or other configuration has changed. That is often OK — changing the hosting provider for your public web server will trigger the warning for sure. However, if you know of no such changes, it may be indication of a system compromise, and you should abort the login and ask around.
You will then be presented with a password prompt, as shown in Figure 1-3.
Figure 1-3. PuTTY password
Figure 1-4. Successful login
“sudo make me a sandwich”
I’m going to take a brief intermission to discuss the sudo command. It stands for super-user do. If a user is in the sudo user group, that user is allowed to execute privileged commands. It is similar to doing a RUNAS command in the Windows Command Prompt to run a command under an elevated account.
Logging in remotely as root (system administrator) is frowned upon, and in fact often forbidden for security purposes. Hence, you’ll need to use sudo to run admin commands that you will see later.
When you try to run a command and get an Access Denied message, you can then try it with sudo — for example, sudo cat /var/log/dmesg. The first time you run sudo, you will get the lecture shown in Figure 1-5, which contains good words to live by anytime you are running as an
administrator on any system!
Figure 1-5. sudo lecture
Note that you have to enter your password when you invoke sudo. Be clear, this is your user ID’s password, not root’s. This is to ensure that a human being is in control and that someone else isn’t trying to hijack your terminal session while you’re getting another cup of coffee.
Chapter 2. Step 2: Getting
Around
Where Am I?
Some command prompts are set to show the current directory path. Others are not, and it can be tough to remember where you are in the filesystem. The pwd (print working directory) command shows you:
bash-4.2$ pwd /etc/init.d
Listing Files
In Bash, the ls (list) command is used to show directories and files. It is similar to the DIR command in Windows Command Prompt.
Figure 2-1 shows a simple sample of an ls command.
Figure 2-1. ls command
Some ssh sessions use color highlighting, as shown in these screenshots (in this case, green means the file is executable). Some do not. So don’t be surprised if you see colors!
To see a more detailed listing of the files and directories, you can use the ls -l command, as shown in Figure 2-2.
Figure 2-2. ls -l command
From left to right, you see file permissions, owner, group, size, last modified date, and finally the file or directory name. File permissions are beyond the scope of this report, but if you continue your Linux education after reading this, you can learn more about them in my ebook.
these dot files, you use the ls -a command shown in Figure 2-3.
Figure 2-3. ls -a command
On the left you see . and .., which mean current directory and parent directory, respectively, just as in Windows. You also see previously hidden files such as .bash_history and the .ssh directory (in this example, blue denotes a directory).
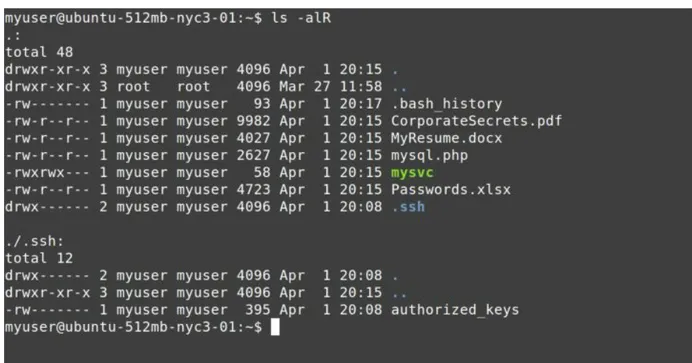
Finally, you can combine parameters. If you want to see a detailed listing (-l) of all files (-a), recursively descending into every child directory (-R), you simply combine them all (ls -alR), as shown in Figure 2-4.
Figure 2-4. ls -alR command
directories, and in terminal sessions that do not use color highlighting, this d will be the only way you know which entries are files and which are
Changing Directories
To change to a different directory, use the cd (change directory) command.
Linux uses the / character as the path delimiter, unlike Windows, which uses \. This will
trip you up the first few times, especially because \ has a different meaning in Bash (it is an escape character).
Linux doesn’t use drive letters. Instead, all devices are mounted in a single hierarchical namespace starting at the root (/) directory. You will see examples of this later in this report.
On login, you are usually in the home directory, which is represented by ~. It is similar to the user directories under C:\Users on Windows. Hence, you will probably need to go elsewhere. Here’s a list of common directories on Linux systems that are of interest:
/etc
System configuration files (often pronounced slash-et-see if someone is instructing you what to do over the phone)
/var
Installed software
/var/log
Log files
/proc
Real-time system information — similar to Windows Management Instrumentation (WMI), but easier!
/tmp
Remember, case matters! And use /, not \!
Changing to another directory with cd is simple, as you can see in Figure 2-5.
Be Lazy
Most modern interactive shells like Bash and Windows Command Prompt allow for tab expansion and command history, at least for the current session of the shell. This is a good thing in a crisis situation, because it saves you typing, and thus, time.
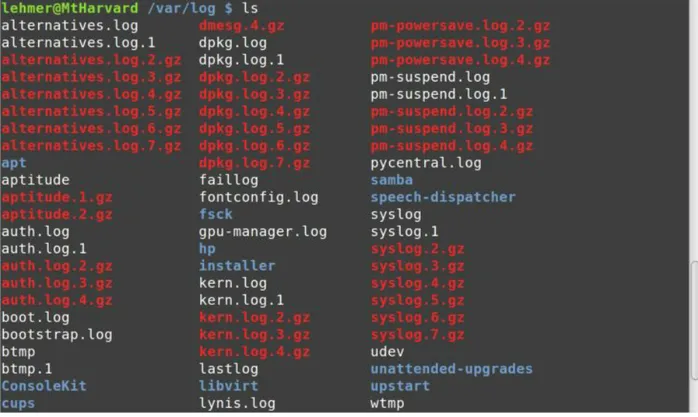
Tab expansion is like autocomplete for the command prompt. Let’s say you have some files in a directory, as shown in Figure 2-6.
Figure 2-6. ls /var/log command
Without tab expansion, typing out something like this is slow and error-prone:
cd unattended-upgrades
tab expansion will fill in the rest of the directory name for you.
One way that tab completion in Bash is different than in Windows Command Prompt is that in Bash, if you hit Tab and there are multiple candidates, Bash will expand as far as it can and then show you a list of files that match up to that point. You can then type in more characters and hit Tab again to
complete it.
For example, in the previous example, if you wanted to list the details of the
pm-powersave.log.2.gz file, instead of typing out ls -l
pm-powersave.log.2.gz (27 keystrokes to type and possibly get wrong), you could use tab expansion to get it in two simple steps:
1. Type ls -l p[Tab]. This would expand to ls -l pm-powersave.log., because only the files named
pm-powersave.log. begin with pm-p. In this case, I specified just enough characters to distinguish between pm-powersave.log files and those beginning with pm-suspend.log.
2. Type 2[Tab]. This would complete the rest, .gz, because only one
pm-powersave.log. file has a 2 in the next character location.
Thus, a total of 13 keystrokes, with two tab characters, saved typing 14 more! Tab expansion is your friend, and you should use it as often as possible. It gives at least three benefits:
Saves you typing.
Helps eliminate misspellings in long file and directory names.
Acts as an error checker — if the tab doesn’t expand, chances are you are specifying the beginning part of the name wrong.
Chapter 3. Step 3: Peeking at
Files
Now that you know how to move around in the filesystem, it is time to learn about how to inspect the content of files. In this chapter, I show a few
Cool cat
The cat (concatenate) command dumps a file to the console, as shown in Figure 3-1.
Figure 3-1. cat command
less Is More
The less command paginates files or output, with each “page” based on the size of the console window.
In Bash, as in Windows Command Prompt, the output from one command can be redirected, or piped, to another command by using the | character. In Linux, where each command “does one thing, well,” it is common practice to combine multiple commands, piping the output from one command to the next to accomplish a series of tasks in sequence. For example, later in this report you will see how to use the ps command to produce a list of running processes and then pipe that output to the grep command to search for a specific process by name. To demonstrate, although less can be passed a filename directly, here’s how to pipe command output from cat to less:
~ $ cat /etc/passwd | less
Figure 3-2. less output
The colon at the bottom of the screen indicates that less is waiting for a command. After less displays its output, you have various navigation options:
Space, Page Down, or the down arrow scrolls down.
Page Up or the up arrow scrolls up.
/ finds text searching forward (down) from the current cursor position, until the end of the file is reached; for example, /error.
? finds text searching backward (up) from the current cursor position, until the beginning of the file is reached; for example, ?error.
n finds next instance of the text you’re searching for (note that the meaning of this is reversed when using ?).
tail Wind
The tail command shows the last lines in a file. It is useful when you’re looking at large log files and want to see just the last lines — for example, right after an error has occurred. By default, tail will show the last 10 lines, but you can adjust the number of lines displayed with the -n parameter. For example, Figure 3-3 shows how to display just the last five lines.
Figure 3-3. tail command
Chapter 4. Step 4: Finding Files
In the preceding chapter, you learned how to look inside files without
changing them. But how do you know which files to look at? In this chapter, I cover searching for files, which can help narrow the scope for your
find Files Fast
The find command is one of the most useful commands in Linux. The command works like this:
Starting at location x
Recursively find entries that match condition(s)
Do something to each match
As a simple example, let’s say you’re in the /var/log directory, and you want to find all files that end in .log. Because there may be a lot of them, you will pipe the output to less so you can page through it. Here is the command:
/var/log# find . -name \*.log -print | less
Remember that I said the \ has a different meaning in Bash, that it is an escape character? Notice its use in this example, where it is preventing the Bash shell from expanding the wildcard character (*) into all matching files in the current directory. Instead, by escaping it, the \ character is telling find to expand that wildcard in the current directory and all of its children.
Figure 4-1. find results
The find command has a lot more power than this simple example! You can find files and directories based on creation and modification dates, file sizes, types, and much more. You can execute any variety of actions on each one as you find them, including Bash commands and shell scripts.
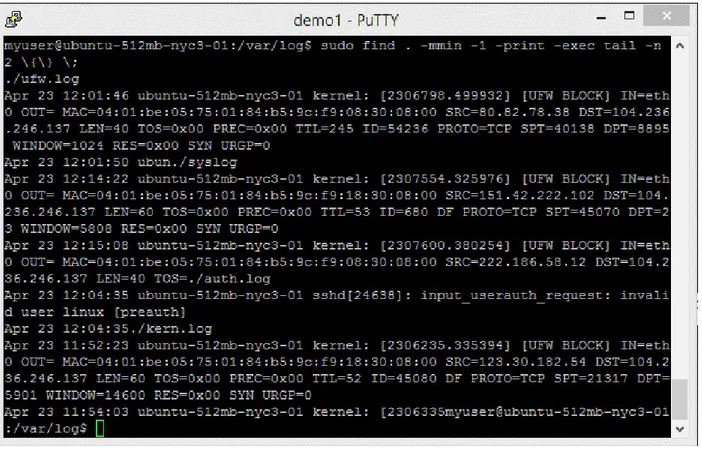
Figure 4-2 shows another example, where I am looking for all log files in
Figure 4-2. find -mmin
You can also combine multiple search conditions and multiple actions. For example, if you want to find all log files in /var/log that were modified in the last minute (-mmin -1), and then print its path (-print) and display the last two lines of each log file found (using tail -n 2), you use the following:
sudo find . -mmin -1 -print -exec tail -n 2 \{\} \;
I will pick that apart for you. From left to right:
sudo
Because some of the log files are protected unless you are root.
find
Search for some files.
.
Starting in the current directory (in this example, that’s /var/log).
-mmin -1
Find files that were modified in the last minute (-1).
Print its full path.
-exec
For each file found, execute a command.
-tail -n 2
As you learned in the preceding chapter, tail shows you the final lines of a file; by default, it shows the last 10 lines, but here I have specified that it should show only the last 2 lines.
Passing in the full path of the filename found to the tail command. That last little bit of magic is important, and you will do well to memorize it for using -exec with the find command. The \{\} is the syntax for “pass in the path of the file that was found” (it is actually {}, but the \ characters are escaping the brackets because they have special meaning to the Bash shell). The ; is terminating the -exec parameter, so that other action
parameters could follow on the find command. It is similarly escaped by \ because the semicolon also has special meaning to Bash. The intervening space between \{\} and \; is required!
Figure 4-3 shows it in action.
Figure 4-3. find tail
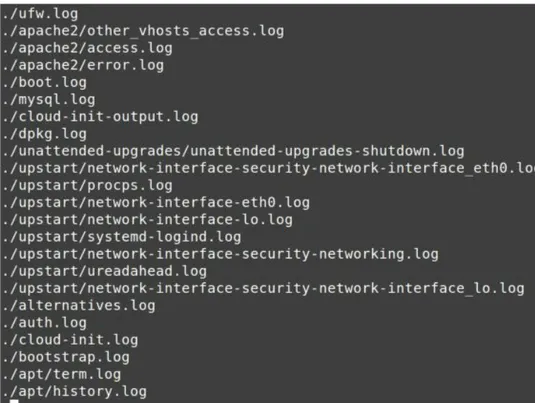
Location, Location, Location
The locate command searches a list of all the filenames on the system. The filenames are gathered periodically by a service, so it does not update in real time, but usually close enough. If you know the name of a file you are
looking for, perhaps the Apache access.log file (which can change location depending on the Linux distro), you can use the locate command to
quickly find it. Because locate searches a pre-built list, it is much quicker for finding files by name than using find -name.
The locate command isn’t “smart.” It is simply looking for any file or directory with the string you pass it somewhere in the path. For example, if you execute locate log | less in the root (/) directory, you’ll see something like Figure 4-4.
Figure 4-4. locate results
Chapter 5. Step 5: Search Me
Getting a grep
The grep command (whose name comes from globally search a regular
expression and print) searches within files. It uses regular expressions (regex) to match patterns inside the files. It can be used to search within binary files, but is most useful for finding things inside text files. There are lots of uses for this command in our crisis scenario, such as searching for certain error
messages within log files, or finding every mention of a certain resource inside the source files for an entire website.
There is an old joke by Jamie Zawinski:
Some people, when confronted with a problem, think, “I know, I’ll use regular expressions.” Now they have two problems.
Some regular expressions are simple — for example, *, which you should recognize as a valid wildcard in Windows Command Prompt. Others can be mind-blowingly complex. For example:
^\(*\d{3}\)*( |-)*\d{3}( |-)*\d{4}$
This regular expression is an (incomplete) approach to matching US phone numbers.
Because regexes are so inscrutable, sometimes I write a regex in a program or a script, come back to it six months later, and have no idea what it is doing. (Now I have two problems.) In this chapter, you’re just going to look at a few simple examples.
Here are some samples of using regular expressions with grep. You will look at the output of some of them in the following screenshots.
grep 500 access.log
Find any occurrence of 500 in access.log grep '\s500\s' access.log
grep '^159.203' access.log
Find 159.203 at beginning of lines (^)
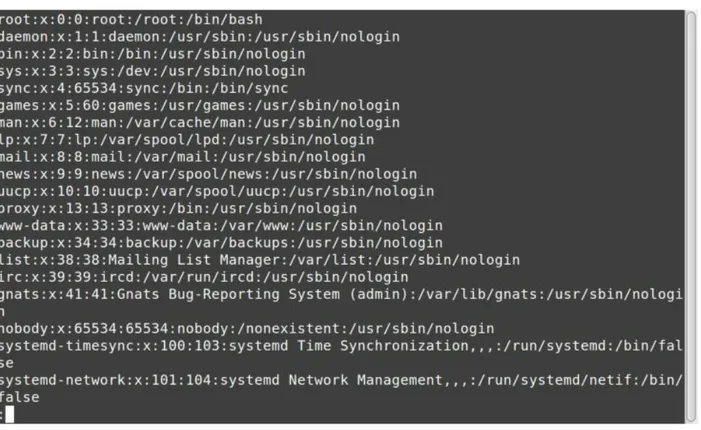
grep 'bash$' /etc/password
Find bash at end of lines ($)
grep -i -r error /var/log
Find all case-insensitive (-i) instances of error in the /var/log directory and its children (-r)
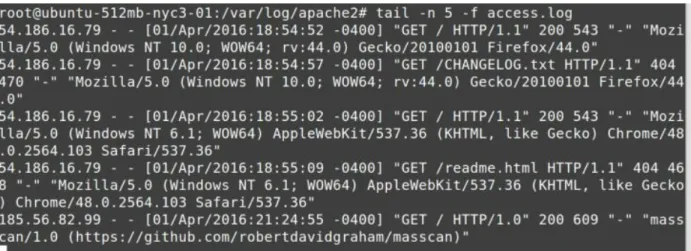
For that first example, you know that if a web program throws a server-side error, by convention it will send an HTTP status code of 500 to the client (browser). Most web servers also write that to their logs. So let’s look for 500
in Apache’s web log, as shown in Figure 5-1.
Figure 5-1. grep command
I use the '\s500\s' regular expression in this command to make sure that only instances of 500 surrounded by spaces (or tabs) are found. Web logs tend to put the HTTP status code in its own column, and I don’t want to see extraneous 500s that are part of response sizes, time-zone offsets, or whatnot. Perhaps you’re being attacked by a block of IP addresses, maybe a bunch of botnets running on some cable modems. The IP block attacking you is
Figure 5-2. grep 159.203 command
In this case, note that the regular expression starts with ^, which means to look for the following pattern only at the beginning of each line in the log file.
Similarly, you can look for patterns at the end of each line as well. The
/etc/passwd file holds every user ID on a Linux system. (Don’t worry, it no longer holds the password, but once upon a time, it did!) Each user is defined by a line in the file, and the last entry on each line indicates the “shell” in which they run. Some user IDs are defined to not be allowed to have interactive logins, and so they might have something like /bin/false or
/usr/sbin/nologin as their shell.
But user IDs that can log in will have bash or csh or similar. So if you want to find all user IDs that can log in interactively, you could use the command in Figure 5-3, which looks for bash at the end of the line by specifying the $ in the regular expression.
Figure 5-3. grep bash command
login on this system.
Finally, because you’re trying to find out what is wrong with the Linux
system you’ve been thrown into, perhaps you want to see each instance of the word exception in the log files. You could do that with something like this:
grep -i -r 'exception' /var/log | less
Here’s what each part of that command does:
grep
Searches through files
-i
Ignores case (makes the search string case-insensitive)
-r
Recursively searches through all directories
'exception'
Looks for the string exception /var/log
Starts in the /var/log directory
| less
Figure 5-4. grep exception results
Chapter 6. Step 6: What’s Going
On?
It’s All Part of the Process
The ps (process) command shows running processes, akin to the Windows Task Manager, as you can see in Figure 6-1.
Figure 6-1. ps command
By default, ps shows only the processes for the current user. In the preceding example, the active processes are the Bash shell and the ps command itself. If you want to see all running processes, you add the -A parameter. To make it pretty and show the hierarchical relationship between parent and child processes, you add -H:
ps -AH | less
Figure 6-2. ps -AH command
Who’s on top?
The top command (Figure 6-3) shows processes sorted by resource consumption. It updates every few seconds, similar to Windows Task Manager.
Figure 6-3. top command
Notice that the top output is divided into two sections. The, well, top section shows system-level statistics: up time, number of logged-in users, number of processes, CPU and memory utilization, and so on.
The bottom section shows the various processes running, sorted by CPU utilization. Some of the more important columns are PID (process ID), USER, VIRT (virtual memory), %CPU, %MEM, and COMMAND. Similar to less, you can quit top by typing q or hitting Ctrl-C.
Figure 6-4, the output from top -o '%MEM' is sorted by memory utilization.
Figure 6-4. top -o command
The /proc Directory
Linux doesn’t mount devices under drive letters as in Windows, but instead uses a single hierarchical filesystem, with different resources mounted under the root (/) directory. In fact, because Linux uses an “everything is a file” paradigm, virtual filesystems that aren’t backed by an actual device can be mounted in the hierarchy as well.
One of the best examples of this is the /proc directory, a virtual filesystem that presents real-time system statistics as files and directories. This makes the information way easier to access than the rather opaque Windows WMI APIs. For example, you can see information on the CPUs being used on the system, as shown in Figure 6-5.
Figure 6-5. /proc/cpuinfo
there are repeating sections for each core.
Similarly, memory info can be displayed as shown in Figure 6-6.
Figure 6-6. /proc/meminfo
Figure 6-7. proc dir
This gives an idea of all the various types of information available. The blue entries are directories containing even more data. Note the numbered
directories on the left. Each of these directories contains real-time statistics for each running process, listed by process ID. If you change into one of those directories and list it, you see an incredible amount of information about that specific process, all of which will be updated in real time every time you display it, as shown in Figure 6-8.
Networking
The ifconfig command shows information on the system’s network interfaces (similar to the IPCONFIG command in Windows), as you can see in Figure 6-9.
Figure 6-9. ifconfig command
Here you see that the system, my handy Raspberry Pi, has two network interfaces. The first is eth0, an Ethernet interface. The MAC address, IPv4 and IPv6 configuration, and various network statistics are shown. The second interface, lo, is the local loopback, 127.0.0.1.
Figure 6-10. ping command
One difference between ping on Linux versus Windows is that on Linux the output does not stop until you hit Ctrl-C. This is similar to PING -T on Windows.
Figure 6-11. traceroute command
Chapter 7. Step 7: Filesystems
Displaying Filesystems
On any computer system, running out of disk space can cause many problems. On Linux, two commands are helpful in determining disk utilization.
The df (display filesystems) command shows the mounted files systems along with statistics on space usage, as you can see in Figure 7-1.
Figure 7-1. df command
The main device you’re interested in is the first one, which shows
/dev/vda1 mounted on /. Note the columns showing disk size, Used, Available, and Use%.
Figure 7-2 shows an example where disk utilization may be causing trouble.
Figure 7-2. df showing full disk drive
Where Did All the Disk Space Go?
Once you’ve seen that there may be a problem with disk space, how do you find out where it is being used? You can use the du (disk utilization)
command for that. By default, it descends through every directory and shows you disk usage for every subdirectory under which it is invoked (think DIR /S on CMD.EXE). That can generate a lot of output and can take a long time to run.
What we really want to do is start at the top and narrow our search to a
specific problem directory. Let’s just look at the top-level directories under /. For that, I pass in the -d 1 (depth of 1) parameter. To make the output easier to read, I also pass -BM to show blocks in megabytes. Finally, as you can see in Figure 7-3, I’m using sudo, because otherwise I wouldn’t have
permission to descend into some system directories to calculate their disk space.
You can see that /usr is using 778 MB of space, followed by some fairly inconsequential directories, but /tmp is using over 16 GB of space. It must be the culprit! From there, you can go look in /tmp (which, remember, is cleared on reboots) to see what is taking up all the space.
You can continue to use du to successively refine your search. If, instead of /tmp in this simple example, the /var directory was the one showing high disk utilization, you could
cd into it and then run this du command again, and continue to traverse down the directories until you find what is using up all the space. You could remove the -d
Chapter 8. Step 8: Transferring
Files
Perhaps you think you’ve found evidence of a system compromise, or you fear log files will be altered if you end up restarting services or the system itself. If you want to preserve files on another system so that someone more knowledgeable can look at them later, the commands in this chapter will come in handy.
Secure Copying
The scp (secure copy) command can be used to copy files over the SSH protocol (the same protocol that you’re running your ssh terminal session over). This command allows us to copy files using an encrypted, compressed mechanism.
If you are going to copy files from Linux “down” to your Windows system, you need a program that will run on Windows. The creator of PuTTY made PSCP.EXE for precisely that purpose: to implement scp for Windows. You can download it from the same place as PuTTY.
The PSCP.EXE program, shown in Figure 8-1, is meant to run under Windows Command Prompt (CMD.EXE). It takes the same parameters as scp.
Figure 8-1. pscp command
In this example, the -r means to copy recursively. The myuser@demo1 is the user ID and machine address, exactly the same as what you specify when connecting with PuTTY. Note that immediately following that connection info (with no space) is a colon and then a path. This path is where you will be copying from — in this example, it’s /var/log/syslog. The final parameter is the to location — for example, F:\Temp\.
Copying to a Windows Share
The PSCP.EXE command can be used to pull information from Linux to your local Windows machine. If the Linux system is on the same network as a Windows file share, you can use smbclient to push files to a CIFS/SMB file share. Both machines must be on the same network for this to work; it will not work across the Internet.
The smbclient command uses similar subcommands as ftp, so if you have ever done FTP transfers from the Windows command line, it should be familiar. One difference is that, instead of specifying the subcommands one at a time after connecting, you can pass a string of commands to execute to smbclient as a parameter on the command line, as in Figure 8-2.
Figure 8-2. smbclient command
What’s going on here? The first parameter, //mtlindsey/docs$, is the Windows share name. The only difference from how this is specified on Windows is the direction of the slashes. The -U parameter is the Windows user ID to use. The -c parameter then gives a list of semicolon-delimited subcommands to execute:
prompt
Turn off prompting for each file
lcd /var/log
mput auth.log*
Send (put) multiple files with a name pattern of auth.log* to the Windows share
quit
Exit the command
Chapter 9. Step 9: Starting and
Stopping
If you are investigating a system that seems hung (perhaps the public website isn’t responding and your management wants you to “do something”), the old tried-and-true method of restarting services or the entire system itself is often your last resort. Rebooting Windows always fixes problems, so you already know one method for approaching Linux issues too! In this chapter, I show you how to restart services and reboot the system.
Managing Services
Linux services (a.k.a. daemons, which is why so many Linux services end in d, such as sshd and httpd) are similar to Windows services. They are processes that run in the background, typically initiated at system startup. Examples of services include web services (Apache), database services (MySQL), and so on.
Typically, you use the service command to start, stop, and restart services. It requires sudo. Figure 9-1 shows how to start the mysql service.
Figure 9-1. service start command
You can see that the process ID (PID) of the service is returned by the command. You stop a service the same way, as shown in Figure 9-2.
Figure 9-2. service stop command
As you can likely guess, restarting a service, just as on Windows, is simply a combination of stopping and then starting it; see Figure 9-3.
Figure 9-3. service restart command
command (Figure 9-4).
Figure 9-4. service status command
Another way to tell whether a service is running is to use our old friends ps and grep (Figure 9-5).
Figure 9-5. ps and grep commands
Note how I start and stop the mysql service, but under the covers it is the mysqld command (or daemon) that is running. That information can be useful when searching through log files.
When starting a service, you may get an error. Often, the output from the service command isn’t helpful. On most systems, service is just a thin wrapper around a series of scripts in /etc/init.d. You can often run one of the scripts directly from /etc/init.d and get better error information (Figure 9-6).
Figure 9-6. start mysql error
Figure 9-7. du command
Let’s go to /tmp, as shown in Figure 9-8, and see if you notice anything wrong.
Figure 9-8. ls /tmp command
Killing a Process
The kill command sends signals to processes. The default behavior for a process is to stop when it receives a signal, although signals can also be used to tell a service to reload its configuration file, and so forth.
Sometimes a service may hang to the point where it won’t respond to the service command. The next step is to try to kill it. First, you need to find its process ID. In Figure 9-9, we’re finding the process ID for the mysvc process.
Figure 9-9. find mysvc process
After you have the process ID (20330 in this case), you can try to kill it, as shown in Figure 9-10.
Figure 9-10. kill command
Let’s look at Figure 9-11 to see if that worked.
Figure 9-11. no more mysvc
Yup — ps piped through grep shows no active processes named mysvc running.
intercept most signals, enabling communication with the background process from the command line. Or the process may really be “hung hard.” In that case, you need to terminate, with prejudice, as shown in Figure 9-12. The -9 (minus nine) signal is one that processes cannot trap (intercept).
Figure 9-12. kill -9 command
You should use the kill -9 command with extreme caution. Notice that the first kill
When All Else Fails
Chapter 10. Step 10: Where to
Go for Help
Hey, man
The man (manual page) command provides documentation on commands, system configuration files, and much more. This command is good for when you can’t access the Internet, or doing so isn’t convenient because you are on a machine console or similar setup. Figure 10-1 shows the first page of output from man reboot.
Figure 10-1. man command
Is That apropos?
How do you know what you don’t know? Sometimes you might not know (or remember) the name of a command. For example, you may recall that this guide mentioned disk space, but can’t remember the actual commands.
Luckily, you can use the apropos command to jog your memory, as shown in Figure 10-2.
Figure 10-2. apropos command
Additional Resources
There are plenty of places to go for more help with Linux:
DuckDuckGo and Google
Search engines, with DDG often providing direct help for a command as the first result
Stack Exchange
A UNIX-specific Stack Exchange site for questions
Debian docs
Provides good documentation, much of it applicable across distros
Arch docs
Ditto
die.net
Chapter 11. The End
Now you know what I know. Or at least what I keep loaded in my head
versus what I simply search for when I need to know it, and you know how to do that searching, too. Hopefully, this report will help you sometime when you most need it.
Appendix A. Cheat Sheet
That rug really tied the room together, did it not?
Walter Sobchak, The Big Lebowski
Redirection Command
See I/O Redirection |
System Directory Commands
See Important System Directories /etc
Configuration files location
/home
Home or user profile directories
/proc
System runtime information
/root
Home directory for root user (system admin)
/tmp
Temporary files location
/var/log
Standard User Commands
These are “Section 1” commands, normal user commands that typically don’t require any special privileges beyond permissions to access files and the like.
apropos
Search for help on commands by title
bash
The Bourne-again shell
cat
Concatenate the input files to stdout cd
Change the current directory
cp
Copy files or directories
df
Show space utilization by filesystem
dig
Look up DNS info on an address
du
Estimate disk usage
find
Find files based on various conditions and execute actions against the results
grep
Search for a pattern (regular expression) in files
Display the file one page at a time on stdout
Display manual pages; remember, q quits
ps
List running processes
pwd
Print the current (working) directory name
scp
File copy over Secure Shell protocol
smbclient
Copy files to and from Windows using the SMB/CIFS (Windows file share) protocol
ssh
Secure Shell terminal program and protocol
tail
Display the last lines of a file
top
List processes by resource utilization (CPU)
whois
System Commands
Most of these are “Section 8” commands, and may require special privileges such as sudo to run, depending on the system. Yes, some systems restrict the use of ping!
Test for network connectivity to an IP address
reboot
Restart the system
shutdown
Shut down or restart the system
sudo
Execute a command with elevated privileges
traceroute
About the Author
Jim Lehmer has been “in computers” for over three decades. He has held various software development roles, including programmer, systems programmer, software engineer, team lead, and architect.
Besides bragging about his wife, Leslie, his five children, and four
Acknowledgments
Thanks to my coworkers, who inspired and attended the lunch-and-learn sessions from which my ebook, webcast, and this report grew — especially Aaron Vandegriff and Rob Harvey. I received excellent advice and
Introduction
0. Step 0: Don’t Panic
1. Step 1: Getting In
“sudo make me a sandwich”
2. Step 2: Getting Around Where Am I?
Listing Files
Changing Directories
Be Lazy
3. Step 3: Peeking at Files Cool cat
less Is More
tail Wind
Location, Location, Location
5. Step 5: Search Me Getting a grep
6. Step 6: What’s Going On? It’s All Part of the Process
Who’s on top?
The /proc Directory
Networking
7. Step 7: Filesystems
Displaying Filesystems
Where Did All the Disk Space Go?
8. Step 8: Transferring Files Secure Copying
Copying to a Windows Share
9. Step 9: Starting and Stopping Managing Services
Killing a Process
When All Else Fails
10. Step 10: Where to Go for Help Hey, man
Is That apropos?
11. The End
A. Cheat Sheet
Redirection Command
System Directory Commands
Standard User Commands