For your convenience Apress has placed some of the front
matter material after the index. Please use the Bookmarks
Contents at a Glance
Contents ... v
About the Author ... xxi
About the Technical Reviewer ... xxii
Acknowledgments ... xiii
Introduction ... xiii
■
Chapter 1: Table Views from the Ground Up ... 1
■
Chapter 2: How the Table Fits Together ... 25
■
Chapter 3: Feeding Data to Your Tables ... 43
■
Chapter 4: How the Cell Fits Together ... 63
■
Chapter 5: Using Tables for Navigation ... 83
■
Chapter 6: Indexing, Grouping, and Sorting ... 113
■
Chapter 7: Selecting and Editing Table Content ... 145
■
Chapter 8: Improving the Look of Cells ... 183
■
Chapter 9: Creating Custom Cells with Subclasses ... 213
■
Chapter 10: Improving the Cell’s Interaction ... 241
■
Chapter 11: Table Views on iPad ... 289
xiv
Introduction
If you’re an iOS app developer, chances are you’ll be using table views somewhere in your development projects. Table views are the bread and butter of iOS apps. With them, you can create everything from the simplest of lists to fully tricked-out user interfaces.
Table views are one of the more complex components found in UIKit. Using them for (potentially boring!) standard user interfaces is quite simple, but customizing them can become much more challenging.
This book has a task-oriented focus to assist you when implementing customized table views. Although it delves deeply into the table view API, you can always choose the level of detail you want to dive into. This book aims to be a reference and customization cookbook at the same time, useful for beginners as well as intermediate developers.
What This Book Covers
Chapter 1, “Creating a Simple Table-View App,” introduces the table view with some examples of the current state of the art. After showing you something of what’s possible, we’ll start out with a very simple table view–based app for the iPhone, which will introduce you to the UITableView and its main elements. The app will also act as a starting point for later versions, and it’ll be a working prototype that you can use as the basis for your own experiments.
In Chapter 2, “How The Table Fits Together,” you’ll look at how the parts of the table view work together. You’ll see the main types of UITableViews and their anatomy. You’ll learn how to create them both with Interface Builder and in code, and how to use the UITableViewController class as a template.
Chapter 3, “Feeding Your Tables With Data,”is about where the table gets its data and how you get it there. It shows how the table keeps track of sections and rows, and covers some of the software design patterns that the UITableView classes exploit.
Chapter 4 “How The Cell Fits Together,” focuses on the cells that make up tables. You’ll see how cells are structured internally, and how they’re created and reused. It also covers the standard cells types that come for free with the UITableView classes.
Chapter 5, “Using Tables for Navigation,” covers an almost-ubiquitous feature of the iOS user interface, and shows how tables can be used to navigate through a hierarchy of data in a simple and consistent way.
The constrained size of the iOS user interface presents some challenges when it comes to presenting large amounts of data. Chapter 6, “Indexing, Grouping, and Sorting,” presents some ways of arranging the data in tables, to help users find their way.
Chapter 7, “Selecting and Editing Table Content,” shows how you can use tables to manage data. It covers how to add, delete, and rearrange the information, and some of the interface aspects that this entails.
■INTRODUCTION
Chapter 9, “Creating Custom Cells with Subclasses,” takes customizing cells to the next level. You’ll learn how to use custom UITableViewCell subclasses to gain detailed control over cells’ appearance.
In addition to changing the look and feel of cells, you can make them truly interactive by embedding controls such as buttons and sliders. Chapter 10, “Improving the Cell’s Interaction,” presents how to do this, as well as building cool table features such as slide-to-reveal, pull-to-refresh, and search.
Finally, in Chapter 11, “Table Views on the iPad,” you’ll look at the iPad’s split-view controller, which provides a flexible two-pane interface familiar from apps such as Mail.
The Style of This Book
I’ve tried to bridge the gap between two styles of book—the in-depth treatment of every last little detail, and the cookbook of specific point solutions. Both have their place, but sometimes I find that descriptions of very detailed, elegant solutions with lots of features can obscure the detail of the problem I’m trying to solve. Equally, sometimes cookbook solutions are too specific and don’t easily lend themselves to adapting to my specific situation.
In the code examples that follow, I’ve tried to balance the two styles. The visual polish and extraneous functions are kept to a minimum, which hopefully results in examples that illustrate how to build a solution while also acting as a building block for your own code.
The Book’s Source Code
You can download the source code for each chapter’s examples from the Apress site or from GitHub at http://github.com/timd/Pro-iOS-TableViews.
Although that’s the quickest way to get up and running, I encourage you to take the extra time to key in the code yourself as you go along. With Xcode’s code completion, it doesn’t take that long, and code that has flowed through your eyes and brain, and then out to your fingers, is much more likely to sink in and make sense.
Where to Find Out More
Beyond the pages of this book, there’s a wealth of other information available online (not to mention the great range of other Apress titles):
■ For a general overview, Apple’s “Table View Programming Guide for iOS” is a detailed guide that covers most of the topics in this book. This is available online at http://developer.apple.com/library/ios/#documentation/userexperience/concep tual/TableView_iPhone/AboutTableViewsiPhone/AboutTableViewsiPhone.html, or in Xcode’s documentation.
■ Apple’s iOS Developer Library has full documentation for all Cocoa Touch libraries. It tends not to include examples in the documentation itself, but the Library is the one-stop shop for a detailed reference for each class, protocol, and library. Again, this is available online, at
http://developer.apple.com/library/ios/navigation/ or in Xcode’s documentation library.
■ Online forums are a fantastic resource. Sites such as Stack Overflow
■INTRODUCTION
xvi
■ A general Google search will often throw up answers from blogs. There are some extremely talented individuals out there who regularly post about how to do this or that with iOS and Objective-C, and many of them also point to source code on their sites or GitHub and the like.
■ Apple also provides some fairly detailed source code examples. Your mileage may vary with these. I sometimes find that they can be a bit overcomplicated and can obscure the core technique that I’m trying to grasp. But they shouldn’t be overlooked, if only because they’ve been written by engineers with an intimate understanding of the frameworks.
■ Universities such as Stanford and MIT place entire semesters’ worth of lecture modules online, both on their sites and on iTunes U. Their technical education is some of the best on the planet, and some of the online lectures are taught by Apple engineers. These are definitely worth checking out.
■ Local user groups, including CocoaDev, CocoaHeads, and NS$city$ (where $city$ is a location near you), are groups that meet regularly around the world. It’s an iron law of software that there’s always someone who knows more than you do about a topic, and problems are always less daunting when discussed with them over a beer or two.
■ Mailing lists such as cocoa-dev don’t perhaps have the profile of sites such as Stack Overflow these days, but can still be a useful resource. An excellent example (which covers not just coding topics, but design and business issues as well) is
http://iosdevweekly.com.
Finally, if you’ve battled with—and resolved—some gnarly issue, then post about it yourself, whether that’s on your own blog or a site like Stack Overflow. Even if the topic has been covered numerous times before, there’s always room for another take on a problem. Your unique point of view could be just what someone else needs.
Contacting the Author
Chapter
Table Views from the
Ground Up
In this chapter, you’ll start your exploration of table views. It begins with an overview of what table views are and some examples of how they’re used in practice. Then in the second section, you’ll build a simple “Hello, world”-style table view app to introduce you to the components behind the user interface and help you to contextualize the detail that’s going to come in later chapters.
If you’re just starting to use table views, it’s worth taking some time to build a very simple one from scratch before diving into the gnarly details. However, if you’ve reached the stage where you feel more confident about how the components of the table view jigsaw fit together and want to get straight into the code, feel free to skip the rest of this chapter completely. I’ll cover the elements in detail later, so you won’t miss out.
What Are Table Views?
Examples of table views are to be found everywhere in iOS apps. You are already familiar with simple tables, implemented as standard controls such as the iPhone’s Contacts app or the iPad’s Mail app, shown in Figure 1–1.
CHAPTER 1: Table Views from the Ground Up
2
Figure 1–1. Some basic table-based applications
CHAPTER 1: Table Views from the Ground Up
3
Figure 1–2. Examples of table views in action on the iPhone
CHAPTER 1: Table Views from the Ground Up
4
Figure 1–3. Two table views in action on the iPad
The Anatomy of a Table View
The table view displays a list of elements—or cells—that can be scrolled up and down vertically. They are instances of the UITableView class and come in two physical parts:
The container part—the tableView itself—is a subclass of
UIScrollView and contains a vertically scrollable list of table cells.
Table cells, which can either be instances of one of four standard UITableViewCell types or custom subclasses of UITableViewCell that can be customized as required.
CHAPTER 1: Table Views from the Ground Up
5
Figure 1–4. The basic anatomy of a table view
Table view operations are supported by two UITableView protocols:
UITableViewDatasource provides the table view with the data that it needs to construct and configure itself, as well as providing the cells that the table view displays.
UITableViewDelegate handles most of the methods concerned with user interaction, such as selection and editing.
Creating a Simple Table View App
In the rest of this chapter, you’ll build a simple “Hello, world”-style table view app from scratch. It will show you how the container, cells, data source, and delegate all fit together and give you an app that you can use as the basis for your own experiments.
I’m going to take it deliberately slowly and cover all the steps. If you’re a confident Xcode driver, you won’t need this hand-holding—just concentrate on the code instead.
Still with me? Okay—you’re going to do the following:
Create a simple, window-based application skeleton
CHAPTER 1: Table Views from the Ground Up
6
Create a simple table view
Wire up the table view’s data source and delegate Implement some very simple interactivity
It’s all very straightforward but useful practice. Onward!
Creating the Application Skeleton
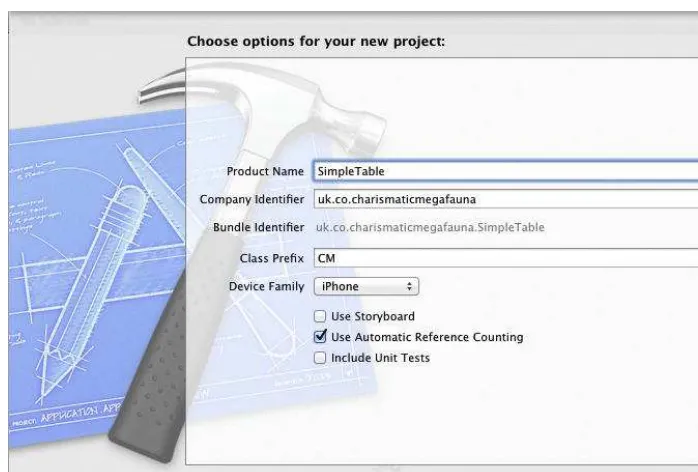
For this application, you’re going to use a simple structure: a single view managed by a view controller, and a NIB file to provide the content for the view. Fire up Xcode and select the Single View Application template, as shown in Figure 1–1.
NOTE: With each new release of Xcode, Apple frequently (and pointlessly) changes the templates that are included. You may see a set that is different from those shown in Figure 1–5. Check the description of the templates to find the one that will provide a single-view application.
Figure 1–5. Xcode’s template selection pane
CHAPTER 1: Table Views from the Ground Up
7
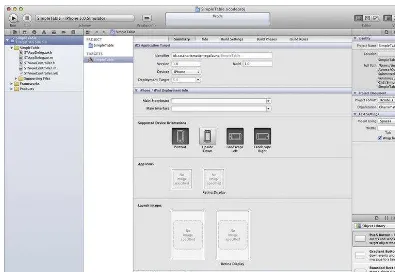
Figure 1–6. Name the application.
CHAPTER 1: Table Views from the Ground Up
8
Figure 1–7. The initial Xcode view showing our new skeleton application
You’ll see that you have the following:
An app delegate (STAppDelegate.h and .m)
A table-view controller (STViewController.h and .m) A NIB file containing the view (STViewController.xib)
At the end of this chapter, you’ll look again at how these fit together. For the moment, you’ll be working with the table view controller and its NIB file.
Generating Some Data
CHAPTER 1: Table Views from the Ground Up
9
You’re also going to need a way of passing the array of data around the application. This process requires a property that can be accessed by the various methods that will need access to the data.
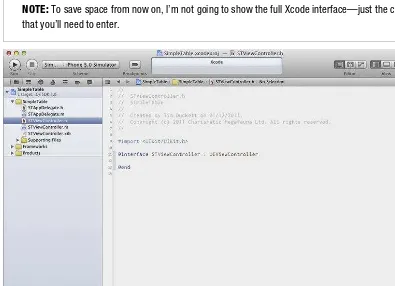
Let’s get started. Open the STViewController.h file (shown in Figure 1–8) and begin by creating the property.
NOTE: To save space from now on, I’m not going to show the full Xcode interface—just the code that you’ll need to enter.
Figure 1–8. Editing the STViewController.h file
Add in a declaration for the property so that the code looks like Listing 1–1. Listing 1–1. Declaring the Property
#import <UIKit/UIKit.h>
@interface STViewController : UIViewController
@property (nonatomic, strong) NSMutableArray *tableData; // holds the table data
end
CHAPTER 1: Table Views from the Ground Up
10
TIP: In Xcode 4, you can flip quickly between the .h and .m files with the Ctrl + Command + Up Arrow key combination, or by clicking the filename in the breadcrumb display at the top of the code editor then selecting the file from the drop-down menu that appears.
First, you’ll need to synthesize the tableData property. Add the following line after @implementation STViewController:
@synthesize tableData;
Now you’re going to create the actual data array itself. In the View lifecycle section of the STViewController.m file, you’ll need to find the viewDidLoad method.
Our data array will be a simple array of ten NSStrings, each with a number. Add the code shown in Listing 1–2.
Listing 1–2. Creating the Data Array
- (void)viewDidLoad {
// Run the superclass's viewDidLoad method [super viewDidLoad];
// Create the array to hold the table data self.tableData = [[NSMutableArray alloc] init];
// Create and add 10 data items to the table data array for (NSUInteger i=0; i < 10; i++) {
// The cell will contain a string "Item X"
NSString *dataString = [NSString stringWithFormat:@"Item %d", i]; NSLog(@"The tableData array contains %@", self.tableData);
}
Having created the tableData array in the viewDidLoad method, you’ll need to clean up after yourself. There’s no right or wrong place to do this. However, I’ve developed a habit: if I create an object in one method that needs to persist, I try to put the cleanup code in a corresponding method.
CHAPTER 1: Table Views from the Ground Up
11
Listing 1–3. Cleaning Up
- (void)viewDidUnload
Let’s run the application to see that data array being created. The user interface isn’t much to write home about yet, but you’ll be able to see the data that you’re going to feed to the table.
Run the application in the Simulator by pressing Command + R or by choosing Product ➤ Run, and then take a look at the logger output:
YYYY-MM-DD HH:MM:SS.sss SimpleTable[21502:ef03] The tableData array contains ( "Item 0",
A NOTE ABOUT MEMORY MANAGEMENT IN IOS 5
Newcomers to iOS often arrive having heard hair-raising tales of the hideous complexity of memory management in Objective-C. There’s a school of thought that says that all “modern” languages should have baked-in memory management such as garbage collection, and managing memory manually is somehow old-fashioned, difficult, and a waste of time. Someone in Apple was obviously listening to that school of thought, because perhaps the single most-anticipated feature of iOS 5 was automatic reference counting (ARC).
Put simply, ARC uses some compiler magic to take care of all the memory management issues that you had to worry about in previous versions. Prior to iOS 5, in order to prevent memory leaks, you had to “balance” any alloc, retain or copy of an object with a corresponding release (or autorelease). Miss a release, and you had a potential memory leak. Over-release, and you risked crashing your app by sending messages to deallocated objects. Having ARC means this is no longer something you need to worry about; switch it on in the compiler, and memory management will be taken care of “automagically.”
NOTE: Automatic reference counting is supported in only iOS 5 and Xcode versions 4.2 and
CHAPTER 1: Table Views from the Ground Up
12
Creating the Table View
As it stands, the user interface for our application is a bit dull. You haven’t added the table yet! This needs fixing.
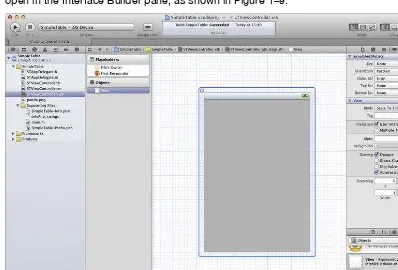
Click the STViewController.xib file in the project explorer, and you’ll see the NIB file open in the Interface Builder pane, as shown in Figure 1–9.
Figure 1–9. Editing the NIB file in Interface Builder
CHAPTER 1: Table Views from the Ground Up
13
Figure 1–10. Resizing the table view
Believe it or not, that’s all you need to do in order to implement the most basic table view. It won’t display any data yet, because you haven’t implemented the
UITableViewDataSource protocol methods, and it certainly won’t have any interactivity— but the app will run.
CHAPTER 1: Table Views from the Ground Up
14
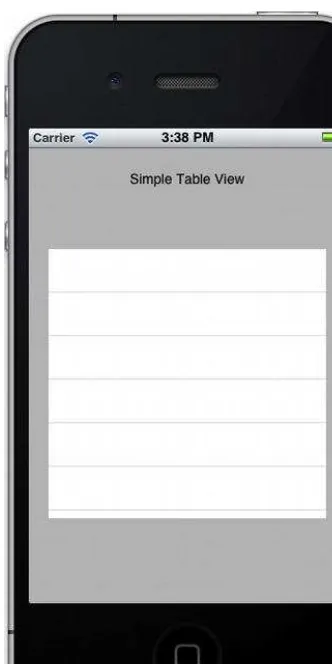
Figure 1–11. A functional, albeit not very impressive, table-view application
Okay—not all that impressive. Let’s complete the wiring up of the table view so it actually does something.
Conforming to the Table View Protocols
The table view that you just created needs both a data source and a delegate. You need to conform our STViewController class to both the UITableViewDataSource and
UITableViewDelegate protocols.
NOTE: Data sources and delegates are covered in detail in Chapters 2 and 3.
CHAPTER 1: Table Views from the Ground Up
15
Listing 1–4. Conforming the Class to the UITableDelegate and UITableDataSource Protocols
#import <UIKit/UIKit.h>
@interface STViewController : UIViewController <UITableViewDelegate, UITableViewDataSource>
@property (nonatomic, strong) NSMutableArray *tableData; @property (nonatomic) int cellCount;
@end
This will tell the compiler to expect the required methods to have been implemented. You’ll do this in a moment.
Wiring Up the Data Source and Delegate
Our STViewController object will be ready shortly, but the table view itself doesn’t yet know that it will act as both a data source and a delegate. You need to connect the two together. There are two ways of doing this: visually (though Interface Builder) or in code. For this example application, you’ll use Interface Builder, so click the NIB file to open it again.
Right-click the table-view object (either in the main Interface Builder or in the objects tree in the middle pane), and you’ll see the Table View property “head-up display” (HUD), as shown in Figure 1–12.
Figure 1–12. The Table View property HUD
It’s showing the two Outlet properties that we’re interested in: the dataSource and the delegate.
CHAPTER 1: Table Views from the Ground Up
16
Figure 1–13. Connecting the dataSource
Release the mouse, and the dataSource is now connected. Next, repeat the same process for the delegate: drag from the plus symbol to File’s Owner, drop, and connect.
The Table View properties HUD will now show that both the dataSource and the delegate are connected to the File’s Owner, as shown in Figure 1–14.
Figure 1–14. The dataSource and delegate connected to File’s Owner
File’s Owner in this context is the view controller for the view, our STViewController object.
Displaying the Data
Now that you have the table view wired up to its delegate and dataSource, you’re in a position to start making it do something. A logical next step would be to get the table view to display its data.
CHAPTER 1: Table Views from the Ground Up
17
The UITableViewDataSource protocol has two required methods and nine optional ones. Because this is a simple example, you’re going to implement only the two required methods and one optional one.
The first required method—tableView:numberOfRowsInSection:—returns the number of rows that the section will eventually contain. The second required method—
tableView:cellForRowAtIndexPath:—creates and returns the cell itself.
The optional method is numberOfSectionsInTableView:. It’s optional in our app because we’re using a table with a single section, and by default the number of sections in a table is 1. Later, when you look at more-complex sectional tables, this method definitely will be required, so I include it even though it’s not strictly necessary.
numberOfSectionsInTableView:
You have a simple table with one section, so this method is going to be pretty trivial. Switch to STViewController.m, where you can create the
numberOfSectionsInTableView: method, as shown in Listing 1–5.
Listing 1–5. The numberOfSectionsInTableView: Method
#pragma mark - UITableViewDataSource
- (NSInteger)numberOfSectionsInTableView:(UITableView *)tableView {
return 1;
}
NOTE: The pragma line is a compiler directive. It’s not used during compilation, but demarcates sections of the code during the writing process. If you pull down the breadcrumb menu at the top of the edit pane, you’ll see that this line breaks up the list of methods and makes the code easier to navigate. Using this directive is not a big deal now, but as your classes grow, this can be a real lifesaver when trying to find a particular method among others.
tableView:numberOfRowsInSection:
CHAPTER 1: Table Views from the Ground Up
18
In STViewController.m, add the tableView:numbersOfRowsInSection: method, as shown in Listing 1–6.
Listing 1–6. The tableView:numberOfRowsInSection: Method
-(NSInteger)tableView:(UITableView *)tableView numberOfRowsInSection:(NSInteger)section {
return [self.tableData count];
}
Pretty straightforward, yes?
tableView:cellForRowAtIndexPath:
Having figured out how many cells are going to be in the section, now it’s time to create the cells. To begin, add the method in Listing 1–7 to STViewController.m, and then we’ll step through what it does.
Listing 1–7. The tableView:cellForRowAtIndexPath: Method
- (UITableViewCell *)tableView:(UITableView *)tableView cellForRowAtIndexPath:(NSIndexPath *)indexPath {
static NSString *cellIdentifier = @"Cell";
UITableViewCell *cell = [tableView
dequeueReusableCellWithIdentifier:CellIdentifier];
if (cell == nil) {
cell = [[UITableViewCell alloc] initWithStyle:UITableViewCellStyleDefault reuseIdentifier:CellIdentifier];
}
cell.textLabel.text = [self.tableData objectAtIndex:indexPath.row];
return cell; }
Let’s start by looking at the method itself:
-(UITableViewCell *)tableView:(UITableView *)tableView cellForRowAtIndexPath:(NSIndexPath *)indexPath
This method returns an instance of UITableViewCell and takes two parameters: The tableView that is calling for the cell (Because this class might be the data source for numerous tables, it needs to identify which table it’s dealing with.)
An indexPath, which has a row property identifying the table row for which the cell is being requested
CHAPTER 1: Table Views from the Ground Up
19
TIP: The use of cell identifiers is something you’ll explore in much more detail in Chapter 4. For now, you can get by thinking of this as a label that identifies the kind of cell you’re dealing with. This table has only one kind of cell, hence the single identifier.
The next line attempts to find and return a cell with the correct CellIdentifier from the queue of cells that are ready for use:
UITableViewCell *cell = [tableView
dequeueReusableCellWithIdentifier:CellIdentifier];
Initially, there probably won’t be any cells in the queue. In that case, the
dequeueReusableCellWithIdentifier: method will return nil. That’s checked in the if statement:
if (cell == nil) {
cell = [[UITableViewCell alloc] initWithStyle:UITableViewCellStyleDefault reuseIdentifier:CellIdentifier];
}
If dequeueReusableCellWithIdentifier: didn’t return a cell, this code creates one with the UITableViewCellStyleDefault style, and gives it a reuse identifier label.
By this time, you have either a recycled cell from the queue, or you have created a brand new one. So you can configure the contents and return it to the calling method with the following:
cell.textLabel.text = [self.tableData objectAtIndex:indexPath.row];
return cell;
CHAPTER 1: Table Views from the Ground Up
20
Figure 1–15. The table replete with content
On that triumphant note, it’s time to make the table respond to some user input.
Adding Some Interactivity
You can legitimately feel quite pleased with yourself at this point. You have a table view that takes in data, displays it on the screen, and can scroll around (try scrolling the table if you haven’t already). You can also select cells by tapping them, and the table view will highlight the selected row.
All of this functionality comes for free with an instance of UITableView, which saves us an awful lot of time getting a table view up and running. But eventually, you’re going to want it to do much more. This is where the UITableViewDelegate comes in.
CHAPTER 1: Table Views from the Ground Up
21
the moment, you’re going to take a look at just one of those methods, which enables a row to react to being tapped by the user.
tableView:didSelectRowAtIndexPath:
Our table view already responds in a somewhat limited way to user input. When you tap a cell, it highlights in blue. Behind the scenes, the table view makes a call to the
delegate indicating two things—that a row has been selected, and which row that was.
If the delegate implements the tableView:didSelectRowAtIndexPath: method, it can use that to fire off some other activity. For example, in the iPhone’s Contacts app, a view showing the contact’s details will be displayed. In iTunes, the song shown in the row will start playing. And so on.
You’re not going to do anything quite so ambitious here. When a row is tapped, you’ll log the event into the debugger, and you’ll pop up a modal dialog box showing which row has been tapped.
To begin, enter the method in Listing 1–8 into STViewController.
Listing 1–8. The tableView:didSelectRowAtIndexPath: Method
#pragma mark - UITableViewDelegate
- (void)tableView:(UITableView *)tableView didSelectRowAtIndexPath: (NSIndexPath *)indexPath {
NSLog(@"Table row %d has been tapped", indexPath.row);
NSString *messageString = [NSString stringWithFormat:@"You tapped row %d", indexPath.row];
UIAlertView *alert = [[UIAlertView alloc] initWithTitle:@"Row tapped" message:messageString
Let’s unpack that method. The tableView:didSelectRowAtIndexPath: method doesn’t return anything and takes two parameters:
The UITableView instance that called the method (As with the data source, the delegate could respond to more than one table view and therefore needs to be able to distinguish between them.)
The indexPath whose row property corresponds to the row that was tapped
First, you log that row number to the debugger:
CHAPTER 1: Table Views from the Ground Up
22
TIP: Most developers spend as much time looking at the output of the debugger as they do actually writing code. To make the debugger console visible if it isn’t already, do one of the following: choose View ➤ Debug Area ➤ Show Debug Area from the menu, or click the middle of the three View icons at the top left of the Xcode toolbar.
Then, using the row number, you create a message string to display in the alert view: NSString *messageString = [NSString stringWithFormat:@"You tapped row %d", indexPath.row];
You then create that alert view:
UIAlertView *alert = [[UIAlertView alloc] initWithTitle:@"Row tapped" message:messageString delegate:nil
cancelButtonTitle:@"OK" otherButtonTitles: nil]; Next, you display it:
[alert show];
CHAPTER 1: Table Views from the Ground Up
23
Figure 1–16. Tapping a row
Congratulations—that’s a fully functional, responsive table you’ve just built there.
Understanding How the App’s Objects Fit Together
Before you leave the SimpleTable app for more-adventurous exercises, it’s worth looking at how the various objects fit together. The app has three main objects:The app delegate The view controller
The view, which has the table view embedded within it
CHAPTER 1: Table Views from the Ground Up
24
Figure 1–17. The SimpleTable app object diagram
The STAppDelegate’s window has a rootViewController property, which is connected to the STViewController object. This in turn has a view outlet, which is connected to the view object in the NIB file. Embedded in the NIB is the UITableView instance, which has delegate and dataSource properties. These are linked back to the STViewController.
Obviously, this is a pretty simple application, but as applications get more complex, it’s worth spending time to sketch out an object diagram. If a picture’s worth a thousand words, as the saying goes, an object diagram is worth at least a thousand lines of comments!
Summary
In this chapter, you’ve created a very basic table view stage by stage: To start, you created some data to display in the table.
Then, using Interface Builder, you created an instance of UITableView in the window.
The view controller conformed to the UITableViewDataSource and UITableViewDelegate protocols so that it could provide the data for the table, and the response to interaction.
You implemented the code required to create cells for the table. Finally, you made the table react to user input.
Chapter
How the Table Fits
Together
In this chapter, you’re going to take a whistle-stop tour of table views and the elements from which they’re built. Although this chapter does not present a lot of code, it will provide a useful foundation later, when you start to customize table views.
Along the way, you’ll look at the following: The types and styles of table views
The anatomy and dimensions of table views
UITableView’s relationship to the UIScrollView superclass
Creation of table views in code and with Interface Builder Use of the UITableViewController class to take advantage of its template methods
Understanding Table Views
At its simplest, a table view is a list of items that can (often) be scrolled vertically. Because this is a common interface design pattern, UIKit provides a powerful suite of classes and protocols to make the creation and management of table views as simple and as effective as possible.
Table views can range from a very plain list created by using one of the standard styles provided by the SDK, to something so customized that it’s barely recognizable as a table at all. Figure 2–1 shows some examples of table views.
CHAPTER 2: How the Table Fits Together
26
Figure 2–1. Examples of table views—the built-in Contacts app, the UK Train Times app, and the Path app
The Contacts app is an example of an indexed table with section headings. The UK Train Times app uses grouped static rows, again with section headers. And the Path app takes the table view customization to extremes. This table view has two sections, together with a clock view that moves vertically as the table scrolls up and down. Despite the differences in visual appearance, all three of these apps are based around UITableViews and have identical interaction patterns.
Working with the UITableView Family
At the heart of the table view are the classes, protocols, and view objects that make up the members of the UITableView family:
The UITableView and UITableViewController classes
The UITableViewDelegate and UITableViewDataSource protocols The UITableView and UITableViewCell view objects
All six work together. The classes provide the core functionality for the table view, the protocols define various data and interaction methods, and the view objects provide the physical user interface.
The UITableView Class Hierarchy
CHAPTER 2: How the Table Fits Together
27
Figure 2–2. The UITableView inheritance chain
This means that UITableView benefits from much of the functionality provided by its parent classes. For example, UIScrollView provides the scrolling of the table, while UIResponder allows the table cells to respond to user touches and swipes.
NOTE: In an attempt to reduce confusion, I’ll use UITableView when I’m referring to the class, tableView when I’m referring to a specific instance of UITableView, and “table view” when I’m talking about table views in general.
Choosing the Type of Table View
Although their visual appearance can be customized to the point where it’s almost difficult to recognize them as instances of the UITableView class at all, table views come in one of two basic forms: plain and grouped. These basic types have two variations: indexed and sectioned.
The Plain Table
The plain table is the basic vanilla incarnation of the UITableView. Figure 2–3 shows an example (with possibly the dullest content imaginable).
NSObject
UIResponder
UIView
UIScrollView
CHAPTER 2: How the Table Fits Together
28
Figure 2–3. A plain table view and its components
The plain table is the version that is created by default, although the type can be specified:
UITableView *tableView = [[UITableView alloc] initWithFrame:tvFrame style:UITableViewStylePlain];
If the number of rows in the tableView means that the table will scroll to reveal more rows, scroll indicators appear in the right-hand scroll area when the table is in motion.
The Indexed Table
CHAPTER 2: How the Table Fits Together
29
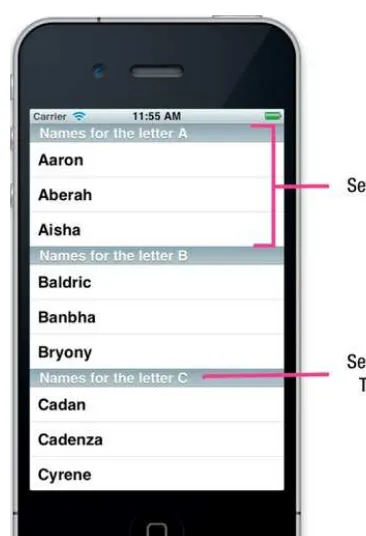
Figure 2–4. An indexed table
Implementing indexes involves UITableViewDataSource protocol methods, and is covered in detail in Chapter 6.
The Sectioned Table
CHAPTER 2: How the Table Fits Together
30
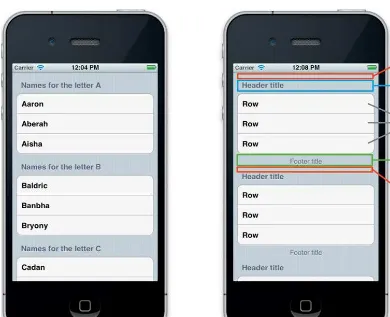
Figure 2–5. A simple sectioned table
This type of table view utilises several UITableViewDataSource protocol methods to configure the behavior of the sections, and is covered in Chapter 6.
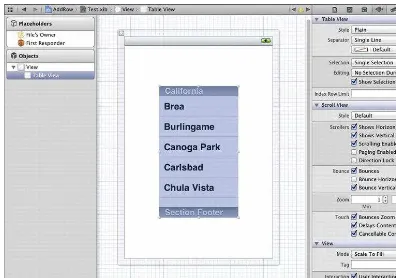
The Grouped Table
CHAPTER 2: How the Table Fits Together
31
Figure 2–6. A grouped table
Each section has a header and footer. These are UIViews, and are returned by two UITableViewDelegate methods:
-(UIView *)tableView:tableView viewForFooterInSection:(NSInteger)section; -(UIView *)tableView:tableView viewForHeaderInSection:(NSInteger)section;
Although you can manipulate the entire header and footer, often it’s enough just to be able to set the titles. UITableViewDataSource has two methods to support this: -(NSString *)tableView:tableView titleForHeaderInSection:(NSInteger)section; -(NSString *)tableView:tableView titleForFooterInSection:(NSInteger)section;
If for any reason you need to find the dimensions of the headers and footers, these are returned (as CGRect values) by the following:
-(CGRect)rectForHeaderInSection:(NSInteger)section; -(CGRect)rectForFooterInSection:(NSInteger)section;
The dimensions of the entire section (header, footer, and content) are available by calling the following:
CHAPTER 2: How the Table Fits Together
32
Setting TableView Dimensions
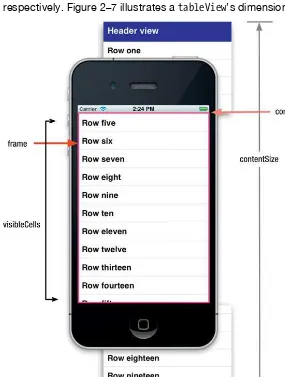
One way to visualize a tableView is to think of it as a window that provides a view of a conveyor belt of cells. The number of cells that are visible through the window depends on the size of the window—indicated by the tableView’s frame property—and the height of each cell. The frame property is a CGRect with height and width values.
The overall length of the conveyor belt—or more properly, the height of the tableView in pixels—is available through the contentSize property, which returns a CGFloat.
At the top and bottom of each “belt” of cells, you can add a UIView as a static header and footer. These are set through the tableHeaderView and tableFooterView properties, respectively. Figure 2–7 illustrates a tableView’s dimensions.
CHAPTER 2: How the Table Fits Together
33
To create the white-on-blue header and footers shown in the preceding example, you’d use something along the lines of Listing 2–1.
Listing 2–1. Adding a Custom Header and Footer to a UITableView UIView *tableHeaderView = [[UIView alloc] initWithFrame:CGRectMake(0, 0, 320, 50)];
[tableHeaderView setBackgroundColor:[UIColor blueColor]];
UIView *tableFooterView = [[UIView alloc] initWithFrame:CGRectMake(0, 0, 320, 50)];
[tableFooterView setBackgroundColor:[UIColor blueColor]];
UILabel *headerLabel = [[UILabel alloc] initWithFrame:CGRectMake(10, 10, 320, 25)]; headerLabel.text = @"Header view";
headerLabel.textColor = [UIColor whiteColor]; headerLabel.font = [UIFont boldSystemFontOfSize:22]; headerLabel.backgroundColor = [UIColor clearColor];
UILabel *footerLabel = [[UILabel alloc] initWithFrame:CGRectMake(10, 10, 320, 25)]; footerLabel.text = @"Footer view";
footerLabel.textColor = [UIColor whiteColor]; footerLabel.font = [UIFont boldSystemFontOfSize:22]; footerLabel.backgroundColor = [UIColor clearColor];
[tableHeaderView addSubview:headerLabel]; [tableFooterView addSubview:footerLabel];
[self.tableView setTableHeaderView:tableHeaderView]; [self.tableView setTableFooterView:tableFooterView];
The cells that are visible at any given moment can be accessed en masse through the tableView’s visibleCells property. This is an NSArray and is updated as the table scrolls up and down.
Controlling the Background of a UITableView
Setting an image as the background of a UITableView is possible, albeit slight convoluted. There are four steps:1. Set the backgroundColor property of your tableView to clearColor, so that the background image is visible.
[myTableView setBackgroundColor:[UIColor clearColor]];
2. Create an instance of a UIImageView and set its image property to the image that you want to appear behind the table.
CHAPTER 2: How the Table Fits Together
34
3. Set the UIImageView’s frame property so that it’s the same size as that of the tableView:
[tableBackgroundView setFrame: myTableView.frame];
4. Update the tableView’s backgroundImage property to point to your new UIImageView object:
[myTableView setBackgroundView:tableBackgroundView];
What UITableView Inherits from UIScrollView
What does UITableView get from UIScrollView? The short answer to this is, “Everything that UITableView doesn’t explicitly override.”.This provides some useful UIScrollView and UIScrollViewDelegate methods and properties that are particularly relevant to the UITableView class.
contentSize indicates the full height that the table would be if all rows were created and populated at once. (In fact, unless the table is small, this very rarely happens because of UITableView’s caching and queuing mechanism.) contentSize is calculated by adding the total height of all the rows, plus the header and footer views.
contentOffset indicates how far down the table has been scrolled from the top of the tableView’s frame. For example, if the tableView’s contentSize.height value is 1,000 pixels, and the table is scrolled halfway down, the contentOffset would be 500 pixels. Two UIScrollViewDelegate methods are particularly useful if you want to know when your user is scrolling the table around. scrollViewWillBeginDragging is fired just before the tableView starts moving, and scrollViewDidScroll is called after the movement has stopped. This is where you could get the new contentOffset value and update anything that needed to change as a result.
NOTE: Although UITableView is a subclass of UIScrollView, table views can only scroll vertically.
Creating UITableViews
Any discussion of how to go about creating UITableViews has to come with a caveat: on their own, UITableViews don’t really do very much. In order to become populated with data and interact with your user, they need the support of a class that implements the UITableViewDelegate and UITableViewDatasource protocols.
CHAPTER 2: How the Table Fits Together
35
Creating a UITableView in Interface Builder
Creating a UITableView in Interface Builder is a massively challenging process:
1. Open your NIB file in Interface Builder.
2. Drag a UITableView from the Objects browser onto your view, as shown in Figure 2–8.
Figure 2–8. The UITableView item in the Objects browser
Okay, I lied. It’s actually pretty straightforward. But there are a couple of details to take care of, so the process is worth stepping through.
Placing a UITableView into Another View
Although you’ll often see table views full-screen, you’re not restricted to that option. You can make your table views any size you want. This is pretty simple: drag the
CHAPTER 2: How the Table Fits Together
36
Figure 2–9. Placing a UITableView into another view
Placing a Full-Screen UITableView
If, on the other hand, your tableView will always be shown full-screen, there’s not really much point in creating it as a child of another view that will never be shown.
The process in this scenario is slightly different:
1. Delete the existing view object from the NIB file.
CHAPTER 2: How the Table Fits Together
37
Figure 2–10. Drag a UITableView object into the main area.
CHAPTER 2: How the Table Fits Together
38
Figure 2–11. Reconnecting the view outlet
CAUTION: It’s easy to forget to reconnect the view outlet if you’ve deleted the object it was once connected to. If you don’t reconnect, your app will crash with an error something along the lines of
*** Terminating app due to uncaught exception 'NSInternalInconsistency Exception', reason: '-[UIViewController _loadViewFromNibNamed:bundle:] loaded the "PlainTable" nib but the view outlet was not set.'
4. After the view outlet is reconnected, you’ll need to hook your new tableView up to its dataSource and delegate.
CHAPTER 2: How the Table Fits Together
39
Figure 2–12. Connecting the dataSource and delegate
Creating a UITableView Programmatically
Following the maxim of anything you can do in Interface Builder, you can also do in code, the alternative way of creating a UITableView is to do so in code. It’s a three-step process:
1. Create an instance of UITableView with a size and a style.
2. Set the new tableView’s delegate and dataSource properties.
3. Add the new tableView to the superView.
Listing 2–2 provides an example of how you could do this in a UIViewController’s viewDidLoad method.
Listing 2–2. Adding a tableView Programmatically - (void)viewDidLoad
{
[super viewDidLoad];
// Do any additional setup after loading the view, typically from a nib.
UITableView *tv = [[UITableView alloc]
initWithFrame:self.view.frame style:UITableViewStylePlain];
[tv setDelegate:self]; [tv setDataSource:self];
[self.view addSubview:tv]; [tv reloadData];
CHAPTER 2: How the Table Fits Together
40
CAUTION: Having set the delegate and dataSource properties of your tableView, it will expect (nay, demand!) that the controller adopts the UITableViewDelegate and
UITableViewDataSource protocols – in particular, that the
numberOfSectionsInTableView:, tableView:numberOfRowsInSection: and tableView:cellForRowAtIndexPath: methods are implemented.
If those protocols haven’t been implemented correctly, the app will crash when the tableView is loaded, complaining that the dataSource hasn’t returned a cell.
Creating a UITableView with UITableViewController
In order for a tableView to operate successfully, it needs a number ofUITableViewDelegate and UITableViewDataSource methods to be implemented. Although Xcode’s autocompletion helps with the typing, creating all the methods by hand will probably induce repetitive strain injury. Save your wrists, speed things up, and create a subclass of UITableViewController instead!
The process is delightfully simple. Instead of creating an instance of a vanilla UIViewController, drop down the subclass list and select UITableViewController instead, as shown in Figure 2–13.
CHAPTER 2: How the Table Fits Together
41
The new class files will be created as usual, but with some added extras. In addition to the usual UIViewController methods, you’ll find some stubbed-out
UITableViewController methods in the file (see Figure 2–14).
Figure 2–14. The UITableViewDataSource and delegate methods
This is the minimal subset of UITableViewController, delegate, and dataSource methods that you need to get going, and the class’s header file declares it as conforming to the two protocols.
Xcode also provides a slew of other methods that are commented out:
-(BOOL)tableView:(UITableView *)tableView canMoveRowAtIndexPath:(NSIndexPath *)indexPath;
- (void)tableView:(UITableView *)tableView
moveRowAtIndexPath:(NSIndexPath *)fromIndexPath toIndexPath:(NSIndexPath *)toIndexPath;
- (void)tableView:(UITableView *)tableView
commitEditingStyle:(UITableViewCellEditingStyle)editingStyle forRowAtIndexPath:(NSIndexPath *)indexPath:
- (BOOL)tableView:(UITableView *)tableView canEditRowAtIndexPath:(NSIndexPath *)indexPath
CHAPTER 2: How the Table Fits Together
42
CAUTION: To remind you to complete the methods, Xcode includes compiler warnings in numberOfSectionsInTableView and tableView:numberOfRowsInSection. If you don’t delete these, the compiler will moan at you when you build your project.
Summary
This short chapter introduced the anatomy and core components of the UITableView.
There are two basic styles of table view: Plain
Grouped
Table views can also be split into sections, and provided with an index. Although they can look different, the different types of table view have similar
component parts and dimensions. They also inherit methods and properties from the UIScrollView parent class.
Like many of UIKit’s components, it’s possible to create UITableViews both visually— using Interface Builder—and programmatically. Anything that can be done with Interface Builder can also be done in code. Implementing the tableView’s controller as a subclass of UITableViewController allows us to cut down on creating methods manually and use the templates that are provided.
Chapter
Feeding Data
to Your Tables
When working with table views, it’s important to bear in mind that on their own, they are able to do very little. Just as it takes a small army of ground staff (not to mention the flight crew!) to get an airliner off the tarmac and into the skies, so tableViews need the help and support of other objects in order to function properly.
One of the main parts of building tableViews is getting the objects to play nicely together, so this chapter covers the following:
Where the table gets its data, and how you get it there
An initial look at how the table handles interaction
How the table keeps track of sections and cells
An overview of the architecture patterns that the UITableView classes exploit
Some of this chapter’s content might feel somewhat abstract and theoretical—but sticking with it is worthwhile. Developing your expertise with iOS (and tableViews especially!) often requires dealing with situations where you find yourself thinking, “Where the heck did that come from?” Figuring out what that is, and where it came from is generally a case of understanding the design patterns that iOS uses—some of which are covered in this chapter.
UITableView and Delegation
On its own, the UITableView is a pretty puny creature. Although it handles the display and scrolling of cells itself, it relies on external support for pretty much everything else.
That’s not a weakness, though. By passing off the UITableView’s responsibility for other functions to external objects, you end up with code that’s much more modular, robust,
CHAPTER 3: Feeding Data to Your Tables
44
and easier to debug. The process of passing off that responsibility is known as delegation.
Understanding Delegation
Delegation is an application design pattern in which one object sends messages to a second object. Figure 3–1 illustrates this pattern, which can occur in a couple of scenarios:
The first object is notifying the second that some event is about to occur, is occurring, or has occurred.
The first object is asking the second object for input.
Figure 3–1. The delegation pattern
Those are pretty dry descriptions, so let’s look at a couple of examples.
tableView:didSelectRowAtIndexPath
When a row in a table is selected, the tableView sends the
tableView:didSelectRowAtIndexPath message to its delegate with two parameters: the tableView, and the indexPath of the selected row. The delegate can then respond to the selection event, either by doing something to the tableView or by triggering some external action.
For example, tapping a cell often causes a detail view to be loaded, so the tableView:didSelectRowAtIndexPath method would look similar to Listing 3–1.
Object B sets itself as Object A’s delegate. ObjectB.delegate = self;
Object B implements the ObjectAProtocol which includes the theDelegateMethod.
– ( NSString
*
) theDelegateMethod ;Object A sends messages
CHAPTER 3: Feeding Data to Your Tables
45
Listing 3–1. An Example tableView:didSelectRowAtIndexPath Method
- (void)tableView:(UITableView *)tableView didSelectRowAtIndexPath: (NSIndexPath *)indexPath {
DetailViewController *detailViewController = [[DetailViewController alloc] initWithNibName:@"DetailView" bundle:nil];
[self.navigationController pushViewController:detailViewController animated:YES];
}
tableView:cellForRowAtIndexPath
You’ve met the tableView:cellForRowAtIndexPath method several times before. When the tableView is ready to display a cell, it asks its dataSource to return a
UITableViewCell for the specified indexPath so that the cell can then be displayed inside the table itself.
The dataSource object will implement the tableView:cellForRowAtIndexPath method, as shown in Listing 3–2.
Listing 3–2. A tableView:cellForRowAtIndexPath Method
- (UITableViewCell *)tableView:(UITableView *)tableView cellForRowAtIndexPath:(NSIndexPath *)indexPath {
static NSString *cellIdentifier = @"cellIdentifier";
UITableViewCell *cell = [tableView
dequeueReusableCellWithIdentifier:cellIdentifier];
if (cell == nil) {
cell = [[[UITableViewCell alloc] initWithStyle:UITableViewCellStyleDefault reuseIdentifier:cellIdentifier] autorelease];
}
// cell properties will be configured here
return cell; }
The point of all this is that by separating out the functionality, you can split view concerns from model concerns and use a controller to coordinate the two.
Setting Delegates
Objects and delegates don’t just get together magically—there needs to be an explicit connection. Objects that have delegates have a delegate property, which can be set in code. Alternatively, you can use Interface Builder to do the same thing visually.
CHAPTER 3: Feeding Data to Your Tables
46
Figure 3–2. Connecting UITableViewdataSource and delegate properties in Interface Builder
CHAPTER 3: Feeding Data to Your Tables
47
Wiring Up an Object with a Delegate
Think back for a moment to our two example objects (see Figure 3–3).
Figure 3–3. The delegate pattern, again
In order for objectB to act as objectA’s delegate, you need some way of connecting the two. This requires setting the delegate property of objectA to point to the instance of its delegate class, in this case objectB.
If objectA exposes a property called delegate, as shown here: @property (nonatomic, weak) id delegate;
Then the object that’s going to act as the delegate can set itself as objectA’s delegate: objectA.delegate = self;
There’s a subtlety here that’s important to be aware of. Although objectA is the object with the delegate property, it’s objectB that sets itself as objectA’s delegate.
This leads to an interesting memory management–related side effect, which you’ll need to bear in mind. Although objectB has been set as objectA’s delegate, objectA will be unaware if objectB goes out of existence. objectA will continue to send messages to what it thinks is its delegate. As long as that delegate object exists, obviously that’s not a problem. However, if the delegate object disappears, objectA will send messages to a nonexistent object, and the program will crash.
To prevent this, it’s important to make sure that objectB will set objectA’s delegate property to nil anytime there’s a risk of objectB disappearing. (It was objectB that set itself as objectA’s delegate, remember, so the onus is on objectB to clean up after itself,
Object B sets itself as Object A’s delegate. ObjectB.delegate = self;
Object B implements the ObjectAProtocol which includes the theDelegateMethod.
– ( NSString
*
) theDelegateMethod ;Object A sends messages
CHAPTER 3: Feeding Data to Your Tables
48
so to speak.) The best place to do this is within objectB’s dealloc method, because this is the last thing called before the object winks out of existence:
-(void)dealloc {
// objectB’s dealloc method
objectA.delegate = nil; [super dealloc]; }
Although sending a message to nil won’t actually do anything—the message is simply discarded—at least it won’t cause your program to fall over completely.
You hopefully have noticed that the delegate property looks a little different from the way that you’ve been setting up properties to this point:
@property (nonatomic, weak) id delegate Specifically, it’s a weak property of type id.
The type is id because objectA doesn’t have any way of knowing what type of object might eventually become its delegate. In fact, nor does it care—so long as the object conforms to the objectA delegate protocol, it doesn’t actually matter. (Protocols are covered in the following section.) id is a generic type, so any object type will do. The property is weak (as opposed to strong) because objects must not retain their delegates. If they do, you run the risk of causing a retain loop. objectB will retain objectA as long as it’s acting as objectA’s delegate, and will release objectA when it sets
objectA’s delegate property to nil when it’s deallocated. But if objectA retains objectB, objectB won’t go out of existence because its retain count will never reach zero.
Defining Protocols
Methods are defined in protocols so that objects and their delegates know the methods that each is expected to implement and respond to. A protocol is simply a list of
methods—sometimes required, and sometimes optional—that an object promises to implement.
If a protocol method is required, the object adopting the protocol must implement it. Otherwise, the compiler will complain, and the project won’t build. Optional methods are, well, optional, so the compiler won’t moan if they are missing.
Protocols are defined either in a stand-alone protocol header file, or in a class’s header file. In both situations, they’re defined as a list of methods, demarked by the @protocol compiler directive. The list is split into @required and @optional sections.
CHAPTER 3: Feeding Data to Your Tables
49
Listing 3–3. The UITableViewDataSource Protocol @protocol UITableViewDataSource<NSObject>
@required
- (NSInteger)tableView:(UITableView *)tableView numberOfRowsInSection:(NSInteger)section;
- (UITableViewCell *)tableView:(UITableView *)tableView cellForRowAtIndexPath:(NSIndexPath *)indexPath;
@optional
- (NSInteger)numberOfSectionsInTableView:(UITableView *)tableView;
- (NSString *)tableView:(UITableView *)tableView titleForHeaderInSection:(NSInteger)section;
- (NSString *)tableView:(UITableView *)tableView titleForFooterInSection:(NSInteger)section;
- (BOOL)tableView:(UITableView *)tableView canEditRowAtIndexPath:(NSIndexPath *)indexPath;
- (BOOL)tableView:(UITableView *)tableView canMoveRowAtIndexPath:(NSIndexPath *)indexPath;
- (NSArray *)sectionIndexTitlesForTableView:(UITableView *)tableView;
- (NSInteger)tableView:(UITableView *)tableView sectionForSectionIndexTitle:(NSString *)title atIndex:(NSInteger)index
- (void)tableView:(UITableView *)tableView
commitEditingStyle:(UITableViewCellEditingStyle)editingStyle forRowAtIndexPath:(NSIndexPath *)indexPath;
- (void)tableView:(UITableView *)tableView moveRowAtIndexPath:(NSIndexPath *)sourceIndexPath toIndexPath:(NSIndexPath *)destinationIndexPath;
@end
This tells us that although the UITableViewDataSourceProtocol defines a myriad of methods, only two of them have to be implemented in order for the table to function. The rest are optional.
NOTE: Strictly speaking, in order to work, a tableView needs to know the number of sections it has. You’ll notice that the UITableViewDataSource protocol lists
CHAPTER 3: Feeding Data to Your Tables
50
ACCESSING PROTOCOL DEFINITIONS IN XCODE
When you implement a protocol method in your classes, that method needs to be implemented exactly as it’s defined in the protocol. That can lead to a lot of typing, so it’s a lot easier (and safer) to copy the method name directly from the protocol itself. You’ll end up spending a lot of time checking protocol documentation, so here’s a quick way of accessing it:
If you hold down the Option key and hover the mouse cursor over the protocol name in an Xcode window, the cursor changes to a “Mickey hand,” and the name becomes a hyperlink. Clicking that link pops up a summary window
Clicking any of the highlighted terms opens either the help file in the Xcode Organizer, or the relevant code file itself.
Using UITableView’s Delegate Methods
UITableView uses the delegate pattern to obtain data from its dataSource and to handle user interaction and table configuration (see Figure 3–4). Despite the name, a
CHAPTER 3: Feeding Data to Your Tables
51
Figure 3–4. How the tableView interacts with its delegate and dataSource
Using UITableViewDelegate Methods
The UITableViewDelegate handles the following:Configuring the tableView’s rows
Configuring the header and footer of sections Managing selection of rows
Editing rows
Managing accessory views Reordering rows
CHAPTER 3: Feeding Data to Your Tables
52
Table 3–1.UITableViewDelegate protocol methods
Method Purpose Returns
tableView:willBeginEditing
RowAtIndexPath Fires when the cell is about to go into editing mode. None
tableView:didEndEditing
RowAtIndexPath Fires when the table leaves editing mode.
None
tableView:editingStyleFor
RowAtIndexPath Returns the editing style that should be used (none, insert, or delete).
UITableView CellEditingStyle
tableView:willSelect
RowAtIndexPath Fired as the cell is selected with a touchUpInside event. didSelectRowAtIndexPath is called immediately after this method.
NSIndexPath
tableView:didSelect
RowAtIndexPath Fires when the user selects the cell at the provided indexPath by tapping it.
This is a commonly implemented method that is often used to trigger the appearance of another view controller, or to toggle a check mark in the cell.
None
tableView:willDeselect
RowAtIndexPath Fires just before a row is deselected. (This fires only if a cell has already been selected.) NSIndexPath
tableView:didDeselect
RowAtIndexPath Fires when the row is deselected (either programmatically or because another row has been selected).
Often used to change the visual state of the cell after it’s been deselected (for example, removing a highlight color).
None
tableView:accessoryButton
TappedForRowWithIndexPath Fires when the user taps the accessory button that’s displayed in a row.
Will typically trigger some sort of response— for example, displaying a new
viewController.
None
tableView:height
ForHeaderInSection Returns the height (as a CGFloat value) for the header of the provided section. CGFloat
tableView:height
ForFooterInSection Similar to the heightForHeader method, this returns the header height as a CGFloat.
CHAPTER 3: Feeding Data to Your Tables
53
Method Purpose Returns
tableView:view
ForHeaderInSection Provides a UIView for use as the section’s header. This and the corresponding footer method allow the headers and footers of sections to be customized.
UIView
tableView:view
ForFooterInSection The footer counterpart of the viewForHeaderInSection method. UIView
tableView:indentationLevelFor
RowAtIndexPath Returns the level of indentation required for the row at that index path.
NSInteger
tableView:shouldIndent
WhileEditingRowAtIndexPath Determines whether the cell’s background view should be indented while the cell is in editing mode (to make space for the editing control).
BOOL
tableView:targetIndexPath ForMoveFromRowAtIndexPath: toProposedIndexPath
Returns the indexPath indicating where a row is to be relocated, during cell reordering.
NSIndexPath
tableView:titleFor DeleteConfirmationButton ForRowAtIndexPath
Allows the title of the Delete button to be customized with a different label. (For example, ‘Remove’ or ‘Revoke’ etc)
NSString
tableView:willDisplayCell:
forRowAtIndexPath Fired just before the cell is drawn, which provides an opportunity to override any properties that have been set by the tableView (for example, background color or selection state).
After this method has been fired, you’re limited to setting the cell’s frame and alpha properties.
None
Data Sources
Data sources have a pretty straightforward role in life: they provide data and information
about data, and handle manipulation of data.
The Key Information Required By a UITableView
A UITableView needs three key pieces of information in order to successfully draw itself and its cells:
The number of sections in the table The number of rows in the section
CHAPTER 3: Feeding Data to Your Tables
54
The dataSource exists to provide this information.
Getting the Number of Sections in the Table
A simple table has only one section, so table views will assume this is 1 unless the
numberOfSectionsInTableView method is implemented and returns something different.
Although numberOfSectionsInTableView is an optional method, I tend to always
implement it so that it’s there. Because this is the first method that gets called, you can also speed things up by returning 0 if the dataset for your table is empty—after which the tableView assumes that it’s not going to get any additional data, and stops asking.
Getting the Number of Rows in the Section
Assuming that there’s data to display, the numberOfRowsInSection method is called. The
tableView calling the method supplies the section number as an integer, and the method returns the number of rows (also as an integer).
Getting Cells That Belong in This Row of This Section
Creating cells to be displayed is at the heart of setting up the tableView. This is where your code will need to return an instance of a UITableViewCell for the tableView to display, each time the tableView:cellForRowAtIndexPath: method is called..
The tableView will provide the section and row numbers as an indexPath, and it’s up to your cellForRowAtIndexPath method to retrieve the data from the model, create the cell, and return it as quickly as possible.
How the Key Information Is Obtained by the Table
CHAPTER 3: Feeding Data to Your Tables
55
Figure 3–5. Messaging Between View Controller, tableView, and datasource
1. First, the view controller allocates and instantiates the tableView, and then sets the delegate and dataSource properties.
2. Once in existence, the tableView asks the dataSource for the number of sections for itself, and the dataSource replies with an NSInteger value.
3. Then the tableView provides a reference to itself and a section number in an indexPath instance, and asks the dataSource for the number of rows in that section. Again, the dataSource replies with an NSInteger.
4. Finally, the tableView provides a reference to itself and the row number in an indexPath object, and asks the dataSource to supply the cell for that row. The dataSource replies with an instance of a UITableViewCell.