Mark J. Collins
Create a complete project management
system using SharePoint Server 2010
•Providetoolsformanagingagiledevelopment(sprints,backlog,•UsewebpartstocustomizeyourSharePointportal •Integratechartingcapability
•Buildastatemachineworkflow •CreatecustomformsusingInfoPath
•Gatherandcommunicatedevelopmentandtestingmetrics •…anddosomuchmore
ontherighttrack…quickly!
Pro
Project Management
Pro Project Management
with SharePoint 2010
■ ■ ■
Pro Project Management with SharePoint 2010
Copyright © 2010 by Mark J. Collins
All rights reserved. No part of this work may be reproduced or transmitted in any form or by any means, electronic or mechanical, including photocopying, recording, or by any information storage or retrieval system, without the prior written permission of the copyright owner and the publisher.
ISBN-13 (pbk): 978-1-4302-2829-5
ISBN-13 (electronic): 978-1-4302-2830-1
Printed and bound in the United States of America 9 8 7 6 5 4 3 2 1
Trademarked names, logos, and images may appear in this book. Rather than use a trademark symbol with every occurrence of a trademarked name, logo, or image we use the names, logos, and images only in an editorial fashion and to the benefit of the trademark owner, with no intention of infringement of the trademark.
The use in this publication of trade names, trademarks, service marks, and similar terms, even if they are not identified as such, is not to be taken as an expression of opinion as to whether or not they are subject to proprietary rights.
President and Publisher: Paul Manning Lead Editor: Jonathan Hassell
Technical Reviewer: Jeff Sanders
Editorial Board: Steve Anglin, Mark Beckner, Ewan Buckingham, Gary Cornell, Jonathan Gennick, Jonathan Hassell, Michelle Lowman, Matthew Moodie, Duncan Parkes, Jeffrey Pepper, Frank Pohlmann, Douglas Pundick, Ben Renow-Clarke, Dominic Shakeshaft, Matt Wade, Tom Welsh Coordinating Editor: Corbin Collins
Copy Editor: Damon Larson
Indexer: BIM Indexing & Proofreading Services Artist: April Milne
Cover Designer: Anna Ishchenko
Distributed to the book trade worldwide by Springer Science+Business Media, LLC., 233 Spring Street, 6th Floor, New York, NY 10013. Phone 1-800-SPRINGER, fax (201) 348-4505, e-mail
[email protected], or visit www.springeronline.com.
For information on translations, please e-mail [email protected], or visit www.apress.com.
Apress and friends of ED books may be purchased in bulk for academic, corporate, or promotional use. eBook versions and licenses are also available for most titles. For more information, reference our Special Bulk Sales–eBook Licensing web page at www.apress.com/info/bulksales.
The information in this book is distributed on an “as is” basis, without warranty. Although every precaution has been taken in the preparation of this work, neither the author(s) nor Apress shall have any liability to any person or entity with respect to any loss or damage caused or alleged to be caused directly or indirectly by the information contained in this work.
To Donna, my beautiful wife and my best friend.
Contents at a Glance
■ About the Author ...xvi
■
About the Technical Reviewer ...xvii
■
Acknowledgments ...xviii
■
Chapter 1: Introduction ...1
■
Chapter 2: Collecting Requirements ...7
■
Chapter 3: Processing Incoming E-mail ...25
■
Chapter 4: Managing Requirements ...45
■
Chapter 5: Supporting Discussions ...59
■
Chapter 6: User Stories...83
■
Chapter 7: Project Backlog...103
■
Chapter 8: Iteration Backlog ...123
■
Chapter 9: Burndown Charts ...143
■
Chapter 10: Getting Organized ...175
■ Chapter 11: Creating Test Cases ...191
■ Chapter 12: Reporting Defects...211
■ Chapter 13: Testing Metrics ...243
■
Chapter 14: Workflow Tasks ...279
■
Chapter 15: State Machine Workflows ...301
■
Chapter 16: Creating Custom Forms...359
■
Epilogue...381
Contents
■ About the Author ...xvi
■
About the Technical Reviewer ...xvii
■
Acknowledgments ...xviii
■
Chapter 2: Collecting Requirements ...7
Defining Requirements ... 7
Creating a Project Management Site... 7
Defining Functional Areas... 8
Defining the Content Type... 9
Creating the Functional Areas List ... 11
Populating the Functional Areas List ... 13
Adding Requirements ... 21
Summary ... 22
■
Chapter 3: Processing Incoming E-mail ...25
Incoming E-mails ... 25
Creating the Incoming Requirements Document Library... 33
Enabling Incoming E-Mails... 34
■
Chapter 4: Managing Requirements ...45
Analyzing Requirements ... 45
Prioritizing Requirements ... 45
Requirement Dependencies ... 46
Adding Factors... 46
Using the List Settings Page ... 46
Modifying the Overall Score Formula ... 54
■
Chapter 5: Supporting Discussions ...59
Adding the Requirement Discussions List... 59
Adding a Page to the SharePoint Site ... 73
Adding a Related List ... 74
Implementing User Stories in SharePoint ... 85
Defining Themes ... 86
Creating New Site Columns ... 87
Defining the Theme Column ... 89
Defining the Story Priority Column ... 89
Defining the Story Points Column ... 90
Defining the Story Requirements Column ... 91
Summarizing the Site Columns... 92
Creating the User Story Content Type ... 92
Creating the User Stories List... 94
Creating the Story Risk Column ... 117
Creating the Story Ready Column ... 118
Handling Issues ... 124
Using the Iteration Backlog... 125
Implementing an Iteration Items List ... 125
Creating New Site Columns ... 125
Creating the Content Types ... 128
Creating the Base Content Type... 128
Creating the Iteration Task Content Type ... 129
Creating the Remaining Content Types ... 130
Creating the Iteration Items List... 131
Using the Iteration Items List ... 131
Modifying the Default View ... 131
Adding Tasks... 133
Adding Defects and Issues ... 134
Creating the Iteration Backlog ... 137
Creating an Iteration Backlog View ... 137
Enhancing the Iteration Form ... 138
Summary ... 140
■
Chapter 9: Burndown Charts ...143
Review ... 143
Using Burndown Charts ... 143
Understanding a Burndown Chart... 144
Using a Project Burndown ... 144
Implementing an Iteration Burndown ... 145
Defining the Iteration Burndown Stats List... 146
Creating the Iteration Burndown Content Type... 147
Creating the Iteration Burndown Stats List... 148
Creating a Datasheet View ... 148
Creating a Web Part Page ... 157
Building the Web Page... 159
Enabling the Enterprise Features . ...161
Adding the Chart Web Part . ...162
Configuring the Chart Data. ...164
■
Chapter 10: Getting Organized . ...175
Using Document Libraries . ...175
Creating a Document Library . ...175
Providing Version History . ...177
Viewing Library Documents in Office . ...180
Organizing Documents in Folders . ...182
■
Chapter 11: Creating Test Cases . ...191
Glossary ...191
Creating a Test Areas List . ...194
Building a Test Scenarios List . ...195
Adding Site Columns . ...195
Creating a Content Type . ...196
Creating the List . ...198
Adding Test Scenarios . ...199
Building a Test Cases List ... 201
Creating the Site Columns ... 201
Creating the Content Type... 202
Creating the Test Cases List ... 204
Adding Test Cases ... 205
Creating a Data Entry View ... 206
Creating a Test Scenarios Page ... 207
Summary ... 210
Creating the Test Status Site Column ... 214
Creating the Test Cycle Content Type ... 215
Modifying the Test Cycles Views ... 217
Adding a Test Cycle... 218
Defining Test Items... 219
Creating Additional Site Columns... 219
Creating the Test Item Content Type... 220
Creating the Test Items List ... 221
Implementing the Test Cycle Workflow ... 222
Creating a Visual Studio Project ... 222
Defining the Workflow... 227
Implementing the Workflow Logic... 228
Deploying and Running the Workflow ... 231
Recording the Test Results ... 233
Adding a Web Part Page... 233
Performing the Tests... 235
Generating Defects in the Iteration Backlog ... 236
Modifying the Iteration Defect Content Type ... 236
Adding the Workflow Logic ... 238
Deploying and Running the Workflow ... 241
Summary ... 242
Modifying the Test Items List ... 252
Modifying the Test Cycles List ... 253
Modifying the Iterations List ... 254
Creating the Defect Source List ... 271
Defining the Workflow Tasks... 282
Creating the PM Issue Content Type ... 288
Creating the Issues List... 290
Creating the Task Content Types ... 291
Creating the Site Columns ... 291
Modifying the Workflow Task Content Type ... 294
Creating the Content Types ... 296
Adding the Content Types to the Tasks List ... 298
Summary ... 299
■
Chapter 15: State Machine Workflows ...301
Using a Work Task... 321
■
Chapter 16: Creating Custom Forms...359
Creating a Custom Task Form ... 359
Connecting to SharePoint ... 359
Modifying the Form Layout ... 363
Publishing the Form... 366
Testing the Custom Form... 367
Creating the Remaining Task Forms ... 368
Creating a Custom Issue Form ... 370
Changing the Control Type ... 371
Handling Date and Time Picker Controls... 372
Changing the Labels... 375
Testing the Form ... 376
Summary ... 378
■
Epilogue...381
About the Author
■Mark Collins has been developing software and managing software development projects for 30 years in a variety of industries and a wide range of technologies. He wrote his first project plan using Microsoft Project 1.0. Fortunately, the available tools have improved significantly. He is often called upon to provide order and process to the project at hand. With a pragmatic approach, he implements the ideal balance of implementing structure while minimizing overhead.
A second underlying theme in Mark’s career has been the improvement of software development methodologies. The process and structure applied in development projects will determine the quality and productivity you can achieve. To that end, Mark has developed several computer-aided software engineering (CASE) tools. His latest application suite is called Omega Tool (see www.thecreativepeople.com).
For questions and comments, you can contact Mark at
About the Technical Reviewer
■Jeff Sanders is a published author and an accomplished technologist. He is currently employed with Avanade Federal Services in the capacity of group manager/senior architect, and is also manager of the Federal Office of Learning and Development. Jeff has years of professional experience in the field of IT and strategic business consulting, leading both sales and delivery efforts. He regularly contributes to certification and product roadmap development with Microsoft, and speaks publicly on Microsoft enterprise technologies. With his roots in software development, Jeff’s areas of expertise include operational intelligence, collaboration and content management solutions, distributed component-based application architectures, object-oriented analysis and design, and enterprise integration patterns and designs.
Jeff is also CTO of DynamicShift, a client-focused organization specializing in Microsoft technologies, specifically SharePoint Server, StreamInsight, Windows Azure, AppFabric, Business Activity Monitoring, BizTalk Server, Commerce Server, and .NET. He is a Microsoft Certified Trainer, and leads DynamicShift in both training and consulting efforts.
Acknowledgments
First, I want to acknowledge that anything that I have ever done that is of any value or significance was accomplished through the provision of my Lord and Savior, Jesus Christ. This book was well beyond my own ability, and it was nothing short of God’s amazing grace that enabled me to complete it. He has once again proven that “I can do all things through His anointing” (Phil 4:13).
Next, I want to say a big thank you to my beautiful wife, Donna. I can honestly say that I would not be who I am if it were not for what you have sown into my life. You are the embodiment of a Proverbs 31 wife. I am truly blessed to be able to share my life with you. Thank you for your loving support and for making life fun!
I am also very thankful for all the people at Apress who made this book possible and for all their hard work that turned it into the finished product you see now. Everyone at Apress has made writing this book a pleasure. Thank you!
■ ■ ■
Introduction
The primary activity of project managers is to keep track of information. Work items are completed, milestones are achieved, defects are reported, tests are passed . . . and the list goes on. More than simply capturing this information, project managers need to analyze this data and provide meaningful status reports. SharePoint is uniquely suited to this environment. As you’ll see throughout this book, SharePoint can be used as a repository for all of these project management artifacts. Using a
combination of web and Microsoft Office applications, you can provide easy access to enter, view, and report on your project data.
About This Book
This book is written for individuals who are tasked with providing a Project Management Information System (PMIS). You may be a project manager who realizes the need for a better system than e-mails and spreadsheets. Or you may be an IT/IS staff member asked to support the project management office (PMO). The exercises in this book will show you step by step how to utilize the features in SharePoint to build a custom solution that fits your specific needs. Each chapter will begin with an explanation of a project management activity. This will explain the purpose of the feature that will be implemented in the chapter. This will help the developer to understand the problem that is being solved and set the context for why the feature should be implemented. The rest of the chapter will then provide detailed
instructions for creating the described feature. Most of the projects that are presented here can be implemented by someone with minimal experience in SharePoint.
My approach to managing projects is based on practical application. I like ideas that work. Activities that add little value to the overall goal steal time and focus from those that are beneficial. Unfortunately, what works well in one environment may not be that effective in another. So flexibility is another key factor. Having a repertoire of management techniques will help you find the right one for any given situation. This book is intended to give you a few more tools to hang on your tool belt.
Prerequisites
This book assumes that you have Microsoft SharePoint Server 2010 installed. It also relies on Microsoft SharePoint Designer 2010, which is a free product that you can download from Microsoft. A couple of the chapters use Visual Studio 2010 to implement some advanced features. If you don’t have Visual Studio installed, you can still implement most of the projects in this book.
Some of the chapters assume you also have the Microsoft Office applications installed, including Word, Outlook, and Excel. Again, you can implement most of the features without these, but because the Office applications are so well integrated with SharePoint, they add a lot to the user experience.
Project Management Activities
This book is structured around the typical project management activities. Each chapter covers a specific project management task. The topics included are based primarily on my experience of managing many successful projects. This includes a variety of management styles and disciplines. Rather than attempt to dictate any particular approach, my motivation is to give you practical techniques so you can pick and choose, and then adapt to your specific needs.
This book is not intended to tell you how to manage a project. Instead, once you have decided how your projects should be managed, the material in this book will show you how to create a system that will help you do that more effectively. That being said, however, I think you’ll find that the examples presented here will give you some good ideas that you may want to try in addition to (or instead of) your existing activities. In each chapter I’ll also give you ideas for extending or adapting the implementation. Feel free to be creative. The best solution is one that fits the way you work.
Requirements
A good set of requirements is the starting point for successful projects. Part 1 of this book describes ways to capture and manage requirements. Typically, this task is performed by a business analyst, and there are various approaches to extracting a set of requirements. This book is focused on collecting the end result of this process. The chapters in this part show you how to use SharePoint to store the results of the requirement-gathering process.
Implementation
Part 2 of this book demonstrates techniques for managing the implementation phase of a project. The activities covered are based on the agile methodology. The topics covered include
• Capturing user stories
• Providing a project backlog (stack) • Scheduling iterations (sprints)
• Tracking work items including tasks, issues, and defects
While the terminology and some of the techniques are specific to the agile methodology, the sample implementations can be tailored to fit other development methodologies.
Testing
Part 3 of this book deals with the testing activities. It provides for storing specific test cases as well as general testing documentation such as test plans and information about testing tools and
configurations. In this part, you’ll also provide a mechanism for recording defects and tracking their resolution. Finally, various reporting features will be demonstrated for communicating testing progress and overall quality indicators.
Postproduction Phase
■ ■ ■
Requirements
Requirements are a key part of any project management system. They can feed many
other project management activities during the implementation, testing, and even
post-production phases. In this section, I’ll demonstrate some techniques for
collecting and managing requirements.
In Chapter 2, you’ll build a simple list for tracking requirements. Requirements
can be expressed in various ways, so this list will be somewhat generic and allow
attachments to provide details as appropriate. In Chapter 3, I’ll show you how you can
allow anyone to submit a requirement via mail. SharePoint stores these incoming
e-mails in a document library. You will also add a simple workflow to review and extract
the requirement details.
■ ■ ■
Collecting Requirements
In this chapter, you’ll create a simple list that will be used to track requirements. The remaining chapters in this section will add more capabilities to this list.
Defining Requirements
Requirements can be expressed in many forms. For example, use cases are used to effectively communicate processing rules for specific scenarios. Other requirements, such as system or legal constraints, will normally be described in other formats. Deliverables, such as report definitions, are usually best defined with a sample output provided by an image or Excel spreadsheet. Rather than trying to force all requirements into a common format, it will usually work better to design the requirements-tracking system to allow multiple formats.
One approach that is often used is to compile all requirements into a single document. However, this approach makes it difficult to track individual requirements. Each requirement should be as specific as practical and then mapped to implementation and testing plans. To account for this when a single document is used, often the paragraph number is used as the unique identifier for mapping purposes. This works well for the traditional waterfall approach where the requirements are fully documented before the implementation begins. For iterative techniques this quickly becomes unmanageable.
A SharePoint list is the ideal solution. Each item is uniquely identified and can be mapped to subsequent activities. Because a list can contain items of different types, a single requirements list can contain many different types of requirements. The approach used in this chapter is to create a simple list with columns that are common to all types. A single text field is used to store the requirement
description. When other formats are needed, such as a diagram or spreadsheet, these are provided as attachments.
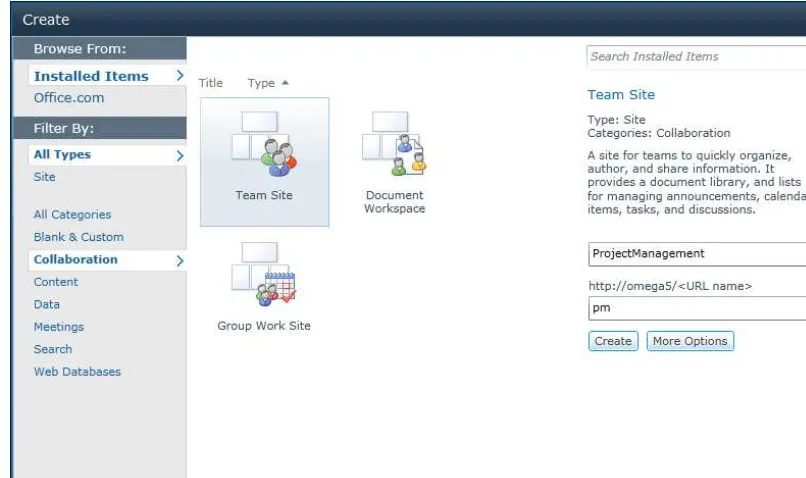
Creating a Project Management Site
Start by creating a SharePoint site. This site will be used for all of the projects in this book. Use the Team Site template, as shown in Figure 2-1. This will create some standard lists, such as Tasks, Calendar, and
Figure 2-1. Creating a new ProjectManagement site
You will create a Requirements list that will contain the following pieces of information: • Title: Very brief summary of the requirement
• Requirement type: The format of the requirement (use case, deliverable, etc.) • Functional area: The organizational entity requesting or primarily affected by this
requirement
• Priority: Initial assessment of the criticality of this requirement • Description: Text field that describes the requirement
Defining Functional Areas
Figure 2-2. Starting SharePoint Designer
Defining the Content Type
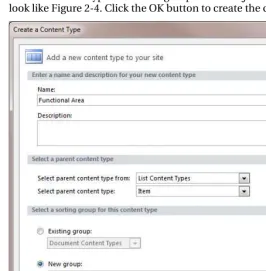
In SharePoint Designer, select the Content Types link from the Navigation pane, as shown in Figure 2-3.
Figure 2-3. Selecting the Content Types link
Area. Select Item for the parent content type, which can be found in the List Content Type group. Put the new content type into a new group called Project Management. The completed dialog box should look like Figure 2-4. Click the OK button to create the content type.
Figure 2-4. Creating a new content type
The Functional Area content type should now be in the content type list in the Project Management
group. Scroll to the bottom of the list and click the Functional Area link to display its properties. Then click the Edit content type columns link to modify the list of columns. The content type should have a single column, Title, which was inherited from the Item content type.
Add the following columns to this content type (these columns can be found in the existing site column collection):
• Manager's Name • E-Mail
Figure 2-5. Defining the Functional Area content type
Creating the Functional Areas List
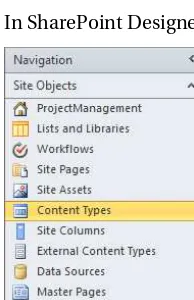
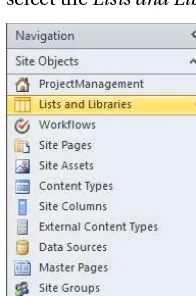
Now you’ll create a Functional Areas list that is based on this content type. In SharePoint Designer, select the Lists and Libraries link in the Navigation pane, as shown in Figure 2-6.
Figure 2-6. Selecting the Lists and Libraries page
In the Ribbon, click the Custom List button, as shown in Figure 2-7.
Figure 2-7. Clicking the Custom List button
Figure 2-8. Creating a new list
This list should now be included in the Lists and Libraries page. Click the Functional Areas link to edit this list. In the Settings section, select the check box to “Allow management of content types.” Also uncheck the box to “Display this list on the Quick Launch.” In the Content Types section, click the Add button and then select the Functional Area content type, which should be in the Project Management
group. Then delete the Item content type and make sure Functional Area is set as the default type. These two sections should look like Figure 2-9.
Figure 2-9. The Functional Area settings
■
Tip
It’s a good idea to adopt your naming convention early on. The most important thing to keep in mind is
consistency. It doesn’t matter so much what conventions you use as long as you use them everywhere. One
convention I use is to make the names of lists plural (e.g.,
Functional Areas). This is consistent with the
standard lists such as
Tasksand
Announcements. Content types, on the other hand, are singular, as they
represent a single object. You don’t have to follow this convention, however, and you can rename the standard
lists to match your naming preferences.
Populating the Functional Areas List
The Functional Areas list is not likely to be viewed or modified frequently so you unchecked the box to remove it from the Quick Launch. To display this list, click the Lists link in the Quick Launch menu. From the All Items page, click the Functional Areas link.
■
Tip
Notice that the list only displays the
Titlecolumn. When the list was created, it was based on the
Itemcontent type, so the view that was created only included the
Titlecolumn. This list is now based on the
Functional Area
content type, which includes two other columns. From the List ribbon, click the Modify View
button and add the
Manager's Nameand
E-Mailcolumns to the view.
Use the Add new item link to add several functional areas. When you’re done, the list should look like Figure 2-10.
Figure 2-10. Displaying the Functional Areas list
Defining the Requirements
Adding Custom Site Columns
You will need to create the following custom columns:
• Functional Area: A lookup column for the list you just created • Requirement Type: A choice field to specify the requirement format
• Requirement Description: A multiline text field for entering the requirement • Submitted By: The user who submitted the requirement
Functional Area
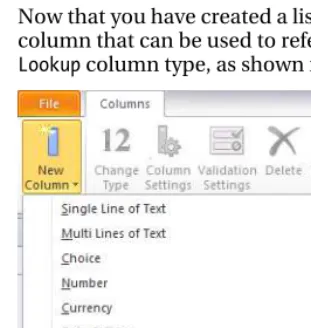
Now that you have created a list to store the dynamic collection of functional areas, you’ll create a column that can be used to reference it. Click the New Column button in the ribbon and select the
Lookup column type, as shown in Figure 2-11.
Figure 2-11. Choosing the column type
Figure 2-12. Creating a site column
In the Column Editor dialog box, shown in Figure 2-13, select the Functional Area list as the source for this column and choose the Title field as the one to be displayed for the value of this column. You can also select additional columns to be included. These will be automatically added to your list or content type when this column is added. You won’t need that for this column, so just leave them all unchecked.
■
Tip
I left the “Allow blank values?” check box selected. That will make this an optional column on the
Requirements
list. If this is an important piece of information in your requirements process, you might want to
make it required by unchecking this box. Also, you can select the “Allow multiple values?” check box, which will
allow multiple functional areas to this requirement. This could be useful depending on how you intend to use this
data.
Save this column definition by clicking the Save button in the title bar.
Requirement Type
Next, you’ll create a column to define the type of requirement (e.g., use case, legal constraint, or deliverable). This will use a Choice column type where the possible values are hard-coded in the column definition.
■
Note
Unlike functional areas, requirement types are more static, so defining a hard-coded list of allowed
values should be acceptable. Arguably, someone could devise new ways of expressing a requirement. However, it
is a relatively simple matter for a developer or power user to add a new option using SharePoint Designer.
Functional areas are designed so that an end-user can set up new areas themselves. These are the kinds of
trade-offs that you will need to make as you design your own system. Perhaps in your organization, though, functional
areas are static and a
Choicecolumn is sufficient.
Click the New Column button in the ribbon and select the Choice column type. Enter the name
Figure 2-14. Creating the Requirement Type column
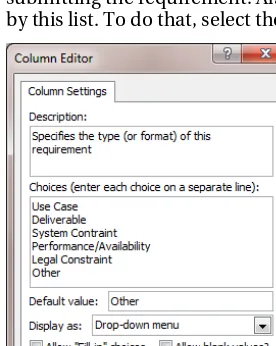
In the Column Editor dialog box, enter the possible values for this column. You can use the values shown in Figure 2-15 or enter types that are more suitable for your scenario. I added an Other type, set this as the default value, and made the column required (by leaving the “Allow blank values?” box unchecked). You could remove the default value, which will require the user to choose a type before submitting the requirement. Also, you have the option to allow the users to add other values not defined by this list. To do that, select the “Allow “fill-in” choices” check box.
Figure 2-15. Configuring the Requirement Type column
Additional Columns
• Requirement Description: Use the Multi Lines of Text column type. • Submitted By: Use the Person or Group column type.
For the Submitted By column, there are several ways to configure this in the Column Editor. You can choose to allow blank values and also to allow multiple values. You can limit this to individuals or also allow groups. You can also choose which user field is displayed in the column—such as the Account
(login), Name, or Work e-mail. A suggested configuration is shown in Figure 2-16.
Figure 2-16. Configuring the Submitted By column
Put these site columns in the same Project Management group to keep all your custom columns together. The list of custom columns should look like Figure 2-17.
Figure 2-17. The list of new column definitions
Defining the Content Type
Now you’re ready to create a Requirement content type, which is pretty easy once the columns are defined. Click the Content Type link in the Navigation pane. Then click the Content Type button in the ribbon. Enter the name Requirement and select Item as the parent content type. Put this in the same
Figure 2-18. Creating the Requirement content type
Select the Requirement content type, which will display the Content Type Settings page. Click the Edit content type columns link. There should be a single column named Title, which was inherited from the Item content type. Add the following columns to this content type:
• Requirement Type • Functional Area • Priority • Submitted By
■
Note
Some of these columns are standard columns shipped with SharePoint. You’ll need to find the group that
these columns are in. Within each group, the columns are listed in alphabetical order. You can also use the search
option provided by the Site Column Picker dialog box. Just start entering the column name in the search box, and
the list will show only matching columns.
The completed column list should look like Figure 2-19.
Figure 2-19. The completed column list
Creating the Requirements List
The last step is to create a new list based on the Requirement content type. You’ll do this the same way that you created the Functional Areas list. Select the Lists and Libraries link in the Navigation pane and then click the Custom List button in the ribbon. Enter the name Requirements, as shown in Figure 2-20.
Select the Requirements list to display the List Settings page. Select the “Allow management of content types” check box. Add the Requirement content type to this list, set this as the default content type, and then remove the Item content type.
Testing the Requirements List
Go to the SharePoint site and select the Requirements list. This list will be empty and will only include the
Title column.
Defining the All Items View
Just like with the Functional Areas list, you will need to add the desired columns to the view. From the List ribbon, click the Modify View button. Select the columns that you want displayed and specify the order they should appear on the page. The completed section should look like Figure 2-21.
Adding Requirements
Now your list is ready to use. Click the Add new item link to create a new requirement. The New Item form should look like Figure 2-22.
Figure 2-22. Entering a new requirement
Notice that the Functional Area drop-down list contains the areas that you added to the associated list. The Requirement Type defaulted to Other, but the other values were available in the drop-down list. After saving this form, the Requirements list should look like Figure 2-23.
Figure 2-23. The Requirements list with a new entry
Summary
In this chapter you created a Requirements list to store and manage requirements as they are identified. In the process, you also used several SharePoint techniques, including
• Defining new site columns using SharePoint Designer • Creating a Lookup column based on an associated list • Creating a Choice column using hard-coded values • Creating new content types using SharePoint Designer • Creating custom lists based on a content type
■ ■ ■
Processing Incoming E-mail
In this chapter you’ll provide a facility that allows individuals the ability to contribute to the requirement-gathering process by simply sending an e-mail.
Incoming E-mails
The requirements process often requires input from people outside your organization. They may not have access to your SharePoint site, or they may prefer to send an e-mail with their requirements instead of filling out a form. You may want to empower your end users to submit feedback, which can be helpful in planning a future release. You might need to accept unsolicited enhancement requests from your internal or external customers.
Understanding SharePoint’s E-mail Capability
You could allow these to accumulate in an inbox and periodically review them with Outlook talking an appropriate action. However, there is a better way to keep track of these. SharePoint provides a facility for handling incoming e-mails. This provides a convenient way to archive these e-mails and make them available to appropriate individuals.
In addition to lists, which you used in the previous chapter, SharePoint also provides document libraries. A document library is used to store documents such as pictures or spreadsheets. Anything that can be saved as a file can be stored in a document library. SharePoint also provides the infrastructure for controlling access to these libraries.
SharePoint allows you to enable a document library to accept incoming e-mails. As part of this configuration, you’ll assign an e-mail address to the document library. Once this is set up, the e-mails sent to that address, along with any attachments, are automatically added to the document library.
Configuring Incoming E-mail
In this chapter I’ll show you how to set up and use incoming e-mail support in SharePoint. The first step is to configure your SharePoint server to support incoming e-mails. There are two ways to do this, and they are referred to as automatic mode and advanced mode. In automatic mode, you will run the Simple Mail Transfer Protocol (SMTP) server on the SharePoint server. The SharePoint server communicates directly with the SMTP server. In advanced mode, the SMTP server can run at a different location. You must tell the SharePoint server the location of the drop folder in which the incoming e-mails will be placed. SharePoint checks this folder periodically and processes any new items that have been “dropped” there.
■
Note
The SMTP server provided with Windows Server implements simple file-based e-mail processing.
Incoming messages are stored as a file in a drop folder. It has no support for individual mail boxes. In an e-mail
address, the text after the @ symbol specifies the server that the message is sent to, and the text to the left of the
@ symbol specifies the mailbox on that server. The SMTP server ignores the mailbox information. All messages
sent to that server are placed in a single drop folder.
Using Automatic Mode
The easiest way to configure incoming e-mail is to simply install the SMTP server on the SharePoint server and configure SharePoint to use automatic mode.
■
Caution
The SMTP server can only be used on a server OS. If you are running SharePoint on a desktop OS
(Vista or Windows 7) you will need to use advanced mode. Also, if you are using a SharePoint farm, you must
install the SMTP server on each of the SharePoint servers in the farm.
Installing the SMTP Server Feature
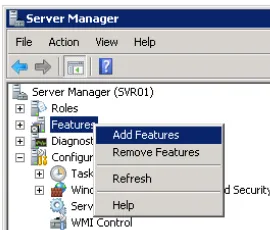
To install the SMTP server, run the Server Manager application, which can be found in the
Figure 3-1. Adding new features
In the Add Features Wizard, select the SMTP Server feature, as shown in Figure 3-2.
Figure 3-2. Selecting the SMTP Server feature
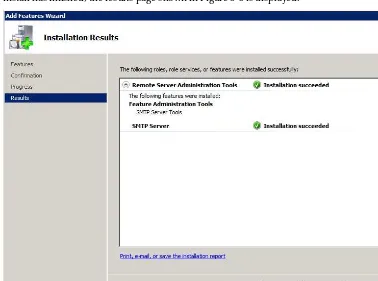
Click the Install button to begin the installation. The progress page will be displayed. When the install has finished, the results page shown in Figure 3-3 is displayed.
Figure 3-3. Results page showing a successful installation
Starting the SMTP Service
The SMTP server is implemented as a Windows service. For some reason, by default, this service is set up to be started manually. You can verify this by selecting the Services application from the Administrative Tools Start menu. Find the Simple Mail Transfer Protocol (SMTP) service and check its startup type. It is normally set to Manual, as shown in Figure 3-4.
Right-click this service and choose Properties. In the Properties dialog box, change the startup type to Automatic. After you have applied this change, click the Start button to start the service. In the future, the service should start by itself whenever the server is rebooted.
Configuring the SMTP Server
To configure the SMTP server, you’ll need to use version 6.0 of IIS Manager. This can be found in the Administrative Tools menu, as shown in Figure 3-5.
Figure 3-5. Starting IIS Manager (version 6)
A default domain is created for you based on the fully qualified Active Directory name for this server, as shown in Figure 3-6.
Figure 3-6. Showing the default e-mail domains
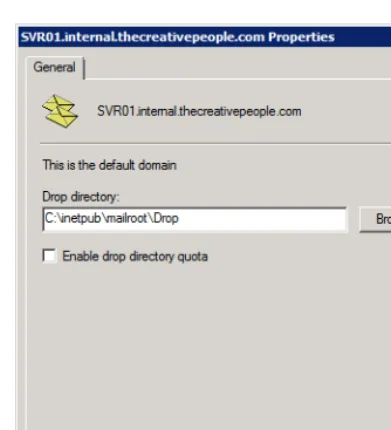
Figure 3-7. Setting the drop folder
By default, this will be in the C:\inetpub\mailroot\Drop folder. You can change this to a different location, but it must be on a local disk.
Configuring SharePoint
Launch the SharePoint 2010 Central Administration application, which you can find in the Start menu in the Microsoft SharePoint 2010 Products folder. From the System Settings page, click the Configure incoming e-mail settings link, as shown in Figure 3-8.
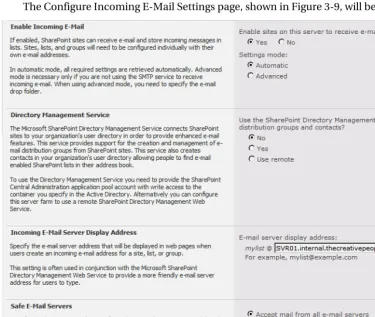
The Configure Incoming E-Mail Settings page, shown in Figure 3-9, will be displayed.
Figure 3-9. The Configure Incoming E-Mail Settings page with Automatic mode
Configuring SharePoint for automatic mode is really easy. Click the Yes radio button for the “Enable sites on this server to receive e-mail?” option. For the settings mode, choose Automatic. You can leave the rest of the values with their default settings.
Using Advanced Mode
■
Caution
SharePoint can be installed on a desktop OS such as Windows 7; however, this is not supported for
production environments.
You will need to have an SMTP server somewhere that will receive the incoming messages. One option is to install the Windows SMTP server on a different server on your network. You can follow the same instructions that were explained earlier. You might be able to configure your existing e-mail system to save the incoming messages to a drop folder in a compatible format.
In the Configure Incoming E-Mail Settings page, select advanced mode and then enter a path to the drop folder, as shown in Figure 3-10. Make sure that you set up the permissions to the drop folder so the SharePoint service account has full control.
■
Tip
To send an e-mail to SharePoint, the e-mail address will be
<list name>@<server name>. The server
name is the domain name specified when configuring the SMTP server. By default this is the fully qualified Active
Directory name for the server. In my example this is
SVR01.internal.thecreativepeople.com. This is probably
not an address that is reachable from outside your network. If you are using Microsoft Exchange or a similar
enterprise e-mail system, you should consider setting up an address on your e-mail system and configure this to
forward the e-mail to the SharePoint server.
Configuring an Incoming List
Now that SharePoint is configured to receive e-mails, you can create a list and set it up to receive incoming e-mails. Launch SharePoint and go to the ProjectManagement site that you set up in Chapter 2.
Creating the Incoming Requirements Document Library
From the Site Actions menu, select the More Options link, as shown in Figure 3-11.
Figure 3-11. Selecting the More Options link
Enabling Incoming E-Mails
Click the Library Settings button in the Library ribbon, as shown in Figure 3-12.
Figure 3-12. Selecting the library settings
The Document Library Settings page is shown in Figure 3-13.
Figure 3-13. The Incoming e-mail setting slink
Figure 3-14. Configuring incoming e-mails
To enable this list to receive e-mails, select the Yes radio button in the Incoming E-Mail section. You will also need to specify a unique e-mail address. The portion of the e-mail address to the right of the @ symbol is fixed and cannot be changed. This is the address of the SharePoint server (or an SMTP server that is receiving mail on behalf of this SharePoint server). This address was configured previously using the SharePoint 2010 Central Administration application. The SMTP server puts all e-mails into a single drop folder and ignores the portion of the e-mail address to the left of the @ symbol.
Figure 3-15. Error indicating that the address has already been used
Handling Attachments
The incoming e-mails can have attachments, and there are several options to control how these are handled. The first option is to include all attachments in the root folder. This will create a document in the list for each attachment. Figure 3-16 shows the library contents after two e-mails have been received.
Figure 3-16. The library contents with two incoming e-mails
The drawback of this approach is that the attachments are not linked together; they are each listed as individual documents. For this reason, it is generally preferred to group attachments into a folder. You can group these by subject or by sender. Grouping by subject is the most common approach. Figure 3-17 shows the contents of the library with subject grouping after the same two e-mails have been received. Notice that both items are folder objects.
Figure 3-17. The library contents with subject grouping
Figure 3-18. Displaying the folder contents
If another e-mail is received with the same subject, its attachments are stored in the same folder.
■
Caution
You cannot have two documents in the same folder with the same name. If a subsequent e-mail is
received that has the same subject as a previous e-mail, the attachments are “added” to the existing folder.
However, if a file with that name already exists, the existing file is overwritten
or
the new file is ignored, depending
on how the list is configured. The “Overwrite file with the same name?” radio buttons control this behavior.
The “Save original e-mail?” option is somewhat misleading. If this is set to Yes, the e-mail will be saved as a document in the library. If set to No, only the attachments are stored in the list, and the e-mail itself is ignored. If saved, the e-mail is stored as an EML file. Unfortunately, SharePoint does not have a built-in viewer for files of this type. If you select this document, a download dialog box will appear. To view the contents, save the file and then open it with Outlook.
You should think through how you expect people will use this feature to submit requirements and configure the incoming mails accordingly. For example, if the requirement will generally be in the e-mail itself and attachments rarely used, put all the documents in the root folder and make sure you choose to “save” the original e-mail. If the requirement is always specified in an attachment, you should put everything in the root folder and not save the e-mail. This is equivalent to uploading the
requirements document to the library. If you can’t rely on any consistency, your safest option is to group by subject, or perhaps sender.
■
Tip
If you need to customize the way incoming e-mails are handled, you can implement your own custom
event handler in Visual Studio. Override the
SPEmailEventReceiverclass to add your custom logic. Use other
classes in the SharePoint object model to add or update list items as necessary.
Adding a Workflow
Figure 3-19. Selecting the Workflow Settings button
Associating the Approval Workflow
This will display the existing workflows associated with this list. The Workflows page shown in Figure 3-20 indicates that there are no existing workflows.
Figure 3-20. The Workflows page showing no existing workflows
Figure 3-21. The completed association page
Select the Approval – SharePoint 2010 workflow. This workflow will create one or more tasks for someone to review and approve the document that the workflow is executed for. Enter the workflow name Review Requirement. You can use the default values for the task and history lists. The task list indicates the list that will contain the approval tasks that will be generated. The history list contains information about the execution of the workflow. Check the “Start this workflow when a new item is created” check box. This specifies that a workflow should be automatically started when a new item is added to the library. The completed form should look like Figure 3-21.
Click the Next button, which will display the workflow-specific page shown in Figure 3-22.
Figure 3-22. The workflow-specific association page
This workflow will create a task for each person that you have set up as a reviewer. In the Reviewers section, select a person or group that you want to review this requirement. If you select a group, the Expand Groups check box determines how the task should be assigned to the group. If Expand Groups is not selected, the task is assigned to the group, and anyone in the group can complete the task. If
selected, a task is created for each person in the group. This means that every person in the group must review the document. If multiple tasks are created, the Order drop-down specifies whether they are assigned serially (one at a time) or in parallel (the reviews may be performed concurrently).
You can specify a due date for these tasks, either as a specific date or based on a duration from the time the task is assigned. I set this up for a duration of two days, which means that each reviewer will have two days to complete the task from the time it is assigned to them. Keep in mind that if you are using the serial option, the overall duration for the review process is compounded.
In the Reviewers section, you can also create additional stages. This allows you to fine-tune the review process. For example, you can have one person or group perform an initial review followed by a subsequent group once the first stage has completed.
Testing the Workflow
The workflow is designed to start automatically when an item is added to the list. However, you can also start it manually. To start a workflow on an existing item, select the item in the list and then click the Workflow button in the Document ribbon. This will display the Workflows page shown in Figure 3-23.
Figure 3-23. The Workflows page
This page shows all the workflows that have been associated with this list. Currently only the Review Requirement workflow is available. The page also shows the status of any currently running or completed workflow instances. Click the Review Requirement link to start this workflow.
Completing the Initiation Form
This will display a form that looks like the workflow-specific association form. This is called the initiation page, and it is often very similar to the association page. The association page defines all the default values for the workflow parameters. When starting a workflow manually, the initiation form is displayed so you can adjust the parameters that are sent to the workflow for this instance.
■
Note
When a workflow is started automatically, the initiation form is not used, and the values from the
association form are used instead.
Figure 3-24. The Incoming Requirements library showing an In Progress workflow
Completing the Approval Task
The workflow should have created an approval task. Go to the Tasks list, and you should see a new item. Select this task, and the task form should look like Figure 3-25.
Figure 3-25. The approval task form
The top of this form states “This workflow task applies to New Requirement.” If you click the New Requirements link, the folder containing the e-mail and its attachments will be displayed. The reviewer can examine the submitted requirements and add a new item to the Requirements list. When finished, they will click the Approve button on the task form. They could also choose to reject this requirement by clicking the Reject button. If the requirement is approved, the task will be marked Complete and the
Summary
In this chapter you learned how to do the following:
• Create a document library that accepts incoming e-mails • Implement a simple document approval workflow
■ ■ ■
Managing Requirements
In this chapter you’ll enhance the Requirements list that you created in Chapter 2. First, you’ll implement a way to score each requirement. This will provide a quantitative approach for determining which requirements should be implemented first. Then you’ll add a feature to specify dependencies since some requirements will rely on other related requirements. With these enhancements you’ll be able to more easily plan the project and decide which requirements are in scope.
Analyzing Requirements
As you start gathering requirements, you could have hundreds, even thousands of them. So how do you decide which to work on first?
Prioritizing Requirements
You should devise a mechanism for scoring each requirement based on a set of factors that fit your environment. A factor is an estimate of the impact that implementing this requirement would have. Some examples are:
• Improved customer service • Time/money saved • Increased market share
These factors can be either positive or negative. A factor such as time/money saved is a positive one; the more time saved, the better. You can also use negative factors such as required development or risk. Requirements that take more effort to implement would lower their overall score. This approach allows you to identify the low-hanging fruit; the items that have a big impact with relatively little effort.
The first step in this process is to decide on what factors work for you. When evaluating a
weight. The most important positive factor should be given a 10 and all other factors should then be assigned a weight based on their relative importance.
■
Tip
If you use a scale with positive numbers only, such as 1 to 10, when computing an overall score, you’ll
need to remember to subtract the score for negative factors instead of adding them. Using negative numbers for
the relative weight may seem a bit confusing, but it simplifies the subsequent computation.
The next step is to score each requirement against these factors. Use a score of 1 to 10. Again, assign a 10 to the highest requirement and then score the remaining ones relative to that one. This can be difficult to do because you may not have all the requirements identified yet. You may want to define scale to use for each factor. For example, for the development-required factor, you can specify the score to use for each predefined range of person-days to implement. For other factors this may be less quantitative, but it is a good idea to define some type of criteria so the scoring is consistent for all requirements.
There are some requirements that are, well, required. These are essential, non-negotiable
requirements. These could be legal or operational constraints that are imposed on the project. Or they could be requirements that are so important that it would be pointless to implement the project without them. For these requirements, instead of scoring them, you’ll just need to identify them as required.
Requirement Dependencies
Requirements should be detailed and specific. They may start out rather general, but as the process evolves they will be broken down into smaller, more specific requirements. At that level, requirements tend to be interrelated. For example, one requirement may be to collect sales tax and another to report the sales tax collected on the income report. In order to report on sales tax, the system must first collect it. In this case, the second requirement is dependent on the first.
When planning your project, you’ll need to keep in mind how these requirements are related. A high-priority requirement may be dependent on a low-priority requirement. If the first is added to the project, the second must be also, even if it otherwise would fall below the cutoff line.
Another thing to be aware of is how breaking a requirement into smaller pieces can affect their individual scores. Take the sales tax scenario as an example. Collecting the tax may take a lot of effort and have little benefit, while the report may be easy and have more visibility. In this case, the first may get a low score and the second a much higher score. To compensate for this, you may want to score these together as a single requirement and give both the same score.
Adding Factors
Using the List Settings Page
Open the ProjectManagement site that you used with the previous chapters and select the Requirements
list. In the List ribbon, click the List Settings button, as shown in Figure 4-1.
Figure 4-1. Selecting the list settings
Scroll down to the Columns section and you’ll see the columns that are currently defined for this list. This section should look like Figure 4-2.
Figure 4-2. The Columns section of the Requirements list settings page
Adding a Factor
Figure 4-3. Specifying the Name and Type
Enter a name for this factor. I used Factor1, but you can choose a more meaningful name. For the type, select Number. Notice that the remainder of the page is updated based on your selection because each type has different options available. Enter the information in the Additional Columns Settings section, as shown in Figure 4-4.
Figure 4-4. The Additional Column Settings section
value and specify the default value of 0. You can define the minimum and maximum values allowed for this column. Also, you should specify the number of decimal places to be zero since you’re only working with whole numbers. If you click the “Add to all content types” check box, this column will also be added to the Requirement content type as well as the Requirements list. Click the OK button to add this column.
Adding Additional Factors
The List Settings page should be displayed, which will now include the new column. The columns are listed in alphabetical order, so the new column may not be at the end of the list. Repeat the following steps to add as many factors as you want:
1. Click the Create column link.
2. On the Create Column page, enter the name of the factor. 3. Specify the type as Number.
4. Enter a description for this factor (include scale information). 5. Require a value and set the default to 0.
6. Specify the minimum and maximum allowed values to 0 and 10, respectively.
7. Specify the number of decimal places as 0.
When you’re done, the Column section of the List Settings page should look like Figure 4-5.
Scoring a Requirement
Now that the factors have been added to the list, edit one of the existing requirements and specify the score for each factor. For each factor there should be a field that looks like Figure 4-6.
Figure 4-6. Entering a factor score
The description that you entered for this factor is displayed below the text box. You can place text here that will help the user enter consistent and accurate scores. The asterisk next to the factor name indicates that this is a required field.
■
Note
For new requirements, the score for each factor should default to 0. However, the default value logic is
only applied when the item is first created. Since this is an existing record, the factors are all blank, and the edit
form should require you to enter a value for each before you can save the record.
After entering a score for each factor, the requirement should look like Figure 4-7.
Figure 4-7. A newly scored requirement
Calculating the Overall Score
Now that you have scored the requirements using the defined factors, it would be very useful to compute an overall score based on relative weight of each of the factors. To do that, you’ll use a calculated
column.
The overall score is computed by multiplying the score for that factor by the relative weight assigned to the factor. These products are then summed to arrive at the overall score. The relative weights are fixed; they are the same for all requirements. The actual scores can be different for each requirement. For example, assume Factor1 has a relative weight of 10, Factor2 has a relative weight of 5, and Factor3
has a weight of –7. In this case Factor1 is twice as important as Factor2. Factor3 is somewhere between these but has a negative value because the higher the score, the less desirable this requirement is.
Adding a Calculated Column
The value of a Calculated column is determined by a formula that you specify. This formula can include other columns in the list, as well as many built-in functions.
From the List ribbon, click the List Setting button. In the List Settings page, click the Create column link just like you did to add the factors. For the column name, enter Overall Score and select the
Calculated column type. Enter the formula as follows:
=([Factor1]*5)+([Factor2]*7)+([Factor3]*10)+([Factor4]*-4)+([Factor5]*2)
This formula simply multiplies each factor score by the relative weight determined for that factor and then adds up the products. You may have different column names. Instead of these generic names, use the correct column names from your Requirements list. Also, the weights I used are just random numbers; you will need to use the weighted values that you determined for each factor.
■
Tip
To add a column to the formula, you can select the column from the list box to the right of the formula and
click the
Add to formula
link. When a column is used in a formula and the name contains spaces, it must be
enclosed by square brackets (i.e.,
[]).
Change the data type returned to Number and set the number of decimal places to 0. The completed form should look like Figure 4-8.
Click the Save button to add this column. Select the Requirements list and you should now see the
Overall Score column in the view.
■
Tip
For more information about formulas in a
Calculatedcolumn, go to
http://msdn.microsoft.com/en-us/library/bb862071.aspx. This page provides lots of examples of formulas that perform string manipulation,
mathematical and statistical functions, date comparisons and formatting, and conditional logic.
Modifying the View
The Overall Score should have been added to the default view. Now that you have this column, you probably don’t need the individual factor scores in the view. From the List ribbon, click the Modify View button, as shown in Figure 4-9.
Figure 4-9. Clicking the Modify View button
On the Edit View page, unselect the factor columns (Factor1, Factor2, etc., or whatever you named your columns). Make sure you leave Overall Score checked. Click the OK button to save your changes. The Requirements list should now look like Figure 4-10.
Figure 4-10. The default view with the overall score
Figure 4-11. The View form showing all factor scores
Supporting Non-Negotiable Requirements
Before you finish up this feature, you’ll add a flag to indicate that this is a required (or non-negotiable) requirement.
Adding the Required Flag
Figure 4-12. Creating the Required column
Modifying the Overall Score Formula
For required items, the score is not applicable. To avoid any confusion, it would be best to not display a score (even if the user enters values for one or more factors). To do that, modify the Overall Score
formula to return 0 if it has the Required flag. From the List Settings page, select the Overall Score
column. Modify the formula as follows:
=IF(Required,0,(Factor1*5)+(Factor2*7)+(Factor3*10)+(Factor4*-4)+(Factor5*2))
If the Required flag is set, the formula returns 0.
■
Note
The square brackets are not required if the column name does not have spaces. Notice that they have
been removed from the formula that you originally entered.
Sorting the View
The last step is to sort the list so that required and higher-scoring items are at the top. Go back to the
Required as the first sort column and select the “Show items in descending order” option. Then choose
Overall Score as the second sort column, and also use the descending-order option for this column. The completed section should look like Figure 4-13.
Figure 4-13. Specifying the sort criteria
The default view should now sort the requirements, putting the required items first and then sorting the remaining items based on their overall score. The view should look like Figure 4-14.
Figure 4-14. The sorted view
Supporting Dependencies
The next feature that you’ll implement is to provide the ability to define dependencies between individual requirements.
Adding a Lookup Column
You’ll now enhance the Requirements list to allow you to specify dependencies. You’ll do this using a multivalued Lookup column. From the List Settings page, click the Create column link. On the Create Column page, enter the name as Dependencies and select the Lookup column type.
Figure 4-15. Specifying the additional column settings
Click the Save button to create the new column.
Adding a Dependency
Go to the Requirements list, select one of the items, and edit it. The edit form should include the
Dependencies column, as shown in Figure 4-16.
Because the column supports multiple values, the edit form lists all the requirements (in alphabetical order) and provides an Add button to add an item to the Dependencies list. You can also select an existing dependency and use the Remove button to remove it from the Dependencies list.
Select one of the other requirements, click the Add button, and then save the form. The view will be displayed, and the selected requirement will be shown in the Dependencies list. The view should look like Figure 4-17.
Figure 4-17. The updated view showing the dependencies
Summary
In this chapter you provided a facility for scoring each requirement based on specific factors. The overall score was then calculated based on the weighted value of each factor. You also added a flag to indicate those requirements that are non-negotiable. Finally, the view was sorted to put higher-priority requirements at the top of the list. This allows you to easily see the more important requirements. You also implemented a feature for defining dependencies between individual requirements.
In this chapter, instead of using SharePoint Designer, you used the List Settings page in SharePoint to modify the Requirements list and the underlying Requirement content type. You used a Calculated