in
10 Minutes
Galaxy
Tab
™
Sams
Teach Yourself
James Floyd Kelly
Sams Teach Yourself Samsung Galaxy Tab™ in 10 Minutes
Copyright © 2011 by Pearson Education, Inc.
All rights reserved. No part of this book shall be reproduced, stored in a retrieval system, or transmitted by any means, elec-tronic, mechanical, photocopying, recording, or otherwise, without written permission from the publisher. No patent liability is assumed with respect to the use of the information contained herein.
ISBN-13: 978-0-672-33682-9 ISBN-10: 0-672-33682-0
Library of Congress Cataloging-in-Publication data is on file. Printed in the United States of America
First Printing: March 2011
Trademarks
All terms mentioned in this book that are known to be trademarks or service marks have been appropriately capitalized. Pearson cannot attest to the accuracy of this information. Use of a term in this book should not be regarded as affecting the validity of any trademark or service mark.
Warning and Disclaimer
Every effort has been made to make this book as complete and as accurate as possible, but no warranty or fitness is implied. The information provided is on an “as is” basis. The author and the publisher shall have neither liability nor responsibility to any per-son or entity with respect to any loss or damages arising from the information contained in this book.
Bulk Sales
Pearson offers excellent discounts on this book when ordered in quantity for bulk purchases or special sales. For more informa-tion, please contact
U.S. Corporate and Government Sales 1-800-382-3419
For sales outside of the U.S., please contact
Contents
Introduction ...ix
1 The Setup Wizard 1 Activate Your Galaxy Tab ...1
Connecting to a Network and Google Account ...4
Synchronizing with Your Google Account ...11
Synchronizing with Other Services ...13
Summary ...17
2 Configuration and Notifications 19 Modifying Galaxy Tab Settings ...19
Customizing Notifications ...25
Customizing Home Pages ...27
Summary ...36
3 Taking Photos and Video 37 The Camera App ...37
Summary ...48
4 Web Browsing and Email 49 Browsing the Web ...49
Using Other Email Services ...58
Summary ...63
5 Exploring with GPS 65 Getting Started with Navigation ...65
Having Fun with Places ...76
Summary ...78
6 Using the Gallery 79 Accessing the Gallery ...79
Viewing a Photo or Video...83
Manipulating Your Photos and Videos...84
Editing Photos ...85
Working with Video ...88
7 Shop the Android Market 91
The Android Market...91
Examining an App ...95
Downloading a Free App ...96
Purchasing an App ...99
Uninstalling Apps ...101
Summary ...106
8 Making Phone Calls 107 Getting Started with Skype ...107
Configure Your Skype Account ...110
Making a Call ...114
Instant Messaging ...117
Summary ...119
9 Read Books, Listen to Music, and Watch Videos 121 Reading a Book ...121
Listening to Music ...125
Watching Videos ...129
Summary ...133
10 Helpful Tips and Useful App Suggestions 135 Monitoring Battery Life ...135
Checking for Updates ...135
Learning to Use the Keyboard ...136
Using the Task Manager ...137
Using Online Help ...138
Connecting to a Windows PC ...139
Interesting Apps ...142
Summary ...149
Index 151
About the Author
James Floyd Kelly received an English degree from the University of West Florida and an industrial engineering degree from Florida State University, and has enjoyed using the skills and knowledge from both in various jobs over the years.
He is the author of numerous books, including books on building a CNC machine, building and programming LEGO robotics, and using open source software.
He currently lives with his wife and two sons in Atlanta, Georgia.
Dedication
For Ashley. Thank you for nonstop encouragement and support.
Acknowledgments
I enjoyed writing this book, and my Pearson team made it that much more enjoyable. Special thanks to Laura Norman, for giving me a chance to write for Pearson and having much patience as I learned the ins and outs of the Pearson writing process and special software.
The rest of my team, whose names you can find a few pages back, were so helpful in getting this book done, and I’m indebted to Romny and Seth for helping pull it all together.
A special thank you to my tech editor and good friend, David Levy, who agreed to purchase a Galaxy Tab and help me out as my tech editor. His error-catching and suggestions for improving the book were invaluable.
Finally, I want to thank Yvonne Hargrove, for her persistence in helping me procure my Galaxy Tab, and Maris Whetstone, for some technical assistance and testing along the way.
We Want to Hear from You
As the reader of this book, you are our most important critic and com-mentator. We value your opinion and want to know what we’re doing right, what we could do better, what areas you’d like to see us publish in, and any other words of wisdom you’re willing to pass our way.
You can email or write me directly to let me know what you did or didn’t like about this book—as well as what we can do to make our books stronger.
Please note that I cannot help you with technical problems related to the topic of this book, and that due to the high volume of mail I receive, I might not be able to reply to every message.
When you write, please be sure to include this book’s title and author, as well as your name and contact information. I will carefully review your comments and share them with the author and editors who worked on the book.
Visit our website and register this book at informit.com/register for conve-nient access to any updates, downloads, or errata that might be available for this book.
Introduction
The Galaxy Tab hit the market with a bang! It’s the first 7-inch tablet to become available with the Android operating system (and a 10-inch ver-sion is just on the horizon), a popular open source OS that is extremely versatile, stable, and feature packed. Add in the ability for third-party soft-ware developers to create new programs (called apps) for consumers, and the Galaxy Tab offers users a wide range of services, games, and capabili-ties in a portable and lightweight package.
Now, tablet computing is certainly not new—they started appearing in the mid-’90s and typically weighed as much as a laptop! The first attempt at tablets were nothing more than stripped-down laptops with hardware that really wasn’t up to the task of running bloated operating systems and gargantuan programs that took forever to open and use. Tablets appeared and disappeared as consumers made their frustrations known, and sales plummeted.
Jump forward a decade and the day of the tablet has come again... but this time the technology appears to have matured. The Galaxy Tab is one of the newest tablets to hit the market, and it brings with it numerous hardware and software features that are sure to impress consumers—and maybe impress you. Whether you already own a Galaxy Tab or are considering purchasing one, this book provides you with information about the device’s features and capabilities.
This book is all about getting a Galaxy Tab owner up to speed on using the Galaxy Tab and its most popular features. Lessons are short and quick— readers can get through a lesson in fewer than 10 minutes and then imme-diately put that new knowledge to work with a Galaxy Tab. The 10 lessons I cover in this book are as follows:
. Set up your Galaxy Tab using the Setup Wizard
. Customize your Galaxy Tab using the Settings tool
x :Introduction
. Browse the Internet and check email
. Navigate using GPS
. View photos and videos using the Gallery app
. Use the Android Market
. Video chat with the WebCam
. Take advantage of multimedia with eReader, Music, and YouTube
. Use custom apps and special features
Along with each lesson, I also provide tips and advice related to that les-son: shortcuts, faster methods, app recommendations, and more.
Who Is This Book For?
This book is for you if. You are a new Galaxy Tab owner.
. You are considering purchasing a Galaxy Tab.
. You want more information on the built-in features of the Galaxy Tab.
. You’re unfamiliar with how a particular app or hardware feature works.
xi Screen Captures and Differences
Conventions Used in This Book
I provide additional material in each lesson that might be useful to some Galaxy Tab users but not everyone. This new information is provided in the form of boxes, as described here:NOTE:A note presents interesting pieces of information related to the surrounding discussion.
TIP:A tip offers advice or teaches an easier way to do something.
CAUTION:A caution advises you about potential problems and helps you steer clear of disaster.
Screen Captures and Differences
Most of the figures in this book were taken directly from the Galaxy Tab using its built-in screen-capture capability. However, there might be differ-ences in what you see in a figure and what you see on your Galaxy Tab screen. The Galaxy Tab is sold by numerous retailers, including electronics stores and mobile phone companies. I purchased my Galaxy Tab, for example, from Verizon Wireless.xii :Introduction
LESSON 1
The Setup Wizard
In this lesson, you learn how to use the Setup Wizard to configure many of the services and apps that you’ll use with your Galaxy Tab. You also learn how to create a Google user account that is required for many services used on the Galaxy Tab.
Activate Your Galaxy Tab
The first time you turn on the Galaxy Tab, you are greeted with a screen that’s locked. This is the default setting—if no action is taken within a few seconds, the device goes into Sleep mode and the screen turns off. To unlock the Galaxy Tab, put your finger on the Unlockbutton shown in Figure 1.1. Notice also in Figure 1.1 that the Galaxy Tab’s control buttons (Menu, Home, Return, and Search) are also indicated.
The Unlock button: Tap and drag to the right.
2 LESSON 1:The Setup Wizard
FIGURE 1.2 Choose a language for your Galaxy Tab.
In some instances, the carrier from which you purchased your Galaxy Tab might have already configured the language setting. If this is the case, feel free to jump ahead to Lesson 2, “Configuration and Notifications,” or con-tinue reading if you think there might be some settings that you want to change.
After selecting your language, you need to activate the Galaxy Tab. You see an alert screen such as the one in Figure 1.3. Tap the Activatebutton to begin the activation process.
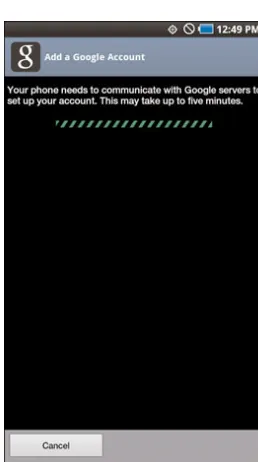
As the activation process continues, you see a message like the one in Figure 1.4 that tells you the operating system is being set up. Be patient— this takes only a minute or so to complete.
You are next led through the Setup Wizard, which helps you configure var-ious settings for your Galaxy Tab.
3 Activate Your Galaxy Tab
FIGURE 1.3 Your Galaxy Tab must be activated before it can run.
4 LESSON 1:The Setup Wizard
FIGURE 1.5 You must have a Google account before you can continue.
Connecting to a Network and
Google Account
After your Galaxy Tab has activated, you are presented with a screen like the one in Figure 1.5. A Google user account is required for many of the Galaxy Tab features, including synchronization of your Gmail contacts and Google Calendar events.
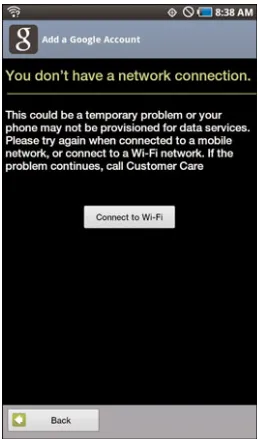
At this point, either a Wi-Fi or 3G data connection must be made. If your Galaxy Tab is not connected (and it shouldn’t be when you first activate) and a Wi-Fi network is not found or a 3G data connection has not been automatically made, a screen like the one shown in Figure 1.6 might pop up, asking you to connect to a Wi-Fi connection (with a password) or to enable 3G data connectivity. If you don’t see this screen, your Galaxy Tab was able to make a Wi-Fi connection without a password. (This might occur at a Wi-Fi hotspot that does not require authentication.)
5 Connecting to a Network and Google Account
FIGURE 1.6 Wi-Fi or 3G data connectivity must be established.
6 LESSON 1:The Setup Wizard
If you are able to make a Wi-Fi or 3G data connection, the Setup Wizard continues by asking whether you already have a Google user account. If you do, tap the Sign Inbutton as shown in Figure 1.9. Otherwise, tap the Createbutton.
NOTE:No Wi-Fi Networks Found
Another option is to enable a connection with your mobile network. Because the instructions for doing this vary from carrier to carrier, contact your mobile carrier for details.
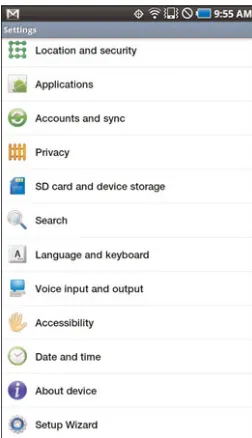
If your Galaxy Tab does not detect any Wi-Fi networks or you do not have the password to successfully connect to a Wi-Fi network, you need to stop and continue the Setup Wizard at a later time. You can cancel the Setup Wizard and run it later by tapping the Homebutton on the Galaxy Tab. Run the Setup Wizard again later by tapping the Menubutton, selecting theSettingsoption, and then scrolling down the page and selecting the Setup Wizard, as shown in Figure 1.8.
7 Connecting to a Network and Google Account
If you tap the Sign Inbutton, you see a screen like the one in Figure 1.10. Simply enter in your Google username and password and tap the Sign In button. Tap the Backbutton to cancel the action and return to the previous screen.
If you click the Createbutton, you are guided through a short process to create a Google account. The first screen you see looks like Figure 1.11 and asks you to provide some basic details.
Tap the Nextbutton and provide a password, as shown in Figure 1.12, and then tap the Nextbutton again.
8 LESSON 1:The Setup Wizard
FIGURE 1.10 Log in to an existing Google account.
9 Connecting to a Network and Google Account
FIGURE 1.12 Give your Google account a strong password.
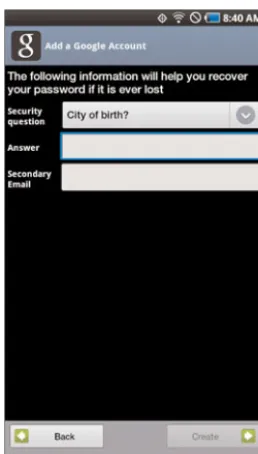
Now provide an answer to a security question (click the drop-down menu to choose from a variety of questions) and tap the Createbutton, as shown in Figure 1.13.
Next, read over the Google terms of service and tap the I Agree, Next but-ton to accept the terms, as shown in Figure 1.14. (If you don’t accept the terms, you cannot create a Google account and cannot use many Google services on your Galaxy Tab.)
10 LESSON 1:The Setup Wizard
FIGURE 1.13 Answer a security question to finish the account-creation process.
11 Synchronizing with Your Google Account
FIGURE 1.15 Prove you’re human by entering some text.
Synchronizing with Your Google
Account
After you create your Google account, the Galaxy Tab next offers you the ability to synchronize your Google account, synchronizing your contacts, Calendar, and email (for your Gmail account that is automatically created for you when you create a Google user account) to the Galaxy Tab. Figure 1.16 shows the screen that enables you to do this. Tap the Nextbutton to perform the synchronization (recommended) or uncheck the box at the bottom to disable the synchronization process.
12 LESSON 1:The Setup Wizard
FIGURE 1.16 Syncing your data is recommended.
13 Synchronizing with Other Services
A confirmation screen appears, as shown in Figure 1.18, to let you know that your Google account has now been synced with the Galaxy Tab— from now on, you are able to access phone numbers, email addresses, and other contact information on your Galaxy Tab, even if a Wi-Fi or 3G data connection isn’t present. Click the Finish Setupbutton to complete the account-creation and synchronization process.
FIGURE 1.18 You’re told when the synchronization is completed.
Synchronizing with Other
Services
The next screen you see looks like Figure 1.19. From this screen, you can configure other services such as Facebook, Yahoo! email, Twitter, and more.
14 LESSON 1:The Setup Wizard
FIGURE 1.19 More services can be
added and synced with your Galaxy Tab.
For example, following is an example of how to add a Facebook account to the Galaxy Tab. Just tap the Facebookicon in Figure 1.19 and you see a screen like the one shown in Figure 1.20.
After entering your username and password, tap the Log Inbutton and specify how often Facebook data on the Galaxy Tab should be synchro-nized with your real Facebook account (see Figure 1.21).
After selecting a time period for synchronization, tap the Nextbutton. You have the option to choose what information on Facebook is synchronized, as shown in Figure 1.22. Leave all the boxes checked to sync your Facebook friends’ updates and pictures, sync your friends’ contact infor-mation, and sync calendar information. Uncheck a box to disable the syn-chronization of that information.
NOTE:The Facebook App
15 Synchronizing with Other Services
FIGURE 1.20 Adding a Facebook account to the Galaxy Tab.
Tap the Donebutton and... you’re done! You can now view your Facebook contacts on your Galaxy Tab (using the Contacts app), even when a Wi-Fi or 3G connection isn’t available. (If you want to view your actual Facebook page or your friends’ pages, you need to install a Facebook app. See Lesson 7 for coverage of finding, downloading, and installing apps.)
16 LESSON 1:The Setup Wizard
FIGURE 1.22 Select items to synchronize from the Facebook account.
TIP:Configuring More Services
17 Summary
Summary
LESSON 2
Configuration and
Notifications
In this lesson, you learn about the three ways to customize your Galaxy Tab, including configuring settings and notifications and customizing your screens.
Modifying Galaxy Tab Settings
The Settings tool contains the largest assortment of configuration options for your Galaxy Tab. Although you’re unlikely to ever change many of these settings (such as the Language), you might find yourself modifying any number of them from time to time. I cannot cover every option in the Settings tool, but I show you how to access it and cover some of the set-tings that you are likely to need to change periodically.First, you need to locate the Settings tool. To do this, you need to be view-ing a home page, as shown in Figure 2.1. You swipe your fview-inger left or right to view the various home pages, but you can access the Settings tool from any home page. Press the Home key, even if you are running an app, and you’ll be taken to the home page.
20 LESSON 2:Configuration and Notifications
FIGURE 2.2 The Menu button offers six different options.
21 Modifying Galaxy Tab Settings
Tap the Settingsoption and the Settings tool appears, as shown in Figure 2.3. The Settings tool scrolls up and down the screen, so use your finger to swipe the screen and scroll down to view all the options. In Figure 2.3, only 12 options are visible, but 3 more options are available in the Settings tool below the Accessibility option: Date and Time, About Device, and Setup Wizard.
FIGURE 2.3 The Settings tool offers 15 options for configuration.
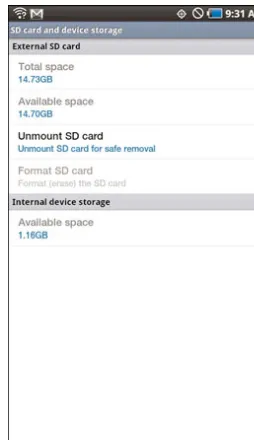
To select an option from the Settings tool, simply tap one of the options with your finger, and you then are taken to a more detailed screen where you can customize the selected option on your Galaxy Tab. Figure 2.4, for example, shows the options available after the SD Card and Device Storage option is selected.
22 LESSON 2:Configuration and Notifications
Now let’s look at a few of the other Settings tools and see how they work. Tap theSound Settingsoption, and you see a screen like the one in Figure 2.5.
If a box is grayed out (such as Silent mode in Figure 2.5), you can simply touch the box, and a green check mark appears in the box to indicate that feature is enabled. A right-pointing arrow such as the one shown to the right of the Vibrate selection tells you that there are multiple choices from which you can select. Tap the arrow and you can select an option from a pop-up window. Figure 2.6 shows the pop-up window that opens after you tap the Vibrateoption.
Select an option (such as Always) or tap the Cancelbutton to leave the current configuration alone. Refer to Figure 2.5 to see that most setting options have a bit of text below the name of the option to let you know what the settings do. Audible Selection, for example, has the following description: Play sound when making screen selection. Remember that you can always undo a selection if you find that a configuration is annoying or doesn’t work as you desire.
23 Modifying Galaxy Tab Settings
FIGURE 2.5 Configure sound settings such as Silent mode or Vibrate.
24 LESSON 2:Configuration and Notifications
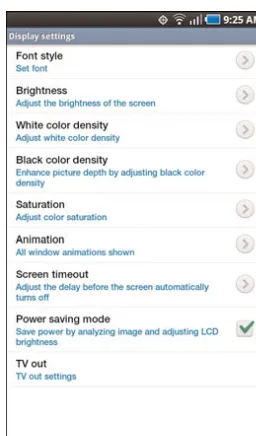
Let’s next look at the display settings shown in Figure 2.7. From here, you can control the screen’s brightness, the font used for all display text, and color tweaks such as white and black color density and saturation.
FIGURE 2.7 Use display settings to tweak the LCD screen on your Galaxy
Tab.
Two important settings that I want to point out in Figure 2.7 are the Power Saving Mode and the Screen Timeout. Click the Screen Timeoutarrow to see the options shown in Figure 2.8. It gets a bit annoying to have the screen shut off after 15 or 30 seconds, so you might find setting it to 2, 10, or 30 minutes works best for you. More battery power is consumed while the LCD screen is lit, even if you’re not using the Galaxy Tab, so the 1-hour selection is probably not a good choice for saving power.
25 Customizing Notifications
FIGURE 2.8 The Screen Timeout has seven options available.
There are 12 more Settings selections that you can experiment with, including wireless and network settings, privacy controls, and date and time configurations. I encourage you to go through each of the options available to see what settings can be turned on and off and what settings have options that can make using your Galaxy Tab more enjoyable and more efficient (for power and for ease of use).
Customizing Notifications
In addition to the Settings tool, your Galaxy Tab offers another way for you to customize your device: the Notifications tool. Refer to Figure 2.2 to see that the Notifications selection is on the pop-up menu that appears when you tap the Menu button. Tap Notificationsto see a screen similar to the one shown in Figure 2.9.
26 LESSON 2:Configuration and Notifications
control; you drag the bar left or right to increase or decrease the brightness level on the screen. You can also place a check in the Auto box to allow the Galaxy Tab to adjust the brightness based on the light level it detects at your current location.
FIGURE 2.9 The Notifications tool offers more customization.
Tapping any of these buttons toggles the associated service on or off. For example, when you want to use the built-in GPS, you can turn it on here by tapping it once; the button turns green. Because GPS (and the Bluetooth and Wi-Fi services) consumes more battery power when it’s turned on, this is a useful way to disable a service and save power when you don’t need to have a service running.
27 Customizing Home Pages
TIP:Open and Close Notifications from the Status Bar Along the top of the Galaxy Tab, the status bar displays the date, time, battery strength, and other notifications. Another method for opening Notifications is to hold your finger on the status bar and drag it to the bottom of the screen. To close it, just tap at the bot-tom of the Notification window and drag it up to the top of the screen.
FIGURE 2.10 Emails, reminders, and other alerts will appear here.
Customizing Home Pages
Another suggestion for customizing your Galaxy Tab is to modify your home pages to display those apps that you use the most and remove apps that you don’t find useful. You can also modify your home page’s wallpa-per to display a photo or other image stored on your device.
28 LESSON 2:Configuration and Notifications
Let’s first change the background wallpaper. Tap the Menubutton and selectWallpaper. Figure 2.12 shows the window that appears, enabling you to browse your Gallery (for photos), a set of animated wallpapers (called Live Wallpaper), or a handful of static wallpapers provided by your carrier.
I cover using your Gallery in Lesson 6, “Using the Gallery,” but for now let’s change the background to a Live Wallpaper. Tap Live Wallpapersto see a screen like the one in Figure 2.13.
ALERT:Animation and the Battery
Believe it or not, the small bit of animation in the Live Wallpapers does affect battery power. Because the screen is constantly having to refresh to create the animation, you experience a slight increase in battery drain.
29 Customizing Home Pages
FIGURE 2.12 Three options are available for wallpaper.
30 LESSON 2:Configuration and Notifications
If you choose to use the Wallpaper Galleryoption, scroll through the pro-vided high-resolution images to preview them at the top of the screen and tap the Set Wallpaperbutton to apply your selection.
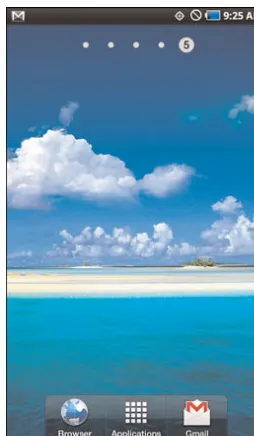
Figure 2.14 shows a new wallpaper that I’ve applied. In this figure, I’ve also clicked the Menu button to pull up the six options to show you how easy it is to customize the home page that appears by default and the apps that appear on these home pages. Note that in Figure 2.14 I’m starting with a clean screen (the three shortcut icons at the bottom and obscured by the Menu pop-up window).
FIGURE 2.14 A new wallpaper and preparing to add some apps.
See the Edit button in Figure 2.14? Tap it and you see a screen like the one in Figure 2.15 that shows you all your customizable home pages and enables you to set one as the default Home screen that appears when you turn on your Galaxy Tab or click the Homebutton.
31 Customizing Home Pages
the top of the screen to jump to one. A number is displayed at the top of the screen to indicate which home screen is selected. Figure 2.16 shows that I’ve added two home screens (for a total of six) and that I’m currently viewing home screen number five.
FIGURE 2.15 View all available screens and select a home screen.
Now let me show you how to customize a home screen. I’ve already selected home screen 5 (see Figure 2.16) so now I want to add some app shortcuts and a few other items. I have two ways to do this: I can press the Menubutton and then select the Addoption, or I can hold my finger down for 2 seconds on any empty area of the screen. Either method pulls up a window like the one in Figure 2.17.
32 LESSON 2:Configuration and Notifications
FIGURE 2.16 You can have up to nine home screens.
33 Customizing Home Pages
FIGURE 2.18 Adding various widgets to your home screens.
A widget is an interactive app that sits on the home screen. It can display information (such as stocks you want to follow or the current weather in your area) and it can also accept requests such as Google search terms or app searches in the Android Market (see Lesson 7, “Shop the Android Market”). To place a widget on the screen, just click a widget in the list and it appears on the current home screen. Figure 2.19 shows that I’ve selected the Google search toolbar. (Tap and hold a widget to drag it around the screen—remove your finger to drop it and lock it in place).
Figure 2.20 shows that I’ve added a shortcut to the Wi-Fi settings option and a folder that gains me access to all my contacts.
34 LESSON 2:Configuration and Notifications
FIGURE 2.19 Drop a widget on the screen and drag it into place.
Finally, if you’ve added a widget, shortcut, or folder that you want to remove from a home screen, tap and hold the item until the Remove box appears in the lower part of the screen, as shown in Figure 2.22.
While continuing to hold down on the item, drag it to the Remove box and lift your finger. The item is removed from the home screen.
35 Customizing Home Pages
FIGURE 2.21 Select a shortcut to add to a home screen.
TIP:Removing Is Not Deleting
36 LESSON 2:Configuration and Notifications
Summary
In this lesson, you learned how to customize your Galaxy Tab’s screen by adding widgets, shortcuts, and other items. You also learned how to config-ure notifications such as email and reminder alerts. Finally, you learned how to use the Settings tool to configure dozens of settings such as dis-play, sound, and Wi-Fi connectivity.
LESSON 3
Taking Photos and Video
In this lesson, you learn how to take photos and video with the Galaxy Tab and how to view, edit, save, and delete these files.
The Camera App
To take photos or videos with the Galaxy Tab, you use the Camera app that comes with your device. This app might be located on one of your home pages, or it might be located in the Applications section, or both. Figure 3.1 shows my Camera app on the first Applications page in the upper-right corner of the screen.
38 LESSON 3:Taking Photos and Video
NOTE:Camera Settings Can Be Tricky
This chapter does not cover camera topics such as ISO settings, exposure, white balance, and other technical considerations that must be made when taking photos. If you need assistance with configuring the camera for taking the best photos, consult a begin-ner’s guide on photography or visit http://en.wikipedia.org/wiki/ Photography for more information.
It’s simple to use: Just touch the app with your finger, and you see the Camera’s user interface, as shown in Figure 3.2.
The viewscreen is in the center of the screen, with camera options running down the left side of the screen (more on those shortly) and camera con-trols on the right side.
Taking a Photo
To take a photo, hold your Galaxy Tab up and use the viewscreen to find your subject. When you’re ready to take the picture, simply tap the
Shutter Button
39 The Camera App
Shutterbutton (see Figure 3.2), and the sound of a camera shutter con-firms the photo has been taken.
A small thumbnail displays in the lower-right corner of the viewscreen showing a tiny image of your newest photo. Tap your finger on the photo to have access to five options: Share, Set As, Delete, Zoom, and View Next Photo. The following sections describe how these five options work. (If the options disappear, just tap on the displayed image again to make the options reappear.)
Delete
Tapping the Deleteoption presents you with a confirmation window, as shown in Figure 3.3. Tap the OKbutton to delete the photo, or tap the Cancelbutton to keep the photo.
Zoom
Use the Zoom InandZoom Outbuttons in the upper-right corner of the screen to enlarge and shrink the photo. Figure 3.4 shows the photo from Figure 3.3 enlarged. You can also use the pinch technique to enlarge and shrink an image. To enlarge, put your thumb and pointer finger together, touch the image, and then move the thumb and pointer finger apart.
40 LESSON 3:Taking Photos and Video
FIGURE 3.5 You can share your digital photos via email or other apps.
FIGURE 3.4 Enlarge or shrink a photo using the Zoom In and Zoom Out options.
Likewise, to shrink an image, touch the image with the thumb and pointer finger (separated) and pinch them together.
Share
41 The Camera App
FIGURE 3.6 Use your Email app to send the photo to a contact. instant messaging, or any other service/app you have installed on your Galaxy Tab that supports sending digital files. If you have multiple apps that can send files, scroll down the page to view all your options.
For example, selecting Emailopens your Email app, enabling you to send the photo along with a message and subject, as shown in Figure 3.6.
Set As
Selecting the Set Asoption enables you to use the digital photo as either the wallpaper for your Galaxy Tab or as the icon for one of your contacts, as shown in Figure 3.7.
If you select theContactoption, you can then scroll down the list of your contacts and assign the photo as a contact icon. This option works best when you’ve taken a digital photo with your Galaxy Tab of the contact and can immediately assign it to that person’s information in your Contacts app.
42 LESSON 3:Taking Photos and Video
FIGURE 3.7 A photo can be used as a contact icon or as wallpaper.
by touching inside its border and dragging it to a desired location, as shown in Figure 3.8. Tap the Savebutton to keep your edits and use the image as the wallpaper or tap the Discardbutton to cancel the action.
43 The Camera App
View Next Photo
If you’ve taken numerous photos with the Camera app, you can use the View Next Photobuttons on either side of the photo (see Figure 3.9) to sort through them (and apply any options previously described).
To return to Camera mode, you must relaunch the Camera app from within the Applications group.
Camera Settings
Along the left side of the viewscreen, five icons represent different camera settings you can change, as shown in Figure 3.10. From top to bottom, they are Shooting Mode, Scene Mode, Flash, Exposure, and Settings.
For the Shooting mode, you can select to take a single shot, a set of con-tinuous photos, a panoramic shot, a close-up smile shot, or a self-portrait. Tap the Shooting Modeicon shown in Figure 3.11 and select the option you want to use for Shooting mode.
Tap the Scene Modeicon (SCN), as shown in Figure 3.12, and you can choose from Portrait, Landscape, Night, and Sports options.
44 LESSON 3:Taking Photos and Video
Camera Setting Options
FIGURE 3.10 Camera settings can be changed to modify your photos.
FIGURE 3.11 The Shooting mode offers a variety of photo types.
45 The Camera App
FIGURE 3.12 The Scene mode is useful for specifying the conditions under which photos are taken (inside, outside, nighttime, or fast-moving subjects).
You can tweak the exposure of the camera by sliding the control shown in Figure 3.14 up and down. You have to experiment with this setting to determine the best exposure for your environment and subject.
46 LESSON 3:Taking Photos and Video
Tapping the Settingsicon pulls up a window like the one shown in Figure 3.15. You can change the resolution of photos, change from color to black and white (with the Effects option), change the ISO setting, and more from the Image tab. The Setup tab enables you to tweak items such as the shut-ter sound you hear when taking a photo, GPS coordinates embedded in the photos, and whether you want to review each photo after it is taken. After making your selections, tap the Returnbutton on the Galaxy Tab to return to the Camera app’s interface to take another photo.
FIGURE 3.14 The Camera app enables you to modify the exposure setting.
47 The Camera App
Taking a Video
Taking a video is even simpler than taking a photo. You use the Camera app, but you first need to flip the Camera app to Video mode. To do this, tap the button indicated in Figure 3.16. This button toggles the Camera app between Photo and Video mode. After switching to Video mode, simply tap the Recordbutton also indicated in Figure 3.16. Tap the Record but-ton again to stop recording.
Video is stored in the Gallery app (see Lesson 6, “Using the Gallery,” for more details) on your Galaxy Tab for later viewing. All the same editing features (Share, Delete, and so on) are available after you shoot a video by pressing the small thumbnail of the video in the lower-right corner of the Camera app’s screen, and video settings can be tweaked using the icons along the left edge of the screen.
Switch between Photo and Video mode
Press to toggle between Record and Stop
48 LESSON 3:Taking Photos and Video
Summary
LESSON 4
Web Browsing and Email
In this lesson, you learn how to use the Galaxy Tab browser to access the Web. You also learn to use the built-in Gmail app for use with your Google account and how to configure other types of email accounts.
Browsing the Web
To access Internet websites, you’ll use the very handy Browser app that is conveniently located in the Primary Shortcuts area at the bottom of the screen (along with Applications and Gmail), as shown in Figure 4.1.
50 LESSON 4:Web Browsing and Email
NOTE:More Web Browsers
If you’re not happy with the Browser app that comes standard with the Galaxy Tab, you can find other web browsers with additional fea-tures in the Android Market. See Lesson 7, “Shop the Android Market,” for more details on using the Android Market and for how to search for apps you want to install.
Touch the Browserapp with your finger to launch. When it opens, you’ll see an interface similar to the one shown in Figure 4.2, which shows the Browser app running with the Galaxy Tab rotated to maximize the web browser window.
If you rotate the Galaxy Tab to Normal View, the web browser rotates the onscreen image and provides scrollbars to navigate the page if portions of it extend beyond the screen’s boundaries. Use the swipe gesture to scroll the page down and up and use the reverse-pinch gesture to enlarge an image or bit of text on the screen.
Windows Button Options Button
51 Browsing the Web
The Browser Interface
The Browser app’s interface is quite simple: If you’ve used any web browser before, you’ll find it easy to use. The special features are limited, but you might be surprised at how fast the pages load.
Visiting a Website
To enter a website, tap your finger inside the address bar, and a keyboard appears on screen, as shown in Figure 4.3.
The website loads and displays in the browser window. Tap the Back button to move to websites you previously visited, and tap the Forward button to move forward.
Moving Between Websites
If you enter a new web address on the current page you’re viewing, the old page disappears and is replaced with the new one. If you want to save the website you’re currently viewing and open a new web address so that you can flip back and forth, tap the Windowsbutton (see Figure 4.2 for its location), and you see a screen like the one in Figure 4.4.
Tap the plus (+) sign in the upper-right corner to open a new web browser and enter the new address. Using this method, you can have multiple web-sites open, and you can simply tap on the website you want to visit to
52 LESSON 4:Web Browsing and Email
FIGURE 4.5 Bookmark a site by tapping the Optionsbutton.
FIGURE 4.4 Jump from site to site with a single touch.
jump right to it. In Figure 4.4, I have two websites open: the Samsung website and the Que Publishing website.
Bookmarking a Site
53 Browsing the Web
FIGURE 4.6 Provide details for your added bookmark.
Tap the Add Bookmarkbutton, and a new screen appears, as shown in Figure 4.6.
As shown in Figure 4.6, you can provide a shorter name for the website to make it easer to find in your Favorites list. (The default is the full-length URL.) You can also tap the Defaultbutton to make it the website that always appears when you launch the Browser app.
Tap the Editbutton (refer to Figure 4.5) and you can organize your book-marks and delete any websites you want to remove.
Finally, if you tap the Optionsbutton again, you can tap the Most Visited tab to see the websites that have been viewed most frequently. Tap the Historytab to view websites visited today, over the last week, or during the last month. Tap the Clearbutton to delete your browsing history.
Using Other Browser Options
While browsing a website, press the Menubutton on the Galaxy Tab to see other options that are available (see Figure 4.7).
54 LESSON 4:Web Browsing and Email
FIGURE 4.7 Additional options are available when using the Browser app.
The Download Manager option tracks any files you download from a web-site and offers a button (Go to My Files) that takes you to a folder where all your downloads are stored.
The Find on Page button enables you to search a web page for words or phras-es that you are looking for. When the Browser app finds your search phrase, all instances of the word or phrase in the web page text appear in highlight.
Using Gmail
In Lesson 1, “The Setup Wizard,” you learned how to set up your Galaxy Tab using the Setup Wizard. (If you haven’t configured your Galaxy Tab to work with a Google user account, refer to Lesson 1 to do it now.) With your Google account, you can use Gmail to read and compose email messages.
To open and run the Gmail app, tap the Gmailicon (refer to Figure 4.1). It’s best to use the Gmail app in Wide View mode (see Figure 4.8), but it also works in Narrow View mode.
Managing Email
55 Browsing the Web
FIGURE 4.8 The Gmail app is customized just for Google email.
As you can see in Figure 4.8, your Inbox emails are listed vertically, most recent to oldest. Tap a message to open it. Figure 4.9 shows a message open for reading.
56 LESSON 4:Web Browsing and Email
From within an email, you have access to most of the Gmail app’s features. You can tap the Show Picturesbutton to view any graphics that are part of the original message. Along the bottom of the screen are the buttons for fil-ing the email (tap Archiveto send it to Gmail’s All Mail folder), deleting a message, and moving forward and backward within your Inbox.
To view additional tasks, tap the Menubutton to show more options along the bottom of the screen, as shown in Figure 4.10.
You can perform many tasks associated with Gmail, such as modifying a message’s label, adding a star, marking the message as unread, jumping to your Inbox, and muting a conversation (hiding it in the Inbox) of the Galaxy Tab.
Tap the Morebutton if you want to report a message as spam, copy text from the message, and access the Gmail settings options that you can con-figure, such as adding an automated signature, changing the font size, and creating new labels.
NOTE:Get Gmail Help
If you’re not familiar with Gmail’s special features, such as labels or stars, tap the Helpoption (open a message, tap the Menu but-ton, and then click the More option) to receive more details than I can offer in this short lesson.
57 Browsing the Web
Tap the Go to Inboxbutton to compose an email message and send it with an attachment, as described in more detail in the next section.
Composing a Message
While viewing your Inbox (refer to Figure 4.8), tap the Menubutton and tap the Composebutton. A new email message window opens like the one in Figure 4.11. Type the email address of your recipient into the To box, enter a subject, and then type a message.
When you’ve finished, tap the Sendbutton. You may also tap the Save as Draftbutton to put the message in the Drafts folder, or you may tap the Discardbutton to delete the message and return to the Inbox.
How do you view the Drafts folder (or other Gmail folders) if you’ve saved a message? Just press the Menubutton while viewing the contents of the Inbox and tap the Go to Labelsbutton (refer to Figure 4.8). A page of folders displays, and you can scroll up and down the page to select a Gmail folder (such as Drafts or Trash or other) and view its contents.
58 LESSON 4:Web Browsing and Email
The Gmail app is a useful app, with all the functionality and features avail-able while using Gmail on a full-size computer or laptop. Because of the limited screen size provided by the Galaxy Tab, the Gmail app keeps many features hidden away, but all the features are there if you get used to using the Menu button and its many options.
Not everyone uses Gmail, though, which is why the Galaxy Tab also offers support for additional email providers, such as Yahoo!, Hotmail, AOL, and even Microsoft Exchange.
Using Other Email Services
If you want to configure other email services on the Galaxy Tab, you need to access the Setup Wizard again. From a home page, tap the Menubutton and choose Settings. Scroll down the Settings screen and tap the Setup Wizard. You’re likely to see a screen like the one in Figure 4.12 if you’ve
59 Using Other Email Services
configured a Google user account already. (You can also open up the Email app in the Applications group and use this app to add new email addresses and other email services such as Yahoo! and Hotmail.)
Tap the Skipbutton to see the choices of accounts you can synchronize with your Galaxy Tab (see Figure 4.13).
Select an icon on the screen, such as Yahoo! or Hotmail, to configure that particular email service. Figure 4.14 shows the screen that appears after clicking the Yahoo! icon.
Follow the steps and provide the information requested. Tap Nextto move through the Setup Wizard for each email account you want to configure, and then tap Doneto finish up the email account setup.
60 LESSON 4:Web Browsing and Email
FIGURE 4.14 Setting up a Yahoo! email account on the Galaxy Tab.
NOTE:Special Information Required
You might be asked to provide information that you are not familiar with. If you are asked for a piece of information that you do not have, contact your email provider or tech support for that informa-tion. For example, if you want to add a Microsoft Exchange email account, you must provide information such as domain and the name of the Exchange server, two things you can get from your network administrator.
61 Using Other Email Services
FIGURE 4.15 Finish setting
up an email account.
To view the new email account on your Galaxy Tab, tap the Applications button on a home page and find the Email app, as shown in Figure 4.16.
62 LESSON 4:Web Browsing and Email
Figure 4.17 shows the Inbox of my new Yahoo! account. The Email app is easy enough to figure out—tap a message to read it, use the Menubutton to view available options, and tap the buttons along the top edge to move an email, delete it, forward it, or compose a new message.
63 Summary
Every email service (Hotmail, Exchange Server, Yahoo!, AOL) operates a little differently, so you have to play around with the Menu button and any other app buttons you find to understand their functionality.
Also, remember that the Notification Bar is useful for alerting you to incoming emails, especially when you are monitoring multiple email accounts. To access the Notification Bar, simply tap and hold your finger on the Status Bar along the top of the LCD screen, and drag your finger to the bottom of the screen and release.
Summary
LESSON 5
Exploring with GPS
In this lesson, you learn how to use your Galaxy Tab to navigate with the built-in GPS feature. You also learn how to find directions from one loca-tion to another.
Getting Started with Navigation
Your Galaxy Tab comes with a free app called Navigation. The best way to understand how Navigation works is simply to use it. Open the app from the Applications group. You might see a pop-up alert like the one in Figure 5.1. Tap the OKbutton to continue.66 LESSON 5:Exploring with GPS
FIGURE 5.2 Select a location service for added features.
In Figure 5.2, you’re basically being asked to specify which service will assist your Galaxy Tab in determining your current location. You can choose the Google Location Services or your carrier (Verizon, in my case) and its location services. Another option is simply to use the Standalone GPS feature.
67 Getting Started with Navigation
FIGURE 5.3 Use Navigation to get directions and map access.
After enabling both the Google Location Services and the Standalone GPS feature, close down Navigation and restart the app.
68 LESSON 5:Exploring with GPS
FIGURE 5.4 Get driving directions by specifying a destination.
Navigation consults Google Maps (or your carrier’s choice of map provider), and the screen changes to show your current location and a Map View with a solid green line indicating the direction you should go (see Figure 5.5).
Tapping the Follow the Routebutton at the top of the screen makes the screen change slightly (it shows your orientation relative to the direction you need to start moving), and a bit of text displays at the top of the screen to tell you which direction to drive.
69 Getting Started with Navigation
FIGURE 5.5 My location and the route I should take to my destination.
FIGURE 5.6 The next set of
70 LESSON 5:Exploring with GPS
NOTE:When GPS Needs Help
You might have noticed at the bottom of the screen that the text says “Searching for GPS.” As I write this, it’s a rainy day in Atlanta, Georgia. GPS functionality is questionable (in bad weather, signals from the GPS satellites aren’t as reliable), so my Galaxy Tab is using the partnered Google Location Services to assist me. My Galaxy Tab was able to determine my location with the basic GPS service before losing signal. After the signal is re-obtained, my loca-tion on the LCD screen will update to show a more exact posiloca-tion.
For driving purposes, the Galaxy Tab’s Navigation app can use Wi-Fi or 3G data connections to figure out my current position (using addresses of well-known locations) and update it on the map to still provide me with decent (but not always 100% accurate) driving instructions!
In addition to the map and driving instructions, Google Location Services offers some other features. The first is Road View. Tap the icon of a stick-man in the lower-right corner of the map to receive an image of your approximate location. This is great for helping identify landmarks, restau-rants, and other buildings (see Figure 5.7).
Tap the blue arrow pointing up in the lower-left corner of the map to return to a bird’s eye view of your location. Tap the Follow the Routebutton at the top to continue where you left off.
Another option available to you with Google Location Services is turning off the driving map and instead using text-based driving instructions. Tap the icon in the lower-right corner just beneath the Road View icon. You are provided with a list of driving instructions, as shown in Figure 5.8.
This list of text-based instructions is scrollable, enabling you to view all the turns and roads you’ll encounter during your trip. At the top of the screen, the app estimates the number of miles you need to travel and the total travel time.
71 Getting Started with Navigation
FIGURE 5.7 The Road View helps you identify landmarks and turns to make.
72 LESSON 5:Exploring with GPS
Tap the Menubutton to see a list of options like the ones in Figure 5.10.
The Search option enables you to search for keywords such as restaurant and hotel names and street addresses. Use the Route Infobutton to see a zoomed-out image of your complete journey, as shown in Figure 5.11. This is a useful view for seeing real-time traffic updates. (A green line indicates normal traffic flow at the posted speed limits, but yellow and red may indicate congestion or accidents.)
FIGURE 5.9 Zoom in to see road names and more detail.
73 Getting Started with Navigation
FIGURE 5.10 More options are built in to the Navigation app.
Tapping the ATMs & Banks,Gas Stations, or Restaurantsoptions shows you these locations along your travel path, as shown in Figure 5.13. Note that gas stations are indicated by a small gas pump icon, restaurants by a small knife and fork icon, and ATMs are represented by $. You can toggle these options on or off by going back to the Layers button.
Although not very useful when it comes to driving, the Satellite option offers a fun and interesting view of your travel path. Figure 5.14 shows the Satellite option enabled.
74 LESSON 5:Exploring with GPS
FIGURE 5.12 Layers can show gas stations, ATMs, and more along your path.
75 Getting Started with Navigation
FIGURE 5.13 Find useful resources as you travel.
76 LESSON 5:Exploring with GPS
Tap the screen to zoom in and out on the Satellite View. When you’ve fin-ished, remember to turn it off to return to Map View.
The Mute button disables the voice instructions that you hear if the volume on your Galaxy Tab is turned up.
Finally, you can exit the Navigation app by tapping the Exitbutton.
Having Fun with Places
If your Galaxy Tab offers the Places app, it’s a nice app to use in conjunc-tion with Navigaconjunc-tion. (If you don’t have the Places app, it’s a free down-load from Android Market.) Places is a great little app that works in con-junction with GPS to provide you with the locations of services such as gas stations, ATMs, restaurants, and more. It’s searchable, and you can even add your own categories (such as sporting goods stores or repair shops).
Figure 5.15 shows the Places app and the services it offers.
While Navigation is running, you see your current location at the bottom of the screen. At any time during your travels, you can tap any of the icons to view information about restaurants, hotels, ATMs, and more.
77 Having Fun with Places
FIGURE 5.15 Use Places for more details about places to stop.
Summary
In this lesson, you learned how to use the Navigation app to get directions from your current location to a specified destination, including traffic reports and satellite views along your path of travel. You also learned how to locate gas stations, ATMs, and more using the Places app.
LESSON 6
Using the Gallery
In this lesson, you learn how to access, view, edit, and delete the photos and videos you have taken using the Camera app.
Accessing the Gallery
To view the photos and videos that you’ve taken with your Galaxy Tab, you need only access the Gallery app. You can find it in the Applications group, but many Galaxy Tabs are configured to have the Gallery app on one of the preconfigured home screens. Tap the Galleryapp, and (if you’ve taken a few photos and a few videos) you should see a screen simi-lar to the one in Figure 6.1.
80 LESSON 6:Using the Gallery
NOTE:Screen Captures
To take a snapshot of your Gallery Tab screen, just tap and hold your finger on the Returnbutton before pressing the Power/Lock key. If the volume is turned up sufficiently, you should hear the familiar shutter sound and see a small black bar appear at the bot-tom of the screen informing you that the screenshot has been saved.
As you can see in Figure 6.1, the Gallery app saves photos and videos under the Camera group. Any screen captures you’ve taken are stored in the ScreenCapture group.
After the Gallery app is open, there are a few controls that might be of interest to you. First, in the upper-left corner of the screen is a small icon that looks like a small square photo (see Figure 6.2). Press this icon any
Return to Gallery home screen Launch Camera app
FIGURE 6.2 The shortcut to jump back to the Gallery app home screen.
time you’re viewing photos or videos to go back to the Gallery app home screen in Figure 6.1.
Next, in the upper-right corner of the screen (refer to Figure 6.1) is a cam-era icon. Tapping this button immediately launches the Camcam-era app (see Lesson 3, “Taking Photos and Video”).
81 Accessing the Gallery
FIGURE 6.3 The Camera group shows videos and photos you’ve taken.
The first possible configuration is shown in Figure 6.3 and displays thumb-nails of your photos and videos in a series of rows and columns. You drag your finger left or right to move back and forth to view the thumbnails.
To switch to the other configuration, tap the Togglebutton in the upper-right corner of the screen (refer to Figure 6.3). Now, instead of rows and columns, the thumbnails are grouped in stacks that are divided by date and time, as shown in Figure 6.4.
82 LESSON 6:Using the Gallery
FIGURE 6.4 Stacks of images are grouped by date and time.
83 Viewing a Photo or Video
NOTE:Configuration Toggle 2
You can always toggle back and forth between views using the Togglebutton in the upper-right corner, but tapping the name of the group you’re viewing does the same thing.
Finally, instead of swiping your finger left or right on the screen to sift through your photos and videos, you can use the drag bar at the very bot-tom of the screen (refer to Figure 6.3). Simply hold your finger to the drag bar and drag left or right to move the collection on the screen. (This won’t be useful if you have fewer than 10 thumbnails on the screen.)
Viewing a Photo or Video
When you’re viewing a group of photos or videos, simply tap a thumbnail to view that image in a full-screen view. Figure 6.5 shows a photo opened while the Tab is in Vertical mode. Notice that the photo does not display using the full size of the LCD screen.
Rotate the Galaxy Tab to Widescreen mode, and the photo expands to fill more of the screen, as shown in Figure 6.6.
84 LESSON 6:Using the Gallery
The first tool, visible in the upper-left corner of the screen just after the shortcut and group icon, is the photo/video counter. In Figure 6.7, I can tell that I’m viewing the sixth of seven photos in the selected group (6/7). What’s the group name? Tap the counter and it toggles back and forth between the counter and the name of the group you’re currently viewing.
In the upper-right corner of the screen, you also see icons for zooming in and out of the image. You can also double-tap an image to zoom in and out quickly as well as use the pinch technique described earlier in Lesson 3.
Manipulating Your Photos and
Videos
In either Vertical or Widescreen mode, you have access to some new tools. Tap the photo to toggle the available tools on and off. Figure 6.5 shows the screen without the tools, and Figure 6.7 shows the same photo with the tools enabled.
85 Editing Photos
Along the bottom of the screen are the Slideshow and Menu buttons. Tapping the Slideshowbutton provides a quick display of all photos or videos in the current group you’re viewing.
Tap the Menubutton once and you see a screen like the one in Figure 6.8.
FIGURE 6.8 You can share and delete photos with a single click.
Tap the Sharebutton to see a list of apps (such as Gmail or Messaging) for sharing the current image with others or via a file-sharing service such as Picasa.
Tap the Deletebutton to delete the current image. Tap the Confirm Deletionsbutton to delete the photo or video, or tap the Cancelbutton if you don’t want to delete it.
Editing Photos
86 LESSON 6:Using the Gallery
Tapping the Detailsbutton enables you to view information such as the date and time the photo was taken and GPS details if that feature is enabled (see Lesson 5, “Exploring with GPS”). Tap the OKbutton when you have finished.
Tapping the Set Asbutton enables you to use the current image as wallpa-per or as a contact icon.
The Crop button enables you to drag a box to a portion of the photo that you want to save as a separate photo. You can increase the height and width of the box by dragging its edges left or right or up and down to increase the size (see Figure 6.10).
TIP:Crop a Photo
It’s easier to crop a photo when the Galaxy Tab is in Widescreen mode. This mode provides you with a larger image on the screen and more space to expand the crop box.
87 Editing Photos
FIGURE 6.10 Use the crop box to select a portion of the image.
Tap the Savebutton to save the photo with the changes you made or tap theDiscardbutton.
Tap the Printbutton (see Figure 6.9) to choose a Wi-Fi–enabled printer to print your current photo selection.
NOTE:Wi-Fi Printers
When you tap the Printbutton, you are asked to locate a Wi-Fi printer using the Wi-Fi Settings screen. If no Wi-Fi printer is avail-able, you cannot print the photo.
88 LESSON 6:Using the Gallery
FIGURE 6.11 You have a few options available for your videos.
Working with Video
Working with videos is slightly different from working with photos, and the options available to you are slightly more limited.
When you tap the thumbnail for a video, the video immediately launches and begins playing onscreen. Tap the Menubutton to see a handful of options like the ones in Figure 6.11.
First, for longer videos, you can tap the Scene Selectionbutton and view thumbnails of your video at various points in time. Figure 6.12 shows my short video is broken into 1-second intervals (not very useful, but for longer videos it can save you time when trying to jump to one particular scene). Tap a thumbnail and the video begins playing at that selected point in time.
89 Working with Video
FIGURE 6.12 Jump to specific scenes by selecting a time.
FIGURE 6.13 Share your videos with others.
90 LESSON 6:Using the Gallery
NOTE:The Shop Option
Figure 6.11 shows one other option: the Shop button. Tap the but-ton, and nothing happens. What is this option? There doesn’t appear to be any documentation on this feature, but it might be that Samsung intends to enable you at a later time to take a photo of a product’s barcode and click the Shop button to have the prod-uct identified so that you can compare prices online and locally before purchasing.
Summary
LESSON 7
Shop the Android
Market
In this lesson, you learn how to search the Android Market for new apps, how to purchase an app (if a fee is required), and how to install an app. You also learn how to manage and delete apps.
The Android Market
You’re not limited to just the handful of apps that came preinstalled on your Galaxy Tab. Thousands of apps are available for your Galaxy Tab, many of them free or at a low cost to purchase. To get these apps, though, you need to learn how to access and use the Android Market.
Fortunately, accessing the Android Market is simple: Just open the Applications group and click the Market appicon, shown in Figure 7.1.
92 LESSON 7:Shop the Android Market
FIGURE 7.2 The Android Market has an easy-to-use interface.
When the Android Market opens, you see a screen similar to the one in Figure 7.2. Your screen might look slightly different depending on the company you purchased your Galaxy Tab from, but for the most part, the app’s search, purchase, and download features should work the same.
In Figure 7.2, notice the screen is divided into sections. There’s a menu bar along the top that offers up an Apps button, a Games button, and possi-bly a button for carrier-specific apps (in this case, Verizon Wireless apps).
93 The Android Market
FIGURE 7.3 You can search for apps using a variety of categories.
If you want to immediately search for an app using keywords, tap the text box in the top-right corner of the screen and enter some keywords to search the entire applications database for apps that fit your search criteria.
Tap the Appsbutton and you see a screen similar to the one in Figure 7.3.
Category examples include Communication, Productivity, Sports, and Shopping. At the top of the list is the All Applications selection. Although this is useful, you might be overwhelmed by the list of available apps. For this rea-son, it’s best to always tap a category before you begin searching for apps.
Our example is a search for a webcam app, which you can find under the Communication category (see Figure 7.4).
94 LESSON 7:Shop the Android Market
FIGURE 7.4 Searching a category for an app of interest.
Tapping the Top Paidbutton enables you to view a scrollable list of the most popular apps that have been purchased. Likewise, clicking the Top Freebutton provides a scrollable list of the most popular free apps. In both cases, you can see a rating of one to five stars to the right of each app’s name. (The price of an app is located above the rating.)
Tapping the Just Inbutton provides a scrollable list of new apps, many of them free and others for a price.
TIP:Beware New Ratings
95 Examining an App
Examining an App
Using the scrollable list of apps, tap the name of an app to view more details about that app and to read comments. Figure 7.5 shows the details provided for the Skype application.
The About button displays a scrollable review of the app, including any special information about its functionality. You can also see how many users have downloaded the app and view its version number and size (in megabytes).
Tap the Commentsbutton to see a scrollable list of reviews written by those who have downloaded and tested the app. Figure 7.6 shows why the Skype app has an average review of three stars; reviews range from “Poor call quality” to “Love the app” and everything in between.