For your convenience Apress has placed some of the front
matter material after the index. Please use the Bookmarks
v
Contents at a Glance
Foreword ...
xv
About the Authors ...
xvii
About the Technical Reviewers ...
xix
Acknowledgments ...
xxi
Introduction ...
xxiii
Chapter 1: Performance Metrics
■
...
1
Chapter 2: Performance Measurement
■
...
7
Chapter 3: Type Internals
■
...
61
Chapter 4: Garbage Collection
■
...
91
Chapter 5: Collections and Generics
■
...
145
Chapter 6: Concurrency and Parallelism
■
...
173
Chapter 7: Networking, I/O, and Serialization
■
...
215
Chapter 8: Unsafe Code and Interoperability
■
...
235
Chapter 9: Algorithm Optimization
■
...
259
Chapter 10: Performance Patterns
■
...
277
Chapter 11: Web Application Performance
■
...
305
Introduction
This book has come to be because we felt there was no authoritative text that covered all three areas relevant to .NET application performance:
Identifying performance metrics and then measuring application performance to verify •
whether it meets or exceeds these metrics.
Improving application performance in terms of memory management, networking, I/O, •
concurrency, and other areas.
Understanding CLR and .NET internals in sufficient detail to design high-performance •
applications and fix performance issues as they arise.
We believe that .NET developers cannot achieve systematically high-performance software solutions without thoroughly understanding all three areas. For example, .NET memory management (facilitated by the CLR garbage collector) is an extremely complex field and the cause of significant performance problems, including memory leaks and long GC pause times. Without understanding how the CLR garbage collector operates, high-performance memory management in .NET is left to nothing but chance. Similarly, choosing the proper collection class from what the .NET Framework has to offer, or deciding to implement your own, requires comprehensive familiarity with CPU caches, runtime complexity, and synchronization issues.
This book’s 11 chapters are designed to be read in succession, but you can jump back and forth between topics and fill in the blanks when necessary. The chapters are organized into the following logical parts:
Chapter 1 and Chapter 2 deal with performance metrics and performance measurement. •
They introduce the tools available to you to measure application performance. Chapter 3 and Chapter 4 dive deep into CLR internals. They focus on type internals •
and the implementation of CLR garbage collection—two crucial topics for improving application performance where memory management is concerned.
Chapter 5, Chapter 6, Chapter 7, Chapter 8, and Chapter 11 discuss specific areas of the •
.NET Framework and the CLR that offer performance optimization opportunities—using collections correctly, parallelizing sequential code, optimizing I/O and networking operations, using interoperability solutions efficiently, and improving the performance of Web applications.
Chapter 9 is a brief foray into complexity theory and algorithms. It was written to give you •
a taste of what algorithm optimization is about.
Chapter 10 is the dumping ground for miscellaneous topics that didn’t fit elsewhere in the •
book, including startup time optimization, exceptions, and .NET Reflection.
xxiv
■ INTRODUCTION
Windows: threads, synchronization, virtual memory •
Common Language Runtime (CLR): Just-In-Time (JIT) compiler, Microsoft Intermediate •
Language (MSIL), garbage collector
Computer organization: main memory, cache, disk, graphics card, network interface •
There are quite a few sample programs, excerpts, and benchmarks throughout the book. In the interest of not making this book any longer, we often included only a brief part—but you can find the whole program in the companion source code on the book’s website.
In some chapters we use code in x86 assembly language to illustrate how CLR mechanisms operate or to explain more thoroughly a specific performance optimization. Although these parts are not crucial to the book’s takeaways, we recommend dedicated readers to invest some time in learning the fundamentals of x86 assembly language. Randall Hyde’s freely available book “The Art of Assembly Language Programming”
(http://www.artofasm.com/Windows/index.html) is an excellent resource.
In conclusion, this book is full of performance measurement tools, small tips and tricks for improving minor areas of application performance, theoretical foundations for many CLR mechanisms, practical code examples, and several case studies from the authors’ experience. For almost ten years we have been optimizing applications for our clients and designing high-performance systems from scratch. During these years we trained hundreds of developers to think about performance at every stage of the software development lifecycle and to actively seek opportunities for improving application performance. After reading this book, you will join the ranks of high-performance .NET application developers and performance investigators optimizing existing applications.
Chapter 1
Performance Metrics
Before we begin our journey into the world of .NET performance, we must understand the metrics and goals involved in performance testing and optimization. In Chapter 2, we explore more than a dozen profilers and monitoring tools; however, to use these tools, you need to know which performance metrics you are interested in.
Different types of applications have a multitude of varying performance goals, driven by business and operational needs. At times, the application’s architecture dictates the important performance metrics: for example, knowing that your Web server has to serve millions of concurrent users dictates a multi-server distributed system with caching and load balancing. At other times, performance measurement results may warrant changes in the application’s architecture: we have seen countless systems redesigned from the ground up after stress tests were run—or worse, the system failed in the production environment.
In our experience, knowing the system’s performance goals and the limits of its environment often guides you more than halfway through the process of improving its performance. Here are some examples we have been able to diagnose and fix over the last few years:
We discovered a serious performance problem with a powerful Web server in a hosted •
data center caused by a shared low-latency 4Mbps link used by the test engineers. Not understanding the critical performance metric, the engineers wasted dozens of days tweaking the performance of the Web server, which was actually functioning perfectly. We were able to improve scrolling performance in a rich UI application by tuning the •
behavior of the CLR garbage collector—an apparently unrelated component. Precisely timing allocations and tweaking the GC flavor removed noticeable UI lags that annoyed users.
We were able to improve compilation times ten-fold by moving hard disks to SATA ports •
to work around a bug in the Microsoft SCSI disk driver.
We reduced the size of messages exchanged by a WCF service by 90 %, considerably •
improving its scalability and CPU utilization, by tuning WCF’s serialization mechanism. We reduced startup times from 35 seconds to 12 seconds for a large application with •
300 assemblies on outdated hardware by compressing the application’s code and carefully disentangling some of its dependencies so that they were not required at load time.
CHAPTER 1 ■ PERFORMANCE METRICS
2
Performance Goals
Performance goals depend on your application’s realm and architecture more than anything else. When you have finished gathering requirements, you should determine general performance goals. Depending on your software development process, you might need to adjust these goals as requirements change and new business and operation needs arise. We review some examples of performance goals and guidelines for several archetypal applications, but, as with anything performance-related, these guidelines need to be adapted to your software’s domain.
First, here are some examples of statements that are not good performance goals:
The application will remain responsive when many users access the Shopping Cart •
screen simultaneously.
The application will not use an unreasonable amount of memory as long as the number •
of users is reasonable.
A single database server will serve queries quickly even when there are multiple, •
fully-loaded application servers.
The main problem with these statements is that they are overly general and subjective. If these are your performance goals, then you are bound to discover they are subject to interpretation and disagreements on their frame-of-reference. A business analyst may consider 100,000 concurrent users a “reasonable” number, whereas a technical team member may know the available hardware cannot support this number of users on a single machine. Conversely, a developer might consider 500 ms response times “responsive,” but a user interface expert may consider it laggy and unpolished.
A performance goal, then, is expressed in terms of quantifiable performance metrics that can be measured
by some means of performance testing. The performance goal should also contain some information about its
environment—general or specific to that performance goal. Some examples of well-specified performance goals include:
The application will serve every page in the “Important” category within less than 300 ms •
(not including network roundtrip time), as long as not more than 5,000 users access the Shopping Cart screen concurrently.
The application will use not more than 4 KB of memory for each idle user session. •
The database server’s CPU and disk utilization should not exceed 70%, and it should •
return responses to queries in the “Common” category within less than 75ms, as long as there are no more than 10 application servers accessing it.
Note
■
These examples assume that the “Important” page category and “Common” query category are
well-known terms defined by business analysts or application architects. Guaranteeing performance goals for every
nook and cranny in the application is often unreasonable and is not worth the investment in development, hardware,
and operational costs.
CHAPTER 1 ■ PERFORMANCE METRICS
Note
■
Characteristics of the hardware on which the application runs are a crucial part of environment
constraints. For example, the startup time constraint placed on the smart client application in Table
1-1
may require
a solid-state hard drive or a rotating hard drive speed of at least 7200RPM, at least 2GB of system memory, and a
1.2GHz or faster processor with SSE3 instruction support. These environment constraints are not worth repeating for
every performance goal, but they are worth remembering during performance testing.
Table 1-1. Examples of Performance Goals for Typical Applications
System Type
Performance Goal
Environment Constraints
External Web Server Time from request start to full response generated should not exceed 300ms
Not more than 300 concurrently active requests
External Web Server Virtual memory usage (including cache) should not exceed 1.3GB
Not more than 300 concurrently active requests; not more than 5,000 connected user sessions Application Server CPU utilization should not
exceed 75%
Not more than 1,000 concurrently active API requests
Application Server Hard page fault rate should not exceed 2 hard page faults per second
Not more than 1,000 concurrently active API requests
Smart Client Application Time from double-click on desktop shortcut to main screen showing list of employees should not exceed 1,500ms
--Smart Client Application CPU utilization when the application is idle should not exceed 1%
--Web Page Time for filtering and sorting the
grid of incoming emails should not exceed 750ms, including shuffling animation
Not more than 200 incoming emails displayed on a single screen
Web Page Memory utilization of cached
JavaScript objects for the “chat with representative” windows should not exceed 2.5MB
--Monitoring Service Time from failure event to alert generated and dispatched should not exceed 25ms
--Monitoring Service Disk I/O operation rate when alerts are not actively generated should be 0
--CHAPTER 1 ■ PERFORMANCE METRICS
4
When performance goals are well-defined, the performance testing, load testing, and subsequent optimization process is laid out trivially. Verifying conjectures, such as “with 1,000 concurrently executing API requests there are less than 2 hard page faults per second on the application server,” may often require access to load testing tools and a suitable hardware environment. The next chapter discusses measuring the application to determine whether it meets or exceeds its performance goals once such an environment is established.
Composing well-defined performance goals often requires prior familiarity with performance metrics, which we discuss next.
Performance Metrics
Unlike performance goals, performance metrics are not connected to a specific scenario or environment. A performance metric is a measurable numeric quantity that ref lects the application’s behavior. You can measure a performance metric on any hardware and in any environment, regardless of the number of active users, requests, or sessions. During the development lifecycle, you choose the metrics to measure and derive from them specific performance goals.
Some applications have performance metrics specific to their domain. We do not attempt to identify these metrics here. Instead, we list, in Table 1-2, performance metrics often important to many applications, as well as the chapter in which optimization of these metrics is discussed. (The CPU utilization and execution time metrics are so important that they are discussed in every chapter of this book.)
Table 1-2. List of Performance Metrics (Partial)
Performance Metric
Units of Measurement
Specific Chapter(s) in This Book
CPU Utilization Percent All Chapters
Physical/Virtual Memory Usage
Bytes, kilobytes, megabytes, gigabytes
Chapter 4 – Garbage Collection Chapter 5 – Collections and Generics
Cache Misses Count, rate/second Chapter 5 – Collections and Generics
Chapter 6 – Concurrency and Parallelism
Page Faults Count, rate/second
--Database Access Counts/Timing
Count, rate/second, milliseconds
--Allocations Number of bytes,
number of objects, rate/second
Chapter 3 – Type Internals Chapter 4 – Garbage Collection
Execution Time Milliseconds All Chapters
Network Operations Count, rate/second Chapter 7 – Networking, I/O, and Serialization Chapter 11 – Web Applications
Disk Operations Count, rate/second Chapter 7 – Networking, I/O, and Serialization
Response Time Milliseconds Chapter 11 – Web Applications
Garbage Collections Count, rate/second, duration (milliseconds), % of total time
Chapter 4 – Garbage Collection
Exceptions Thrown Count, rate/second Chapter 10 – Performance Patterns
Startup Time Milliseconds Chapter 10 – Performance Patterns
CHAPTER 1 ■ PERFORMANCE METRICS
Some metrics are more relevant to certain application types than others. For example, database access times are not a metric you can measure on a client system. Some common combinations of performance metrics and application types include:
For client applications, you might focus on startup time, memory usage, and CPU •
utilization.
For server applications hosting the system’s algorithms, you usually focus on CPU •
utilization, cache misses, contentions, allocations, and garbage collections.
For Web applications, you typically measure memory usage, database access, network •
and disk operations, and response time.
A final observation about performance metrics is that the level at which they are measured can often be changed without significantly changing the metric’s meaning. For example, allocations and execution time can be measured at the system level, at the single process level, or even for individual methods and lines. Execution time within a specific method can be a more actionable performance metric than overall CPU utilization or execution time at the process level. Unfortunately, increasing the granularity of measurements often incurs a performance overhead, as we illustrate in the next chapter by discussing various profiling tools.
perFOrMaNCe IN the SOFtWare DeVeLOpMeNt LIFeCYCLe
Where do you fit performance in the software development lifecycle? This innocent question carries the
baggage of having to
retrofit
performance into an existing process. Although it is possible, a healthier
approach is to consider every step of the development lifecycle an opportunity to understand the
application’s performance better: first, the performance goals and important metrics; next, whether the
application meets or exceeds its goals; and finally, whether maintenance, user loads, and requirement
changes introduce any regressions.
1.
During the requirements gathering phase, start thinking about the performance
goals you would like to set.
During the architecture phase, refine the performance metrics important for your
2.
application and define concrete performance goals.
During the development phase, frequently perform exploratory performance testing
3.
on prototype code or partially complete features to verify you are well within the
system’s performance goals.
During the testing phase, perform significant load testing and performance testing to
4.
validate completely your system’s performance goals.
During subsequent development and maintenance, perform additional load testing
5.
and performance testing with every release (preferably on a daily or weekly basis) to
quickly identify any performance regressions introduced into the system.
CHAPTER 1 ■ PERFORMANCE METRICS
6
Summary
This chapter served as an introduction to the world of performance metrics and goals. Making sure you know
what to measure and what performance criteria are important to you can be even more important than actually
Chapter 2
Performance Measurement
This book is about improving the performance of .NET applications. You can’t improve something that you can’t measure first, which is why our first substantial chapter deals with performance measurement tools and techniques. Guessing where the application’s bottlenecks are and jumping to premature conclusions on what to optimize is the worst thing a performance-conscious developer can do and often ends perilously. As we have seen in Chapter 1, there are many interesting performance metrics that can be the central factor to your application’s perceived performance; in this chapter we shall see how to obtain them.
Approaches to Performance Measurement
There is more than one right way to measure application performance, and much depends on the context, the application’s complexity, the type of information required, and the accuracy of the obtained results.
One approach for testing small programs or library methods is white-box testing: inspecting source code, analyzing its complexity on the whiteboard, modifying the program’s source, and inserting measurement code in it. We will discuss this approach, often called microbenchmarking, towards the end of this chapter; it can be very valuable—and often irreplaceable—where precise results and absolute understanding of every CPU instruction is required, but rather time-consuming and inflexible where large applications are concerned. Additionally, if you don’t know in advance which small part of the program to measure and reason about, isolating the bottleneck can be extremely difficult without resorting to automatic tools.
For larger programs, the more common approach is black-box testing, where a performance metric is identified by a human and then measured automatically by a tool. When using this approach, the developer doesn’t have to identify the performance bottleneck in advance, or assume that the culprit is in a certain (and small) part of the program. Throughout this chapter we will consider numerous tools that analyze the application’s performance automatically and present quantitative results in an easily digestible form. Among these tools are performance counters, Event Tracing for Windows (ETW), and commercial profilers.
As you read this chapter, bear in mind that performance measurement tools can adversely affect application performance. Few tools can provide accurate information and at the same time present no overhead when the application is executing. As we move from one tool to the next, always remember that the accuracy of the tools is often at conflict with the overhead they inflict upon your application.
Built-in Windows Tools
CHAPTER 2 ■ PERFORMANCE MEASUREMENT
8
Performance Counters
Windows performance counters are a built-in Windows mechanism for performance and health investigation. Various components, including the Windows kernel, drivers, databases, and the CLR provide performance counters that users and administrators can consume and understand how well the system is functioning. As an added bonus, performance counters for the vast majority of system components are turned on by default, so you will not be introducing any additional overhead by collecting this information.
Reading performance counter information from a local or remote system is extremely easy. The built-in
Performance Monitor tool (perfmon.exe) can display every performance counter available on the system, as well as log performance counter data to a file for subsequent investigation and provide automatic alerts when performance counter readings breach a defined threshold. Performance Monitor can monitor remote systems as well, if you have administrator permissions and can connect to them through a local network.
Performance information is organized in the following hierarchy:
• Performance counter categories (or performance objects) represent a set of individual counters related to a certain system component. Some examples of categories include .NET CLR Memory, Processor Information, TCPv4, and PhysicalDisk.
• Performance counters are individual numeric data properties in a performance counter category. It is common to specify the performance counter category and performance counter name separated by a slash, e.g., Process\Private Bytes. Performance counters have several supported types, including raw numeric information (Process\Thread Count), rate of events (Print Queue\Bytes Printed/sec), percentages (PhysicalDisk\% Idle Time), and averages (ServiceModelOperation 3.0.0.0\Calls Duration).
• Performance counter category instances are used to distinguish several sets of counters from a specific component of which there are several instances. For example, because there may be multiple processors on a system, there is an instance of the Processor Information category for each processor (as well as an aggregated _Total instance). Performance counter categories can be multi-instance—and many are—or single-instance (such as the Memory category).
If you examine the full list of performance counters provided by a typical Windows system that runs .NET applications, you’ll see that many performance problems can be identified without resorting to any other tool. At the very least, performance counters can often provide a general idea of which direction to pursue when investigating a performance problem or inspecting data logs from a production system to understand if it’s behaving normally.
Below are some scenarios in which a system administrator or performance investigator can obtain a general idea of where the performance culprit lies before using heavier tools:
If an application exhibits a memory leak, performance counters can be used to determine •
whether managed or native memory allocations are responsible for it. The Process\ Private Bytes counter can be correlated with the .NET CLR Memory\# Bytes in All Heaps counter. The former accounts for all private memory allocated by the process (including the GC heap) whereas the latter accounts only for managed memory. (See Figure 2-1.)
If an ASP.NET application starts exhibiting abnormal behavior, the
• ASP.NET
CHAPTER 2 ■ PERFORMANCE MEASUREMENT
If a WCF service that heavily relies on a database and distributed transactions is failing to •
handle its current load, the ServiceModelService category can pinpoint the problem— the Calls Outstanding, Calls Per Second, and Calls Failed Per Second counters can identify heavy load, the Transactions Flowed Per Second counter reports the number of transactions the service is dealing with, and at the same time SQL Server categories such as MSSQL$INSTANCENAME:Transactions and MSSQL$INSTANCENAME:Locks can point to problems with transactional execution, excessive locking, and even deadlocks.
Figure 2-1. The Performance Monitor main window, showing three counters for a specific process. The top line on the graph is the Process\Private Bytes counter, the middle one is .NET CLR Memory\# Bytes in all Heaps, and the bottom one is .NET CLR Memory\Allocated Bytes/sec. From the graph it is evident that the application exhibits a memory leak in the GC heap
MONItOrING MeMOrY USaGe WIth perFOrMaNCe COUNterS
In this short experiment, you will monitor the memory usage of a sample application and determine that it
exhibits a memory leak using Performance Monitor and the performance counters discussed above.
Open Performance Monitor—you can find it in the Start menu by searching for
1.
CHAPTER 2 ■ PERFORMANCE MEASUREMENT
10
Click the “Performance Monitor” node in the tree on the left, and then click the
3.
green
+
button.
From the .NET CLR Memory category, select the # Bytes in all Heaps and Allocated
4.
Bytes/sec performance counters, select the MemoryLeak instance from the instance
list, and click the “Add >>” button.
From the Process category, select the Private Bytes performance counter, select the
5.
MemoryLeak instance from the instance list, and click the “Add >>” button.
Click the “OK” button to confirm your choices and view the performance graph.
6.
You might need to right click the counters in the bottom part of the screen and select
7.
“Scale selected counters” to see actual lines on the graph.
You should now see the lines corresponding to the Private Bytes and # Bytes in all Heaps performance
counters climb in unison (somewhat similar to Figure
2-1
). This points to a memory leak in the managed
heap. We will return to this particular memory leak in Chapter 4 and pinpoint its root cause.
Tip
■
There are literally thousands of performance counters on a typical Windows system; no performance
investigator is expected to remember them all. This is where the small “Show description” checkbox at the bottom
of the “Add Counters” dialog comes in handy—it can tell you that
System\Processor Queue Lengthrepresents the
number of ready threads waiting for execution on the system’s processors, or that
.NET CLR LocksAndThreads\ Contention Rate / secis the number of times (per second) that threads attempted to acquire a managed lock
unsuccessfully and had to wait for it to become available.
Performance Counter Logs and Alerts
Configuring performance counter logs is fairly easy, and you can even provide an XML template to your system administrators to apply performance counter logs automatically without having to specify individual performance counters. You can open the resulting logs on any machine and play them back as if they represent live data. (There are even some built-in counter sets you can use instead of configuring what data to log manually.)
CHAPTER 2 ■ PERFORMANCE MEASUREMENT
CONFIGUrING perFOrMaNCe COUNter LOGS
To configure performance counter logs, open Performance Monitor and perform the following steps. (We
assume that you are using Performance Monitor on Windows 7 or Windows Server 2008 R2; in prior
operating system versions, Performance Monitor had a slightly different user interface—if you are using
these versions, consult the documentation for detailed instructions.)
1.
In the tree on the left, expand the Data Collector Sets node.
2.
Right-click the User Defined node and select New
➤
Data Collector Set from the
context menu.
3.
Name your data collector set, select the “Create manually (Advanced)” radio button,
and click Next.
4.
Make sure the “Create data logs” radio button is selected, check the “Performance
counter” checkbox, and click Next.
5.
Use the Add button to add performance counters (the standard Add Counters dialog
will open). When you’re done, configure a sample interval (the default is to sample
the counters every 15 seconds) and click Next.
6.
Provide a directory which Performance Monitor will use to store your counter logs
and then click Next.
7.
Select the “Open properties for this data collector set” radio button and click Finish.
8.
Use the various tabs to further configure your data collector set—you can define a
schedule for it to run automatically, a stop condition (e.g. after collecting more than
a certain amount of data), and a task to run when the data collection stops (e.g. to
upload the results to a centralized location). When you’re done, click OK.
9.
Click the User Defined node, right-click your data collector set in the main pane,
and select Start from the context menu.
10.
Your counter log is now running and collecting data to the directory you’ve selected.
You can stop the data collector set at any time by right-clicking it and selecting
Stop from the context menu.
When you’re done collecting the data and want to inspect it using the Performance Monitor, perform the
following steps:
11.
Select the User Defined node.
12.
Right-click your data collector set and select Latest Report from the context menu.
13.
In the resulting window, you can add or delete counters from the list of counters
in the log, configure a time range and change the data scale by right-clicking the
graph and selecting Properties from the context menu.
CHAPTER 2 ■ PERFORMANCE MEASUREMENT
12
Custom Performance Counters
Although Performance Monitor is an extremely useful tool, you can read performance counters from any .NET application using the System.Diagnostics.PerformanceCounter class. Even better, you can create your own performance counters and add them to the vast set of data available for performance investigation.
Below are some scenarios in which you should consider exporting performance counter categories: You are developing an infrastructure library to be used as part of large systems. Your •
library can report performance information through performance counters, which is often easier on developers and system administrators than following log files or debugging at the source code level.
You are developing a server system which accepts custom requests, processes them, •
and delivers responses (custom Web server, Web service, etc.). You should report performance information for the request processing rate, errors encountered, and similar statistics. (See the ASP.NET performance counter categories for some ideas.)
You are developing a high-reliability Windows service that runs unattended and •
communicates with custom hardware. Your service can report the health of the hardware, the rate of your software’s interactions with it, and similar statistics.
The following code is all it takes to export a single-instance performance counter category from your application and to update these counters periodically. It assumes that the AttendanceSystem class has information on the number of employees currently signed in, and that you want to expose this information as a performance counter. (You will need the System.Diagnostics namespace to compile this code fragment.) public static void CreateCategory() {
if (PerformanceCounterCategory.Exists("Attendance")) { PerformanceCounterCategory.Delete("Attendance"); }
CounterCreationDataCollection counters= new CounterCreationDataCollection(); CounterCreationData employeesAtWork= new CounterCreationData(
"# Employees at Work", "The number of employees currently checked in.", PerformanceCounterType.NumberOfItems32);
PerformanceCounterCategory.Create(
"Attendance", "Attendance information for Litware, Inc.", PerformanceCounterCategoryType.SingleInstance, counters); }
public static void StartUpdatingCounters() {
PerformanceCounter employeesAtWork= new PerformanceCounter( "Attendance", "# Employees at Work", readOnly: false); updateTimer= new Timer(_ => {
employeesAtWork.RawValue= AttendanceSystem.Current.EmployeeCount; }, null, TimeSpan.Zero, TimeSpan.FromSeconds(1));
}
CHAPTER 2 ■ PERFORMANCE MEASUREMENT
Note
■
Performance Monitor can be used to collect other types of information that have nothing to do with
perfor-mance counters. You can use it to collect configuration data from a system—the values of registry keys, WMI objects
properties, and even interesting disk files. You can also use it to capture data from ETW providers (which we discuss
next) for subsequent analysis. By using XML templates, system administrators can quickly apply data collector sets
to a system and generate a useful report with very few manual configuration steps.
Although performance counters offer a great amount of interesting performance information, they cannot be used as a high-performance logging and monitoring framework. There are no system components that update performance counters more often than a few times a second, and the Windows Performance Monitor won’t read performance counters more often than once a second. If your performance investigation requires following thousands of events per second, performance counters are not a good fit. We now turn our attention to Event Tracing for Windows (ETW), which was designed for high-performance data collection and richer data types (not just numbers).
Event Tracing for Windows (ETW)
Event Tracing for Windows (ETW) is a high-performance event logging framework built into Windows. As was the case with performance counters, many system components and application frameworks, including the Windows kernel and the CLR, define providers, which report events—information on the component’s inner workings. Unlike performance counters, that are always on, ETW providers can be turned on and off at runtime so that the performance overhead of transferring and collecting them is incurred only when they’re needed for a performance investigation.
One of the richest sources of ETW information is the kernel provider, which reports events on process and thread creation, DLL loading, memory allocation, network I/O, and stack trace accounting (also known as
sampling). Table 2-1 shows some of the useful information reported by the kernel and CLR ETW providers. You can use ETW to investigate overall system behavior, such as what processes are consuming CPU time, to analyze disk I/O and network I/O bottlenecks, to obtain garbage collection statistics and memory usage for managed processes, and many other scenarios discussed later in this section.
CHAPTER 2 ■ PERFORMANCE MEASUREMENT
14
Accessing this highly detailed information requires an ETW collection tool and an application that can read raw ETW events and perform some basic analysis. At the time of writing, there were two tools capable of both tasks: Windows Performance Toolkit (WPT, also known as XPerf ), which ships with the Windows SDK, and
PerfMonitor (do not confuse it with Windows Performance Monitor!), which is an open source project by the CLR team at Microsoft.
Windows Performance Toolkit (WPT)
Windows Performance Toolkit (WPT) is a set of utilities for controlling ETW sessions, capturing ETW events into log files, and processing them for later display. It can generate graphs and overlays of ETW events, summary tables including call stack information and aggregation, and CSV files for automated processing. To download WPT, download the Windows SDK Web installer from http://msdn.microsoft.com/en-us/performance/ cc752957.aspx and select only Common Utilities ➤ Windows Performance Toolkit from the installation options screen. After the Windows SDK installer completes, navigate to the Redist\Windows Performance Toolkit subdirectory of the SDK installation directory and run the installer file for your system’s architecture (Xperf_x86. msi for 32-bit systems, Xperf_x64.msi for 64-bit systems).
Table 2-1. Partial List of ETW Events in Windows and the CLR
Provider
Flag / Keyword
Description
Events (Partial List)
Kernel PROC_THREAD Creation and destruction of
processes and threads
--Kernel LOADER Load and unload of images
(DLLs, drivers, EXEs)
--Kernel SYSCALL System calls
--Kernel DISK_IO Disk I/O reads and writes
(including head location)
--Kernel HARD_FAULTS Page faults that resulted in disk
I/O (not satisfied from memory)
--Kernel PROFILE Sampling event—a stack trace
of all processors collected every 1ms
--CLR GCKeyword Garbage collection statistics
and information
Collection started, collection ended, finalizers run, ~100KB of memory have been allocated
CLR ContentionKeyword Threads contend for a managed lock
Contention starts (a thread begins waiting), contention ends
CLR JITTracingKeyword Just in time compiler (JIT) information
Method inlining succeeded, method inlining failed
--CHAPTER 2 ■ PERFORMANCE MEASUREMENT
Note
■
On 64-bit Windows, stack walking requires changing a registry setting that disables paging-out of
kernel code pages (for the Windows kernel itself and any drivers). This may increase the system’s working
set (RAM utilization) by a few megabytes. To change this setting, navigate to the registry key
HKLM\System\CurrentControlSet\Control\Session Manager\Memory Management
, set the
DisablePagingExecutive
value to the DWORD
0x1, and restart the system.
The tools you’ll use for capturing and analyzing ETW traces are XPerf.exe and XPerfView.exe. Both tools require administrative privileges to run. The XPerf.exe tool has several command line options that control which providers are enabled during the trace, the size of the buffers used, the file name to which the events are flushed, and many additional options. The XPerfView.exe tool analyzes and provides a graphical report of what the trace file contains.
All traces can be augmented with call stacks, which often allow precise zooming-in on the performance issues. However, you don’t have to capture events from a specific provider to obtain stack traces of what the system is doing; the SysProfile kernel flag group enables collection of stack traces from all processors captured at 1ms intervals. This is a rudimentary way of understanding what a busy system is doing at the method level. (We’ll return to this mode in more detail when discussing sampling profilers later in this chapter.)
CaptUrING aND aNaLYZING KerNeL traCeS WIth XperF
In this section, you’ll capture a kernel trace using XPerf.exe and analyze the results in the XPerfView.exe
graphical tool. This experiment is designed to be carried out on Windows Vista system or a later version.
(It also requires you to set two system environment variables. To do so, right click Computer, click Properties,
click “Advanced system settings” and finally click the “Environment Variables” button at the bottom of the
dialog.)
1.
Set the system environment variable
_NT_SYMBOL_PATHto point to the
Microsoft public symbol server and a local symbol cache, e.g.:
srv*C:\Temp\ Symbols*http://msdl.microsoft.com/download/symbols2.
Set the system environment variable
_NT_SYMCACHE_PATHto a local directory on
your disk—this should be a
different
directory from the local symbols cache in the
previous step.
3.
Open an administrator Command Prompt window and navigate to the installation
directory where you installed WPT (e.g.
C:\Program Files\Windows Kits\8.0\ Windows Performance Toolkit).
4.
Begin a trace with the
Basekernel provider group, which contains the
PROC_ THREAD,
LOADER,
DISK_IO,
HARD_FAULTS,
PROFILE,
MEMINFO, and
MEMINFO_WSkernel flags (see Table
2-1
). To do this, run the following command:
xperf -on Base5.
Initiate some system activity: run applications, switch between windows, open
files—for at least a few seconds. (These are the events that will enter the trace.)
6.
Stop the trace and flush the trace to a log file by running the following command:
CHAPTER 2 ■ PERFORMANCE MEASUREMENT
16
7.
Launch the graphical performance analyzer by running the following command:
xperfview KernelTrace.etl
8.
The resulting window contains several graphs, one for each ETW keyword that
generated events during the trace. You can choose the graphs to display on the left.
Typically, the topmost graph displays the processor utilization by processor, and
subsequent graphs display the disk I/O operation count, memory usage, and other
statistics.
9.
Select a section of the processor utilization graph, right click it, and select Load
Symbols from the context menu. Right click the selected section again, and select
Simple Summary Table. This should open an expandable view in which you can
navigate between methods in all processes that had some processor activity during
the trace. (Loading the symbols from the Microsoft symbol server for the first time
can be time consuming.)
There’s much more to WPT than you’ve seen in this experiment; you should explore other parts of the UI and
consider capturing and analyzing trace data from other kernel groups or even your own application’s ETW
providers. (We’ll discuss custom ETW providers later in this chapter.)
There are many useful scenarios in which WPT can provide insight into the system’s overall behavior and the performance of individual processes. Below are some screenshots and examples of these scenarios:
WPT can capture all disk I/O operations on a system and display them on a map of the •
physical disk. This provides insight into expensive I/O operations, especially where large seeks are involved on rotating hard drives. (See Figure 2-2.)
WPT can provide call stacks for all processor activity on the system during the trace. It •
aggregates call stacks at the process, module, and function level, and allows at-a-glance understanding of where the system (or a specific application) is spending CPU time. Note that managed frames are not supported—we’ll address this deficiency later with the PerfMonitor tool. (See Figure 2-3.)
WPT can display overlay graphs of different activity types to provide correlation between •
I/O operations, memory utilization, processor activity, and other captured metrics. (See Figure 2-4.)
WPT can display call stack aggregations in a trace (when the trace is initially configured •
CHAPTER 2 ■PERFORMANCE MEASUREMENT
Figure 2-2. Disk I/O operations laid out on a map of the physical disk. Seeks between I/O operations and individual I/O details are provided through tooltips
CHAPTER 2 ■ PERFORMANCE MEASUREMENT
18
Figure 2-4. Overlay graph of CPU activity (lines—each line indicates a different processor) and disk I/O operations (columns). No explicit correlation between I/O activity and CPU activity is visible
Figure 2-5. Call stack aggregation in the report. Note that managed frames are displayed only partially—the ?!?
frames could not be resolved. The mscorlib.dll frames (e.g. System.DateTime.get_Now()) were resolved successfully because they are pre-compiled using NGen and not compiled by the JIT compiler at runtime
Note
CHAPTER 2 ■ PERFORMANCE MEASUREMENT
XPerfView is very capable of displaying kernel provider data in attractive graphs and tables, but its support for custom providers is not as powerful. For example, we can capture events from the CLR ETW provider, but XPerfView will not generate pretty graphs for the various events—we’ll have to make sense of the raw data in the trace based on the list of keywords and events in the provider’s documentation (the full list of the CLR ETW provider’s keywords and events is available in the MSDN documentation—
http://msdn.microsoft.com/en-us/library/ff357720.aspx).
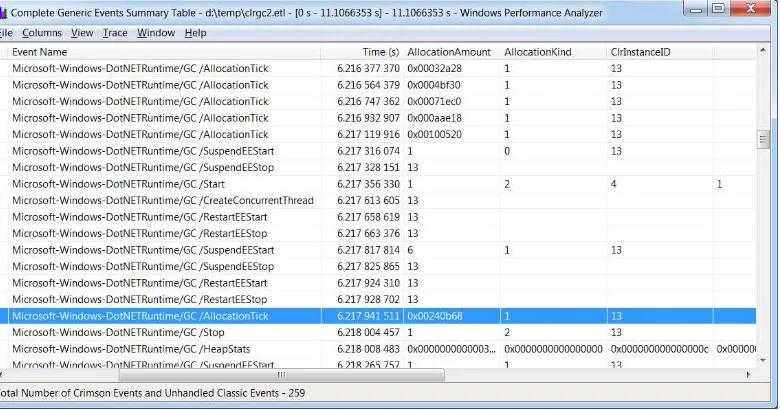
If we run XPerf with the CLR ETW provider (e13c0d23-ccbc-4e12-931b-d9cc2eee27e4) the keyword for GC events (0x00000001), and the Verbose log level (0x5), it will dutifully capture every event the provider generates. By dumping it to a CSV file or opening it with XPerfView we will be able—slowly—to identify GC-related events in our application. Figure 2-6 shows a sample of the resulting XPerfView report—the time elapsed between the
GC /Start and GC /Stop rows is the time it took a single garbage collection to complete in the monitored application.
Figure 2-6. Raw report of CLR GC-related events. The selected row displays the GCAllocationTick_V1 event that is raised every time approximately 100KB of memory is allocated
Fortunately, the Base Class Library (BCL) team at Microsoft has identified this deficiency and provided an open source library and tool for analyzing CLR ETW traces, called PerfMonitor. We discuss this tool next.
PerfMonitor
The PerfMonitor.exe open source command line tool has been released by the BCL team at Microsoft through the CodePlex website. At the time of writing the latest release was PerfMonitor 1.5 that can be downloaded from http://bcl.codeplex.com/releases/view/49601. PerfMonitor’s primary advantage compared to WPT is that it has intimate knowledge about CLR events and provides more than just raw tabular data. PerfMonitor analyzes GC and JIT activity in the process, and can sample managed stack traces and determine which parts of the application are using CPU time.
CHAPTER 2 ■ PERFORMANCE MEASUREMENT
20
Although PerfMonitor can be used to collect kernel events or even events from a custom ETW provider (using the /KernelEvents and /Provider command line switches), it is typically used to analyze the behavior of a managed application using the built-in CLR providers. Its runAnalyze command line option executes an application of your choice, monitors its execution, and upon its termination generates a detailed HTML report and opens it in your default browser. (You should follow the PerfMonitor user guide—at least through the Quick Start section—to generate reports similar to the screenshots in this section. To display the user guide, run PerfMonitor usersguide.)
When PerfMonitor is instructed to run an application and generate a report, it produces the following command line output. You can experiment with the tool yourself as you read this section by running it on the JackCompiler.exe sample application from this chapter’s source code folder.
C:\PerfMonitor > perfmonitor runAnalyze JackCompiler.exe
Starting kernel tracing. Output file: PerfMonitorOutput.kernel.etl Starting user model tracing. Output file: PerfMonitorOutput.etl Starting at 4/7/2012 12:33:40 PM
Current Directory C:\PerfMonitor Executing: JackCompiler.exe {
} Stopping at 4/7/2012 12:33:42 PM = 1.724 sec
Stopping tracing for sessions 'NT Kernel Logger' and 'PerfMonitorSession'. Analyzing data in C:\PerfMonitor\PerfMonitorOutput.etlx
GC Time HTML Report in C:\PerfMonitor\PerfMonitorOutput.GCTime.html JIT Time HTML Report in C:\PerfMonitor\PerfMonitorOutput.jitTime.html Filtering to process JackCompiler (1372). Started at 1372.000 msec. Filtering to Time region [0.000, 1391.346] msec
CPU Time HTML report in C:\PerfMonitor\PerfMonitorOutput.cpuTime.html Filtering to process JackCompiler (1372). Started at 1372.000 msec. Perf Analysis HTML report in C:\PerfMonitor\PerfMonitorOutput.analyze.html PerfMonitor processing time: 7.172 secs.
The various HTML files generated by PerfMonitor contain the distilled report, but you can always use the raw ETL files with XPerfView or any other tool that can read binary ETW traces. The summary analysis for the example above contains the following information (this might vary, of course, when you run this experiment on your own machine):
CPU Statistics—CPU time consumed was 917ms and the average CPU utilization was •
56.6%. The rest of the time was spent waiting for something.
GC Statistics—the total GC time was 20ms, the maximum GC heap size was 4.5MB, the •
maximum allocation rate was 1496.1MB/s, and the average GC pause was 0.1ms. JIT Compilation Statistics—159 methods were compiled at runtime by the JIT compiler, •
for a total of 30493 bytes of machine code.
CHAPTER 2 ■ PERFORMANCE MEASUREMENT
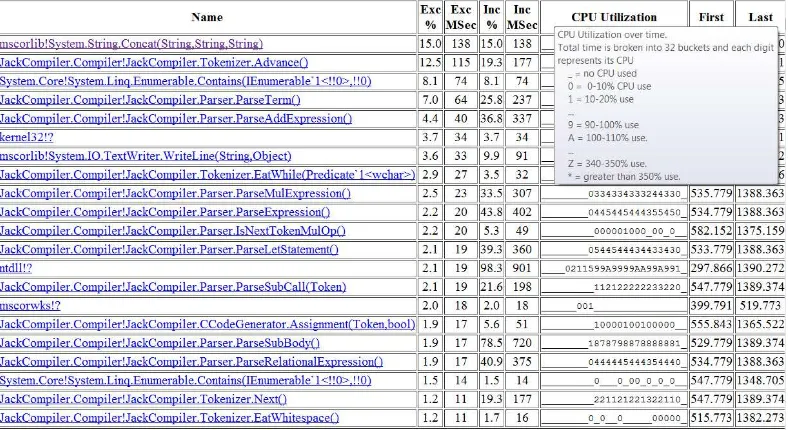
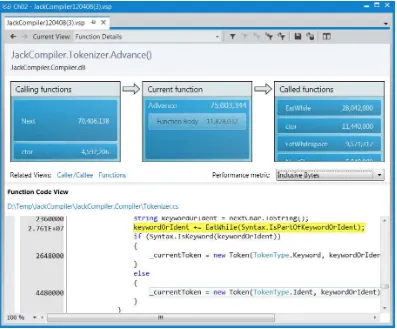
Figure 2-7. Bottom up report from PerfMonitor. The “Exc %” column is an estimation of the CPU time used by that method alone; the “Inc %” column is an estimation of the CPU time used by that method and all other methods it called (its sub-tree in the call tree)
CHAPTER 2 ■ PERFORMANCE MEASUREMENT
22
The detailed GC analysis report contains a table with garbage collection statistics (counts, times) for each generation, as well as individual GC event information, including pause times, reclaimed memory, and many others. Some of this information will be extremely useful when we discuss the garbage collector’s inner workings and performance implications in Chapter 4. Figure 2-9 shows a few rows for the individual GC events.
Figure 2-9. Individual GC events, including the amount of memory reclaimed, the application pause time, the type of collection incurred, and other details
Finally, the detailed JIT analysis report shows how much time the JIT compiler required for each of the application’s methods as well as the precise time at which they were compiled. This information can be useful to determine whether application startup performance can be improved—if an excessive amount of startup time is spent in the JIT compiler, pre-compiling your application’s binaries (using NGen) may be a worthwhile optimization. We will discuss NGEN and other strategies for reducing application startup time in Chapter 10.
Tip
■
Collecting information from multiple high-performance ETW providers can generate very large log files.
For example, in default collection mode PerfMonitor routinely generates over 5MB of raw data per second. Leaving
such a trace on for several days is likely to exhaust disk space even on large hard drives. Fortunately, both XPerf
and PerfMonitor support circular logging mode, where only the last
N
megabytes of logs are retained. In PerfMonitor,
the
/Circularcommand-line switch takes the maximum log file size (in megabytes) and discards the oldest logs
automatically when the threshold is exceeded.
Although PerfMonitor is a very powerful tool, its raw HTML reports and abundance of command-line options make it somewhat difficult to use. The next tool we’ll see offers very similar functionality to PerfMonitor and can be used in the same scenarios, but has a much more user-friendly interface to collecting and interpreting ETW information and will make some performance investigations considerably shorter.
The PerfView Tool
PerfView is a free Microsoft tool that unifies ETW collection and analysis capabilities already available in PerfMonitor with heap analysis features that we will discuss later in conjunction with tools such as CLR Profiler and ANTS Memory Profiler. You can download PerfView from the Microsoft download center, at
CHAPTER 2 ■ PERFORMANCE MEASUREMENT
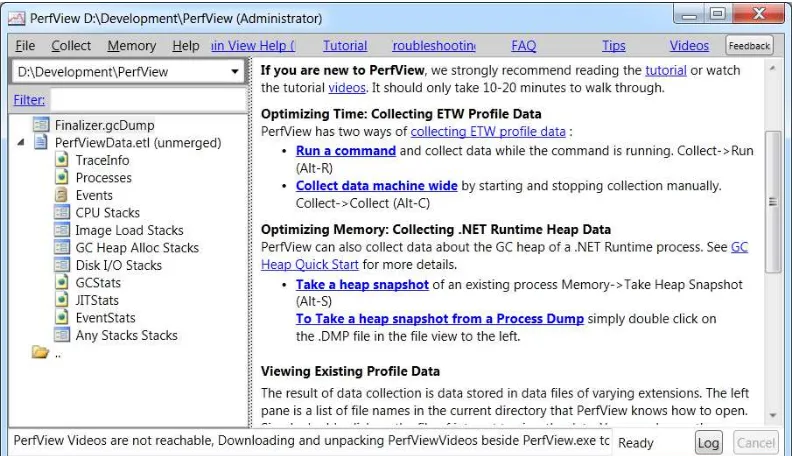
To analyze ETW information from a specific process, use the Collect ➤ Run menu item in PerfView (Figure 2-10 shows the main UI). For the purpose of the heap analysis we will perform shortly, you can use PerfView on the MemoryLeak.exe sample application from this chapter’s source code folder. It will run the process for you and generate a report with all the information PerfMonitor makes available and more, including:
Raw list of ETW events collected from various providers (e.g. CLR contention information, •
native disk I/O, TCP packets, and hard page faults)
Grouped stack locations where the application’s CPU time was spent, including •
configurable filters and thresholds
Stack locations for image (assembly) loads, disk I/O operations, and GC allocations (for •
every ~ 100KB of allocated objects)
GC statistics and events, including the duration of each garbage collection and the •
amount of space reclaimed
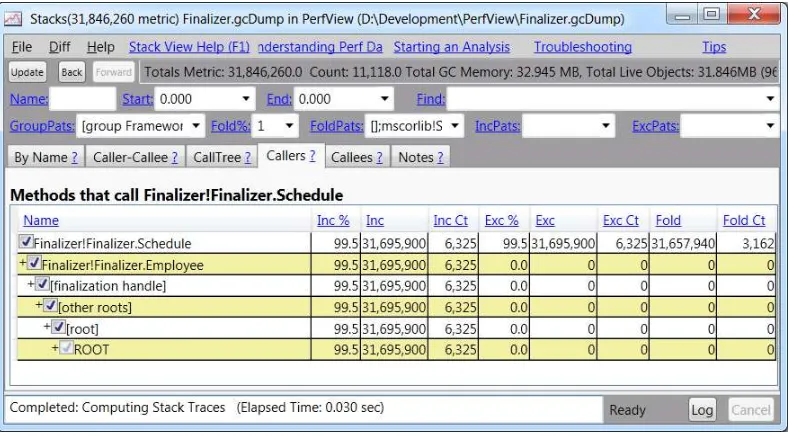
Additionally, PerfView can be used to capture a heap snapshot from a currently running process or import a heap snapshot from a dump file. After importing, PerfView can be used to look for the types with most memory utilization in the snapshot and identify reference chains that are responsible for keeping these types alive. Figure 2-11 shows the PerfView reference analyzer for the Schedule class, which is responsible (inclusively) for 31MB of the heap snapshot’s contents. PerfView successfully identifies the Employee class instances holding references to Schedule objects, while Employee instances are being retained by the f-reachable queue (discussed in Chapter 4).
CHAPTER 2 ■ PERFORMANCE MEASUREMENT
24
When we discuss memory profilers later in this chapter, we’ll see that PerfView’s visualization capabilities are still somewhat lacking compared to the commercial tools. Still, PerfView is a very useful free tool that can make many performance investigations significantly shorter. You can learn more about it using the built-in tutorial linked from its main screen, and there are also videos recorded by the BCL team that exhibit some of the tool’s main features.
Custom ETW Providers
Similarly to performance counters, you might want to tap into the powerful instrumentation and information collection framework offered by ETW for your own application’s needs. Prior to .NET 4.5, exposing ETW information from a managed application was fairly complex. You had to deal with plenty of details around defining a manifest for your application’s ETW provider, instantiating it at runtime, and logging events. As of .NET 4.5, writing a custom ETW provider could hardly be easier. All you need to do is derive from the
System.Diagnostics.Tracing.EventSource class and call the WriteEvent base class method to output ETW events. All the details of registering an ETW provider with the system and formatting the event data are handled automatically for you.
The following class is an example of an ETW provider in a managed application (the full program is available in this chapter’s source code folder and you can run it with PerfMonitor later):
public class CustomEventSource : EventSource { public class Keywords {
public const EventKeywords Loop= (EventKeywords)1; public const EventKeywords Method= (EventKeywords)2; }
[Event(1, Level =EventLevel.Verbose, Keywords =Keywords.Loop, Message ="Loop {0} iteration {1}")]
public void LoopIteration(string loopTitle, int iteration) {
CHAPTER 2 ■ PERFORMANCE MEASUREMENT
WriteEvent(1, loopTitle, iteration); }
[Event(2, Level =EventLevel.Informational, Keywords =Keywords.Loop, Message ="Loop {0} done")]
public void LoopDone(string loopTitle) { WriteEvent(2, loopTitle);
}
[Event(3, Level =EventLevel.Informational, Keywords =Keywords.Method, Message ="Method {0} done")]
public void MethodDone([CallerMemberName] string methodName= null) { WriteEvent(3, methodName);
} }
class Program {
static void Main(string[] args) {
CustomEventSource log= new CustomEventSource(); for (int i= 0; i< 10; ++i) {
Thread.Sleep(50);
log.LoopIteration("MainLoop", i); }
log.LoopDone("MainLoop"); Thread.Sleep(100); log.MethodDone(); }
}
The PerfMonitor tool can be used to automatically obtain from this application the ETW provider it contains, run the application while monitoring that ETW provider, and generate a report of all ETW events the application submitted. For example:
C:\PerfMonitor > perfmonitor monitorDump Ch02.exe
Starting kernel tracing. Output file: PerfMonitorOutput.kernel.etl Starting user model tracing. Output file: PerfMonitorOutput.etl
Found Provider CustomEventSource Guid ff6a40d2-5116-5555-675b-4468e821162e Enabling provider ff6a40d2-5116-5555-675b-4468e821162e level: Verbose keywords: 0xffffffffffffffff
Starting at 4/7/2012 1:44:00 PM Current Directory C:\PerfMonitor Executing: Ch02.exe {
} Stopping at 4/7/2012 1:44:01 PM = 0.693 sec
Stopping tracing for sessions 'NT Kernel Logger' and 'PerfMonitorSession'. Converting C:\PerfMonitor\PerfMonitorOutput.etlx to an XML file.
CHAPTER 2 ■ PERFORMANCE MEASUREMENT
26
Note
■
There is another performance monitoring and system health instrumentation framework we haven’t
considered:
Windows Management Instrumentation
(WMI). WMI is a command-and-control (C&C) infrastructure
integrated in Windows, and is outside the scope of this chapter. It can be used to obtain information about the
system’s state (such as the installed operating system, BIOS firmware, or free disk space), register for interesting
events (such as process creation and termination), and invoke control methods that change the system state (such
as create a network share or unload a driver). For more information about WMI, consult the MSDN documentation
at
http://msdn.microsoft.com/en-us/library/windows/desktop/aa394582.aspx. If you are interested in
developing managed WMI providers, Sasha Goldshtein’s article “WMI Provider Extensions in .NET 3.5”
(
http://www.codeproject.com/Articles/25783/WMI-Provider-Extensions-in-NET-3-5, 2008) provides a
good start.
Time Profilers
Although performance counters and ETW events offer a great amount of insight into the performance of Windows applications, there’s often a lot to be gained from more intrusive tools—profilers—that inspect application execution time at the method and line level (improving upon ETW stack trace collection support). In this section we introduce some commercial tools and see the benefits they bring to the table, bearing in mind that more powerful and accurate tools sustain a bigger measurement overhead.
Throughout our journey into the profiler world we will encounter numerous commercial tools; most of them have several readily available equivalents. We do not endorse any specific tool vendor; the products demonstrated in this chapter are simply the profilers we use most often and keep in our toolbox for performance investigations. As always with software tools, your mileage may vary.
The first profiler we consider is part of Visual Studio, and has been offered by Microsoft since Visual Studio 2005 (Team Suite edition). In this chapter, we’ll use the Visual Studio 2012 profiler, which is available in the Premium and Ultimate editions of Visual Studio.
Visual Studio Sampling Profiler
CHAPTER 2 ■PERFORMANCE MEASUREMENT
Capturing samples using the Visual Studio profiler is quite cheap, and if the sample event interval is wide enough (the default is 10,000,000 clock cycles), the overhead on the application’s execution can be less than 5%. Moreover, sampling is very flexible and enables attaching to a running process, collecting sample events for a while, and then disconnecting from the process to analyze the data. Because of these traits, sampling is the recommended approach to begin a performance investigation for CPU bottlenecks—methods that take a significant amount of CPU time.
When a sampling session completes, the profiler makes available summary tables in which each method is associated with two numbers: the number of exclusive samples, which are samples taken while the method was currently executing on the CPU, and the number of inclusive samples, which are samples taken while the method was currently executing or anywhere else on the call stack. Methods with many exclusive samples are the ones responsible for the application’s CPU utilization; methods with many inclusive samples are not directly using the CPU, but call out to other methods that do. (For example, in single-threaded applications it would make sense for the Main method to have 100% of the inclusive samples.)
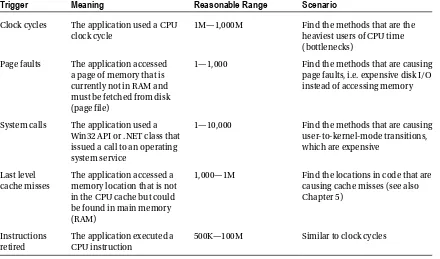
Table 2-2. Visual Studio Sampling Profiler Events (Partial List)
Trigger
Meaning
Reasonable Range
Scenario
Clock cycles The application used a CPU clock cycle
1M—1,000M Find the methods that are the
heaviest users of CPU time (bottlenecks)
Page faults The application accessed a page of memory that is currently not in RAM and must be fetched from disk (page file)
1—1,000 Find the methods that are causing
page faults, i.e. expensive disk I/O instead of accessing memory
System calls The application used a Win32 API or .NET class that issued a call to an operating system service
1—10,000 Find the methods that are causing
user-to-kernel-mode transitions, which are expensive
Last level cache misses
The application accessed a memory location that is not in the CPU cache but could be found in main memory (RAM)
1,000—1M Find the locations in code that are
CHAPTER 2 ■ PERFORMANCE MEASUREMENT
28
rUNNING the SaMpLING prOFILer FrOM VISUaL StUDIO
The easiest way to run the sampling profiler is from Visual Studio itself, although (as we will see later) it also
supports production profiling from a simplified command line environment. We recommend that you use one
of your own applications for this experiment.
1.
In Visual Studio, click the Analyze
➤
Launch Performance Wizard menu item.
2.
On the first wizard page, make sure the “CPU sampling” radio button is selected
and click the Next button. (Later in this chapter we’ll discuss the other profiling
modes; you can then repeat this experiment.)
3.
If the project to profile is loaded in the current solution, click the “One or more
available projects” radio button and select the project from the list. Otherwise, click
the “An executable (.EXE file)” radio button. Click the Next button.
4.
If you selected “An executable (.EXE file)” on the previous screen, direct the profiler
to your executable and provide any command line arguments if necessary, then
click the Next button. (If you don’t have your own application handy, feel free to use
the JackCompiler.exe sample application from this chapter’s source code folder.)
5.
Keep the checkbox “Launch profiling after the wizard finishes” checked and click
the Finish button.
6.
If you are not running Visual Studio as an administrator, you will be prompted to
upgrade the profiler’s credentials.
7.
When your application finishes executing, a profiling report will open. Use the
“Current View” combo box on the top to navigate between the different views,
showing the samples collected in your application’s code.
For more experimentation, after the profiling session completes make sure to check out the Performance
Explorer tool window (Analyze
➤
Windows
➤
Performance Explorer). You can configure sampling
parameters (e.g. choosing a different sample event or interval), change the target binary, and compare
multiple profiler reports from different runs.
CHAPTER 2 ■ PERFORMANCE MEASUREMENT
CHAPTER 2 ■ PERFORMANCE MEASUREMENT
30
Figure 2-13. Functions view, showing the functions with the most exclusive samples. The System.String.Concat
function is responsible for twice as many samples as any other function
CHAPTER 2 ■ PERFORMANCE MEASUREMENT
Caution
■
It may appear that sampling is an accurate technique for measuring CPU utilization. You might hear
claims that go as far as “if this method had 65% of the exclusive samples, then it ran for 65% of the time”. Because
of the statistical nature of sampling, such reasoning is treacherous and should be avoided in practical use. There
are several factors that can contribute to the inaccuracy of sampling results: CPU clock rates can change hundreds
of times every second during application execution, such that the correlation between the number of samples and
actual CPU time is skewed; a method can be “missed” (underrepresented) if it happens not to be running when many
samples were taken; a method can be overrepresented if it happens to be running when many samples were taken
but finished quickly every time. To summarize, you should not consider the results of a sampling profiler to be an exact
representation of where CPU time was spent, but rather a general outline of the application’s main CPU bottlenecks.
The Visual Studio profiler offers more information in addition to the exclusive/inclusive sample tables for every method. We recommend that you explore the profiler’s windows yourself—the Call Tree view shows the hierarchy of calls in the application’s methods (compare to PerfMonitor’s top down analysis, Figure 2-8), the Lines view displays sampling information on the line level, and the Modules view groups methods by assembly, which can lead to quick conclusions about the general direction in which to look for a performance bottleneck.
Because all sampling intervals require the application thread that triggers them to be actively executing on the CPU, there is no way to obtain samples from application threads that are blocked while waiting for I/O or synchronization mechanisms. For CPU-bound applications, sampling is ideal; for I/O-bound applications, we’ll have to consider other approaches that rely on more intrusive profiling mechanisms.
Visual Studio Instrumentation Profiler
The Visual Studio profiler offers another mode of operation, called instrumentation profiling, which is tailored to measuring overall execution time and not just CPU time. This makes it suitable for profiling I/O-bound applications or applications that engage heavily in synchronization operations. In the instrumentation profiling mode, the profiler modifies the target binary and embeds within it measurement code that reports back to the profiler accurate timing and call count information for every instrumented method.
For example, consider the following method: public static int InstrumentedMethod(int param) { List<int> evens= new List <int >();
for (int i= 0; i< param; ++i) { if (i % 2 == 0) {
evens.Add(i); }
}
return evens.Count; }
During instrumentation, the Visual Studio profiler modifies this method. Remember that instrumentation occurs at the binary level—your source code is not modified, but you can always inspect the instrumented binary with an IL disassembler, such as .NET Reflector. (In the interests of brevity, we slightly modified the resulting code to fit.) public static int mmid = (int)