He is the author of the Student Pilot's Flight Manual, the Instrument Flight Manual, the Advanced Pilot's Flight Manual, the Flight Instructor's Manual, and the Basic Aerobatic Manual. I would welcome any feedback provided on the Student Pilot's Flight Manual 10th Edition.
The Big Three
After you start flying, you may decide at some point that it is better for your learning process if you switch instructors. It's best if you omit your FAA (Federal Aviation Administration) medical exam very soon after you start flying, or, if you think you have a problem, have it done before you start classes.
Headwork
If you have a couple of these in a row, you should consider changing your schedule to early morning instead of later afternoon flights or vice versa. You may not hear any of the details, but you can see that such briefings are taking place.
Air Discipline
Attitude
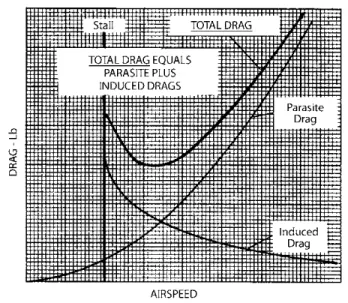
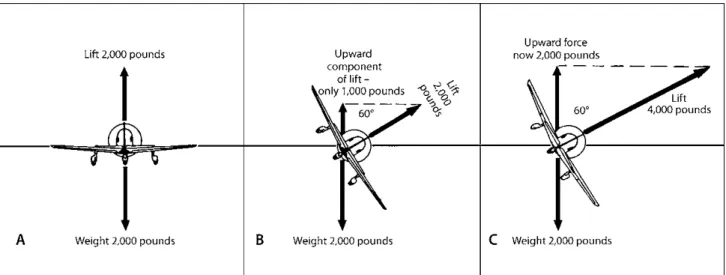
The Four Forces
Lift
The angle of attack is the angle between the relative wind and the airfoil chord line. But because of the higher angle of attack, more drag is created, the plane slows down and there is balance again.
Thrust
Thrust: The horsepower developed by the propeller in moving the aircraft through the air. Some manufacturers use the idea of "tilting" the engine slightly so that the thrust line of the propeller (or crankshaft) points slightly to the right.
Drag
They can "wash in" the left wing so that it has a greater angle of attack (resulting in a higher angle of attack for a particular nose position) than the right wing. The down-going blade, which is on the right side of the propeller arc as seen from the cockpit, has a higher angle of attack and higher thrust than the up-going blade on the left.
Weight
This will be for the navigation (position) lights, the wing tip strobes and the red rotary light on the fin tip. The button on the end of the handle is used to unlock the control from the previous setting.
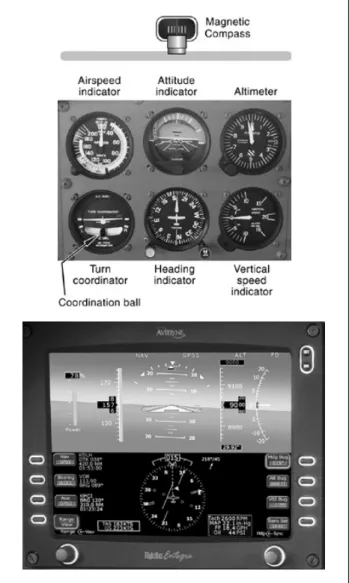
Required Instruments
Your trainer probably has one of the two types (items 24 and 39) shown here, but not both.
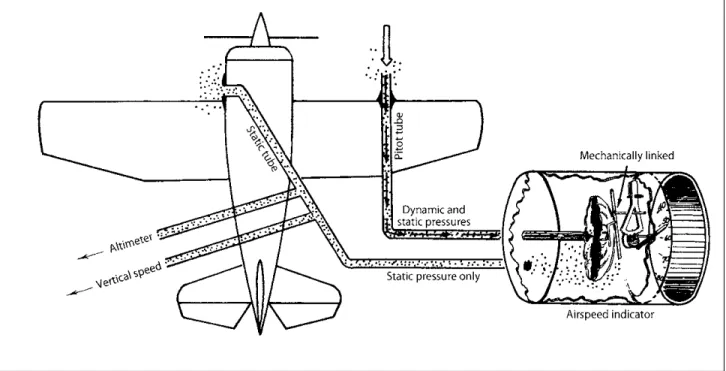
Altimeter
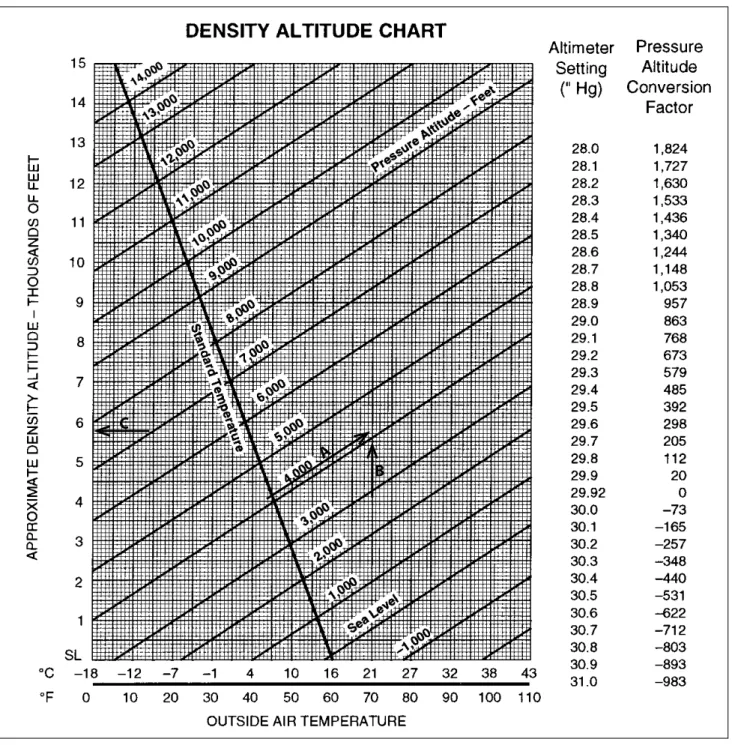
Unless the ground altimeter setting is exactly 29.92 and the pressure drop per thousand feet is standard, the pressure altitude and displayed altitude will be different. Note that in Figure 3-4 the pressure altitude conversion factor to use if the altimeter setting is not the standard 29.92.
Airspeed Indicator
In other words, when you fly from a region of high pressure to a region of lower pressure, the altitude "thinks" the plane is climbing and registers accordingly, when in fact your altitude may be not changed at all. The computer takes into account any deviations of temperature and pressure from the "normal error rate". The standard temperature at sea level is 59°F (15°C).
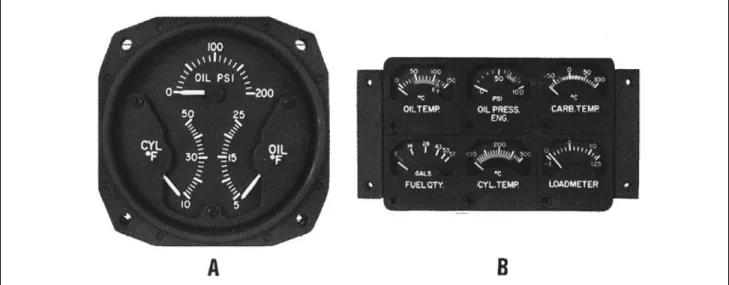
Tachometer
Oil Pressure Gauge
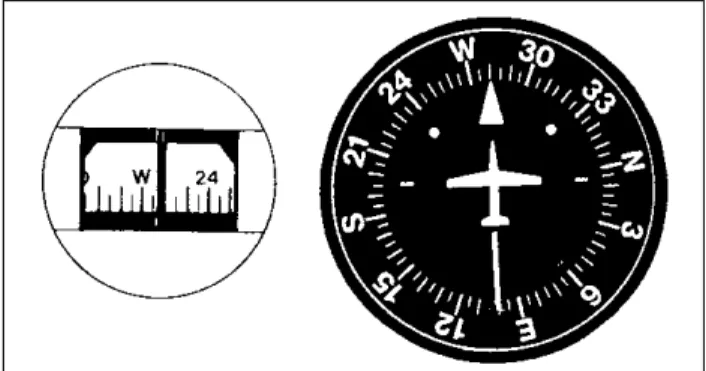
In turbulence the compass wobbles so badly that it is very difficult to fly a course by it. As the compass approaches the North Magnetic Pole, the magnets will have a tendency to point towards the earth's surface.
Additional Instruments
Gyro Instruments in General
Turn and Slip Indicator (Needle and Ball)
Note that the gyro wheel in turn and slip (Figure 3-17) is vertical and in line with the axis of the instrument housing when yaw forces are not acting on it. The advantage of turn and drop over other gyro instruments is that the gyro does not "tumble".
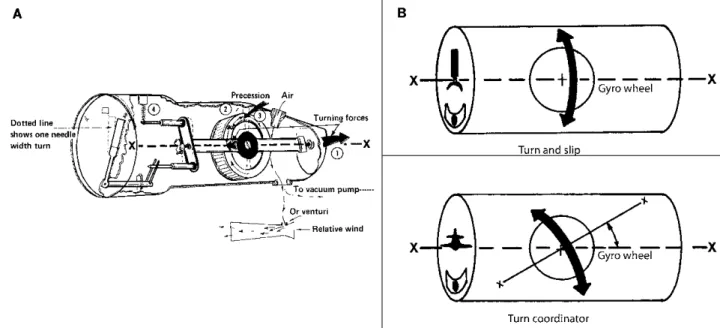
Attitude Indicator
A good rule of thumb to find how much pitch is required for a standard turn at various airspeeds (mph) is to divide your airspeed by 10 and add 5 to the answer. A rule of thumb for finding the pitch required for a standard speed turn when working with knots, is to divide the airspeed by 10 and multiply the result by 11⁄2.
Heading Indicator
A disadvantage of the older types of heading indicators is that they flip over when the limits of 55° nose up or down or 55° pitch are reached. The greatest advantage of a bearing indicator is that it allows you to turn directly to a bearing without the deviation or lag required with a magnetic compass.
Vertical Speed Indicator
Since the casing pressure is always "behind" the diaphragm pressure when climbing or diving, a certain lag occurs. The vertical speed indicator is therefore used when a constant rate of climb or descent is required or as a check of the aircraft's rate of climb, dive or glide.
Summary of the Additional Instruments
The diaphragm is mechanically connected to a hand, and the correct rate of descent, in hundreds (or thousands) of feet per minute (fpm), is read on the front of the instrument. During a climb, the pressure in the diaphragm decreases faster than that in the instrument box, and the needle will indicate the correct rate of ascent.
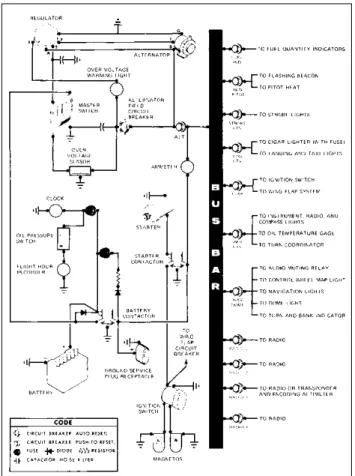
Electrical System
For normal operation, both switches must be ON for the system (BAT) to work and the alternator to "top up" the electricity used by the various components, as is the case for your car (except that the aircraft is not dependent on the battery/ alternator for ignition, but more on this soon). The ignition system is shown in Figure 3-26, but it is self-contained and independent of the alternator-battery system.
Aircraft Documents
You should not, in this particular system, turn off the battery switch when the alternator is running. If the battery is completely dead, the airplane can be manually started (prop) (Chapter 5) to start the engine, but the alternator needs some electrical power to energize it to start charging.
Certificate of Aircraft Registration
An external source of electricity (for example with jumper cables) is required to start the charging process by the alternator. The circuit breakers blow or the fuses blow when there is an overload, cutting the connection between the component causing the problem and the alternator battery system.
Airworthiness Certificate
If the alternator started working, you would turn it off and rely on the battery (for a while anyway), which conserves electricity by turning off all unnecessary electrical equipment. 3-18 Part One / Before the Flight airplane depends on the stall speed, which decreases as the airplane becomes lighter.
Airplane Flight Manual or Pilot’s Operating Handbook
An aircraft may not be able to use some of the fuel during the flight and this is listed as 'unusable fuel'. For example, one aircraft has a total fuel capacity of 24 US units. Recommended speeds for normal use are summarized, but also provided as part of the comprehensive procedures.
Logbooks
The logbooks do not need to be in the airplane at all times, just like the first three documents discussed, but they must be available to an FAA inspector if requested. This means that if you are flying away from the aircraft's normal base, it would be wise to take the logbooks with you.
Radio Equipment
Glass Cockpit
Moving to an aircraft with standard instrumentation and navigation can feel quite daunting after using EFIS.
Summary
Look inside the bottom cover to check for indications of fluid leaks. You can trace the path here from .. the front of the crankcase to the outlet opening).
General Procedure
Before turning the main power switch ON to start the engine, shout "Clear?" and receive the confirmation: “Clear!” from someone in the driveway who can see it. Some pilots are criminal in their takeoff procedures; they shout, “Clear!” and before the word is out of their mouths they start the engine.
Cold Weather Starting
A dog or a small child can easily run under your nose unseen and be killed or seriously injured when you start the engine. If you don't get that answer, but still turn on the main switch and press the start button, you may have reason to regret it for the rest of your life.
Hot Weather Starting
It is possible for the engine to backfire during a start, causing the fuel in the carburetor to ignite. If you suspect a fire in the carburetor intake, keep the engine running.
Accelerating Pump
Another procedure is, as soon as you notice the engine is under load, open the throttle at least half way and then continue to start. When the engine is clearly under load, you can open the throttle and allow the mixture to idle while the start continues.
Mixture Control
If you have done the pre-start procedure correctly, chances are the engine is loaded. You can set the mixture to idle cutoff, shut off the fuel and open the throttle while revving the engine with the starter.
Stopping the Engine
The in-flight blend control allows you to take care of such variations as needed. The mixture control is normally in the full-rich position for starting and other high power conditions and for starting.
Propping the Plane
As the control is pulled out or moved back, the mixture becomes progressively leaner until the "idle break" position is reached in the full aft or aft position. Later, you will learn techniques to lean the mixture for takeoffs under these conditions, but for now, use full rich unless the instructor tells you otherwise.
When You’re Swinging the Prop
He may push the propeller hub to see if you hold the brakes, then pull the propeller until the engine starts, and will be very unhappy if you forget to back off the throttle and don't hold the brakes. When the plane is ready to take off, the pilot will say, “THROTTLE CLOSED, BRAKE AND CONTACT.” You turn off the throttle (he can hear it close from the outside), say, “THROTTLE CLOSED, BRAKE AND CONTACT,” hold apply the brakes and turn on the switch.
After Starting
In most cases, with students, the person providing support will say: “SWITCH OFF AND GAS OPEN”. SWITCH ON!” which on a noisy ramp can sound like "SWITCH OFF!" there is only one meaning to the word (the magnetos are hot or will be hot).
Communications
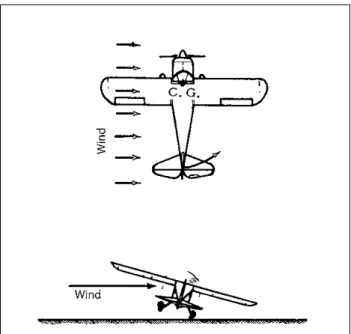
Wind Indicators
Airplanes normally take off and land in wind because the lower ground speed shortens the ground run. Some students remember the correct way to use the wind sock at first by thinking that the airplane is being blown by a horn. The tetrahedron is an arrowhead that shows the way for you to rise and fall.
Segmented Circle
6-2 First part / Before flight resembling an airplane; and (3) the tetrahedron (a . Greek word meaning "four bases or sides"), a four-sided object that resembles an arrowhead when viewed from the air.
Taxiing
Your likely inclination during the first taxiing session (and subsequent ones as well) will be to grab hold of the steering wheel in front of you and try to use it to steer the aircraft. The taxi speed, which is controlled by the accelerator pedal, should be fast on the taxiway and much slower in a busy area such as the apron.
Flight Controls in Taxiing
A mnemonic is that when the wind is strong and behind the plane (straight or quarter), hold the steering wheel as if you were ducking away from the wind. It is quite difficult to look directly at the wingtips of you and the other aircraft to judge the distance between them.

Brakes
You don't have to be an aeronautical engineer to figure out what would happen if you did. Many people flew for years before brakes became universal on airplanes, so don't become dependent on them.
Some Important Notes
You might get away with it in a tricycle plane, but even in that it could put a lot of stress on the nose wheel assembly and slide the tires. A pre-flight inspection on the line found the aircraft to be in good shape; this is where you will find out if the aircraft is working properly (Figure 7-1).
Procedure
There are no excessive swings from the instrument hand, and the engine sounds and feels good. If you switch to one of the mags and the engine does just as well (no stalling) as on BOTH, you are probably still running on both mags (a ground wire is off or the starter switch is bad).
Elevators
You will find that you can. zoom" the aircraft, i.e. gain a momentary climb by exchanging airspeed for altitude using cruise speed. Probably started back in the early days of flight when it was believed that this was their function - to "raise" the aircraft.
Elevator Trim Tab
To repeat: The elevators control the angle of attack (and indirectly the airspeed) of the aircraft. The principle of operation is the same — the "stabilizer" is an angle of attack and airspeed control and, like the elevator, has a trim tab to help the pilot correct for different aircraft loads and airspeeds.
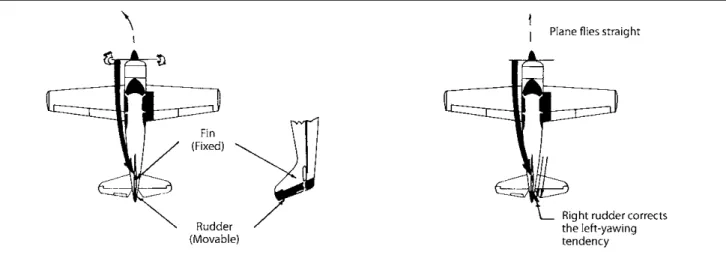
Rudder
The elevators' job during the climb is that of controlling the airspeed: reaching the speed at which the greatest excess power is available, which is the speed for the best rate of climb. Since most light aircraft do not have angle of attack indicators, pay attention to the airspeed indicator for the aircraft's reactions to your use of the elevators.
Rudder Trim
The main purpose of the rudder is to overcome the opposite twist of the aileron. On tailwheel aircraft, the rudder is connected to the tailwheel by coil springs and is the main factor in ground control.
Ailerons
This extra lift causes the aircraft to bank and the remainder of the turn is normal. It is a force that acts against the tendency of the airplane to continue in a straight line.
The Turn
You will try to slide towards the outside of the corner like you do when a car turns a corner. Slippage is caused by too little handlebars and you will feel like you are sliding towards the inside of the turn.
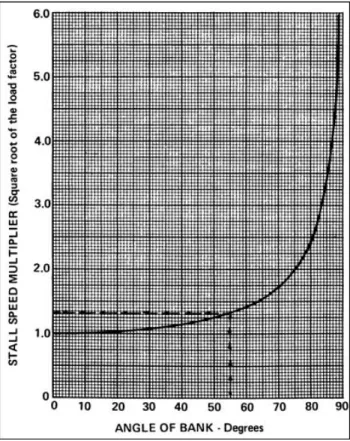
Load Factors in the Turn
Mathematically speaking, the load factor in the bend is a function of the secant of the bank angle. The stall speed in a 60° slope is therefore twice as great as the stall speed in level flight.
Review of the Turn
Lightweight flats are generally stressed to obtain a maximum positive load factor ranging from 3.8 to 6 and a negative load factor between 1.52 and 3, depending on the make and model. Positive or negative load factors can be imposed on the airplane by sharp up or down gusts, as well as by the pilot's handling of the elevators.
The Rollout
Coordination Exercises
Apply the opposite rudder and more opposite rudder and roll it to the other side, then repeat the process. You will find it difficult at first, but will soon get the hang of it and be able to roll smoothly from side to side without the nose moving from the tip.
The Normal Climb
Although in parts of the maneuver the controls are crossed and uncoordinated as they are in the turn, you will find that your turns will benefit from a short period of this maneuver.
To Climb
To Level Off from the Climb
Probable Errors
After you get a good feel for the controls for the climb, your instructor will have you cut the plane for it. As you level off, the trim will need to be changed for straight and level cruise flight.
The Climbing Turn
Occasionally make a shallow turn to each side of your "base course" or drop the nose briefly to check ahead.
The Normal Glide
As the airspeed drops to normal glide speed, lower the nose slightly down to the normal glide position as instructed by the instructor. You will notice that quite a bit of counter pressure is needed to keep the nose up.
Common Errors
Note that the glide position is only slightly more nose down than that for straight and level flight. Your instructor will later have you trim the plane for glide and you will be quite busy re-adjusting the trim at first as you apply force to level off.
Gliding Turn
In winter, after a long run without cleaning, the engine can cool down so much that it won't take the gas. To see what an actual emergency landing is like, do not release the engine.
Straight and Level Flying
Flying is a strange experience at this point, and if you're completely relaxed, you're one student in a million. For example, if you are 50 feet low, you will apply (slight) back pressure to the wheel and regain height rather than adding power, which from previous discussions would be the.
The Four Fundamentals and Instrument Indications
Private Pilot Certificate
Tail Airplanes
The heading indicator indicates a left turn, and the turn coordinator indicates a balanced standard rate turn.
Steep Turns
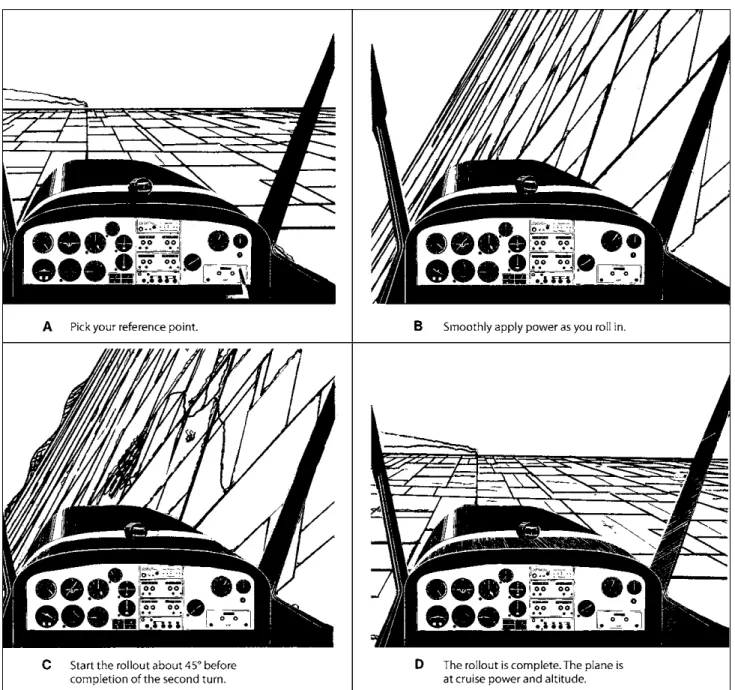
The 720° Power Turn
Back thrust added too soon at the start of the turn — the nose rises and the aircraft climbs. When the nose drops, try to pull it up by back pressure alone, not shallow bank - results in high stress on the aircraft.
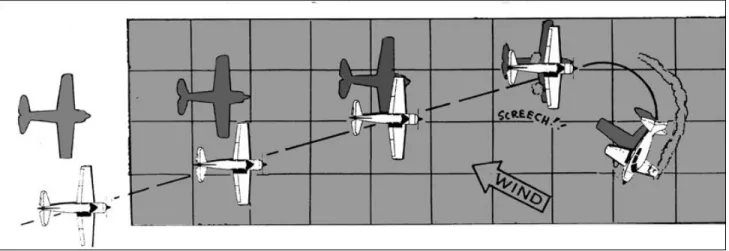
Wind Drift
The infinitesimal amount of thrust angle does not compare to the huge loss of efficiency suffered by the plane sliding and slowing down. Forgetting to throttle back while the plane is in a roll - also causes the plane to climb.
Correction Maneuvers
A steep turn only requires a longer period of deflection of the ailerons and rudder to achieve the steeper bank. Force is used because (1) the angle of inclination is such that stall speed increases, and (2) the additional angle of attack required increases drag to the point where altitude may no longer be efficiently maintained by back pressure alone.
The Rectangular Course
Turns Across a Road
As shown in Figure 10-6, the initial bank must be steep; otherwise the wind would "push" the plane too far off the road before the turn was completed (point 1). Once point 6 is reached, the bank must be steep to complete the turn when the aircraft recrosses the road.
What to Do
If the aircraft is stationary at 50K and you have a headwind of 15K, your groundspeed (or relative speed to the ground) will be 35K upon landing. If you try to stretch a hover, the rate of descent actually increases as the angle of attack gets into the critical range.
Stalls as an Aid to Landings
It is impossible to see the ground by looking over the nose of the average trainer when in landing attitude;. The opening (Figure 12-3) near the leading edge allows the air to maintain a steady flow at angles of attack that would result in a stall for the unslotted portion of the wing.
Approach to Stalls — Power-On or Power-Off
Approach to a Stall — Power-Off
Approach to a Stall — Power-On
Granted, you practice approaching stalls at an altitude where recovery won't be a problem. You will also practice turning stalls into banks of about 20°.
Some Straight-Ahead Stalls
Still, you can get into the habit of using full power and recovering with as little altitude loss as possible, because one day you might be low and not have time to think, "Well, I'm pretty low, so maybe you'd better use full power; on the other hand but maybe I should.."
Normal Stall — Power-Off
If you are preparing for landings, practice looking out the left side, keeping the wings level and the airplane in the correct nose-up position by checking it out of the corner of your eye. More on this idea of keeping the wings level: If a wing drops, the plane will pitch and will turn.
Normal Stall — Power-On
During your first series of stalls, the plane seems to have a mind of its own. This doesn't matter at high altitudes, but the runways are only a few hundred feet wide at best (some of them will be only 50 feet) and the plane will be landing in good harbors before you know it.
Complete or Full Stall — Power-On and Power-Off
Characteristic Stall
Elementary Turning Stalls
Takeoff and Departure Stalls — Climbing Turns
Approach to Landing Stalls — Gliding Turn
Coefficient of the lift and stall break attitudes for a fictional aircraft: clean and with the landing flaps down.
Flaps and Stalls
Flight at Minimum Controllable Airspeed (Slow Flight)
The angle of attack at the stall is always the same (for a given flap setting), but the airspeed at the stall varies with the weight of the aircraft. If you find yourself too low and slow and close to the stall on the power approach, you wouldn't pull the nose up.
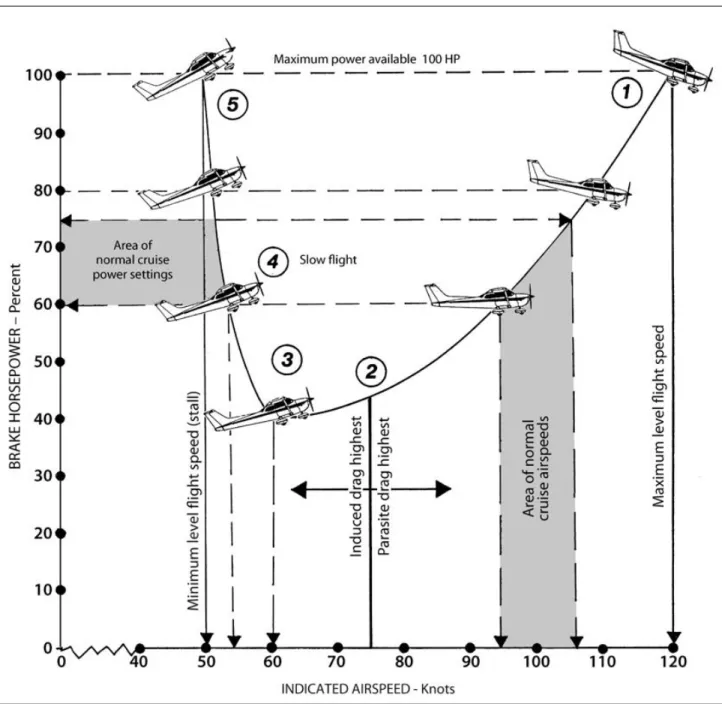
Power versus Airspeed
A spin can only occur if the aircraft (or at least one wing) has passed the angle of attack and remains there. Just before or when the stall occurs (depending on the aircraft), set the rudder to the direction of rotation.
Spins
So the spin is caused by too high an angle of attack with yaw or roll (the roll can be caused by the yaw or other factors). Reducing the back pressure will cause some of the spin's planes to spiral.
Recovery
It will show a speed close to normal stall speed or even “zero” on some trainers. You hold the left rudder fully, which would move the ball to the right under normal flight conditions (but not in a developed spin with the instrument mounted on the left side of the panel, as shown).
Summary of a Spin Recovery
12-16 Part Two / Presolo In some cases how quickly the wheel or stick is moved for-. You'll have to get the wheel or poke forward to break the stall, and sometimes it's hard to get yourself to do that.
Spins and Spirals
If you accidentally find yourself in a spin situation one day while at altitude practicing stalls, your initial instinct will be (as the airplane spins and the nose drops to a very low altitude) to hold the rudder or climb all the way back to pull the nose up. An experienced spin instructor, when asked to recommend a "spin warning" (ie, when the aircraft is stalling and when a yaw or spin is induced), responded that a boxing glove should come out of the instrument panel by hitting the pilot and forcefully releasing the rudder or stick.
Summary of Elementary Stalls and Spins
The warning can be issued anytime the angle of attack becomes too great, regardless of airspeed. As the airfoil approaches the critical angle of attack, the relative wind pushes the vane to ON.
A Few Last Notes on Spins
Changes in air pressure at changing higher angles of attack draw air through the horn and give warning of an impending stall a few knots before the stall occurs. The angle of attack indicator is not generally accepted for light general aviation aircraft, but may be used in the future.
Normal Takeoff
Maybe you think takeoffs and landings are the most important parts of flying, but as far as your training is concerned, they're just another maneuver.
Tricycle-Gear Airplane Takeoff Procedure
Releasing backpressure after takeoff (or continuing to hold the backpressure used to lift the aircraft) so that the nose of the aircraft rises sharply and does not maintain the best rate of climb (VY).
Takeoff for Airplanes with Tailwheels
The Tail-Up Part of the Roll
When the tail comes up, the tail wheel no longer helps and a further deflection of the rudder is required for torque correction. The aircraft reacts as if the force were applied to the right side of the arc, and this tends to turn the aircraft to the left.
Lift-Off
When the tail is raised, the effect of the force acting on the top of the propeller arc is from behind. You know that a gyroscope responds as if the force is acting on a point 90° around the wheel (measured in the direction of rotation).
Normal Landing
But speaking on a pilot level, the idea of a landing is to get the plane on the ground without fuss. The best way to land is to try to keep the plane at bay for as long as possible.
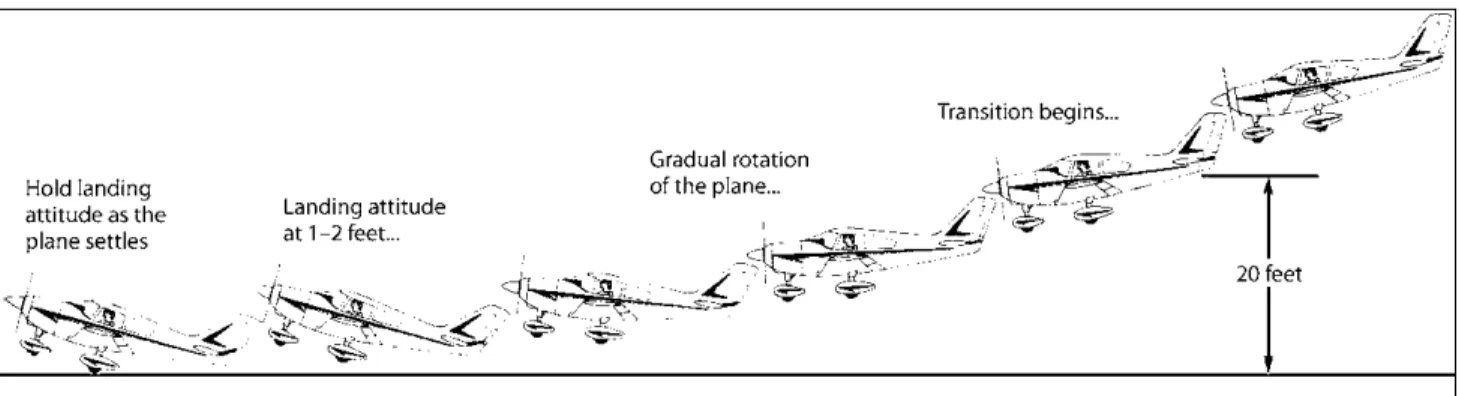
Where to Look
After starting the transition at about 20 feet, continue to move smoothly back to the wheel (height shown here about 15 feet). The plane continues to settle as you continue to move back on the wheel and it touches down in the correct landing attitude.
Ground Loops
Shooting Takeoffs and Landings
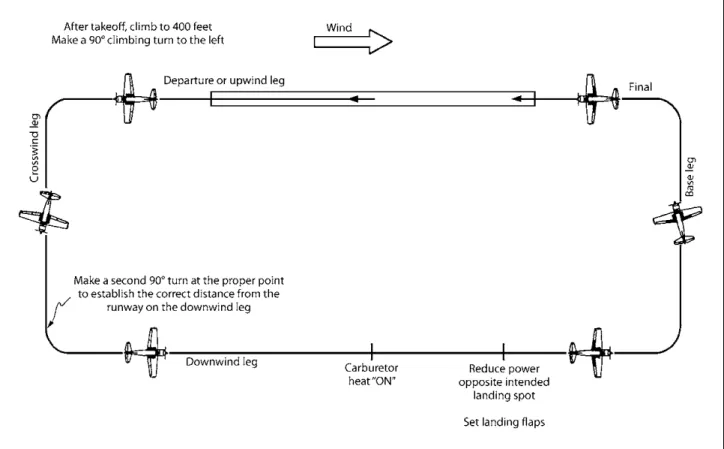
The Traffic Pattern
If necessary, make the final turn to align with the centerline of the runway. Don't try to take out the runway at too high a speed; you can get a ground loop.
Flaps
This occurs when the final turn is not initiated quickly enough and the aircraft must be turned back onto the runway. One day you may have to go around from a touchdown position with full flaps starting no more than a few feet above the runway.
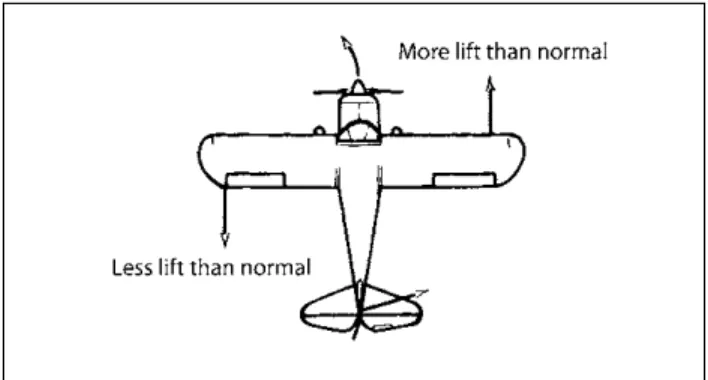
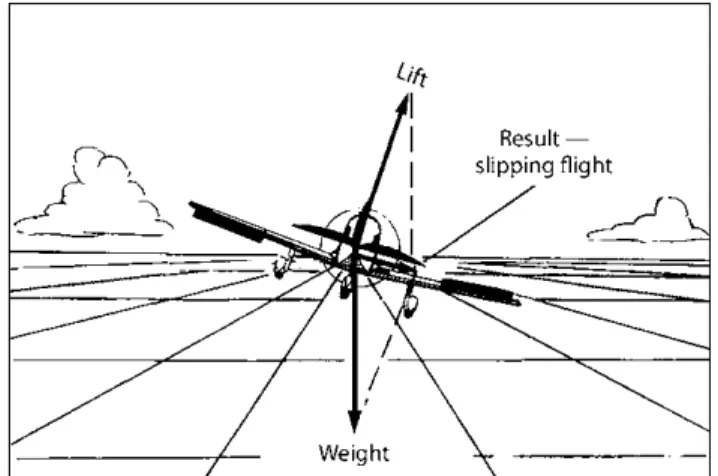
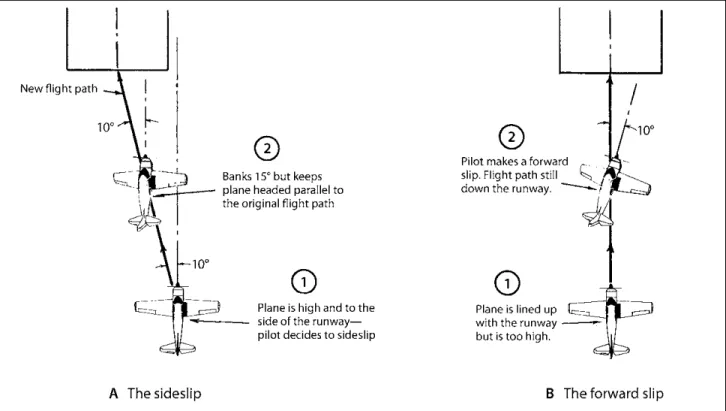
Slip
Sideslip is usually used to correct for wind drift (as you'll see later in crosswind landings) or to change the airplane's flight path as you increase the angle of descent. In a right glide, a low pressure area tends to form on the left side of the airplane, lowering that static pressure so that it doesn't "cancel out" the static pressure in the pitot tube (and diaphragm).
Recoveries from Bad Situations During the Landing
Some aircraft require you to apply a slight forward thrust to prevent the nose from getting too high in the skid. "wrong side" tends to negate the "right" dynamic pressure coming into the pitot tube.).
Flying into the Ground
You can see that the static pressure in the static tube should exactly cancel out the static pressure in the pitot tube (it says here) so that the dynamic pressure shows up correctly as airspeed. The bottom line is that if you rely on the airspeed indicator rather than the aircraft's position, you may be too fast in the glide and lose the advantage of the maneuver, or you may be too slow and have an unusually high rate of sink.
Dropping the Plane In
It is also bad form to sit there and do nothing after the bounce, with the plane up and the airspeed. As soon as you notice that you and the runway have not made connections and the plane is going to stall, apply power.
Too Low in the Approach
You unknowingly pull up your nose as you see it's going to be a squeeze making the runway; when you start to break the glide the airspeed is very low (angle of attack is very high) and you run out of airspeed and inspiration before the plane reaches the ground. The power is then cut off, giving the airplane a longer distance to "fall" than the initial situation.
Too High in the Approach
Being too low on the approach while trying to stretch the slide is another cause. In some cases of ballooning or bouncing, the tendency is to add power while the aircraft is pointing upwards, thereby dragging it even higher at too low an airspeed.
Emergencies on Takeoff and in the Pattern
But you have a better chance of surviving there than trying to get back to the field. You realize what is happening and quickly spin the plane around to return to the runway.
Crosswind Takeoffs and Landings
Experience has shown that attempting a 180° turn to return to the runway after an engine failure on climb is fraught with danger. Also remember that once you get to the transition point to land, you won't be looking at the airspeed indicator anyway.
Crosswind Takeoff
As soon as the plane takes off, it will want to start drifting. Holding down too many ailerons in the final stages of takeoff so that the aircraft pitches steeply into the wind as soon as the wheels leave the ground.
Crosswind Landing
One way to correct for drift is to put a crab on final approach, then just before the plane touches down, glide it straight down the runway with the rudder. As the airplane slows down during the landing process, more aileron and rudder deflection is required because (1) the controls are less effective as the speed decreases, and (2) the actual pitch must be steeper because of the relationship between the wind speed and your speed increasing (more fixes needed).
Power-Off Approaches
The 90° (plus) turn must be completed without delay so that you arrive at the key position of the base with the wings level and a good view of the runway, so that you can verify the necessary corrections. One problem instructors have with the base leg is that students often stare straight ahead and don't look at the runway until they think they're ready to go to the final leg.
Downwind Leg
The down key will check if the plane is too far or too close to the runway. Was the wind decreasing or increasing?” Chances are the plane won't stall, but you may feel like it's low speed when the ground is rising rapidly.
Wake Turbulence
The balance between lift and weight is disrupted (lift is suddenly reduced) and the aircraft accelerates downward, increasing the angle of attack to the point where the aircraft stalls - making the situation worse. Many a pilot has been ready to land on a gusty day and had the bottom fall out, then climbed out of the wreckage and wondered why the plane "went down". It is not unusual to have a plus or minus 10K swing on the airspeed indicator during approach on a windy day.
Gusty Air and Wind Gradients
If you hit sudden turbulence on an approach, apply power first and then ask, “Was that a shear zone. -28 Part Two / Pressolo Again, don't be too proud - pay attention if you think there will be wake turbulence during the landing.
After Landing/Taxi-In
Read Chapter 7, Section 3 of the Aeronautical Information Manual, which contains information you need to know about wake turbulence.
Solo
Cross-Control Stall / Skidding
The pilot doesn't want to make a steep bank at low altitude, knowing that stall speed increases with bank angle, so he uses the rudder to cheat a little. The nose likes to go down because of the rudder and ailerons, so uplift is added.
Procedure — Power-Off
Accelerated Stalls
A whip stall occurs when the aircraft comes to rest in a vertical nose-up position; the aircraft slides backwards before recovery can take place. Release the back pressure and after recovery has begun, return the aircraft to level flight with coordinated control.
Stabilator or Elevator Trim Tab Stall
Relaxing the back pressure at the right time will cause the airplane to recover to straight and level flight if the high wing stalls first and you can perform a recovery as the wings roll up to level. In (2) the aircraft may have rolled into a bank in the opposite direction and the nose will be low.
Excessive Top-Rudder Stall
Excessive Bottom-Rudder Stall
General Talk About Stalls
Instrument training is teaching you to interpret the information provided by the instruments and to make the aircraft respond in the desired manner using the indications. The number of flight hours has no bearing on a pilot's ability to fly the aircraft by "feel" alone.
Private Pilot
As always, a coordinated use of ailerons and rudder is required, and the rudder and ball must be considered as working together. Again, if the aircraft you are using for training has an attitude and heading indicator, you would use them for all subsequent maneuvers.
Recovery from a Power-On Spiral
Check the airspeed in your scan of the instruments, but realize that it will settle down on its own soon. During the final stages of recovery, the turn signal should not be neglected and constant scanning of all instruments is necessary for a safe, firm recovery.
Summary of the Power-On Spiral Recovery
The aircraft must be controlled directionally while the descent (or ascent) is controlled or stopped. It is better if you throttle back at the start of the spiral recovery to avoid this abuse of the engine.
Recovery (Attitude and Heading Indicators Inoperative)
Assume that the position and direction indicators are not working in the first part of the discussion. You should know how to achieve recovery using the basic instruments shown in Figure 15-3, but in most cases you will use the position indicator.
Recovery from the Approach to a Climbing Stall
However, in this case the airspeed starts to increase when the attitude of the aircraft is approximately level. Again, using the attitude indicator makes things much easier; you can simultaneously lower the nose as the wings are leveled.
180° Turn
If the airspeed and altitude begin to decrease, stop the turn, recover to straight and level flight, and resume the turn after the aircraft is under control. If the aircraft remains under control after entry into force, a 180° turn is desirable.
Using the Four Main Directions
On the other hand, if you've inadvertently turned while in cloud or fog, a 180° turn can put you deeper into the weather. You don't particularly notice the direction, but you mechanically set a 180° turn, which will actually take you further into the weather, when a 20° right turn would put you in the desired reciprocal direction.
Timed Turn — Recommended Method
15-6 Part Three / Postsolo Maneuvers Remember that the turn signal is not the only instrument to watch during this maneuver. When flying across the country, always keep in mind the inverse of your course.
Shallow-Climbing Turns to a Predetermined Altitude
You will be on your heading of 125 when you still have 350 feet of elevation left. One point: While the attitude indicator can flip over and be out of order for several minutes (if you don't have an instrument with a dial), you can reset the heading indicator immediately and use it as an aid to keeping your wings level (if you get indications of a right turn, is that wing down, etc.).
Procedure (Basic Instruments)
When the heading indicator is in the middle, slowly apply reverse pressure to reduce the airspeed to the climb value. Once the climb is established with the airspeed and power setting (wings handled with the direction indicator), set the standard turn to the desired direction.
Leveling-Off Procedure
If the altitude is kept constant and the power setting is set to cruising speed, the airspeed will take care of itself and soon drop to cruising value. It will take some time for the airspeed to drop to that of the climb.
Shallow Descending Turns at Reduced Power to a Predeter-
In visual flying, the leveling off was accomplished by easing the nose to the straight and level position, checking the altimeter, and, as the airspeed approached the speed value, throttle back to cruise rpm and trim the airplane. It may be required to climb to a specific height and turn to a definite course, so stop the turn but continue the climb, or vice versa, to get what you want.
Straight and Level
Straight Descents Using the Magnetic Compass
Simulated Radar Advisories
Another Basic Wind Drift Maneuver
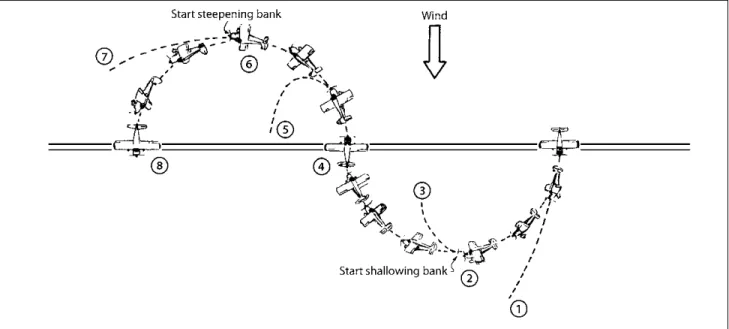
Turns Around a Point
However, the 100 K true airspeed vector must "point" in such a way that the resultant of the airplane's course plus the wind makes the airplane's path tangent to the circle at any position. The reason for the bank is to get the right heading for the next "leg". The width at point 1 must be steepest because the aircraft is approaching the next "leg" at the greatest speed.
Eights Around Pylons (Around-Pylon Eights)
Advanced Wind Drift Correction Maneuvers
The principles involved are the same as for the other wind drift correction maneuvers discussed earlier. The turning portions of the figure-of-eight follow the theory shown in Figure 16-3 — the airplane scrapes in the turn.
Spirals (Constant-Radius Descending Turns)
This is to get the plane into the air sooner than would be the case if the plane was "detained". The aircraft will accelerate faster when airborne due to the reduced drag of the air. There are some 50 foot trees on the other side of the runway that you will have to get over.
Short-Field Takeoff
The most important thing is to set the airspeed and configuration recommended in the POH for takeoff with short field or obstacles because that is the problem. There's the old aviation adage: "The runway behind you, altitude above you, and fuel left in the fuel truck are three very useless things."
Short-Field Landing
For airplanes with retractable gear and flaps or for airplanes with fixed flaps and flaps, the best airspeed to avoid obstacles given in the Pilot's Operating Handbook may be less than the speed given for the best angle of climb in that same publication. The best rate of climb and angle is usually found by the manufacturer through flight testing and graphics, for the aircraft flying in its cleanest condition (flaps up and gear up, if possible).
More About Power Approaches
If it moves away from the nose, the plane will be short of the tip. If the spot "increases" on the plane, you will land short of the spot.
Short-Field Approach and Landing
You will essentially be flying a pattern, so using a normal glide would result in too low a takeoff; otherwise, if the power supply is used in a normal pattern, you will overshoot. Gliding too fast in the normal part of the approach, so that when the nose is up to slow down to final approach speed, the airplane inflates and is too high to make a hard approach.
Soft-Field Takeoff
Closing the throttle while the aircraft is almost level and still off the ground - let the aircraft descend. With more experience, you will be able to leave the throttle at a constant setting once the path is established.
Soft-Field Landing
The technique was once to use force throughout the landing, but this resulted in the pilot "juggling" the throttle, using the runway and disrupting the landing, trying to forcefully control the landing time (Figure 17.8). This keeps the plane from using as much runway as it would under lesser wind conditions, but poor techniques can still eat up a lot of runway.
Gusty Wind Landings
Some pilots advocate using rpm for a wheel landing, but you have found that the average light aircraft will maintain altitude at a power setting only slightly higher. Dragging the main wheels will force it, but you can keep as much weight off the nose wheel as possible by pushing back.
Tricycle-Gear Procedures
17-6 Part Three / Postsolo Maneuvers the airplane literally flies to the ground and lands on the main wheels to maintain a low angle of attack and prevent any tendency for a sudden gust to lift the airplane off the ground, as can happen in a three-point landing under such conditions. The approach is made at a speed slightly higher than a normal glide, and the transition is made at a lower altitude for two reasons: (1) the aircraft must touch down at a higher speed, and (2) the nose-down position will be the safest possible touchdown position.
Wheel Landing —
Use just enough power to control your rate of descent and get into a position to land without power. The same principle applies to landing in a soft field for an aircraft equipped with a tricycle.
Tailwheel-Type Airplane
The crosswind correction for a wheel landing is the same as for a three-point landing. If the plane starts to bounce open the throttle and take it around and land again.
Dragging the Area
Position yourself on a downwind course and begin a normal approach to the part of the field you want to land on. Drag the area when you think the plane should be on the ground for safety and you are not close to the airport.
Takeoff and Landing Performance
After landing, go to the farmhouse and ask if you can use the phone. The manufacturing-demonstrated crosswind component (0.2 VS0) is that required by 14 CFR §23.233 (a) for certification of the airplane.
Simulated High-Altitude Takeoffs
The problems you get on the knowledge test require you to find the angle ("you land on runway 27 with a wind of 310° at 20 K") and then use the map. One thing you may not have considered is that moist air is less dense than dry air (all other factors being equal), so the airplane will not perform as well in takeoffs and climbs when the air is moist. You can expect up to about 10 percent less performance in wet conditions.).
Telling Wind Direction
As you loosen the flaps to extend the glide, you will lighten the nose to maintain the required airspeed. It is better not to waste time trying to figure out the wind direction after the emergency has occurred.
Picking Your Field
But if you're in a typical trainer with normal glide speed and a reasonable altitude (say, 300 feet or so), you'll be much better off getting distance by easing a grade or so of bump. easy), even if that initial easy sink bothers you. Well, it's not Dulles International Airport, but because you used the right techniques, you'll make it without any damage to the plane or passengers.
Common Errors in Practice Emergencies
The shutdown procedure varies by aircraft type and model, but you'll want to have the mixture, fuel, and ignition and master switch OFF before touchdown if you're going to field it for sure. You'll be scared, but if you've practiced in an emergency and gone through the process in your mind, you'll be fine and it'll be well-talked about afterwards.
Discussion
If you have time, open the doors just before landing to prevent them from jamming. Go to the nearest phone and let the people at the airport know what happened.
Emergency Descent
Too many pilots jump into a plane and head for distant airports with little thought to weather, the condition of the destination airport, or what kind of fuel or repair service can be obtained there. Unfortunately, too many pilots rely on radio navigation and find themselves corroded in piloting or using the cross section chart if the radios go out.
Meridians, Parallels and Time
The reason for choosing an intermediate meridian is because of the type of chart you will be using, as will be discussed later under "Plotters". If you are at 90° west longitude, your standard time will be 6 hours after Greenwich (every 15° longitude = 1 hour time).
More About the Compass
If you are in the eastern standard time zone, add 5 hours to get UTC (or Zulu) time, add 6 in the central standard time zone, and so on. The Airport/Facility Directory (discussed in the next chapter and also in Appendix A, the legend for the A/FD – see item 5 there) gives the correct conversions from Zulu (UTC) to local time or vice versa.
Variation
Since you mean the compass, the heading should be considered in relation to the magnetic north pole. The angle from the magnetic north pole to the heading line is 5° less than the true heading and is 115° magnetic.
Deviation
Draw the course line and imagine what the bearing is (Jonesville is east-southeast of Smithtown, so you'll figure somewhere between 90° and 135° true course). If you can't find your plotter and one of those omni roses is near your course line on the map, you can measure the magnetic course by placing a straight edge parallel to the course line and through the center of the circle (or use a parallel ruler if you have one).
Computer
You will soon be able to look at a heading line on a chart and guess within 5° of it. The magnetic course is then read due to the orientation with magnetic north rather than a meridian and you have saved the step of adding or subtracting variation.
Plotter
It is an aid to the pilot that combines pilot and radio navigation, as will be covered later. The indicated airspeed for normal cruise for this aircraft will be in the region of 100 K (depending on power setting and altitude).
Finding True Airspeed
The cruise information in the airplane's Pilot's Operating Handbook is given as TAS for various power settings and altitudes (see Chapter Figure 19-8. There is an error of about 2 percent for every thousand feet of difference between the indicated and pressure altitudes.
Getting the Groundspeed