297
■ ■ ■
Writing to the Database
S
o far, you’ve dealt with only read-only data—pulling some data from a database without altering it. In this chapter, you’ll discover how to create pages that allow users to add, modify, and delete the contents of a database. At the core of these three operations are three SQL queries:INSERT, UPDATE, and DELETE.
First, we’ll look at modifying the data in separate pages that neatly wrap up the three different types of operations using a Command object. Then you’ll see how to use a DataSet to make changes to tables.
This chapter covers the following topics:
• How to use single-value and list Web controls to build a query sent directly to the data- base with a call to ExecuteNonQuery() or ExecuteScalar()
• How to validate data entered through Web controls to make sure no invalid changes are made
• How to use a DataSet to hold several different tables and propagate any changes back to the database in one call to Update() through the DataAdapter
Making Changes to a Database
Those three basic steps you first heard about back in Chapter 1—creating the connection, sending the query, and handling the results—still hold true for making changes to a database. However, you have a lot more things to consider, and the changes must play by the database’s rules.
The main difference is in sending the query, where you’ll need to use the appropriate query for what you want to do. The results of the query will generally be a scalar value indicating the number of rows in the database that have changed as the result of the query. It’s your choice whether you use this result, but it does provide quite a good indication of whether the query that you’ve executed has worked correctly.
In this chapter, you’ll learn how to use the following queries:
• The SQL INSERT query to add new rows to a table in a database
• The SQL UPDATE query to change rows already in a database
• The SQL DELETE query to remove rows from a database
Unlike the SELECT query, which just retrieves data, these three queries must obey the rules you created when you built the database and created relationships between tables. What was the data type for this column? What was its maximum length? Was it a key? Can it be null? The onus is on you to make sure that the data you try to add to a table obeys its rules. As with dealing with data for display, the basics are straightforward, but you need to expend a little more effort to make the page user-friendly (and idiot-proof).
Inserting Data into the Database
You’ll always have information to change and new data to collect, so providing a way to add new information to your databases is pretty crucial. Some sites may hide this functionality away in an administration section. How inserting data is handled depends on what the database models and who is logged on. For instance, Amazon hides the functionality to add new product information from you, the public, but it does let you add new feedback, and user information to its database, provided you’re logged in. Similarly, eBay allows anyone to add a new auction to its database, but only the auctioneer can change those details. Security, then, is also a very impor- tant issue to consider.
The INSERT Query
At the heart of the code to add new information to a database is the SQL INSERT query. Although it may seem otherwise, sending an INSERT query to a database is the only way to do this. Compared to the complexities of the SELECT query, the INSERT query is quite simple.
INSERT [INTO] <table name>
[ (column list) ]
VALUES ( column value list )
The query doesn’t need to be split over three lines, but that format makes it easier to see that it has six pieces:
• The keyword INSERT denotes the action to the database.
• The optional keyword INTO makes the query more readable.
• The table name identifies the table to which you’re adding information.
• The (comma-separated) column list names the columns in the new row to which you’re giving values. Although this isn’t required, it is a good idea to specify it. It makes the query easier to follow and can reduce the risk of problems when you make changes to the database structure.
• The keyword VALUES separates the column list from the column value list.
• The (comma-separated) column value list contains a value for each of the columns in the column list for the new row. The number of the items in the column list should equal the number of items in the column value list and be ordered in the same way.
Thus, the first column named in the column list will be filled with the first value in the column value list, the second with the second, and so on. Each value can be one of the following:
• A literal
• An expression saying how a value is to be determined from the values of other columns (firstname + surname, for example)
• The keyword DEFAULT, indicating that the column should take its default value as defined in the database
• NULL
With this in mind, it shouldn’t be too difficult to construct a simple INSERT query for any of the four tables in the sample database. To insert a new Player, for instance, you could use the following query:
INSERT Player (PlayerName, PlayerManufacturerID, PlayerCost, PlayerStorage) VALUES ('New Player', 1, '199.99', 'Solid State')
As you’ll recall, the Player table actually has five columns, and you have not specified one of them. This isn’t an error!
If a column is an identity column or has a default value, then you don’t need to specify it when you’re adding a new row; the database takes care of populating the column. So, even though you haven’t specified the PlayerID column, the value is entered automatically by the database.
It’s also possible to insert data into a database using the INSERT query without specifying the columns you want to insert the data into, as long as you specify the data for all the columns (bar the identity columns) in the order they appear in the database. Even columns that have default values must be specified.
So, you could change the previous INSERT query to the following without any problems:
INSERT Player
VALUES ('New Player', 1, '199.99', 'Solid State')
Although inserting data without specifying a list of columns is perfectly valid, it makes more sense to name the columns. As with the SELECT query, specifying the columns makes the query slightly quicker and shows which columns you’re trying to affect. With the INSERT query, it also avoids putting data in the wrong column if columns have been added to or removed from the table.
■ Note
One point to remember about INSERT is that it works with only a single table at a time. If you’re working with complex data that would be sourced from two or more tables in a database, you’ll need to write an INSERT query for each table to be updated. For example, to add details for a new Player to the sample database, you would have to write an INSERT query for both the Player table and the WhatPlaysWhatFormat table at the least. If the new Player were manufactured by a Manufacturer not in the database, you would need to create an INSERT query for the Manufacturer table as well.The database-generation scripts in the code download for this book illustrate this point.
The scripts contain INSERT queries for each row in each table, with each table populated in the correct order so that no data entry breaks any of the database constraints.
Working to the Database’s Rules
Unlike playground rules, database rules aren’t made to be broken, and you need to keep the following in mind when you’re inserting new data into a table using INSERT:
Primary keys: You must provide a unique value for the column(s) in a table’s primary key.
If you don’t, the database will return an error. Thus, you need to ensure that when you insert a new row into a table using INSERT, it contains a valid and unique value for the primary key. Things are a bit simpler if the primary key you use in the table is an identity column, such as the PlayerID column in the Player table, the ManufacturerID column in the Manufacturer table, or the FormatID column in the Format table. By establishing such a primary key, you can omit this column from the INSERT query’s column list, because the database will automatically generate the value for you as you add the new row.
Foreign keys: If one of the columns in a table is a foreign key, you must ensure that any value you try to add to that column already exists as a value for the primary key in the corresponding table. When adding a Player, for example, the Manufacturer must exist before you can use it for the Player.
Mandatory columns: If a table doesn’t allow a column to be null, you must give it a value when you add a new row. Either the user provides a value or you give it a default value when the user doesn’t.
Column data types: Each column must be given a value of the appropriate type.
Each of these rules complicates things. Can you ensure that values are unique? What Web controls best suit data entry for each column? How do you enter a default value and make sure a column is given a certain value? You’ll learn the answers to these questions as you work through this chapter’s examples.
Try It Out: Inserting a New Player with INSERT
In this example, you’ll build a page that allows you to add details of a new Player to the sample database. However, you won’t include the selection of the supported Formats for the Player, which is handled in a later example.
1. In Visual Web Developer, create a new Web site at C:\BAND\Chapter08 and delete the auto-generated Default.aspx file.
2. Add a new Web.config file to the Web site and add a new setting to the
<connectionStrings /> element:
<add name="SqlConnectionString"
connectionString="Data Source=localhost\BAND;Initial Catalog=Players;
Persist Security Info=True;User ID=band;Password=letmein"
providerName="System.Data.SqlClient" />
3. Add a new Web Form to the Web site called Players.aspx. Make sure that the Place Code in Separate File check box is unchecked.
4. In the Source view, find the <title> tag within the HTML at the bottom of the page and change the page title to Players.
5. Switch to the Design view and add a SqlDataSource to the page. Choose to configure the data source and use SqlConnectionString to connect to the database. Select the PlayerID, PlayerName, and PlayerCost columns from the Player table to configure the SELECT query.
6. Switch back to the Source view and add the following markup after the definition of the SqlDataSource:
<asp:HyperLink ID="HyperLink1" runat="server"
NavigateUrl="./Player_Insert.aspx">Add player</asp:HyperLink>
<br /><br />
<asp:GridView ID="GridView1" runat="server" AutoGenerateColumns="False"
DataSourceID="SqlDataSource1">
<Columns>
<asp:BoundField DataField="PlayerID" HeaderText="PlayerID" />
<asp:BoundField DataField="PlayerName" HeaderText="Name" />
<asp:BoundField DataField="PlayerCost" DataFormatString="{0:n}"
HeaderText="Cost" />
</Columns>
</asp:GridView>
7. Add a new Web Form to the Web site called Player_Insert.aspx. Make sure that the Place Code in Separate File check box is unchecked.
8. In the Source view, find the <title> tag within the HTML at the bottom of the page and change the page title to INSERT Player. Add the required Import statement to the top of the page:
<%@ Page Language="C#" %>
<%@ Import Namespace="System.Data.SqlClient" %>
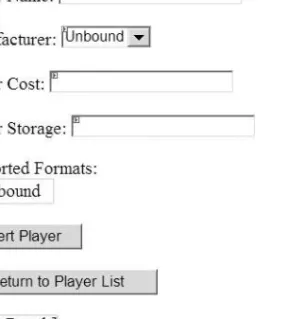
9. Add some Web controls to allow the addition of the Player to the database: a Button to insert the Player, a Button to return to the list of Players, a TextBox for the user to add the Player’s name, a DropDownList for the Manufacturer, a TextBox for the Player’s cost, and a final TextBox to specify the storage type for the Player. Call these SubmitButton, ReturnButton, PlayerName, ManufacturerList, PlayerCost, and PlayerStorage, respectively.
Also add a Label, called QueryResult, to show the results from the query that was actually executed. You can see how the Web controls are laid out in Figure 8-1.
Figure 8-1. The Web control layout for Player_Insert.aspx
10. Add a Page_Load event handler to the page, as follows:
protected void Page_Load(object sender, EventArgs e) {
if (Page.IsPostBack == false) {
// populate the list of manufacturers PopulateManufacturers();
} }
11. Add the PopulateManufacturers() method:
private void PopulateManufacturers() {
// create the connection
string strConnectionString = ConfigurationManager.
ConnectionStrings["SqlConnectionString"].ConnectionString;
SqlConnection myConnection = new SqlConnection(strConnectionString);
try {
// query to execute
string strQuery = "SELECT ManufacturerID, ManufacturerName ➥ FROM Manufacturer ORDER BY ManufacturerName";
// create the command
SqlCommand myCommand = new SqlCommand(strQuery, myConnection);
// open the database connection myConnection.Open();
// run query
SqlDataReader myReader = myCommand.ExecuteReader();
// set the data source and bind
ManufacturerList.DataSource = myReader;
ManufacturerList.DataTextField = "ManufacturerName";
ManufacturerList.DataValueField = "ManufacturerID";
ManufacturerList.DataBind();
// close the reader myReader.Close();
} finally {
// always close the database connection myConnection.Close();
} }
12. Switch to the Design view of the page and add a DataBound event handler for the ManufacturerList control. Add the following code to the event handler:
protected void ManufacturerList_DataBound(object sender, EventArgs e) {
ListItem myListItem = new ListItem();
myListItem.Text = "please select...";
myListItem.Value = "0";
ManufacturerList.Items.Insert(0, myListItem);
}
13. With the Web control layout sorted and populated as required, you need to implement the code to insert the Player into the database. Switch back to the Design view of the page and double-click the SubmitButton control to add a Click event handler. Add the following code to the event handler:
protected void SubmitButton_Click(object sender, EventArgs e) {
// save the player to the database int intPlayerID = SavePlayer();
// did an error occur?
if (intPlayerID == -1) {
QueryResult.Text = "An error has occurred!";
}
else {
// show the result
QueryResult.Text = "Save of player '" + intPlayerID.ToString() + "' was successful";
// disable the submit button SubmitButton.Enabled = false;
} }
14. To insert the Player into the database, you call a function named SavePlayer(). This function returns the PlayerID for the new entry, or it returns -1 if an error occurs:
private int SavePlayer() {
int intPlayerID = 0;
// create the connection
string strConnectionString = ConfigurationManager.
ConnectionStrings["SqlConnectionString"].ConnectionString;
SqlConnection myConnection = new SqlConnection(strConnectionString);
try {
// query to execute
string strQuery = "INSERT Player (PlayerName, PlayerManufacturerID, ➥ PlayerCost, PlayerStorage) VALUES (@Name, @ManufacturerID, ➥ @Cost, @Storage); SELECT SCOPE_IDENTITY();";
// create the command
SqlCommand myCommand = new SqlCommand(strQuery, myConnection);
// add the parameters
myCommand.Parameters.AddWithValue("@Name", PlayerName.Text);
myCommand.Parameters.AddWithValue("@ManufacturerID", ManufacturerList.SelectedValue);
myCommand.Parameters.AddWithValue("@Cost", PlayerCost.Text);
myCommand.Parameters.AddWithValue("@Storage", PlayerStorage.Text);
// open the connection myConnection.Open();
// execute the query
intPlayerID = Convert.ToInt32(myCommand.ExecuteScalar());
} catch {
// return -1 to indicate error intPlayerID = -1;
} finally {
// close the connection myConnection.Close();
}
// return the ID return(intPlayerID);
}
15. Finally, you need to provide a means for the user to return to the list of Players. Switch to the Design view and double-click the ReturnButton. Add the following code to the Click event handler:
protected void ReturnButton_Click(object sender, EventArgs e) {
Response.Redirect("./Players.aspx");
}
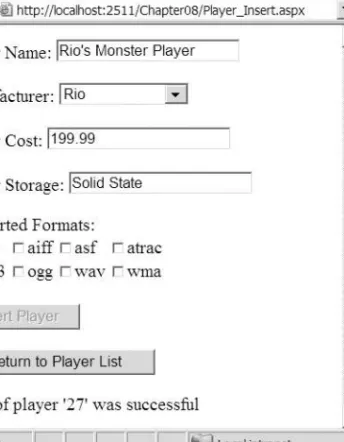
16. Save the page, and then open the Web site in your browser. In the list of Players, click the Add Player link. On the following page, add the details for a new Player. Then click the Insert Player button to execute the INSERT query and return the ID of the Player added, as shown in Figure 8-2.
Figure 8-2. Adding a new Player to the database
17. Click the Return to Player List button. You’ll see that the new Player has been added to the end of the list of Players, as shown in Figure 8-3.
Figure 8-3. The new Player added to the database
How It Works
This example has provided you with the means to add a Player to the database. The first 12 steps of the example should be quite familiar to you by now. You built a page that lists basic details for all of the Players in the database using a SqlDataSource and a GridView. We looked at table binding a GridView in Chapter 7.
The second page is the one that lets you insert data into the database.
Web Control Selection
The first stage of this page needs to take the rules of the sample database into consideration.
You’re adding a new row to the Player table, so the first task is to figure out which Web control is most suitable for adding the value for each column, as follows:
PlayerID: This is the primary key for the Player table, but it’s also an identity column, so you don’t need to insert a value for this column. It will be added for you automatically.
PlayerName: A Player’s name is just text, so a TextBox is appropriate.
PlayerManufacturerID: This is a foreign key from the Manufacturer table, so it can hold only values already in the Manufacturer table. It makes sense to give the user a choice of Manufacturers from a list, so you use a DropDownList and bind the ManufacturerName to DataTextField and the ManufacturerID to DataValueField. You could use any data-aware list Web control, but DropDownList works fine.
PlayerCost: The cost of the Player is a decimal, and the best way for entering this value is using a TextBox.
PlayerStorage: At this point, it becomes obvious that the sample database design is (delib- erately) flawed and that the Storage Type entries should really be in their own table. This would mean you could bind the available Storage Types to a list Web control and keep control of the Storage Types for the Players. But since the types are in the Player table, we’re allowing users to enter any Storage Type that they want. This is a good example of one of the repercussions of bad database design.
The list of Manufacturers is populated using a simple query to return just the ManufacturerID and ManufacturerName columns from the Manufacturer table. You saw how to do this in Chapter 6. You could also have used a SqlDataSource to populate the DropDownList.
Once the Web controls are set up as required, the user can enter the details of the new Player and click the Insert Player button to save the Player to the database. Here, you see the first problem with the page.
Error Handling
Rerun the Web site and enter a new Player without a name, cost, or storage type. Now save the Player. Instead of the Player being saved, an error has been trapped and an error message displayed, as shown in Figure 8-4.
Entering invalid data and trying to save it causes a SqlException to be raised and handled by the catch clause of your data-access code. If you add a breakpoint to the code within the catch clause, you’ll see that the exception is thrown because you’re trying to convert an empty string (an nvarchar) to a numeric value, and it’s not a valid cast. Figure 8-5 shows this information.
A multitude of different errors can arise if you don’t validate entries made by the user when inserting and updating data to the database. We’ll look at validating the user’s input in the “Validating Data” section later in this chapter, and you’ll update this example so that invalid data can’t make its way to the database. For now, you must enter values in all of the columns.
Figure 8-4. Invalid data causes exceptions, which thankfully are trapped.
Figure 8-5. When debugging, you can see the details of the raised exception.
Database Record Insertion
The part of the example of particular interest is the SubmitButton_Click event handler:
protected void SubmitButton_Click(object sender, EventArgs e) {
// save the player to the database int intPlayerID = SavePlayer();
// did an error occur?
if (intPlayerID == -1) {
QueryResult.Text = "An error has occurred!";
} else {
// show the result
QueryResult.Text = "Save of player '" + intPlayerID.ToString() + "' was successful";
// disable the submit button SubmitButton.Enabled = false;
} }
The SubmitButton_Click event handler calls the SavePlayer() method to save the Player to the database, and this method returns the PlayerID value for the new Player, or it returns -1 if an error has occurred. If you don’t have a valid PlayerID, you know that something has gone wrong, and you display an error message to the user. If the returned PlayerID is valid (not equal to -1), you can assume that the Player has been added to the database, and you display a success message showing the PlayerID of the Player just added to the database. If the Player has been added successfully, you also disable the SubmitButton, so that you can’t save the details for the same Player twice by accident. (Of course, there is nothing stopping the user from adding the exact same Player again and again!)
The SavePlayer() method is responsible for taking the details entered by the user and saving these details, using an INSERT query to the database:
INSERT Player (PlayerName, PlayerManufacturerID, PlayerCost, PlayerStorage) VALUES (@Name, @ManufacturerID, @Cost, @Storage);
This should look familiar, as it was the example used in the earlier introduction to the INSERT query, but instead of having actual values in the column value list, you’re using parameters that you add using the AddWithValue method:
// add the parameters
myCommand.Parameters.AddWithValue("@Name", PlayerName.Text);
myCommand.Parameters.AddWithValue("@ManufacturerID", ManufacturerList.SelectedValue);
myCommand.Parameters.AddWithValue("@Cost", PlayerCost.Text);
myCommand.Parameters.AddWithValue("@Storage", PlayerStorage.Text);
You’re using a parameterized INSERT query in the interest of security. You could just build the query with string concatenation, but as you learned in Chapter 4, parameters prevent users from trying to harm your database by sending malevolent SQL instructions through the TextBox.
Once the Command object is created and the parameters added correctly, you execute the query against the database. But if you look at the code for the page, you’ll see that the query that you’re going to execute isn’t quite what you just saw. In fact, the query that you send to the database is actually a query batch of two separate SQL queries: an INSERT and a SELECT query:
INSERT Player (PlayerName, PlayerManufacturerID, PlayerCost, PlayerStorage) VALUES (@Name, @ManufacturerID, @Cost, @Storage);
SELECT SCOPE_IDENTITY();
When sending a query to a SQL Server 2005 database, you can actually send multiple queries, separated by semicolons. You want to insert the Player into the database, but you also want to know the PlayerID of the Player that you’ve added. In this example, you display the PlayerID as a confirmation that the Player has been added to the database. In the next example, you’ll use this PlayerID when adding the details of the Formats that the Player supports.
When using a column defined as an identity column, you can use the SCOPE_IDENTITY() function to retrieve the value of that column. In order to return the value from this function, you can use it as a column in a SELECT query.
■ Note
The system variable @@IDENTITY returns the value of the identity column last entered. In this instance, both the SCOPE_IDENTITY() function and the @@IDENTITY system variable would return the same value. However, in cases when you’re using triggers, the @@IDENTITY system variable may return the wrong value; if the trigger also does an INSERT, it may return the identity value from a different table, whereas the SCOPE_IDENTITY() function returns the identity value from the original table. You should always use the SCOPE_IDENTITY() function to prevent any problems if triggers are added to your tables later.Thus, when you execute this query, you do so by calling ExecuteScalar() rather than ExecuteNonQuery() so you can capture the new PlayerID. ExecuteScalar() returns a generic object, rather than a string or an integer, so you cast it to an integer to make it easier to handle:
// execute the query
intPlayerID = Convert.ToInt32(myCommand.ExecuteScalar());
If there was an error when inserting the Player, an exception is thrown. You catch this and set the PlayerID to -1 to indicate that the INSERT query failed:
catch {
// return -1 to indicate error intPlayerID = -1;
}
Although all you’re doing here is setting a flag to indicate that there has been an error, you’re free to perform any other actions you want. If you want to send an e-mail message to the Web site administrator informing her that a problem has occurred, you can do so. Just be careful that your error-handling code doesn’t throw an exception, as that would cause a runtime error to be displayed to the user!
Once you’ve executed the query and returned the PlayerID, you exit from the SavePlayer() method and either display an error message or a confirmation to the user. At this point, the user can return to the list of Players to confirm that the new Player has been added and to add another Player if desired.
Queries in MySQL 5.0 and Microsoft Access
Before we move on to the next example and add the Format information, we’ll quickly look at two areas where SQL Server 2005 differs from MySQL 5.0 and Microsoft Access:
• Only when using the SQL Server data provider to connect to SQL Server 2005 can you use named parameters. Neither the ODBC data provider when connecting to MySQL 5.0 nor the OLE DB data provider (which we use to connect to Microsoft Access) support named parameters. With those data providers, you need to add parameters in the order in which they appear in the query.
• Neither MySQL 5.0 nor Microsoft Access allows multiple queries to be executed as part of the same query batch, and neither supports the SCOPE_IDENTITY() function.
Parameters and Queries in MySQL 5.0 and Microsoft Access
As you’ve learned in earlier chapters, you can’t use named parameters with MySQL 5.0 or Microsoft Access using the Odbc or OleDb data providers. You need to change the query that you want to execute and add the parameters to the parameters collection in the correct order.
For MySQL 5.0, replace the named parameters with the question mark character:
INSERT Player (PlayerName, PlayerManufacturerID, PlayerCost, PlayerStorage) VALUES (?, ?, ?, ?)
The query required for Microsoft Access is similar, except you must also specify the INTO keyword:
INSERT INTO Player (PlayerName, PlayerManufacturerID, PlayerCost, PlayerStorage)
VALUES (?, ?, ?, ?)
Once the query is defined correctly, the parameters are added in the order in which they’re required:
myCommand.Parameters.AddWithValue("?", PlayerName.Text);
myCommand.Parameters.AddWithValue("?", ManufacturerList.SelectedValue);
myCommand.Parameters.AddWithValue("?", PlayerCost.Text);
myCommand.Parameters.AddWithValue("?", PlayerStorage.Text);
Identity Values and MySQL 5.0 and Microsoft Access
Retrieving the identity value for a new row in a table requires two different queries to be executed.
SQL Server 2005 allows you to execute these queries as part of the same query batch to the data- base by separating the queries with semicolons. However, neither MySQL 5.0 nor Microsoft Access supports this functionality. Therefore, you need to make two distinct queries to the database:
the INSERT query to add the Player and a SELECT query to return the PlayerID.
For MySQL 5.0, this is relatively easy, as there is a corresponding function: LAST_INSERT_ID() returns the value you’re after. So, you create two queries and execute these one after the other:
// create the INSERT query
string strQuery1 = "INSERT Player (PlayerName, PlayerManufacturerID, ➥ PlayerCost, PlayerStorage) VALUES (?, ?, ?, ?);";
OdbcCommand myCommand1 = new OdbcCommand(strQuery1, myConnection);
// add the parameters
myCommand1.Parameters.AddWithValue("?", PlayerName.Text);
myCommand1.Parameters.AddWithValue("?", ManufacturerList.SelectedValue);
myCommand1.Parameters.AddWithValue("?", PlayerCost.Text);
myCommand1.Parameters.AddWithValue("?", PlayerStorage.Text);
// create the SELECT query
string strQuery2 = "SELECT LAST_INSERT_ID();";
OdbcCommand myCommand2 = new OdbcCommand(strQuery2, myConnection);
// open the connection myConnection.Open();
// execute the queries we need to execute myCommand1.ExecuteNonQuery();
intPlayerID = Convert.ToInt32(myCommand2.ExecuteScalar());
// close the connection myConnection.Close();
You’ll still wrap all of the above code in a try..catch..finally block, so that if there is a problem, you can set the PlayerID value to -1 to indicate that an error occurred.
To get the identity value in Microsoft Access, you can use the @@IDENTITY system variable.
So, simply execute a different query to return the identity value:
// create the SELECT query
string strQuery2 = "SELECT @@IDENTITY;";
OleDbCommand myCommand2 = new OleDbCommand(strQuery2, myConnection);
// open the connection myConnection.Open();
// execute the queries we need to execute myCommand1.ExecuteNonQuery();
intPlayerID = Convert.ToInt32(myCommand2.ExecuteScalar());
You’ll see these versions of getting the value of the PlayerID column in the code download for this book.
Try It Out: Setting the Player’s Supported Formats
Now that we’ve looked at how to add the basic details for the Player, let’s see how to add the Player’s supported Formats.
1. Open Players_Insert.aspx and switch to the Design view.
2. Add a new CheckBoxList before the Insert Player button. Rename it FormatList, set its RepeatColumns property to 4 and its RepeatDirection to Horizontal. The layout should now be as shown in Figure 8-6.
Figure 8-6. The new layout showing the Supported Formats CheckBoxList
3. Switch to the Source view and modify the Page_Load event as follows:
protected void Page_Load(object sender, EventArgs e) {
if (Page.IsPostBack == false) {
// populate the list of manufacturers PopulateManufacturers();
// populate the list of formats PopulateFormats();
} }
4. Add the new PopulateFormats() method:
private void PopulateFormats() {
// create the connection
string strConnectionString = ConfigurationManager.
ConnectionStrings["SqlConnectionString"].ConnectionString;
SqlConnection myConnection = new SqlConnection(strConnectionString);
try {
// query to execute
string strQuery = "SELECT FormatID, FormatName FROM Format ➥ ORDER BY FormatName";
// create the command
SqlCommand myCommand = new SqlCommand(strQuery, myConnection);
// open the database connection myConnection.Open();
// run query
SqlDataReader myReader = myCommand.ExecuteReader();
// set the data source and bind FormatList.DataSource = myReader;
FormatList.DataTextField = "FormatName";
FormatList.DataValueField = "FormatID";
FormatList.DataBind();
// close the reader myReader.Close();
} finally {
// always close the database connection myConnection.Close();
} }
5. Modify the SubmitButton_Click event handler as follows:
protected void SubmitButton_Click(object sender, EventArgs e) {
// save the player to the database int intPlayerID = SavePlayer();
// did an error occur?
if (intPlayerID == -1) {
QueryResult.Text = "An error has occurred!";
} else {
// save the formats for the player bool blnError = SaveFormats(intPlayerID);
// did an error occur?
if (blnError == true) {
QueryResult.Text = "An error has occurred!";
} else {
// show the result
QueryResult.Text = "Save of player '" + intPlayerID.ToString() + "' was successful";
// disable the submit button SubmitButton.Enabled = false;
} } }
6. Add the new SaveFormats() method as follows:
private bool SaveFormats(int intPlayerID) {
bool blnError = false;
// create the connection
string strConnectionString = ConfigurationManager.
ConnectionStrings["SqlConnectionString"].ConnectionString;
SqlConnection myConnection = new SqlConnection(strConnectionString);
try {
// query to execute
string strQuery = "INSERT WhatPlaysWhatFormat(WPWFPlayerID, ➥ WPWFFormatID) VALUES (@PlayerID, @FormatID)";
// create the command
SqlCommand myCommand = new SqlCommand(strQuery, myConnection);
// add the two parameters
myCommand.Parameters.AddWithValue("@PlayerID", intPlayerID);
myCommand.Parameters.Add("@FormatID", System.Data.SqlDbType.Int);
// open the connection myConnection.Open();
// loop through each of the formats
foreach (ListItem objFormat in FormatList.Items) {
// save if selected
if (objFormat.Selected == true) {
// set the parameter value
myCommand.Parameters["@FormatID"].Value = objFormat.Value;
// execute the query
myCommand.ExecuteNonQuery();
} } } catch {
// indicate that we have an error blnError = true;
} finally {
// close the connection myConnection.Close();
}
// return the error flag return(blnError);
}
7. Save the page, and then open the Web site in your browser. In the list of Players, click the Add Player link, and you’ll see that the list of Formats is populated. Enter the details for a new Player, and this time, specify the Formats that the Player supports.
8. Click the Insert Player button to save the Player to the database, along with the Formats it supports, as shown in Figure 8-7.
9. To see that the Format details have been saved to the database correctly, you can perform a SELECT query against the WhatPlaysWhatFormat table. The Player added has a PlayerID of 27, so look for this in the WPWFPlayerID column. As you can see in Figure 8-8, the two Formats have been added correctly.
Figure 8-7. The supported Formats are also saved.
Figure 8-8. The supported Formats have been saved to the database.
How It Works
With a bit more work, you’ve added the ability to save the supported Formats for a Player to the database. In order to do this, you need to perform two steps:
• Display the options on the page that may be selected in a suitable Web control.
• Save the selected options correctly to the database.
Because of the way that you structured the code for the first example, you can quite easily perform these two steps by adding two new functions: PopulateFormats() and SaveFormats().
The PopulateFormats() method displays the available Formats. You’re showing a list of Formats, so you’re going to be using one of the Web controls that support list binding, as described in Chapter 6. You need to allow the user to select multiple options, so you have only two choices:
a CheckBoxList or a ListBox. You’ve used a CheckBoxList as it allows the selection of multiple entries with a single click, so the user doesn’t need to use a combination of keyboard presses and mouse clicks to select multiple Formats.
The code within the PopulateFormats() method should be familiar to you by now. You return a list of FormatID and FormatName pairs using a simple query, and then set the DataTextField and DataValueField properties on the CheckBoxList.
It’s within the SaveFormats() method that the real work occurs. The first part of the method should be familiar by now. You create a Connection object to connect to the database and a Command object populated with the correct INSERT query:
INSERT WhatPlaysWhatFormat(WPWFPlayerID, WPWFFormatID) VALUES (@PlayerID, @FormatID)
Both parameters are then added to the Parameters collection:
// add the two parameters
myCommand.Parameters.AddWithValue("@PlayerID", intPlayerID);
myCommand.Parameters.Add("@FormatID", System.Data.SqlDbType.Int);
You already know the @PlayerID parameter value, as you retrieved it from the SavePlayer() method, and it is fixed for this Player, so you can use the AddWithValue() method to add it. But the @FormatID parameter is different. You’re allowing the user to select multiple values, so you can’t just add the parameter value and execute the query. You can add the parameter without a value using the Add() method, and then set its value later before you execute the query.
You check which Formats have been selected by using a foreach loop to work through all of the possible Formats (returned as ListItem objects from the Items collection of the CheckBoxList) and execute the INSERT query for each Format that is selected:
// loop through each of the formats
foreach (ListItem objFormat in FormatList.Items) {
// save if selected
if (objFormat.Selected == true) {
// set the parameter value
myCommand.Parameters["@FormatID"].Value = objFormat.Value;
// execute the query
myCommand.ExecuteNonQuery();
} }
If the Format is selected, the Selected property will return true, and you can set the parameter value to be the Value of the ListItem. The ExecuteNonQuery() method is then used to execute the INSERT query against the database.
Note that you open the connection to the database only once, and you close the database connection only once. You’re reusing the connection for each of the INSERT queries that you’re executing. Now this goes a little against my “open late, close early” mantra, as you’re keeping the connection open for longer than is necessary. However, in this case, the foreach loop is quick enough for the open connection to not be an issue.
Validating Data
The previous two examples have demonstrated how to add data to the database using INSERT queries. You also saw that it’s quite easy to cause runtime errors by not entering valid data.
Although you trapped these errors and handled them before the user saw the dreaded ASP.NET runtime error page, it would be much better to guard against these errors before they occur.
You need to validate the data that the user enters before you attempt to insert the data into the database. The same is also true when you update data, as you’ll see later in this chapter.
Whether you want to ensure that the user has entered a value of the required format (such as an e-mail address), entered a value within a range (such as a number between 1 and 10), or entered any value, ASP.NET provides Web controls to perform validation for you. The different validation Web controls are shown in Table 8-1. In addition to the Web controls for actually validating the user’s input, another Web control displays the results of the validation:
ValidationSummary.
Each of the validation Web controls can be executed either at the client or at the server.
If you choose to use client-side validation (the default), a postback will not occur, giving a richer user experience. However, in certain cases, a postback must occur before validation can continue. For example, if you’re validating for a unique username when creating a user account, you must check against the database that the username hasn’t already been used.
Table 8-1. The Validation Controls
Name Description
CompareValidator The CompareValidator compares the value entered by the user with either a constant value or the value entered in another Web control.
RangeValidator The RangeValidator checks that the value entered is between two specified values.
RegularExpressionValidator The RegularExpressionValidator checks that the value entered matches the specified regular expression.
RequiredFieldValidator The RequiredFieldValidator checks that a Web control contains a value.
CustomValidator If none of the other four validators match your requirements, the CustomValidator allows you to define your own validation routines.
■ Caution
In the default state of the validation Web controls, the validation is performed at the client as well as at the server. However, it is quite possible for users to disable JavaScript in their browser and turn off the client-side validation, and post the page to the server with invalid data. The validation always runs at the server, even if you have client-side validation turned on. You should always check that any validation has been done before allowing changes to be made to the database.The validation Web controls all expose a ControlToValidate property that specifies the ID of the Web control that is to be validated. The Web controls that can be validated automatically are shown in Table 8-2. For those Web controls that don’t support automatic validation, you’ll need to use a CustomValidator control for validation. For example, since there’s no way to automatically validate that a user selected a value from a CheckBoxList, in our example, you’ll have to write a CustomValidator to ensure that the user has selected at least one supported Format for the new Player.
Table 8-2 also lists the property of the Web control that the validator accesses to perform the validation. At this point, warning signs should be flashing. How can you use the SelectedItem from a ListBox with a RegularExpressionValidator? The validation Web controls are a little more clever than you may initially think, and for the Web list controls, the validator will actually look at the Value property of the SelectedItem.
Now let’s try using the various validation Web controls to improve the page for entering a new Player.
Table 8-2. Controls That Can Be Validated Automatically
Control Property Validated
DropDownList SelectedItem
FileUpload FileBytes
HtmlInputFile Value
HtmlInputPassword Value
HtmlInputText Value
HtmlSelect Value
HtmlTextArea Value
ListBox SelectedItem
RadioButtonList SelectedItem
TextBox Text
Try It Out: Validating Entered Data
In this example, you’ll update the previous example to add validation Web controls to prevent the user from entering incorrect data into the database.
1. Open Players_Insert.aspx and switch to the Design view.
2. Add a ValidationSummary from the Validation tab of the Toolbox to the top of the page.
3. Add a RequiredFieldValidator to the start of the Player Name line. Set its Display property to Dynamic, Text property to *, and ErrorMessage property to You must enter a name.
Finally set the ControlToValidate property to PlayerName. The page should look like the one shown in Figure 8-9.
Figure 8-9. Adding the first validation Web controls
4. Save the page, and then view it in your browser. Try saving a Player without a name.
As soon as you click the Insert Player button, you’ll receive an error, as shown in Figure 8-10, without a postback to the server being made.
Figure 8-10. The validation Web controls in action
5. Add a CompareValidator to the start of the Manufacturer line. Set its properties as follows:
• Display: Dynamic
• Text: *
• ErrorMessage: You must select a manufacturer
• ControlToValidate: ManufacturerList
• Operator: NotEqual
• ValueToCompare: 0
6. Add a RequiredFieldValidator to the start of the Player Cost line. Set its properties as follows:
• Display: Dynamic
• Text: *
• ErrorMessage: You must enter a cost
• ControlToValidate: PlayerCost
7. Add a RegularExpressionValidator to the start of the Player Cost line. Set its properties as follows:
• Display: Dynamic
• Text: *
• ErrorMessage: You must specify the cost as a decimal
• ControlToValidate: PlayerCost
• ValidationExpression: ^\d+(\.\d\d)
8. Add a RequiredFieldValidator to the start of the Player Storage line. Set its properties as follows:
• Display: Dynamic
• Text: *
• ErrorMessage: You must enter a storage type
• ControlToValidate: PlayerStorage
9. Add a CustomValidator to the start of the Supported Formats text. Set its properties as follows:
• Display: Dynamic
• Text: *
• ErrorMessage: You must select at least one format
10. Double-click the CustomValidator to add the server-side validation event. Add the following code to the event handler:
protected void CustomValidator1_ServerValidate(object source, ServerValidateEventArgs args)
{
if (FormatList.SelectedIndex == -1) {
args.IsValid = false;
} }
11. Save the page, and then view it in your browser. Try testing the different combinations of validators. You’ll see that they won’t let you save the Player until all of the data entered is valid. But there’s still a problem. Enter the data correctly, but don’t select any Formats.
As you can see in Figure 8-11, you’ll get the correct validation error, but the Player will still been saved.
Figure 8-11. A validation error occurs, but the Player is still saved.
12. You want to save the page only if all of the validators on the page are valid. Modify the SubmitButton_Click event handler as follows:
protected void SubmitButton_Click(object sender, EventArgs e) {
// only save if valid if (Page.IsValid == true) {
// save the player to the database int intPlayerID = SavePlayer();
// did an error occur?
if (intPlayerID == -1) {
QueryResult.Text = "An error has occurred!";
} else {
// save the formats for the player bool blnError = SaveFormats(intPlayerID);
// did an error occur?
if (blnError == true) {
QueryResult.Text = "An error has occurred!";
} else {
// show the result
QueryResult.Text = "Save of player '" + intPlayerID.ToString() + "' was successful";
// disable the submit button SubmitButton.Enabled = false;
} } } }
13. Rerun the page, and now try to save the new Player without any Formats selected. This time, the Player won’t be saved. Select at least one Format, and the page will now add the Player to the database.
How It Works
In this example, you used four out of the five available validators to prevent the user from saving a Player to the database with incorrect data, and you used both client and server-side validators.
Validator Properties
Although you used four different validator types on this page, three properties are common across all of the validators:
• Display: This determines how the validator is displayed on the page. The default value of Static always reserves space for the Web control on the page, even if it isn’t being displayed.
Setting this property to None will not show the Web control on the page (although the ErrorMessage will appear in a ValidationSummary). Setting it to Dynamic displays the Web control only if it’s invalid.
• ErrorMessage: The ErrorMessage property sets the text that will be displayed in a ValidationSummary (if one exists on the page) if the validation for the Web control fails.
• Text: The Text property sets the text displayed as the validator when validation fails.
When you’re using a ValidationSummary, the Text property is usually used simply to highlight which validator has failed.
All of the validation Web controls, other than the CustomValidator, also set the
ControlToValidate property. This specifies the ID of the Web control that is being validated.
You can also set this property for a CustomValidator, but in the majority of cases, it won’t be used. If you’re using a CustomValidator because a normal validator won’t work, you’ll need to interrogate the Web control directly in code.
The ValidationSummary Web Control
The first Web control that you have on the page is the ValidationSummary. It is here that the different validation Web controls display their ErrorMessage if the validation fails. It isn’t necessary to have this Web control on the page for validation to work, but it provides a handy location for all of the validation errors to be displayed.
The RequiredFieldValidator Web Control
The RequiredFieldValidator needs no configuration other than the Display, ErrorMessage, Text, and ControlToValidate properties that we’ve already discussed. As you saw in the example, if you don’t specify a value for a Web control that has a RequiredFieldValidator attached to it, the validation will fail.
The CompareValidator Web Control
The CompareValidator allows you to compare the value of the attached Web control against either another Web control (using the ControlToCompare property) or against a specific value (using the ValueToCompare property). In this example, you need to ensure that a Manufacturer has been selected, and you can use a specific value comparison, since you know that the
“please select...” entry has a value of 0 (zero). You can then set the ValueToCompare property to 0 and set the Operator property to NotEqual to ensure that the user has selected a value that isn’t equal to 0.
As well as checking for NotEqual comparisons, the Operator also allows you to perform various other checks:
• Equal (default)
• GreaterThan
• GreaterThanEqual
• LessThan
• LessThanEqual
• NotEqual
The CompareValidator also allows you to perform a further validation check. By setting the Operator property to DataTypeCheck, you can check that the value of the ControlToValidate is of a specific type. If you choose this type of check, the ControlToCompare and ValueToCompare properties are ignored, and only a check for a value that is of the correct type is performed. You specify the type allowed using the Type property, which can be one of the following values:
• Currency
• Date
• Double
• Integer
• String (default)
■ Note
In this example, you could have used a CompareValidator to ensure that the cost of the Player was entered correctly. However, you used a RegularExpressionValidator rather than a CompareValidator, simply because it demonstrated another type of validator.The RegularExpressionValidator Web Control
The RegularExpressionValidator allows you to check that the value entered matches a specific regular expression by setting the ValidationExpression property to the regular expression you want to use.
Any valid regular expression can be used, and Visual Web Developer provides you with several standard ones (an e-mail address and Web address, for instance). You’re checking that the entered value is a decimal, so you need to define your own regular expression as follows:
^\d+(\.\d\d)
A decimal is any number of digits followed by a decimal point, then two decimal digits.
■ Tip
A good place to look for regular expressions that meet your requirements is http://www.regexlib.com. Also refer to Regular Expression Recipes for Windows Developers: A Problem-Solution Approach by Nathan A. Good (1-59059-497-5; Apress, 2005).
The CustomValidator Web Control
The CustomValidator allows you to perform any validation that you require. You can perform this validation on the client side if you write a function in JavaScript and then pass its name to the ClientValidationFunction property. However, in most cases, you’ll run the validation on the server by providing an implementation for the ServerValidate event.
Within the ServerValidate event, if the validation fails, you indicate this by setting the IsValid property of the passed-in ServerValidateEventArgs parameter to false.
In this example, you determine if the user has selected a Format by checking the SelectedIndex property of the FormatList control. When validating, you’re not actually concerned with what the user has selected, just that she has selected something. So the validation fails if the user hasn’t selected anything—if the SelectedIndex is equal to -1:
if (FormatList.SelectedIndex == -1) {
args.IsValid = false;
}
Although the validation check that you’re performing here is quite simple, there are no limits to the validation that you can perform in the ServerValidate event. As long as you set the IsValid property to false, you can make the validation as complex and complete as you require.
The Page IsValid Check
The final change to the code for the page is to change the SubmitButton_Click handler to save the page only if the page was valid:
// only save if valid if (Page.IsValid == true) {
// save player }
Without this check, as you saw, the data will be saved to the database, even if one of the validators—in this case, the CustomValidator—failed. When committing changes to the database, you need to make sure that the submitted page is valid before actually saving the changes.
■ Caution
Always check that the page IsValid before inserting or updating data in the database. Never rely on the fact that the client-side validators will prevent incorrect data from being transmitted. All validators run the validation routines, even if the check is also made client side, and this extra check will make sure that malicious users don’t deliberately send false data to your page.Deleting Data from the Database
After completing the previous examples in this chapter, you have a number of extra Players in the database. So, you’ll want to know how to delete data from tables in a database.
When you remove data, you still need to follow the rules laid out by the database, but this time, you must consider how a database deals with deleting data:
• Unlike Windows, databases don’t have a Recycle Bin. Once a user says delete some data, it’s gone; the only way to get it back is to reinsert it.
• The foreign key constraints you set on your tables may cause the database to delete additional data from related tables or prevent you from deleting data from a table.
Because of these considerations, users need to be absolutely sure that they want to delete information before they actually do, and you want to warn them if any other data will be removed.
In fact, you could even take it out of their hands and not give them the opportunity to delete data in the first place.
Another possibility is that you won’t actually want to delete the data, but instead pretend to delete the data. For example, you might decide to no longer display a Player to the users, but you need to keep the details for historical purposes. By adding an extra Boolean column to the Player table called Deleted, you can hide data from the user. If it’s false, the row is available to the user. If it’s true (the user has “deleted” the Player), the data is not available.
In the example here, you’re going to really delete the data so that you can see the DELETE query in action, and also see some of the issues related to relationships that deleting data can cause. If you were following the “pretend delete” route, you wouldn’t actually execute a DELETE query, but would instead execute an UPDATE query. We’ll look at the UPDATE query in the “Updating Data in the Database” section later in this chapter.
The DELETE Query
Like any other database operation, data deletion is handled by sending a SQL query to a database—
in this case, a DELETE query. The DELETE query is quite simple:
DELETE [FROM] <table name>
[ WHERE <constraints> ]
The DELETE query has four parts:
• The keyword DELETE denotes the action to the database.
• The optional keyword FROM makes the query more readable.
• The table name identifies the table from which the data will be deleted.
• An optional list of constraints as a WHERE clause constrains the rows to which the DELETE query applies.
Like the INSERT query, DELETE can work on only one table at a time, which is probably a good thing. A rogue query such as DELETE * could wipe out all the data at once, if it were a valid query, a bit like del *.* would do in a DOS prompt. Indeed, DELETE works with whole rows only.
You never delete single columns from a row. If you needed to remove a column from a row, you would change the column to an empty value or null, if the database allowed it.
Sympathy for the User: GridView ButtonField Columns
In the INSERT example, you used a collection of individual Web controls to let the user specify the column values for a new Player, and then displayed the new Player in a GridView as confirma- tion. You could carry on using simple Web controls in this exercise—perhaps binding Player names to a DropDownList and deleting the one selected in the list when a button is clicked—but you can easily code a more elegant solution, which you’ll look at here.
The GridView can display much more than just the results of a SELECT query. In fact, to make it more interactive, you can add columns of buttons and links to it, allowing you to work with a row of data in the grid, given the button that was clicked. In this special case, you’ll use
a button to indicate that a row should be deleted from the database. Depending on the purpose of your page, the button could signify that the row should be added to a shopping cart, copied to another location, or selected to have an e-mail message sent to it.
The object that enables you to do all this is the <asp:ButtonField> object, which you add to the GridView’s Columns collection, like so:
<asp:GridView id="GridView1" runat="server">
<Columns>
<asp:ButtonField Text="Delete" ButtonType="Button"
CommandName="DeletePlayer" />
</Columns>
</asp:GridView>
When you DataBind() to the DataGrid, any auto-generated columns will appear as usual, but there will now also be a column of buttons to the left displaying the value of the
ButtonField’s Text property, as shown in Figure 8-12.
Figure 8-12. The ButtonField as rendered in a GridView
The <asp:ButtonField> object has two other key properties that should be given values:
ButtonType and CommandName. ButtonType lets you specify whether the new column contains actual buttons or hyperlink-like buttons. CommandName identifies the action associated with the button and ties into the event handler called when the button is clicked.
By default, when a button in a ButtonField is clicked, the GridView raises an event called RowCommand. Within this event handler, you’re free to implement whatever code you require.
■ Note
There is one exception to the event mechanism when using a ButtonField. Setting the CommandName to Cancel, Delete, Edit, Insert, New, Page, Select, Sort, or Update has a slightly different effect than simply raising the RowCommand event. For instance, setting CommandName to Delete will actually raise the RowDeleting event and, after deleting the row, the RowDeleted event. However, in all cases, the RowCommand event also fires, so be aware if you’re using multiple button columns that you need to check the CommandName to ensure that you’re running the correct code. If you can avoid it, don’t use a predefined CommandName.Try It Out: Deleting Players with DELETE
Now that you know how to select a row for deletion in a GridView, let’s build a page that demon- strates the technique. In this example, you’ll add a ButtonField that sends the user to a new page that confirms that the Player is to be deleted.
1. Open Players.aspx. In the Design view, set the DataKeyNames property of the GridView to PlayerID.
2. Switch to the Source view and add a BoundField to the Columns collection of the GridView:
<Columns>
<asp:BoundField DataField="PlayerID" HeaderText="PlayerID" />
<asp:BoundField DataField="PlayerName" HeaderText="Name" />
<asp:BoundField DataField="PlayerCost" DataFormatString="{0:n}"
HeaderText="Cost" />
<asp:ButtonField Text="Delete" ButtonType="Button"
CommandName="DeletePlayer" />
</Columns>
3. Switch to the Design view and add a RowCommand event to the GridView. Add the following code to the event handler:
protected void Grid1View_RowCommand(object sender, GridViewCommandEventArgs e)
{
// get the PlayerID
int intIndex = Convert.ToInt32(e.CommandArgument);
string strPlayerID = Convert.ToString(GridView1.DataKeys[intIndex].Value);
// perform the correct action if (e.CommandName == "DeletePlayer") {
Response.Redirect("./Player_Delete.aspx?PlayerID=" + strPlayerID);
} }
4. Add a new Web Form to the Web site called Player_Delete.aspx and change the page title to DELETE Player.
5. Add a confirmation question to the page and two buttons, called SubmitButton and ReturnButton. You’ll also need a Label, called QueryResult, to show the results from the query that was actually executed. You can see how the Web controls are laid out in Figure 8-13.
Figure 8-13. You should always confirm deletions.
6. Add a Click event for the ReturnButton control and add the following code to the event handler:
protected void ReturnButton_Click(object sender, EventArgs e) {
Response.Redirect("./Players.aspx");
}
7. Add the required namespace declaration to the top of the page:
<%@ Import Namespace="System.Data.SqlClient" %>
8. Add a Click event for the SubmitButton and add the following code to the event handler:
protected void SubmitButton_Click(object sender, EventArgs e) {
// create the connection
string strConnectionString = ConfigurationManager.
ConnectionStrings["SqlConnectionString"].ConnectionString;
SqlConnection myConnection = new SqlConnection(strConnectionString);
try {
// query to execute
string strQuery = "DELETE FROM WhatPlaysWhatFormat WHERE ➥ WPWFPlayerID = @PlayerID; DELETE FROM Player ➥
WHERE PlayerID = @PlayerID;";
// create the command
SqlCommand myCommand = new SqlCommand(strQuery, myConnection);
// add the parameter
myCommand.Parameters.AddWithValue("@PlayerID", Request.QueryString["PlayerID"]);
// open the connection myConnection.Open();
// execute the query
myCommand.ExecuteNonQuery();
// show the result
QueryResult.Text = "Delete of player '" +
Request.QueryString["PlayerID"] + "' was successful";
// disable the submit button SubmitButton.Enabled = false;
}
catch (Exception ex) {
// show the error
QueryResult.Text = "An error has occurred: " + ex.Message;
} finally {
// close the connection myConnection.Close();
} }
9. Save both pages, and then start the Web site. Click the Delete button for a Player, and you’ll be presented with the confirmation page. Clicking the Delete Player button will call the event handler to delete the Player and return a confirmation, as shown in Figure 8-14.
10. If you now click the Return to Player List button, you’ll be able to confirm that the Player has indeed been deleted.