Carlos Sessa
50 Android Hacks
CARLOS SESSA
M A N N I N G
For online information and ordering of this and other Manning books, please visit
www.manning.com. The publisher offers discounts on this book when ordered in quantity. For more information, please contact
Special Sales Department Manning Publications Co. 20 Baldwin Road
PO Box 261
Shelter Island, NY 11964.
©2013 by Manning Publications Co. All rights reserved.
No part of this publication may be reproduced, stored in a retrieval system, or transmitted, in any form or by means electronic, mechanical, photocopying, or otherwise, without prior written permission of the publisher.
Many of the designations used by manufacturers and sellers to distinguish their products are claimed as trademarks. Where those designations appear in the book, and Manning
Publications was aware of a trademark claim, the designations have been printed in initial caps or all caps.
Recognizing the importance of preserving what has been written, it is Manning’s policy to have the books we publish printed on acid-free paper, and we exert our best efforts to that end. Recognizing also our responsibility to conserve the resources of our planet, Manning books are printed on paper that is at least 15 percent recycled and processed without the use of elemental chlorine.
Manning Publications Co. Development editor: Cynthia Kane 20 Baldwin Road Technical proofreader: Cyril Mottier
PO Box 261 Copyeditor: Benjamin Berg
Shelter Island, NY 11964 Proofreader: Katie Tennant
Typesetter: Dottie Marsico Cover designer: Marija Tudor
ISBN 9781617290565
Printed in the United States of America
Al milagro que hizo esto posible
vii
brief contents
1
■Working your way around layouts 1
2
■Creating cool animations 19
3
■View tips and tricks 29
4
■Tools 47
5
■Patterns 53
6
■Working with lists and adapters 77
7
■Useful libraries 97
8
■Interacting with other languages 107
9
■Ready-to-use snippets 117
10
■Beyond database basics 133
11
■Avoiding fragmentation 157
ix
contents
foreword xvii preface xix
acknowledgments xxi about this book xxiii
about the cover illustration xxvii
1
Working your way around layouts 1
HACK 1
C
ENTERINGVIEWSUSINGWEIGHTS1
1.1 Combining weightSum and layout_weight 2
1.2 The bottom line 3
1.3 External links 3
HACK 2
U
SINGLAZYLOADINGANDAVOIDINGREPLICATION3
1.4 Avoid replication using the <include /> tag 4
1.5 Lazy loading views with the ViewStub class 5
1.6 The bottom line 7
1.7 External links 7
HACK 3
C
REATINGACUSTOMV
IEWG
ROUP8
1.8 Understanding how Android draws views 9
1.9 Creating the CascadeLayout 9
CONTENTS
x
1.11 The bottom line 13
1.12 External links 14
HACK 4
P
REFERENCESHACKS14
1.13 The bottom line 17
1.14 External links 17
2
Creating cool animations 19
HACK 5
S
NAPPYTRANSITIONSWITHT
EXTS
WITCHERANDI
MAGES
WITCHER19
2.1 The bottom line 21
2.2 External links 21
HACK 6
A
DDINGEYECANDYTOYOURV
IEWG
ROUP’
SCHILDREN
21
2.3 The bottom line 23
2.4 External links 23
HACK 7
D
OINGANIMATIONSOVERTHEC
ANVAS23
2.5 The bottom line 25
2.6 External links 25
HACK 8
S
LIDESHOWUSINGTHEK
ENB
URNSEFFECT25
2.7 The bottom line 27
2.8 External links 28
3
View tips and tricks 29
HACK 9
A
VOIDINGDATEVALIDATIONSWITHANE
DITT
EXTFORDATES
29
3.1 The bottom line 30
3.2 External links 30
HACK 10
F
ORMATTINGAT
EXTV
IEW’
STEXT30
3.3 The bottom line 31
3.4 External links 31
HACK 11
A
DDINGTEXTGLOWINGEFFECTS32
CONTENTS xi
HACK 12
R
OUNDEDBORDERSFORBACKGROUNDS33
3.7 The bottom line 34
3.8 External links 34
HACK 13
G
ETTINGTHEVIEW’
SWIDTHANDHEIGHTINTHEON
C
REATE()
METHOD34
3.9 The bottom line 36
3.10 External links 36
HACK 14
V
IDEOV
IEWSANDORIENTATIONCHANGES36
3.11 The bottom line 38
3.12 External links 39
HACK 15
R
EMOVINGTHEBACKGROUNDTOIMPROVEYOURA
CTIVITYSTARTUPTIME39
3.13 The bottom line 40
3.14 External links 41
HACK 16
T
OAST’
SPOSITIONHACK41
3.15 The bottom line 42
3.16 External links 42
HACK 17
C
REATINGAWIZARDFORMUSINGAG
ALLERY42
3.17 The bottom line 46
3.18 External links 46
4
Tools 47
HACK 18
R
EMOVINGLOG STATEMENTSBEFORERELEASING47
4.1 The bottom line 48
4.2 External links 48
HACK 19
U
SINGTHEH
IERARCHYV
IEWERTOOLTOREMOVEUNNECESSARYVIEWS
49
4.3 The bottom line 52
4.4 External links 52
5
Patterns 53
HACK 20
T
HEM
ODEL-V
IEW-P
RESENTERPATTERN53
CONTENTS
xii
HACK 21
B
ROADCASTR
ECEIVERFOLLOWINGA
CTIVITY’
SLIFECYCLE
56
5.3 The bottom line 57
5.4 External links 58
HACK 22
A
RCHITECTUREPATTERNUSINGA
NDROIDLIBRARIES58
5.5 Back-end logic and model 58
5.6 Android library 59
5.7 Android application 59
5.8 The bottom line 60
5.9 External links 60
HACK 23
T
HES
YNCA
DAPTERPATTERN60
5.10 Common approaches 60
5.11 What we’ll create 62
5.12 The bottom line 75
5.13 External links 75
6
Working with lists and adapters 77
HACK 24
H
ANDLINGEMPTYLISTS77
6.1 The bottom line 78
6.2 External links 78
HACK 25
C
REATINGFASTADAPTERSWITHAV
IEWH
OLDER78
6.3 The bottom line 80
6.4 External links 81
HACK 26
A
DDINGSECTIONHEADERSTOAL
ISTV
IEW81
6.5 Creating list layouts 82
6.6 Providing visible section headers 83
6.7 Wrapping up 84
6.8 The bottom line 84
6.9 External links 84
HACK 27
C
OMMUNICATINGWITHANA
DAPTERUSINGANA
CTIVITYANDADELEGATE
85
CONTENTS xiii
HACK 28
T
AKINGADVANTAGEOFL
ISTV
IEW’
S HEADER87
6.12 The bottom line 89
6.13 External links 89
HACK 29
H
ANDLINGORIENTATIONCHANGESINSIDEAV
IEWP
AGER89
6.14 The bottom line 90
6.15 External links 91
HACK 30
L
ISTV
IEW’
SCHOICEM
ODE91
6.16 The bottom line 94
6.17 External links 95
7
Useful libraries 97
HACK 31
A
SPECT-
ORIENTEDPROGRAMMINGINA
NDROID97
7.1 The bottom line 100
7.2 External links 100
HACK 32
E
MPOWERINGYOURAPPLICATIONUSINGC
OCOS2
D-
X101
7.3 What is Cocos2d-x? 101
7.4 Using Cocos2d-x 101
7.5 The bottom line 104
7.6 External links 105
8
Interacting with other languages 107
HACK 33
R
UNNINGO
BJECTIVE-C
INA
NDROID107
8.1 Downloading and compiling Itoa 108
8.2 Creating the modules 108
8.3 Setting up the Java part 112
8.4 The bottom line 113
8.5 External links 113
HACK 34
U
SINGS
CALAINSIDEA
NDROID113
CONTENTS
xiv
9
Ready-to-use snippets 117
HACK 35
F
IRINGUPMULTIPLEINTENTS117
9.1 Taking a picture 118
9.2 Picking a picture from the gallery 118
9.3 Mixing both intents 118
9.4 The bottom line 118
9.5 External links 119
HACK 36
G
ETTINGUSERINFORMATIONWHENRECEIVINGFEEDBACK
119
9.6 The bottom line 121
9.7 External links 121
HACK 37
A
DDINGANMP3
TOTHEMEDIAC
ONTENT-P
ROVIDER121
9.8 Adding the MP3 using content values 121
9.9 Adding the MP3 using the media scanner 122
9.10 The bottom line 122
9.11 External links 122
HACK 38
A
DDINGAREFRESHACTIONTOTHEACTIONBAR122
9.12 The bottom line 125
9.13 External links 125
HACK 39
G
ETTINGDEPENDENCIESFROMTHEMARKET126
9.14 The bottom line 127
9.15 External links 128
HACK 40
L
AST-
IN-
FIRST-
OUTIMAGELOADING128
9.16 Starting point: Android sample application 128
9.17 Introducing executors 129
9.18 UI thread—leaving and returning seamlessly 130
9.19 Considerations 131
CONTENTS xv
10
Beyond database basics 133
HACK 41
B
UILDINGDATABASESWITHORML
ITE133
10.1 A simple data model 134
10.2 Getting started 135
10.3 Rock-solid database schema 136
10.4 SQLiteOpenHelper—your gateway to the
database 138
10.5 Singleton pattern for database access 139
10.6 CRUD operations made easy 140
10.7 Query builders 141
10.8 Data types and tricky foreign types 143
10.9 Raw SQL queries 145
10.10 Transactions 146
10.11 The bottom line 147
10.12 External links 147
HACK 42
C
REATINGCUSTOMFUNCTIONSINSQL
ITE148
10.13 Java code 148
10.14 Native code 149
10.15 The bottom line 151
10.16 External links 151
HACK 43
B
ATCHINGDATABASEOPERATIONS152
10.17 No batch 152
10.18 Using batch operations 153
10.19 Applying batch using SQLiteContentProvider 154
10.20 The bottom line 156
10.21 External links 156
11
Avoiding fragmentation 157
HACK 44
H
ANDLINGLIGHTS-
OUTMODE157
11.1 Android 2.x 158
11.2 Android 3.x 158
11.3 Merging both worlds in a single Activity 160
11.4 The bottom line 160
CONTENTS
xvi
HACK 45
U
SINGNEWAPI
SINOLDERDEVICES160
11.6 Using apply() instead of commit() 161
11.7 Storing the app on the SD card 163
11.8 The bottom line 164
11.9 External links 164
HACK 46
B
ACKWARD-
COMPATIBLENOTIFICATIONS164
11.10 The bottom line 168
11.11 External links 168
HACK 47
C
REATINGTABSWITHFRAGMENTS168
11.12 Creating our tab UI 169
11.13 Placing the tabs in an Activity 169
11.14 The bottom line 170
11.15 External links 170
12
Building tools 171
HACK 48
H
ANDLINGDEPENDENCIESWITHA
PACHEM
AVEN171
12.1 The bottom line 174
12.2 External links 174
HACK 49
I
NSTALLINGDEPENDENCIESINAROOTEDDEVICE175
12.3 Predexing 176
12.4 Creating the permissions XML 176
12.5 Modifying AndroidManifest.xml 177
12.6 The bottom line 177
12.7 External links 177
HACK 50
U
SINGJ
ENKINSTODEALWITH DEVICEDIVERSITY178
12.8 Creating a Jenkins job 179
12.9 Running the job 181
12.10 The bottom line 182
12.11 External links 182
xvii
foreword
Android as an ecosystem is expanding rapidly in all directions. Every day manufactur-ers introduce new devices and form factors, consummanufactur-ers purchase and activate over one million devices, and users download and try new apps. It’s the job of developers (yourself included, hopefully) to fill this ecosystem with beautiful, engaging, and deeply fulfilling applications through which users can better interpret and interact with their world.
As a platform, Android was birthed in late 2003 by former employees of Danger (the company behind the popular Sidekick phones). In 2005 the company driving
Android was acquired by Google, and three years later the HTC Dream (G1) was
released as the first consumer device running Android. Over the next three years the hardware and platform were heavily iterated, but Android remained solely a phone operating system.
In 2011 Google introduced two new form factors for the Android: tablets and TV.
This represented the first official deviation from phones as the device of choice and sparked manufacturer interest in other devices. Android now runs on laptops, wrist-watches, video game consoles, and car stereos. It can only be expected that in the future the number of devices supporting Android will continue to grow.
FOREWORD
xviii
In developing applications there are three major things that you’ll need aside from your own creativity and desire to develop: the platform documentation, the open source community, and glue to hold everything together. The platform
documenta-tion is easy, since the latest version is always hosted at http://developer.android.com.
The open source community is spread across GitHub, Google Code, Stack Overflow, and the like, providing libraries, code snippets, and design patterns for simplifying development. You still need something to tie these disjointed pieces together as one cohesive app. If it were as simple as arranging a few building blocks, everyone would be developing applications. This book is that glue.
Contained in the book are examples of how to solve common problems that arise in Android development. Some are relatively trivial and some quite complex. What they share, however, is being loosely or sparsely documented facets of app
develop-ment which often cause developers pain. 50 Android Hacks is not meant as a sole
resource for learning or mastering Android development, but rather exists to fill in the cracks.
It’s a great task to craft an app that’s dynamic enough to support Android’s grow-ing device diversity. With the knowledge provided by this book, accompanied by that of similar print and online sources, it’s my hope that you’re more empowered to develop and publish apps. Beyond this, while I am a developer just like you, I am also an avid Android user and patiently await that next great application. Perhaps you will be the one to write it.
JAKE WHARTON
xix
preface
I started learning about Android back in 2009. Android version 1.5 had just been released, and it showed a lot of potential.
In July 2009, thanks to a friend living in Australia, I got my first Android-powered
device, an HTC Magic with Android version 1.5. To be honest, it processed more
slowly than I expected, but I started testing the APIs and creating apps that I wanted to
have on my cell phone. I sensed that Android would get a lot of attention and I knew that if I managed to create an application, it would be available to a lot of people.
I was proved right—not long afterward, there was a kick-off for Android develop-ment, which soon grew bigger and bigger. Suddenly a lot of tools and third-party libraries supporting the Android platform emerged—everything from game frame-works, like cocos2d-x, to build systems, like Apache Maven.
In November 2010 I was asked to review a book from Manning Publications called
Android in Practice (www.manning.com/collins/). Delving deep into Manning’s work, it occurred to me that I could write a book about Android development using a
differ-ent approach. I wanted to imitate Joshua Bloch’s Effective Java (www.amazon.com/
Effective-Java-2nd-Joshua-Bloch/dp/0321356683), providing tips and patterns I had learned over all my years of developing for the Android platform.
Essentially, I wanted to gather together in one book every Android tip I have
learned and provide some degree of documentation for it. That’s what 50 Android
Hacks is all about: a collection of tips gathered in the process of developing different Android applications.
Something I enjoyed about Effective Java was that the book doesn’t have any
PREFACE
xx
of them. After some time, I would go back to the book and find a different application for the project I was working on. I kept that in mind while writing this book. I imagine the reader investigating a hack while going to work or before going to sleep, getting new ideas for the project they’re working on.
I’m already using this book on my new projects, copying the sample code for cer-tain tasks and using its examples to explain to my coworkers cercer-tain patterns. It’s proven to be useful for myself, and I hope it will be useful for you as well.
While writing the book and samples, I set the minimum SDK to 1.6. Most of the
hacks in the book work in Android version 1.6 onward unless mentioned. You’ll notice that there are hacks specific to the newest Android versions, but most of them are recommendations or ideas that would work for every version. Every hack has an
icon identifying the minimum SDK it will work with.
xxi
acknowledgments
When reading acknowledgments in other books, I’m always surprised by the number of people the author thanks. I now understand how big the list can be, and as I write these words I’m nervous that I may be forgetting someone.
First of all, I want to thank Cynthia Kane, my development editor. She helped me manage the book. She pointed out every single thing that needed a change, dealt with my inadequacies in English, and helped me understand the key parts of creating a book. Almost every single line I wrote needed a fix, and while it was sometimes frustrat-ing for Cynthia, the result of these repeated iterations is a book of which I am proud.
Another key player was Nicholas Chase. Nick is in charge of support for the
Man-ning XML schema and the authoring tool. Fortunately, Nick was online on Skype every
time I had an question for him.
The rest of the Manning team also played a big part. Some of the people who worked with me are Ozren Harlovic, Kevin Sullivan, Tara McGoldrick Walsh, Benja-min Berg, Katie Tennant, Candace Gillhoolley, Martin Murtonen, Michael Stephens, and Maureen Spencer.
Thanks to the collaborators: William Sanville (Hack 40: Last-in-first-out image loading; and Hack 41: Building databases with ORMLite); Chris King (Hack 26: Add-ing section headers to a ListView); and Christopher Orr (Hack 50: UsAdd-ing Jenkins to deal with device diversity). They lent their expertise to complete these areas.
ACKNOWLEDGMENTS
xxii
Thanks to my partners at NASA Trained Monkeys, who helped me out by reading a
lot and making recommendations. Most of the cool hack titles came from their wild imaginations.
Thanks to the Android community itself, and a special thanks to the people who contribute to open source libraries (just to mention a few names: Michael Burton, Manfred Moser, Matthias Käppler, Jake Wharton, Jeremy Feinstein, the cocos2d-x team, Jan Berkel, Jeff Gilgelt, Xavi Rigau, Chris Banes, James Brechtel, and Dmitry Skiba).
Thanks to everyone who reviewed the book. The reviews helped me identify what was missing and what topics needed more attention. Getting positive reviews from people I admire was very rewarding. Thanks to the following reviewers for finding the time to read the book; I hope you learned something from it: Adam Koch, Alberto Pose, Bill Cruise, Christian Badenas, Frank Ableson, Ignacio Luciani, Jeff Goldschrafe, Joshua Skinner, Matthias Käppler, Maximiliano Gomez Vidal, “Ming,” Octavian Damiean, Paul Butcher, Robi Sen, Roger Binns, Shan Coster, Suzanne Alexandra, and Will Turnage.
Thanks to my family and friends—you did a great job supporting me!
xxiii
about this book
Android is a project with a lot of momentum. The first Android release happened on September 23, 2008, and by the end of 2010 it had become the leading smartphone platform.
Every time there’s a new release, a new set of APIs and possibilities show up. While
Android version 1.5 (Donut) only worked in the HTC Dream, right now Android runs
in many devices from cellphone to TVs, and on different sizes of tablets and laptops.
This causes two big problems when developing for Android. First, you have to deal with different types of supported devices. While there are lots of ways of dealing with different screen sizes and screen density, you need to create an app that works, and looks great, in every device. Also, targeting every possible Android-powered device might result in different user experiences. The user won’t interact in the same way
with a cellphone as with a TV.
The second problem is how long the Android versions stay alive. The story is always
the same: with a new Android version, we get new APIs. A new API would be an
excel-lent addition to your app, but as a developer you still need to support older versions, because not everyone will get the update and also because it may take a lot of time to reach your main target audience.
You’ll need to choose if you want to add the new API functionality and release an
app just for people using the newest Android version, or go with a hybrid approach where some functionalities are only available in newer versions.
I’ve created this book to help you out, because when you’re developing for
Android, all the decisions are in your hands. 50 Android Hacks offers a
ABOUTTHISBOOK
xxiv
What is Android?
Android is an open source operating system based on Linux. In the beginning, it was
just for cell phones, but now it works on tablets, TVs, computers, and even car stereos.
It has been gaining a lot of momentum in the mobile scene and is now used in more than 50% of mobile devices.
The apps that run on an Android-powered device are usually coded in Java and it has a powerful SDK that allows the developer to create different types of applications. Android allows developers to customize almost everything. For example, you can cre-ate custom wallpapers, custom keyboards, and custom home screens, things you wouldn’t imagine doing in other platforms.
Who should read this book?
This book is intended for people who are already developing with Android. I assume you know how to program in Java and the basic concepts of the Android platform.
There are hacks intended for people taking their first steps with the Android plat-form, and there are hacks for advanced developers. If you’re developing an Android app, skim through the book; I’m sure you’ll find something that will help you.
To find out if this book is for you, consider these questions:
■ Are you developing for Android?
■ Have you found yourself scratching your head, trying to think of better
solu-tions to your problems?
■ Are you looking for new ways of addressing your programming issues?
■ Do you want to find out how other people are handling similar problems?
How to use this book
My recommendation is that, before you read about a hack, you first compile and run the sample code. That will give you a better understanding of what we’ll do in each example. Apart from that, the book doesn’t need to be read in any particular order. Feel free to start reading any section that interests you.
Roadmap
While the book is flexible enough to let you go forward and backward between hacks without an issue, you can also read it sequentially.
■ Chapter 1, “Working your way around layouts,” has four hacks that offer you
dif-ferent layout tips.
■ The four hacks in chapter 2, “Creating cool animations,” describe different tips
for dealing with animations.
■ Chapter 3, “View tips and tricks,” has nine hacks covering every tip related to
views.
■ The two hacks in chapter 4, “Tools,” give you an overview of available tools apart
ABOUTTHISBOOK xxv
■ Chapter 5, “Patterns,” offers pattern examples in its four hacks that are
applica-ble for Android.
■ Chapter 6, “Working with lists and adapters,” groups tips about the ListView
and Adapter classes in its seven hacks.
■ Two hacks in chapter 7, “Useful libraries,”explain how to use third-party
librar-ies in your apps.
■ Chapter 8, “Interacting with other languages,” shows some examples of coding
for Android in programming languages other than Java in one hack focused on Objective-C and one hack discussing Scala.
■ Chapter 9, “Ready-to-use snippets,” offers six hacks that provide copy-and-paste
code snippets.
■ The three hacks in chapter 10, “Beyond database basics,” state some advanced
tips about database usage.
■ Chapter 11, “Avoiding fragmentation,” includes four hacks that show how to
make your app work in different Android versions.
■ The final three hacks presented in chapter 12, “Building tools,” include tips on
how to build your app.
Code conventions and downloads
All the code in the examples used in this book is presented in a monospacefont like
this. Annotations accompany many of the code listings and numbered cueballs are
used if longer explanations are needed.
The source code for all of the examples in the book is available for download from
the publisher’s website at www.manning.com/50AndroidHacks. You can also
down-load the source code from the Google code project. How to get the latest code is explained in the appendix. The sample code is hosted at GitHub. You can download
the code here: https://github.com/Macarse/50AH-code.
To run the book samples, you’ll need to install
■ Eclipse
■ Android SDK
■ Eclipse Android plugin
If you don’t know where to start, I recommend visiting http://developer
.android.com/sdk/installing/index.html, where there’s an easy step-by-step guide to configuration.
Author Online
The purchase of 50 Android Hacks includes free access to a private web forum run by
Manning Publications, where you can make comments about the book, ask technical questions, and receive help from the author and from other users. To access the forum
ABOUTTHISBOOK
xxvi
This page provides information on how to get on the forum once you are registered, what kind of help is available, and the rules of conduct on the forum.
Manning’s commitment to our readers is to provide a venue where a meaningful dialogue between individual readers and between readers and the author can take place. It is not a commitment to any specific amount of participation on the part of the author, whose contribution to the forum remains voluntary (and unpaid). We sug-gest you try asking the author some challenging questions lest his interest stray!
The Author Online forum and the archives of previous discussions will be accessi-ble from the publisher’s website as long as the book is in print.
About the author
Carlos Sessa is a passionate full-time Android developer. He is the cofounder of a
mobile development company based in Buenos Aires, Argentina, called NASA Trained
Monkeys. His company focuses on mobile development for both Android and iOS
xxvii
about the cover illustration
The figure on the cover of 50 Android Hacks is captioned “A Woodsman.” The
illustra-tion is taken from a nineteenth-century ediillustra-tion of Sylvain Maréchal’s four-volume compendium of regional dress customs published in France. Each illustration is finely drawn and colored by hand. The rich variety of Maréchal’s collection reminds us viv-idly of how culturally apart the world’s towns and regions were just 200 years ago. Iso-lated from each other, people spoke different dialects and languages. On the streets or in the countryside, it was easy to identify where they lived and what their trade or station in life was just by their dress.
Dress codes have changed since then and the diversity by region, so rich at the time, has faded away. It is now hard to tell apart the inhabitants of different conti-nents, let alone different towns or regions. Perhaps we have traded cultural diversity for a more varied personal life—certainly for a more varied and fast-paced technolog-ical life.
1
Working your way
around layouts
In this chapter, we’ll cover tips and recommendations for Android layouts. You’ll learn how to create certain types of layouts from scratch as well as how to improve upon existing ones.
Hack 1
Centering views using weights
Android v1.6+
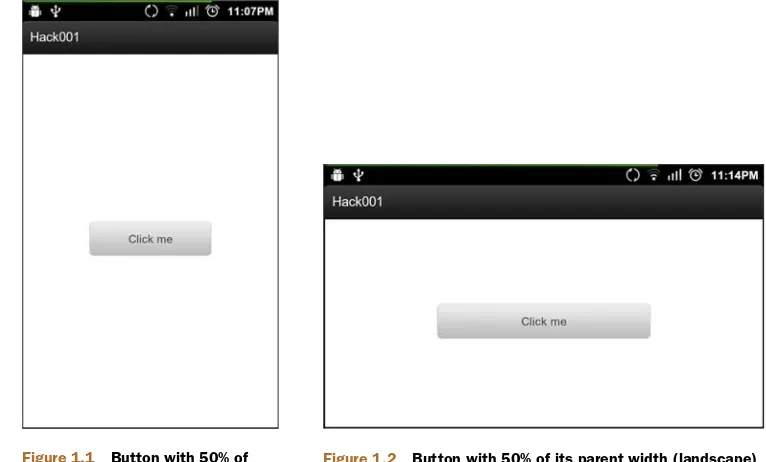
At an Android talk I gave to a group of developers, when I was explaining how to
create a view using an XML file, someone asked, “What should I write if I want a
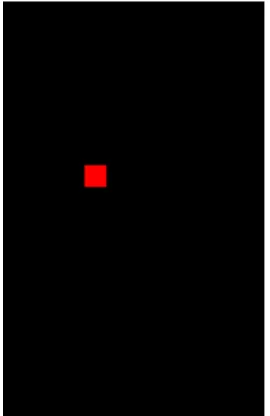
but-ton to be centered and 50% of its parent width?” At first I didn’t understand what he was asking, but after he drew it on the board, I understood. His idea is shown in figures 1.1 and 1.2.
It looks simple, right? Now take five minutes to try to achieve it. In this hack, we’ll
look at how to solve this problem using the LinearLayout’s android:weightSum
attribute in conjunction with the LinearLayout’s child android:layout_weight
Figure 1.1 Button with 50% of its parent width (portrait)
Figure 1.2 Button with 50% of its parent width (landscape) 2 CHAPTER1 Working your way around layouts
1.1
Combining weightSum and layout_weight
Android devices have different sizes, and as developers we need to create XML in a
way that works for different screen sizes. Hard-coding sizes isn’t an option, so we’ll need something else to organize our views.
We’ll use the layout_weight and weightSum attributes to fill up any remaining
space inside our layout. The documentation for android:weightSum (see section 1.3)
describes a scenario similar to what we’re trying to achieve:
Defines the maximum weight sum. If unspecified, the sum is computed by
adding the layout_weight of all of the children. This can be used for instance
to give a single child 50% of the total available space by giving it a layout_weight of 0.5 and setting the weightSum to 1.0.
Imagine we need to place stuff inside a box. The percentage of available space would
be the weightSum and the layout_weight would be the percentage available for each
item inside the box. For example, let’s say the box has a weightSum of 1 and we have
two items, A and B. A has a layout_weight of 0.25 and B has a layout_weight of 0.75.
So item A will have 25% of the box space, while B will get the remaining 75%.
The solution to the situation we covered at the beginning of this chapter is similar.
We give the parent a certain weightSum and give the button half of that value as
android:layout_weight. The resulting XML follows:
<?xml version="1.0" encoding="utf-8"?>
3
Using lazy loading and avoiding replication
android:layout_width="fill_parent" android:layout_height="fill_parent" android:background="#FFFFFF" android:gravity="center"
android:orientation="horizontal" android:weightSum="1">
B
Reads theandroid:weightSum attribute
<Button
android:layout_width="0dp"
C
Decides the button’s width android:layout_height="wrap_content"android:layout_weight="0.5"
D
Makes sure it uses exactly 50% of available space android:text="Click me"/></LinearLayout>
The LinearLayout reads the android:weightSum attribute
B
and learns that the sumof the weights of its children needs to be 1. Its first and only child is the Button and
because the button has its android:layout_width set to 0dp
C
, the LinearLayoutknows that it must decide the button’s width by the available space given by the android:weightSum. Because the Button has the android:layout_weight set to 0.5
D
, it will use exactly 50% of the available space.A possible example would be a 200dp wide LinearLayout with its
android:weightSum set to 1. The width of the Button would be calculated as follows:
Button's width + Button's weight * 200 / sum(weight)
Because the Button’s width is 0dp, the Button’s weight is 0.5. With the sum(weight)
set to 1, the result would be the following:
0 + 0.5 * 200 / 1 = 100
1.2
The bottom line
Using LinearLayout’s weight is important when you want to distribute the available
space based on a percentage rather than using hard-coded sizes. If you’re targeting Honeycomb and using Fragments, you’ll notice that most of the examples place the different Fragments in a layout using weights. Understanding how to use weights will add an important tool to your toolbox.
1.3
External links
http://developer.android.com/reference/android/widget/LinearLayout.html
Hack 2
Using lazy loading and avoiding replication
Android v1.6+
When you’re creating complex layouts, you may find yourself adding a lot of
4 CHAPTER1 Working your way around layouts
Creating optimized layouts is fundamental to building an application that runs fast and is responsive to the user.
In this hack, you’ll learn how to use the <include /> tag in your XML to avoid
rep-lication, and how to use the ViewStub class to lazy load views.
2.1
Avoid replication using the <include /> tag
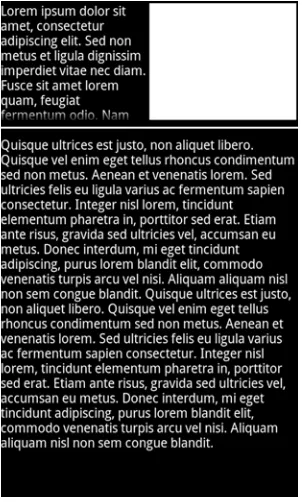
Let’s imagine we want to add a footer to every view in our application—something
simple, such as a TextView with our application’s name. If we have more than one
Activity, we might have more than one XML file. Would we copy this TextView to
every XML file? What happens if we need to edit it in the future? Copying and pasting
would solve the problem, but it doesn’t sound efficient. The easiest way to add a footer
to our application is to use the <include /> tag. Let’s look at how it can help us out.
We use the <include /> tag in XML to add another layout from another XML file.
In our example, we’ll create our complete view, and at the bottom we’ll add the <include /> tag pointing to our footer’s layout. One of our Activity’s XML files would look like the following:
<RelativeLayout
xmlns:android="http://schemas.android.com/apk/res/android" android:layout_width="fill_parent"
android:layout_height="fill_parent">
<TextView
android:layout_width="fill_parent" android:layout_height="wrap_content" android:layout_centerInParent="true" android:gravity="center_horizontal" android:text="@string/hello"/>
<include layout="@layout/footer_with_layout_properties"/>
</RelativeLayout/>
And the footer_with_layout_properties would look like the following:
<TextView xmlns:android="http://schemas.android.com/apk/res/android" android:layout_width="fill_parent"
android:layout_height="wrap_content" android:layout_alignParentBottom="true" android:layout_marginBottom="30dp" android:gravity="center_horizontal" android:text="@string/footer_text"/>
In this first example, we’ve used the <include /> tag with the only required layout.
You might be thinking, “OK, this works because we’re using a RelativeLayout for our
main XML. What’ll happen if one of the XML files is a LinearLayout? android
5
Using lazy loading and avoiding replication
The following modified main.xml uses the <include /> tag with android:layout_*
attributes:
<RelativeLayout
xmlns:android="http://schemas.android.com/apk/res/android" android:layout_width="fill_parent"
android:layout_height="fill_parent">
<TextView
android:layout_width="fill_parent" android:layout_height="wrap_content" android:layout_centerInParent="true" android:gravity="center_horizontal" android:text="@string/hello"/>
<include
layout="@layout/footer"
android:layout_width="fill_parent" android:layout_height="wrap_content" android:layout_alignParentBottom="true" android:layout_marginBottom="30dp"/>
</RelativeLayout/>
The following shows the modified footer.xml:
<TextView xmlns:android="http://schemas.android.com/apk/res/android" android:layout_width="0dp"
android:layout_height="0dp" android:gravity="center"
android:text="@string/footer_text"/>
In this second example, we’ve let the container of the included footer decide where to
place it. Android’s issue tracker has reported an issue, which says that the <include/>
tag is broken (overriding layout params never works). This is partially true. The
prob-lem is that the <include /> tag must specify both android:layout_width and
android:layout_height if we want to override any android:layout_* attributes. Note a small detail about what we’ve done in this hack. As you can see in the
sec-ond example, we moved every android:layout_* attribute to the <include /> tag.
Take a look at the width and height we placed in the footer.xml file: they’re both 0dp.
We did this to make users specify a width and height when used together with the <include /> tag. If users don’t add them, they won’t see the footer because the width and height are zero.
2.2
Lazy loading views with the ViewStub class
When designing your layouts, you may have thought about showing a view depending on the context or the user interactions. If you’ve ever found yourself making a view invisible and then making it visible afterward, you should keep on reading—you’ll
want to use the ViewStub class.
As an introduction to the ViewStub class, let’s take a look at the Android
6 CHAPTER1 Working your way around layouts
A ViewStub is an invisible, zero-sized View that can be used to lazily inflate
layout resources at runtime. When a ViewStub is made visible, or when
inflate() is invoked, the layout resource is inflated. The ViewStub then
replaces itself in its parent with the inflated View or Views.
You already know what a ViewStub is, so let’s see what you can do with it. In the
follow-ing example you’ll use a ViewStub to lazy load a MapView. Imagine creating a view with
the details about a place. Let’s look at two possible scenarios:
Some venues don’t have GPS information
The user might not need the map
If the venue doesn’t have GPS information, you can’t place a marker on the map, and
if the user doesn’t need the map, why load it? Let’s place the MapView inside a
View-Stub and let the user decide whether to load the map.
To achieve this, you’ll use the following layout:
<?xml version="1.0" encoding="utf-8"?> <RelativeLayout
xmlns:android="http://schemas.android.com/apk/res/android" android:layout_width="fill_parent"
android:layout_height="fill_parent">
<Button
android:layout_width="fill_parent" android:layout_height="wrap_content" android:text="@string/show_map" android:onClick="onShowMap"/>
<ViewStub
android:id="@+id/map_stub"
android:layout_width="fill_parent" android:layout_height="fill_parent" android:layout="@layout/map"
android:inflatedId="@+id/map_view"/> </RelativeLayout>
It might be obvious, but we’ll use the map_stub ID to get the ViewStub from the
Activity, and the layout attribute tells the ViewStub which layout should inflate. For this example, we’ll use the following layout for the map:
<?xml version="1.0" encoding="utf-8"?> <com.google.android.maps.MapView
xmlns:android="http://schemas.android.com/apk/res/android" android:layout_width="fill_parent"
android:layout_height="fill_parent" android:clickable="true"
android:apiKey="my_api_key"/>
The last attribute we need to discuss is inflatedId. The inflatedId is the ID that the
inflated view will have after we call inflate() or setVisibility() in the ViewStub
7
Using lazy loading and avoiding replication
anything else with the MapView. If we want to get a reference to the view inflated, the
inflate() method returns the view to avoid a second call to findViewById().
The code for the Activity is simple:
public class MainActivity extends MapActivity {
private View mViewStub;
@Override
public void onCreate(Bundle savedInstanceState) { super.onCreate(savedInstanceState);
setContentView(R.layout.main);
mViewStub = findViewById(R.id.map_stub); }
public void onShowMap(View v) {
mViewStub.setVisibility(View.VISIBLE); }
...
}
As you can see, we only need to change the ViewStub visibility when we want to show
the map.
2.3
The bottom line
The <include /> tag is a useful tool to order your layout. If you already created
some-thing with the Fragment class, you’ll notice that using includes is almost the same
thing. As you need to do with fragments, your complete view can be a set of includes.
The <include /> tag offers a nice way to organize the content of your XML files. If
you’re making a complex layout and the XML gets too big, try creating different parts
using includes. The XML becomes easier to read and more organized.
ViewStub is an excellent class to lazy load your views. Whenever you’re hiding a
view and making it visible, depending on the context, try using a ViewStub. Perhaps
you won’t notice the performance boost with only one view, but you will if the view has a large view hierarchy.
2.4
External links
http://code.google.com/p/android/issues/detail?id=2863 http://android-developers.blogspot.com.ar/2009/03/
android-layout-tricks-3-optimize-with.html
8 CHAPTER1 Working your way around layouts
Hack 3
Creating a custom ViewGroup
Android v1.6+
When you’re designing your application, you might have com-plex views that will show up in different activities. Imagine that you’re creating a card game and you want to show the user’s hand in a layout similar to figure 3.1. How would you create a layout like that?
You might say that playing with margins will be enough for that type of layout. That’s true. You can do something similar
to the previous figure with a RelativeLayout and add margins
to its children. The XML looks like the following:
<?xml version="1.0" encoding="utf-8"?>
In this hack, we’ll look at another way of creating
the same type of layout—we’ll create a custom
View-Group. The benefits of using a custom ViewGroup
instead of adding margins by hand in an XML file are
these:
It’s easier to maintain if you’re using it in
differ-ent activities. hand in a card game
9
Creating a custom ViewGroup
You can use custom attributes to customize the position of the ViewGroup
chil-dren.
The XML will be easier to understand because it’ll be more concise.
If you need to change the margins, you won’t need to recalculate by hand every
child’s margin.
Let’s take a look at how Android draws views.
3.1
Understanding how Android draws views
To create a custom ViewGroup, you’ll need to understand how Android draws views. I
won’t go into the details, but you’ll need to understand the following paragraph from the documentation (see section 3.5), because it explains how you can draw a layout:
Drawing the layout is a two-pass process: a measure pass and a layout pass. The
measuring pass is implemented in measure(int, int) and is a top-down
traversal of the View tree. Each View pushes dimension specifications down
the tree during the recursion. At the end of the measure pass, every View has
stored its measurements. The second pass happens in layout(int,int,int,
int) and is also top-down. During this pass each parent is responsible for
positioning all of its children using the sizes computed in the measure pass.
To understand the concept, let’s analyze the way to draw a ViewGroup. The first step is
to measure its width and height, and we do this in the onMeasure() method. Inside
that method, the ViewGroup will calculate its size by going through its children. We’ll
make the final pass in the onLayout() method. Inside this second method, the
View-Group will lay out its children using the information gathered in the onMeasure() pass.
3.2
Creating the CascadeLayout
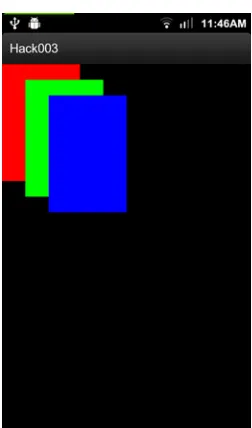
In this section, we’ll code the custom ViewGroup. We’ll achieve the same result as
fig-ure 3.2. Call the custom ViewGroup: CascadeLayout. The XML using the
Cascade-Layout follows:
<?xml version="1.0" encoding="utf-8"?> <FrameLayout
xmlns:android="http://schemas.android.com/apk/res/android" xmlns:cascade=
"http://schemas.android.com/apk/res/com.manning.androidhacks.hack003"
android:layout_width="fill_parent" Custom
10 CHAPTER1 Working your way around layouts
Now that you know what you need to build, let’s get started. The first thing we’ll do is define those custom attributes. To do this, we need to create a file called attrs.xml inside the res/values folder, with the following code:
<?xml version="1.0" encoding="utf-8"?> <resources>
<declare-styleable name="CascadeLayout">
<attr name="horizontal_spacing" format="dimension" /> <attr name="vertical_spacing" format="dimension" /> </declare-styleable>
</resources>
We’ll also use default values for the horizontal and vertical spacing for those times when the user doesn’t specify them. We’ll place the default values inside a dimens.xml file inside the res/values folder. The contents of the dimens.xml file are as follows:
<?xml version="1.0" encoding="utf-8"?> <resources>
<dimen name="cascade_horizontal_spacing">10dp</dimen> <dimen name="cascade_vertical_spacing">10dp</dimen> </resources>
After understanding how Android draws views, you might imagine that you need to
write a class called CascadeLayout that extends ViewGroup and overrides the
onMeasure() and onLayout() methods. Because the code’s a bit long, let’s analyze it
in three separate parts: the constructor, the onMeasure() method, and the
onLayout() method. The following code is for the constructor:
public class CascadeLayout extends ViewGroup {
private int mHorizontalSpacing; private int mVerticalSpacing;
public CascadeLayout(Context context, AttributeSet attrs) { Constructor
called when view instance is created from an XML file.
super(context, attrs);
11
Creating a custom ViewGroup
R.styleable.CascadeLayout_horizontal_spacing,
class will hold the x,y position values of each child. We’ll have the LayoutParams class
as a CascadeLayout inner class. The class definition is as follows:
public static class LayoutParams extends ViewGroup.LayoutParams { int x;
int y;
public LayoutParams(Context context, AttributeSet attrs) { super(context, attrs);
}
public LayoutParams(int w, int h) { super(w, h);
} }
To use our new CascadeLayout.LayoutParams class, we’ll need to override some
additional methods in the CascadeLayout class. These are checkLayoutParams(),
generateDefaultLayoutParams(), generateLayoutParams(AttributeSet attrs), and generateLayoutParams(ViewGroup.LayoutParams p). The code for these
meth-ods is almost always the same between ViewGroups. If you’re interested in its content,
you’ll find it in the sample code.
The next step is to code the onMeasure() method. This is the key part of the class.
The code follows:
@Override
protected void onMeasure(int widthMeasureSpec, int heightMeasureSpec) { int width = 0;
Use width and height to calculate layout’s final size and children’s x and y positions.
int height = getPaddingTop();
final int count = getChildCount(); for (int i = 0; i < count; i++) {
View child = getChildAt(i);
measureChild(child, widthMeasureSpec, heightMeasureSpec); Make
every child measure itself.
12 CHAPTER1 Working your way around layouts
lp.x = width; Inside the LayoutParams,
hold x and y positions for each child.
height += getChildAt(getChildCount() - 1).getMeasuredHeight() + getPaddingBottom();
The last step is to create the onLayout() method. Let’s look at the code:
@Override
protected void onLayout(boolean changed, int l, int t, int r, int b) {
final int count = getChildCount(); for (int i = 0; i < count; i++) {
View child = getChildAt(i);
LayoutParams lp = (LayoutParams) child.getLayoutParams();
child.layout(lp.x, lp.y, lp.x + child.getMeasuredWidth(), lp.y + child.getMeasuredHeight());
} }
As you can see, the code is dead simple. It calls each child layout() method using the
values calculated inside the onMeasure() method.
3.3
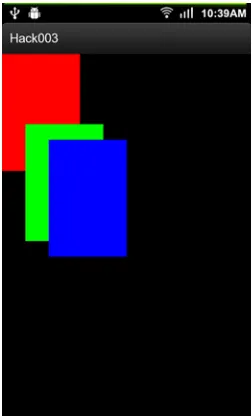
Adding custom attributes to the children
In this last section, you’ll learn how to add custom attributes to the children views. As an example, we’ll add a way to override the vertical spacing for a particular child. You can see a result of this in figure 3.3.
The first thing we’ll need to do is add a new attribute to the attrs.xml file:
<declare-styleable name="CascadeLayout_LayoutParams">
<attr name="layout_vertical_spacing" format="dimension" /> </declare-styleable>
Because the attribute name starts with layout_ instead of containing a View attribute,
it’s added to the LayoutParams attributes. We’ll read this new attribute inside the
LayoutParams constructor as we did with the ones from CascadeLayout. The code is the following:
public LayoutParams(Context context, AttributeSet attrs) { super(context, attrs);
TypedArray a = context.obtainStyledAttributes(attrs, R.styleable.CascadeLayout_LayoutParams);
try {
Figure 3.3 First child with different vertical spacing
13
Creating a custom ViewGroup
R.styleable.CascadeLayout_LayoutParams_layout_vertical_spacing, -1);
} finally { a.recycle(); }
}
The verticalSpacing is a public field. We’ll use it inside the CascadeLayout’s onMeasure() method. If the child’s LayoutParams contains the verticalSpacing, we can use it. The source code looks like the following:
verticalSpacing = mVerticalSpacing;
...
LayoutParams lp = (LayoutParams) child.getLayoutParams();
if (lp.verticalSpacing >= 0) {
verticalSpacing = lp.verticalSpacing; }
...
width += child.getMeasuredWidth(); height += verticalSpacing;
3.4
The bottom line
Using custom Views and ViewGroups is an excellent way to organize your application
layouts. Customizing components will also allow you to provide custom behaviors. The next time you need to create a complex layout, decide whether or not it’d be better to
use a custom ViewGroup. It might be more work at the outset, but the end result is
14 CHAPTER1 Working your way around layouts
3.5
External links
http://developer.android.com/guide/topics/ui/how-android-draws.html http://developer.android.com/reference/android/view/ViewGroup.html
http://developer.android.com/reference/android/view/ViewGroup.LayoutParams.html
Hack 4
Preferences hacks
Android v1.6+
One of the features I like about the Android SDK is
the preferences framework. I prefer it to the iOSSDK
because it makes it easier to create layouts. When
you edit a simple XML file, you get an easy-to-use
preferences screen.
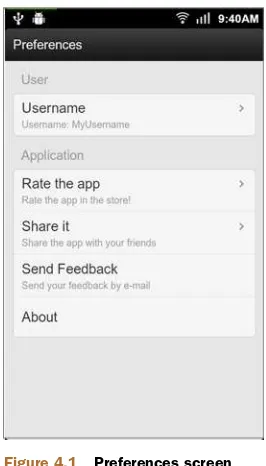
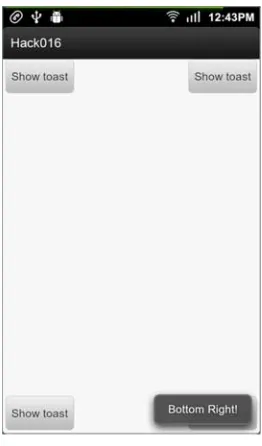
Although Android provides many settings wid-gets for you to use, sometimes you may need to cus-tomize the view. In this hack, you’ll find a couple of examples in which the settings framework has been customized. The finished preferences screen is shown in figure 4.1.
Let’s first take a look at the XML:
practice to give preferences an
We can use a PreferenceCategory to separate preferences by certain group names.
<EditTextPreference
android:key="pref_username"
android:summary="Username" To pick a username, we’ll
use an EditTextPreference. A summary is set, but we’ll replace it with the username the user picked. android:title="Username"/>
android:summary="Rate the app in the store!" We’ll use a Preference
for options that will launch an Intent.
android:title="Rate the app"/>
15
Preferences hacks
<Preference
android:key="pref_share"
android:summary="Share the app with your friends" android:title="Share it"/>
<com.manning.androidhacks.hack004.preference.EmailDialog android:dialogIcon="@drawable/ic_launcher"
android:dialogTitle="Send Feedback"
android:dialogMessage="Do you want to send an email?" android:key="pref_sendemail_key"
android:negativeButtonText="Cancel" android:positiveButtonText="OK"
android:summary="Send your feedback by e-mail" android:title="Send Feedback"/>
<com.manning.androidhacks.hack004.preference.AboutDialog
Inside preferences, we can also create custom preferences to extend one of the existing widgets. android:dialogIcon="@drawable/ic_launcher"
we’ll extend android.preference.PreferenceActivity. The code follows:
public class MainActivity extends PreferenceActivity implements OnSharedPreferenceChangeListener {
@Override
public void onCreate(Bundle savedInstanceState) { super.onCreate(savedInstanceState);
addPreferencesFromResource(R.xml.prefs);
Instead of calling setContentView(), we need to call addPreferences-FromResource with XML we created previously.
...
Preference ratePref = findPreference("pref_rate");
In onCreate() method, we can start getting preferences without actions and start setting their Intents. In this case, rate preference will use Intent.ACTION_VIEW. Uri uri = Uri.parse("market://details?id=" + getPackageName());
Intent goToMarket = new Intent(Intent.ACTION_VIEW, uri); ratePref.setIntent(goToMarket);
}
@Override
protected void onResume() { super.onResume();
getPreferenceScreen().getSharedPreferences()
.registerOnSharedPreferenceChangeListener(this);
Register to be notified of preferences changes. }
@Override
16 CHAPTER1 Working your way around layouts getPreferenceScreen().getSharedPreferences()
.unregisterOnSharedPreferenceChangeListener(this); Unregister to
preferences changes. }
@Override
public void onSharedPreferenceChanged(
SharedPreferences sharedPreferences, String key) {
if (key.equals("pref_username")) {
When there’s a change in username preference, we need to update preference summary.
updateUserText(); }
}
private void updateUserText() { EditTextPreference pref;
pref = (EditTextPreference) findPreference("pref_username");
To update summary, we need to get preference and update summary using EditTextPreference’s getText() method. String user = pref.getText();
if (user == null) {
The code we want to create shows how to create custom preferences. It works as if we were creating a custom view. To understand it, let’s look at the following, where we
create the code for the EmailDialog class:
public class EmailDialog extends DialogPreference {
Custom class should extend some of existing preferences widgets. In this case, we’ll use DialogPreference. Context mContext;
public EmailDialog(Context context) { this(context, null);
}
public EmailDialog(Context context, AttributeSet attrs) { this(context, attrs, 0);
}
public EmailDialog(Context context, AttributeSet attrs, int defStyle) {
Constructors are the same as those used to create a custom view extending the View class.
super(context, attrs, defStyle); mContext = context;
}
@Override
public void onClick(DialogInterface dialog, int which) {
onClick() is overridden. If users press OK button, then we’ll launch email Intent with helper class. super.onClick(dialog, which);
if (DialogInterface.BUTTON_POSITIVE == which) { LaunchEmailUtil.launchEmailToIntent(mContext); }
17
Preferences hacks
4.1
The bottom line
Although the settings framework allows you to add some custom behavior, you need to remember that its purpose is to create simple preferences screens. If you’re thinking of adding more complex user interfaces or flows, I’d recommend you create a
sepa-rate Activity, theming it as a Dialog, and launching it from a preferences widget.
4.2
External links
19
Creating cool animations
In this chapter, you’ll learn about animations. You’ll find different examples that
use a variety of APIs to add animations to your application widgets.
Hack 5
Snappy transitions with TextSwitcher and
ImageSwitcher
Android v1.6+
Imagine you need to cycle through information in a TextView or in an ImageView.
Some examples of this would be
Navigating through a list of dates with Left and Right buttons
Changing numbers in a date picker
Countdown clock
News headlines
Changing the contents of a view is a basic function of most applications, but it
doesn’t have to be boring. If we use the default TextView, you’ll notice there’s no
eye candy when we swap its content. It’d be nice to have a way to apply different animations to content being swapped. So to make our transitions more visually
appealing, Android provides two classes called TextSwitcher and ImageSwitcher.
20 CHAPTER2 Creating cool animations
TextView and TextSwitcher work in a similar way. Suppose we’re navigating through a list of dates, as mentioned earlier. Every time the user clicks a button, we
need to change a TextView’s content with each date. If we use a TextView, we’re
swap-ping out some text in a view using mTextView.setText("something"). Our code
should look something like the following:
private TextView mTextView;
@Override
public void onCreate(Bundle savedInstanceState) { super.onCreate(savedInstanceState);
mTextView = (TextView) findViewById(R.id.your_textview);
...
mTextView.setText(“something”); }
As you might’ve noticed, if we change the content of a TextView, it’ll change instantly;
TextSwitcher is what we need if we want to add an animation to avoid the hard swap. A TextSwitcher is useful to animate a label onscreen. Whenever it’s called, TextSwitcher animates the current text out and animates the new text in. We can get a more pleasant transition by following these easy steps:
1 Get the view using findViewById(), or construct it in your code like any normal
Android view.
2 Set a factory using switcher.setFactory().
3 Set an in-animation using switcher.setInAnimation().
4 Set an out-animation using switcher.setOutAnimation().
Here’s how TextSwitcher works: it uses the factory to create new views, and whenever
we use setText(), it first removes the old view using an animation set with the
set-OutAnimation() method, and then places the new one using the animation set by the setInAnimation() method. So let’s see how to use it:
private TextSwitcher mTextSwitcher;
@Override
public void onCreate(Bundle savedInstanceState) { super.onCreate(savedInstanceState);
setContentView(R.layout.main);
Animation in = AnimationUtils.loadAnimation(this, android.R.anim.fade_in);
Animation out = AnimationUtils.loadAnimation(this, android.R.anim.fade_out);
mTextSwitcher = (TextSwitcher) findViewById(R.id.your_textview); mTextSwitcher.setFactory(new ViewFactory() {
@Override
public View makeView() {
21
Adding eye candy to your ViewGroup’s children
return t; }
});
mTextSwitcher.setInAnimation(in); mTextSwitcher.setOutAnimation(out); }
That’s it. The user gets the new text, and we get some cool animations for free. The new transition fades out the original text while the new text fades in to replace it.
Because we used android.R.anim.fade_in in our example, the effect was a fade-in.
This technique works equally well with other effects. Providing your own animation or
using one from android.R.anim. ImageSwitcher works in the same way, except with
images instead of text.
5.1
The bottom line
The TextSwitcher and ImageSwitcher methods give you a simple way to add ani-mated transitions. Their role is to make these transitions less dull and more vibrant. Don’t abuse them; you don’t want your application to look like a Christmas tree!
5.2
External links
http://developer.android.com/reference/android/widget/TextSwitcher.html http://developer.android.com/guide/topics/graphics/view-animation.html
Hack 6
Adding eye candy to your
ViewGroup’s children
Android v1.6+
By default, when you add views to a ViewGroup, they’re instantly added and displayed,
but there’s an easier way to animate that action. In this hack, I’ll show you how to
apply an animation to children views being added to their parent ViewGroup. I’ll show
you how to add eye candy to your application in a few lines.
Android provides a class called LayoutAnimationController. This class is useful to
animate a layout’s or a ViewGroup’s children. It’s important to mention that you won’t
be able to provide different animations for each child, but the
LayoutAnimation-Controller can help you decide when the animation should apply to each child.
The best way to understand how to use LayoutAnimationController is through an
example. We’ll animate ListView’s children with a mix of two animations, alpha and