Apache Tomcat 7
Aleksa Vukotic
James Goodwill
electronic or mechanical, including photocopying, recording, or by any information storage or retrieval system, without the prior written permission of the copyright owner and the publisher.
ISBN-13 (pbk): 978-1-4302-3723-5
ISBN-13 (electronic): 978-1-4302-3724-2
Trademarked names, logos, and images may appear in this book. Rather than use a trademark symbol with every occurrence of a trademarked name, logo, or image we use the names, logos, and images only in an editorial fashion and to the benefit of the trademark owner, with no intention of infringement of the trademark.
The use in this publication of trade names, trademarks, service marks, and similar terms, even if they are not identified as such, is not to be taken as an expression of opinion as to whether or not they are subject to proprietary rights.
President and Publisher: Paul Manning Lead Editor: Chris Nelson
Technical Reviewer: Chád Darby
Editorial Board: Steve Anglin, Mark Beckner, Ewan Buckingham, Gary Cornell, Jonathan Gennick, Jonathan Hassell, Michelle Lowman, James Markham, Matthew Moodie, Jeff Olson, Jeffrey Pepper, Frank Pohlmann, Douglas Pundick, Ben Renow-Clarke, Dominic Shakeshaft, Matt Wade, Tom Welsh
Coordinating Editor: Corbin Collins Copy Editor: Tracy Brown
Compositor: Bytheway Publishing Services Indexer: SPI Global
Artist: SPI Global
Cover Designer: Anna Ishchenko
Distributed to the book trade worldwide by Springer Science+Business Media, LLC., 233 Spring Street, 6th Floor, New York, NY 10013. Phone 1-800-SPRINGER, fax (201) 348-4505, e-mail [email protected], or visit www.springeronline.com.
For information on translations, please e-mail [email protected], or visit www.apress.com.
Apress and friends of ED books may be purchased in bulk for academic, corporate, or promotional use. eBook versions and licenses are also available for most titles. For more information, reference our Special Bulk Sales–eBook Licensing web page at www.apress.com/bulk-sales.
The information in this book is distributed on an “as is” basis, without warranty. Although every precaution has been taken in the preparation of this work, neither the author(s) nor Apress shall have any liability to any person or entity with respect to any loss or damage caused or alleged to be caused directly or indirectly by the information contained in this work.
iv
About the Authors... xiii
About the Technical Reviewer ... xiv
Acknowledgments ... xv
Preface... xvi
Chapter 1: Introduction to Apache Tomcat 7 ...1
Chapter 2: Deploying Web Applications to Tomcat...17
Chapter 3: Servlets, JSPs and ServletContext
...
47
Chapter 4: Using Tomcat’s Manager Web Application
...
73
Chapter 5: HTTP Sessions ...95
Chapter 6: Configuring Security Realms...119
Chapter 7: Securing Tomcat with SSL ...141
Chapter 8: Valves and Servlet Filters...155
Chapter 9: Embedding Tomcat...175
Chapter 10: Integrating Apache Web Server...185
Chapter 11: Integrating Spring MVC Framework...199
Chapter 12: Logging in Tomcat...211
Chapter 13: Configuring JNDI in Tomcat...229
Appendix A: Server.xml File...247
Appendix B: The Web.xml File...261
v
Contents
About the Authors... xiii
About the Technical Reviewer ... xiv
Acknowledgments ... xv
Preface... xvi
Chapter 1: Introduction to Apache Tomcat 7 ...1
The Apache Tomcat Server...1
The Tomcat Manager Web Application... 2
Specialized Realm Implementations ... 2
Tomcat Valves ... 2
Further Information ... 2
The Architecture of Tomcat ...3
The Server ... 5
The Service... 5
The Connector ... 6
The Engine... 6
The Host ... 6
The Context... 6
Installing and Configuring Tomcat...6
Requirements for Installing and Configuring Tomcat ... 6
Installing Tomcat Using Windows Service Installer... 7
Manually Installing on Windows ... 8
vi
Testing Your Tomcat Installation ...12
Summary ...15
Chapter 2: Deploying Web Applications to Tomcat...17
The Tomcat Directory Structure...17
Executing Tomcat scripts ... 18
Passing Runtime Options to Catalina Script ... 19
Tomcat Configuration Files... 20
Java Web Applications...20
The Directory Structure ... 21
The Deployment Descriptor ... 22
Manually Deploying Web Applications to Tomcat...23
Creating the Web Application Directory Structure... 24
Adding Static Content ... 24
Adding JSPs... 25
Adding Servlets ... 27
Deploying WAR Archive ... 30
Other Methods of Deployment... 32
Configuring Hosts and Contexts ...32
Configuring Hosts ... 32
Configuring Web Application Contexts ... 33
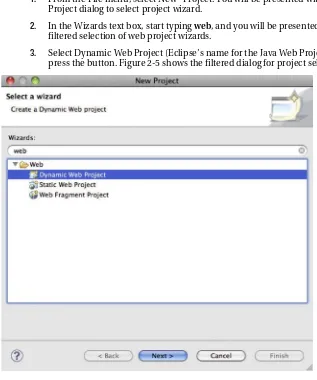
Deploying a Web Application from Eclipse IDE ...37
Updating Eclipse for Java Web Development ... 37
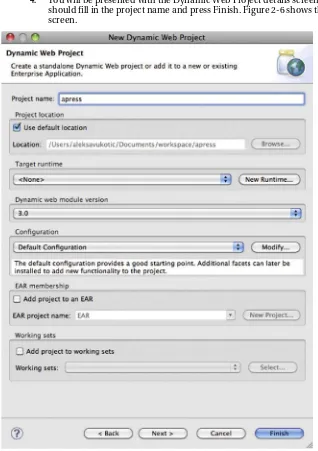
Creating a Dynamic Web Project ... 39
Adding Tomcat Runtime Environment ... 41
Deploying a Java Web Project to Tomcat from Eclipse ... 43
vii
Chapter 3: Servlets, JSPs and ServletContext
...47
Servlets...47
The Lifecycle of a Servlet ... 48
ServletRequest and ServletResponse... 49
The GenericServlet and HttpServlet Classes ... 51
Configuring a Servlet in a Servlet Container... 53
Servlet API 3.0 ... 55
Java Server Pages ...58
Lifecycle of Java Server Pages... 59
The Components of a Java Server Pages ... 60
JSP Directives... 61
JSP Scripting ... 63
Relationship Between Servlets and ServletContext...69
Summary ...70
Chapter 4: Using Tomcat’s Manager Web Application
...
73
What Is the Manager Web Application?...73
Gaining Access to the Manager Web Application ...74
Accessing the Manager Web Application Using Web Interface ...76
Listing Deployed Web Applications ... 78
Checking Server Status ... 79
Deploying a New Web Application... 80
Reloading an Existing Web Application ... 83
Sessions ... 84
Stop ... 86
Start... 88
viii
Using a Text-Based Interface to Access Manager Web Application ...90
Installing Ant... 90
Configuring Tomcat’s Ant Tasks... 91
Running Ant Scripts... 93
Summary ...94
Chapter 5: HTTP Sessions ...95
The Servlet Implementation of HTTP sessions ...97
Shopping Basket Session Example ... 99
Invalidating a Session... 107
Session Management in Tomcat ...108
StandardManager ... 109
PersistentManager ... 112
Summary ...118
Chapter 6: Configuring Security Realms...119
Security Realms...119
MemoryRealm...120
Protecting a Resource with a MemoryRealm ... 121
Protection Against Brute Force Attacks... 126
UserDatabaseRealm ... 127
JDBC Realms ...128
Creating the Users Database ... 128
Configuring Tomcat to Use a JDBCRealm... 131
Configuring FORM-Based Authentication with JDBCRealm ... 132
DataSourceRealm... 136
The Benefits of Using a JDBCRealm ... 137
ix
Accessing an Authenticated User ...139
Summary ...140
Chapter 7: Securing Tomcat with SSL ...141
Introduction to SSL ...141
What SSL Does ... 142
How SSL works ... 142
Configuring Tomcat with SSL ...144
Creating Keystore with SSL Certificate... 144
Configuring Tomcat’s SSL Connector ... 147
Configuring Secure Resources in the Web Application ... 149
Installing a Certificate from the Certificate Authority ... 151
Secure Session Tracking with Tomcat ...152
Summary ...154
Chapter 8: Valves and Servlet Filters...155
Introduction to Valves and Filters ...155
What Is a Tomcat Valve? ... 156
What Is a Servlet Filter? ... 156
Tomcat Valves vs. Servlet Filters...157
Configuring Tomcat Valves ...157
Implementing a Custom Valve ... 157
The Access Log Valve ... 159
The Remote Address Valve... 162
Crawler Session Manager Valve ... 163
Dead Thread Detection Valve ... 164
Configuring Servlet Filters ...164
Implementing a Servlet Filter ... 165
x
Expires Filter... 169
Cross-Site Request Forgery Prevention Filter ... 171
Summary ...173
Chapter 9: Embedding Tomcat...175
Requirements for Embedding Tomcat ...175
Embedded Tomcat Java Components ...177
Implementing a Sample Application with Embedded Tomcat ...178
Testing Servlets with Embedded Tomcat ...182
Summary ...184
Chapter 10: Integrating Apache Web Server...185
What Is the Apache Web Server? ...185
Integrating Tomcat and Apache Web Server ...186
Using mod_proxy... 187
Using mod_jk... 192
Which Approach to Use ... 195
Load Balancing ...195
Summary ...197
Chapter 11: Integrating Spring MVC Framework...199
Introducing Spring MVC ...199
Spring Framework Overview ... 199
MVC Pattern... 200
Front Controller Pattern ... 202
Spring MVC Web Applications ...203
Configuring DispatcherServlet... 204
Adding Views ... 205
xi
Wiring Spring Application Context ... 206
Summary ...209
Chapter 12: Logging in Tomcat...211
Using Tomcat’s JULI Logging Library ...211
Introduction to Java Logging and JULI libraries ... 212
Configuring Internal Tomcat Logging with JULI ... 217
Configuring Web Application Logging with JULI... 219
Using Log4j Library for Web Application Logging ...221
PatternLayout ... 223
Using Log4j for Tomcat Internal Logging... 224
Using Log4j for Web Application Logging ... 225
Web Application Logging Using Slf4j Library...226
Using Slf4j ... 226
Summary ...228
Chapter 13: Configuring JNDI in Tomcat...229
Introduction to JNDI...229
JNDI API Overview ... 230
Tomcat JNDI Configuration... 231
Configuring the Database Connection ...232
Introducing JDBC... 232
Configuring Data Source as a JNDI Resource ... 235
Configuring Mail Session ...240
Introducing JavaMail ... 240
Configuring Mail Session as a JNDI Resource... 242
Summary ...246
Appendix A: Server.xml File...247
xii
The Server Container ... 247
The Service Container ... 248
The Engine Container ... 249
The Host Container ... 250
The Context Container ... 252
Connectors...255
The HTTP Connector ... 257
The AJP Connector ... 258
Summary ...259
Appendix B: The Web.xml File...261
The Basic web.xml Configuration ...261
Adding a Servlet Definition ...262
Adding a Servlet Mapping ... 263
Configuring a Servlet Using Annotations ... 263
Adding a Servlet Filter ...264
Configuring Filter Mapping ... 265
Configuring Servlet Filter Using Annotations... 266
Configuring ServletContext Parameters ...267
Configuring the Session...267
Adding a Welcome File List ...267
Configuring Error Handlers ...268
Configuring Mime Types...268
Configuring Web Application Security ...268
Adding a Security Constraint ... 268
Adding a Login Config... 270
Summary ...271
xiii
■Aleksa Vukotic is a keen agile advocate, author, trainer, software architect, and developer, and has years of experience leading successful deliveries of business critical software projects.
He has a track record of success with the agile transformation of large companies, helping senior management lead the way in turning business requirements into effective software products. Aleksa has vast experience with Java technologies, and has been involved with the Spring Framework since the early days, becoming an expert in enterprise Java development with Spring, along with other open-source technologies. In addition to his Java EE expertise, Aleksa often utilizes his problem-solving skills to tackle the most complex issues that arise with projects. This combination of high-level management skills and technical knowledge has made Aleksa invaluable in motivating software teams to bring out the best in themselves and make rapid progress toward successful project delivery. His experience includes working with large and small teams on all levels—from high-level management, planning, and architecture to low-level technical
implementation of critical software components. Aleksa co-authored Pro Spring 2.5, published by Apress, and has had several articles published in respected open-source publications. Aleksa is currently working at Open Credo, a London-based company of technical experts specializing in maximizing software development value for its clients. Outside of the working environment, Aleksa enjoys following football and exploring the latest technology gadgets.
xiv
■Chád Darby is an author, instructor, and speaker in the Java development world. As a recognized authority on Java applications and architectures, he has presented technical sessions at software development conferences worldwide. In his 15 years as a professional software architect, he’s had the opportunity to work for Blue Cross/Blue Shield, Merck, Boeing, Northrop Grumman, and other IT companies.
Chád is a contributing author to several Java books, including Professional Java E-Commerce (Wrox Press), Beginning Java Networking (Wrox Press), and XML and Web Services Unleashed (Sams, 2002). He is also the author of numerous magazine articles for the Java Developer’s Journal (Sys-Con Publishing).
xv
I would like to thank Jelica, for standing beside me during the writing of this book. Without her support and encouragement, completing this book would have been a much more difficult task.
I’d also like to thank my parents for providing me with the life guidance that enabled me to be where I am.
I would like to express my gratitude to all the people helping me to make this book better: Chád Darby, who helped to achieve a higher technical standard for this book; Chris Nelson, who patiently helped me improve my writing style and make the book read better with his excellent editorial skills; Corbin Collins, Steve Anglin, and everyone else at Apress for all the hard work they did to get this book published.
Big thanks to all who contribute to the Apache Tomcat project and other open-source software for being part of a community that creates such great products.
And finally, I’d like to thank all my colleagues and friends with whom I’ve worked throughout my career, for contributing to my professional development, which prepared me to be co-author of this book.
xvi
The first edition of this book covered the then-new Jakarta Tomcat 4. Tomcat has come a long way from there, becoming Apache Tomcat in the process, with version 7 released in January 2011. During this time, Tomcat has become the most popular and used Java servlet container on the market. Other open source application servers also have started using Tomcat as their embedded servlet engine. With the shift of focus in enterprise Java development toward more lightweight architecture and tools, Tomcat has grown to become the deployment platform of choice for business-critical enterprise Java
applications.
This edition has been revised to cover the latest features of Apache Tomcat 7 and Servlet API 3.0. In the world of technology, changes are introduced quickly, and yesterday’s new ideas are the legacy systems of tomorrow. Although Tomcat is still a leading open source servlet container, a lot has changed in Java web technologies since version 4. The biggest change was Java Servlet specification, which advanced to version 3.0, bringing a lot of new features along the way.
This book is based on the original text by James Goodwill, and the concepts and structure of the original book have been kept where possible. However, where the changes to Tomcat architecture and Java Servlet specification have been too great, the text was changed significantly, and some chapters have been entirely rewritten. In addition, some of the chapters from the original book have been removed, because they are now outdated. Instead, new chapters, covering up-to-date Tomcat concepts and Java web technologies, have been included. All code and configuration examples have been either updated to use up-to-date Tomcat 7 and Servlet API 3 syntax and structure, or have been entirely replaced to match the architectural changes to the underlying technology.
This book will be useful to the reader who is familiar with Java, but new to servlet development with Tomcat. That’s why it contains an introduction to the development of Java web applications using servlets and JSPs. Server administrators new to Tomcat 7 also will find a lot of useful information in this book related to Tomcat management and configuration tasks.
It was not the aim of the authors to provide a detailed Tomcat reference covering all aspects of Tomcat configuration. The authors did try to write a book that introduces Tomcat in the context of web application development, so that readers can implement, deploy, and manage their Java web
Introduction to Apache Tomcat 7
In this chapter, we introduce the world of Apache Tomcat server. Throughout this chapter, we
v Describe the Apache Tomcat architecture
v Discuss the requirements for installing and configuring Tomcat
v Describe the steps of installing and configuring Tomcat
v Test your Tomcat installation
At the end of this chapter, you will understand the Tomcat architecture, have an instance of Tomcat server installed and running on your computer, and have a sample web application displayed in your browser.
The Apache Tomcat Server
The Apache Tomcat server is an open source, Java-based web application container that was created to run servlet and JavaServer Pages (JSP) web applications. It was created under the Apache-Jakarta subproject; however, due to its popularity, it is now hosted as a separate Apache project, where it is supported and enhanced by a group of volunteers from the open source Java community.
Apache Tomcat is very stable and has all of the features of a commercial web application container – yet comes under Open Source Apache License. Tomcat also provides additional functionality that makes it a great choice for developing a complete web application solution. Some of the additional features provided by Tomcat—other than being open source and free—include the Tomcat Manager application, specialized realm implementations, and Tomcat valves.
Currently supported versions on Apache Tomcat are 5.5X, 6.0X, and 7.0X. Versions earlier than 5.5 are still available for download, but they are archived and no support is available for them, so users are encouraged to use the latest possible version of Tomcat where available.
Major versions on Apache Tomcat coincide with versions of the Java Servlet specification, or Java Servlet API, released. So, Tomcat 5.5X supports Servlet API 2.3, Tomcat 6.0X supports Servlet API 2.4, and the latest Tomcat 7.0 is a reference implementation of current Servlet API 3.0. In addition to Servlet API versions, Tomcat versions support corresponding JSP API versions.
Table 1-1. Tomcat Versions and Supported API and JDK Versions
Apache Tomcat
Servlet API
JSP API
JDK
7.0 3.0 2.2 1.6
6.0 2.5 2.1 1.5
5.5 2.4 2.0 1.4
4.1 2.3 1.2 1.3
3.0 2.2 1.1 1.1
This book will cover version 7 of the Apache Tomcat Server. However, most of the content can be applied to versions 5.5 and 6—where that is not possible, it will be clearly stated.
The Tomcat Manager Web Application
The Tomcat Manager web application is packaged with the Tomcat server. It is installed in the context path of /manager and provides the basic functionality to manage web applications running in the Tomcat server from any web browser. Some of the provided functionality includes the ability to install, start, stop, remove, and report on web applications. Chapter 4 covers the details of the Tomcat Manager web application.
Specialized Realm Implementations
Tomcat provides container-managed security methods for protecting resources within the container. These “databases” of users that can be authenticated by the container are called realms.
We will cover two types of realms supported by Tomcat in more detail: MemoryRealm, where user information is simply read from a file and stored in memory, and JDBCRealm, which uses relational database to store users. You can read more about realms with examples in Chapter 6.
Tomcat Valves
Tomcat valves are a technology introduced with Tomcat 4, and available in all later versions. Valves allow you to associate an instance of a Java class with a particular Catalina container. The configured valve class is then acting as a preprocessor for all requests coming to the container. Valves are proprietary to Tomcat and cannot, at this time, be used in a different servlet/JSP container.
Servlet API defines similar functionality in form of Filters. We will also discuss the differences between valves and servlet filter implementation in Chapter 8.
Further Information
Figure 1-1. The Tomcat project homepage
You can also subscribe to the Tomcat mailing lists, which can be found at
http://tomcat.apache.org/lists.html.
This page contains all of the mailing lists controlled by the Apache Tomcat project. Once you are on the mailing lists page, you can choose the list that you’re interested in.
In addition to the official documentation and mailing lists from the Apache Tomcat Project web site, you can find useful information on a number of web sites and forums online. We’d like to recommend
www.tomcatexpert.com, a relatively new web site promoting adoption of Tomcat in enterprise environments.
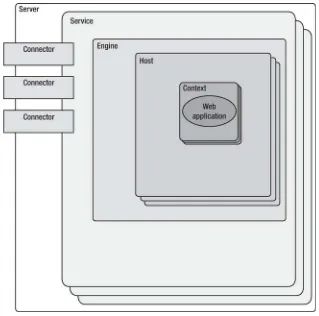
The Architecture of Tomcat
A Tomcat instance, or server, is the top-level component in Tomcat’s container hierarchy. Only one Tomcat instance can live in a single Java Virtual Machine (JVM). This approach makes all other Java applications, running on the same physical machine as Tomcat server, safe in case Tomcat and/or its JVM crashes.
Tomcat instance consists of grouping of the application containers, which exist in the well-defined hierarchy. The key component in that hierarchy is the Catalina servlet engine. Catalina is the actual Java servlet container implementation as specified in Java Servlet API. Tomcat 7 implements Servlet API 3.0, the latest specification from Sun.
Listing 1-1 provides an XML representation of the relationships between the different Tomcat containers.
Listing 1-1. XML Outline of the Tomcat Architecture Components
<Server>
<Service>
<Connector /> <Engine> <Host>
<Context> </Context> </Host>
</Engine> </Service> </Server>
Figure 1-2. Tomcat architecture with main components
This instance can be broken down into a set of containers including a server, a service, a connector, an engine, a host, and a context. By default, each of these containers is configured using the server.xml file, which we describe later in more detail.
The Server
The first container element referenced in this snippet is the <Server> element. It represents the entire Catalina servlet engine and is used as a top-level element for a single Tomcat instance. The <Server>
element may contain one or more <Service> containers.
The Service
The next container element is the <Service> element, which holds a collection of one or more
The Connector
The next type of element is the <Connector> element, which defines the class that does the actual handling requests and responses to and from a calling client application.
The Engine
The third container element is the <Engine> element. Each defined <Service> can have only one
<Engine> element, and this single <Engine> component handles all requests received by all of the defined
<Connector> components defined by a parent service.
The Host
The <Host> element defines the virtual hosts that are contained in each instance of a Catalina <Engine>. Each <Host> can be a parent to one or more web applications, with each being represented by a
<Context> component.
The Context
The <Context> element is the most commonly used container in a Tomcat instance. Each <Context>
element represents an individual web application that is running within a defined <Host>. There is no limit to the number of contexts that can be defined within a <Host>.
Installing and Configuring Tomcat
In this section, we install Tomcat as a standalone server, which means that Tomcat will service all requests, including static content, JSPs, and servlets. Before continuing with the installation steps, let’s take a look at the prerequisites for Tomcat installation.
Requirements for Installing and Configuring Tomcat
Before we get started performing the tasks outlined by this chapter, you need to download the items listed in Table 1-2.
Table 1-2. Tomcat Requirements
NAME LOCATION
Tomcat 7 http://tomcat.apache.org
JDK 1.6 Standard Edition www.java.com/en/download/index.jsp
Installing Tomcat Using Windows Service Installer
The first installation we will be performing is for Windows. The first thing you need to do is install the Java Development Kit (JDK). Since we’re using Tomcat 7, we will need JDK 1.6 or later. To download Java, just type download Java in your favorite web search engine, and follow the top result link.
Note
Make sure you follow the instructions included with your OS-appropriate JDK.
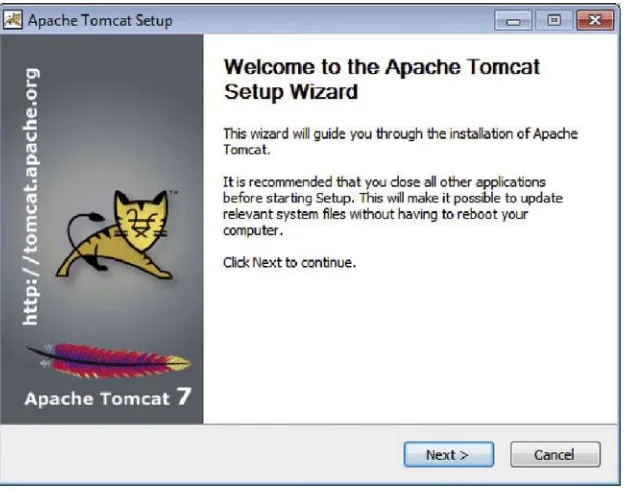
Tomcat 7 comes with easy-to-use executable Windows installer, which will do all tasks explained in previous section automatically.
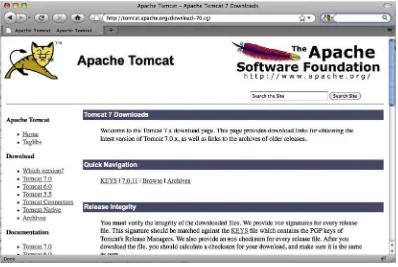
First step to do is to download the Apache Tomcat Windows service installer from the Tomcat download page (http://tomcat.apache.org/download-70.cgi). Tomcat Windows installer interface is very similar to any other Windows installer. Follow the steps, choose the installation location, and the installer will take care of extracting and copying files to correct directory, and configuring Environment variables and service properties. Figure 1-3 shows the running Tomcat installer for Windows.
Figure 1-3. Tomcat Windows Service installer
After the installation is completed, you can check that the environment variable CATALINA_HOME has been set, from the System Properties application.
If you are not going to perform a Linux installation, you should skip the section “Installing to Linux” later in this chapter and move on to the section “Testing Your Tomcat Installation.”
Manually Installing on Windows
If you want to control all aspects of Tomcat installation, manage the environment variables required for Tomcat to run and configure your system so you have easy command line access to your Tomcat server, you will need to install Tomcat manually.
For a manual Tomcat installation, you will need to have installed and configured Java Runtime Environment. For this example, we will install the JDK to drive D:, so therefore JAVA_HOME directory is
D:\jdk1.6.
To check whether Java is configured correctly, run your version of Java from the Windows command prompt. You should get the full version of the installed JDK.
After you have extracted Tomcat, you need to add two environment variables to the Windows system: JAVA_HOME, which is the root directory of your JDK installation, and CATALINA_HOME, which is the root directory of your Tomcat installation. To do this in Windows, perform the following steps:
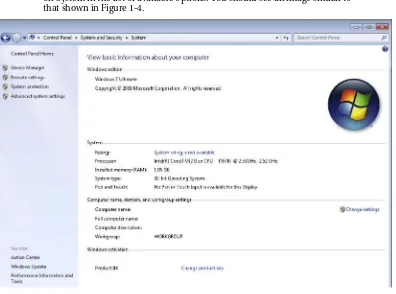
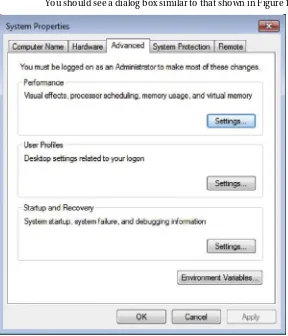
1. Open the Windows Control Panel, select System and Security, and then click on System in the list of available options. You should see an image similar to that shown in Figure 1-4.
2. Now select Advanced system settings from the list in the left-hand side menu. You should see a dialog box similar to that shown in Figure 1-5.
Figure 1-5. Windows System Properties dialog box – Advanced tab
Figure 1-6. Environment Variables dialog box
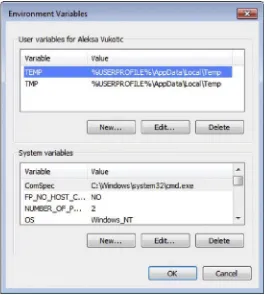
4. Now, click on the New button on the System Variables section of the
Environment Variables dialog box. Add a variable named JAVA_HOME, set its value to the location of your JDK installation, and click OK to complete the step.
Figure 1-7. CATALINA_HOME environment settings
6. Make sure you click OK to accept the new variable, and then click OK in the Environment Variables and System Properties dialog boxes to accept all your changes.
That is all there is to it; Tomcat is installed and configure on your Windows system. Before we test the installation, let’s take a look at the automated process of installing Tomcat on Windows, using Tomcat Windows Service Installer.
Installing to Linux
A Linux installation is a much simpler process compared to a Windows installation. The first thing you need to do is install the downloaded JDK.
You can either download the correct Java version from www.java.com, or use built-in application management tool for Linux to download and install Java automatically. On Debian/Ubuntu Linux for example you can install Java by running following command:
sudo apt-get install sun-java6-jdk
We will assume at this point that the JDK is installed to /usr/local/java/jdk1.6.0_02.
To check whether Java is configured correctly, run your version of Java from the command line. You should get the full version of the installed JDK.
After the JDK has been installed, you need to set the JAVA_HOME environment variable. To do this in Linux, find the shell that you are using in Table 1-3 and type the matching command. You need to replace /usr/local/java/jdk1.6.0_02 with the root location of your JDK installation.
Table 1-3. JAVA_HOME Environment Commands
SHELL JAVA_HOME
Bash JAVA_HOME=/user/java/jdk1.3.0_02
export JAVA_HOME
Note
You should also add the location of the Java runtime to your PATH environment variable.
You now need to extract the Tomcat server to a directory of your choosing. This directory will become the CATALINA_HOME directory. For this installation, we assume that Tomcat is installed to /opt/tomcat7.
The last step is to set the CATALINA_HOME environment variable. Find the shell that you are using in Table 1-4 and type the matching command. You need to replace /var/tomcat with the directory of your Tomcat installation.
Table 1-4. CATALINA_HOME Environment Commands
SHELL CATALINA_HOME
Bash CATALINA_HOME=/var/tomcat
export CATALINA_HOME
Tsh setenv TOMCAT _HOME /var/tomcat
And that is all there is to the Linux installation. You should now be able to move on to the next section, “Testing Your Tomcat Installation.”
Testing Your Tomcat Installation
To test the Tomcat installation, you need to first start the Tomcat server. Table 1-5 contains the startup and shutdown commands for both operating systems.
Table 1-5. Tomcat Startup/Shutdown Commands
OS STARTUP
SHUTDOWN
Windows CATALINA_HOME\bin\startup.bat CATALINA_HOME\bin\shutdown.bat
Linux CATALINA_HOME/bin/startup.sh CATALINA_HOME/bin/shutdown.sh
Note
If you have installed Tomcat on Windows, a folder was placed in your Windows Start menu with shortcuts
that allow you to start and stop your Tomcat server from there.
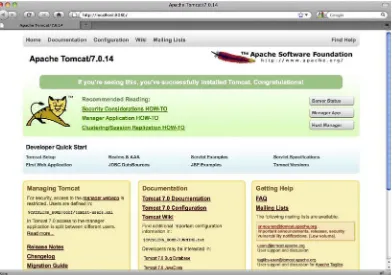
Once Tomcat has started, open your browser to the following URL:
http://localhost:8080/
Figure 1-8. The Tomcat default homepage
Tomcat is by default accepting all requests on port 8080. This is set on purpose, to clearly differentiate Java servlet container from the standard HTTP servlets that are accepting incoming requests on port 80 (for example MS IIS or Apache Http Server). If you would like to have all requests serviced on the default HTTP port of 80 instead of port 8080, you need to make the following change to the CATALINA_HOME/conf/server.xml file and restart Tomcat.
Find the following line in the server.xml file:
<!-- Define a non-SSL HTTP/1.1 Connector on port 8080 -->
<Connector className="org.apache.catalina.connector.http.HttpConnector" port="8080"«
minProcessors="5" maxProcessors="75" acceptCount="10" debug="0"/>
and change the port property to value “80,” as shown in the following code snippet:
<!-- Define a non-SSL HTTP/1.1 Connector on port 80 -->
<Connector className="org.apache.catalina.connector.http.HttpConnector" port="80"«
minProcessors="5" maxProcessors="75" acceptCount="10" debug="0"/>
After Tomcat is restarted, you will be able to open your browser to the following URL and see results similar to those shown previously in Figure 1-8:
http://localhost
Note
This URL does not have the port number specified. The URL convention for browsers is that if the port is
omitted from the URL, value 80 is assumed. Therefore, URL http://localhost:80/ would have the same effect.
The next step is to verify if the JSP pages are handled correctly from the Tomcat. You do this by executing one of the JSP examples provided with the Tomcat server. To execute an example JSP, start from the page shown in Figure 1-8 and choose JSP Examples. You should see a page similar to that shown in Figure 1-9.
Figure 1-9. The JSP examples page
Figure 1-10. The JSP date page
If you do not see the previous page, make sure that the location of your JAVA_HOME environment variable matches the location of your JDK installation.
Summary
In this chapter, we introduced the Apache Tomcat server and discussed its main components and architecture. We went on to install and configure Tomcat on both Windows and Linux. We also discussed some simple steps to test your new installation and run Tomcat-provided JSP examples.
Deploying Web Applications
to Tomcat
Now that Tomcat is installed and running, let’s look at the steps necessary to deploy a web application. To do this, we need to first examine the directory structure of Tomcat, and then move on to actually deploying a web application.
In this chapter, we:
v Describe the Tomcat directory structure
v Introduce the structure of Java web applications that can be deployed to Tomcat
v Manually deploy web applications to Tomcat
v Configure Tomcat’s hosts and contexts components Use Eclipse IDE to deploy sample web application to Tomcat
The Tomcat Directory Structure
Before you can start creating your own web applications, you need to be familiar with the Tomcat directory structure.
The Tomcat installation directory is referred to as CATALINA_HOME. Table 2-1 describes the directories that compose a Tomcat installation. It is assumed that each of these directories is contained within the
Table 2-1. The Tomcat Directory Structure
Directory Contents
/bin Contains the startup and shutdown scripts for both Windows and Linux. Jar files with classes required for tomcat to start are also stored here.
/conf Contains the main configuration files for Tomcat. The two most important are server.xml and the global web.xml.
/lib Contains the Tomcat Java Archive (jar) files, shared across all Tomcat components. All web applications deployed to Tomcat can access the libraries stored here. This includes the Servlet API and JSP API libraries.
/logs Contains Tomcat’s log files.
/temp Temporary file system storage.
/webapps The directory where all web applications are deployed, and where you place your WAR file when it is ready for deployment.
/work Tomcat’s working directory where Tomcat places all servlets that are generated from JSPs. If you want to see exactly how a particular JSP is interpreted, look in this directory.
Executing Tomcat scripts
All Tomcat executable files are located in the CATALINA_HOME/bin directory. Tomcat distributes
executables for both Windows and Linux-based systems in this directory, so you will see that it contains pairs of scripts with the same name and different extensions (*.bat for Windows executables and *.sh
for Linux executables).
The most important executable located in this directory is Catalina script (catalina.sh on Linux or
catalina.bat for Windows). This script is responsible for starting and stopping Tomcat, and it accepts different command line arguments for different operations. For example, to start Tomcat, you can simply invoke the command catalina start from your command line, and catalina stop to stop Tomcat.
Note
Catalina script is only available if you download the zip distribution of Tomcat. If you install Tomcat using
the Windows service installer, you won’t have access to Catalina script. In that case, you can use the
tomcat7w.exe GUI application to manage the Tomcat service.
Table 2-2. The Catalina script command line argument options
Command Line Argument
Description
catalina start Starts Tomcat server as a new detached process. On Windows, Tomcat will be started in the new command prompt window. On Linux, the Tomcat will be started in the background, so you can continue using the command line.
catalina stop Stops the Tomcat server.
catalina run Starts the Tomcat server in the current window/terminal. On Windows, the output of the Tomcat startup will be added to the current command prompt window, while on Linux the Tomcat process will run in the current terminal session. It’s useful for diagnostics when Tomcat fails to start.
catalina debug Starts Tomcat in debug mode.
catalina version Displays the Tomcat version.
catalina configtest Checks if the current Tomcat configuration is correct. The script will try to start Tomcat and load all configuration files, and then exit gracefully in case the configuration is correct. If any of the configuration files are incorrect, it will report the problem.
catalina jpda start Starts Tomcat in Java Platform Debugging Architecture (JPDA) debug mode.
In addition, you can append option –security to any of the start commands, so that Tomcat starts with the security manager enabled. The security manager is the Java mechanism for protecting the Java-managed resources from unauthorized access. For example, if your Java code has a line of code like
System.exit(1), and that code is executed in Tomcat, the Tomcat server will exit. Security manager can, using security policies configured, forbid explicit calls to specific classes or methods, so the Tomcat server is protected. In cases where the Tomcat server runs only the known code, running Tomcat with security manager is not required. However, if you’re administering Tomcat with third-party web applications deployed, it’s recommended to run with security manager enabled.
Tomcat’s bin directory also contains two convenient scripts for starting and stopping Tomcat:
startup.sh (and the corresponding startup.bat) and shutdown.sh (and shutdown.bat). These scripts are just thin wrappers around the catalina script, and are commonly used instead of catalina script to start and stop Tomcat without any command line arguments.
Passing Runtime Options to Catalina Script
When running Java applications, it is often required to pass different options to the Java Virtual Machine (JVM), such as memory settings, file encoding setting, hostnames, addresses, and ports. These options are passed to Tomcat’s catalina script using the standard Java and Tomcat environment variables.
export JAVA_OPTS="-Dfile.encoding=utf-8"
If you start Tomcat after exporting JAVA_OPTS, it will make sure to use UTF-8 encoding for all file reads, but this behavior will not be restricted to Tomcat’s Java process only, but to all JVM processes running on the same machine.
To pass specific JVM arguments to Tomcat only, you can use the CATALINA_OPTS environment variable. A typical scenario is adding more heap memory to the Tomcat process, without affecting the memory settings of other Java applications. The following snippet exports the memory settings to
CATALINA_OPTS variable:
export CATALINA_OPTS=" –Xms256m -Xmx1g -XX:MaxPermSize=256m"
If you start Tomcat after these setting are exported to the environment variable, catalina start
script sets the JVM memory settings as configured, with a maximum heap size of 1GB.
Note
You have to restart Tomcat to apply any changes to the JAVA_OPTS or CATALINA_OPTS environment
variables.
Tomcat Configuration Files
This directory contains all the configuration files for the Tomcat server. We will be discussing the configuration files in the chapters that cover their specific options; however, we will mention the most important ones here.
The main Tomcat configuration file is server.xml, located in conf directory. The main Tomcat elements like engines, hosts, and contexts are configured here. You can read more about host and context configuration in server.xml file later this chapter. Appendix A contains a reference of all configuration options in server.xml file.
The context.xml configuration contains the default context settings that will be shared across all Tomcat contexts. You can read more about default context configuration in the section “Configuring Web Application Contexts” later in this chapter.
In addition to global context configuration in the server.xml and context.xml files, each context can have its own configuration file within the conf directory. The location of the context configuration file depends on the engine name and the host name in which the context is defined. The convention is that the context with name CONTEXT_NAME, configured within the host with name HOST_NAME, which is configured in engine with name ENGINE_NAME, will have its configuration file located in following file location:
CATALINA_HOME/conf/ENGINE_NAME/HOST_NAME/CONTEXT_NAME.xml
For example, if you’re deploying a web application to context apress, using the default host with name localhost in the Tomcat’s standard Catalina engine, the configuration file location will be:
CATALINA_HOME/conf/Catalina/localhost/apress.xml
Java Web Applications
The main function of the Tomcat server is to act as a container for Java web applications. Therefore, before we can begin our Tomcat-specific discussion, a brief introduction as to exactly what web
applications are is in order. The concept of a web application was introduced with the release of the Java servlet specification 2.2. According to this specification, “a web application is a collection of servlets, html pages, classes, and other resources that can be bundled and run on multiple containers from multiple vendors.” What this really means is that a web application is a container that can hold any combination of the following list of objects:
v Servlets
v Java Server Pages (JSPs)
v Utility classes
v Static documents, including HTML, images, JavaScript libraries, cascading stylesheets, and so on
v Client-side classes
v Meta-information describing the web application
One of the main characteristics of a web application is its relationship to the ServletContext. Each web application has one and only one ServletContext. This relationship is controlled by the servlet container and guarantees that no two web applications will clash when accessing objects in the ServletContext. We discuss this relationship in much more detail in Chapter 3.
The Directory Structure
Table 2-3. The Directories of a Web Application
Directory Description
/apress The root directory of the web application. All JSP and HTML files should be stored here. Usually each type of static content is stored in a separate subdirectory (images/, styles/, js/).
/apress/WEB-INF Contains all resources related to the application that are not in the document root of the application. This is where your web application deployment descriptor is located (defined in the next section). Note that the WEB-INF directory is not part of the public document. No files contained in this directory can be requested directly by a client.
/apress/WEB-INF/classes Where servlet and utility classes are located.
/apress/WEB-INF/lib Contains Java archive files (jar libraries) that the web application is dependent upon. For example, this is where you would place a jar file that contained a JDBC driver or JSP tag library.
As you look over the contents of the web application’s directory structure, notice that web applications allow for compiled objects to be stored in both the /WEB-INF/classes and /WEB-INF/lib
directories. Of these two, the class loader loads classes from the /classes directory first, followed by the jar files that are stored in the /lib directory. If duplicate objects in both the /classes and /lib directories exist, the objects in the /classes directory take precedence.
The Deployment Descriptor
At the heart of all web applications is a deployment descriptor that is an XML file named web.xml. The deployment descriptor is located in the WEB-INF/ directory within the main application directory. It contains configuration information for the entire web application. For our application, the web.xml file is in the CATALINA_HOME/webapps/apress/WEB-INF/ directory. The information that is contained in the deployment descriptor includes the following elements:
v Servlet definitions
v Servlet initialization parameters
v Session configuration parameters
v Servlet/JSP mappings
v MIME type mappings
v Security configuration parameters
v List of error pages
v Resource and environment variable definitions
Listing 2-1 is a limited example of a web application deployment descriptor. As we move through this book, we will be looking at the web.xml file and its elements in much more detail.
Listing 2-1. XML Outline of the Web Deployment Descriptor File (web.xml)
<web-app>
<display-name> Apress Demo </display-name>
<servlet>
<servlet-name>TestServlet</servlet-name> <servlet-class>
com.apress.TestServlet </servlet-class>
<load-on-startup>1</load-on-startup> <init-param>
<param-name>name</param-name> <param-value>value</param-value> </init-param>
</servlet>
<session-timeout>30</session-timeout>
</web-app>
In this example, we are setting three application-level elements, the first of which is the <display-name>. This element simply describes the name of the web application, and doesn’t initiate any actions.
The second web application-level element that we have defined is the <servlet> element, which defines a servlet and its properties.
The last web application-level element is the <session-timeout> element, which controls the lifetime of the application’s HttpSession object. The <session-timeout> value that we have just used tells the JSP/servlet container that the HttpSession object will become invalid after 30 minutes of inactivity. This means that, if you have been logged to the web application using a username and password, after 30 minutes of inactivity, your session will be lost and you will need to log in again. Session handling in Tomcat will be discussed in more detail in Chapter 5.
Manually Deploying Web Applications to Tomcat
In this section, we cover the manual deployment of Web applications using Tomcat, and we perform a manual deployment to fully explain the steps involved when deploying a web application.
Creating the Web Application Directory Structure
The first thing you need to create when building a new web application is the directory structure that will contain the application. The following list contains the directories that you must create to contain the /apress web application. Each these directories must be appended to the CATALINA_HOME/webapps/
directory:
v /apress
v /apress/WEB-INF
v /apress/WEB-INF/classes
v /apress/WEB-INF/lib
Note
The name of our web application, /apress, is the root of our directory structure.
As the purpose of this example is to show how applications are deployed to Tomcat, we will simply create the web application directory structure within the Tomcat’s /webapps directory. For the day-to-day development and production deployment to Tomcat, you should build a WAR file that will be deployed to Tomcat. We will cover the deployment of WAR-packaged web applications later in this chapter.
The last step in creating the web application directory structure is adding a deployment descriptor. At this point, you will be creating a default web.xml file that contains only the DTD, describing the
web.xml file, and an empty <webapp/> element. Listing 2-2 contains the source code for a default web.xml
file.
Listing 2-2. The Source Code for a Default web.xml File
<?xml version="1.0" encoding="ISO-8859-1"?> <web-app xmlns="http://java.sun.com/xml/ns/javaee" xmlns:xsi="http://www.w3.org/2001/XMLSchema-instance" xsi:schemaLocation="http://java.sun.com/xml/ns/javaee
http://java.sun.com/xml/ns/javaee/web-app_3_0.xsd" version="3.0">
</web-app>
The most important part in this web.xml file is the XML schema definition. The schema definition will verify that the correct syntax is used for the selected Servlet API version. Because Apache Tomcat 7 supports version 3.0 of Servlet API, we reference its schema ( http://java.sun.com/xml/ns/javaee/web-app_3_0.xsd) in the web.xml header.
Adding Static Content
In addition to being a servlet container, Tomcat is also a capable web server, so it can serve static files like images, JavaScript files, Flash movies, and cascading stylesheets (CSS).
as the WEB-INF directory. It is common practice to split the static resources to subdirectories based on their purpose, so we will create subdirectories for images, JavaScript files, and CSS in the /apress
directory. The directory structure of our web applications will now look as follows:
v /apress
v /apress/WEB-INF/
v /apress/images/
v /apress/scripts/
v /apress/styles/
Let’s copy the logo image, logo.jpg, to the /apress/images/ subdirectory. If you restart Tomcat (the web application will be redeployed), you can now access the image in the browser, by entering the following URL:
http://localhost:8080/apress/images/logo.jpg.
The logo image will be rendered directly in the browser. You can access all other images in the
/apress/images directory in the same way. Similarly, if you copy a stylesheet file main.css to the
/apress/styles/ directory, you can open the file in the browser by navigating to
http://localhost:8080/apress/styles/main.css.
As you can see, the directories with static content can be accessed from your browser directly by entering the directory structure of your web application. Because all static resources are publicly available to anyone who types the correct URL in the browser, they are sometimes called public directories.
Note that the WEB-INF directory cannot be used to serve static content. Only the servlet container (Tomcat and servlets deployed to it) can access resources stored in the WEB-INF directory. You can test that by copying the same image logo.jpg to the /apress/WEB-INF/ directory, and trying to access it on the URL http://localhost:8080/apress/WEB-INF/logo.jpg. The image will not be displayed; all you will see is the “404 page not found” error in the browser.
Adding JSPs
Java Server Pages (JSPs) are a simple but powerful technology used most often to generate dynamic HTML on the server side. They are a direct extension of Java servlets with the purpose of allowing the developer to embed Java logic directly into a requested page. JSP documents typically have the .jsp extension.
Apache Tomcat comes with JSP configuration out of the box, so all you have to do is create JSP files and deploy them with your web application. Listing 2-3 shows a sample JSP file that simply displays the current date and time, and the greeting to the user based on the time of the day.
Listing 2-3. Displaying Current Date and Time in JSP
<%@ page import="java.util.Calendar" %> #1
<html> <head>
<title>Apress Demo</title>
<body>
<div class="content"> <b>Welcome to Apress</b>
<p>Today is <%=Calendar.getInstance().getTime()%> #2 </p>
<%
String greeting; #3 int hourOfDay =
Calendar.getInstance().get(Calendar.HOUR_OF_DAY); if (hourOfDay < 12) {
greeting = "Good Morning";
} else if (hourOfDay >= 12 && hourOfDay < 19) { greeting = "Good Afternoon";
} else {
greeting = "Good Evening"; }
%>
<p><%=greeting%></p> #4 </div>
</body> </html>
JSP file contains the HTML markup that will be rendered in the browser. As you can see in Listing 2-3, the entire JSP file is formatted using HTML markup (with <HTML>, <HEAD>, <BODY>, and other enclosed HTML tags). However, it contains some Java code as well.
In the first line (#1), we have something that looks like a Java import statement. It does the same job as an import statement in standard Java files, referencing classes and interfaces required for
compilation. In JSP, the import statement is implemented using a JSP page directive, which you can recognize because it starts with <%@ characters, and ends with %>.
Next, we invoke the Java method to get current date, and render the result of the method directly to the HTML (#2). The Java code is enclosed between <%= and %>, and the <%= JSP construct takes the return value of the Java method invoked and renders in to the HTML, using Object.toString () Java method. This example of JSP syntax is called JSP expression, and is an easy way to render values that are easily retrieved in Java to the HTML.
Finally, we demonstrate the standard Java code snippet (or JSP scriptlet), enclosed within <% and %>
(#3). You can consider code snippet like this as a Java code that will be inserted to the _jspService()
method. However, all local variables you define in such code snippet have global visibility, so you can reference them anywhere else on the JSP page, after it has been introduced. We decide what message to use to greet the user in our code snippet, and store it in the variable greeting (#3). We render the stored
greeting to the HTML using the JSP expression (<%= syntax) outside the original code where we introduced the greeting variable (#4).
All we need to do now is save the JSP resource from Listing 2-3 in the new directory called jsps
under root web application directory. The file location will be /apress/jsps/index.jsps.
Note
Tomcat by default recognizes JSP files with either .jsp or jspx extension.
Now you can start Tomcat again. If the Tomcat server has been running all the time, there is no need for the restart, as the new file will be loaded automatically. If you can navigate to
http://localhost:8080/apress/jsps/index.jsp, the page will be rendered in the browser. Figure 2-1 shows the resulting page in Firefox browser.
Figure 2-1. JSP page that renders current date and time deployed in Tomcat
Because the JSP page is rendered dynamically, you will see a different result whenever you reload the page, including a different greeting message in the morning, afternoon, or evening. We have our first dynamic page deployed to Tomcat, using Tomcat’s built-in support for JSP resources. We will discuss more JSP capabilities in the next chapter. Let’s now see how we can add a servlet to the Tomcat server.
Adding Servlets
A servlet is a Java program that runs in the servlet container, with the responsibility of accepting requests from the clients and sending back the responses, all over the HTTP protocol. In Java Servlet API, servlets are defined using the Java interface javax.servlet.Servlet, which any concrete servlet class must implement.
To make the developer’s life easier, Java Servlet API ships with javax.servlet.http.HttpServlet
class, which is commonly used as a convenient superclass that concrete servlet implementations extend. Listing 2-4 illustrates the HelloWorldServlet implementation, a simple servlet that renders Hello World message in the browser.
Listing 2-4. Rendering HTML to the Browser Using HelloWorldServlet
package com.apress.apachetomcat7.chapter2;
public class HelloWorldServlet extends HttpServlet {
public void doGet(HttpServletRequest request, HttpServletResponse response) #1 throws IOException, ServletException
{
response.setContentType("text/html"); #2 PrintWriter out = response.getWriter(); #3 out.println("<html>");
out.println("<head>");
out.println("<title>Hello World!</title>"); out.println("</head>");
out.println("<body>");
out.println("<h1>Hello World!</h1>"); out.println("</body>");
out.println("</html>"); }
}
In this example, we extend the doGet() method from the HttpServlet class, which is responsible for handling HTTP GET operations (#1). We are going to render HTML content to the browser, so we set the content type of the HttpServletResponse to “text/html” (#2). Finally, to render text to the browser, we’re obtaining the PrintWriter instance from the HttpServletResponse (#3), and then just write the HTML markup to it.
The next step is to compile our servlet class, so it can be deployed to Tomcat. In addition to standard Java libraries, we will need servlet API classes and interfaces on our classpath to compile
HelloWorldServlet successfully. All required servlet API classes and interfaces are already included with Tomcat (in CATALINA_HOME/lib directory), so we can just add it to the classpath for java compiler. To compile the HelloWorldServlet class run the following command:
javac HelloWorldServlet.java -cp CATALINA_HOME/lib/servlet-api.jar
The result of the compilation will be HelloWorldServlet.class file, located in the same directory.
Note
JSP files are actually complied into Java servlet classes by the servlet container, and each JSP file is
running as a small servlet in Tomcat, invisible to the user.
The next step is to copy the compiled class to the /apress/WEB-INF/classes directory of our web application, so it can be picked up by Tomcat and deployed successfully (compiled Java classes in this directory will be loaded by Tomcat’s class loader). Make sure to copy entire compiled class directory structure, as per Java standard; each Java package must have its own directory, with classes stored in directories matching their packages. The code in Listing 2-4 has package
com.apress.apachetomcat7.chaper2, so the directory structure will be as follows:
Note
As we mentioned before, Tomcat will automatically load compiled Java classes from the
/WEB-INF/classes and /WEB-INF/lib directory, in that particular order. You should keep your application classes in the /WEB-INF/classes directory, and all third-party jar dependencies in the /WEB-INF/lib directory.
The final step is to configure our servlet in the web deployment descriptor (web.xml file). We left web.xml empty when we started (see Listing 2-2), so now it’s time to add servlet configuration to it. Listing 2-5 shows the servlet configuration added to web.xml file.
Listing 2-5. HelloWorldServlet Configuration in the web.xml File
<?xml version="1.0" encoding="ISO-8859-1"?> <web-app xmlns="http://java.sun.com/xml/ns/javaee"
xmlns:xsi="http://www.w3.org/2001/XMLSchema-instance" xsi:schemaLocation="http://java.sun.com/xml/ns/javaee«
http://java.sun.com/xml/ns/javaee/web-app_3_0.xsd" version="3.0">
<display-name>Chapter 2</display-name> <description>Apress demo</description>
<servlet> #1 <servlet-name>helloworld</servlet-name>
<servlet-class>
</servlet-class> </servlet>
<servlet-mapping> #2 <servlet-name>helloworld</servlet-name>
<url-pattern>/hello.html</url-pattern> </servlet-mapping>
</web-app>
The servlet is configured using the <servlet> XML element (#1), with two sub-elements: <servlet-name>, the unique name for this servlet, and <servlet-class>, the fully qualified servlet class name.
Finally, we need to map the servlet to the URL, so that the web application knows which URL should invoke the configured servlet. This is achieved using the <servlet-mapping> XML element (#2). Its nested element <servlet-name> references the name of the configured servlet (it must be the same as <servlet-name> in the servlet class configuration #1). The nested element <url-pattern> specifies the pattern of URLs that will be mapped to this servlet. All URL patterns are relative to the context of the web application. Based on the configuration in Listing 2-5, HelloWorldServlet will be mapped to the URL
http://localhost:8080/apress/hello.html.
And this completes the servlet configuration. We will need to restart Tomcat in order to reload the servlet class. After Tomcat starts up, you can navigate to the URL
http://localhost:8080/apress/hello.html in your browser, and you will see the page with the “Hello World!” message rendered. Figure 2-2 shows the page displayed in the browser.
Figure 2-2. Page rendered HelloWorldServlet in the browser
So far, we have covered how to deploy static resources, JSP files, and now servlets to Tomcat server. We deployed a web application in a subdirectory under CATALINA_HOME/webapps directory. The
deployment of the Java web application as the directory with structure defined like in our example is called exploded directory. Exploded directory web application deployment is not part of Java servlet specification, and therefore may not work on servlet containers other than Tomcat. In the next section, we will cover the deployment of Java web applications as WAR archives, the deployment method supported by Java Servlet specification.
Deploying WAR Archive
A WAR file is the standard method for packaging Java web applications, and you can create one using Java’s archiving tool, jar. You can create a WAR file from the exploded directory by changing into it and running the following command from the exploded directory (/apress in our example):
jar cvf apress.war.
Note
The period (.) at the end of the jar cvf apress.war. command references the active directory;make sure to include it when running the command, otherwise the jar packaging won’t work.
This command produces an archive file named apress.war that contains your entire web application. Figure 2-3 shows the contents of the apress.war file.
Figure 2-3. Contents of the WAR-packaged web applications, in the same structure as the exploded directory
Note
The *.war file is nothing more than the *.jar file with a different extension. The Java archive standard is
the zip file format, so you can read or create jar and war files using any zip-compatible archiving tool.
To deploy a WAR-packaged web application, all you have to do is copy it to the
CATALINA_HOME/webapps directory. Make sure you remove the previously deployed application’s exploded directory. Upon server startup, Tomcat will pick up the apress.war file and deploy it automatically. When Tomcat is up and running again, you can access the web application from the browser in the same way as before.
apress.war web application will be unpacked to directory CATALINA_HOME/webapps/apress. You can confirm this by inspecting the CATALINA_HOME/webapps directory after deployment, and you will see that it contains both the apress.war file that we copied there, and the apress/ directory, created by Tomcat. The unpacked directory will contain all web application resources that were packaged into WAR archive.
Tomcat unpacks the WAR file for performance reasons, as it’s much quicker to load files from file system directly, than to unpack them from the archive file every time they are requested. If you’re running Tomcat on a machine where you have limited write permissions, this may not be desired behavior, and you would prefer to serve web resources directory from the WAR archive, without
unpacking. You can configure whether WAR files should be unpacked automatically by setting unpackWAR
attribute on the <Context> element of your web application. The following code snippet illustrates configuration where the WAR archive won’t be unpacked, and all resources will be served from the archive directly:
<Context path="/apress" docBase="apress" unpackWar="true">
You can add this context configuration directly to the CATALINA_HOM/conf/server.xml file, or you can use other available methods to configure web application context described later in the chapter (see the section “Configuring Web Application Contexts”).
Other Methods of Deployment
So far we have seen how to deploy web applications to Tomcat manually, by copying files to an exploded directory, or by creating the WAR archive and copying it to Tomcat’s deployment directory.
Copying the files to remote servers for production deployment can become cumbersome, or simply impossible if you don’t have access to the remote server’s file system. That’s why Tomcat distributes with the Manager web application, a built-in front end for management of web applications, which can be used for deployment. You can navigate to Manager web application’s home page on a remote server from the browser, fill the web form with your web application details, select the WAR archive to deploy, and press submit. The web application will be deployed automatically.
To learn more about Manager web application, see Chapter 4.
In addition to web interface, Tomcat ships with the set of Ant tasks, which can be used for application deployment (and for other web application maintenance tasks) from the command line. This approach is very useful in development and for automated deployment for testing. Ant tasks available with Tomcat will be covered in Chapter 4 as well.
Configuring Hosts and Contexts
In the Tomcat architecture, each deployed web application is representing a Context within a particular
<Host> element. Even without specific configuration, Tomcat ships with sensible defaults out of the box, which is why we could deploy web applications in earlier examples without worrying about hosts and contexts. For simple web applications, the default configuration works well. However, if you need to configure advanced Tomcat options for your web application, you will need to configure these elements manually. In the following sections, we will describe the default Tomcat configuration of hosts and contexts elements, and take a look how we can configure these elements manually.
Configuring Hosts
Listing 2-6. Tomcat Ships with Default Host Configuration Out of the Box
<Host #1 name="localhost" #2 appBase="webapps" #3 unpackWARs="true" #4 autoDeploy="true" #5 >
The h