P O R T A B L E G E N I U S
2 n d E D I T I O N
Aperture
®
3
Published by John Wiley & Sons, Inc. 10475 Crosspoint Blvd. Indianapolis, IN 46256 www.wiley.com
Copyright © 2012 by John Wiley & Sons, Inc., Indianapolis, Indiana
Published simultaneously in Canada
ISBN: 978-1-118-27429-3
Manufactured in the United States of America
10 9 8 7 6 5 4 3 2 1
No part of this publication may be reproduced, stored in a retrieval system or transmitted in any form or by any means, electronic, mechanical, photocopying, recording, scanning or otherwise, except as permitted under Sections 107 or 108 of the 1976 United States Copyright Act, without either the prior written permission of the Publisher, or authorization through payment of the appropriate per-copy fee to the Copyright Clearance Center, 222 Rosewood Drive, Danvers, MA 01923, (978) 750-8400, fax (978) 646-8600. Requests to the Publisher for permission should be addressed to the Permissions Department, John Wiley & Sons, Inc., 111 River Street, Hoboken, NJ 07030, 201-748-6011, fax 201-748-6008, or online at http://www. wiley.com/go/permissions.
Limit of Liability/Disclaimer of Warranty: The publisher and the author make no representations or warranties with respect to the accuracy or completeness of the contents of this work and specifically disclaim all warranties, including without limitation warranties of fitness for a particular purpose. No warranty may be created or extended by sales or promotional materials. The advice and strategies contained herein may not be suitable for every situation. This work is sold with the understanding that the publisher is not engaged in rendering legal, accounting, or other professional services. If professional assistance is required, the services of a competent professional person should be sought. Neither the publisher nor the author shall be liable for damages arising herefrom. The fact that an organization or Web site is referred to in this work as a citation and/or a potential source of further information does not mean that the author or the publisher endorses the information the organization or Web site may provide or recommendations it may make. Further, readers should be aware that Internet Web sites listed in this work may have changed or disappeared between when this work was written and when it is read.
For general information on our other products and services or to obtain technical support, please contact our Customer Care Department within the U.S. at (877) 762-2974, outside the U.S. at (317) 572-3993 or fax (317) 572-4002.
Wiley publishes in a variety of print and electronic formats and by print-on-demand. Some material included with standard print versions of this book may not be included in e-books or in print-on-demand. If this book refers to media such as a CD or DVD that is not included in the version you purchased, you may download this material at http://booksupport.wiley.com. For more information about Wiley products, visit www.wiley.com.
Library of Congress Control Number: 2012948911
Trademarks: Wiley and the Wiley logo are trademarks or registered trademarks of John Wiley & Sons, Inc. in the United States and/or other countries, and may not be used without written permission. Aperture is a registered trademark of Apple, Inc. All other trademarks are the property of their respective owners. John Wiley & Sons, Inc. is not associated with any product or vendor mentioned in this book. Aperture® 3 Portable
Senior Acquisitions Editor
Stephanie McComb
Project Editor
Kristin Vorce
Technical Editor
Paul Shivonen-Binder
Senior Copy Editor
Kim Heusel
Editorial Director
Robyn Siesky
Business Manager
Amy Knies
Senior Marketing Manager
Sandy Smith
Vice President and Executive Group Publisher
Richard Swadley
Vice President and Executive Publisher
Barry Pruett
Senior Project Coordinator
Kristie Rees
Graphics and Production Specialists
Andrea Hornberger
Quality Control Technician
Jessica Kramer
Proofreading and Indexing
has been a nature photographer for most of his life, with his interest in photography starting when he received his first Kodak 110 camera at the ripe old age of 4. Camera in hand, he received a BS in computer science from Northwestern University. After graduating, Josh started working at Pixar Animation Studios in Emeryville, California. There he worked on The Incredibles, Up, Toy Story 3, and more, primarily as a camera and staging artist. Currently he is a senior product manager at Lytro.
Josh travels the globe searching for the next great picture, be it 100 feet deep on the Great Barrier Reef, on a cold and windy beach in the South Atlantic, or inside the Arctic Circle. His award-winning images, represented by the prestigious Jaynes Gallery and available at www.joshanon.com, have appeared in a variety of galleries, calendars, and other publications including the San Diego Natural History Museum, Nature’s Best Photography, NBC Nightly News, The Kiteboarder, and more. Josh teaches photography, both privately and for the Digital Photo Academy, and he and his mother, Ellen, have also coauthored Photoshop CS5 for Nature Photographers (Sybex, 2010), See It: Photographic Composition Using Visual Intensity (Focal Press, 2012), iPhoto iOS: Tap the Power
(available on the Apple iTunes bookstore, 2012), and more.
Josh continues to develop software in his free time, currently focusing on FlipBook HD, which is movie-making software for the iPad. When not shooting, making cartoons, or coding, Josh can be found kiteboarding.
got her start in photography around age 5, but for years it remained a hobby as she took a very long fork in the road, earning a PhD in clinical psychology. In 1997, a broken foot forced her to take a break from work as a psychologist and she used the time to study photography. She debated briefly between building a traditional darkroom in her home and creating a digital darkroom. Because she’s not fond of being closed up in small dark spaces with strong smells of funky chemicals, she opted for the latter. Ever since, photography has been a two-part process for her. Capturing the images in the field is the first step, and optimizing them in the digital darkroom is the second. Being creative with it is the icing on the cake!
Ellen is now a full-time freelance photographer, speaker, and writer. Her goal with her photographs is to go beyond the ordinary in ways that she hopes stimulates others to pause and appreciate some of the beauty and wonder of our earth. Ellen’s images are included in collections in several continents. She is also represented by the Jaynes Gallery and her photos have been showcased in galleries and featured in numerous publications. In addition, she has been Highly Honored in
Nature’s Best Photography Windland Smith Rice International Awards and Highly Commended in
Josh Anon
series and other books mentioned previously. In addition, she has contributed chapters to other books and has created video training materials on photography-related subjects for several companies. Ellen leads photographic and digital darkroom-oriented workshops and is a popular featured speaker at various events. She had been an active member of the North American Nature Photography Association (NANPA) and is an instructor for its high school scholarship program. She is an Apple Certified Trainer for Aperture and is honored to be a member of Nik Software’s Team Nik and SanDisk’s Extreme Team.
Acknowledgments
of wisdom that sometimes tag along with the wrinkles of time — Ellen
First and foremost, we both owe our family, especially Jack and Seth, a big thank you for their continued support and encouragement. Neither of us would have made it where we are without it. Someone once said it takes a village to raise a child. We don’t know whether that’s true, but it sure feels like it takes a village to create a book like this. Specifically, we want to thank Stephanie McComb, our Acquisitions Editor, and Kristin Vorce, our outstanding Project Editor. It’s been a pleasure working with them on this project.
We both want to thank our friends at Apple involved with Aperture, especially Kirk Paulsen and Martin Gisborne as well as all the engineers, for creating such an amazing program that’s the core of our workflows.
Josh wants to thank his friends and coworkers at Pixar, including Trish Carney, Jeremy Lasky, Patrick Lin, Eben Ostby, and Adam Habib. You guys always provide great inspiration and are just awesome people. To his friends Michelle Safer and Jeffrey Cousens: Thank you for always being there to provide moral support. Last but certainly not least, he owes his continued gratitude to his high school English teacher Claudia Skerlong for teaching him to write well; although he heard she once said something about the odds of her achieving sainthood for the efforts she put into teaching Josh compared to the odds of his writing a seventh book.
Ellen wants to thank her friends and colleagues who continue to inspire and encourage her, particularly Art Becker and George Lepp, as well as all the readers of our books, who make it possible for us to continue writing. She also wants to thank Dr. Gary Brotherson and Dr. J.P. Dailey for their flexibility and perseverance in ensuring that she can continue to see through the viewfinder in
Introduction
xiv
chapter 1
How Do I Get Started with
Aperture? 2
Understanding Why Aperture Is a Key Part of Your Workflow 4
Seeing the difference between
Aperture and iPhoto 4 Choosing Aperture over Lightroom 5 Working with Aperture’s File Structure 6
Understanding the Aperture
library and where your files live 7 Understanding referenced and A Brief Tour of Aperture’s Interface 13
Understanding the Inspector,
Browser, and Viewer 13 Inspector 14 Browser 17 Viewer 20 Managing files with Projects
and Albums 21 Using special built-in views 23 All Projects 23
Modifying preview preferences 29
chapter 2
How Do I Import Images?
30
Importing from a Memory Card,
Camera, or Hard Drive 32 Touring the Import panel 32 Using the different views in the
Import panel 34 Choosing Import Settings 37
Configuring a destination project for your images 38 Using referenced or managed files 40 Renaming files on import 42 Fixing time zone settings on your
images 44 An introduction to presets 45
Setting up and applying a
Metadata Preset on import 45 Setting up and applying an
Effect Preset on import 48 Configuring what types of files
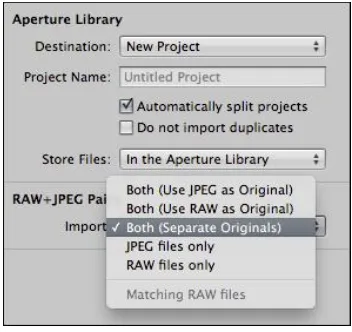
to import 50 Working with RAW+JPEG pairs 51 Running actions automatically
after importing 53
Dragging and Dropping Files into
Aperture 58 Using the Viewer with multiple
monitors 65 Using multiple Browsers 66 Showing hot and cold areas
of an image 67 Taking a Closer Look 68 Zooming and scrolling in Viewer 68 Using and customizing the Loupe 70 Viewing in Full-Screen Mode 72
Using Browser and Viewer in
full-screen mode 73 Working with the filmstrip
Switching and customizing
metadata views 104 Setting metadata 107 Managing and applying presets 107 Adjusting Date and Time after Import 109 Working with Keywords 110 The Keywords control bar 112
Editing button sets and
keywords 113 Keywords library 113 Customizing button sets 115 The Keywords heads-up display 116 Adding Custom Metadata 117 Applying Batch Metadata Changes 117 Using the Batch Change tool 118 Using the Lift and Stamp tool 119 Searching for Images 120 Searching within Browser 120 Creating Smart Albums 122 Searching with stacks 124 Writing IPTC Information to an Original 125
chapter 5
How Do I Use Faces and Places
to Categorize My Images?
126
Using Primary Only 77 Using Quick Preview 78 Viewing the original image 79 Configuring and Using Metadata Overlays 80 Switching between RAW+JPEG Originals 82 Working with Referenced Images 83
Identifying and managing referenced images 83 Reconnecting a missing original 84 Relocating referenced originals 85 Converting referenced originals
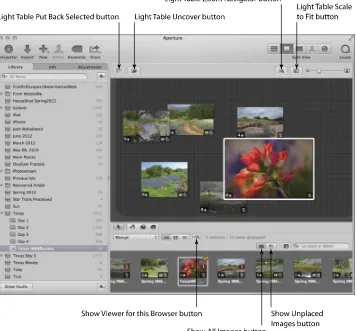
to managed originals 87 Deleting referenced files 87 Working with Stacks in Browser 88 Creating and Working with a Light Table 90
chapter 4
How Can I Use Metadata to
Organize and Find My Images?
94
Using Ratings to Sort Images 96 Setting ratings 96 Working with rejected images 98 Using Flags and Labels to Further
What Tools Can I Use to
Make My Images Better?
154
Getting Started with Adjustments 156 Reprocessing originals for
Aperture 3.3 or later 156 Setting preferences for making
adjustments 158 Making Adjustments 162
Commonalities of all the adjustment bricks 162 Working with the histogram 163 Straightening an image 164 Cropping images 166 Using Auto Enhance 167 Using the adjustment bricks 169 Setting white balance 169 Using the Exposure controls 172 Taking advantage of the
Enhance tools 176 Using the Highlights & Shadows
adjustments 181 Using Levels 182 Taking advantage of the Color
controls 184 Sharpening the image 186 Enabling Faces 128
Using the Faces interface 129 Assigning names using Faces 130 Assigning names using the
Name button 133 Correcting a name 134 Finding people using Faces 135 Using Places 137 Enabling Places 137 Assigning locations to photos 137
Dragging images onto the
map using Places 139 Using the Info Inspector map
to assign a location 141 Using the search option in
Configuring a standard print 225 Layout and Margins 226 Rendering 227 Image Adjustments 229 Image Options 230 Metadata & Page Options 230 Creating a contact sheet 231 Using built-in custom presets and
creating your own 232 Clicking the Print button and
its settings 234 Ordering Prints 235 Creating a Book 236
Creating a new book album
and picking themes 236 Navigating the Book Layout Editor 238 Placing images and text 239 Adjusting metadata boxes 241 Adding and removing pages 248 Customizing page layout 248 Editing master pages 250 Printing or ordering your book 251 Taking advantage of Curves 190
Converting an image to
black and white 194 Converting an image to a color
monochrome or sepia 195 Adding or removing a vignette 196 Removing chromatic aberration 197 Removing noise 198 Using iPhoto Effects 199 Brushing adjustments in or out 200 Using Quick Brushes 202 Using the Retouch Brushes 202 Using the remaining Quick Brushes 204 Creating and Using Effects 211 Using an External Editor 214 Using Third-Party Editing Plug-Ins 215
chapter 7
What Options Do I Have to Create
a Physical Copy of My Photos?
218
Comparing web journals, web
pages, and Smart Web Pages 275 Creating and configuring a new
web page 277 Creating and configuring a new
web journal 280 Facebook 282
Setting up Facebook access within Aperture 282 Publishing images from Aperture
to Facebook 283 Managing your Facebook account 284 Flickr 285
Setting up Flickr access within
Aperture 285 Publishing images to Flickr 286 Using Other Export Plug-ins 287
chapter 9
How Can I Use Aperture with
My HDSLR’s Video Files?
290
How Does Aperture Handle Video Files? 292 Importing Video Files 292 Viewing Video Files 293
How Can I Share My
Images Digitally?
254
Exporting Originals and Versions
of Images 256 Exporting originals 256 Folder and filename options 257 Metadata options 259 Exporting versions 260 Managing Image Export Presets 261 Adding watermarks 263 E-mailing Images 264 Setting Your Desktop Image 265 Creating Slide Shows 265 Creating a new slide show 265 Creating a custom slide show preset 266 Using the Slideshow Editor 267 Arranging a slide show 269 Adjusting the show’s settings 269 Adjusting individual slide
settings 270 Adding video clips 273 Adding music 273 Playing and exporting your
Switching libraries 306 Moving images between libraries 307 Exporting a library 308 Importing a library 309 Working with multiple computers 310 Controlling Tethered Shooting 311 Configuring a tethering session 312 Running a tethering session 312 Customizing Keyboard Shortcuts 313 Using Aperture with Automator 315 Using Vaults and Backup 319 Using vaults to back up your images 320 Creating a vault 321 Updating a vault 321 Restoring from a vault 322 Deleting a vault 322 Alternate backup strategies 323 Time Machine 323 Other physical storage 324 Online backup 324 Using Aperture’s Database Repair Tools 326 Setting the clip’s poster frame 294
Trimming the clip 295 Exporting a Video Clip 296 Working with Audio Files 296 Importing audio files 296 Playing audio 296 Attaching and detaching audio files 297 Attaching audio files 297 Detaching audio files 298
chapter 10
How Can Aperture Make My
by Apple, the same folks who brought you iPhoto, iPhone, iPad, and more. We could lavish it with praise for the next few hundred pages and describe to you how happy we are with the photographic workflows we’ve developed with Aperture, but while that praise would be completely true (perhaps garnished with a touch of hyperbole to add some humor), that wouldn’t leave much room to explain how Aperture can help your workflow. Instead, we’ll simply say that Aperture has helped us optimize our digital workflows more than any other piece of software (and between the two of us, we’ve tried them all) so that we can quickly process thousands of images and spend more time shooting and less time at our computers. The latest revisions to Aperture continue to make it more powerful and user friendly.
When you first look at it, though, it’s tough to understand how this neutral-gray window can do so much, and more importantly, what all these weird words like stacks and projects mean. Don’t worry: We’re here to help.
Don’t feel obligated to read this book from start to finish, however. While we’ve tried to build the text so that the chapters follow roughly a digital workflow order and build on each other, feel free to skip around, especially if you’ve used Aperture before.
Aperture is like iPhoto on steroids in some ways; but in other ways, it’s a
com-pletely different beast. Unlike iPhoto, it’s designed to be an incredibly
flexi-ble image, video, and audio file asset management tool that you can
integrate into your existing workflow. However, this flexibility means that
Aperture has more jargon, settings, and buttons than iPhoto. This chapter
helps demystify Aperture’s jargon and shows you key fundamentals you
need to know when using Aperture.
Understanding Why Aperture Is a Key Part of Your Workflow . . . 4
Working with Aperture’s File Structure . . . 6
A Brief Tour of Aperture’s Interface . . . 13
Understanding Why Aperture Is
a Key Part of Your Workflow
Most photographers agree that the time you spend behind the lens shooting is the best part of being a photographer, and all the other stuff (processing an image, categorizing it, trying to sell it, or using it to promote business) is really just annoying. While digital photography enables you to be more creative as a photographer, from being able to see right away whether you got the shot to being able to experiment as much as you want with the only cost being hard drive space, the “other stuff” arguably gets more frustrating because now you have to manage digital files instead of physical film and learn to use multiple programs to develop and output your images. That’s where Aperture comes into play. Aperture is a central point for all of your image management from the moment you download an image from camera to computer until you search for an image and click Print to make a physical copy for a client. Aperture makes it relatively easy and fast to organize and manage your digital files, and that lets you spend more time having fun shooting. However, Aperture isn’t the only digital asset management tool out there. Let’s look at what Aperture gives you over iPhoto and Lightroom.
Seeing the difference between
Aperture and iPhoto
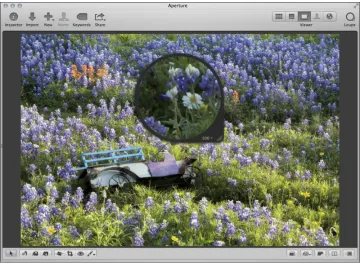
If you’ve been using iPhoto to manage your images, then you know that our explanation of why Aperture is a key part of our workflow could apply to iPhoto, too. While iPhoto is great for manag-ing images of your family and friends taken with your point and shoot, it’s really limited when you put it under a microscope. For example, while you can make basic retouching adjustments in iPhoto like a levels adjustment, Aperture lets you fine-tune those adjustments to develop your image exactly the way you want it to look, perhaps adjusting the levels in just one color channel or using the quarter tone controls (which we cover in Chapter 6) to adjust the levels in a specific part of your image. If you really like the effect your adjustment creates, you can save it as a preset to easily apply to other images, even on import. Aperture 3 has the ability to brush those adjust-ments selectively onto just part of your image, meaning you can make one levels adjustment in the sky and another on the ground, something iPhoto just can’t do. Oh, and if you prefer using curves to levels, Aperture 3 has a curves adjustment, too.
out Chapters 5 and 6. Aperture is also a lot more flexible with managing your photos, and unlike in iPhoto, images in Aperture can easily be stored on multiple hard drives. Aperture 3 also adds great new tools to merge and split off collections of images, making it easy to share image collections between two machines.
1.1 An image search that’s easy to do in Aperture but just not practical in iPhoto.
Lastly, while there are similar features in iPhoto and Aperture, like Faces, Places, books, and slide shows, they are just more powerful in Aperture. Aperture’s Book tool, which is covered in Chapter 7, has advanced layout options that let you completely customize the image and text boxes on your page, or even use a photo to create a two-page background spread. Aperture’s slide shows, explored in Chapter 8, let you go beyond iPhoto’s click-and-play slide shows, creating custom titles, transitions, and music. You can even include HD video within an Aperture slide show. Fortunately, starting with Aperture 3.3, iPhoto and Aperture have a unified library and adjustment format. This means you can seamlessly move between the two programs using the same library data. As an example, you could use Aperture to split your library over multiple drives and to adjust your images, and then you could switch to iPhoto, load up that same library displaying your adjusted images, and then order a card or calendar, something you can’t do in Aperture.
In summary, while iPhoto is great for the casual consumer, just as you move from a point-and-shoot camera to a dSLR to upgrade your photography, moving to Aperture from iPhoto lets you upgrade your image-management tools.
Choosing Aperture over Lightroom
percent of our manipulation work in Aperture instead of Photoshop). You might be asking your-self why you shouldn’t just use Adobe products, such as Adobe Lightroom.
While in some ways the Lightroom-versus-Aperture debate is a bit like a religious Mac-versus-PC debate, there are specific reasons that we find Aperture to be a much better choice than Lightroom for our workflows. The main reason is that Lightroom has different modules that you must switch between for different tasks, whereas Aperture does not. Practically speaking, adjustments affect editing decisions, and it’s faster to make those decisions in Aperture than in Lightroom. For exam-ple, you may frequently look at an image and say, “This is good, but if I straighten it, will it be great?” In Aperture, you can use one keyboard shortcut and then drag the mouse to straighten the image. In Lightroom, you need to switch from the Organize to the Develop module, adjust the image, and then switch back to the main module to continue making editing decisions. Less time having to switch modes to make a decision means more time shooting and having fun!
We prefer Aperture for specific, technical reasons as well. One is that Aperture has a more powerful hierarchy (we dig into the specific parts of its structure shortly) that you can customize, such as moving albums wherever you want them to be, whereas Lightroom has a relatively flat hierarchy with limited customization options. In Aperture 3, like in Lightroom, you are able to brush adjust-ments onto an image, but Aperture provides far more control over how those adjustadjust-ments are applied, such as only affecting the highlights or shadows. Furthermore, only a few adjustments in Lightroom can be brushed onto an image, whereas most adjustments in Aperture can be selec-tively applied. Aperture’s curves control is far more powerful than Lightroom’s parametric curves, too. Some tools, such as book authoring, have been in Aperture since the first version and have undergone a lot of refinement, whereas in Lightroom they are just appearing and are not as mature. Then there are also features that Lightroom just doesn’t have, such as Faces.
We should mention that while we far prefer Aperture to Lightroom, Lightroom is not a bad pro-gram, and if you have a PC, it’s a very good choice. However, if you have a Mac, we enthusiastically recommend that you use Aperture.
Working with Aperture’s File Structure
particular location on your hard drive (more on this in a minute) and appear within a different structure within Aperture. When you move images around within Aperture, between albums for example, they don’t move around on your hard drive (although there are special commands to let you move the files around), and when you create a new folder within Aperture, that folder doesn’t actually exist on your hard drive. Let’s take a minute to explore how Aperture stores files and the different terms for the various collections of images.
We frequently use the word image to talk about any file in Aperture, including movie and audio files, as Aperture treats them all in essentially the same way, especially as far as the file structure is concerned.
Note
Understanding the Aperture library
and where your files live
One of the fundamental concepts in Aperture is a library. A library refers to a collection of images. On your hard drive, a library, like the one in Figure 1.2, stores and tracks information about an image, ranging from the various-sized thumbnails that Aperture uses to display the image to the image’s metadata, information about the faces in your images, and information about what adjustments you’ve made to an image. If you choose, Aperture will also store your image files themselves within a library (more on this in a minute), but your image files can also live outside the library instead. An Aperture library appears as a bundle within the Finder (a bundle is a special type of folder that appears as if it were a single file) and discourages you from digging inside your library. If you dig inside your library, you might accidentally do something, such as move a key file, which causes a problem in Aperture.
Unlike in iPhoto, where most users tend to just have one photo library, you will most likely have multiple libraries with Aperture. For example, you could have a library on an external drive con-taining every image that you’ve ever taken and a second library on your laptop’s internal hard drive that has a library with images from the previous shoot or two.
By default, Aperture creates a library in your Pictures folder. Chapter 10 explains how to work with multiple libraries.
When Aperture is closed, double-click on a library in the Finder to launch Aperture with the contents of that library.
1.2 An Aperture library as seen in the Finder. Notice that it appears as just a single file, even though it contains other files within.
Understanding referenced and managed files
Referenced and managed files refer to where your image files are stored. Put simply, referenced files are stored in whatever folder on your hard drive you select, and Aperture stores a reference to their location within the library. If you move the files around on your hard drive, you have to tell Aperture to update its reference (we cover working with referenced files in depth in Chapter 3). Managed files, on the other hand, are stored within the Aperture library. You don’t need to worry about where they are on your hard drive because they’ll always just be inside your library, and if you want to access the image files you must do so via Aperture rather than the Finder.
Choosing to use referenced or managed files is largely a personal choice, and within Aperture they are treated exactly the same. The main benefit to managed files is that you don’t have to worry about into what folder on your drive you’re importing your images because they’re all just going into your Aperture library. You might find it preferable to use managed files because they help prevent you from losing track of your images.
Referenced files that you see in Aperture but whose image files can’t be found are called offline images. Aperture indicates an offline image with the badge overlay indicated in Figure 1.3.
A second benefit to referenced files is that if you want to use another program to work with your images, such as Adobe Photoshop, without going through Aperture, you can because your image files are not locked away inside of the library bundle. Just be careful about reorga-nizing your image files outside of Aperture. If you move the file on your hard drive, you need to tell Aperture where the file’s new location is so that it doesn’t think the image is offline. Chapter 3 covers working with referenced files in depth.
Last, if you use an online backup service like CrashPlan or Mozy, we recommend using referenced files so that if Apple updates the internal library format and changes where the managed images are stored, these backup services won’t have to upload a new copy of every image to the cloud.
Understanding how images are
organized within Aperture
Aperture has special terms to explicitly describe which image you’re working with: the original file on disk or a version within Aperture. Furthermore, a key concept to understand about Aperture is that files within Aperture have their own hierarchy that isn’t guaranteed to be anything like the file hierarchy on your hard drive. When you move an image around within Aperture, it doesn’t also move it between folders on your hard drive. As such, Aperture has a special vocabulary to describe how originals and versions are organized into projects, albums, folders, and stacks.
Original images
An original is the initial file you import into Aperture, whether it’s a RAW, JPEG, TIFF, DNG, and so on. Aperture never modifies the original file; you can always return to your original image no mat-ter how many adjustments you make within Aperture.
Versions
A version is a representation of an original file that you work with within Aperture. It refers to the original file but is not the original file. No matter how many changes you make to a version, you aren’t changing the original. This is called nondestructive editing.
Something special about Aperture is that you can make multiple versions of an image with differ-ent adjustmdiffer-ents applied to each, as shown in Figure 1.4. And unlike iPhoto, which makes a full copy of the original file each time and uses a lot of hard drive space, Aperture only stores the changes you make to each image, saving hard drive space. (This alone is a great reason to use Aperture for all of your adjustments, even if you use iPhoto for everything else.) Then, when you ask to see a particular version, Aperture loads the original behind the scenes and applies the changes you made to create this version.
1.4 All three versions of this image share the same original file, and each new version only takes a few kilobytes more hard drive space to create.
Working with versions can get a little confusing. Although all of Aperture’s built-in adjustments are nondestructive and are stored as information on top of an original file, Aperture also supports third-party adjustment editors such as plug-ins to create High Dynamic Range (HDR) images, as well as external editors like Photoshop. In order for these third-party programs to see the adjust-ments you make to an image, Aperture makes a TIFF or PSD file from your version for the other tool to work with. This means that if you make a bunch of adjustments to an image within Aperture and want to open it in Photoshop, rather than trying to describe to Photoshop how Aperture verted the RAW file and then also convey to Photoshop the changes you made on top of the con-verted file, Aperture just collects everything, makes a new TIFF file, and then tells Photoshop to open that TIFF file.
Even if you’re using referenced files, this new file that Aperture makes from your ver-sion will be stored within your Aperture library. You can relocate the Aperture-created original wherever you want after it’s Aperture-created, as discussed in Chapter 3.
Genius
If you see the badge overlay indicated in Figure 1.5 within Aperture, it means that this version also has an Aperture-created original aside from the original file you imported.
Projects
Within an Aperture library, you group your original files and versions into projects. A project might represent an entire shoot, multiple shoots of the same subject, a part of a shoot, or just a completely random col-lection of images. Each time you import an image, you must determine into what project to place it. If you delete a project, you are removing the original files contained within it from your library. There is no limit on how many projects you can create. If you open your Aperture library in iPhoto, a project appears as an event, and vice versa.
Albums
Albums are a collection of image versions that you create manually. Versions may exist in more than one album (for example, you might put an image in both a Brooks Wedding Dinner album and a Show to Bride album). Albums can either exist within a project to provide a finer-grained group-ing of images or at a library level if they contain images from multiple projects. For example, we typically create a project for a shoot such as Japan – February 2012 and then create albums within the project to represent specific parts of the shoot such as Tsurui Day 3 AM. Later, we create a library-level album, such as Images to Copyright, containing images from every project that we need to submit for copyright registration. No matter how many albums within a library you put an image into, Aperture does not create a new copy of the original file on disk. Furthermore, deleting an image from an album does not remove it from your library or hard drive.
There are special types of albums, called Smart Albums, whose contents are created dynamically. For example, Aperture has built-in Smart Albums at the library level (called Library Albums) for 5-star images (the highest rating you can give), videos, images created in the last week, and more. Each time you add or adjust an image and make it meet one of these criteria, such as rating an image with 5 stars, Aperture automatically adds it to the appropriate Smart Album. Smart Albums are covered in depth in Chapter 4.
Folders
A folder is a container for projects, albums, and other folders. As you create more and more proj-ects, you may find it helpful to use folders to group related projects together so that you’re not
always scrolling through a long list of projects. For example, we have a folder in our library called Antelope Valley (shown in Figure 1.6) that contains projects for each time we’ve shot at that location.
Stacks
While not strictly part of Aperture’s hierarchy, Aperture calls a small collection of images that are related in some way a stack. The difference between a stack and a project or album is that a stack of images tends to essentially be one image, but just slightly different versions of that image, whereas a project or album might contain many stacks of images.
For example, Aperture can automatically group bursts of images taken close together into a stack. If you shoot a sporting event and import the images into one album, you would have many stacks representing each burst of action. Additionally, if you want to create mul-tiple versions of a single image with different adjustments, you could group these different versions into a stack for organization. Each time you open your image in an external edi-tor such as Photoshop, Aperture automati-cally stacks the previous version and this new externally edited version together. Stacks are covered in more detail in Chapter 3.
A Brief Tour of Aperture’s Interface
Now that you’ve learned some of Aperture’s basic jargon, let’s look at Aperture itself. The first time you launch Aperture, you see the Welcome screen in Figure 1.7. Click Continue to close this win-dow to begin using Aperture. The main parts of the interface you see right away are the Inspector, Browser, and Viewer, and this section explores these pieces in depth and explains how to work with the Library Inspector, which you use to manage Aperture’s file hierarchy.
1.7 Aperture’s Welcome screen.
Understanding the Inspector,
Browser, and Viewer
1.8 Three areas of the Aperture interface that will serve you well.
Inspector
To create an empty project, choose File ➪
New ➪ Project. To create an empty album within a Project, select that project and choose File ➪ New ➪ Album. To create an empty, library-level album, do one of three things:
Deselect everything in the Library Inspector before running this command. Select an item, such as Photo Stream,
not within the Projects group and choose File ➪ New ➪ Album.
Click and drag a project-level album out of the project and into the Albums group.
To create a new folder, choose File ➪ New ➪
Folder.
At the very top of the Library Inspector is a search field that filters the contents of the Library Inspector. This search field does not search inside the metadata of your images. It simply searches your project, album, and folder names for a match. Next to the search field is an Action pop-up menu. This menu contains the following four commands:
Add to Favorites/Remove from Favorites. Over time, you will end up with many items in your Library Inspector. To filter the list so that you only see your favorite items, select Favorite Items from the search field’s pop-up menu. To mark an item as a favorite, select it in the Library Inspector and choose Add to Favorites from the Action pop-up menu.
Keep Albums & Projects Arranged By. This submenu affects how items at the same level (such as all the top-level items, all the items directly under a project, and all the items directly within the same folder) are sorted within the Library Inspector. Choose
Name from this submenu to sort all the items in the Library Inspector alphabetically. Choose Kind to group the items by kind (for example, all projects will be grouped together, all folders will be grouped together, and so on). Choose Manual so that you can drag and drop items to rearrange them however you want. Even if you choose Name or Kind, you can manually rearrange an item at any point and Aperture will automatically switch to Manual sorting.
Export Project/Folder/Album as New Library. We cover this topic more in Chapter 10, but the quick explanation is that any item in Aperture can be exported as a new library to make it easy to share groups of images.
Maintain Previews for Project. By default, Aperture maintains large previews of your images for use in other applications such as iWork. However, these previews can take a lot of hard drive space, and it’s often useful to not maintain them for an entire project. We cover previews and this command more in Chapter 10.
At the very bottom of the Library Inspector is a button marked Show Vaults and another Action pop-up menu with vault-related commands. Vaults are special Aperture-created backups of your library. We cover Vaults and other backup options in Chapter 10.
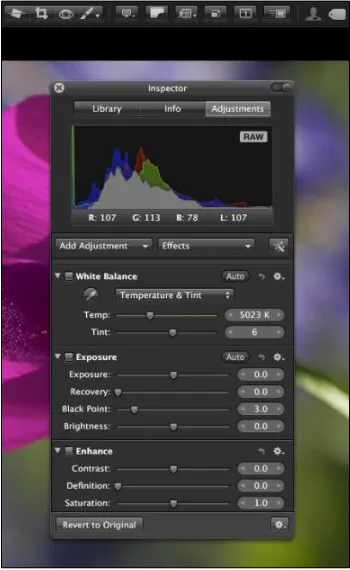
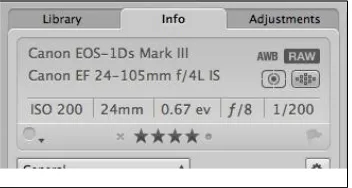
By clicking the Info tab at the top of the Inspector, you switch from the Library Inspector to the Info Inspector. As you might expect, this inspector allows you to view and edit information about your image, information that’s also referred to as metadata. This inspector is covered in depth in Chapter 4. The last tab, Adjustments, lets you switch to the Adjustments Inspector, which contains tools to adjust your image. The Adjustments Inspector is covered in Chapter 6.
If you’re working on a small screen, it’s often useful to hide the Inspector and to only show it when needed. To hide the Inspector, choose Window ➪ Hide Inspector; to reveal it, choose Window ➪
Show Inspector. The keyboard shortcut for hiding and showing the Inspector is I (with no modifi-ers). There are menu commands for quickly switching to the Library, Info, and Adjustments Inspectors under View ➪ Inspector, but more useful are the keyboard shortcuts to switch to those views: Control+P for the Library Inspector (think P for Project), Control+D for the Info Inspector, and Control+A for the Adjustments Inspector. W (with no modifiers) is also a keyboard shortcut for View ➪ Inspector ➪ Next Tab, which lets you quickly cycle among Inspector tabs.
If you’re working with a tablet display like a Wacom Cintiq, you might find it useful to move the Inspector to the right side of the screen. Choose View ➪Inspector ➪Swap Position.
Browser
The Library Inspector lets you switch between collections of images within your library, and the Browser lets you see the contents of those collections. The three views within Browser are Filmstrip, Grid, and List, which you can switch by clicking the view buttons marked in Figure 1.10. Filmstrip (the default) and Grid are similar in that they both show primarily thumbnails of your image (we cover customizing what other data you see in Chapter 3), but Filmstrip only has one row of images that scrolls from side-to-side. Grid view arranges your images into a grid that you scroll up and down. List view turns Browser into a table where each column has a different piece of metadata, such as the image’s date, aperture, and shutter speed. Another way of switching views is to choose View ➪ Browser ➪ Filmstrip (Control+F), Grid (Control+G), or List (Control+L). In Grid and List views, there is a thumbnail size slider that lets you make the displayed thumbnails larger or smaller. In Filmstrip view, use the Split view control, as described shortly, to resize the thumbnails.
Browser also has a sorting pop-up menu that lets you determine how your images are sorted, be it by date, rating, or more. Switch between Ascending and Descending in the Sorting pop-up menu to change the sort direction. When in List view, you can also click the column header to sort by that criteria, and click the header again to change the sort direction. If you prefer, it’s also possible to manually arrange the images by clicking and dragging an image (or group of images) wherever you want it to be. If for some reason the sorting and filtering controls aren’t visible, choose View ➪ Browser ➪ Show Sort and Filter Controls (⌘+Shift+F). Similarly, if you want to hide those controls, choose View ➪ Browser ➪ Hide Sort and Filter Controls.
If you start to work with your images in the Browser while Aperture is still importing your images, it tends to revert to Manual sorting. We highly recommend making sure you’re sorting by Date when editing your photos so that it’s easier to see sequences of images.
Caution
At the top right of Browser is a search field. As you might expect, if you start typing in it, Browser filters its contents to only show images whose name or other metadata match the text you’re typ-ing. If you click on the search field’s pop-up menu, you will see commands to quickly filter Browser based on image ratings and labels. By clicking the Filter button to the left of the search field, you open the Filter dialog, as shown in Figure 1.11, which lets you refine your filter even further. This is covered more in Chapter 4, but this control is where you can make advanced queries like “filter Browser so that it only shows images taken last Tuesday containing Eric’s face.”
1.11 The Filter dialog and button.
Browser’s size. Note that if you’re using the Filmstrip view, Aperture just makes the thumbnails larger when you adjust the split. Switch to Grid view to see more images in Browser. Unfortunately, Aperture only lets you drag Browser so that it takes up about 60 percent of the screen. To hide Viewer and make Browser take the entire screen, click the Browser button in the toolbar indicated in Figure 1.12 (if for some reason the toolbar is hidden, click the pill-shaped button at the top right to reveal it). To return to the previous view, click the Split view button in the toolbar. Note that when you’re in Browser mode, you can only switch between Grid and List views, not Filmstrip. If you’re comfortable using keyboard shortcuts, press V to cycle among Viewer and Browser, Viewer only, and Browser only.
If you prefer to see your thumbnails in a vertical Filmstrip rather than a horizontal one, it’s possible to rotate Browser by choosing View ➪ Browser ➪ Rotate Position (Shift+W). Like Inspector, it’s also possible to swap which side of the screen Browser’s on (as shown in Figure 1.13) by choosing View ➪ Browser ➪ Swap Position (Option+W).
1.13 Aperture with Browser’s position rotated and swapped.
Viewer
Viewer, the last key part of Aperture’s interface, is where you see the full contents of your image (or selected images). When you select an image in Browser, Aperture loads the full contents of that version, displaying a “Loading” indicator while doing so, and displays it in Viewer. Many tools in Viewer help you examine your image in detail, from zooming in to 1,000 percent to quickly
In Browser, you can use keyboard shortcuts to quickly scroll through your images. Press L to scroll forward, J to scroll backward, and K to stop scrolling. Press L and J multiple times to scroll faster in their respective directions. Make sure to click inside of Browser so that it has focus before using these hotkeys.
switching between seeing the original image and the current version with your adjustments. Viewer is covered in depth in Chapter 3.
Aperture also has an excellent full-screen mode for Browser and Viewer that removes any distrac-tion and lets you focus on your images. We explore this mode in depth in Chapter 3.
Managing files with Projects and Albums
As mentioned earlier, Projects are where your images and originals truly live. Making a new project is quite easy. To move a group of images into a new project, do the following:
1. Select the images in Browser that you want to use for the new project.
2. Choose File ➪ New ➪ Project (⌘+N).
Aperture displays the New Project dia-log, as shown in Figure 1.14.
3. Type the project name.
4. Select the Move selected items to new project check box if you want to
move your selected images into the new project.
5. Click OK.
Another very common task in Aperture is to make a new, empty album at the project or library level and then move images into it. For example, we might make a Submit to Agency album and then drag whatever images we want to submit to our stock agent into that album. Another com-mon task is to prepopulate a new album at the project level with the images you’ve selected in Browser, such as if you select all the images of a certain subject and want to make a new album just for that subject. These tasks are straightforward and similar to making a new project.
1. Choose one of the following options to begin creating an album:
•
To make an empty album, select the project in the Library Inspector where you want the album to live.•
To make a new album from a group of images, select the images in Browser that you want to put into the album. Aperture creates the new album at the same level as the currently selected item.•
To make a library-level album, click on the Projects collection under the Library group instead of selecting a specific project in Library Inspector.2. Choose File ➪ New ➪ Album.
Aperture displays the New Album dialog, as shown in Figure 1.15.
3. Type the album’s name.
4. If you are creating a new album from a group of images, select the Add
selected items to new album check box if you want to add the selected items to the album. If you are creating an empty album at the project level in the Library Inspector or at the library level in Albums, leave this check box unselected.
5. Click OK.
6. If the album doesn’t appear in the right place, drag and drop it to the right location in the Library Inspector. To drag it to the library level, drag it out of the project and to the Albums group and then drop it. To drag it into another project, drag the album until a black box appears around the right project. Note that this does not move the original files into this new project.
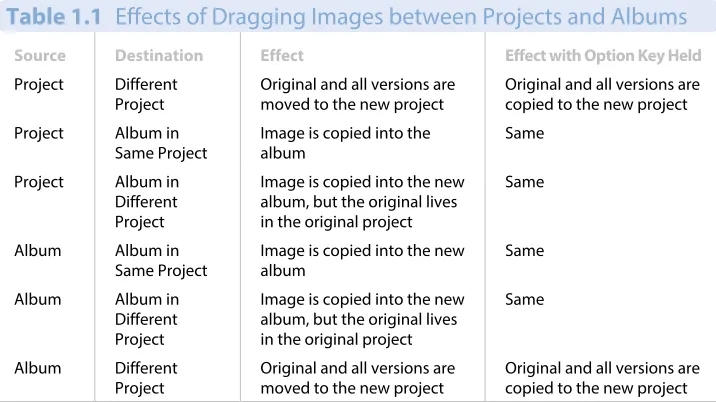
Things get confusing when you start to move images between albums and different projects. To move images (and videos and other items in your projects and albums) around, select them in Browser and drag and drop them to the desired destination. Holding down the Option key while dragging affects what Aperture does with the files in some cases. Table 1.1 explains the situations you can encounter.
Table 1.1 Effects of Dragging Images between Projects and Albums
Source Destination Effect Effect with Option Key Held
Project Different Project
Original and all versions are moved to the new project
Original and all versions are copied to the new project
Project Album in Same Project
Image is copied into the album
Same
Project Album in Different Project
Image is copied into the new album, but the original lives in the original project
Same
Album Album in
Same Project
Image is copied into the new album
Same
Album Album in
Different Project
Image is copied into the new album, but the original lives in the original project
Same
Album Different
Project
Original and all versions are moved to the new project
To quickly reveal which project an image is in from any album, select the image and choose File ➪ Show in Project.
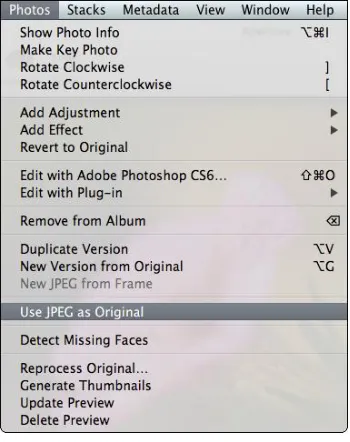
To remove an image from an album, select it and choose Photos ➪ Remove from Album (or press Delete). However, removing an image from an album does not move the original to Aperture’s Trash. To delete a specific version of an image, whether you’re in a project or an album (and by delete we really mean move to Aperture’s Trash), select it and choose File ➪ Delete Version. If the version has an Aperture-created original file, it is deleted, too. If there is only one version of an image, then Aperture deletes the image’s original file when you empty Aperture’s Trash. However, if there are multiple versions of an image and you want to remove all of them, select the image and choose File ➪ Delete Original Image and All Versions.
Also note that it’s possible to delete an album, project, or folder by selecting it in the Library Inspector and choosing File ➪ Delete Album, Project, or Folder, respectively. Deleting an album does not delete the contents of an album, but deleting a project (or folder that contains a project) does remove its contents, too.
Using special built-in views
We mentioned earlier that there is a special group at the top of the Library Inspector that lets you access library-wide collections. Specifically, they are Projects, Photos, Faces, Places, Last Month, Last Import, Photo Stream, Flagged, Rejected, and Trash. We discuss these views next with the exception of Photos, Last Month, and Last Import, as these views are straightforward (clicking the Photos item displays every image in your library). Rejected/Flagged items are also not discussed here but are detailed in Chapter 4.
All Projects
Clicking the Projects item opens the All Projects view, as shown in Figure 1.16. This view is similar to the Events view in iPhoto, especially if you click the Group by Year button. Move your mouse over a project’s thumbnail to scroll through all the images within a project. If there’s a particular image you want to set as the project thumbnail, press the spacebar when the image is displayed.
A more direct way to set an image as a project’s key photo is to Control+click on it in either the Browser or Viewer and choose Set Key Photo.
1.16 The All Projects view.
To merge two projects together, drag and drop one onto the other in the All Projects view.
Genius
Click the Info button (which becomes visible when you move your mouse over a project’s thumb-nail) to display the Project Info panel, where you can add a project description and assign its gen-eral location on a map. Double-click on a project’s thumbnail to open the project in Browser view.
Faces and Places
Clicking the Faces item provides quick access to the Faces corkboard, with every face Aperture finds in your library. Clicking the Places item takes you to the Places map, with pins for every loca-tion you’ve assigned to a photo. These features are covered in depth in Chapter 5.
Photo Stream
your iPad with the Camera Connection Kit, and images you import into Aperture. Chapter 2 covers Photo Stream in more detail.
Aperture Trash
When you delete an item in Aperture, whether it’s an entire project or a specific image, it’s placed into the Aperture Trash, as shown in Figure 1.17. You can view the contents of Aperture’s Trash at any time by clicking the Trash item in the Library Inspector and either retrieve something from it or empty it. Click the disclosure triangle next to the Trash group to see the items in the Trash sepa-rated out by original location. To empty Aperture’s Trash, choose Aperture ➪ Empty Aperture Trash. Note that if you’re using referenced files, you need to select the Move referenced files to System Trash check box because otherwise, Aperture deletes the images from Aperture but leaves the original files in their current location on your hard drive.
1.17 Note how you view Aperture’s Trash just like you would any other album.
Emptying Aperture Trash does not delete the image from your hard drive. To com-pletely remove it, you must also empty the Trash in Finder. If you want to recover the file, open the Trash in Finder, and within the Aperture folder, there will be a folder for the image’s project that contains the original file.
Caution
To restore an item from the Trash, either drag it back to the desired location or Control+click on it and choose Put Back.
Using gestures
to scale the thumbnails. Swipe when in Browser to go to the next or previous image, and if you make a rotation gesture in Browser, Aperture rotates the image beneath the cursor. Viewer zooms in and out of the full image when you pinch. In Viewer and in slide shows, swipe to go to the next or previous image. In the Book Layout Editor, swipe to go to the next or previous page.
Basic Customization Options
To open the Preferences panel within Aperture, choose Aperture ➪ Preferences. Specific prefer-ences are discussed throughout the rest of the book when they apply, but there are a few key options we want to point out for your initial Aperture setup.
Setting library location and
other General preferences
The most basic setting under the General pane, shown in Figure 1.18, is which current Aperture library you’re working with. In addition to the ways mentioned earlier to switch libraries (using the commands in File ➪ Switch to Library), you can also switch libraries by clicking Change and brows-ing for the new library. Clickbrows-ing Reveal opens a new Finder window with your current Aperture library selected.
Select or deselect the Show Last X months album check box (where X is the number of months of images you want to see) to enable or disable the Last Month group under Recent. We find it useful to leave this check box selected so that if we’re in a hurry when downloading a card and then for-get where we imported an image, we can quickly locate it.
We recommend selecting the Scroll to navigate photos in the Viewer check box so that using your mouse’s scroll wheel in Viewer (as long as you’re not zoomed in) enables you to go to the previous or next image.
The next option in the General pane is Enable Faces. We highly recommend deselecting this check box, unless you primarily photograph people and use Faces all the time. The reason we recom-mend disabling Faces is that it slows Aperture down, especially when importing images.
If you have a portable with a Multi-Touch trackpad or a Magic trackpad and want to use gestures within Aperture, make sure to select the Enable gestures check box.
The last key option in the General pane is the Reset All Warnings button. Sometimes, a dialog has an Ask again next time check box or something similar. If you deselect that check box but decide that you really do want to be prompted again, clicking Reset All Warnings makes all the dialogs appear again.
Changing appearance preferences
The second Preferences pane is the Appearance pane, as shown in Figure 1.19. We recommend leaving the brightness levels at their default values, although you might prefer to set your Full Screen Viewer brightness to 18% (which is neutral gray) because the color surrounding an image can influence your perception of an image.
1.19 The Appearance preferences pane.
Changing default import behavior
The Import pane, shown in Figure 1.20, lets you modify the default import behavior. Importing is covered in detail in Chapter 2, but the key option here is what you want to happen when a camera is connected. This pop-up menu allows you to pick between having a specific application open or doing nothing at all. Although you can set this preference within Aperture, it affects your entire sys-tem. We typically leave this set to Aperture, but if you sync an iPhone with your computer, we recom-mend choosing No application so that Aperture doesn’t open every time you plug in your iPhone.
Starting with Aperture 3.3, you also have the option to have Aperture generate new previews from the RAW files or use the camera-created previews embedded into your RAW files. Using the camera-created previews is much faster, and especially if you’re working on a battery-powered portable, selecting that option saves processor work and hence battery life. But the camera- created preview might look different (how different can vary) from the RAW file when it loads, and if you want the most accurate previews possible, instead select the Standard Previews option so that Aperture generates new previews after importing a RAW file.
Modifying preview preferences
Aperture automatically generates JPEG versions of all your images with all your adjustments applied so that other applications, like iWork or Apple TV, can access your adjusted images. However, these previews can take a lot of hard drive space if you’re not careful. These are covered in depth in Chapter 10, but for now we recommend that you either disable them entirely by dese-lecting the New projects automatically generate previews check box or at least limiting the size to your screen resolution and selecting a medium quality, as shown in Figure 1.21.
After you capture your images, the next step is downloading them onto your
computer. The Import interface in Aperture 3 enables you to do far more
than just copy the photos from a memory card to your computer’s hard drive.
It gives you a head start on organizing and optimizing your images as well.
You determine where the images should be stored, whether to
simultane-ously create a backup copy of them, rename them or modify a time stamp,
apply keywords or other metadata, and apply any Effect Presets. You can
even view each image nearly full-screen to determine whether to import it.
Importing from a Memory Card, Camera, or Hard Drive . . . 32
Choosing Import Settings . . . 37
Understanding Unified iPhoto and Aperture Libraries . . . 54
Dragging and Dropping Files into Aperture . . . 58
Importing from a Memory Card,
Camera, or Hard Drive
We know that when you finish shooting you want to get your images into Aperture as quickly as possible so you can see the results and start editing. Aperture offers lots of ways to import files, all designed to give you as much control of the process as possible while simultaneously making it as efficient and painless as possible. Most of the time, the files you want to import will be on a mem-ory card. You can also import images that are already stored on your computer but that are not yet in Aperture, or that are on an external hard drive that’s connected to your computer. You can even use Aperture to import video and audio clips in addition to your image files and keep them orga-nized so they’re easily accessible. Then you can play the video and audio clips in the Browser and use them in Aperture-generated slide shows. By using Photo Stream, you can also wirelessly import images from your iPad or iPhone. (Photo Stream is covered in a separate section later in this chapter because doing so bypasses the Import panel.)
Currently, you can’t use Aperture to make adjustments to audio or video files beyond basic trimming.
Note
If your files are on a memory card, you have the option to use a card reader attached to your com-puter or to directly attach your camera to the comcom-puter using the USB cable that comes with most cameras. Using card readers enables faster image downloading in many cases and means that you don’t need to rely on the camera’s battery. Some computers offer built-in card readers that are convenient and fast.
Touring the Import panel
After you attach your memory card, camera, or hard drive to the computer, you’re ready to use the Import panel. We recommend that you set up Aperture Preferences to automatically open Aperture when a camera is connected by following these steps:
1. Choose Aperture ➪ Preferences to open the Preferences dialog.
2. Click the Import button. The import-related preferences appear, as shown in Figure 2.1.
4. Select the Camera Previews option to use the previews that are embedded in most RAW files. We recommend selecting this so that you can see and work with your images as quickly as possible. However, after Aperture loads the full RAW files, the colors and sharpness of the images may change. If you prefer to see accurate previews initially even though it may take longer for Aperture to import your images, choose Standard Previews.
2.1 Set Aperture Preferences to automatically open the Import panel whenever a camera or memory card is connected to the computer.
To access the Import panel manually, click the Import button at the top left of the main Aperture window, as shown in Figure 2.2.
The Import panel contains a lot of powerful options in a concise and well-laid-out interface that’s divided into several major sections. You specify where to look for the images in the upper-left sec-tion of the interface, and the Viewer displays the images found on the card or the content of the hard drive that you selected. If you don’t select a card, camera, or external drive, then the Browser appears beneath the Viewer and displays a directory to the files on your computer and any drives that are connected to the computer.
2.2 The Import interface is divided into well-organized sections.
Using the different views in the Import panel
There are three icons beneath the Viewer that you use to control how the images are displayed. Choose the Grid view (refer to Figure 2.2) to see the images displayed as a series of thumbnails, choose the List view, shown in Figure 2.3, to view basic information about each file as well as a tiny thumbnail, or choose the Viewer only mode, shown in Figure 2.4, to display a single image at a time so that you can inspect it more closely.
2.3 The List view displays information about each file.
If you’re in Grid view, double-clicking any image changes the Import panel to the Viewer mode. Double-clicking the image in the Viewer again returns it to the Grid view.
2.4 The Viewer only mode displays a single image at a time.
Each image has a check box that is selected by default to indicate that image should be imported. Selecting or deselecting the check box toggles the check mark on and off. You can quickly select or deselect all images by clicking the Check All or Uncheck All buttons at the top of the Import panel. While in Grid view or List view, to select or deselect a group of images, follow these steps:
1. If the images are contiguous, select the first image, press and hold the Shift key, and click the last image in the group.
2. If the images are not contiguous, select the first image, then ⌘+click each subse-quent image you want to select.
2.5 Select a group of images and then toggle the check marks to choose the images to import.
Choosing Import Settings
Configuring a destination
project for your images
You need to decide whether you want to import the images into an existing project or to create a new project for them. If you set the default import location in the Import Preferences to New Project, then by default the Destination pop-up chooses New Project even if you already have a project selected in the Library Inspector. However, if you specify Selected Item in the Import pref-erences, then by default the Destination pop-up in the Import panel reflects whatever project you’ve selected in the Library Inspector. If you have not yet selected a specific project or album, then the Destination pop-up automatically chooses New Project.
You can override the default setting in the Destination pop-up by selecting a specific proj-ect or album to import the images there, or by selecting New Project, as shown in Figure 2.6. If you use a memory card to hold images that you take over an extended period, whether several hours, days, or weeks, the Automatically split project option is enabled in the Import interface.
Aperture can automatically split the import into several projects, one for each span of time. You can determine the timeframe by
choosing Preferences ➪ Import ➪ Autosplit into Projects and choosing One project per day, One project per week, Two-hour gaps, or Eight-hour gaps, as shown in Figure 2.7.
As shown in Figure 2.8, the Viewer panel of the Import interface changes to show which images are in each project. The additional projects can be manually renamed in the Library Inspector after import.
2.6 Choose whether to import your images into an existing project or to create a new project.
If you opt to use an existing project for the import, you can create a new album within that project to further organize your images while in the Import panel by pressing
⌘+L. This opens a new dialog in which you name the new album by typing in the Album Name field. The images are imported within the selected project, but they are also visible within the new album, and that’s very handy. To import your images into a new album within a new project, you must first create the new project in the Library by choosing New ➪Project and naming it before using the Import interface.
2.7 Set Preferences to split the import into new projects according to the timeframe in which they were captured.
When you import into an existing project, select the Do not import duplicates check box to avoid importing multiple copies of the same file.
Using referenced or managed files
The next choice in the Aperture library section of the Import interface is one of the most impor-tant. You tell Aperture whether you want to use referenced or managed files. Before you choose the setting in the Store Files pop-up menu, you need to be certain that you understand the differ-ences between referenced and managed files. Although the differdiffer-ences between referenced and managed files are covered in Chapter 1, the topic is important enough, and at times confusing enough, that it bears a little repetition.
When you choose to store your files in the Aperture library, you are specifying that you want Aperture to manage your files. This means that Aperture stores the managed files within the Aperture library. In addition, any versions of the image that you create are also stored in the library, which makes it easy to keep track of both your originals and the versions. You choose the location of the library, which can be on your hard drive or on an external drive or even on a backup device such as a Pegasus or Drobo.
A Pegasus or a Drobo is a type of external drive system containing two or more drives that creates automatic backups of each drive to protect against data loss in the event that a single drive fails. For more information, go to www.promise.com or www.datarobotics.com.