Red Hat Linux 6.2
ISBN: 1-58569-076-7
Red Hat, Inc.
2600 Meridian Parkway Durham NC 27709 US 919-547-0012 1-888-733-4281 919-547-0024 [email protected] Research Triangle Park NC 27713
© 2000 Red Hat, Inc.
GSG(EN)-6.2-Print-RHI (02/00)
Red Hat is a registered trademark and the Red Hat Shadow Man logo, RPM, the RPM logo, and Glint are trademarks of Red Hat, Inc.
Linux is a registered trademark of Linus Torvalds.
Motif and UNIX are registered trademarks of The Open Group.
Alpha is a trademark of Digital Equipment Corporation.
SPARC is a registered trademark of SPARC International, Inc. Products bearing the SPARC trademark are based on an architecture developed by Sun Microsystems, Inc.
Netscape is a registered trademark of Netscape Communications Corporation in the United States and other countries.
TrueType is a registered trademark of Apple Computer, Inc.
Windows is a registered trademark of Microsoft Corporation.
All other trademarks and copyrights referred to are the property of their respective owners.
Copyright © 2000 by Red Hat, Inc. This material may be distributed only subject to the terms and con-ditions set forth in the Open Publication License, V0.4 or later (the latest version is presently available at http://www.opencontent.org/openpub/).
Distribution of substantively modified versions of this document is prohibited without the explicit per-mission of the copyright holder.
Distribution of the work or derivative of the work in any standard (paper) book form for commercial purposes is prohibited unless prior permission is obtained from the copyright holder.
Printed in Canada, Ireland, and Japan
3.5 TheMain Menu KIcon . ... ... .. ... .. ... ... .. ... .. ... ... .. ... ... .. ... .. ... ... .. ... . 58
Chapter 7
The Web, E-Mail and News in GNOME and KDE
129 7.1 UsingNavigatorin GNOME and KDE ... .. ... .. ... ... .. ... ... .. ... .. ... ... .. ... . 130 7.2 E-Mail and News Settings forMessenger. ... .. ... ... .. ... ... .. ... .. ... ... .. ... . 138 7.3 Reading and Composing Mail inMessenger.. ... ... .. ... ... .. ... .. ... ... .. ... . 147 7.4 UsingMessengerto Read News . .. ... ... .. ... .. ... ... .. ... ... .. ... .. ... ... .. ... . 15513.11 Stringing Commands Together.. .. ... ... .. ... .. ... ... .. ... ... .. ... .. ... ... .. ... . 270
Part V Appendixes
.. .. ... ... .. ... ... .. ... .. ... ... .. ... .. ... ... .. ... ... .. ... .. ... ... .. ... . 329Appendix A Glossary
.. ... .. ... ... .. ... .. ... ... .. ... .. ... ... .. ... ... .. ... .. ... ... .. ... . 331Appendix B A Brief History of Linux and Red Hat
. ... .. ... ... .. ... . 347 B.1 What is Linux? . ... ... .. ... ... .. ... .. ... ... .. ... .. ... ... .. ... ... .. ... .. ... ... .. ... . 347Appendix C DOS to Linux Cheat Sheet
. .. ... ... .. ... ... .. ... .. ... ... .. ... . 351 C.1 DOS and Linux Commands .. ... .. ... ... .. ... .. ... ... .. ... ... .. ... .. ... ... .. ... . 351 C.2 Different Paths . ... ... .. ... ... .. ... .. ... ... .. ... .. ... ... .. ... ... .. ... .. ... ... .. ... . 353Section 0.1:Who Should Read This Book? ix
Introduction
Welcome to theOfficial Red Hat Linux Getting Started Guide!
Just a few short years ago, a user who wanted to try out Linux had relatively few choices in thedistributions, or types of packaged Linux operating systems, which were available. That’s all changed. Now, there are dozens of Linux distributions from which you can choose.
But Red Hat Linux has remained a leading choice of Linux distributions for years. Here at Red Hat, we believe we offer the best Linux distribution on the market. We hope you’ll agree that the time and money you spent to install and work with Red Hat Linux were well spent, indeed.
The Official Red Hat Linux Getting Started Guide is part of our effort to help you become acquainted with your new Red Hat Linux system.
Who Should Read This Book?
If you count yourself among the many who are discovering Red Hat Linux for the first time, this book is for you!
Inside, you’ll find valuable tips and tricks which can help you get acquainted with your desktop environment. Concentrating on tasks in GNOME and KDE, you’ll see how to navigate through your system, how to manage files and directories and how to make some of the power of Red Hat Linux work for you.
x Introduction
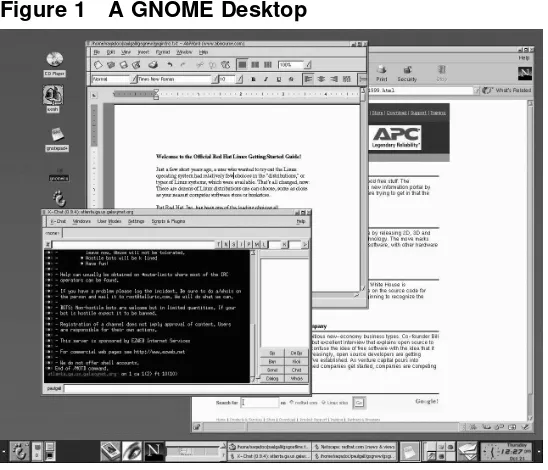
Figure 1 A GNOME Desktop
You’ll learn how to accomplish such basic first steps as connecting to the Internet, configuring your e-mail client, adding a printer and more.
More advanced topics will cover how to work withUpdate Agent, so your system au-tomatically stays current with critical software updates.
Is Red Hat Linux sharing your computer with Microsoft Windows? Turn to Chapter 15,Q & A: Quick Answers to Common Questionsto find out how you can allow Red Hat Linux to "see" into your other operating system, so you can perform certain tasks without having to reboot into the other operating system.
You’ll even gain some experience at file management and system administration us-ing the "shell prompt," the command-line interface.
Section 0.3:A Note About Environments xi
A Peek Inside
This book is divided into several parts:
• The Basics: When you’ve finished this section, you’ll start to feel comfortable with your GNOME or KDE environment. You’ll take your first steps to becoming productive (or just having fun and looking productive). You’ll find out how to get online, set up an e-mail account and communicate with others using yourNetscape Web browser.
• Managing Files and Directories: Beyond the basics; here, you’ll learn about the GNOME and KDE file managers, working with running processes, locating files, installing and removing applications, usingUpdate Agentand other administrative necessities.
• The Shell Prompt: Just beneath your graphical environment, the real power of your system awaits. You’ll get a taste of this power and learn how to put it to work for you.
• Q & A: When you care only for answers, turn to this chapter. Many of the entries you’ll find here concern answers to some of the most common new user questions, such as: how to access a floppy disk; what happens if you forget your root password (you can create a new one); how to access files on a Windows partition; and more.
• Th Glossary: Here, you’ll find quick definitions to plenty of words and phrases that can vex any new Linux user.
A Note About Environments
xii Introduction
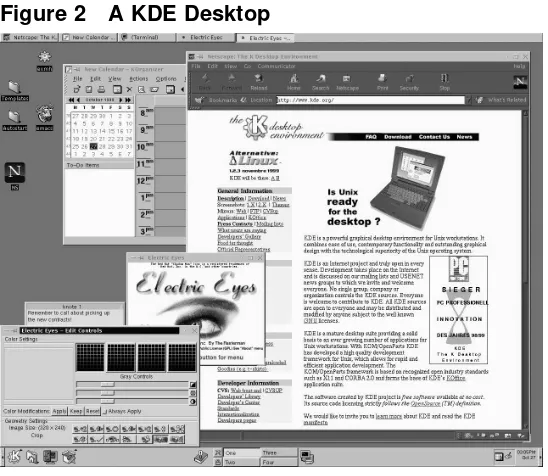
Figure 2 A KDE Desktop
Much of what you can accomplish from a graphical environment can also be per-formed from the shell prompt. In fact, many actions you can perform from the shell prompt are faster than from the graphical environment.
Section 0.4:Work With Your User Account xiii
Figure 3 UsingPicoat a Shell Prompt
You’ll also find useful tips, caution notices and related information inside.
And speaking of caution…
Work With Your User Account
Linux is a multi-tasking, multi-user operating system, so it can easily accommodate many users’ needs. Even if your machine isn’t attached to a network, you can share your machine with others -- each of whom will have their own settings.
Because of user accounts, Linux makes it easy to share your machine while pre-serving customized settings. Using accounts is convenient for users; it’s also secure, because ordinary users don’t havepermissionto damage or delete sensitive system data. Only one account, theroot accountcan make changes to the system -- and to others’ account information.
xiv Introduction
Most tasks in the following chapters don’t require that you be logged in to your sys-tem’s root account. Instead, you can accomplish almost everything from your user account -- so you won’t accidentally harm your system.
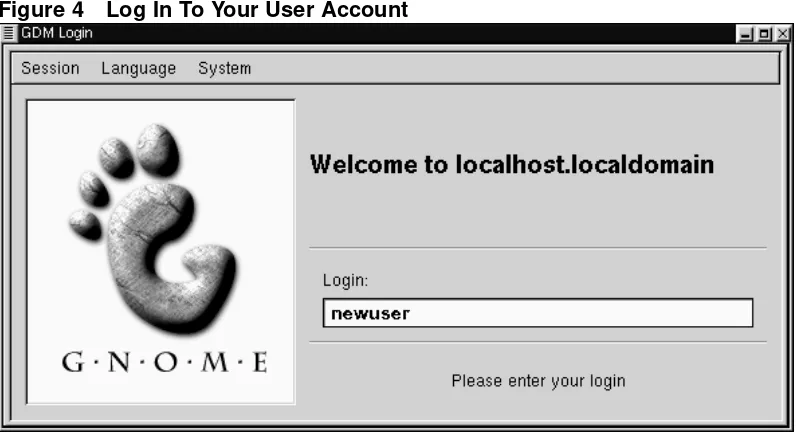
Figure 4 Log In To Your User Account
Unless you’re specifically told that you should be logged in as root, log in to your user account to accomplish tasks in this manual -- without risking disaster.
Where to Find More Info
Plenty of websites offer valuable information on how to use a command, but you’ve probably got quite a bit of documentation already on your system. In the following chapters, you’ll learn:
• How to read and printman pagesandinfo pages. Man and info pages are system documents which can help you understand what many commands are for and how to use them.
• How to use the GNOME and KDE help browsers.
Section 0.7:Sign Up for Support xv
• And in Appendix B,A Brief History of Linux and Red Hat, you’ll find a brief history of Linux -- and Red Hat.
More to Come
As Linux evolves, so will theOfficial Red Hat Linux Getting Started Guide. In future editions, expect to find more essential information to help you get the utmost from your system.
And here’s how you can help…
Send In Your Feedback
If you’d like to make suggestions about theOfficial Red Hat Linux Getting Started Guide -- from words to add in the Glossary to typos or subjects you’d like to see covered -- please mention this guide’s identifier:
GSG(EN)-6.2-Print-RHI (02/00)
That way we’ll know exactly which version of the guide you have. Send your feed-back to:
Sign Up for Support
If you have an official edition of Red Hat Linux 6.2, please remember to sign up for the benefits you’re entitled to as a Red Hat customer.
You can receive any or all of the following benefits, depending upon the Official Red Hat Linux product you purchased:
• Official Red Hat support -- Get help with your installation questions from Red Hat, Inc.’s support team.
xvi Introduction
• Red HatUpdate Agent-- Use Red Hat’sUpdate Agentto automatically retrieve and install system and security updates as well as other packages.
• Under the Brim: The Official Red Hat E-Newsletter -- Every month, get the latest news and product information directly from Red Hat.
To sign up, go to http://www.redhat.com/now. You’ll find your Personal Product IDon a red and white card in your Official Red Hat Linux box.
Good luck, and enjoy your new Red Hat Linux system!
Section 1.1:Log In, Please 19
1
Getting Started
Like many new users, learning how to work on your Red Hat Linux system can be both exciting and a little unnerving. To begin your journey, you’ll have to log in. When you log in, you’re basically "introducing yourself" to the system.
Linux is case sensitive
Like UNIX, Linux is case sensitive. That means that typing root refers to a different account than Root, as far as Linux is concerned -- the lowercase root is the name of the root login, or system administrator.
When you installed Red Hat Linux, you had the opportunity to install theX Window System-- also simply calledX-- which is the graphical environment. You were also asked whether you wanted to use a graphical screen, rather than aconsoleto log in. Although our emphasis throughout this book will be on navigation and productivity usingX, we’ll cover both the graphical and console methods of logging in and starting the X Window System.
1.1 Log In, Please
Unlike some other operating systems, your Red Hat Linux system usesaccountsto manage privileges, maintain security and more. Not all accounts are created equal: some have fewer rights to access files or services than others.
20 Chapter 1:Getting Started
Don’t "root" around
Because your Red Hat Linux system creates one account (the root account) during installation, some new users are tempted to use only this account for all their activities. This is a bad idea; because the root account is allowed to do any-thing on the system, you can easily damage your system by mistakenly deleting or modifying sensitive system files. You may be tempted to forego creating and using a user ac-count during or after installation, but you’re playing with fire if you do.
1.1.1 Create a User Account
When you installed Red Hat Linux, you were asked to create a root password --that is, a password for the root account, the system administrator. At that time, you were also able to create additional user accounts, which allow you to accomplish most tasks, without potentially harming your system -- as would be the case if you were to use your root account for everything.
If you didn’t create a user account during the installation, that’s your first task. Here’s what you’ll do:
• Log in from the console or from a graphical screen.
• Open aterminal emulation window(also called anXterm windoworXterm) on the desktop.
• Create a new user account.
• Log out, then log in to the new account.
1.1.2 Logging In As Root
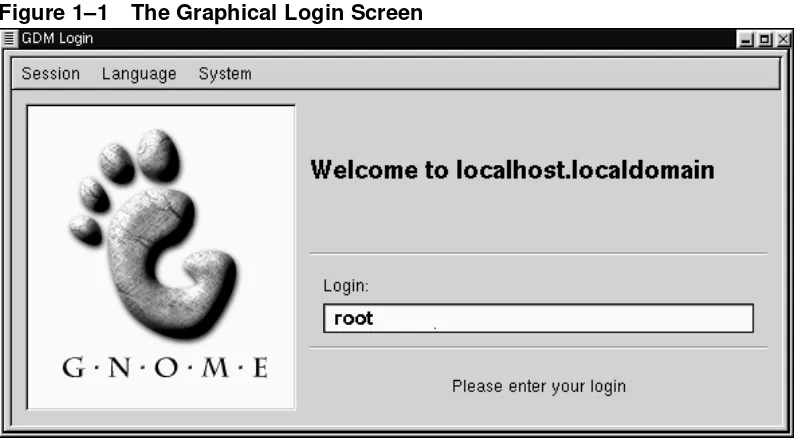
Regardless of whether you’ve chosen a graphical or console login screen, you’ll have to supply a login account name and the password associated with that account.
Section 1.1:Log In, Please 21
Red Hat Linux release 6.2 Kernel 2.2.14-xx on an i686 localhost login:root
Password:yourrootpassword
Unless you’ve chosen to give your machine a name, as in a network setting, your machine will probably be called localhost.
To log in to the root account, at theloginandpasswordprompts, typerootand the root password you chose when you installed Red Hat Linux.
Figure 1–1 The Graphical Login Screen
If you’re using the graphical login screen, similar to Figure 1–1,The Graphical Login Screen, just typerootin the box, press[Enter]and type in the password you created for the root account.
22 Chapter 1:Getting Started
[root@localhost /root]#startx
To change your login screen
To find out how you can change from a console to a graph-ical login screen see Section 15.16, Changing Login from Console to X at Startup.
Once you start the X Window System, you’ll find a desktop similar to Figure 1–2, A GNOME Desktopin GNOME or Figure 1–3,A KDE Desktopin KDE.
Section 1.1:Log In, Please 23
Figure 1–3 A KDE Desktop
1.1.3 Starting an Xterm
Both GNOME and KDE offer quick launch buttons on theirpanelsto open an Xterm window.
Figure 1–4 The GNOMEPanel
On the GNOMEPanel, the button which launches an Xterm appears near the center
and looks like:
24 Chapter 1:Getting Started
Figure 1–5 The KDE Panel
Similar to GNOME, the KDEPanelprominently features a quick launch button for an
Xterm. The launcher looks like:
You can also find the launcher from the KDE main menu underUtilities=>Konsole.
Now, click on theXtermbutton to open a window. You’ll see the shell prompt inside the window, and will look like
[root@localhost /root]#
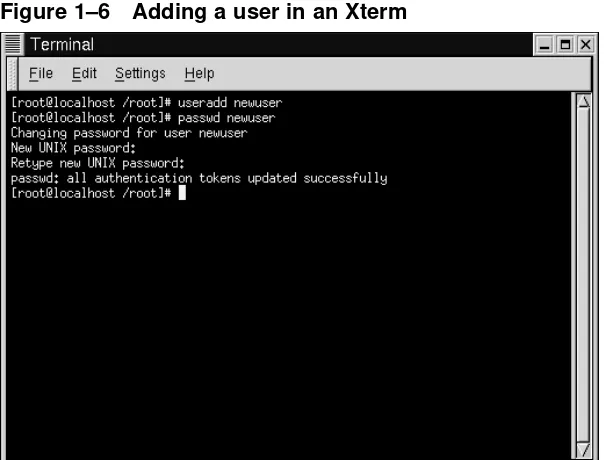
Typeuseradd, then a space and the name of the new user account (name the account newuser, for example).
It may not appear that anything has happened, but you’ve just completed step one of creating the new account. All that remains is for you to give this account apassword.
Picking account names
Often, user accounts are just variations on the user’s name, such as jsmith for John Smith. You can choose whichever name you prefer, however, such as musicman or ElivsisK-ing.
Section 1.1:Log In, Please 25
What is a secure password?
You can be fancy or plain when you pick a user account name, but take precautions when you choose a password. The password is the key to your account, so it should be both unique and easy for you to remember. Your password should be at least six characters (actually, it can be 256 char-acters long, though you probably don’t need that). You can mix upper- and lowercase letters, as well as numbers and characters. Avoid easy selections, such as qwerty or pass-word. If you want to pick an easy-to-remember but some-what unique password, consider a variation of a word, such as a!rPl8nE for airplane. If you need more information about passwords, see Chapter 12,Shell Prompt Basics.
Next, you’ll be asked to enter the password for the new user’s account -- the prompt will state:New UNIX password. Enter a password that will be easy to remember and secure.
26 Chapter 1:Getting Started
Figure 1–6 Adding a user in an Xterm
In Figure 1–6,Adding a user in an Xterm, you can see a sample of an Xterm window with the commands and prompts.
You can exit from the Xterm by clicking theXbutton on the upper right of the window, or by typingexitat the prompt.
1.1.4 Logging Out of Root
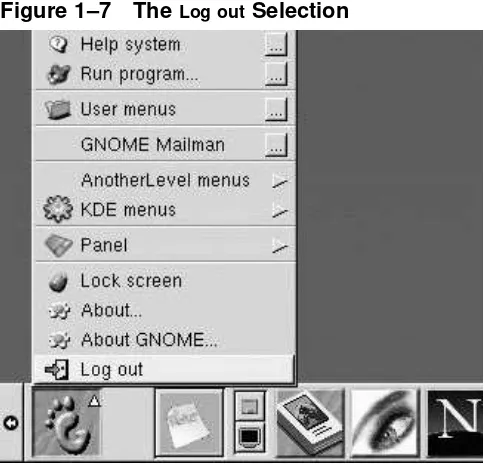
Now, you should log out of the root account and log in to your user account.
To log out from GNOME, click once on theMain Menu Button on thePanelanddrag your mouse cursor to the first item, labeled Log out (as in Figure 1–7, The Log out
Section 1.1:Log In, Please 27
Figure 1–7 TheLog outSelection
When the confirmation dialog appears (see Figure 1–8,Logout Confirmation), select the Logoutoption and click the Yesbutton. If you want to save the configuration of your Panel, as well as any programs which are running, check theSave current setup
28 Chapter 1:Getting Started
Figure 1–8 Logout Confirmation
Similarly, in KDE, you can log out from themenu buttonon thePanel(see Figure 1–9, TheLogoutEntry in KDE).
By default, thePanelin KDE also contains a quick launch button to log out; it’s located
Section 1.1:Log In, Please 29
Figure 1–9 TheLogoutEntry in KDE
You’ll either return to the graphical login screen or the shell prompt, depending on how you chose to log in.
If you’re returned to a non-graphical console prompt, just typeexitat the prompt, as in:
[root@localhost /root]# exit
Another way to exit
You can exit at the shell prompt either by typing the word
exitor by using the key combination of[Ctrl]-[D].
Section 2.1:An Overview 31
2
GNOME in 60 Seconds (or so)
GNOME is the default desktop environment in Red Hat Linux 6.2. Like KDE, GNOME is flexible and user-friendly, providing both the power of your new Red Hat Linux system and a comfortable graphical user interface -- orGUI.
This chapter will help you get acquainted with some of the fundamentals of GNOME. You’ll find greater detail about specific tasks -- such as connecting a printer and set-ting up your Internet account -- in later chapters.
You’ll find the latest GNOME-related information at the the official GNOME web-site: http://www.gnome.org.
For a similar orientation to KDE, turn to Chapter 3,KDE in 60 Seconds (or so).
If you want to use both
If you’ve got both GNOME and KDE on your system, you can often use applications from the other environment in your chosen environment. For example, you can use the KDE e-mail client,KMail, even though your chosen environ-ment is GNOME. The same can be said for other applica-tions which aren’t strictly GNOME or KDE applicaapplica-tions, such as those you might find online.
2.1 An Overview
When you first begin your GNOMEX Window session, among the first items you’ll see are:
32 Chapter 2:GNOME in 60 Seconds (or so)
• Folders -- When you first log in, folders contain links to documentation such as support, help and reference guides, either on your installed system (locally) or on the Web. Folders (as well as launchers to other applications) can be added and deleted from the Desktop. See Figure 2–2,Folders and Launchers on the Desktop for an example of folders and launchers on the desktop. See Section 2.3,Folders.
• The Panel-- The long bar across the bottom of the Desktop (for example, Fig-ure 2–4, The Panel at the Bottom of the Desktop). The Panelserves as a quick
launcher for applications andapplets(mini-applications), as well as minimized applications you may already be running. See Section 2.4,ThePanel.
• Main Menu Button-- Part of the Panel, this button, which looks like the stylized GNOME footprint (see Figure 2–6,The Expanded Main Menufor an example), holds launchers and submenus to all of the included applications and applets for your Red Hat Linux system. Some applications which you install will also be incorporated into this menu. You can add launchers to these menus, as well. See Section 2.5,Main Menu Button.
• Help Button-- By default, you’ll find a button on thePanelwhich has a question mark on it. This button is a launcher to the GNOMEHelp Browser. See Section 2.6,Finding Help.
• Multiple desktops-- In the center of thePanelyou’ll find theDesk Guide, which shows you the number ofdesktopsavailable to you. You can spread your work throughout multiple desktops, rather than crowd one desktop area with multiple applications. See Section 2.7,Multiple Desktops.
• Switching environments -- Although it’s not something you’ll find on your desk-top, there’s a utility which allows you to easily and quickly change your choice of environments. CalledSwitchdesk, you can use this utility to quickly and easily change from GNOME to KDE or vice-versa. See Section 2.8, Switching Envi-ronments.
2.1.1 Using Your Mouse
Section 2.2:The Desktop 33
Make your two-button mouse act like it has three buttons
A three-button mouse offers the greatest flexibility in GNOME. If you have a two-button mouse, however, and you selected three-button emulation when you installed Red Hat Linux, simply hold down both left and right mouse buttons at the same time to get the effect of a middle mouse button.
Pressing the middle button of your mouse on the desktop will reveal a GNOME ap-plications menu, help menus and configuration menus for Enlightenment, the default GNOMEwindow manager.
Using the right mouse button reveals a menu of actions which you can take. Right-clicking on the desktop shows you options such as adding desktop items, customizing the background and more. Right-clicking on a folder or application reveals a menu related to actions you can take with your selection, such as deletion, properties and more.
2.1.2 Drag and Drop
You can drag and drop items in GNOME, meaning that you can "carry" data or applications from one area of the desktop to another, "drop" items in folders or on applications, and move or copy information and applications.
2.2 The Desktop
34 Chapter 2:GNOME in 60 Seconds (or so)
Figure 2–1 A GNOME Desktop
The desktop, which is also sometimes referred to as the workspace, is the area on which you run your applications and perform all your work. On your desktop are launchersandfolders(see Figure 2–2,Folders and Launchers on the Desktop, for example).
• Launchers -- Icons which appear on the desktop. Click on the icon to start the application it’s associated with. For example, clicking on a Netscape icon will launch the browser.
• Folders -- Containing contents of directories, launchers to documentation or ap-plications.
• The folder Home directory -- Leads to your specific directory in/home on the system (for example, if your login directory was newuser, the Home directory
Section 2.3:Folders 35
Figure 2–2 Folders and Launchers on the Desktop
Double-click on a launcher to start the associated file (see Figure 2–2, Folders and Launchers on the Desktop). If it’s an application, it will start; if it’s data, that data will be displayed in its associated program (a spreadsheet, for example, will open in Gnumeric).
Launchers can also be shortcuts to websites. By double-clicking on the launcher labeledRed Hat Supporton your desktop, for example, yourNetscapebrowser will open and go to Red Hat’s online support site.
2.3 Folders
Folders on the desktop can store applications, data such as text files or spreadsheets, and other items. Double-clicking on a folder will open it and display its contents.
36 Chapter 2:GNOME in 60 Seconds (or so)
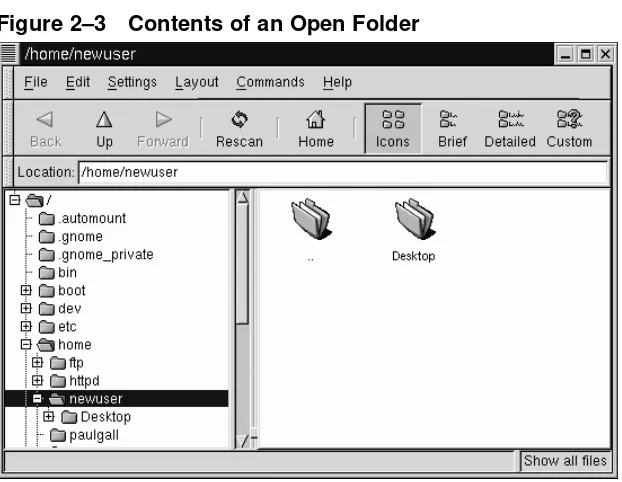
contents of your /home and other directories on your system, in general, the left pane of the file manager shows you the directorytreewhile the right pane shows you the contents of that directory.
Figure 2–3 Contents of an Open Folder
Section 2.4:ThePanel 37
What is the file manager?
The file manager is actually an application called theGNU Midnight Commander, orGMC.GMCis GNOME’s version of the popularMidnight Commanderfile manager. You can learn more about theFile Managerin Section 9.1,TheGNOME File Manager or from theGNOME User’s Guideat the GNOME website.
2.4 The
PanelLike much of GNOME, thePanelis highly configurable (see Figure 2–4,The Panel at the Bottom of the Desktop).
From thePanel, you can launch applications andapplets, small applications and utili-ties which are meant to be docked into the panel. Among the applets already running on thePanelare theGNOME Pager andclock applet.
Like KDE, you can hidethe Panelby clicking on one of the arrows at either of its borders. You can alsoauto-hidethePanel, making it appear to sink beneath the frame
of your screen (it will return when you hold your cursor over the minimized space). To enable the auto-hide feature, right-click on the Panel, select This panel properties
and chooseAuto hidein theMinimize optionssection.
Elements of the GNOME Pager
The GNOME Pager consists of the Desk Guide, which is a
visual representation of your desktops, and the Tasklist, which shows your running applications -- either minimized or opened on the desktop.
38 Chapter 2:GNOME in 60 Seconds (or so)
Other applets which can enhance productivity and enjoyment range from a mail checker and a CD player to system monitors. Applications, folders and applets can be docked on thePanel, so that they can be launched with a single click of the button.
Figure 2–4 The Panel at the Bottom of the Desktop
To add an applet:
• Right-click on thePanel;
• Drag your cursor to theAdd appletmenu;
• Select an applet from within the listed categories.
You can also customize thePanel, add more than onePanelto your desktop, or convert
the current orientation of the Panelfrom horizontal to vertical. By clicking on the
Section 2.5:Main Menu Button 39
Figure 2–5 Adding an Applet
Switch tasks quickly
One way to bring currently running applications to the front is to press[Alt]-[Tab]. To scroll through the tasks, hold down the[Alt]key, while pressing the[Tab]key in succession. When you’ve found the task you want to bring to the front, stop pressing the[Tab]key and release the[Alt]key.
2.5
Main Menu Button40 Chapter 2:GNOME in 60 Seconds (or so)
Figure 2–6 The Expanded Main Menu
From here, you can start all the included applications and applets for GNOME; you also have access to KDE applications, under KDE menus, and to applications you would find in the window manager AnotherLevel (provided that these applications were installed in the first place).
These submenus give you access to a full range of applications on your system -- in GNOME, KDE and AnotherLevel. If you prefer to use the GNOME environment, but would rather use some non-GNOME applications, you can easily choose them from theMain Menu Button.
Section 2.6:Finding Help 41
2.6 Finding Help
The GNOME Help Browser(see Figure 2–7,The GNOME Help Browser) is one of the
more useful utilities at your command.
In fact, since this application displays not only GNOME-related help but alsoinfo pagesandman pages, theGNOME Help Browsercan be an invaluable resource for learn-ing about both GNOME and your Red Hat Linux system. (Info pages and man pages are concise help documents which are usually installed on a Linux system. These help documents are covered more extensively in Chapter 12,Shell Prompt Basics.)
Figure 2–7 The GNOME Help Browser
42 Chapter 2:GNOME in 60 Seconds (or so)
2.7 Multiple Desktops
Rather than crowd your work on one screen, you can usevirtual desktops, which extend your workspace to multiple desktop areas. Say you have your browser open on one desktop; if you want to use a word processor and e-mail program without crowding everything together, you can have each application run on its own desktop.
Figure 2–8 Moving an Application to Another Desktop
For example, by using GNOME and theEnlightenmentwindow manager(which liter-allymanageshow your windows are displayed), you can move a window from one desktop to another by clicking on the application’s title bar and "dragging" the appli-cation beyond the left, right, top or bottom border of your screen.
Another way to move an application to another desktop, if your window manager supports the feature, is to select the desktop by right-clicking a window’s title bar (see Figure 2–8, Moving an Application to Another Desktopfor an example, using Enlightenment).
Section 2.8:Switching Environments 43
Figure 2–9 The GNOMEDesktop Guide
TheDesk Guide(see Figure 2–9,The GNOMEDesktop Guide) is a GNOME utility which allows you to switch desktops (or workspaces) by clicking on the corresponding desk-top.
You can use the GNOMEDesktop Guide, the collection of "panes" on thePanel, to see where running applications are located on your desktops -- they will appear as small, raised squares inside a desktop pane.
Part of the Pager
TheDesktop Guideis one part of the GNOME Pager; the other part of the Pager is the Tasklist. You can add new Tasklists, Pagers, orDesk Guides by right-clicking on thePaneland mov-ing your cursor toAdd applet=>Utilityand selecting the ap-plets from the menu.
2.8 Switching Environments
In addition to changing your graphical environment at the login screen, you can "switch" to another environment when you’re already logged in.
You can change environments by using the Switchdesk utility (see Figure 2–10, The
SwitchdeskUtility). Whether you’re using GNOME, KDE or AnotherLevel, you can
select your new environment inSwitchdeskand log out. When you restart your session, you’ll find your new environment.
In GNOME, one way to findSwitchdeskis from theMain Menu Button(go toSystem=>
44 Chapter 2:GNOME in 60 Seconds (or so)
Figure 2–10 The SwitchdeskUtility
Other ways to start the utility include:
• Typeswitchdeskat the shell prompt
• Open theRun programitem from theMain Menu Buttonand typeswitchdeskin
the window.
Section 3.1:An Overview 45
3
KDE in 60 Seconds (or so)
Like GNOME, KDE is an appealing and easy to configure graphical environment.
Formally called the K Desktop Environment (the K doesn’t represent any word, according to the website FAQ), the goals of the KDE Project are to lessen the Linux/UNIX learning curve for many users, and to present an appealing environment for everyone. Since its foundation in October 1996 by Matthias Ettrich, KDE has garnered praise from new and seasoned Linux users alike.
Hundreds of free software developers from all over the world have worked on the KDE Project, and continue to refine and enhance the environment.
Like the chapter about the basics of GNOME (Chapter 2,GNOME in 60 Seconds (or so)), this chapter will provide a quick overview of KDE fundamentals. Details, such as configuring your desktop, working with the file manager and using specific KDE tools, will be covered later in this book.
For the latest documentation on KDE, visit the project’s website: http://www.kde.org.
If you want to use both
If you’ve got both GNOME and KDE on your system, you can often use applications from the other environment in your chosen environment. For example, you can use the
Gnumeric spreadsheet application in KDE, even though the
application is part of the bundled GNOME applications.
3.1 An Overview
When you first start KDE, among the first items you’ll see are:
46 Chapter 3:KDE in 60 Seconds (or so)
• The Floppy, CD-ROM, Printer, and Trash icons -- These are links (or shortcuts) which allow you easy access to your floppy and CD-ROM drives or let you "throw away" items by dropping them into the trashcan. See Section 3.2.1, The Trash,
Printer, and Drives.
• Folders -- In the folder labeledTemplates, you’ll find links which you candrag to your desktop to create new desktop items. The folder calledAutostartis where
you can place applications which you want to start automatically whenever you log in (see Section 3.3,Folders).
• The Panel -- The long bar across the bottom of the Desktop (for example, in
Figure 3–1,A Typical KDE Desktop). The Panelserves as a quick launcher for applications andapplets(mini-applications). See Section 3.4,ThePanel.
• Multiple desktops -- In the center of the Panelyou’ll find the Switch Desktop
buttons, which show you the number ofworkspaces available to you. You can spread your work throughout multiple desktops, rather than crowd one desktop area with multiple applications. See Section 3.4.1,Multiple Desktops.
• Main Menu K Icon-- Part of thePanel, at the left (see Figure 3–9,TheMain Menu K
Icon with Expanded Menufor an example), leads to launchers and submenus for included applications and applets on your Red Hat Linux system. Some applica-tions which you install, such asStarOffice, can also be incorporated into this menu. See Section 3.5,TheMain Menu KIcon.
• TheTaskbar-- Appearing at the top of the desktop by default (though you can change this), theTaskbaris a thin bar which shows your currently opened windows -- both minimized and on the desktop. See Section 3.6,TheTaskbar.
• Finding Help -- KDE includes a detailed set of help files for navigating and customizing the environment. See Section 3.7,Finding Help.
Section 3.1:An Overview 47
3.1.1 Using Your Mouse
Click once
Unlike GNOME, you start applications and open folders by clicking just once on the associated icon.
Using the left mouse button selects an item to open or drag to another location. To drag the item, hold down the mouse button, and continue holding it down while drag-ging to the new location. Once at the desired location, release the mouse button to "drop" the item.
You can also select multiple items by holding down the cursor and dragging it over the items. Once you release the mouse button, each of the selected items will be highlighted.
If there are multiple items you want to move or copy, but they’re not easily aligned for quick selection, you can highlight each item by holding down the[Ctrl]key while clicking once on each icon.
When youdropthe files on their desired location -- such as a folder -- a menu will appear asking whether you want toCopy,MoveorLinkthe files at the selected location.
Make your two-button mouse act like it has three buttons
48 Chapter 3:KDE in 60 Seconds (or so)
Pressing the middle button of your mouse on the desktop will allow you to switch desktops by selecting desktops one through four (you can rename the desktops, as you’ll learn in later in this book).
Using the right mouse button reveals a brief menu of actions which you can take. Right-clicking on the desktop shows you options such as adding desktop links --which start applications, visit websites or open documents. You can also rescan or unclutter the desktop.
Also, among the options when you right-click on the desktop, you’ll find a link to helpful documentation on using the desktop itself.
Right-clicking on a folder or application reveals a menu related to actions you can take with your selection, such as moving the item to the Trash, revising the item’s properties and more.
3.1.2 Drag and Drop
You candrag and dropitems in KDE, meaning that you can "carry" data or cations from one area of the desktop to another, "drop" items in folders or on appli-cations, move or copy information and applications.
When you drag an item by holding down the left mouse button, then release the button over the desired location, you’ll find a menu of actions you can take. You can copy the item into the location (which will preserve the original item) you can move the item to its new location, or you can create a link from the item in its new location to the original item. This last option is somewhat similar to copying; however, when you copy the item, the original item remains unchanged if you modify the copy. When you link an item, any changes you make to the item in one location are reflected in the item at its original location.
Section 3.2:The Desktop 49
3.2 The Desktop
When you first start KDE, your desktop will look something like Figure 3–1,A Typ-ical KDE Desktop.
Figure 3–1 A Typical KDE Desktop
The desktop is your main work area. It is the area on which all of your running applications will be placed -- throughout one or multiple desktops.
Like GNOME, the KDE desktop can be easily configured.
50 Chapter 3:KDE in 60 Seconds (or so)
Dressing it up
Like so much of KDE, you can customize the look of your desktop, either through the use of preferred col-ors or pictures, or through the use of themes. To learn more about themes in KDE, visit the KDE website (http://www.kde.org).
3.2.1 The
Trash,
Printer, and Drives
Among the first items you’ll discover on your desktop will be the icons representing your printer, CD-ROM and floppy drives, as well as a Trashcan (see Figure 3–2, Drives, Trash and Printer Icons).
Figure 3–2 Drives, Trash and Printer Icons
Section 3.2:The Desktop 51
Be aware of formatting
If you place a floppy diskette in the drive, then select the
floppy drive on your desktop, you may receive an error
message such as "wrong fs type, bad option, bad superblock on /dev/fd0..."
Chances are good that the floppy you’ve placed in the drive is not formatted with the ext2 filesystem -- the Linux filesys-tem format -- but rather another filesysfilesys-tem format, such as MS-DOS. For more information about how to access an MS-DOS formatted diskette, as well as an ext2 filesystem, see Section 15.2,Using a Diskette.
When you right-click on the drive icons, you will see several options for working with these drives, such asDelete andMove to Trash, which will remove the icon from
your desktop (and which you probably won’t want to do); Copy, which allows you to copy the icon to another location;Open with, which you should probably avoid for now; and Mount.
"Mounting" a device
Ordinarily, you’ll be able to use your drives just by clicking on them. In UNIX and Linux, however, that’s not always the case: you’ve often got tomountthe drives. When you mount a floppy or CD-ROM, you’re making that device’s contents available to you. Note, however, that whenever you mount a drive, you must alsounmountthe drive when you’re finished.
52 Chapter 3:KDE in 60 Seconds (or so)
ThePrintershows you theprint queue, meaning the jobs which are printing or sched-uled to print. This is a handy tool for monitoring the progress of your printing tasks.
3.3 Folders
When you first start KDE, you’ll see "file folders" on your desktop. Among the more important folders areTemplatesand Autostart(see Figure 3–3, File Folders on the Desktop).
Figure 3–3 File Folders on the Desktop
To open a folder, single-click on it with your left mouse button.
In the Autostartfolder, you can drag and drop applications which you would like to open or start automatically when you begin your KDE session.
In theTemplates folder, you’ll find basic file-types which you can use to drag onto
Section 3.3:Folders 53
Figure 3–4 A View of theTemplatesFolder
Among the templates you can choose are:
• Ftpurl-- Creates a link to FTPsites. (FTP stands forFile Transfer Protocol, a means of exchanging files, such as on the Internet.) Single-click on the link to access the site.
• Mime Type-- Creates a link to an application or text file. (MIME means Multi-purpose Internet Mail Extensions; they’re used to describe different data so that the operating system knows how to work with it when that data is selected.) You won’t require this template often, since many MIME types are already available with KDE.
• Program-- Creates a link to start a program.
• URL-- Creates a link to a favorite website, like a detachable bookmark.
54 Chapter 3:KDE in 60 Seconds (or so)
3.4 The
PanelThePanelstretches across the bottom of the desktop.
Figure 3–5 The Panel
The Panelis very configurable. You can add and remove applications and applets, which will allow you to access them easily.
As in GNOME, you canhidethePanelby choosing toauto-hideit, making it appear to sink beneath the lower frame of your screen (it will return when you hold the cursor over the minimized space).
You can also hide thePanelby clicking on one of the arrows on either of its borders;
depending on the arrow you select, that will be the direction in which thePanelwill shrink to hide.
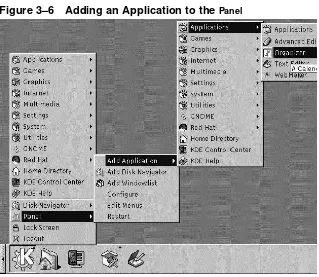
Applications and utilities can easily be added to thePanel(see Figure 3–6,Adding an
Section 3.4:ThePanel 55
Figure 3–6 Adding an Application to the Panel
To add an application:
• Click on theMain Menu Kicon and highlight thePanelentry in the menu.
• In the submenu which opens, highlightAdd Application.
• Highlight one of the submenus which open and select the corresponding appli-cation, game or utility you wish by dragging your cursor to the item until it’s highlighted.
56 Chapter 3:KDE in 60 Seconds (or so)
3.4.1 Multiple Desktops
By default, KDE offers you four different desktops over which you can spread your work. Each desktop can hold icons, open applications and individually customized backgrounds.
For example, while you’re writing e-mail on the first desktop, you can haveNetscape running on desktop two, a word processor open on desktop three, and so on.
You can change the number -- and names -- of desktops available under KDE. To make these adjustments:
• Right-click on thePanel; you’ll see a limited menu of actions you can take.
• SelectConfigure; the KDEPanelconfiguration tool will open.
• Click on the tabbed entry markedDesktops(see Figure 3–7,TheDesktopsTab in
thePanelConfiguration).
Section 3.4:ThePanel 57
To change the names of your desktops, fromOne,Two, and so on, replace the desktop "names" by typing in your preferred names in the appropriate boxes (see Figure 3–8, Renaming Desktops).
Figure 3–8 Renaming Desktops
You can increase (or decrease) the number of desktops available to you by adjusting the sliding bar in the Visibleslider of theDesktopsdialog. For more desktops, "drag"
the bar to the right; for fewer desktops, drag the bar to the left.
58 Chapter 3:KDE in 60 Seconds (or so)
Switch desktops quickly
Want to change desktops without the hassle of pointing and clicking? Just use the keyboard combination of the [Ctrl] and Function keys. For example,[Ctrl]-[F2] will switch you from Desktop One to Desktop Two,[Ctrl]-[F3] will take you to Desktop Three. (If you rename your desktops, remember which number represents the associated name!)
3.5 The
Main Menu KIcon
Similar to the Main Menuof GNOME (and many other graphical environments), the
main menu in KDE, at theKicon, incorporates all of the available KDE applets and applications, as well as many other applications on your Red Hat Linux system.
Section 3.6:TheTaskbar 59
You can find the icon on the left of thePanel. You open the main menu by clicking once on the icon. As in Figure 3–6, Adding an Application to the Panel, you’ll see
the top-most level of menu headings first. These headings are the major groups into which the applications are placed. For example, to openKOrganizer, the KDE calendar and appointment book, you would open Main Menu K, drag your mouse to highlight theApplicationsmenu listing, then highlight and click once on theOrganizerentry in
the submenu which opens.
Also available from the main menu, you’ll find:
• TheKDE Control Center, an invaluable resource for customizing your environment and locating system information.
• AHome Directorylisting which, which selected, will open a browser showing you all the files in your account.
• A menu calledDisk Navigator, which provides quick access to recent applications as well as important directories in the filesystem.
• TheLock ScreenandLogouticons, which will password protect your desktop and
allow you to log out of your account.
3.6 The
TaskbarTheTaskbardisplays all running applications -- both minimized and on the desktop
(see Figure 3–10,Applications on theTaskbar).
Figure 3–10 Applications on theTaskbar
Like GNOME, Windows 9xand other graphical environments, theTaskbaris an easy way to keep track of and access running applications.
You can keep theTaskbarrunning in a separate location from thePanelor you can have
them both located in the same place on the desktop. The default configuration places theTaskbarat the top of the desktop while thePanelruns at the bottom of the desktop.
60 Chapter 3:KDE in 60 Seconds (or so)
Switch tasks quickly
Another way to bring minimized or background windows to the front is to use the[Alt]and[Tab]keys. To pick an item from theTaskbar, hold down[Alt]-[Tab]. To scroll through the tasks, hold down the [Alt] key, while pressing the [Tab] key in succession. When you’ve found the task you want to maximize and bring to the front, stop pressing the[Tab]key and release the[Alt]key. This procedure works only on your current desktop, so if you’ve got applications running on other desktops, you’ll have to switch to that desktop in order to maximize it with these keys.
3.7 Finding Help
Section 3.7:Finding Help 61
Figure 3–11 The Opening Screen of the Help Browser
There are several ways to accessKDE Help, but the easiest are:
• From thePanel-- A single click on theKDE Helpicon, which looks like:
• From theMain Menu-- Listed asKDE Helpnext to the help icon.
• By right-clicking on the desktop and selecting the Help on desktop entry in the brief menu.
The opening screen of theKDE Helpbrowser will appear like Figure 3–11,The Opening Screen of the Help Browser. From this main page, you can view help documentation on using and configuring the desktop, working withKFM, the KDE file manager, and more.
62 Chapter 3:KDE in 60 Seconds (or so)
• Welcome to the K Desktop Environment-- Introductory material about the KDE Project.
• KDE Help Contents-- Help documentation such asman pagesandinfo pages, as well as specific help on KDE applications.
• Getting the most out of KDE -- Quick-start tutorials, information on KFM and kwm, thewindow managerfor KDE (a window manager does just that: manages window display and behavior in an environment).
A useful extension to the help browser is the ability to search through the help doc-umentation installed on your system. You can search through KDE docdoc-umentation and through man pages (eventually, you’ll also be able to search through info pages, although this feature is not yet available).
You’ll find a link to the search tool in theKDE Help Contentssection of the help browser. To open the search tool, select the linkSearch for Keyword.
Section 3.8:Switching Environments 63
In the search tool (see Figure 3–12, The KDE Help Search Tool for an example screen), type in the keyword, subject or significant phrase for which you want help. Select from KDE-specific documentation (KDE Documentation) or man pages (Online Manuals), which are system-related help documentation, or both categories. Click on
Submit Search or press[Enter]to begin searching.
When you find useful material, you can print the documentation by going toFile=>
Printon the menu, or by pressing[Ctrl]-[P].
3.8 Switching Environments
In addition to changing your graphical environment at the login screen, you can "switch" to another environment when you’re already logged in.
You can change environments using the Switchdesk utility (see Figure 3–13, The
SwitchdeskUtility). Whether you’re using GNOME, KDE or AnotherLevel, you can
select your new environment in Switchdesk, then log out of your session. When you restart your session, you’ll find your new environment.
64 Chapter 3:KDE in 60 Seconds (or so)
Start Switchdesk from the shell prompt in an Xterm window. You’ll find a quick
launcher to an Xterm on thePanel; it looks like:
To useSwitchdesk, perform the following tasks:
• Open an Xterm window
• Type switchdeskat the prompt
• Select your new environment and clickOK
• Close the Xterm window by typingexit
• Log out and log in again
Section 4.1:Quitting from GNOME 65
4
Logging Out and Shutting Down
By now, most computer users know that shutting down their system involves a little bit more than just tapping a power switch. The same is true for your Red Hat Linux system.
But just because you’re done working doesn’t mean you must shut down. For exam-ple, if you’re sharing your computer with another user, you can leave your machine running and simply log outof your account, which can avoid a time-consuming re-boot.
There are similarities and differences to the procedure of logging out and shutting down in both GNOME and KDE. Let’s cover the basics first in each environment.
4.1 Quitting from GNOME
66 Chapter 4:Logging Out and Shutting Down
Figure 4–1 The GNOME Log Out Confirmation
To log out from theMain Menuon thePanel, click on theMain Menu Buttonand select Log out.
In the confirmation dialog which opens (see Figure 4–1,The GNOME Log Out Con-firmation), you can choose to:
• Logout-- logs you out of your account and returns you to the login screen, leaving the system running.
• Halt-- logs you out of your account and shuts down the system.
• Reboot-- logs you out of your account and restarts the system.
Section 4.1:Quitting from GNOME 67
If you don’t wish to proceed, choose the Nobutton to continue with your GNOME session.
Typing your password
When you select either Halt or Reboot, you’ll be asked for your account’s password before proceeding. In the space provided, just type in the password you used when you logged in for your current session.
4.1.1 Adding a Log Out Button
You can add a quick launchLog outbutton to thePanel.
68 Chapter 4:Logging Out and Shutting Down
To add the button to yourPanel, go to theMain Menu=>Paneland click onAdd log out button(see Figure 4–2,Adding a Log Out Button). Then, just click on the launcher
on thePanelto log out.
4.1.2 Shutting Down from the
Run programmenu
An additional way to shut down or restart your machine is to select theRun program
item from theMain Menuand, in the dialog which opens, typeshutdown -r now
orshutdown -h now. The-rmeans reboot, and will restart your machine; the
-hmeans halt, and will shut down the system.
We’ll discuss these two commands a little later in this chapter.
4.2 Quitting from KDE
There are several easy ways to log out from your KDE session:
Section 4.3:Shutting Down at the Shell Prompt 69
• From theMain Menu -- Select the Logoutitem (see Figure 4–3, Logoutfrom the
Main Menu).
• From thePanel-- Select theLogouticon, which looks like:
• From the desktop -- Right-click on the desktop and selectLogoutfrom the menu.
Like GNOME, KDE offers you the chance to save your current settings, which will preserve your panel settings and keep your currently open applications.
If you’re working in an application and you haven’t saved your work when you log out, a dialog will inform you that you’ll lose your unsaved material when you log out.
When you see this dialog, you can simply select theCancelbutton, save your work, then log out again. If you continue without saving your work, you’ll lose the data.
4.3 Shutting Down at the Shell Prompt
Like theRun programoption in GNOME, you can use theshutdowncommand to halt or restart your system from the shell prompt in an Xterm window. Whether you’re working in GNOME, KDE or theconsole mode(non-graphical), you can shut down or restart your system from the shell prompt.
Figure 4–4 The Password Dialog
To halt or restart your system from the shell prompt:
70 Chapter 4:Logging Out and Shutting Down
• At the shell prompt, typeshutdown -r now or shutdown -h now and enter your user account password in the dialog box which appears (see Figure 4–4,The Password Dialog). The-hmeans halt and will shut down the system; the-rmeans reboot and will restart the system.
• In console mode, typeshutdown -r noworshutdown -h nowand enter your user account password after thePasswordprompt.
Make certain that you’ve saved your work before halting or restarting your system from the shell prompt. Running applications will be closed and you won’t have the option of saving your work or your session.
"Killing" an X session
If you’re having difficulty quitting your X session -- for ex-ample, if you get no response when you click on theLog out
button in KDE -- you can swiftlykillthe X session and re-turn to the login screen by pressing the[Ctrl]-[Alt]-[Backspace] keys. This procedure should be used only as a last resort, however. Make sure you close your running applications and save your work before logging out this way!
More about shutting down
You can specify the delay between when you issue the
Setting Up Your Printer 71
5
Setting Up Your Printer
Most new Red Hat Linux users want to immediately set up their printer.
Here, we’ll cover some basic steps to configure a parallel printer on your system. For the most part, the process isn’t too complicated, regardless of whether you’re using GNOME or KDE.
Is it compatible?
Although many printers work well with Linux, not all print-ers are compatible. To make certain your printer is compat-ible with Linux, refer to The Hardware Compatibility List at http://www.redhat.com/corp/support/hardware/.
Another useful site which features printer compatibility lists as well as useful hints and instructions isThe Linux Printing HOWTO, at http://www.picante.com/~gtaylor/pht.
Because Linux is a multi-user, multi-tasking operating system, it can handle a variety of printing jobs at once. You could have multiple users on the system, all of whom want to send their work to a printer. Linux dutifully handles these requests by spool-ingthem -- storing and printing the files in the order in which they were received.
Even if you’re the only user on your system, you’re still going to send your work to theprint spool, where the files wait until it’s their turn to be printed.
There are some terms and conditions you should know:
• lpd-- Theline printer spooler daemon. Normally starts when the system starts. Manages the print jobs.
• lpr-- Takes each print job and submits it tolpd.
• Input filters-- Manage printer-specific formatting.
72 Chapter 5:Setting Up Your Printer
• /var/spool/lpd/ -- This is the location of the print spool, which is where files await printing.
• Printtool -- A graphical utility you will use to configure and modify
/etc/printcap.
Read the "man page"
You can learn more about lpd and related commands and daemons by typingman lpd at a shell prompt. To move forward through the man page, use the[Space]; to move back, press the[B]key, and to quit, press the[Q]key.
Regardless of whether you’re using GNOME or KDE, you can configure your printer withPrinttool. Printtoolprovides a graphical means for setting up and managing your printer.
5.1 Using
PrinttoolThe file/etc/printcapdefines howlprshould process the print jobs. If you were to take a peek at the file, you’d find it looks something like the following excerpt:
##PRINTTOOL3## REMOTE POSTSCRIPT 600x600 letter {} PostScript Default 1 acct|xerox-ac:\
It’s not pretty, and unless you know exactly what you’re doing, you shouldn’t edit the file. Instead, use the utilityPrinttoolto set up the printer (and/etc/printcap)for you.
Section 5.1:Using Printtool 73
Whenever you make changes to your system configuration -- such as adding or modi-fying hardware settings, installing or uninstalling software -- you must besuperuser, or root.
To become root from your user account:
• Open an Xterm window;
• Typesuat the prompt;
• Type your root password. (You won’t see it "echoed" on the screen when you type it.)
See Figure 5–1,Switching to Root for an example of how to become root.
Figure 5–1 Switching to Root
As you can see in the previous figure, when you’re root your prompt changes from a
$to a#. Typeprinttool-- one word, without capitalization.
When the utility starts, you’ll see a window similar to Figure 5–2, ThePrinttool Win-dow. At first, you won’t find any printers listed, because you haven’t added a printer to /etc/printcap.
74 Chapter 5:Setting Up Your Printer
Figure 5–2 The PrinttoolWindow
Next, you’ll be asked what kind of printer you want to add (see Figure 5–3,Selecting the Type of Printer to Add).
Figure 5–3 Selecting the Type of Printer to Add
Section 5.1:Using Printtool 75
• Local Printer: Choose this if your printer is directly connected to the machine on which you’re working (called thelocal machine).
• Remote Unix (lpd) Queue: A printer attached to another machine on which anlpd daemon is running. Choose this if you want to print to a network printer on a LAN.
• SMB/Windows 95/NT Printer: A printer which is attached to a machine running
Win-dows orSamba. (Sambais a suite of programs which allows Windows machines to share files and services with UNIX and Linux machines on a network.)
• NetWare Printer (NCP): A printer on a machine running NovellNetWareor compati-ble server software -- two networking applications for interacting with machines running NovellNetWare.
What is a daemon?
You may have seen thatlpdis called the line printer spooler daemon. A daemon is a small program that runs in the back-ground. Daemons usually perform critical system tasks, and usually start when the system starts. (Most daemons, also, have names that end in a d, such ascrond, httpd, lpd, and so on.)
For this example, we’ll add a local printer. Highlight the entryLocal Printerand select
the OKbutton.
76 Chapter 5:Setting Up Your Printer
Figure 5–4 Detecting a Printer Port
The/dev/lpxDevice Files
Linux refers to parallel ports differently than DOS. In DOS, a printer located atLPT1is known in Linux as/dev/lp0;
LPT2in DOS is/dev/lp1in Linux, and so on.
In our example, a parallel port printer was detected at/dev/lp0. Click on theOK
button to continue.
In the next dialog (see Figure 5–5,Editing a Local Printer), you can specify details about your printer, such as a name of the printer and its related spool directory, the location of the printer device and other options.
Section 5.1:Using Printtool 77
entry). You can probably leave these settings unchanged; note that giving a printer entry the namelpmakes it the default printer.
Figure 5–5 Editing a Local Printer
The Input Filter contains information about your specific printer and its formatting requirements. To add your printer’s information, click on theSelectbutton. The Con-figure Filterdialog will open.
Once theConfigure Filterdialog opens, your tasks are to perform the following:
• Pick an exact match for your make and model printer in theConfigure Filterdialog.
If you can’t find an exact match, see if you can find a match that’s close (such as the same manufacturer, but a different model). Select other options, such as paper size and resolution. Click onOKto accept your selections.
• Click onOKin theEdit Local Printer Entrydialog; you’ll return to thePrint System Manager.
• Highlight your new printer entry in thePrint System Managerdialog, then restart
lpd from the menu.
• Finally, with your printer highlighted in thePrint System Manager, print a test page
by selecting the option from the menu.
If you’re unsuccessful at printing the test page -- or you’ve got to modify the way it printed -- return to the Configure Filter dialog to select a different filter or change settings for your current filter.
78 Chapter 5:Setting Up Your Printer
5.1.1 Selecting Input Filters
TheConfigure Filterdialog will look similar to Figure 5–6,Selecting a Filter. Select
the appropriate filter for your printer. When you select a filter, you’re selecting the correct way to convert file formats so that your printer can use them.
Figure 5–6 Selecting a Filter
The filter dialog is divided into several sections:
• Printer Type: Lists the available printer models for which you have drivers.
• Driver Description: Describes basic information about the driver, as well as the
types of models for which the driver is appropriate.
• ResolutionandPaper Size: Allow you to specify the quality of output to the printer,
as well as the default paper size in the paper tray.
• Color Depth/Uniprint Mode: Allows you to specify additional resolution options for a color printer.
Section 5.1:Using Printtool 79
In thePrinter Typepane, at left, choose the exact make and model listed for your printer. If you can’t find an exact match, try to find the closest match to your printer’s make and model.
If you have questions about which filter may be appropriate for your printer, you’ll find information about the driver in the box calledDriver Description, at the right of the
dialog.
Quite a few makes and models of printers are supported, but not all printers are fully supported -- or supported at all. In some cases, printers may require additional drivers; in other cases, the printer may be unsupported by Red Hat Linux. Again, re-fer to the Hardware Compatibility List at http://www.redhat.com/corp/support/hard-ware/ to verify that your printer is supported under Red Hat Linux.
If you find the manufacturer of your printer, but not your model number, you can check your printer’s documentation to find out whether your printer canemulateany of the listed printers. You may also be able to find out whether a filter is suitable for your unlisted model by highlighting the filter in the left window and reading its description in theDriver Descriptionwindow, at the right of the dialog.
Choose the resolution and default paper size for your printer. (Not all printer types will offer optional paper sizes.)
In theColor Depth / Uniprint Modesection, select the options you desire.
A little about Floyd-Steinberg
Floyd-Steinberg refers to a process of dithering, which is used to create shades or to smooth jagged lines.
5.1.2 Other Printing Options
The remainder of the Configure Filterdialog allows you to specify other printing op-tions:
• Send EOF after job to eject page-- This option forces the printer to eject the page