Updates, source code, and Wrox technical support at
www.wrox.com
Microsoft
®SQL Server
®
2008
Administration
with Windows PowerShell
™Get more out of
WROX.com
Programmer to Programmer
™
Interact
Take an active role online by participating in
our P2P forums
Wrox Online Library
Hundreds of our books are available online
through Books24x7.com
Wrox Blox
Download short informational pieces and
code to keep you up to date and out of
trouble!
Chapters on Demand
Purchase individual book chapters in pdf
format
Join the Community
Sign up for our free monthly newsletter at
newsletter.wrox.com
Browse
Ready for more Wrox? We have books and
e-books available on .NET, SQL Server, Java,
XML, Visual Basic, C#/ C++, and much more!
Contact Us.
Professional SQL Server
2008 Administration with
Windows PowerShell
Introduction . . . xxi
Chapter 1: What Is Windows PowerShell? . . . 1
Chapter 2: Windows PowerShell Command Types, Snap-ins, and cmdlets . . . 15
Chapter 3: Windows PowerShell Programming, Scripting, Error Handling,
and Debugging . . . 43
Chapter 4: Windows PowerShell Functions, Parameters, Sourcing,
Scopes, and User Profiles . . . 77
Chapter 11: Windows PowerShell in SQL Server 2008 Environment,
SQL Server PowerShell Provider . . . 241
Chapter 12: Managing Policies through SQLSERVER:\SQLPolicy . . . 259
Chapter 13: Windows PowerShell and SMO . . . 283
Chapter 14: Building SQL Server Standards and PowerShell Coding
Standards . . . 317
Chapter 15: Building SQL Server Inventory . . . 333
Chapter 16: SQL Server Installation . . . 377
Chapter 17: Collecting SQL Server Performance and Host Performance
Data . . . 401
Chapter 18: Monitoring SQL Server . . . 419
Chapter 19: Monitoring Disk Space Usage, Database Files, and Backups . . 451
Chapter 20: Defining Policies . . . 475
Chapter 21: Generating Database Scripts . . . 487
Appendix A: cmdlets . . . 507
Professional
SQL Server
2008 Administration with
Professional
SQL Server
2008 Administration with
Windows PowerShell
Muthusamy Anantha Kumar
Yan Pan
Professional SQL Server
Copyright2009 by Wiley Publishing, Inc., Indianapolis, Indiana
Published by Wiley Publishing, Inc., Indianapolis, Indiana Published simultaneously in Canada
ISBN: 978-0-470-47728-1
Manufactured in the United States of America 10 9 8 7 6 5 4 3 2 1
Library of Congress Cataloging-in-Publication Data Kumar, Muthusamy Anantha,
1974-Microsoft SQL server 2008 administration with Windows Powershell / Muthusamy Anantha Kumar, Yan Pan. p. cm.
Includes index.
ISBN 978-0-470-47728-1 (paper/website)
1. SQL server. 2. Windows PowerShell (Computer program language) I. Pan, Yan, 1976- II. Title. QA76.73.W56K96 2009
005.2’82--dc22
2009013304
No part of this publication may be reproduced, stored in a retrieval system or transmitted in any form or by any means, electronic, mechanical, photocopying, recording, scanning or otherwise, except as permitted under Sections 107 or 108 of the 1976 United States Copyright Act, without either the prior written permission of the Publisher, or authorization through payment of the appropriate per-copy fee to the Copyright Clearance Center, 222 Rosewood Drive, Danvers, MA 01923, (978) 750-8400, fax (978) 646-8600. Requests to the Publisher for permission should be addressed to the Permissions Department, John Wiley & Sons, Inc., 111 River Street, Hoboken, NJ 07030, (201) 748-6011, fax (201) 748-6008, or online atwww.wiley.com/go/permissions.
Limit of Liability/Disclaimer of Warranty:The publisher and the author make no representations or warranties with respect to the accuracy or completeness of the contents of this work and specifically disclaim all warranties, including without limitation warranties of fitness for a particular purpose. No warranty may be created or extended by sales or promotional materials. The advice and strategies contained herein may not be suitable for every situation. This work is sold with the understanding that the publisher is not engaged in rendering legal, accounting, or other professional services. If professional assistance is required, the services of a competent professional person should be sought. Neither the publisher nor the author shall be liable for damages arising herefrom. The fact that an organization or Web site is referred to in this work as a citation and/or a potential source of further information does not mean that the author or the publisher endorses the information the organization or Web site may provide or recommendations it may make. Further, readers should be aware that Internet Web sites listed in this work may have changed or disappeared between when this work was written and when it is read.
For general information on our other products and services please contact our Customer Care Department within the United States at (877) 762-2974, outside the United States at (317) 572-3993 or fax (317) 572-4002.
Trademarks:Wiley, the Wiley logo, Wrox, the Wrox logo, Wrox Programmer to Programmer, and related trade dress are trademarks or registered trademarks of John Wiley & Sons, Inc. and/or its affiliates, in the United States and other countries, and may not be used without written permission. SQL Server and Windows PowerShell are trademarks or registered trademarks of Microsoft Corporation in the United States and/or other countries. All other trademarks are the property of their respective owners. Wiley Publishing, Inc., is not associated with any product or vendor mentioned in this book.
About the Authors
Muthusamy Anantha Kumar, aka MAK(MCTS, MCITP: Database Administrator 2008), is currently the
Senior SQL Server Database Engineer for a leading global financial services firm on Wall Street. He has published many online articles as a contributing columnist forDatabaseJournal.com. He also pub-lished online articles forSQL-Server-Performance.comandSQLServercentral.com. His articles can be found atwww.mssqlengineering.com. He also teaches SQL Server Database Administration online at the University of West Florida.
MAK has been working in information technology for more than 10 years. He has worked in the technol-ogy side of the finance, dot com, B2B, and software industries. His past clients include Fort James, Boston Financial, PCConnection, PurchaseSoft, Merrill Lynch, and Jefferies. MAK holds an M.B.A. degree and various certifications in the computer field.
He also teaches Microsoft SQL Server and has taught many SQL Server developers and DBAs. He has master’s degree in Business Administration.
MAK lives in New Jersey. He can be reached [email protected].
Yan Pan(MCITP, MCDBA, OCA) is a Senior DBA for a leading global financial services firm, where
her daily duties include administering hundreds of SQL Server and Oracle servers of every possible version, working with business units, and troubleshooting database performance problems. She is also a contributing columnist forDatabaseJournal.com. Her articles can be found atwww.yanpansql.com.
Previously, Yan worked as a SQL Server DBA and a .NET developer at Data Based Ads, Inc., and devel-oped two .NET Web applications. Before that, she worked at AT&T Research Labs. She designed OLAP cubes with SQL Server Analysis Services and developed PivotTable reports for regional managers. She has master’s degrees in Computer Science and Physics.
Credits
Executive Editor
Robert Elliott
Development Editor
Rosanne Koneval
Technical Editor
Haidong Ji
Production Editor
Daniel Scribner
Copy Editor
Luann Rouff
Editorial Manager
Mary Beth Wakefield
Production Manager
Tim Tate
Vice President and Executive Group Publisher
Richard Swadley
Vice President and Executive Publisher
Barry Pruett
Associate Publisher
Jim Minatel
Project Coordinator, Cover
Lynsey Stanford
Proofreader
Jen Larsen, Word One
Indexer
Acknowledgments
First of all, I would like to thank my fianc´ee, Claire Hsu. Without her moral support, this book would not have been possible. I would like to thank my mom, Jayalakshmi Muthusamy, for bringing me into this world. I still admire her for not losing her patience and always keeping her sense of humor. I would like to thank my dad, Muthusamy Srinivasan, for being a friend and a teacher. I want to take this opportunity to thank both my parents for all the compromises they made to raise both my sister and me. I would also like to thank my sister, Anuradha, for supporting me and taking care of me.
I would like to thank my co-author, Yan Pan, especially for being both very patient when needed and pushing me when necessary. She is a very good friend and colleague. She could always get me back on track when I was distracted with other projects.
I would also like to thank all my friends, current and past colleagues, and relatives for their constant inspiration.
I am very grateful to all the readers and fans of my online articles from various parts of the world. With-out their support, comments, motivation, and critiques, this book wouldn’t have shaped up so well.
Yan and I are both grateful to Haidong Ji, aka Alex, for introducing us to Wrox-Wiley and being our knowledgeable technical editor. We also want to thank Bob Elliot for bringing our book proposal to the executive team and making it happen.
Last but not least, we would like to thank Rosanne Koneval and Daniel Scribner. Your questioning at the right place, proper decision-making, and quick turnaround made this book much neater and clearer.
It is hoped that I haven’t forgotten anyone, but if I have, it was an oversight. Honest.
—MAK
First and foremost, I would like to thank my beloved husband, Yue Guo. You have always supported and encouraged me in everything I have ever done. Thank you for your incredible patience throughout the writing of this book. I would also like to thank my parents for all they have done for me to give me the best life they could possibly give.
I would like to express my sincere appreciation to MAK for introducing me to technical writing and sharing the book idea with me. Your optimism, enthusiasm, and humor have made the book-writing journey a wonderful experience.
I am also deeply indebted to Haidong (Alex) Ji. Haidong, thank you for introducing us to Wrox. Thank you for your suggestions, guidance, and encouragement throughout the course of this book. Your tech-nical input and attention to detail helped us improve the quality of this book greatly.
PowerShell–powered SQL Server enterprise infrastructure to reach thousands of readers, and hopefully making their lives easier. Rosanne, thank you for your incredible patience in cleaning up the words and polishing everything up to get this book ready for the printer. Daniel, thank you for giving a final touch to this book.
Finally, I’d like to thank you, my readers, for reading what I have written! Without your support and feedback, I could not have accomplished so much.
Contents
Introduction
xxi
Chapter 1: What Is Windows PowerShell?
1
Command-Line Interfaces versus Graphical User Interfaces
1
Prerequisites for Installing Windows PowerShell 2.0
2
Installing the Microsoft .NET Framework 6
Installing Windows Remote Management 6
Installing Windows PowerShell
7
Launching Windows PowerShell
10
Using the Command console 11
Using All Programs 11
Using Start Run 11
Summary
13
Chapter 2: Windows PowerShell Command Types, Snap-ins, and cmdlets
15
PowerShell Command Types
16
Native Commands 16
PowerShell cmdlets 18
Shell Function Commands 19
Script Commands 20
Calling PowerShell cmdlets or Scripts from the Command Shell 22
PowerShell Snap-ins
23
PowerShell cmdlet Syntax
28
Named Parameter 28
Positional Parameter 29
Getting Help
31
Filtering 34
Sorting
38
Formatting
39
Summary
42
Chapter 3: Windows PowerShell Programming, Scripting,
Error Handling, and Debugging
43
PowerShell Scripts
44
Text File As Input
62
Output
64
Writing to the Console 64
Writing to a File 65
Error Handling
67
Debugging
71
Summary
75
Chapter 4: Windows PowerShell Functions, Parameters, Sourcing,
Scopes, and User Profiles
77
Functions
77
Arguments in Functions 78
Returning Values 80
Script Parameters
81
Sourcing
84
Function Scope 87
User Profiles 88
Transcripts
90
Summary
91
Chapter 5: Working with the File System, Registry, and Variables
93
Using Get-PSDrive and Get-PSProvider
93
Working with File System
95
Navigating the File System 96
Managing Files and Directories 98
Managing File Contents 106
Working with the Registry
108
Working with Variables
111
Automatic Variables 113
Preference Variables 115
User-Created Variables 116
Working with Environment Variables
121
Summary
122
Chapter 6: Working with Event Logs
123
Event Log Service
124
Event Viewer
125
Event Logs
125
Log Entry Types
128
Exporting the event logs
134
PowerShell cmdlets Related to event log 136
Summary
140
Chapter 7: Working with Windows Services and Processes
141
What Is a Windows Service?
141
Windows PowerShell and Windows Services
143
Get-Service 144
Stop-Service 146
Start-Service 148
Set-Service 150
Working with Windows Processes
151
Get-Process
153
Stop-Process
155
Chapter 8: Working with WMI
159
Permission Issues and WMI
159
The WMI Model
161
Working with Event Log
164
Working with Services
170
Working with Processes
179
Working with Environment Variables
186
Working with the Registry
190
Summary
195
Chapter 9: WMI Provider for Configuration Management
197
Managing SQL Server Services
198
Managing Client Network Protocols
203
Managing SQL Server Client Aliases
207
Managing Server Network Protocols
211
Changing FILESTREAM Settings
214
Changing SQL Server Advanced Properties
216
Summary
218
Chapter 10: WMI Provider for Server Events
219
WMI Provider for Server Events
219
WMI Query Language (WQL)
220
Event Handling with Windows PowerShell 2.0
221
Monitoring Errors from the SQL Server Error Log
225
Monitoring Deadlocks
226
Monitoring Blockings
229
Monitoring Login Changes and Failed Login Attempts
233
Monitoring Databases
235
Monitoring Database Objects
236
Summary
239
Chapter 11: Windows PowerShell in SQL Server 2008 Environment,
SQL Server PowerShell Provider
241
sqlps Utility
241
SQLSERVER: Drive and Invoke-Sqlcmd cmdlet
245
SQL Snap-ins
245
Encoding and Decoding Uniform Resource Name (URN)
256
Chapter 12: Managing Policies through SQLSERVER:\SQLPolicy
259
SQLSERVER:
\
SQLPolicy Folder
259
Conditions
263
Policies
268
Summary
281
Chapter 13: Windows PowerShell and SMO
283
PowerShell and the SQLConnection .NET Class
283
Working with SQL Server using SMO
290
Methods and Properties 291
Getting Version Information 291
SQL Server SPID Information 292
SQL Server Server-Related Information 293
SQL Server Database-Related Information 295
Changing the Login Mode 296
Host Information 296
Performance Counters 297
Working with Databases using SMO
297
Working with Tables using SMO
304
Creating Tables 305
Listing Columns 305
Removing Columns 306
Adding Columns 307
Dropping a Table 308
Backup and Restore with SMO
308
Database Backup 308
Transaction Log Backup 311
Differential Backup 312
Restoring Full Backup 313
Restoring a Full Backup and Transaction Log Backup 313
Summary
316
Chapter 14: Building SQL Server Standards and PowerShell
Coding Standards
317
SQL Server Standards
318
SQL Server Development Standards
318
Naming Conventions 318
General Rules 320
Stored Procedure Standards
321
Keep Them Small 321
Use Comments Generously 321
Select * 322
Cursors 322
Temporary Tables 322
Things to Avoid 322
Things to Use 323
Check @@ERROR 323
Use SQL Server Date Data Types 323
DML Statements 323
ANSI-Standard Join Clauses 323
Deprecated Features 324
Database Design Standard and Best Practices
324
User-Defined Tables 324
Logs 324
Split tempdb 325
Databases 325
Security and Roles 325
Auto Create and Auto Update 325
Size 325
Auto Shrink and Auto Close 325
Design and Performance 326
Store Unstructured Data 326
More Performance Guidelines 326
Data Protection Standards and Best Practices
327
Backup Policy 327
SQL Server Production Standards
327
High Availability and Disaster Recovery 327
The Administration Database 328
The Scratch Database 328
Centralized Inventory Server 328
Database File Location and RAID 328
Segregation 328
Features 328
PowerShell Coding Standard
329
Default Parameters 329
Log File 329
Log Format 329
Comments 330
Display 330
Variable Naming Convention 330
Exception Handling 330
Chapter 15: Building SQL Server Inventory
333
SQL Server Inventory
333
Hosts
335
Chapter 16: SQL Server Installation
377
Installation Procedure and Template
377
SQL Server Installation Template 381
Standalone Installation Example
389
Cluster Installation Example
395
Summary
399
Chapter 17: Collecting SQL Server Performance and Host
Performance Data
401
SQL Server Performance Data Collection
401
SQL Server Host Performance Data Collection
408
Summary
417
Chapter 18: Monitoring SQL Server
419
Pinging SQL Server Hosts
420
Checking SQL Server–related Services on SQL Server Hosts
423
Checking Uptime of SQL Server Hosts
427
Monitoring Windows Event Logs
429
Monitoring SQL Server Error Log
433
Monitoring Blockings
439
Monitoring Deadlocks
444
Summary
449
Chapter 19: Monitoring Disk Space Usage, Database Files, and Backups
451
Monitoring Disk Space Usage
451
Monitoring Database Files
461
Monitoring Backups
468
Chapter 20: Defining Policies
475
Stored Procedure Naming Convention Policy
475
Auto_Close and Auto_Shrink Off Policy
480
Summary
485
Chapter 21: Generating Database Scripts
487
Scripting Databases
487
Scripting Schemas
489
Scripting User-Defined Data Types
491
Scripting Tables
494
Scripting User Views
496
Scripting Stored Procedures
498
Scripting Functions 500
Scripting XML Schemas
502
Scripting Users
503
Summary
506
Appendix A: cmdlets
507
cmdlets Related to Core Snap-ins
507
cmdlets Related to the PowerShell Management Snap-in
512
cmdlets Related to the Security Snap-in
519
cmdlets Related to the Utility Snap-in
520
I n t r o d u c t i o n
Welcome toSQL Server 2008 Administration with Windows PowerShell. This book is a nuts-and-bolts guide to creating Windows PowerShell scripts that can be used to administer every aspect of the SQL Server 2008 Database Engine. Using a very hands-on approach, this book guides you through the basics of Windows PowerShell, the available Windows PowerShell components that have been integrated into SQL Server 2008, and the actual administration tasks. By providing clear, well-structured examples,SQL
Server 2008 Administration with Windows PowerShellshows you how to construct effective and practical
solutions that can improve SQL Server administration and monitoring at your company.
SQL Server 2008 delivers a dynamic, smart, and productive data platform for all your data-related needs. SQL Server 2008 offers secure, reliable, and consistent performance. It is also very scalable and flexible, handling any form of data. It is well known in the technology world that SQL Server 2008 is not only a RDBMS, but also has built-in features such as Integration Services for ETL, Analysis Services for Business Intelligence, Reporting Services for report management, and more. This is why Microsoft SQL Server is a cut above all other database products.
Windows PowerShell 2.0 is the new extensible command-line interface shell and scripting language that provides an environment for interactive scripting and non-interactive scripted administration of local and remote computers. Because Windows PowerShell integrates with the Microsoft .NET Framework, we can take advantage of all the features of .NET as well. Windows PowerShell 2.0 helps system admin-istrators to automate and manage various aspects of the Windows environment. PowerShell 2.0 also has many new and useful features such as remoting, eventing, and many more. For these reasons, Windows PowerShell 2.0 stands above all the system administration products on the market.
This book brings together the best of both worlds — namely, the database world and the administra-tion world — to help you manage, automate, and control your environment. This book combines three technologies — SQL Server 2008, the .NET Framework, and Windows PowerShell 2.0 — and guides SQL Server database administrators in managing a server plant using Windows PowerShell 2.0.
We’ve provided a wide range of material in a tutorial-based book to get you over the learning curve of Windows PowerShell 2.0 and SQL Server 2008 database administration.
Who This Book Is For
Whether you are a SQL Server database administrator, a developer, or a systems administrator, at some point you probably have had to develop or administer the system or the database in your organization. It is also common for the people in these roles to wear each other’s hats in order to get things done.
If you are a systems administrator and would like to know more about SQL Server database adminis-tration, this book introduces you to the features in SQL Server 2008 and provides plenty of examples demonstrating how to manage SQL Server 2008 using Windows PowerShell 2.0.
This book is also appropriate for those who have some exposure to systems administration and SQL Server administration, or for those who want to expand their skill set to include administration.
What This Book Covers
This book covers the fundamentals of Windows PowerShell 2.0 cmdlets. It includes programming, script-ing, debuggscript-ing, and error handling in PowerShell. It covers all Windows administration related to SQL Server 2008 using Windows PowerShell 2.0.
It also introduces Windows Management Instrumentation (WMI) and explains how to write WMI scripts in Windows PowerShell to perform system and SQL Server 2008 administrative tasks.
This book also covers the WMI providers for SQL Server. These useful providers enable you to manage SQL Server services and network connectivity, and proactively monitor SQL Server events. You will also discover the new Eventing feature in Windows PowerShell 2.0.
Additionally, the new SQL Server 2008 support for Windows PowerShell is presented. It illustrates the SQL Server PowerShell provider and SQLSERVER: drive. You will also learn how to manage SQL Server objects, including the new policy objects.
One more important topic this book covers is using SQL Server Management Objects (SMO) to create databases and tables and perform backups and restores. The SMO scripts shown in this book are all written in Windows PowerShell 2.0.
This book also explains the need for SQL Server standards; and you will learn how to build a SQL Server inventory over an existing or new environment.
Finally, you will learn how to perform the various SQL Server administrative tasks on servers in the inventory, such as installation, monitoring, performance data collection, policy definition, backups, restores, database scripting, and more, using Windows PowerShell 2.0.
How This Book Is Structured
Windows PowerShell 2.0 is introduced in the first eight chapters. If you do not have any background in Windows PowerShell 2.0, these chapters are critical. They help you understand the basics of writing Windows PowerShell 2.0 scripts, and you will learn how to use the scripts to administer the overall operating system.
Chapter 1 covers installation of prerequisites, and installation and configuration of Windows PowerShell 2.0.
Chapters 5, 6, 7, and 8 cover the various systems administration features, including accessing file systems, registry information, variables, and Event logs. It also explains the Windows Management Instrumenta-tion (WMI) model and shows you how to use WMI to manage system resources.
Chapters 9 and 10 show you how to access the WMI providers for SQL Server. You will learn how to use the WMI Provider for Configuration Management to manage SQL Server services and network connec-tivity, and the WMI Provider for Server Events to manage SQL Server events. You will also discover the new Eventing feature in Windows PowerShell 2.0.
Chapters 11 and 12 take on the Windows PowerShell support that has been integrated into SQL Server 2008, namely, the SQLSERVER: drive. These two chapters will focus on the SQL and SQLPolicy folders separately.
Chapter 13 shows you how to write SQL Server Management Objects (SMO) programs in Windows PowerShell 2.0. This chapter covers various tasks such as creating a database and database objects, and backing up and restoring a database.
Chapters 14 and 15 provide you with ample examples of building a SQL Server tasks inventory over an existing or new environment, and how to define various standards. Standards include both SQL Server standards and Windows PowerShell standards.
The remaining chapters explain installation, data collection, monitoring, and how to create Windows PowerShell scripts to handle a wide range of SQL Server administrative tasks for servers in the inventory.
Chapter 16 illustrates the installation of SQL Server 2008. Chapter 17 covers tasks related to collecting SQL Server host and server performance data. Chapters 18 and 19 cover monitoring aspects of SQL Server 2008 administration. Chapter 20 defines policies to enforce SQL Server standards, and Chapter 21 generates various scripts at both the database level and the database object level.
What You Need to Use This Book
This book covers SQL Server 2008 administration with Windows PowerShell 2.0. In order to use this book, you need both a server-side component and client-side components:
❑ For the server-side component, you need SQL Server 2008 Developer or Enterprise or Standard edition.
❑ For client-side components, you need Windows PowerShell 2.0 CTP3. To install Windows PowerShell 2.0 CTP3, the operating system of your computer needs to be either Windows XP Service Pack 3, Windows 2003 Service Pack 2, Windows Vista Service Pack 1, or Windows Server 2008. You also need to pre-install the following components on your computer:
❑ Microsoft .NET Framework 2.0 or greater
❑ Windows Remote Management 2.0 CTP3 for Windows PowerShell remoting and back-ground jobs
All the scripts and codes in the book have been tested on SQL Server 2008 with .NET Framework 3.5 and Windows PowerShell 2.0 CTP3. We tested all the scripts on Windows XP, Windows Server 2008, and Windows Vista. Most of the scripts and code illustrated here work under Windows PowerShell 1.0 as well, although you may notice that the output of such scripts and codes differs slightly, and that remoting under Windows PowerShell 1.0 is not possible unless you use WMI objects.
In order to install Windows PowerShell 2.0 and Windows Remote Management, and to store all the scripts provided in the book, you need a minimum of 100MB of hard disk space.
Conventions
To help you get the most from the text and keep track of what’s happening, we’ve used a number of conventions throughout the book.
Notes, tips, hints, tricks, and asides to the current discussion are offset and placed in italics like this.
As for styles in the text:
❑ Wehighlightnew terms and important words when we introduce them.
❑ We show filenames, URLs, and code within the text like so:persistence.properties.
❑ We present code like this:
We use a monofont type with no highlighting for most code examples.
Source Code
As you work through the examples in this book, you may choose either to type in all the code manually or to use the source code files that accompany the book. All of the source code used in this book is available for download atwww.wrox.com. Once at the site, simply locate the book’s title (either by using the Search box or by using one of the title lists) and click the Download Code link on the book’s detail page to obtain all the source code for the book.
Because many books have similar titles, you may find it easiest to search by ISBN; this book’s ISBN is 978-0-470-47728-1.
Once you download the code, just decompress it with your favorite compression tool. Alternately, you can go to the main Wrox code download page atwww.wrox.com/dynamic/books/download.aspxto see the code available for this book and all other Wrox books.
Errata
another reader hours of frustration, and at the same time you will be helping us provide even higher quality information.
To find the errata page for this book, go towww.wrox.comand locate the title using the Search box or one of the title lists. Then, on the book details page, click the Book Errata link. On this page you can view all errata submitted for this book and posted by Wrox editors. A complete book list, including links to each book’s errata, is also available atwww.wrox.com/misc-pages/booklist.shtml.
If you don’t spot ‘‘your’’ error on the Book Errata page, go towww.wrox.com/contact/techsupport.
shtmland complete the form there to send us the error you have found. We’ll check the information and,
if appropriate, post a message to the book’s errata page and fix the problem in subsequent editions of the book.
p2p.wrox.com
For author and peer discussion, join the P2P forums atp2p.wrox.com. The forums are a Web-based system for you to post messages relating to Wrox books and related technologies and interact with other readers and technology users. The forums offer a subscription feature to e-mail you topics of interest of your choosing when new posts are made to the forums. Wrox authors, editors, other industry experts, and your fellow readers are present on these forums.
Athttp://p2p.wrox.comyou will find a number of different forums that will help you not only as you
read this book, but also as you develop your own applications. To join the forums, just follow these steps:
1.
Go top2p.wrox.comand click the Register link.2.
Read the terms of use and click Agree.3.
Enter the required information to join as well as any optional information you wish to pro-vide and click Submit.4.
You will receive an e-mail with information describing how to verify your account and com-plete the joining process.You can read messages in the forums without joining P2P but in order to post your own messages, you must join.
Once you join, you can post new messages and respond to messages other users post. You can read messages at any time on the Web. If you would like to have new messages from a particular forum e-mailed to you, click the Subscribe to this Forum icon by the forum name in the forum listing.
What Is Windows
PowerShell?
Windows PowerShell is the extensible command-line interface shell and scripting language that provides a command-line environment for interactive exploration and administration of computers. In addition, it provides developers with an opportunity to script these commands, enabling them to be automated, scheduled, and run multiple times.
This chapter covers the following topics:
❑ A brief overview of command-line interfaces
❑ Prerequisites for installing PowerShell
❑ Installing PowerShell 2.0 CTP3.
Command-Line Interfaces versus Graphical
User Interfaces
Before UNIX, Linux, and Windows surfaced in the information technology market, input media such as punched card and punched tape were used. All the input and instructions to the computer used command lines.
When UNIX and Linux were released, administrators started managing the operating system using command-line interfaces, which were also used by the day-to-day users and programmers to inter-act with the operating system.
Originally, when Microsoft released MS-DOS, it was not used as a shell. It was entirely a standalone operating system. The initial and original Microsoft Windows release was a graphical shell that sat on top of the MS-DOS operating system. Once Windows NT was introduced, this situation was reversed. MS-DOS became the shell in the graphical Windows operating system.
Graphical user interfaces (GUIs) were basically developed for users with less technical background who were looking for a friendly interface. Because graphical interfaces are limited to fewer functions, once you hit their limitations you will start relying on the command-line interface. For example, with a GUI, if you want to rename all the extensions of a group of files and suffix each file with the current day’s timestamp, it will take a while because you have to select and rename each file individually.
Therefore, command-line interfaces and their commands are very commonly used for administrative tasks and automation. They also help to consolidate functionality in batches, through MS-DOS batch files.
command.comwas used as the command-line user interface in early versions of Microsoft Windows.
cmd.exewas introduced in Windows NT.
When administrators reached the limit of command-line batch files, they started looking for a language that could do both command shell functions and programming. Microsoft introduced the Visual Basic scripting language, which helped administrators initially. However, there were limitations in VBScript as well. Administrators started relying on Windows Management Instrumentation (WMI) and COM objects introduced later by Microsoft for many other administrative functions.
The administrative command-line interface started becoming more complicated with internal DOS com-mands, external DOS comcom-mands, batch files, executables, VBScripts, WMI, and so forth.
It was with all of this in mind that Microsoft developed and introduced Windows PowerShell.
Prerequisites for Installing Windows
PowerShell 2.0
Windows PowerShell can be installed and run on Windows XP, Windows Vista, Windows Server 2003, and Windows Server 2008. Although Windows PowerShell is included as part of Windows Server 2008, it is not installed by default on Windows XP, Windows 2003, or Windows Vista. At the time of writing, Windows PowerShell 1.0 is visible as a feature in Windows Server 2008 that can be turned on.
Windows PowerShell 1.0 is also installed with Exchange Server 2007, System Center Operations Manager 2007, System Center Data Protection Manager V2, and System Center Virtual Machine Manager because they leverage Windows PowerShell to improve administrator control, efficiency, and productivity.
This book uses Windows PowerShell 2.0 CTP3. Before installing Windows PowerShell 2.0 CTP3, you should ensure that your system has the following software programs it requires:
❑ Windows XP Service Pack 3, Windows 2003 Service Pack 2, Windows Vista Service Pack 1, or Windows Server 2008
❑ Windows Remote Management 2.0 CTP3 for Windows PowerShell remoting and background jobs
❑ Microsoft .NET Framework 3.5 Service Pack 1 for Windows PowerShell Integrated Scripting Environment (ISE) and the Out-GridView cmdlet
If .NET Framework 2.0 is not installed on your computer, the error message shown in Figure 1-1 will pop up when you try to install Windows PowerShell 2.0 CTP3.
Figure 1-1
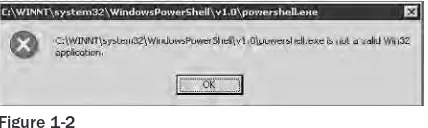
After installing the .NET Framework, if you continue to install on a non-standard operating system such as Windows Server 2000, Windows NT, and so on, you may get the error shown in Figure 1-2.
Figure 1-2
Although Figure 1-2 shows v1.0 in the title bar and file path, it is actually PowerShell 2.0 CTP3. Com-munity Technology Preview, also known as CTP3, is basically the bug fix that Microsoft relies on, adding new features based on feedback from the technology community. The folder may be changed to v2.0 once therelease to manufacturing (RTM)version is released.
In order to check the prerequisites for the PowerShell installation, we created a batch file to run all the necessary checks. Listing 1-1 shows the MS-DOS batch script,CheckPowershellPreqs.bat, which uses Windows Management Instrumentation Command-line (WMIC) to check the requirements before you install Windows PowerShell. WMIC enables you to access WMI information via the command line. In some respects, you can think of WMIC as an early prototype of PowerShell. However, WMIC can only output its results as text. It doesn’t return programming objects that can be further processed, as Window PowerShell does, and as you will see later.
Listing 1-1: CheckPowershellPreqs.bat
@ECHO Off
REM *****************************************************************
REM *Objective: TO check if the current windows version is *
REM * Compatible for PowerShell 2.0 and its pre-requisites*
REM *Created by: Yan and MAK *
REM *Created Date: 2008/09/01 *
Listing 1-1: CheckPowershellPreqs.bat(continued)
REM * *
REM *****************************************************************
SET OS_VERSION=
SET Service_Pack=
REM Find OS version
FOR /F "delims== tokens=2" %%i IN (’wmic os get Version /value’)
DO SET OS_VERSION=%%i
IF NOT DEFINED OS_VERSION (
ECHO WMIC is not installed on this system. GOTO :END_SCRIPT
)
REM Find service pack value
FOR /F "delims== tokens=2" %%i IN (’wmic os get ServicePackMajorVersion /value’)
DO SET Service_Pack=%%i
REM Windows XP
IF "%OS_VERSION%"=="5.1.2600" (
@IF "%Service_Pack%" LSS "3" (
ECHO %OS_NAME% Service Pack 3 is required GOTO :END_SCRIPT
)
GOTO :DOTNETFRAMEWORK_CHECK )
REM Windows Server 2003
IF "%OS_VERSION%"=="5.2.3790" (
@IF "%Service_Pack%" LSS "2" (
ECHO %OS_NAME% Service Pack 2 is required GOTO :END_SCRIPT
)
GOTO :DOTNETFRAMEWORK_CHECK )
REM Windows Vista
IF "%OS_VERSION%"=="6.0.6001" (
@IF "%Service_Pack%" LSS "1" (
ECHO %OS_NAME% Service Pack 1 is required GOTO :END_SCRIPT
)
GOTO :DOTNETFRAMEWORK_CHECK )
IF "%OS_VERSION%" GTR "5.2.3790" ( GOTO :DOTNETFRAMEWORK_CHECK )
ELSE (
Listing 1-1: CheckPowershellPreqs.bat(continued)
REM Check .NET framework :DOTNETFRAMEWORK_CHECK
wmic product where (caption like "Microsoft .NET Framework%%") get Version /value |
findstr "=[2-9]\.*" > nul
IF "%ERRORLEVEL%"=="1" (
ECHO .NET Framework 2.0 or greater is required GOTO :END_SCRIPT
)
REM Check Windows remote management :WINRMCHECK
wmic path Win32_service where caption="Windows Remote Management (WS-Management)" |
findstr /i "(WS-Management)" > nul
IF "%ERRORLEVEL%"==1 (
ECHO Windows Remote Management is required GOTO :END_SCRIPT
)
ECHO Your system meets the requirements
:END_SCRIPT
From a Windows command console, runCheckPowershellPreqs.batfrom the script directory
C:\DBAScripts. You should get a message similar to the one shown in Figure 1-3 if your system meets
the requirements for a PowerShell installation.
Figure 1-3
You may run into an error as follows on Windows Server 2003:
ERROR:
Code = 0x80041010
Description = Invalid class
Facility = WMI
This means that you need to install the WMI Windows Installer Provider in order for WMIC to work. To do so, open Control PanelAdd/Remove Programs. Select Add/Remove Windows Components. Double-click Management and Monitoring Tools. Select WMI Windows Installer Provider, and then click OK to install.
PowerShell 2.0 CPT3 is Service Pack 3, so when executingC:\DBAScripts\CheckPowershellPreqs.bat
it will complain that Service Pack 3 is required.
Installing the Microsoft .NET Framework
Windows PowerShell integrates with the .NET Framework and provides a shell environment to per-form administrative tasks. PowerShell exposes the .NET classes as built-in commands, and when these commands are executed they produce one or more structured objects as output.
Download the .NET Framework fromhttp://download.microsoft.comand install .NET Framework 2 or later. It is recommended that you use .NET 3.5, although all the code in this book works on .NET Framework 2 and later. In Chapter 11, you will see that an SQL Server 2008 installation installs .NET 3.5 by default.
Installing Windows Remote Management
Another prerequisite is to install Windows Remote Management (WinRM). WinRM is required for Win-dows PowerShell remoting and background jobs. You can download WinRM 2.0 CTP3 (also known as Ws-Management) fromhttps://connect.microsoft.com/WSMAN/Downloadsfor Windows Vista and Windows Server 2008. The installation procedures of the executableWindows6.0-KB950099-x86.msufor 32-bit andWindows6.0-KB950099-x64.msufor 64-bit are shown in Figure 1-4 and Figure 1-5.
Figure 1-4
Double-click onWindows6.0-KB950099-x86.msuif you are installing WinRM on a 32-bit Windows oper-ating system. Double-click onWindows6.0-KB950099-x64.msuif you are installing it on a 64-bit Windows operating system.
If you already have Windows PowerShell 1.0 installed on your machine, then you have to uninstall PowerShell 1.0 first and then install PowerShell 2.0 CTP3.
To uninstall Windows PowerShell 1.0, follow these steps:
1.
Click Start➪Run, typeappwiz.cpl, and then click OK.2.
Select the Show Updates check box (on the top in the middle).3.
In the list of currently installed programs, click Windows PowerShell(TM) 1.0, and then click Remove. If you don’t see Windows PowerShell(TM) 1.0, please look for Windows Hotfix 926139, 926140, or 926141.4.
Follow the instructions to remove Windows PowerShell(TM) 1.0.If you already have Windows PowerShell 2.0 CTP1 or CTP2, you have to uninstall them also. They appear as ‘‘Windows PowerShell V2 (TM)’’ in the program list.
In Windows 2008, Windows PowerShell 1.0 is made visible as a Windows feature. You can disable and uninstall thePowerShellfeature as described here:
1.
Click Start at the Windows taskbar.2.
Click Server ManagerFeaturesAdd Feature, and uncheck the Windows PowerShell check box.3.
Click Next to uninstall.Now that you have the acceptable operating system, the .NET Framework, and Windows Remote Man-agement, the next section provides the steps needed to actually install Windows PowerShell 2.0 CTP3.
Installing Windows PowerShell
To install Windows PowerShell on Windows XP or Windows 2003 systems, do the following:
1.
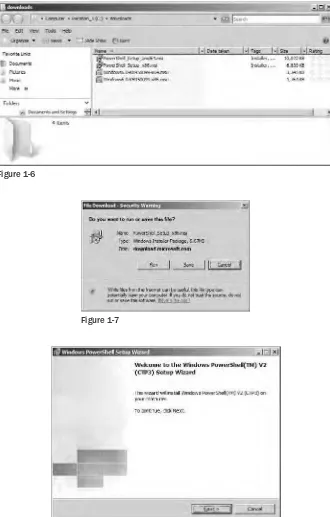
Download the Windows PowerShell 2.0 CTP3 installation file fromwww.Microsoft.com/downloads. The name of the installation file varies according to platform, operating system,
and language pack. Choose the appropriate version for your operating system. If you have a 64-bit Windows operating system, then please downloadPowerShell_Setup_amd64.msi, as shown in Figure 1-6. If you have a 32-bit Windows operating system, then please download
PowerShell_Setup_x86.msi, as shown in Figure 1-7.
2.
After downloading the appropriate version for your operating system, you will see the ini-tial screen of the installation wizard, similar to the one shown in Figure 1-8. Click Next.Figure 1-6
Figure 1-7
Figure 1-9
4.
It takes a few minutes to complete the install. As shown in Figure 1-10, click Install to begin the installation process. You will see the progress of the installation, as shown in Figure 1-11.Figure 1-10
5.
When installation is completed successfully, you will see a screen similar to the one shown in Figure 1-12. Click Finish.On 32-bit versions of Windows, Windows PowerShell is installed by default in the%SystemRoot%
\System32\WindowsPowerShell\v1.0directory.
On 64-bit versions of Windows, a 32-bit version of Windows PowerShell is installed in the
%SystemRoot%\SystemWow64\WindowsPowerShell\v1.0directory and a 64-bit version of Windows
Figure 1-11
Figure 1-12
This book covers Windows PowerShell 2.0 CTP3. The installation file replaces the executables in the v1.0 folder. The actual folders for Windows PowerShell may change to v2.0 when PowerShell 2.0 RTM is released.
Launching Windows PowerShell
Using the Command console
To launch Windows PowerShell using the command console, open the command console and then type
powershell, as shown in Figure 1-13.
Figure 1-13
Using All Programs
You can also click StartAll ProgramsWindows PowerShell V2 (CTP3), and then select and click Windows PowerShell V2 (CTP3), as shown in Figure 1-14.
Figure 1-14
You may also see Windows PowerShell ISE (CTP3) in the Windows Program menu. The Windows Power-Shell Integrated Scripting Environment (ISE) is a host application for Windows PowerPower-Shell. In Windows PowerShell ISE, you can run commands and write, test, and debug scripts in a single Windows graph-ical user interface. This book illustrates all Windows PowerShell-related cmdlets and scripts using a command-line interface. It does not illustrate PowerShell scripts using the ISE.
Once PowerShell is launched, you can see the command prompt. The prompt in the PowerShell com-mand window varies according to the operating system used.
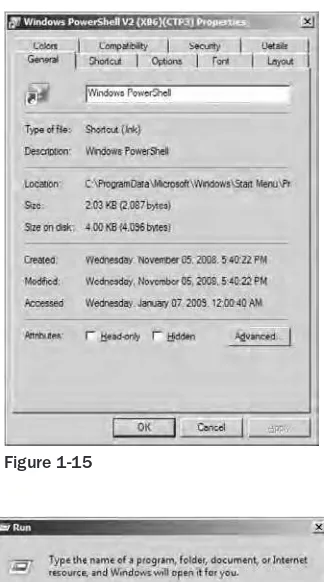
To be consistent with the PowerShell window title, you could update the shortcut, as illustrated in Figure 1-15. Right-click on the Windows PowerShell V2 (CTP3) shortcut, click Properties, and under the General tab, update the title to ‘‘Windows PowerShell’’ and click OK.
Using Start Run
Figure 1-15
Figure 1-16
Alternatively, you can also launch PowerShell by clicking StartRun and typingPowerShell.
Windows finds the PowerShell.exe executable from the environment PATH variable and then launches it.
This opens the PowerShell command console, shown in Figure 1-17.
If you are using 64-bit PowerShell, then you can launch PowerShell by clicking StartRun and typing the following:%systemroot%\SysWOW64\WindowsPowerShell\v1.0\PowerShell.exe.Then click OK, as shown in Figure 1-18.
Figure 1-18
This opens the PowerShell command console, as shown in Figure 1-19.
Figure 1-19
Summar y
This chapter discussed the prerequisites for Windows PowerShell, described how to install Windows PowerShell 2.0 CTP3, and showed various methods to launch PowerShell.
Windows PowerShell
Command Types, Snap-ins,
and cmdlets
Now that you’ve installed Windows PowerShell on your computer, I bet you can’t wait to start run-ning your own commands to unravel the power of Microsoft’s new command shell. This chapter introduces you to the new PowerShell commands, or cmdlets. It also introduces you to the collec-tions of cmdlets called snap-ins. By following all of the examples in this book, you will become comfortable working with the cmdlets, and you will even be able to tweak the output to your liking. First, however, this chapter gives you a quick-start on how to run PowerShell commands interactively.
This chapter covers the following topics:
❑ PowerShell command types
❑ PowerShell snap-ins
❑ Syntax of cmdlets
❑ Command chaining
❑ Getting help
❑ Filtering
❑ Sorting
PowerShell Command Types
When you launch a new PowerShell window, you are basically executing a smallPowerShell.exe
executable, which provides a command-line interface and issues instructions on how to make the func-tionality in the PowerShell Engine available.
Those instructions are written in .NET language and are available in the form of commands calledcmdlets
(pronounced ‘‘command lets’’). All the cmdlets, when executed, process the instructions and return an object, not just text.
The following four different command types are available in the PowerShell environment. Don’t panic. PowerShell understands and performs the different types of functions based on the type of commands that you execute.
❑ Native commands
❑ PowerShell cmdlets
❑ Shell functions
❑ Script commands
The following sections take a closer look at the differences between the different command types in PowerShell and how each can be used.
Native Commands
Native commands are external executables that the Windows operating system can run. For example,
notepad.exe,calc.exe, or even a batch file can be run from the PowerShell command-line interface.
The following example executes a Windows command shellcmd.exewith thesystem.inifile as a parameter, as shown in Figure 2-1:
cmd /c c:\windows\system.ini
Figure 2-1
Once this command is executed, PowerShell recognizes the executable file and passes the command to the operating system directly. The operating system basically opens the file using the default editor
Notepad.exe, as shown in the Figure 2-2.
If the default editor on your machine is notNotepad.exe, then the operating system opens this
Figure 2-2
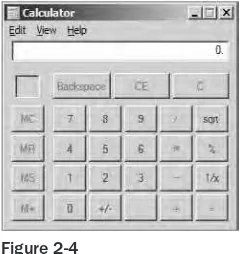
The next example will launch the Windows calculator. Enter the following command into PowerShell, as shown in Figure 2-3:
calc
Figure 2-3
Once this command is executed, PowerShell recognizes the executable file and passes the command to the operating system directly. The operating system launches the calculator, as shown in Figure 2-4.
Figure 2-4
You can also execute a batch file within the Windows PowerShell environment. Create a small batch file,
C:\Batch-Test.bat, that displays the current date and time, as shown here:
@Echo off
You can execute the batch file in the Windows PowerShell environment using.\or./, as shown in Figure 2-5:
.\Batch-Test.bat
Figure 2-5
PowerShell cmdlets
PowerShell cmdlets are compiled DLL files that are loaded into PowerShell at runtime. Anybody can write custom cmdlets using the PowerShell Software Development Kit (SDK). You can get more information on the PowerShell SDK fromhttp://msdn.microsoft.com/en-us/library/ms714469
(VS.85).aspx.
The cmdlets are constructed inverb-nounformat. The verb specifies the action that it is going to perform and the noun specifies the object being operated on. The noun is always singular (not plural), even if it retrieves or acts on multiple objects.
The following example is a cmdlet that gets all the processes running on the current host machine, as shown in Figure 2-6:
Get-Process
Figure 2-6
The termgetin this command is the verb, and the termprocessis the noun, so the cmdlet ‘‘gets’’ all the ‘‘processes’’ running on the current host.
We know this makes you wonder what other amazing cmdlets are available that you could use in your environment. If you would like to know the basic definitions of cmdlets and other elements of all the PowerShell commands in the current PowerShell environment, you can run the following cmdlet, as shown in Figure 2-7:
Get-Command
Figure 2-7
Figure 2-7 shows the names of the cmdlets and their definitions.
Windows PowerShell 2.0 CTP3 also has a feature called Tab Completion. With this feature, you don’t have to type the entire cmdlet every time it is used. You can just type the beginning of the cmdlet — for example,Get-PS, and press the Tab key. PowerShell will automatically complete your cmdlet with the cmdlet starting withGet-PS. If more than one cmdlet starts withGet-PS, then press the Tab key again and PowerShell will show you the next available cmdlet that starts withGet-PS. Continue pressing the Tab key until you see the cmdlet that you want to use.
For example, if you typeGet-PSand press the Tab key several times, all of the following cmdlets will appear, in ascending order:
❑ Get-PSBreakpoint
❑ Get-PSCallStack
❑ Get-PSDrive
❑ Get-PSProvider
❑ Get-PSSession
❑ Get-PSSessionConfiguration
❑ Get-PSSnapin
Shell Function Commands
Here is an example of how to create a simple function. This function lists all the files with the extension
.iniunder theC:\Windowsfolder. Shell functions are discussed in more detail in Chapter 4.
function list-ini {Get-ChildItem c:\windows\*.ini}
Once the preceding command is executed (see Figure 2-8), the functionlist-iniis created.
Figure 2-8
Thislist-inifunction can be called anywhere in the current session. Execute the function as shown in Figure 2-9. Once the function name is called, PowerShell recognizes it as a function code block and executes the code block defined in the actual functionlist-ini. The following command requests all the files with the extension.iniunderC:\Windowsfolder:
list-ini
Figure 2-9
Functions can be made persistently available in all the Windows PowerShell sessions by adding them to the PowerShell profile. You will see examples of the Windows PowerShell profile and its uses in detail in Chapter 5.
Script Commands
Script commands are a set of executable PowerShell cmdlets stored in a file with the.ps1extension.
You can create a simpleAdd-Num.ps1script using Notepad under the directoryC:\DBAScripts, as shown in the following example. This script file, shown in Figure 2-10, accepts two variables,$variable1and
$variable2, as parameters and stores the sum to a third variable,$variable3. It then displays the value
of$variable3.
# ==================================================
#
#
# AUTHOR: Yan and MAK
# DATE : 4/26/2008
#
# COMMENT: This script accepts two numbers, sums the # two numbers and display the result
#
# ==================================================
param (
[int] $variable1, [int] $variable2 )
$variable3=$variable1+$variable2;
$variable3
You can use any text editor to write a PowerShell Script file, not just Notepad.
Figure 2-10
Here, all the information that appears after the pound symbol (#) will be ignored by Windows PowerShell because that tells PowerShell that those are comments. Beginning with PowerShell 2.0 CTP3, you can use multi-line comments using<#and#>.
Because you created the PowerShell script Add-Num.ps1 underC:\DBAScripts, you have to navigate to the folder DBAScripts. The cmdletSet-Locationcan be used to move the location from the current folder to the DBAScripts folder, as shown in Figure 2-11.
Then the PowerShell scriptAdd-Num.ps1can be executed using.\or./, as shown in Figure 2-11.
Set-Location C:\DBAScripts .\add-num.ps1 100 200 ./add-num.ps1 10 200
Figure 2-11
Figure 2-12. By default, execution of any PowerShell script is restricted for security reasons, but you can use the cmdletset-executionpolicyto make it unrestricted.
Set-ExecutionPolicy Unrestricted
Figure 2-12
More PowerShell scripts and securities are shown in detail in later chapters.
Calling PowerShell cmdlets or Scripts from the Command
Shell
PowerShell functionality can be used from other shells such as command shell. ThePowerShell.exe
executable accepts numerous parameters, such as a console file or a command.
You can execute.ps1files by passing them as parameters to the PowerShell executable, as shown in Figures 2-13 and 2-14. Launch the command shell by running the following command from StartRun, as shown in Figure 2-13:
cmd.exe
At the command prompt, execute the following command as shown in Figure 2-14. This PowerShell.exe executable accepts the parameter name-commandand the parameter valueAdd-Num.ps1with parameters
100and400:
Figure 2-13
Figure 2-14
You can execute a PowerShell cmdlet directly from the command shell as shown here and in Figure 2-15:
PowerShell -command Get-Process
Figure 2-15
PowerShell Snap-ins
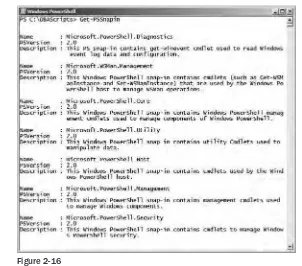
PowerShell cmdlets are contained in PowerShell snap-ins. PowerShellsnap-insare a group of Power-Shell cmdlets or providers that extend the functionality of the shell. When a snap-in is loaded into the PowerShell environment, the cmdlets and providers contained in it are registered with the shell.
By default, seven core snap-ins are loaded, and their corresponding cmdlets are available when Power-Shell is launched. Each core snap-ins has its own namespace:
❑ Core
❑ Management
❑ Security
❑ Utility
❑ Diagnostics
❑ WSMAN.Management
Execute the following PowerShell cmdlet to see all the snap-ins that are loaded into the current Power-Shell environment, as shown in Figure 2-16.
Get-PSSnapin
Figure 2-16
The following sections describe each of the snap-ins and their cmdlets. Most of the cmdlets listed here are described and demonstrated throughout the remaining chapters. The following section provides basic information about how to get all the cmdlets available in each snap-in.
You can also check Appendix A for more details about each cmdlet in each snap-in.
Core
The namespace of the Core snap-in is Microsoft.PowerShell.core. This snap-in contains cmdlets related to the PowerShell engine, such as aliases, environments, variables, and functions.
Here, two cmdlets are used. One isGet-Command, which provides the commands available in Power-Shell. The other isWhere-Object, which is used for filtering the result. The pipe (|)is used for command chaining. More about command chaining is explained later in this chapter.
Get-Command -commandtype cmdlet | Where-Object {$_.PSSnapin -match "core"}
Figure 2-17
Host
The namespace of the Host snap-in is Microsoft.PowerShell.Host. This snap-in contains cmdlets related to hosting, such asstart-transcriptandstop-transcript.
You can find all the cmdlets available in the namespace Microsoft.PowerShell.host using the following cmdlet, shown in Figure 2-18:
Get-Command -commandtype cmdlet | Where-Object {$_.PSSnapin -match "host"}
Figure 2-18
PowerShell.Management
You can find all the cmdlets available in the namespace Microsoft.PowerShell.Management using the following cmdlet, shown in Figure 2-19:
Get-Command –commandtype cmdlet | Where-Object {$_.PSSnapin -match "PowerShell.Management"}
Figure 2-19
Security
The namespace of the Security snap-in is Microsoft.PowerShell.Security. This snap-in contains cmdlets related to PowerShell security, such asGet-AclandSet-ExecutionPolicy.
You can find all the cmdlets available in the namespace Microsoft.PowerShell.Security using the follow-ing cmdlet:
Get-Command -commandtype cmdlet | Where-Object {$_.PSSnapin -match "Security"}
Figure 2-20 shows some of the commonly used cmdlets, including their descriptions, related to the Secu-rity snap-in.
Utility
The namespace of the Utility snap-in is Microsoft.PowerShell.Utility. This snap-in contains cmdlets that can retrieve and manipulate data, such aswrite-host,Format-List, and so on.
You can find all the cmdlets available in the namespace Microsoft.PowerShell.Utility using the following cmdlet:
Get-Command -commandtype cmdlet | Where-Object {$_.PSSnapin -match "Utility"}
Figure 2-21 shows some of the commonly used cmdlets, including their descriptions, related to the Utility snap-in.
Figure 2-21
Diagnostics
The namespace of the Diagnostic snap-in is Microsoft.PowerShell.Diagnostics. This snap-in contains cmdlets related to performance counters and event logs.
You can find all the cmdlets available in the namespace Microsoft.PowerShell.Diagnostics using the following cmdlet, shown in Figure 2-22:
Get-Command -commandtype cmdlet | Where-Object {$_.PSSnapin -match "Diagnostics"}
WsMan.Management
The namespace of the WsMAN.Management snap-in is Microsoft.WsMan.Management. This snap-in contains cmdlets related to WsMan.
You can find all the cmdlets available in the namespace Microsoft.WsMan.Management using the follow-ing cmdlet, shown in Figure 2-23:
Get-Command -commandtype cmdlet | Where-Object {$_.PSSnapin -match "WsMan.Management"}
Figure 2-23
cmdlets related to WsManagement are very new and currently there is little documentation for Power-Shell 2.0 CTP3. This should change, however, after its official release. Such documentation, when it becomes available, will help you understand more about each of the cmdlets and enable you to explore their functionality and usage.
PowerShell cmdlet Syntax
As stated earlier in this chapter, cmdlets are constructed inverb-nounformat. The verb specifies the action to be performed and the noun specifies the object being operated on. Recall that the noun is always singular, even if it retrieves or acts on multiple objects or data.
Two examples are the cmdletGet-processandWrite-host.
Most cmdlets accept parameters. All parameters names are prefixed with a hyphen, and all the parameter values are prefixed with a blank space after the parameter name. There are two types of parameters:
named parametersandpositional parameters.
Named Parameter
This is the easiest and most common way to use parameters. Basically, you specify the name of the parameter followed by its value — for example,Get-Process –Name smss:
Get-processis the cmdlet,Nameis the parameter name, andsmssis the parameter value.
Parameter values can be substituted with wildcards as well, as shown here and in Figure 2-24:
Get-Process –Name s*
Figure 2-24
Positional Parameter
PowerShell allows us to omit the parameter name completely for certain parameters. In the previous example,nameis a positional parameter in the first position; therefore, it can be called without the param-eter name (see Figure 2-25), as shown here:
Get-Process s*
Figure 2-25
You can easily find all the positional parameter of a PowerShell cmdlet by executing the following cmdlet (see Figure 2-26):
Figure 2-26
Figure 2-26 shows the end of the output. As you can see, the value of thePosition?property of theName
parameter is1, soNameis a positional parameter at position 1.
Windows PowerShell supports the following six common parameters on all the cmdlets:
❑ Debug
❑ ErrorAction
❑ ErrorVariable
❑ OutputBuffer
❑ OutputVariable
❑ Verbose
Two other commonly used parameters available in certain cmdlets provide options for ‘‘what if’’ scenar-ios and choosing confirmation (Yes/No):
❑ WhatIf
❑ Confirm
For more information regarding the common parameters, run the following command:
Get-Help about_CommonParameters
Command Chaining
As in UNIX and Linux, PowerShell cmdlets can be chained together using a pipeline.Command chaining
is having the output of one command feed into, or act as the input to, another command. This was shown earlier in Figure 2-23.
In the following command example, the output ofGet-Processis fed to the cmdletWhere-Object. The output of the cmdletWhere-Objectis fed to the cmdletSort-Object.
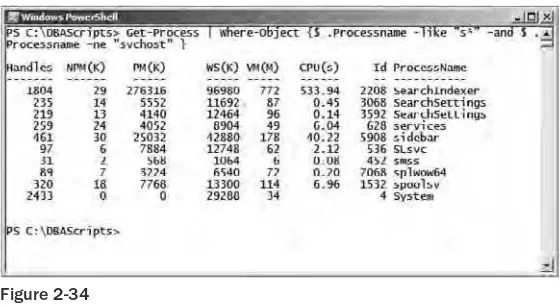
As you already know, the cmdletGet-Processshows all the processes on the current local machine. When the output of theGet-Processis fed toWhere-Objectusing command chaining, theWhere-Object
"rundll32". Then the filtered output ofWhere-Objectis passed toSort-Object, which sorts the database based on theObject IDvalue in descending order (see Figure 2-27).
Get-Process | Where-Object {$_.Processname -eq "rundll32"} | Sort-Object ID –desc
Figure 2-27
Hence, the output shown in Figure 2-27 is the result of command chaining. You will be using command chaining throughout this book.
Getting Help
Microsoft documented all the cmdlets and that documentation can be retrieved using the cmdletGet
-Help. This documentation is similar to using themancommand in the UNIX and Linux environment. In addition, certain parameters can be used withGet-Helpto get detailed information and examples.
The cmdletGet-Helpcan be used in three different ways:
❑ Get-Helpwith no parameter:
Get-Help Get-Process
This provides the minimal information needed to understand and use the cmdlet. The following information is returned when executed (see Figure 2-28):
❑ Name
❑ Synopsis
❑ Detailed Description
❑ Related Links
❑ Remarks
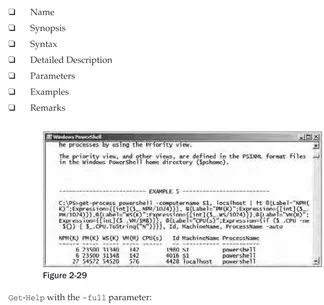
❑ Get-Helpwith the–detailedparameter:
Figure 2-28
This returns the following information when executed (see Figure 2-29):
❑ Name
❑ Synopsis
❑ Syntax
❑ Detailed Description
❑ Parameters
❑ Examples
❑ Remarks
Figure 2-29
❑ Get-Helpwith the–fullparameter:
Get-Help Get-Process –full
This provides all of the following (see Figure 2-30):
❑ Name