Workbench External Connection Add-In
Release 17.0 ANSYS, Inc.
January 2016 Southpointe
2600 ANSYS Drive
Canonsburg, PA 15317 ANSYS, Inc. is
certified to ISO 9001:2008. [email protected]
Copyright and Trademark Information
© 2015 SAS IP, Inc. All rights reserved. Unauthorized use, distribution or duplication is prohibited.
ANSYS, ANSYS Workbench, Ansoft, AUTODYN, EKM, Engineering Knowledge Manager, CFX, FLUENT, HFSS, AIM and any and all ANSYS, Inc. brand, product, service and feature names, logos and slogans are registered trademarks or trademarks of ANSYS, Inc. or its subsidiaries in the United States or other countries. ICEM CFD is a trademark used by ANSYS, Inc. under license. CFX is a trademark of Sony Corporation in Japan. All other brand, product, service and feature names or trademarks are the property of their respective owners.
Disclaimer Notice
THIS ANSYS SOFTWARE PRODUCT AND PROGRAM DOCUMENTATION INCLUDE TRADE SECRETS AND ARE CONFID-ENTIAL AND PROPRIETARY PRODUCTS OF ANSYS, INC., ITS SUBSIDIARIES, OR LICENSORS. The software products and documentation are furnished by ANSYS, Inc., its subsidiaries, or affiliates under a software license agreement that contains provisions concerning non-disclosure, copying, length and nature of use, compliance with exporting laws, warranties, disclaimers, limitations of liability, and remedies, and other provisions. The software products and documentation may be used, disclosed, transferred, or copied only in accordance with the terms and conditions of that software license agreement.
ANSYS, Inc. is certified to ISO 9001:2008.
U.S. Government Rights
For U.S. Government users, except as specifically granted by the ANSYS, Inc. software license agreement, the use, duplication, or disclosure by the United States Government is subject to restrictions stated in the ANSYS, Inc. software license agreement and FAR 12.212 (for non-DOD licenses).
Third-Party Software
See the legal information in the product help files for the complete Legal Notice for ANSYS proprietary software and third-party software. If you are unable to access the Legal Notice, Contact ANSYS, Inc.
Table of Contents
Introduction to the External Connection Add-In... 1
Integrating an External Application ... 4
External Process Responsibilities ... 5
Customizing the Workbench User Interface ... 5
Creating Custom External Connection Systems and Components... 7
General Workflow ... 7
Creating an External Connection Directory ... 7
Creating System Definition Files ... 8
Creating Component Configuration Files ... 8
Defining Inputs and Outputs ... 9
Creating Update Instructions for Producing or Consuming Data ... 9
Upstream Data Consumption (Input) ... 10
Data Generation (Output) ... 10
Convenience Queries ... 10
Configuration XML File Details... 11
Configuration Node ... 11
Instructions Node ... 11
Format ... 12
Attributes ... 12
GuiOperations Node ... 14
Format ... 14
Attributes ... 14
Properties Node ... 16
Format ... 17
Attributes ... 17
External Connection Examples... 21
Custom, Lightweight, External Application Integration ... 21
File Structure ... 22
Component Configuration XML File ... 22
User Interface Button Definition ... 23
File Structure ... 23
User Interface Configuration XML File ... 24
Instruction File ... 24
Mesh Transfer System ... 24
File Structure ... 25
System Definition XML File ... 25
Component Configuration File ... 25
Update Instruction ... 26
Material Transfer ... 26
File Structure ... 27
System Definition XML File ... 27
Component Configuration File ... 28
Update Instruction ... 28
Material File ... 28
Custom Transfer System ... 29
File Structure ... 29
Producer System Definition XML File ... 30
Producer Component Configuration File ... 30
Producer Update Instruction ... 31
Consumer Component Configuration File ... 31
Consumer Update Instruction ... 31
A. Component Input and Output Tables ... 33
B. ANSYS Workbench Internally Defined System Template and Component Names ... 95
C. Data Transfer Types ... 113
D. Addin Data Types and Data Transfer Formats ... 119
Introduction to the External Connection Add-In
The External Connection add-in enables you to integrate custom, lightweight, external applications and processes into the ANSYS Workbench Project Schematic workflow. Features exposed by the External Connection also enable you to perform automation and customization activities:
• Define user interface elements (such as buttons in the Workbench Toolbar or entries in custom menus) and create the scripts that they run.
• Create new systems to facilitate interaction with the Workbench Project Schematic.
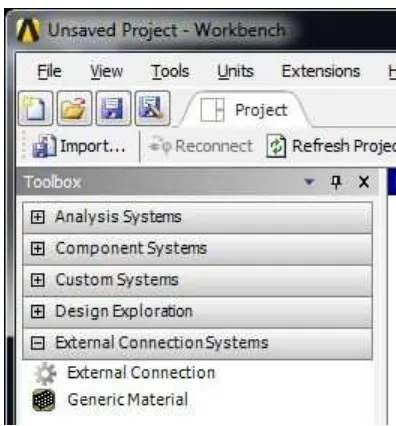
The External Connection add-in provides an External Connection system in the External Connection Systems toolbox. The system contains a single External Connection component that acts as a proxy for the external application.
Figure 1: External Connection System Cell in Toolbox
Figure 2: Read Configuration Menu
In the figure that follows, the External Connection reads the Configuration file SquaresConfig.xml, which provides integration details for an external application that calculates square values that are then displayed in the System Parameters. See Custom, Lightweight, External Application Integration (p. 21)
for more details.
Figure 3: Squares Example Schematic View
The following figure shows an External Connection that adds a button to the toolbar. See User Interface Button Definition (p. 23) for more details.
Figure 4: Button Definition Example
Figure 5: End-to-End Mesh Transfer Between Mesh, Mesher, and Fluent Setup
The following sections describe how you can use the ANSYS Workbench External Connection add-in within an ANSYS Workbench workflow.
Integrating an External Application
Customizing the Workbench User Interface
Integrating an External Application
The default External Connection add-in provides a single-component External Connection system in the External Connection Systems toolbox. This system acts as a proxy for the external application, enabling the external application to define and expose input and output parameters within the Work-bench Schematic window. You can manipulate these External Connection-defined parameters in the same way as standard Workbench parameters—for example, in terms of design point creation, update, and state. Specifically, the External Connection add-in enables you to use the Design Exploration applic-ation’s capabilities with any external application.
Every External Connection system exposes a Read Configuration user interface operation as a component context menu. This user interface operation’s underlying command reads a Component Configuration XML file that contains all the information that the external process wants to provide to Workbench (see
Configuration XML File Details (p. 11) for more information). At a minimum, the configuration file contains the following elements:
• An operating system executable or a Python script to be executed during the component Update command. Python scripts execute within the Workbench Python interpreter; as a result, scripts have full access to the scriptable Workbench API (Using Journals and Scripts in the Workbench User's Guide).
External Connection reads and stores all the information defined within the Component Configuration file. You can access the stored configuration information through the Edit Configuration user interface operation on the external connection component’s context menu. Only infrastructure/integration changes within the external application should result in configuration file changes; otherwise, users should not modify loaded configuration settings.
When you invoke an Update on the External Connection component, the add-in:
1. Writes the current input parameter values to the file specified in the Component Configuration file.
2. Launches the external application.
Upon the completion of the external application, the add-in:
1. Verifies successful execution (and sends an error message if it was not successful).
2. Reads the current output parameter values provided by the external application in the file location specified in the Component Configuration file.
After you read a Component Configuration file into an External Connection component, Workbench disables the Read Configuration user interface operation. The Reset user interface operation, also a context menu operation on an External Connection component, discards the imported configuration information. Workbench re-enables the Read Configuration user interface operation upon Reset as you must load a new Component Configuration file to proceed.
External Process Responsibilities
An external process must, at minimum:
1. Provide a configuration file that contains two elements:
• The input/output parameter processing definitions
• The update script or the name of an operating system executable file.
2. Read the input parameters from the input file.
3. Execute a solve/update of the external process.
4. Write the computed output parameter values to the output file.
Customizing the Workbench User Interface
You can enrich the external connection functionality by defining custom toolbar and menu entries within the Workbench user interface. At add-in load time, Workbench reads in a user-interface config-uration file, independent of any defined Component Configconfig-uration files, from either an installation-specific or user-installation-specific location. A user interface-based configuration file located in the installation area results in Workbench exposing additional custom entries for every user who accesses the installed ANSYS Workbench application. On the other hand, a file located in the user-specific area will result in additional custom entries only appearing for that specific user. In either case,the content of the user-specific custom files takes precedence over the custom installation files. If user interface configuration files exist in both
locations, workbench first examines and loads the user-specific entries and then processes installation entries (ignoring duplicates).
The custom User Interface configuration file format shares the same syntax as the Component Config-uration files used with External Connection components. However, only the user interface operation section and elements remain relevant. If you provide content from other sections, Workbench will ignore it (see Configuration XML File Details (p. 11) for element descriptions and examples).
1. You must place custom installation files in the ExternalConnection directory under v170/Addins
(for example C:\Program Files\Ansys Inc\v170\Addins\ExternalConnection). The user-specific custom file location depends upon the operating system:
• For Windows machines, create a directory named ExternalConnection under %APPDATA%\An-sys\v170.
• For Linux machines, create a directory named ExternalConnection under $HOME/.config/An-sys/v170.
2. You must create a directory named Customization under ExternalConnection folder to use the custom user interface functionality within the External Connection add-in.
3. You must name your custom user interface configuration file (which contains the information about the custom user interface entries) CustomToolBarConfiguration.xml and place it under the new Customiz-ation folder.
4. If your custom user interface entries use images or scripts (as defined in your user interface configuration file), you require folders named Images and Scripts under the Customization directory.
The custom entries defined within the user interface configuration file invoke either in-line C# code snippets or python script files. Typically, External Connection users define python script files as they have full access to the Workbench Scripting APIs. You can use a combination of custom user interface entries and scripts to support process automation, wizard-like dialog boxes, and custom lightweight vertical applications.
Note
Toolbar buttons may not appear in Workbench by default. If your External Connection-defined user interface entry does not appear, select the corresponding Toolbar group menu entry from the View>Toolbars menu.
Creating Custom External Connection Systems and Components
You can define custom External Connection-based systems and components. This functionality helps deliver features previously available only through the ANSYS Workbench SDK in a more user-friendly, less technical fashion.
This chapter discusses how you can create the various files required to expose custom External Connec-tion systems and components. The following topics are covered:
General Workflow
Creating an External Connection Directory Creating System Definition Files
Creating Component Configuration Files
General Workflow
The general workflow for creating a custom External Connection System includes:
1. Create a directory for the External Connection files.
2. Create a System Definition file.
3. Create any necessary Component Configuration XML files. The files optionally can contain: Python scripts
•
• Operating system executables • System and component images.
4. Add the files to the appropriate installation directories.
5. Manipulate External Connection system cells within Workbench to add them to your workflow.
Creating an External Connection Directory
All the files for a single system should reside in the same directory; this directory should contain at least the System Definition XML file and the Component Configuration XML files. Optionally, the directory can contain:
• Python scripts
• Operating system executables • System and component images.
For example, a directory C:\Program Files\Ansys Inc\v170\Addins\ExternalConnec-tion\SystemDefinitions might contain the following files:
\MySystem
\MySystem\MySystem.xml \MySystem\MyComponent.xml \MySystem\update.py
Creating System Definition Files
The System Definition file contains information to create an ANSYS Workbench system designed for a particular simulation objective. All analyses performed within Workbench begin by referencing a system template. This XML file describes the system and declares all components contained by the system.
System Definition files must specify, at a minimum:
• The system name
• The component name and Input Type for a component. The Input Type can be empty.
At the System level, you can optionally specify:
• Display text • Abbreviation • Image name • Toolbox group
At the Component level, you can optionally specify:
• Display text • Image name
At the Input/Output level, you can optionally specify a Data Type.
The following is an example of the basic structure of a System Definition file:
<System name="system_name"> <Components>
<Component name="component_name"> <Inputs>
<Input/> </Inputs> <Component> </Components> </System>
Creating Component Configuration Files
Component Configuration files contain both parameter and instructional information, including key commands associated with a specific component. A Component Configuration file follows the same format and delivers the same functionality as the Configuration files discussed in Integrating an External Application (p. 4).
Components within Workbench stay in an Edit Required state (displaying the question mark icon) until the user selects a Component Configuration file using the Read Configuration component’s context menu.
Figure 6: Component File with Read Configuration Menu Exposed
Defining Inputs and Outputs
Workbench Schematic connections serve as visual representations of data flow between components. These connections depend on input and output coordination. Workbench can establish connections only if an upstream (providing) component exposes outputs whose types also match the inputs for a downstream (consuming) component. These input and output specifications must be made within the Component nodes of the System Definition file. At a minimum, a component should always specify an empty input (<Input/>).
Certain Workbench types require the use of the dataType attribute. For example, the Mesh component uses dataType to determine which mesh file format to output (for example, Fluent).
In the following example, the FluentMesh data type value instructs an upstream mesh component to output the Fluent mesh file format (.msh).
This example defines the inputs and outputs for a component within a Fluent meshing workflow:
<Component name="Mesher" displayText="Mesher" imageName="GenericMesh_cell"> <Inputs>
<Input/>
<Input dataType="FluentMesh">MeshingMesh</Input> </Inputs>
<Outputs>
<Output dataType="FluentMesh">SimulationGeneratedMesh</Output> </Outputs>
<component/>
For a list of supported transfer types and their corresponding transfer properties, see Table 172: Data Transfer Types and Properties (p. 113).
For a list of supported datatype strings, see Appendix D (p. 119).
Creating Update Instructions for Producing or Consuming Data
If any component produces or consumes data, you must supply an Update routine that processes input and output types as declared by the system definition file. For a table of supported component inputs and outputs, see the Component Input and Outputs Table (p. 33) in Appendix B.
Upstream Data Consumption (Input)
Typically, components need to implement complex source handling logic, connection tracking routines, and a refresh procedure in order to consume data. However, the External Connection Add-in handles all of these actions. It obtains upstream data and stores it in a dictionary accessible during the component Update. The component can obtain this data by calling External Connection-exposed convenience
queries (p. 10).
Data Generation (Output)
Components that produce output data (for example, declare output types in the system definition file) must ensure that their custom Update routine assigns output data. The External Connection Add-in prepares empty data objects representing component outputs; the user must only set the correct transfer properties that downstream consumers will interrogate. Refer to Table 172: Data Transfer Types and Properties (p. 113) to determine which properties you must set. For example, a material transfer to a downstream Engineering Data component must set the DataReference TransferFile property on a MatML31 data object to the file reference of a registered matml-formatted XML file–all completed during the Update routine.
Convenience Queries
Convenience queries are Python queries that provide simple access to component-stored input and output data. The three types of convenience queries are:
• GetInputData
Returns a Dictionary containing input-type keys and data-containing property-based values. For example:
Dictionary<string, Dictionary<string, object>>> upstreamData = GetInputData(container); Dictionary<string, object> meshData = upstreamData[“MeshingMesh”];
DataReference meshFile = (DataReference)meshData[“TransferFile”];
• GetInputDataByType
Returns a Dictionary<string,object> containing upstream data for a given type. For example:
Dictionary<string, object> geometryData = GetInputDataByType(container, “Geometry”); DataReference geomFile = (DataReference)geometryData[“GeometryFileReferene”];
DataReferenceSet auxFiles = (DataReferenceSet)geometryData[“AuxiliaryFiles”];
• GetOutputData
Returns a Dictionary<string, DataReference> holding the component’s output types. For example:
Dictionary<string, DataReference> outputs = GetOutputData(container); DataReference meshOutput = outputs[“SimulationGeneratedMesh”];
Configuration XML File Details
The Configuration XML file contains an <Instructions> XML node where you define the information needed for parameter initialization and component update. In addition to the instructions, you can define the following elements in the configuration file:
• User interface operations that execute from a component’s context menu or from a custom toolbar or menu entry. Each user interface operation can either define inline C# code or specify a Python script.
• One or more set of data entities with properties. You can access these properties from the Python scripts invoked for update or custom user interface operations.
Configuration XML files are used for both the External Connection component and user interface con-figuration files. Details on the concon-figuration file are provided in the following sections.
Configuration Node
The <Configuration> node contains the <Instructions>,<GUIOperations>, and <Proper-ties> nodes.
<Configuration> </Configuration>
The <Configuration> node enables you to specify the following optional attributes:
• SystemName - The user-visible string that is assigned to the system.
• CellName - The user-visible string that is assigned to the cell.
• Version - The version associated with the configuration file.
• ShowEditConfiguration - Specifies whether the user can view and modify the entries provided in the configuration file.
Instructions Node
The global <Instructions> XML node contains all the information related to initialization (including parameters definition) and update. A Working Directory is defined inside the<Instructions> node as follows:
<Instructions WorkingDirectory="[Directory Name]"> </Instructions>
The <Instructions> node enables you to specify the following optional attribute:
point). The Working Directory is also used to search for files defined in other sections of the configuration file if a full path to those files is not provided.
Note
To ensure project portability, the External Connection add-in does not use the working dir-ectory after you save the Workbench project. When the project is saved, External Connection copies the Configuration file and all external files (scripts, parameter files, and so on) to which the Configuration file refers into a unique directory inside the project directory. The unique directory corresponds to the system from where you invoked the Read Configuration action (for example,project_files/dpx/Ex/Ext, where dpx is the active design point). This directory becomes the working directory for the saved project. Because the project directory now contains all the Configuration-related files, you can archive the project and then re-open it even when the external files are not accessible.
Format
The <Instructions> node has the following format:
<Instruction Type="[Instruction Type]"> <Name>[Plug-In Name]</Name>
<ExePath>[Executable Path]</ExePath> <ErrorFile>[Error File]</ErrorFile> <CheckOnError>[Error String]</CheckOnError> <Args>[Args]</Args>
<Script>[Script]</Script>
<InterruptScript>[Interrupt Script]</InterruptScript> <StopScript>[Stop Script]</StopScript>
<ParameterParsingRules>
<[Node Name] Name="[Parameter Name]" Type="[Type]"> <[Rule Name]Type="[Rule Type]">[Value]</[Rule Name]> </[Node Name]>
</ParameterParsingRules> </Instruction>
Attributes
The <Instructions> node has the following attributes:
• [Instruction Type] - The type that determines where the instruction will be executed.
Init - The parameter will be executed when the configuration is read.
Update - The parameter will be executed when the project is updated.
• [Plug-In Name] - The user-defined name of the generic plug-in. This name must be unique throughout the instruction file. It defines a way for the Workbench environment to identify this instance of the generic plug-in, because it is possible to have several instances (several third party applications or codes) of the third party plug-in in the process sequence.
• [Executable Path] - The location of the executable file with which the third-party plug-in will interact. This can be either the full path or the relative path of the executable with respect to the Working Directory for the instruction file.
• [Error File] - A file used to communicate that the execution of the external application was not suc-cessful. The error file needs to be removed by the external application upon completion. If still present,
through the attribute CheckOnError (see below). A generic message is displayed if CheckOnError is not specified.
• [Error String] - If an error file is specified, its content will be scanned for lines that contain the specified error string. All lines that contain the string will be displayed as error messages (with the error string stripped from the message). An error string named file will cause the whole content of the file to be displayed.
• [Args] - The command line arguments passed to the executable when run.
• [Script] - The Python script to be interpreted within the Workbench framework on execution of this in-struction if the ExePath is not defined. The Python script has access to the following variables:
– container - A string that can be passed to any command or query that requires a data container reference parameter.
– configurationObject - The configuration object can be used to access some of the information specified in the configuration file (for example, Working Directory or error file). The query GetEnti-tyProperties(Entity=configurationObject) returns a dictionary that contains all the available configuration information.
• [Interrupt Script] - An optional Python script that is invoked when the computation is interrupted. In Workbench terminology, the Interrupt operation closes the external application cleanly, allowing access to data. The Interrupt operation is visible only if the Interrupt script is provided.
• [Stop Script] - An optional Python script that is invoked when the computation is stopped. In Workbench terminology, the Stop operation abruptly closes the external application, possibly resulting in the loss of data. The Stop operation is visible only if the Stop script is provided. The same script can be used for Stop and Interrupt. Both scripts have access to the same information (strings container and configura-tionObject) that is passed to the update script.
• [Node Name] - A name given to the XML node that defines the parsing information for a single parameter. This name does not have to be unique but must adhere to the naming rules for XML nodes (for example, no spaces or special characters).
• [Parameter Name] - A unique name that represents a single parameter in the Workbench environment. This is the name that will be used to identify the parameter throughout the user interface.
• [Type] - The general type of the parameter. It must be one of two possible values:
– Input - The parameter will be treated as an input parameter, exactly as input parameters are handled in the Workbench environment.
– Output - The parameter will be treated as an output or response parameter in the Workbench environ-ment. When chaining generic plug-ins together, each instance of the generic plug-in can contain input and output parameters.
• [Rule Name] - A name given to the XML node that represents a single parsing rule for the parameter defined by the rule's parent node. This name does not have to be unique, but must adhere to the naming rules for XML nodes (for example, no spaces or special characters). Multiple rules can (and in most cases must) be defined for each parameter. The only restriction is that only one rule of each type (detailed below) can exist for each parameter.
• [Rule Type] - The type of the defined rule. This can be one of the following values:
– File - The file rule defines the text file that contains the parameter value. This file can be the full path to the file, or the relative path to the file with respect to the Working Directory. Files containing Input
type parameters must exist when reading the configuration file.
– StartLine - The line number in the text file that the code will begin parsing. For example, if the first 500 lines of a file contain only comments, begin parsing the file at line 501 to avoid wasting system re-sources. The start line is 1 based; therefore, a value of 0 or 1 will be treated in the same way.
– PreString - The text that immediately precedes the actual parameter value in the file. For example, if the file defines a parameter as "Cf = 12.555" the PreString for the parameter would be "Cf =". This text does not need to include any white space immediately preceding the parameter value.
– DataType - The type of data that represents the parameter. The DataType must be one of the following values.
1. float - The value of the parameter is a floating point (decimal) number. This is used for continuous variables.
2. double - The value of the parameter is a double.
3. quantity - The value of the parameter is a quantity containing a numeric value with units in the form value [unit] (for example,“20 [m s^-1]”).
– SkipOccurrences - The number of PreString occurrences to skip before parsing begins.
• [Value] - The value of the rule. No quotes are needed to delimit this value, as per the XML parsing rules. For example, a SkipOccurrences node would look like
<Rule Type="SkipOccurrences">3 </Rule>
where "3" is the [Value] for the rule, signifying that 3 lines should be skipped in the file before searching for the parameter.
GuiOperations Node
You can add custom user interface operations to the context menu of an External Connection component. You can also add custom toolbar buttons or entries in a custom menu. These custom operations support script or C# code definition to execute upon operation invocation.
<GuiOperations> </GuiOperations>
Format
The <GuiOperations> node has the following format:
<GuiOperation Name="[Operation Name]" Priority="[Priority]" SourceType="[SourceType]" Type="[Type]" Entry="[Entry]" ScriptFile="[Script]" Image="[Image]" Tooltip="[Tooltip]"> <Code>[Code]</Code>
</GuiOperation>
Attributes
The <GuiOperations> node has the following attributes:
• [Priority] - The weighted value determining the location within the context menu, the toolbar or the menu where the user interface operation is defined.
• [SourceType] - The type of code being used to define the response behavior for operation execution.
– CSharp - The code will be written in C#.
– Python - The code will be written in Python.
• [Type] - The type specifies where the user interface operation should be placed in the user interface. The allowed types are:
– ContextMenuEntry - This is the default type and should be specified in order to define user interface operations that are shown upon Right Mouse Button selection of a component in an External Connection system.ContextMenu should NOT be specified for operations defined in configuration files located in the installation area or in the user-specific area since it is not possible to associate them with a specific cell.
– ToolbarButton - The type ToolbarButton should be used for creating custom entries in the toolbar. You can define a toolbar group using the attribute Entry defined below. This type should NOT be specified for user interface operations defined on the component configuration file. It is reserved for user interface-specific configuration files that are processed at add-in load from the installation or user interface-specific areas.
– MenuEntry - The type MenuEntry should be used for creating custom entries in Menu. The newly created Menu Entry is specified via the attribute Entry defined below. This type should NOT be specified for user interface operations defined on the component configuration file. It is reserved for user interface-specific configuration files that are processed at add-in load from the installation or user interface-specific areas.
• [Entry] - The Entry attribute is relevant only in conjunction with a specified Type=MenuEntry or
Type=ToolbarButton. It defines the name of a new menu entry or Toolbar group where the user interface operation is shown. For menu entries, it is also possible to define sub-menus of a given menu as comma separated values. For example, specifying Entry as "NewMenu, SubMenu1" will result in the user interface operation appearing from a sub-menu "SubMenu1" of a Menu Entry "NewMenu"
• [Code] - The code defined inside the configuration file, rather than a separate file:
<GuiOperations>
<! - Code can either be loaded from a file with the "ScriptFile" attribute, or be included in a "Code" tag - >
<GuiOperation Name="Enter Something" Priority="2" SourceType="CSharp"> <Code>
<![CDATA[
Ansys.UI.Toolkit.MessageBox.Show("This is a test"); ]]>
</Code>
• [Script] - The path to a Python script to be run on execution of the operation. Specification of the script cannot be combined with execution of custom code. Therefore a script should not be included if code is defined inside the tags of the GuiOperation node. Scripts invoked from a user interface operation defined on the ContextMenu of the cell have access to the following variables:
– container - A string that can be passed to any command or query that requires as a parameter the reference to the data container associated with the component.
– configurationObject - The configuration object can be used in order to access some of the inform-ation specified in the configurinform-ation file (for example, a working directory or error file). The query
GetEntityProperties(Entity=configurationObject)returns a dictionary that contains all the available configuration information.
When the user interface operation invokes a script, the invocation of the script is wrapped in a command. It is possible to specify scripts to be executed in order to interrupt or cancel the execution of the com-mand. It is also possible to specify an error file to provide messages when the command execution fails, with the same control on the error display that is provided for the update. A detailed description of the attributes is given below:
1. InterruptScript=[string] - An optional Python script that is invoked when the computation is interrupted. In Workbench terminology, the Interrupt operation closes the external application cleanly, allowing access to data. The Interrupt operation is visible only if the Interrupt script is provided.
2. StopScript=[string] - An optional Python script that is invoked when the computation is stopped. In Workbench terminology, the Stop operation abruptly closes the external application, possibly resulting in the loss of data. The Stop operation is visible only if the Stop script is provided. The same script can be used for Stop and Interrupt. The script has access to the same information (strings container and con-figurationObject) that is passed to the executing script.
3. ErrorFile=[string] - A file used to communicate that the execution of the user interface operation was not successful. The error file needs to be removed by the user interface operation upon completion. If it is still present, Workbench will send an error message. The content of the error message can be specified through the attribute CheckOnError (see below). A generic message is displayed if CheckOnError is not specified.
4. CheckOnError=[string] - If an error file is specified, its content will be scanned for lines that contain the specified error string. All lines that contain the string will be displayed as error messages (with the error string stripped from the message). An error string named file will cause the whole content of the file to be displayed.
5. UseUpdateConfiguration=[boolean] - This variable can be specified as a shortcut, in order to use for the custom user interface operation the same files specified in the Update instructions for stop/interrupt and for controlling the error message display. If the attribute is True and the attributes above are not spe-cified, the code will use the ones provided for the first update instruction, if specified.
• [Image] - The name (without extension) of a file containing an image to be used for the user interface operation. Files with common extension for images are searched under the Images directory under External Connection add-in. If a Customization directory is provided under the installation or user specific area, the corresponding Images directories are also searched for the specified file.
• [Tooltip] - A string to be displayed as the Tooltip for ToolbarButton type operations. The string has no effect for other operation types.
Properties Node
You can define custom properties in the <Properties> XML node.
Properties are used to create dynamic data objects in Workbench; therefore, their definitions reflect the internal organization of the Workbench data model. Properties should be assigned a DataEntity and an ObjectName. The DataEntity is a string that defines high level grouping for the properties. One or more objects can be created for a given DataEntity.
A DataObject“ObjectName” (as defined by its DataEntity and properties) is added to the con-tainer associated with the cell from which the configuration is read. If different External Data systems are present, each has a separate container.
Format
The <Properties> node has the following format:
<Properties>
<DataEntity Name= “[ Data Entity Name ]” Label = “[ Data Entity Label ]” > <Object Name= “[ Data Object Name ]” >
<Property Name= “[ Property Name ]” Label= “[ Property Label ]” DataType= “[ Data Type ]” Value= “[Value]”
Group = “[ Group ]” IsReadOnly = “[ IsReadOnly ]” IsExtrinsic = “[ IsExtrinsic ]” IsVisible = “[ IsVisible ]” Min = “[ Min ]” Max = “[ Max ]”
OptionLabels = “[ Option Labels ]”/> </Object>
</DataEntity> </Properties>
Attributes
The <Properties> node has the following attributes:
DataEntity
• [Data Entity Name] - The internal (immutable) name assigned to the Data Entity. If this attribute is not specified, a default name is assigned internally. However, specification of a name enables the retrieval of the properties associated with objects of the Data Entity (see below). A special name “CellProperties” is reserved for the DataEntity whose properties should be displayed in the user interface from the context menu of the associated cell.
• [Data Entity Label] - The display name (user changeable) assigned to the Data Entity in the user interface.
Object
[Data Object Name] - The internal (immutable) name assigned to the Data Object. If this attribute is not specified, a default name is assigned internally. However, specification of a name enables the retrieval of the properties associated with the given object (see below).
Properties
Mandatory attributes for the definition of a property are:
• [Property Name] - The name to be assigned to the property, unique for that DataEntity
• [DataType] - The type of data which the properties define. Currently supported types include:
– int
– double
– string
– quantity
– bool
– option
– DataReference
• [Value] - A string representing the value to be assigned to the property, which is parsed by the code according to the type.
– The bool type can assume the values of “True” or “False.”
– A quantity type should be specified by providing a string of type “double [ unit ]” (for ex-ample,“23 [ms^-1]” ).
– The options type is used for mutually exclusive choices, that should be specified by comma sep-arated strings without white space (for example,“[Option1,Option2]”).
– The DataReference type should be specified by a string of typeDataEntityType:ObjectName.
Optional attributes are:
• [Property Label] - The user-visible string that can be assigned to the property (default is the property name).
• [Group] - The group to organize the properties (for user interface purpose only).
• [IsReadOnly] (“True”/”False”) - Specifies that the property cannot be edited. Default is "False."
• [IsExtrinsic] (“True”/”False”) - Specifies that the property is not relevant for the compu-tation of the state of the cell. Default is "False."
• [IsVisible] (“True”/”False”) - Specifies whether the property should be shown in the user interface. Default is "True."
• [Min] - The lowest range for the property value.
• [Max] - The highest range for the property value.
• [OptionLabels] (for option type only) - The visible names for the options, to be used in the user
interface, specified by comma separated strings without white space (for example “ [Background,Fore-ground]”).
You can access the value for each property from any Python script used with Workbench via the Workbench query GetEntityProperty, as described below:
dataReference = “/” + container + “/” + DataEntityName + “:” + ObjectName propertyVal = GetEntityProperty(Entity=dataReference, Name=PropertyName)
where
• container is the name of the container associated with the cell. This information is typically available in the function from where the Python script is called (for example, the update script for a cell or the script invoked from a user interface operation selected on a given cell).
<DataEntity Name="MyDataEntity">
• ObjectName is the name specified in the configuration file. For example:
<Object Name="MyObjectName">
• PropertyName is the name of the property specified in the configuration file.
It is also possible to change the value of the properties that are not marked as read-only using the Workbench SetEntityProperty command:
SetEntityProperty(Entity=dataReference,Name=PropertyName, Value=value)
where value is the appropriate type for the property being modified. For example, a property of type quantity named “InletVelocity” defined for an object named AnsSettingsObject of the data entity type SettingsDataEntity can be queried and set as follows:
dataReference = “/” + container + “/” + “SettingsDataEntity” + “:” + “AnsSettingsObject” value = GetEntityProperty(Entity=dataReference,
Name = “InletVelocity”)
SetEntityProperty(Entity = dataReference, Name = “InletVelocity”, Value=”10 [m s^-1]”)
External Connection Examples
The following section provides examples of how you can use the External Connection in ANSYS Work-bench. The examples are as follows:
Custom, Lightweight, External Application Integration User Interface Button Definition
Mesh Transfer System Material Transfer Custom Transfer System
Custom, Lightweight, External Application Integration
The following example illustrates the integration of an external application that squares the value of an input number, which is displayed in the Parameter Set tab. The external application updates the output parameter to the computed square value.
Figure 8: Squares Example In Parameter Set Tab
File Structure
The file structure for this External Connection system within the user-specified working directory (which for the purpose of this example is D:/ExternalConnection) is:
D:/ExternalConnection/Squares/SquaresCongfig.xml D:/ExternalConnection/Squares/Squares.exe
D:/ExternalConnection/Squares/input.txt D:/ExternalConnection/Squares/ouput.txt
Component Configuration XML File
The Component Configuration File (SquaresConfig.xml) defines the input and output types and calls the executable file Squares.exe.
<Configuration CellName="Squares" SystemName="SquareSystem" Version="" ShowEditConfiguration="True"> <Instructions WorkingDirectory="D:/ExternalConnection/Squares">
<Instruction Type="Init"> <Name></Name>
<Args></Args>
<ParameterParsingRules>
<Parameter Name="SquareInput" Type="Input"> <Rule Type="File">input.txt</Rule> <Rule Type="StartLine">1</Rule> <Rule Type="PreString">input=</Rule> <Rule Type="DataType">Double</Rule> </Parameter>
<Parameter Name="SquareOutput" Type="Output"> <Rule Type="File">output.txt</Rule> <Rule Type="StartLine">1</Rule> <Rule Type="PreString">output=</Rule> <Rule Type="DataType">Double</Rule> </Parameter>
</ParameterParsingRules> </Instruction>
<Instruction Type="Update"> <Name></Name>
<ExePath>D:/ExternalConnection/Squares/Squares.exe</ExePath> <Args></Args>
</Instruction> </Instructions> </Configuration>
User Interface Button Definition
This example illustrates an external connection that defines a button and provides the script to execute upon button invocation.
Figure 9: Button Example
File Structure
The file structure for this External Connection solution within the directory C:/Program Files/Ansys Inc/v170/Addins/ExternalConnection is:
Customization\CustomToolBarConfiguration.xml Customization\Images\custom.png
Customization\Scripts\pipe1.py
Note
This example uses the installation Customization location. You could instead choose a user-specific location to limit custom user interface additions to a user-specific user.
User Interface Configuration XML File
The user interface configuration file (CustomToolBarConfiguration.xml) defines a user interface operation and calls the Python file pipe.py to enable the button.
<Configuration ShowEditConfiguration="True"> <GuiOperations>
<GuiOperation Name="Custom GUI" Priority="2" ScriptFile="pipe1.py" Image="custom" Type="ToolbarButton" SourceType="Python"/>
</GuiOperations> </Configuration>
Instruction File
The Instruction file (pipe1.py) contains the Python code that displays a message box.
import clr
clr.AddReference("Ans.UI.Toolkit") clr.AddReference("Ans.UI.Toolkit.Base")
from Ansys.UI.Toolkit import *
MessageBox.Show("Example!")
Mesh Transfer System
This example implements a mesh transfer system. It consumes an upstream mesh and passes it to a downstream Fluent system.
File Structure
The file structure for this External Connection system within the directory C:/Program Files/Ansys Inc/v170/Addins/ExternalConnection/SystemDefinitions is:
/GenericMeshTransfer/GenericMeshTransferSystem.xml /GenericMeshTransfer/Mesher.xml
/GenericMeshTransfer/test.py
/GenericMeshTransfer/GenericMesh_cell.png /GenericMeshTransfer/GenericMesh.png
System Definition XML File
The System Definition XML file (GenericMeshTransferSystem.xml) defines a system named Generic Mesh, which appears under External Connection Systems in the Workbench Toolbox, as shown.
Figure 11: Toolbox System Entry
The file,GenericMeshTransferSystem.xml, contains the following code:
<System name="GenericMeshTransfer" displayText="Generic Mesh" abbreviation="GenMeshXfr" imageName="GenericMesh">
<Components>
<Component name="Mesher" displayText="Mesher" imageName="GenericMesh_cell"> <Inputs>
<Input/>
<Input dataType="FluentMesh">MeshingMesh</Input> </Inputs>
<Outputs>
<Output dataType="FluentMesh">SimulationGeneratedMesh</Output> </Outputs>
</Component> </Components> </System>
Component Configuration File
The Component Configuration File (Mesher.xml) calls the Python file test.py.
<Configuration ShowEditConfiguration="False"> <Instructions>
<Instruction Type="Update"> <Name></Name>
<Script>
C:/Program Files/Ansys Inc/v170/Addins/ExternalConnection/SystemDefinitions/ GenericMeshTransfer/test.py
</Script> </Instruction> </Instructions>
</Configuration>
Update Instruction
The Update Instruction file (test.py) contains the Python code that provides instructions for passing the mesh data to the downstream Fluent system.
#obtain input data
container = ExternalConnectionSystemContainer
upstreamData = container.GetInputDataByType(InputType="MeshingMesh") meshFileRef = None
upstreamDataCount = upstreamData.Count if upstreamDataCount > 0:
meshFileRef = upstreamData[0]
#set our output so that we are just a pass through. outputRefs = container.GetOutputData()
meshOutputSet = outputRefs["SimulationGeneratedMesh"] meshOutput = meshOutputSet[0]
#meshOutput.MeshFile = meshFileRef meshOutput.TransferFile = meshFileRef
#if no new data...nothing to process from upstream sources.
Material Transfer
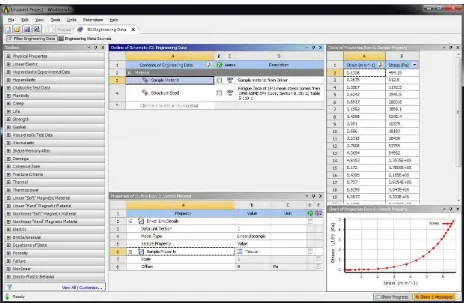
[image:30.612.54.518.419.722.2]This example implements a material transfer system that passes MatML-formatted material data to a downstream Engineering Data system.
Figure 13: Schematic View
File Structure
The file structure for this External Connection system within the directory C:/Program Files/Ansys Inc/v170/Addins/ExternalConnection/SystemDefinitions is:
/GenericMaterialTransfer/GenericMaterialTransferSystem.xml /GenericMaterialTransfer/Material.xml
/GenericMaterialTransfer/test.py
/GenericMaterialTransfer/Sample_Materials.xml /GenericMaterialTransfer/GenericMaterial_cell.png /GenericMaterialTransfer/GenericMaterial.png
System Definition XML File
The System Definition XML file (GenericMaterialTransferSystem.xml) defines a system named Generic Material, which appears under External Connection Systems in the Workbench Toolbox, as shown.
Figure 14: Toolbox System Entry
The file,GenericMaterialTransferSystem.xml, contains the following code:
<System name="GenericMaterialTransfer" displayText="Generic Material" abbreviation="GenMatXfr" imageName="GenericMaterial" toolboxGroup=""> <Components>
<Component name="Material" displayText="Material" imageName="GenericMaterial_cell"> <Inputs>
<Input/> </Inputs> <Outputs>
<Output>MatML31</Output> </Outputs>
</Component>
[image:31.612.52.250.384.597.2]</Components> </System>
Component Configuration File
The Component Configuration File (Material.xml) calls the Python file test.py.
<Configuration ShowEditConfiguration="False"> <Instructions>
<Instruction Type="Update"> <Name></Name>
<Script>
C:/Program Files/ANSYS Inc/v170/Addins/ExternalConnection/SystemDefinitions/ GenericMaterialTransfer/test.py
</Script> </Instruction> </Instructions>
</Configuration>
Update Instruction
The Update Instruction file (test.py) contains the Python code that provides instructions for passing the MatML-formatted material data to a downstream Engineering Data system
container = ExternalConnectionSystemContainer
matFilePath = r"C:\Program Files\Ansys Inc\v170\Addins\ExternalConnection\SystemDefinitions\ GenericMaterialTransfer\Sample_Materials.xml"
matFileRef = None
isRegistered = IsFileRegistered(FilePath=matFilePath) if isRegistered == True:
matFileRef = GetRegisteredFile(matFilePath) else:
matFileRef = RegisterFile(FilePath=matFilePath) AssociateFileWithContainer(matFileRef, container) outputRefs = container.GetOutputData()
matOutputSet = outputRefs["MatML31"] matOutput = matOutputSet[0]
matOutput.TransferFile = matFileRef
Material File
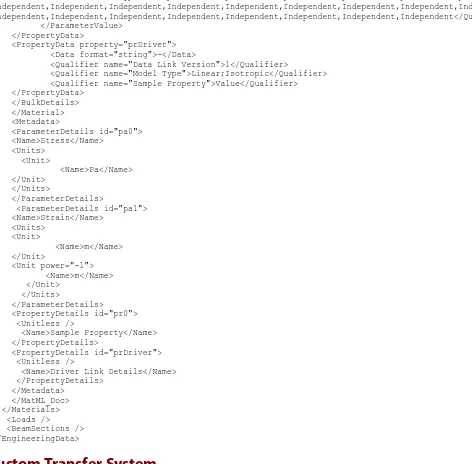
This file (Sample_Materials.xml) contains the MatML-formatted material data:
<?xml version="1.0" encoding="UTF-8"?> <EngineeringData version="17.0"> <Notes />
<Materials> <MatML_Doc> <Material> <BulkDetails>
<Name>Sample Material</Name>
<Description>Sample material from Driver</Description> <PropertyData property="pr0">
<Data format="string">-</Data>
<ParameterValue parameter="pa0" format="float">
<Data>494.1474492,912.7972764,1172.453938,1941.495468,2803.754154,3869.063522,5245.395513,10378.82012, 18192.58268,28438.67868,57755.1982,94951.87682,135751.6191,178064.7612,216504.4272,261538.9311,304701. 5076,333300.2826,364061.2544,397079.5705,432533.1159,457543.8578,483751.5301</Data>
<Qualifier name="Variable Type">Dependent,Dependent,Dependent,Dependent,Dependent,Dependent,Dependent, Dependent,Dependent,Dependent,Dependent,Dependent,Dependent,Dependent,Dependent,Dependent,Dependent, Dependent,Dependent,Dependent,Dependent,Dependent,Dependent</Qualifier>
</ParameterValue>
<ParameterValue parameter="pa1" format="float">
<Data>0.1338,0.2675,0.3567,0.6242,0.8917,1.1592,1.4268,2.051,2.586,3.0318,3.7898,4.3694,4.8153,5.172, 5.4395,5.707,5.9299,6.0637,6.1975,6.3312,6.465,6.5541,6.6433</Data>
<Qualifier name="Variable Type">Independent,Independent,Independent,Independent,Independent,Independent, Independent,Independent,Independent,Independent,Independent,Independent,Independent,Independent,Independent, Independent,Independent,Independent,Independent,Independent,Independent,Independent,Independent</Qualifier> </ParameterValue>
</PropertyData>
<PropertyData property="prDriver"> <Data format="string">-</Data>
<Qualifier name="Data Link Version">1</Qualifier>
<Qualifier name="Model Type">Linear;Isotropic</Qualifier> <Qualifier name="Sample Property">Value</Qualifier> </PropertyData>
</BulkDetails> </Material> <Metadata>
<ParameterDetails id="pa0"> <Name>Stress</Name>
<Units> <Unit>
<Name>Pa</Name> </Unit>
</Units>
</ParameterDetails>
<ParameterDetails id="pa1"> <Name>Strain</Name>
<Units> <Unit>
<Name>m</Name> </Unit>
<Unit power="-1"> <Name>m</Name> </Unit>
</Units>
</ParameterDetails>
<PropertyDetails id="pr0"> <Unitless />
<Name>Sample Property</Name> </PropertyDetails>
<PropertyDetails id="prDriver"> <Unitless />
<Name>Driver Link Details</Name> </PropertyDetails>
</Metadata> </MatML_Doc> </Materials> <Loads />
<BeamSections /> </EngineeringData>
Custom Transfer System
[image:33.612.67.539.54.518.2]This example implements a custom transfer from a producing system to a consuming system.
Figure 15: Schematic View
File Structure
The file structure for this External Connection system within the directory C:/Program Files/Ansys Inc/v170/Addins/ExternalConnection/SystemDefinitions is:
/CustomTransfer/CustomTransferProducerSystem.xml /CustomTransfer/CustomTransferConsumerSystem.xml /CustomTransfer/Producer.xml
/CustomTransfer/Consumer.xml /CustomTransfer/Producer.py /CustomTransfer/Consumer.py
/CustomTransfer/Sample_Materials.xml /CustomTransfer/Generic_cell.png /CustomTransfer/Generic.png
Producer System Definition XML File
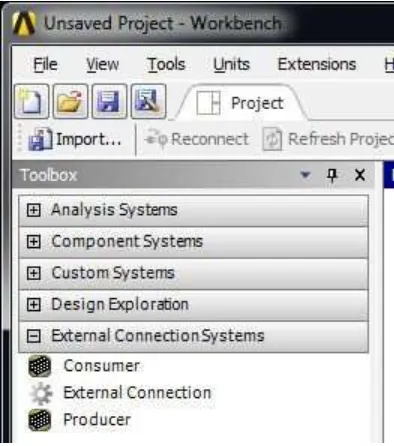
[image:34.612.54.251.203.426.2]The System Definition XML file (CustomTransferProducerSystem.xml) defines a system named Producer, which appears under External Connection Systems in the Workbench Toolbox, as shown.
Figure 16: Toolbox System Entry
The file,CustomTransferProducerSystem.xml, contains the following code:
<System name="Producer" displayText="Producer" abbreviation="Producer" imageName="Generic"> <Components>
<Component name="Producer" displayText="Producer" imageName="Generic_cell"> <Inputs>
<Input/> </Inputs> <Outputs>
<Output>MyData</Output> </Outputs>
</Component> </Components> </System>
Producer Component Configuration File
The Component Configuration File (Producer.xml) calls the Python file producer.py.
<Configuration ShowEditConfiguration="False"> <Instructions>
<Instruction Type="Update"> <Name></Name>
<Script>
C:/Program Files/ANSYS Inc/v170/Addins/ExternalConnection/SystemDefinitions/CustomTransfer/producer.py </Script>
</Instruction> </Instructions>
</Configuration>
Producer Update Instruction
The Update Instruction file (producer.py) contains the Python code that provides update instructions for the producing system.
container = ExternalConnectionSystemContainer
filePath = r"C:\Program Files\Ansys Inc\v170\Addins\ExternalConnection\SystemDefinitions\ CustomTransfer\Sample_Materials.xml"
fileRef = None
isRegistered = IsFileRegistered(FilePath=filePath) if isRegistered == True:
fileRef = GetRegisteredFile(filePath) else:
fileRef = RegisterFile(FilePath=filePath) AssociateFileWithContainer(fileRef, container) outputRefs = container.GetOutputData()
outputSet = outputRefs["MyData"] myData = outputSet[0]
myData.TransferFile = fileRef
Consumer System Definition XML File
The System Definition XML file (CustomTransferConsumerSystem.xml) defines a system named Consumer, which appears under External Connection Systems in the Workbench Toolbox, as shown in Figure 16: Toolbox System Entry (p. 30).
<System name="Consumer" displayText="Consumer" abbreviation="Consumer" imageName="Generic"> <Components>
<Component name="Consumer" displayText="Consumer" imageName="Generic_cell"> <Inputs>
<Input/>
<Input dataType="">MyData</Input> </Inputs>
</Component> </Components> </System>
Consumer Component Configuration File
The Component Configuration File (Consumer.xml) calls the Python file consumer.py.
<Configuration ShowEditConfiguration="False"> <Instructions>
<Instruction Type="Update"> <Name></Name>
<Script>
C:/Program Files/Ansys Inc/v170/Addins/ExternalConnection/SystemDefinitions/CustomTransfer/consumer.py </Script>
</Instruction> </Instructions> </Configuration>
Consumer Update Instruction
The Update Instruction file (consumer.py) contains the Python code that provides update instructions for the consuming component to obtain the output data from the upstream producer.
#obtain input data
container=ExternalConnectionSystemContainer
upstreamData=container.GetInputDataByType(InputType="MyData") fileRef=None
upstreamDataCount=upstreamData.Count if upstreamDataCount>0:
fileRef=upstreamData[0]
#if no new data...nothing to process from upstream sources.
Appendix A. Component Input and Output Tables
The following tables list component inputs and outputs supported by the External Connection.
Table 1: Autodyn
Output Input
Task Taskgroup
Autodyn
Setup
AutodynSetup AUTODYN_Remap
MechanicalSetup
SimulationGeneratedMesh Analysis
None None
Table 2: BladeGen
Output Input
Task Taskgroup
BladeGen
Blade Design
TurboGeometry None
VistaGeometry
BladeGen (Beta)
Blade Design
TurboGeometry None
VistaGeometry
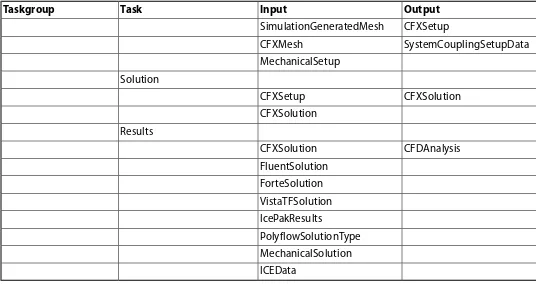
Table 3: CFX
Output Input
Task Taskgroup
CFX (Beta)
Setup
CFXSetup SimulationGeneratedMesh
SystemCouplingSetupData CFXMesh
MechanicalSetup Solution
CFXSolution CFXSetup
CFXSolution CFX
Output Input
Task Taskgroup
CFXSetup SimulationGeneratedMesh
SystemCouplingSetupData CFXMesh
MechanicalSetup Solution
CFXSolution CFXSetup
CFXSolution Results
CFDAnalysis CFXSolution
FluentSolution ForteSolution VistaTFSolution IcePakResults
PolyflowSolutionType
[image:38.612.53.589.46.330.2]MechanicalSolution ICEData
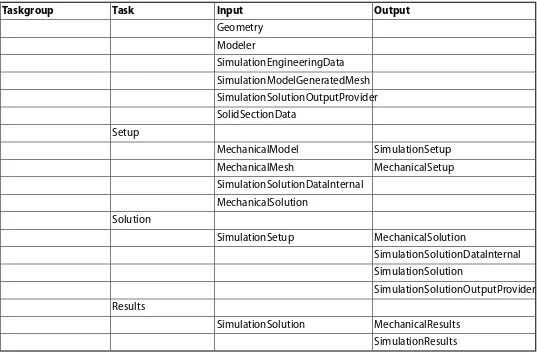
Table 4: Design Assessment
Output Input
Task Taskgroup
Design Assessment
Engineering Data
Material ExternalModelOutputProvider
EngineeringData FEMSetup
MatML31 Geometry
Geometry FEMSetup
TurboGeometry AnsoftCADObject
ICEData Geometry Model
MechanicalModel AIMGeometryMeshOutputProvider
MechanicalMesh CompositeEngineeringData
SimulationGeneratedMesh EngineeringData
SimulationEngineeringData EnhancedModelData
SimulationModelGeneratedMesh ExternalDataSetup
Output Input
Task Taskgroup
Geometry
Modeler
SimulationEngineeringData SimulationModelGeneratedMesh SimulationSolutionOutputProvider SolidSectionData
Setup
SimulationSetup MechanicalModel
MechanicalSetup MechanicalMesh
SimulationSolutionDataInternal MechanicalSolution
Solution
MechanicalSolution SimulationSetup
SimulationSolutionDataInternal SimulationSolution
SimulationSolutionOutputProvider Results
MechanicalResults SimulationSolution
SimulationResults
Table 5: Direct Optimization
Output Input
Task Taskgroup
Direct Optimization
Optimization
[image:39.612.54.591.45.400.2]OptimizationModel DesignPointsDataTransfer
Table 6: Electric
Output Input
Task Taskgroup
Electric
Engineering Data
EngineeringData ExternalModelOutputProvider
Material FEMSetup
MatML31 Geometry
Geometry FEMSetup
Output Input
Task Taskgroup
ICEData
Geometry Model
MechanicalModel AIMGeometryMeshOutputProvider
MechanicalMesh CompositeEngineeringData
SimulationGeneratedMesh EngineeringData
SimulationEngineeringData EnhancedModelData
SimulationModelGeneratedMesh ExternalDataSetup
ExternalModelOutputProvider ExternalTraceDataSetup Geometry
Modeler
SimulationEngineeringData
SimulationModelGeneratedMesh SimulationSolutionOutputProvider SolidSectionData
Setup
SimulationSetup MechanicalModel
MechanicalSetup MechanicalMesh
SimulationSolutionDataInternal Solution
MechanicalSolution SimulationSetup
SimulationSolution
SimulationSolutionDataInternal
SimulationSolutionOutputProvider Results
MechanicalResults SimulationSolution
SimulationResults
Table 7: Engineering Data
Output Input
Task Taskgroup
Engineering Data
Engineering Data
Material ExternalModelOutputProvider
EngineeringData FEMSetup
Output Input
Task Taskgroup
[image:41.612.60.586.106.744.2]MatML31
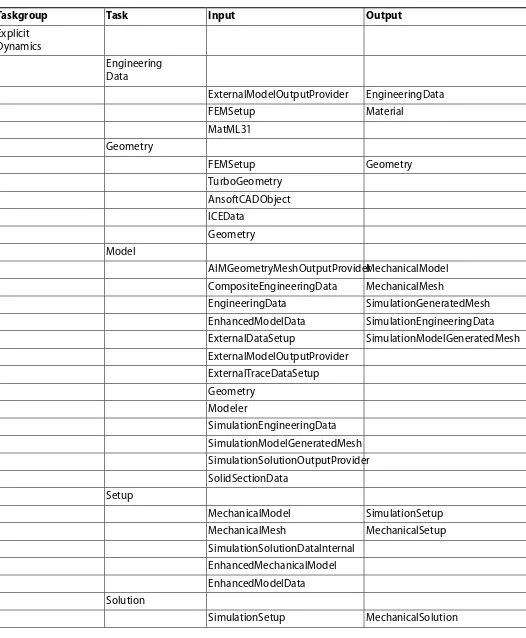
Table 8: Explicit Dynamics
Output Input
Task Taskgroup
Explicit Dynamics
Engineering Data
EngineeringData ExternalModelOutputProvider
Material FEMSetup
MatML31
Geometry
Geometry FEMSetup
TurboGeometry AnsoftCADObject ICEData
Geometry
Model
MechanicalModel AIMGeometryMeshOutputProvider
MechanicalMesh CompositeEngineeringData
SimulationGeneratedMesh EngineeringData
SimulationEngineeringData EnhancedModelData
SimulationModelGeneratedMesh ExternalDataSetup
ExternalModelOutputProvider ExternalTraceDataSetup Geometry
Modeler
SimulationEngineeringData SimulationModelGeneratedMesh
SimulationSolutionOutputProvider SolidSectionData
Setup
SimulationSetup MechanicalModel
MechanicalSetup MechanicalMesh
SimulationSolutionDataInternal EnhancedMechanicalModel EnhancedModelData Solution
Output Input
Task Taskgroup
SimulationSolutionDataInternal
SimulationSolution
SimulationSolutionOutputProvider Results
MechanicalResults SimulationSolution
[image:42.612.60.584.202.747.2]SimulationResults
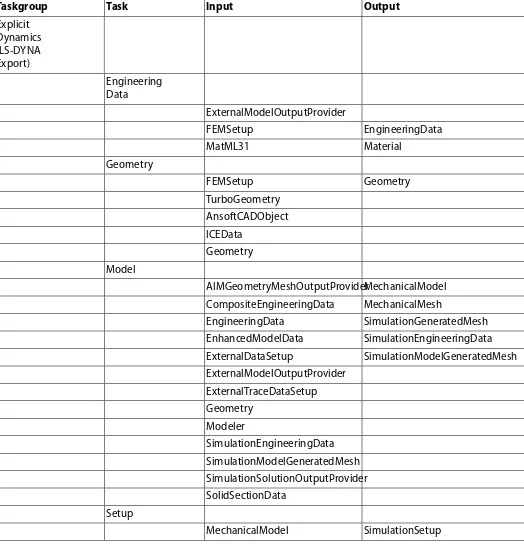
Table 9: Explicit Dynamics (LS-DYNA Export)
Output Input
Task Taskgroup
Explicit Dynamics (LS-DYNA Export)
Engineering Data
ExternalModelOutputProvider
EngineeringData FEMSetup
Material MatML31
Geometry
Geometry FEMSetup
TurboGeometry
AnsoftCADObject ICEData
Geometry Model
MechanicalModel AIMGeometryMeshOutputProvider
MechanicalMesh CompositeEngineeringData
SimulationGeneratedMesh EngineeringData
SimulationEngineeringData EnhancedModelData
SimulationModelGeneratedMesh ExternalDataSetup
ExternalModelOutputProvider ExternalTraceDataSetup Geometry
Modeler
SimulationEngineeringData SimulationModelGeneratedMesh SimulationSolutionOutputProvider SolidSectionData
Setup
SimulationSetup MechanicalModel
Output Input
Task Taskgroup
MechanicalSetup MechanicalMesh
Table 10: External Data
Output Input
Task Taskgroup
External Data
Setup
ExternalDataSetup None
ExternalTraceDataSetup
Table 11: External Model
Output Input
Task Taskgroup
External Model
Setup
ExternalModelOutputProvider None
Table 12: External Connection
Output Input
Task Taskgroup
External Connection
External Connection
ExternalConnectionProperties None
Table 13: Finite Element Modeler
Output Input
Task Taskgroup
Finite Element Modeler
Model
FEMMesh MechanicalSetup
FEMSetup SimulationGeneratedMesh
Geometry MAPDLCdb
FEMSetup SolidSectionData
CompositeEngineeringData SimulationEngineeringData
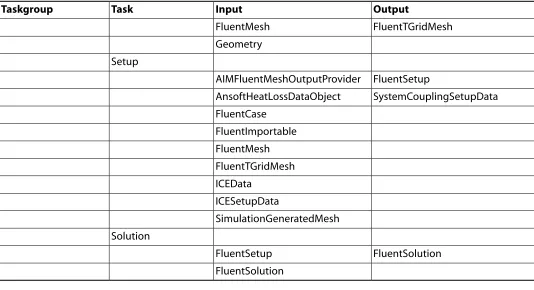
Table 14: Fluent (with Fluent Meshing)
Output Input
Task Taskgroup
Fluent
Output Input
Task Taskgroup
FluentTGridMesh FluentMesh
Geometry Setup
FluentSetup AIMFluentMeshOutputProvider
SystemCouplingSetupData AnsoftHeatLossDataObject
FluentCase FluentImportable
FluentMesh FluentTGridMesh ICEData
ICESetupData
SimulationGeneratedMesh Solution
FluentSolution FluentSetup
[image:44.612.55.589.46.336.2]FluentSolution
Table 15: Fluent
Output Input
Task Taskgroup
Fluent
Setup
FluentSetup AIMFluentMeshOutputProvider
SystemCouplingSetupData FluentImportable
AnsoftHeatLossDataObject FluentMesh
FluentCase
SimulationGeneratedMesh ICEData
ICESetupData FluentTGridMesh Solution
FluentSolution FluentSetup
FluentSolution
Table 16: Fluid Flow – Blow Molding (Polyflow)
Output Input
Task Taskgroup
Fluid Flow – Blow Molding (Polyflow)
Output Input
Task Taskgroup
Geometry FEMSetup
TurboGeometry AnsoftCADObject ICEData
Geometry Mesh
MechanicalModel Geometry
MeshingMesh MeshingGeneratedMeshOutput
Provider
SimulationGeneratedMesh
MeshingGeneratedMeshOutputProvider Setup
PolyflowSetup SimulationGeneratedMesh
PolyflowTransferMesh Solution
PolyflowSolutionType PolyflowSetup
PolyflowSolution PolyflowSolution
ExternalDataSetup Results
CFD Analysis CFXSolution
FluentSolution
ForteSolution VistaTFSolution IcePakResults
PolyflowSolutionType MechanicalSolution
ICEData
Table 17: Fluid Flow – Extrusion (Polyflow)
Output Input
Task Taskgroup
Fluid Flow – Extrusion (Polyflow)
Geometry
Geometry FEMSetup
TurboGeometry
AnsoftCADObject ICEData
Output Input
Task Taskgroup
Mesh
MechanicalModel Geometry
MeshingMesh MeshingGeneratedMeshOutput
Provider
SimulationGeneratedMesh MeshingGeneratedMeshOutput Provider
Setup
PolyflowSetup SimulationGeneratedMesh
PolyflowTransferMesh Solution
PolyflowSolutionType PolyflowSetup
PolyflowSolution PolyflowSolution
ExternalDataSetup Results
CFDAnalysis CFXSolution
FluentSolution
ForteSolution VistaTFSolution IcePakResults
PolyflowSolutionType MechanicalSolution ICEData
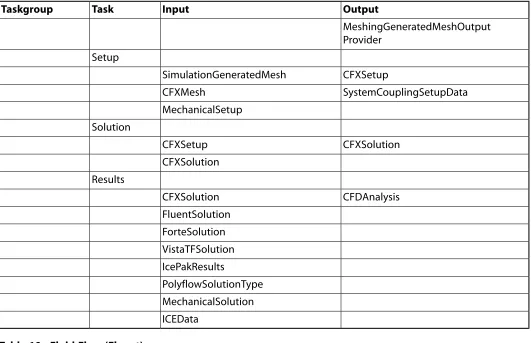
Table 18: Fluid Flow (CFX)
Output Input
Task Taskgroup
Fluid Flow (CFX)
Geometry
Geometry FEMSetup
TurboGeometry
AnsoftCADObject ICEData
Geometry Mesh
MechanicalModel Geometry
MeshingMesh MeshingGeneratedMeshOutput
Provider
Output Input
Task Taskgroup
MeshingGeneratedMeshOutput Provide