Celebrating
Our
100th
IXSYSTEMS DELIVERS A FLASH ARRAY
FOR UNDER $10,000.
Introducing FreeNAS
®Certified Flash:
A high performance
all-flash array at the cost of spinning disk.
The all-flash datacenter is now within reach. Deploy a FreeNAS Certified Flash array
today from iXsystems and take advantage of all the benefits flash delivers.
IS AFFORDABLE
FLASH STORAGE
OUT OF REACH?
NOT ANYMORE!
The FreeNAS Mini:
Plug it in and boot it up — it just works.
And really — why would you trust storage from anyone else?
Call or click today! 1-855-GREP-4-IX (US) | 1-408-943-4100 (Non-US) | www.iXsystems.com/FreeNAS-certified-servers Unifies NAS, SAN, and object storage to support
multiple workloads
Runs FreeNAS, the world’s #1 software-defined storage solution
Performance-oriented design provides maximum throughput/IOPs and lowest latency
OpenZFS ensures data integrity
Perfectly suited for Virtualization, Databases, Analytics, HPC, and M&E
10TB of all-flash storage for less than $10,000 Maximizes ROI via high-density SSD technology and inline data reduction
Backed by a 1 year parts and labor warranty, and
supported by the Silicon Valley team that designed
and built it
Perfectly suited for SoHo/SMB workloads like
backups, replication, and
fi
le sharing
Lowers storage TCO through its use of
enterprise-class hardware, ECC RAM, optional
fl
ash,
white-glove support, and enterprise hard drives
Runs FreeNAS, the world’s #1 software-de
fi
ned
storage solution
Uni
fi
es NAS, SAN, and object storage to support
multiple workloads
Encrypt data at rest or in
fl
ight using an 8-Core
2.4GHz Intel® Atom® processor
OpenZFS ensures data integrity
A 4-bay or 8-bay desktop storage array that scales
to 48TB and packs a wallop
Certified Flash:
flash array at the cost of spinning disk.
The all-flash datacenter is now within reach. Deploy a FreeNAS Certified Flash array
today from iXsystems and take advantage of all the benefits flash delivers.
DON’T DEPEND
ON
CONSUMER-GRADE STORAGE.
KEEP YOUR DATA SAFE!
USE AN ENTERPRISE-GRADE STORAGE
SYSTEM FROM IXSYSTEMS INSTEAD.
The FreeNAS Mini:
Plug it in and boot it up — it just works.
And really — why would you trust storage from anyone else?
Call or click today! 1-855-GREP-4-IX (US) | 1-408-943-4100 (Non-US) | www.iXsystems.com/Freenas-Mini or purchase on Amazon.
Editor’s Word
Dear Readers,
Wow, it’s a wrap for 2017! As you take stock of all the monthly issues, we hope that some, if not all of your dreams were fulfilled this year. Additionally, we would like to encourage you to start planning for 2018, in hopes for a better and more interesting year. I know that most of you are spending time with your family and friends this New Year’s Eve. Although such an evening repeats itself yearly, it is
undoubtedly an amazing experience for all. The evening is magical for each one of us. It brings hope and joy to our hearts. It shows us how we should live every day and what we should incorporate in our lives. I hope that you will have a great night, and may the same energy you feel today take you through the next year. Hence, allow me to make the following wishes to you:
The New Year is the time of unfolding horizons and the realization of dreams.
May you rediscover new strength and garner faith with you,
be able to rejoice in the simple pleasures
that life has to offer and put a brave front for
all the challenges that may come your way.
Wishing you a lovely New Year.
As usual, we have prepared a solid amount of good readings in this month tailored for you. You will not only meet new people who love the BSD world but also read mind-refreshing articles. Therefore, I invite you to check a list of the articles on the next page. Lastly, a big thank you to all our reviewers for their valuable input on how to make the articles better.
See you in 2018!
Enjoy reading,
In Brief
In Brief 06
Ewa & The BSD Team
This column presents the latest news coverage of breaking news, events, product releases, and trending topics from the BSD sector.
PostgreSQL
Page Checksum Protection in PostgreSQL 14
Luca Ferrari
PostgreSQL does support a feature called page checksum that, if enabled at a cluster-wide level, protects the database from data corruption on the disk. The protection does not involve
automatic data recover, rather a way to discard a piece of data that is no longer considered. In this short article, readers will see the effect of data corruption and how PostgreSQL reacts to such event.
FreeBSD
OpenLDAP Directory Services in FreeBSD (II) Applications on Centralized Management using NIS+ 20
José B. Alós
In the first part of this article, the main basic concepts around installation and configuration using the new dynamic online configuration (OCL) for FreeBSD systems are presented. At this point the reader will understand the
importance and benefits of the use of directory services provided by LDAP protocol. For the sake of simplicity, the second part is going to present a direct application to encapsulating a NIS+/YP centralized user authentication and management schema for an arbitrary number of servers and clients connected to a TCP/IP
network. Additionally, we’ll show a web-based administration tool that will make administering the OpenLDAP server easier.
Bitcoin Full Node On FreeBSD 36
Abdorrahman Homaei
Cryptocurrencies are replacements for banking that we have today, and bitcoin is the game changer. Mining bitcoin with typical hardware is not a good idea and needs a more specific device like ASIC, but you can create a full node and help the bitcoin network.
Blog Presentation
OpenBSD Router with PF 40
Carlos Klop
OpenBSD is an operating system which has been used widely for network routing and firewall. Also, it can easily install for you Virtual Machine lab environment. In this blog post, you will learn how to turn an OpenBSD installation quickly in router and NAT with PF for your environment.
My Switch to OpenBSD, First Impressions 44
Eduardo Lavaque
So that you can understand how I use my distros, "ricer" is a term used mostly to refer to people that change the look of their setup to make it look very attractive, outside of the defaults of whatever environment they have. Take a look at /r/unixporn for a list of good examples of ricing.
Column
The year of 2017 went by so quickly, and we are now entering the season of goodwill, parties, and family gatherings. It is a time to look back, look forward, and take stock. What might 2018 bring to the technology table? 48
Rob Somerville
In Brief
End-of-Life for
FreeBSD 11.0
A few days ago, the FreeBSD Team announced END-of-LIFE for FreeBSD version 11.0.
So if you are still on 11.0, you should consider upgrading to a newer release. This way, you will still be receiving updates.
---BEGIN PGP SIGNED MESSAGE--- Hash: SHA512
Dear FreeBSD community,
As of Nov 30, 2017, FreeBSD 11.0 reached end-of-life and is no longer supported by the FreeBSD Security Team. Users of FreeBSD 11.0 are strongly encouraged to upgrade to a newer release as soon as
possible.
The currently supported branches, releases and their expected end-of-life dates are:
As a reminder, FreeBSD changed the support model as of 11.0-RELEASE.
For additional information, please see
https://lists.freebsd.org/pipermail/freebsd-annou nce/2015-February/001624.html
Please refer to https://security.freebsd.org/ for an up-to-date list of
supported releases and the latest security advisories.
- --
The FreeBSD Security Team
Source:
Kernel ASLR on amd64
Maxime Villard has completed a Kernel ASLR implementation for NetBSD-amd64, making NetBSD the first BSD system to support such a feature. Simply said, KASLR is a feature that randomizes the location of the kernel in memory, making it harder to exploit several classes of vulnerabilities, both locally (privilege escalations) and remotely (remote code executions).
Source:
https://blog.netbsd.org/tnf/entry/kernel_aslr_on_ amd64
arm64 Platform
Supported
OpenBSD's ARM64 support is now considered officially supported. Theo de Raadt committed this change:
CVSROOT: /cvs
Module name: www Changes by:
[email protected] 2017/12/07
12:00:12
Modified files:
. : plat.html
Log message:
graduate arm64 to supported; having syspatch it is even beyond some
other systems
Source:
https://undeadly.org/cgi?action=article;sid=2017 1208082238
DTrace and ZFS Update
Chuck Silvers worked to update the DTrace and ZFS code. The code that has been used so far was originated from the OpenSolaris code-base.
file-system, adds mmap() support to ZFS on NetBSD, and the DTrace code re-base can be done.
NetBSD 8.0 is the next major feature release currently under development.
DragonFly version 5 has been released, including the first bootable release of HAMMER2. Version 5.0.2, the current version, came out 2017/12/04. DragonFly belongs to the same class of
operating systems as other BSD-derived
systems and Linux. It is based on the same UNIX ideals and APIs, and shares ancestor code with other BSD operating systems. DragonFly
provides an opportunity for the BSD base to grow in an entirely different direction from the one taken in the FreeBSD, NetBSD, and OpenBSD series.
DragonFly includes many useful features that differentiate it from other operating systems in
the same class.
The most prominent one is HAMMER, our modern high-performance file system with built-in mirroring and historic access
functionality.
Virtual kernels provide the ability to run a full-blown kernel as a user process for the purpose of managing resources or for
accelerated kernel development and debugging. The kernel uses several synchronizations and locking mechanisms for SMP. Much of the work done since the project began has been in this area. A combination of intentional simplification of certain classes of locks to make more
expansive subsystems less prone to deadlocks, and the rewriting of nearly all the original
codebase using algorithms designed specifically with SMP in mind, has resulted in an extremely stable, high-performance kernel that is capable of efficiently using all CPU, memory, and I/O resources thrown at it.
DragonFlyBSD has virtually no bottlenecks or lock contention in-kernel. Nearly all operations can run concurrently on any number of CPUs. Over the years, the VFS support infrastructure (namecache and vnode cache), user support infrastructure (uid, gid, process groups,and sessions), process and threading infrastructure, storage subsystems, networking, user and kernel memory allocation and management, process fork, exec, exit/teardown, timekeeping, and all other aspects of kernel design, have been rewritten with extreme SMP performance as a goal.
DragonFly is uniquely positioned to take
advantage of the wide availability of affordable Solid Storage Devices (SSDs), by making use of swap space to cache filesystem data and
meta-data. This feature commonly referred to as "swapcache", can give a significant boost to both server and workstation workloads, with a minor hardware investment.
The DragonFly storage stack comprises of
volume management and encryption.
Some other features that are especially useful to system administrators are a performant and scalable TMPFS implementation, an extremely efficient NULLFS that requires no internal replication of directory or file vnodes, our natively written DNTPD (ntp client) which uses full-bore line intercept and standard deviation summation for highly-accurate timekeeping, and DMA, designed to provide low-overhead email services for system operators who do not need more expansive mail services such as postfix or sendmail.
A major crux of any open-source operating system is third party applications. DragonFly leverages the dports system to provide
thousands of applications in source and binary forms. These features and more band together to make DragonFly a modern, useful, friendly and familiar UNIX-like operating system.
The DragonFly BSD community is made up of users and developers who take pride in an operating system that maintains challenging goals and ideals. This community has no
reservation about cutting ties with legacy when it makes sense, preferring a pragmatic,
no-nonsense approach to development of the system. The community also takes pride in its openness and innovative spirit, applying
patience liberally and always trying to find a means to meet or exceed the performance of our competitors while maintaining our
trademark algorithmic simplicity.
FreeNAS 11.1 is Now
Available for Download!
by The FreeNAS Development Team
FreeNAS 11.1 Provides Greater Performance and Cloud Integration
The FreeNAS Development Team is excited and proud to present FreeNAS 11.1! FreeNAS 11.1 adds cloud integration, OpenZFS performance improvements, including the ability to prioritize resilvering operations, and preliminary Docker support to the world’s most popular
software-defined storage operating system. This release includes an updated preview of the beta version of the new administrator graphical user interface, including the ability to select display themes. This post provides a brief overview of the new features.
The base operating system has been updated to the STABLE version of FreeBSD 11.1, which adds new features, updated drivers, and the latest security fixes. Support for Intel® Xeon® Scalable Family processors, AMD Ryzen
processors, and HBA 9400-91 have been added.
FreeNAS 11.1 adds a cloud sync (data
import/export to the cloud) feature. This new feature lets you sync (similar to backup), move (erase from source), or copy (only changed data) data to and from public cloud providers that include Amazon S3 (Simple Storage Services), Backblaze B2 Cloud, Google Cloud, and
Microsoft Azure.
OpenZFS has noticeable performance
improvements for handling multiple snapshots and large files. Resilver Priority has been added to the Storage screen of the graphical user
interface, allowing you to configure resilvering at a higher priority at specific times. This helps to mitigate the inherited challenges and risks
associated with storage array rebuilds on very large capacity drives.
FreeNAS 11.1 adds preliminary Docker container support, delivered as a VM built from
RancherOS. This provides a mechanism for automating application deployment inside containers, and a graphical tool for managing Docker containers. Please report any issues you encounter when beta testing this feature. This will assist the development team in improving it for the next major release of FreeNAS.
Finally, there are updates to the new
Angular-based administrative GUI, including the addition of several themes. The FreeNAS team expects the new administrative GUI to achieve parity with the current one for the FreeNAS 11.2 release. To see a preview of the new GUI, click the BETA link on the login screen. Here is an example of the new GUI’s main dashboard, with the available themes listed in the upper right corner.
The FreeNAS community is large and vibrant. We invite you to join us on the FreeNAS forum. To download FreeNAS 11.1 RELEASE and sign-up for the FreeNAS Newsletter, visit
TrueOS 17.12 Release
by Ken Moore
We are pleased to announce a new release of the 6-month STABLE version of TrueOS!
This release cycle focused on lots of cleanup and stabilization of the distinguishing features of TrueOS: OpenRC, boot speed, removable-device management, SysAdm API integrations, Lumina improvements, and more. We have also been working quite a bit on the server offering of TrueOS, and are pleased to provide new text-based server images with support for
Virtualization systems such as bhyve. This allows for simple server deployments which also take advantage of the TrueOS improvements to FreeBSD such as:
Sane service management and status reporting with OpenRC
Reliable, non-interactive system update mechanism with fail-safe boot environment support.
Graphical management of remote TrueOS
servers through SysAdm (also provides a reliable API for administering systems remotely).
LibreSSL for all base SSL support.
Base system managed via packages (allows for additional fine-tuning).
Base system is smaller due to the removal of the old GCC version in base. Any compiler and/or version may be installed and used via packages as desired.
Support for newer graphics drivers and chipsets (graphics, networking, wifi, and more)
TrueOS Version 17.12 (2017, December) is now available for download from the TrueOS website. Both the STABLE and UNSTABLE package
repositories have also been updated in-sync with each other, so current users only need to follow the prompts about updating their system to run the new release.
We are also pleased to announce the availability of TrueOS Sponsorships! If you would like to help contribute to the project financially, we now can accept both one-time donations as well as recurring monthly donations which will help us advocate for TrueOS around the world.
Thank you all for using and supporting TrueOS!
~ The TrueOS Core Team
Notable Changes:
The OpenRC services for FreeBSD itself have been overhauled, resulting in significantly shorter boot times.
Separate install of images for desktops and servers (server image uses a text/console installer)
Bhyve support for TrueOS Server Install
FreeBSD base is synced with 12.0-CURRENT as of December 4th, 2017 (Github commit: 209d01f)
FreeBSD ports tree is synced as of November 30th (pre-FLAVOR changes)
Lumina Desktop has been updated/developed from 1.3.0 to 1.4.1
PCDM now supports multiple simultaneous graphical sessions
Removable devices are now managed through the “automounter” service.
Devices are “announced” as available to the system via *.desktop shortcuts in /media. These shortcuts also contain a variety of optional “Actions” that may be performed on the device.
Devices are only mounted while they are being used (such as when browsing via the command line or a file manager).
Devices are automatically unmounted as soon as they stop being accessed.
Integrated support for all major filesystems (UFS, EXT, FAT, NTFS, ExFAT, etc..)
NOTE: Currently, the Lumina desktop is the only one which supports this functionality.
The TrueOS update system has moved to an “active” update backend. This means that the user will need to start the update process by clicking the “Update Now” button in SysAdm, Lumina, or PCDM (as well as the command-line
option). The staging of the update files is still performed automatically by default, but this (and many other options) can be easily changed in the “Update Manager” settings as desired.
Known Errata:
[VirtualBox] Running FreeBSD within a VirtualBox VM is known to occasionally receive
non-existent mouse clicks – particularly when using a scroll wheel or two-finger scroll.
Quick Links:
TrueOS Forums
TrueOS Bugs
TrueOS Handbook
TrueOS Community Chat on Telegram
Become a Sponsor!
Versions of common packages:
NOTE: The “STABLE” branch effectively locks 3rd-party package versions for its 6-month lifespan. The “UNSTABLE” branch provides rolling updates to all packages on a regular basis.
Web Browsers:
Firefox: 57.0.1
Firefox-ESR: 52.5.0
Iridium: 58.0
Chromium: 61.0.3163.11
QupZilla: 2.1.2 (Qt5) 1.8.9 (Qt4)
SeaMonkey: 2.49.1
Desktop Environments:
Lumina: 1.4.1
KDE: 4.14.3
MATE: 1.18.0
GNOME: 3.18.0
Cinnamon: 2.4.6
XFCE: 4.12
LXDE: 1.0
Databases:
PostgreSQL: 9.2, 9.3, 9.4, 9.5, 9.6, 10.1
MySQL: 5.5.58, 5.6.38, 5.7.20, 8.0.2
SQLite: 2.8.17, 3.21.0
Computing Languages:
Python: 2.7, 3.4, 3.5, 3.6
Ruby: 2.2, 2.3, 2.4
Perl: 5.22, 5.24, 5.26, 5.27
Rust: 1.22.1
Go: 1.4.3, 1.9.2
Compilers/Tools:
Clang: 3.3, 3.4.2, 3.5.2, 3.8, 6.0.d20171113
LLVM: 3.3, 3.4.2, 3.5.2, 3.8.1, 3.9.1, 4.0.1, 5.0.0, 6.0.d20171113
GCC: 4.6.4, 4.7.4, 4.8.5, 4.9.4, 5.5.0, 6.4.0, 6.4.1.s20171129, 7.2.0, 7.2.1.s20171123, 8.0.0.s20171126
Automated Deployment:
Puppet: 4.10.9, 5.3.3 (server: 2.7.2, 5.1.0 ; database: 4.4.0, 5.1.3)
Ansible: 1.9.6, 2.4.2.0
Salt: 2017.7.2
Other Applications/Utilities:
Libreoffice: 5.3.7
Apache OpenOffice: 4.1.4
Nginx: 1.12.2, 1.13.7
Apache: 2.4
Git: 2.15.1
GitLab: 10.1.4
PostgreSQL
Page Checksum Protection
in PostgreSQL
PostgreSQL does support a feature called page checksum that, if enabled at a cluster-wide level, protects the database from data corruption on the disk. The protection does not involve
automatic data recover, rather a way to discard a piece of data that is considered no more reliable. In this short article, readers will see the effect of data corruption and how PostgreSQL reacts to such event.
You will learn
• How to enable page checksums
• What page checksum protects you from
• How to simulate a page corruption
• How to erase the damaged page
You need to know
• How to interact with a PostgreSQL (9.6) database
• How PostgreSQL sets up disk layout
PostgreSQL supports the page checksum feature since version 9.3; such feature allows the cluster to check for every checked-in data page to
determine if the page is reliable or not. A reliable page is a page that has not been corrupted during the path from memory to the disk (writing data to the disk) or the opposite (reading back the data).
As readers probably know, a data corruption can happen because of a bug or a failure in the disk controller, in the memory, and so on. What is the risk of a data corruption from a PostgreSQL point of view? A corrupted data page contains wrong tuples such that the data within the tuples is possibly wrong. Using such wrong data could make a single SELECT statement to report wrong data or, worst, such data can be used to build up other tuples and therefore "import" corrupted data within the database.
It is important to note that the page checksum feature does not enforce the database
consistency: the latter is provided by the Write Ahead Logs (WALs) that have always been strongly protected from corruption with several techniques including a checksum on each segment. But while WALs ensure that data is made persistent, they don't protect you from a silent data corruption that hits a tuple (or alike), and again this "silent" corruption will be checked in the database in future.
What can the database do when a corruption in a data page lays around? There are two possible scenarios:
The data page is checked in and used as if it was reliable (i.e., the corruption is not detected at all);
The data page is discarded. Therefore, the data contained in it is not considered at all. Without page checksums , PostgreSQL will default to scenario 1), that is the detection is not perceived. Hence, possible corrupted data (e.g., a tuple, a field, a whole range of an index or table) is used in live operations and can corrupt other data.
Editor in Chief: Ewa Dudzic
www.bsdmag.org
Contributing:
Luca Ferrari, José B. Alós, Carlos Klop, Eduardo Lavaque, Jean-Baptiste Boric, Rafael Santiago, Andrey Ferriyan, Natalia
Portillo, E.G Nadhan, Daniel Cialdella Converti, Vitaly Repin, Henrik Nyh, Renan Dias, Rob Somerville, Hubert Feyrer, Kalin
Staykov, Manuel Daza, Abdorrahman Homaei, Amit Chugh, Mohamed Farag, Bob Cromwell, David Rodriguez, Carlos
Antonio Neira Bustos, Antonio Francesco Gentile, Randy Remirez, Vishal Lambe, Mikhail Zakharov, Pedro Giffuni, David
Carlier, Albert Hui, Marcus Shmitt, Aryeh Friedman
Top Betatesters & Proofreaders:
Daniel Cialdella Converti, Eric De La Cruz Lugo, Daniel LaFlamme, Steven Wierckx, Denise Ebery, Eric Geissinger, Luca Ferrari, Imad Soltani, Olaoluwa Omokanwaye, Radjis
Mahangoe, Katherine Dizon, Natalie Fahey, and Mark VonFange.
Publisher: Hakin9 Media SK,
02-676 Warsaw, Poland Postepu 17D, Poland worldwide publishing
Hakin9 Media SK is looking for partners from all over the world. If you are interested in cooperation with us, please
contact us via e-mail: [email protected]
All trademarks presented in the magazine were used only for informative purposes. All rights to trademarks presented in the
With page checksums enabled, PostgreSQL will discard the page and all the data within it. For instance all the tuples of a table stored in such a page. Is it the administrator’s duty to decide what to do with such a data page? However, there is nothing PostgreSQL can do automatically since it is unknown what the real corruption is and what caused it.
Enabling page checksums
This feature can be enabled only at cluster initialization via initdb: the
--data-checksum option instruments the command to enable data pages from the very beginning of the database. It is worth noting that a page checksum means a little more resource consumption to compute, store, and check the checksums on each page. More resource consumption means fewer throughputs.
Therefore, the database administrator must decide what is more important: performance or data reliability. Usually, the latter is the right choice for pretty much any setup. Therefore, it is important to understand that there is no
protection at all against external data corruption without page checksum.
Consequently, to enable page checksums, initdb has to be run with the --data- checksum option. For instance a new cluster can be initialized as follows in Table 1:
Table 1. A new cluster can be initialized
Once the database has been instrumented as shown above, the user can interact with it in the
same way as if page checksums was disabled. The whole feature is totally transparent to the database user or administrator.
Forcing a corruption
Readers must not execute the following steps in production!
The main aim of this section is to provide an insight on what happens when data is corrupted, but readers must understand that these four steps will deliberately destroy their data!
First of all, find out a table to corrupt. The
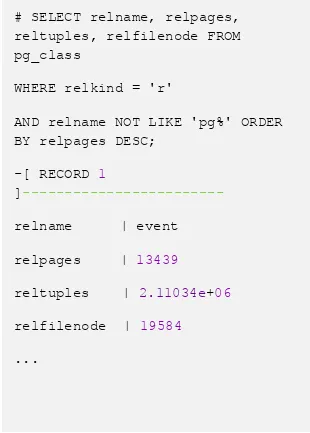
following query will show you all the user tables order by descending page occupation. Hence the first table that will show up is a "large" table (see Table 2).
Table 2. All the user tables order by descending page occupation
$ initdb --data-checksum
-D /mnt/data1/pgdata/
# SELECT relname, relpages, reltuples, relfilenode FROM pg_class
WHERE relkind = 'r'
AND relname NOT LIKE 'pg%' ORDER BY relpages DESC;
relfilenode | 19584
As readers can see, the event tables have 13439 data pages, and a two millions tuple, so it is a large enough table to play with.
In order to find out the real file on the disk, it is important to get the path of the database which can be obtained with the following query (see Table 3).
Table 3. The path of the database
Since the event table is within the testdb database, the file on disk will be in
$PGDATA/baase/19554/19584. The utility oid2name(1) can be used to extract the very same information for databases and tables.
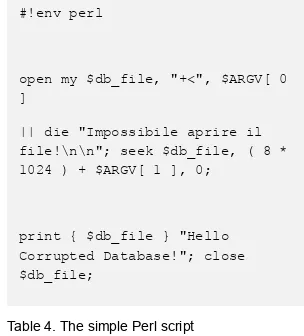
Corrupting a data page
The following simple Perl script will corrupt a data page (see Table 4).
Table 4. The simple Perl script
The idea is simple:
• Open the specified data file (the one named relname in the previous SQL query);
• Move to the specified data page (please note that data pages are usually 8kb in size for a default PostgreSQL installation);
• Print out a string to corrupt the data;
• Close the file and flush to disk.
To perform the corruption, you have to launch the program with something like you can see on Table 5.
Table 5. To launch the program
The above will corrupt the 20th page of the event table. This can be done when the database is running or is stopped.
# SELECT datname, oid
FROM pg_database;
datname | oid
---+---postgres | 12758
template1 | 1
template0 | 12757
luca | 16389
foodb | 18936
testdb | 19554
#!env perl
open my $db_file, "+<", $ARGV[ 0 ]
|| die "Impossibile aprire il file!\n\n"; seek $db_file, ( 8 * 1024 ) + $ARGV[ 1 ], 0;
print { $db_file } "Hello Corrupted Database!"; close $db_file;
% sudo perl corrupt.pl
See the corruption
When you try to access the relation, PostgreSQL will clearly state that there is a corruption in the data page (see Table 6).
Table 6. PostgreSQL will clearly state that there is a corruption in the data page
So far, the database has no chance to recover the data, but at least it is not checking in wrong data!
Cleaning the damaged page
Since PostgreSQL can do nothing about data recovery, the only choice it has is to zero the damaged page. In other words, unless you really need the page to inspect the corruption, you can instrument PostgreSQL to clean the page and make it reusable (as a fresh new page). Data will still be lost, but at least you will not waste space on the disk. PostgreSQL provides the
zero_damaged_pages option that can be set either in the configuration file postgresql.conf or in the running session. For instance, if a session performs the same extraction from the table with zero_damaged_pages enabled, PostgreSQL will not warn on anything (see Table 7).
Table 7. PostgreSQL will not warn on anything
But in the cluster logs, there will be a notice about the cleanup of the page (see Table 8).
Table 8. The cleanup of the page
Moreover, the relation will have a page less than it was before (see Table 9).
Table 9. The relation will have a page less
The number of pages is now 13438,a page less than the original size, 13439. PostgreSQL did find out a page was not reliable and discarded it.
Vacuum and autovacuum
The same effect would have taken place in the case where a vacuum was run against the table (see Table 10).
> SELECT * FROM event;
...
ERROR: invalid page in block 20 of relation base/19554/19584
# SET zero_damaged_pages TO 'on';
# SELECT * FROM event;
...
-- the query runs to the end
WARNING: page verification
failed, calculated checksum 61489 but expected 61452
WARNING: invalid page in block 20 of relation base/19554/19584; zeroing out page
# SELECT relname, relpages, reltuples, relfilenode FROM pg_class
WHERE relkind = 'r'
AND relname NOT LIKE 'pg%' ORDER BY relpages DESC;
-[ RECORD
1]---relname | event
relpages | 13438
reltuples | 2.11015e+06
relfilenode | 19841
Table 10. A vacuum was run
However, do not expect autovacuum to work the same: it is a design choice to not allow
autovacuum to clean up damaged pages, as you can read in the source code of the autovacuum process (see Table 11).
Table 11. The autovacuum process
As you can see, the option
zero_damaged_pages is always set to false, so that an autovacuum process will not zero (or clean) a page. The idea is that such an operation is so important that an administrator should be notified and decide manually to perform a
cleanup. In fact, a page corruption often means there is a problem with hardware (or filesystem or other software) that requires more investigation, and also a recovery from a reliable backup.
Conclusions
The page checksum feature allows PostgreSQL to detect silent data corruption that happened outside the WALs, i.e., on real data pages. The database cannot decide automatically how to recover such data. Therefore, the only choice left to the administrator is to clean up the wrong page or not. However, once a corruption is detected, PostgreSQL will refuse to check-in such a page thus protecting the other data pages from being polluted.
References
PostgreSQL website: www.postgresql.org
PostgreSQL Doc: www.postgresql.org/docs/ # SET zero_damaged_pages TO 'on';
# VACUUM FULL VERBOSE event;
INFO: vacuuming "public.event"
WARNING: page verification
failed, calculated checksum 22447 but expected 19660
WARNING: invalid page in block 1 of relation base/19554/19857; zeroing out page
INFO: "event": found 0
removable, 2109837 nonremovable row versions in 13437 pages
/*
• Force zero_damaged_pages OFF in the autovac process, even if it is set
• in postgresql.conf. We don't really want such a dangerous option being
• applied non-interactively. */
SetConfigOption("zero_damaged_pages", "false", PGC_SUSET, PGC_S_OVERRIDE);
Meet the Author
Luca Ferrari lives in Italy with his beautiful wife, his great son, and two female cats. Computer science passionate since the
Commodore 64 age, he holds a master degree and a PhD in Computer Science. He is a
PostgreSQL enthusiast, a Perl lover, an Operating System passionate, a UNIX fan, and performs as much tasks as possible within Emacs. He considers the Open Source the only truly sane way of interacting with software and services. His website is available at
FreeBSD
OpenLDAP Directory Services in
FreeBSD (II)
Applications on Centralized Management using NIS+
What you will learn:
• Installation and configuration methods for OpenLDAP 2.4 under FreeBSD
• Basic foundations of the new LDAP on-line configuration (OLC)
• Hardening LDAPv3 with SASL and TLS/SSL protocols
• Embedding of NIS+/YP into an LDAP server to provide centralized NIS+ support for UNIX computers
• Administration and basic tuning principles for LDAP servers
What you should already know:
• Intermediate UNIX OS background as end-user and administrator
• Some knowledge of UNIX authentication systems and NIS+/YP
• Experience with FreeBSD system package and FreeBSD ports
In the first part of this article, the main basic concepts around installation and configuration using the new dynamic online configuration (OCL) for FreeBSD systems have been presented. At this point the reader will
understand the importance and benefits that the use of directory services provided by LDAP protocol. For the sake of simplicity, the second part is going to present a direct application to encapsulating a NIS+/YP centralized user
authentication and management schema for an arbitrary number of servers and clients
connected to a TCP/IP network. Additionally, we’ll show a web-based administration tool that will make administering the OpenLDAP server easier.
LDAP Administration
Assuming our LDAP server was configured correctly, some typical operations to search for interesting values and attributes of the
configuration are shown in illustration 4 are:
a) Finding LDAP Administrator Entry
In addition to the database directories, the BaseDN, RootDN, and user’s password, the retrieved information also contains the name of indexes created by LDAP database to speed up the queries:
root@laertes:~ # ldapsearch -H
ldapi:// -Y EXTERNAL -b "cn=config" "(olcRootDN=*)"
# base <cn=config> with scope subtree
,cn=auth manage by * break
olcRootDN: cn=admin,cn=config by self write by anonymou
s auth by * none
olcAccess: {2}to * by * read
olcLastMod: TRUE
olcRootDN:
cn=admin,dc=bsd-online,dc=org
olcRootPW:
{SSHA}OaucFEx3RGbjVc+9JLXkfbDP8QBsRM S1
olcDbCheckpoint: 512 30
olcDbIndex: objectClass eq
olcDbIndex: cn,uid eq
olcDbIndex: uidNumber,gidNumber eq
olcDbIndex: member,memberUid eq
olcDbMaxSize: 1073741824
# search result
search: 2
result: 0 Success
# numResponses: 3
# numEntries: 2
b) Modules and backends
Modules are widely used to extend LDAP functionality:
root@laertes2:~# ldapsearch -H
ldapi:// -Y EXTERNAL -b "cn=config" -LLL -Q "objectClass=olcModuleList"
SASL/EXTERNAL authentication started
SASL username:
gidNumber=0+uidNumber=0,cn=peercred, cn=external,cn=auth
SASL SSF: 0
# extended LDIF
#
# LDAPv3
# base <cn=config> with scope subtree
# filter:
(objectClass=olcModuleList)
# requesting: ALL
#
# module{0}, config
dn: cn=module{0},cn=config
objectClass: olcModuleList
cn: module{0}
olcModulePath:
/usr/local/libexec/openldap
olcModuleLoad: {0}back_mdb
# search result
search: 2
result: 0 Success
# numResponses: 2
c) Backends included
root@laertes2:~# ldapsearch -H
ldapi:// -Y EXTERNAL -b "cn=config" -LLL -Q
"objectClass=olcBackendConfig"
SASL/EXTERNAL authentication started
SASL username:
gidNumber=0+uidNumber=0,cn=peercred, cn=external,cn=auth
SASL SSF: 0
# extended LDIF
#
# LDAPv3
# base <cn=config> with scope subtree
# filter:
(objectClass=olcBackendConfig)
# requesting: ALL
#
# {0}mdb, config
dn: olcBackend={0}mdb,cn=config
objectClass: olcBackendConfig
olcBackend: {0}mdb
# search result
search: 2
result: 0 Success
# numResponses: 2
# numEntries: 1
d) Databases
root@laertes2:~# ldapsearch -H
ldapi:// -Y EXTERNAL -b "cn=config" -LLL -Q "olcDatabase=*" dn
SASL/EXTERNAL authentication started
SASL username:
gidNumber=0+uidNumber=0,cn=peercred, cn=external,cn=auth
SASL SSF: 0
# extended LDIF
#
# LDAPv3
# base <cn=config> with scope subtree
# filter: (olcDatabase=*)
# requesting: dn
#
# {-1}frontend, config
dn:
olcDatabase={-1}frontend,cn=config
# {0}config, config
dn: olcDatabase={0}config,cn=config
# {1}mdb, config
# search result
search: 2
result: 0 Success
# numResponses: 4
# numEntries: 3
By default, LDAP servers have three databases numbered from -1, 0, and 1. Their description is given now:
• olcDatabase={-1}frontend,cn=config: This
entry is used to define the features of the special "frontend" database. This is a pseudo-database used to define global settings that should apply to all other databases (unless overridden).
• olcDatabase={0}config,cn=config: This entry is
used to define the settings for the cn=config database that we are now using. Most of the time, this will be mainly access control
settings, replication configuration, etc.
• olcDatabase={1}hdb,cn=config: This entry
defines the settings for a database of the type specified (mdb in this case). These will typically define access controls, details of how the data will be stored, cached, and buffered, and the root entry and administrative details of the DIT.
The latter one numbered 1 is the database used to store all data for our BaseDN
dc=bsd-online,dc=com and corresponds to the red-coloured box in Illustration 4.
Populating LDAP Custom Database
Once the preliminary setup of slapd(8) server configuration is complete, we can now populate our database to handle our BaseDN whose DN is dc=bsd-online,dc=org associated to
olcDatabase{1}. The information we need to provide corresponds to NIS+ services, more specifically focused on password, group and hosts management although it can be expanded to support other of NIS+ tables described in nsswitch.conf(5) file.
a) Querying operational attributes for an entry
root@laertes:~# ldapsearch -H ldap:// -x -s base -b
"dc=bsd-online,dc=org"
# extended LDIF
#
# LDAPv3
# base <dc=bsd-online,dc=org> with scope baseObject
# filter: (objectclass=*)
# requesting: ALL
#
# bsd-online.org
dn: dc=bsd-online,dc=org
objectClass: top
objectClass: dcObject
objectClass: organization
o: BSD Online
dc: bsd-online
# search result
search: 2
# numResponses: 2
# numEntries: 1
If you need more information, add the options -LLL "+" to the ldapsearch(1) command.
Adding NIS+ tables data to the
domain
Now, our OpenLDAP server is
password-protected, and another LDIF file named base.ldif file shall be incorporated with the following contents:
dn: ou=People,dc=bsd-online,dc=org
ou: People
objectClass: top
objectClass: organizationalUnit
dn: ou=Group,dc=bsd-online,dc=org
ou: Group
objectClass: top
objectClass: organizationalUnit
dn: ou=Hosts,dc=bsd-online,dc=org
ou: Hosts
associatedDomain: bsd-online.com
objectClass: top
objectClass: organizationalUnit
objectClass: domainRelatedObject
This file must be inserted by issuing the command below with the RootDN password
defined by our custom database associated to our domain dc=bsd-online,dc=org:
root@laertes:~# ldapadd -x -W -D cn=admin,dc=bsd-online,dc=org -f /etc/openldap/base.ldif
Enter LDAP Password:
adding new entry
"dc=bsd-online,dc=org"
adding new entry
"ou=People,dc=bsd-online,dc=org"
adding new entry
"ou=Group,dc=bsd-online,dc=org"
adding new entry
"ou=Hosts,dc=bsd-online,dc=org"
These entries whose RDN are ou=People,
ou=Group and ou=Hosts correspond to the NIS+ entries in nsswitch.conf(5) file passwd, group, and hosts respectively.
Adding NIS+ users and hosts data to
the domain
Eventually, we need to populate the database with our known hosts and users' account settings. There are two possible approaches:
• Migrate local
/etc/{hosts,passwd,group,shadow} data to LDAP server.
• The fastest way to proceed with such a
migration is to install a copy of PADL Migration Tools which are a set of Perl scripts available at
client tools ldapadd(1) for online migration to LDAP and ldiff2dbm(1) if you prefer an offline migration to LDAP.
These scripts do not only allow migrating hosts and users accounts but also the following local files:
/etc/alias
/etc/networks
/etc/services
/etc/protocols
/etc/netgroup
/etc/rpc
Nevertheless, these scripts use the
passwd/shadow approach used by GNU/Linux and SunOS 5.x systems. However, they do not support the FreeBSD password approach which uses /etc/master.password rather than
/etc/shadow file to store the encrypted passwords of users.
Once these scripts have been downloaded in our FreeBSD system running OpenLDAP server, uncompress the gzipped-tarball:
root@laertes:~# tar xvfz MigrationTools.tgz
Thereafter, replace the default path for Perl executable (for FreeBSD OS, it is placed at
/usr/local/bin/perl.). The easiest way to achieve it is by the use of soft links:
# ln -sf /usr/local/bin/perl /usr/bin/perl
Then, edit the migrate_common.ph file and set up the following variables:
# Default DNS domain
$DEFAULT_MAIL_DOMAIN = "bsd-online.org";
# Default base
$DEFAULT_BASE
dc=bsd-online,dc=org
$EXTENDED_SCHEMA=1
Notice that the Perl variable is required to add organisationalPerson and inetOrgPerson among others to all user accounts.
There are also environment variables that may alter the normal behaviour of PADL Migration Tools. However, for simplicity; we do not reproduce it here as they are detailed in the official documentation.
Now, as a super-user, execute the following shell script:
root@laertes:~/MigrationTools-47# ./migrate_all_offiline.sh
As a result, a set of LDIF files containing the data are released:
• base.ldif, which contains the domain data,
which has been defined.
• group.ldif, which contains /etc/group data in LDIF format
• hosts.ldif, which contains /etc/hosts data
in LDIF format
Now is the moment to feed up the OpenLDAP server database with our hosts, passwd, and other databases using these files mentioned above:
• If you are more ambitious, you can also use
migrate_all_nis_offline.sh script to migrate all NIS/YP files.
• Add data step by step using ldapadd(1) or
ldapmodify(1).
In such a case, we can generate individual LDIF files for each of the /etc files we plan to migrate to LDAP. The safest approach is the use of PADL Migration Tools scripts. Hence, to generate the LDIF files corresponding to hosts,
passwd/shadow, and group local data files at /etc/, execute the following shell scripts:
root@laertes:~/MigrationTools-47# ./migrate_hosts.pl /etc/hosts > hosts.ldif
root@laertes:~/MigrationTools-47# ./migrate_group.pl /etc/group > group.ldif
root@laertes:~/MigrationTools-47# ./migrate_passwd.pl /etc/passwd > passwd.ldif
These three LDIF files can be uploaded to our LDAP server by issuing the ldapadd(1)
commands:
root@laertes:~# ldapadd -x -W -D cn=admin,dc=bsd-online,dc=org -f group.ldif
root@laertes:~# ldapadd -x -W -D cn=admin,dc=bsd-online,dc=org -f hosts.ldif
root@laertes:~# ldapadd -x -W -D cn=admin,dc=bsd-online,dc=org -f passwd.ldif
root@laertes:~# ldapadd -x -W -D cn=admin,dc=bsd-online,dc=org -f hosts.ldif
Once again, recall that we can use these scripts in another computer running Unix-like OS such as GNU/Linux to migrate its local /etc/ files to our LDAP server running on FreeBSD.
Tuning LDAP Access. Indexes Usage
Eventually, to improve LDAP performance, the indexes set up during the OLC configuration phase may be rebuilt by stopping our slapd(8) daemon and using the slapindex(8) command
root@laertes:~#
/usr/local/etc/rc.d/slapd stop
root@laertes:~# slapindex
root@laertes:~#
/usr/local/etc/rc.d/slapd start
To add new indexes, just use the following OCL file, new_indexes.ldif, with ldapmodify(1)
command:
dn: olcDatabase={2}hdb,cn=config
changetype: modify
olcDbIndex: uid pres,sub,eq
And execute the command:
[root@mcn241 ~]# ldapmodify -Y EXTERNAL -H ldapi:/// -f
new_indexes.ldif
To recreate a given index, stop slapd process and issue the slapindex(8) command for our database which is numbered 1 with the
argument “-n 1”. Otherwise, you will index both, configuration database and the custom database to allocate data from BaseDB
dc=bsd-online,dc=org.
root@laertes:~#
/usr/local/etc/rc.d/slapd stop
root@laertes:~# slapindex -n 1 uid
root@laertes:~#
/usr/local/etc/rc.d/slapd start
Notice that if you do not specify the database number to be used by all slap-commands, the main configuration database numbered “0” will be used by default. For further details, remember the already shown olcDatabase attribute
objects shown in previous sections.
Indexes recreation is an essential task to speed up the search operations in LDAP server
databases, and shall be performed on a regular basis.
Useful administration tools for LDAP
At this point, the reader is aware that dealing with LDIF files to add, modify or delete data is a tricky task. There are a bunch of tools to provide user-friendly interfaces for LDAP administration such as PHPldapadmin to make things easier. The interface is nothing other than a web front-end built in PHP 5.6 to interact with the slapd(8) daemon.
To get a fully working LDAP-based front-end, download the package into our FreeBSD host running LDAP server using portmaster(8) command:
The above command installs
phpldapadmin-1.2.3_7,1 and php-ldap for FreeBSD 11.1 distribution at
/usr/local/www/phpldapadmin/ directory. Moreover, it adds the following entry to
/usr/local/etc/php/ext-20-ldap.ini configuration file to automatically load the installed extension:
extension=ldap.so
To make phpLDAPadmin available through your web site, install Apache 2.4 server and the required PHP 5.6 module:
root@laertes:/usr/ports # portmaster www/apache24
root@laertes:/usr/ports # portmaster www/mod_php56
The commands install www/libnghttp2 (libnghttp2-1.26.0), mod_php56-5.6.31, www/apache24 (apache24-2.4.27_1), and mod_php56-5.6.31 packages together with the required PHP module so that the server can interact with PHP files. Next, add the entry:
apache24_enable="YES"
in /etc/rc.conf file and start the httpd(8) server:
root@laertes:/usr/local/etc/rc.d # ./apache24 start
My suggestion for HTTP configuration is to add something like the following to httpd.conf:
Alias /phpldapadmin/
"/usr/local/www/phpldapadmin/htdocs/ "
<Directory
"/usr/local/www/phpldapadmin/htdocs" >
Options none
AllowOverride none
Order Deny,Allow
Deny from all
Allow from 127.0.0.1 .bsd-online.org
</Directory>
in your HTTP server configuration file, and edit configuration file config.php at
/usr/local/www/phpldapadmin/config/ directory with the following settings:
$servers->newServer('ldap_pla');
$servers->setValue('server','name',' LDAP Server');
$servers->setValue('server','host',' 127.0.0.1');
$servers->setValue('server','port',3 89);
$servers->setValue('server','base',a rray(''));
$servers->setValue('login','auth_typ e','cookie');
$servers->setValue('login','bind_id' ,'');
$servers->setValue('login','bind_pas s','');
$servers->setValue('server','force_m ay',array('uidNumber','gidNumber','s ambaSID' ));
It is prudent to remark that the following setting:
$servers->setValue('login','attr','d n');
will allow you to log into HTTP/S interface using DN cn=admin,dc=bsd-online,dc=org and the BindDN password defined earlier by the
slappasswd(8) command. Now, open a session with your favourite web browser and point out the URL whose IP address matches the one for our FreeBSD OpenLDAP server. Then,
authenticate yourself using rootDN user data before getting the page shown in Illustration 5.
Also, try to navigate across the hierarchy of database associated to the BaseDN example shown in Illustration 6 which chose
dc=bsd-online,dc=org . You will discover how easy it is now to add, remove or modify these values and attributes stored on it.
A Use Case. NIS+ Management using
LDAP Server
Suppose we encounter a scenario in which we have an OpenLDAP server on a FreeBSD host with the data migrated using the procedure described in the previous section. This LDAP server will be used to provide centralised NIS+ data for an arbitrary farm of GNU/Linux servers running DEB-based and RPM-based
distributions.
These GNU/Linux servers will play the role of LDAP clients contacting with our LDAP server using NSS PAM LDAP services according to the procedures described in the following
paragraphs.
Client Configuration (DEB-based
distributions)
/etc/ldap.conf, /etc/nsswitch.conf and /etc/pam.d/system-auth:
Let's start with ldap.conf, the ldap's client configuration file.
BASE dc=bsd-online,dc=org
URI ldap://192.168.1.10
HOST 192.168.1.10
scope sub
suffix
"dc=bsd-online,dc=org"
## when you want to change user's password by root
rootbinddn
cn=admin,dc=bsd-online,dc=org
## there are needed when your ldap dies
timelimit 5
bind_timelimit 5
pam_password exop
ldap_version 3
pam_filter objectclass=posixAccount
pam_login_attribute uid
pam_member_attribute memberuid
nss_base_passwd
ou=Computers,dc=bsd-online,dc=org
nss_base_passwd
ou=People,dc=bsd-online,dc=org
nss_base_shadow
ou=People,dc=bsd-online,dc=org
nss_base_group
ou=Group,dc=bsd-online,dc=org
nss_base_hosts
ou=Hosts,dc=bsd-online,dc=org
Now, modify the entries in nsswitch.conf so that they can appear as shown below:
passwd: files ldap
shadow: files ldap
group: files ldap
Thereafter, ensure the following entries are present in /etc/pam.conf file:
auth required pam_env.so
auth sufficient pam_unix.so likeauth nullok
auth sufficient pam_ldap.so use_first_pass
auth required pam_deny.so
account sufficient pam_ldap.so
account required pam_ldap.so
password required
pam_cracklib.so difok=2 minlen=8 dcredit=2 ocredit=2 retry=3
password sufficient pam_unix.so nullok md5 shadow use_authtok
password sufficient pam_ldap.so use_first_pass
password required pam_deny.so
session required pam_limits.so
session required pam_unix.so
session optional pam_ldap.so
Eventually, test the LDAP configuration using the best available tool, getent(1):
$ getent passwd
$ getent hosts
$ getent group
Getent tool enables all data present in our FreeBSD LDAP server is available at our
GNU/Linux client. Notice that you should get the result twice in case you did not remove the local data if nss_ldap is working fine. Also, PAM might be tested by deleting a user from /etc/passwd file, and trying to log in through SSH.
Client Configuration (RPM-based
distributions)
For clarity, suppose a GNU/Linux computer is running CentOS 7 or RHEL 7 distribution release. First, you must install the following packages:
# rpm -i
openldap-clients-2.4.40-8.el7.x86_64 .rpm
# rpm -i
nscd-2.17-105.el7.x86_64.rpm
# rpm -i
nss-pam-ldapd-0.8.13-8.el7.x86_64.rp m
If SElinux is enabled, it squashes client
authentication connectivity and users will fail to log in. To avoid this undesired inconvenience, issue the command below in server/clients:
# setsebool -P allow_ypbind=0 authlogin_nsswitch_use_ldap=0
In such a case, there exist two options instead of the deprecated authconfig-tui to configure LDAP clients: nslcd and sssd, whether you want to use NSS or SSS approach, which provides NSS and PAM modules support. In case of NSS, the process of configuring an LDAP client to use centralised LDAP repository is
summarised below:
# authconfig --enableldap --enableldapauth –
ldapserver=192.168.1.10
Also, check the accuracy of the configuration by typing the following command:
# authconfig --test
caching is disabled
nss_files is always enabled
nss_compat is disabled
LDAP+TLS is disabled
LDAP server =
"ldap://192.168.1.10/"
LDAP base DN =
"dc=bsd-online,dc=org"
Ultimately, if you want to enable LDAP+TLS support to increase security on LDAP
communication, use the OpenSSL package to generate the X.509v3 self-signed certificate.:
# scp
[email protected]:/etc/openldap/cert s/cert.pem /etc/openldap/cacerts
# authconfig --enableldaptls --update
getsebool: SELinux is disabled
Then, check if everything is working well:
# getent passwd c20395
c20395:x:10452:5100:ALOS ALQUEZAR; Jose
Bernardo:/homesun/c20395:/bin/tcsh
In case you prefer SSSD option, the following package should be installed before running authconfig-tui tool:
# rpm -i
sssd-1.13.0-40.el7.x86_64.rpm
If you encounter any trouble, pay attention to the system logs. In both cases (SSS/NSLCD), use authconfig-tui command to disable the default use of TLS certificates for Secure LDAP connection.
Conclusions and Remarks
Anyway, a professional deployment of LDAP servers requires redundancy and replication mechanisms provided by syncrepl(8). syncrepl(8) is a replacement of the former slurpd(8) which was provided by the previous OpenLDAP releases due to its lack of reliability. In as much as replication has not been
introduced here, it should be taken into account to ensure high-availability to provide centralized NIS+ services for a set of Unix-like servers.
Similarly, the use of referrals in LDAP servers has not been discussed due to limited time and space which as you have noticed, were dedicated to focus on the main goal of this article.
It is important to remark that the process of building and populating LDAP server is not free from mistakes. For this reason, it is imperative to get familiar with the debugging options to
References and Bibliography
Howes, Gordon S. Good, Mark
Smith; Macmillan Publishing, USA
Understanding and Deploying LDAP Directory Services Authentication and Security Layer (SASL)
DSA Directory Specific Agent
DIT Directory Information Tree
DSE DSA Specific Entry
OCL OpenLDAP Online Configuration
DN Distinguished Name
RDN Relative Distinguished Name
LDIF LDAP Data Interchange Format
LDAP Lightweight Directory Access Protocol
NSS Name Service Switch
PAM Pluggable Authentication Modules
SSL Secure Sockets Layer
TLS Transport Layer Security
SASL Simple Authentication and Security Layer
OID Object Identifier
MDB Memory-Mapped Database
LMDB Lighting Memory-Mapped Databases
YP Yellow Pages
Meet the Author
José B. Alós has developed an important part of his professional career since 1999 as an EDS
FreeBSD
What is a Bitcoin ?
Bitcoin is a valuable popular open-source cryptocurrency that was invented by Satoshi Nakamoto in 2009. Bitcoins have value because they possess same characteristics like money
(durability, portability, fungibility, scarcity,
divisibility, and recognizability), but based on the properties of mathematics rather than on
physical properties (like gold and silver) or trust in central authorities (like fiat currencies). In short, Bitcoin is backed by mathematics.
Bitcoin Full Node on
FreeBSD
What is a Bitcoin?
What is a Bitcoin Wallet?
What is a Blockchain?
What is Mining?
What is Pooled Mining?
What is a Full Node?
What is a Bitcoind?
Bitcoin is the first decentralized peer-to-peer cryptocurrency that is controlled by its users.
Transactions take place directly between users, and are later verified by network nodes with digital signature and then placed in a public distributed ledger called a blockchain. Bitcoin is unique in that only 21 million bitcoins will ever be created. The unit of the bitcoin system is bitcoin or mBTC.
What is a Bitcoin Wallet ?
A wallet is nothing more than a pair of public and private keys that are created by a client to store the digital credentials for your bitcoin.
There are several types of wallets:
• Desktop Wallet
• Token Wallet
• Online Wallet
• Mobile Wallet
A token wallet is the safest way to work with bitcoin network, but you can use your mobile or pc as a bitcoin wallet.
What is a Blockchain?
A blockchain is a ledger that records bitcoin transactions. The blockchain is a distributed database that achieves independent verification of the chain of ownership. Each network node stores its own copy of the blockchain.
Transactions will broadcast on the bitcoin network, and about 2400 transactions create a block. These blocks are building blocks of the blockchain.
What is Mining?
Mining is the process of dedicating computing power to process transactions, secure the network, and keep everyone in the system
synchronized together. It has been designed to be fully decentralized.
Miners need mining software with specialized hardware. Mining software listens for
transactions broadcasted through the
peer-to-peer network and performs appropriate tasks to process and confirm these transactions. Bitcoin miners perform this work because they can earn transaction fees paid by users for faster transaction processing.
New transactions have to be confirmed then be included in a block along with a mathematical proof of work. Such proofs are very hard to
generate because there is no way to create them other than by trying billions of calculations per second. Hence, miners are required to perform these calculations before their blocks are
accepted by the network and before they are rewarded. As more people start to mine, the difficulty of finding valid blocks is automatically increased by the network to ensure that the average time to find a block remains equal to 10 minutes. As a result, mining is a very competitive business where no individual miner can control what is included in the blockchain.
The proof of work is also designed to depend on the previous block to force a chronological order in the blockchain. This makes it exponentially difficult to reverse previous transactions because it would require the recalculation of the proofs of work of all the subsequent blocks. When two blocks are found at the same time, miners work on the first block they receive and switch to the longest chain of blocks as soon as the next block is found. This allows mining to secure and maintain a global consensus based on
processing power.
What is Pooled Mining?
You have more chances if you participate with others to create a block. In a pool, all
participating miners get paid every time a
depends on the amount of work an individual miner contributed to help find that block.
What is a Full Node?
A full node is a client that fully validates
transactions and blocks. Full nodes also help the network by accepting transactions and blocks from other full nodes, validating those transactions and blocks, and then relaying them to further full nodes.
Many people and organizations volunteer to run full nodes using spare computing and bandwidth resources.
What is a Bitcoind?
bitcoind is a Bitcoin client under the MIT license in 32-bit and 64-bit versions for Windows,
GNU/Linux-based OSes, Mac OS X, OpenBSD and FreeBSD as well.
How To Start Bitcoind To Be Full
Node?
Install bitcoind by PKG:
#pkg install bitcoin-daemon
Install bitcoind by source:
#fetch
https://github.com/UASF/bitcoin/arch ive/v0.14.2-uasfsegwit1.0.tar.gz
#tar xzvf
v0.14.2-uasfsegwit1.0.tar.gz
#cd bitcoin-0.14.2-uasfsegwit1.0
Install dependencies:
Then config build and install Bitcoind:
#./autogen.sh
#./configure –without-gui
Since we are in command line, GUI is not required and –without-gui will disable it.
#gmake
#gmake install
Start Bitcoind client and wait full-sync with other nodes:
#bitcoind -daemon
bitcoind will download database that is about 150GB. You can check your node status by clicking on this URL:
https://bitnodes.earn.com
Conclusion
Cryptocurrencies are replacement for banking we know today, and bitcoin is the game changer. Mining bitcoin with typical hardware is not a good idea. It needs specialized devices like
ASIC, but you can create a full node and help the bitcoin network.
Useful Links
https://en.wikipedia.org/wiki/Cryptocurrency
https://bitcoin.org/en/faq
Meet the Author
Abdorrahman Homaei has been working as a software developer since 2000. He has used FreeBSD for more than ten years. He was involved with the meetBSD dot ir and performed serious trainings on FreeBSD. He started his company, etesal amne sara tehran, in Feb 2017, and it is
based in Iran Silicon Valley.
Full CV: http://in4bsd.com
Blog Presentation
Interview with
Carlos Klop
SOLRAC
Please tell us about yourself?
I am Carlos Klop. I live in Netherlands and have been working in IT for 14 years now. When it’s windy outside, I am either out kitesurfing or behind my computer.
How you first got involved with programming? What was your path?
In 2000, I started to create a forum for a group of friends with PHP 3 and MySQL server. From there, I became interested and figured out myself how to program. Later in 2005, I learnt how to program in Java at school. From there, I did some small C++ and Object-C projects. The last 6 years, I worked for companies that had Microsoft C#/.NET developers, and that was when I primarily got involved in programming.
Reading your blog, we can see that you have a wide field of expertise. Please tell us which is your favorite area?
Automating workflows is what I like the most. At this moment, I pick a programming language that
fits the job and that I have experience with. In the feature, maybe I did focus on specific areas, but for now, I like the diversity. But if I have to pick a favorite one for the last year, about it would be Microsoft Azure. I started to work with Microsoft Azure from the beginning and hence reserve a lot of questions about it. From last year, I think it has been my favorite since it has enabled me to
create ARM templates, make C# scripts to work with data in blob storage, and assist customers migrate from on-premise Windows environments to Microsoft Azure platforms.
What is the most interesting programming issue you’ve encountered, and why was it so amazing?
One of the web shops we hosted was crashing all the time on the eight front-end server we had running. It was a C# / .NET Framework
application and it was running on Windows Server. We discovered that it used more than 15GB of memory before it crashed. The memory usage was astonishingly more than 4GB we had expected during normal operations. The problem was that the high season for this web shop had commenced, and we had one week to fix this. None of the developers could tell us where the problem was. So, we started the investigation by cutting the Web Application in pieces and
running them in separated servers with a reverse proxy in front. We could separate the web
application with the URL used. Hence, I created a few rewrite rules for it. Splitting the application was costing us already a few days since it was one big monolithic application. After identifying the crashing pieces, we started debugging and we found out that the XML converter tool was causing high memory usage. Because the XML converter was not used all the time, we had troubles to find exactly where the issue