LEVEL 1
Automotive Technician Training (ATT)
Copyright © ATT Training Ltd. – Tom Denton, BA, FIMI, MIRTE, MSAE, Cert Ed
Online editions may also be available for this title. Please visit www.atttraining.com for more information.
All rights reserved by the author. No part of this publication can be reproduced, stored in a retrieval system, or transmitted
ACKNOWLEDGEMENTS
Over the years many people have helped in the production of my books. I am therefore very grateful to the following companies who provided information and/or permission to reproduce
photographs and/or diagrams:
AA Photo Library AC Delco
Alpine Audio Systems ATT Training (UK and USA)
Clarion Car Audio Delphi Media Eberspaecher
Fluke Instruments UK Ford Motor Company Ford Media
Mercedes Cars UK Mitsubishi Cars UK NGK Plugs
Nissan Cars UK Most Corporation Peugeot UK
Philips PicoTech Pioneer Radio Porsche Cars UK Robert Bosch GmbH. Robert Bosch UK Rover Cars Sun Electric UK
Unipart Group
Lucas UK LucasVarity
Toyota Cars UK Tracker UK
HOW TO USE THIS BOOK
Introduction This book is for use with the ‘Automotive
Technician Training’ blended eLearning material. The text and images are the same on screen and in this book – most
importantly, the images on screen are much larger and often animated.
Diagrams Most of the diagrams in this book have numbered (or similar) labels. Use the computer material to find out what the labels should say and then write them in to the book. In some cases there will be a blank space where the diagram from the screen should be drawn in.
Notes Use this book as a workbook, make notes, add bullet points, underline things, make sketches and highlight important points. This is your book, so use it in whatever way works for you!
Online In most cases you will probably access the computer based materials through a college or training centre. However, the learning screens, questions, worksheets, activities (and more!) are also available at: www.atttraining.com.
Worksheets Practical worksheets, for use under supervision in the workshop, are included in a separate book as a PDF or
printing. These match all the tasks outlined in this book as well as covering more practical activities.
Symbols A number of symbols are used as a reminder that you should complete different tasks:
Check the computer for animations or videos ()
Complete self-assessment questions
Draw a diagram in this space
Look back over the previous section and write out a list of the key bullet pointsCONTENTS
Acknowledgements . . . 2
How to Use this Book . . . 4
General Introduction . . . 1 8
Vehicle Layouts and Introduction ... 18Health and Safety on Vehicles ... 35
Maintenance, Regulations and Information ... 49
Reasons for Maintenance and Inspections ... 49
Information Sources, Recording and Regulations ... 52
Workshop Bench Skills ... 54
Introduction ... 54
Fitting and Machining ... 54
Filing ... 56
Drilling... 57
Cutting ... 58
Thread Cutting ... 60
Soldering ... 71
Brazing ... 72
Welding ... 72
Shrinking ... 75
Riveting ... 77
Gaskets ... 78
Sealants ... 80
Oil Seals ... 81
Valeting ... 84
Overview, equipment and safety ... 84
Exterior cleaning ... 89
Interior cleaning ... 100
The Motor Trade ... 103
Introduction ... 103
Types of MV companies ... 105
Company Structure ... 107
Estimating Costs and Times ... 112
Job Cards and Systems ... 113
Invoicing ... 114
Computerised Workshop System ... 116
Warranties ... 124
Background Studies ... 126
Introduction ... 126
Science... 131
Electricity ... 140
Materials ... 152
Mechanical Machines ... 155
Maths ... 159
Drawings ... 162
Safety and General Units . . . 1 67
Contribute to Workplace Good Housekeeping ... 167Legal Requirements ... 167
Introduction to Health and Safety ... 179
Health and Safety Regulations ... 182
Good Working Practices ... 187
Look after Yourself, Your Workshop and Your Workmates . 193 Maintain Positive Working Relationships ... 203
Working Relationships ... 203
Communication ... 206
Engine Systems . . . 21 9
Engine Mechanical ... 219Introduction and Operating Cycles... 219
Engine Components ... 239
Engine Operating Details ... 243
Engine Terminology and Systems ... 269
Routine Maintenance ... 309
Engines – Customer Care ... 319
Engine Lubrication ... 321
Lubrication System Operation ... 328
Oil Pumps and Filtration ... 332
Routine Maintenance ... 342
Lubrication – Customer Care ... 348
Engine Cooling ... 350
Introduction ... 350
System Requirements ... 356
Components and Operation ... 358
Cooling & Heating ... 365
Antifreeze ... 368
Routine Maintenance ... 370
Air Supply, Exhaust and Emissions ... 377
Air Pollution from Motor Vehicles ... 377
Engine Combustion ... 381
Systems Development for Environmental Protection ... 384
Air-Supply System and Intake Air Temperature Control .... 387
Air and Exhaust – Customer Care ... 412
Ignition ... 416
Introduction ... 416
Components ... 420
Spark Plugs and Secondary Circuit ... 432
Electronics and System Operation ... 443
Dwell and Timing ... 451
Tools and Equipment ... 456
Routine Maintenance ... 460
Fuel Systems ... 472
Introduction ... 472
Carburettors (optional) ... 480
Electronic Fuel Injection Systems ... 500
Diesel Introduction ... 535
Tools and Equipment ... 555
Routine Maintenance ... 561
Electricity and the Atom ... 571
Basic Electric Circuits and Magnetism ... 576
Vehicle Electrical Components and Circuits ... 582
Tools and Equipment ... 597
Routine Maintenance ... 599
Electrical and Electronic – Customer Care ... 602
Engine Electrical ... 604
Introduction and Battery Construction ... 604
Battery Capacity and State of Charge ... 609
Battery Types and Charging ... 615
Checking Batteries ... 626
Battery Charging ... 634
Remove and Refit Batteries and Components ... 638
Servicing and Routine Repairs... 644
Battery, Starting and Charging – Customer Care ... 648
Lighting and Indicators ... 650
Tools and Equipment ... 664
Routine Maintenance ... 668
Lighting – Customer Care ... 672
Body Electrical and Electronic Systems... 674
Washers, Wipers and Heated Screens ... 674
Horns, Obstacle Avoidance and Cruise Control ... 682
Mobile Multimedia ... 691
Tools and Equipment ... 699
Routine Maintenance ... 701
Body Electrical – Customer Care ... 705
Monitoring and Instrumentation ... 708
Sensors ... 708
Gauges ... 713
Tools and Equipment ... 720
Routine Maintenance ... 722
Instrumentation – Customer Care ... 726
Tools and Equipment ... 735
Routine Maintenance ... 739
Heating and AC – Customer Care ... 744
Chassis Systems . . . 747
Suspension ... 747
Reasons for suspension ... 747
Springs ... 758
Dampers/Shock Absorbers ... 771
Tools and Equipment ... 779
Routine Maintenance ... 783
Suspension – Customer Care ... 788
Steering ... 790
Introduction to Steering ... 790
Steering Racks and Boxes ... 795
Introduction to Power Steering ... 808
Tools and Equipment ... 812
Introduction ... 822
Disc, Drum and Parking Brakes ... 830
Hydraulic Components ... 839
Tools and Equipment ... 846
Routine Maintenance ... 850
Brakes – Customer Care ... 855
Wheels and Tyres ... 857
Types of Wheel ... 857
Wheel rims and fixings ... 861
Tyres Introduction ... 867
Wheel Balancing ... 875
Tools and Equipment ... 879
Routine Maintenance ... 883
Wheels and Tyres – Customer Care ... 886
Transmission Systems . . . 888
Manual Transmission Clutch ... 888
Tools and Equipment ... 901
Routine Maintenance ... 905
Clutch – Customer Care ... 908
Manual Transmission Gearbox ... 910
Gearbox Operation ... 910
Gear Change Mechanisms ... 914
Tools and Equipment ... 920
Routine Maintenance ... 924
Manual Gearbox – Customer Care... 926
Transmission Driveline ... 929
Propshafts ... 929
Driveshafts ... 932
Rear Wheel Drive Bearings ... 936
Front Wheel Drive Bearings ... 941
Tools and Equipment ... 944
Routine Maintenance ... 947
Differential Operation ... 961
Tools and Equipment ... 966
Routine Maintenance ... 971
GENERAL INTRODUCTION
VEHICLE LAYOUTS AND INTRODUCTION
(Remember to add notes and bullet points from each screen as you work through the material)
Introduction This section is a general introduction to the car as a whole. Over the years many unusual designs have been tried, some with more success than others. The most common is of course a rectangular vehicle with a wheel at each corner! To take this rather simple idea further, we can now put ‘light vehicles’ in one of five groups:
Rear engine driving the rear wheels
Mid-engine driving the rear wheels
The most common layout these days is the front engine, front wheel drive vehicle. This will be examined in more detail in a later.
Terminology Here are some useful words and abbreviations to learn:
FWD
RWD
AWD
4WD
Light vehicle
Light vehicle types
These can range from small two-seater
different types; saloon, estate, hatchback, coupe, convertible, van and a pick-up truck.
Vehicle systems This is a term used to describe a set of related components on the vehicle. For
example all the components used to make the brakes work, are described simply as the ‘braking system’.
A bit of history As you learn more about the fascinating world of the automobile, you will keep meeting ‘new’ technologies. I have included a list of events and dates for you to see that
some new ideas are not as ‘new’ as you first thought! By the way you don’t need to learn this bit, it is for interest only.
• 1769 Cugnot built a steam tractor in France. • 1801 Trevithick built a steam coach.
• 1860 Lenoir built an internal-combustion gas engine. • 1876 Otto improved the gas engine.
• 1885 Daimler developed a petrol engine and fitted it to a bicycle.
• 1885 Benz fitted his petrol engine to a three-wheeled carriage.
• 1938 Germany produced the Volkswagen Beetle.
• 1948 Jaguar launched the XK120 sports car and Michelin introduced a radial-ply tyre.
• 1955 Citroen introduced a car with hydro-pneumatic suspension.
• 1957 Wankel built his first rotary petrol engine. • 1959 BMC (Rover Cars) introduced the Mini.
• 1966 California brought in legislation regarding air pollution by cars.
• 1991 European Parliament voted to adopt stringent control of car emissions.
• 2006 Satellite navigation systems are used on many vehicles
• 2007 Telematics becomes more important and more accurate satellite navigation is introduced
• 2008 Combined active and passive safety systems • 2009 The story continues with you!
Front engine FWD
A design of vehicle with the engine at the front has a number of advantages.
• Protection in case of a front end collision
weight is at the front
• Front wheel drive adds further advantages particularly if the engine is mounted sideways on (transversely).
• More room in the passenger compartment
• Power unit can be made as a complete unit
• Drive acts in the same direction that the steered wheels are pointing
Front engine RWD Rear wheel drive from a front engine was the method used for many years. Some
joints such as used by front wheel drive vehicles, are not needed. Four wheel drive combines all the good points mentioned above but does make the vehicle more complicated and
therefore expensive. The main difference with four wheel drive is that an extra gearbox known as a transfer box is needed to link the front and rear wheel drive.
Mid-engine Fitting the engine in the mid position of a car has one major disadvantage; it takes up space inside the vehicle. This makes it impractical for most ‘normal’ vehicles. However, the distribution of weight is very good. This makes it the choice of high
performance vehicle designers. A good example is the Ferrari Testarossa. Mid-engine is used to describe any vehicle where the engine is between the axles, even if it is not in the middle!
Chassis Vehicle chassis can be of two main types: separate or integrated. Separate chassis are usually used on heavier
vehicles. The integrated type, often called monocoque, is used for almost all cars.
Body Shown here is a car and a list of body panel names. Click the buttons in turn to reveal the panel or other body
component.
Front engine FWD detailed layout Front engine front wheel drive is now the most common layout, so this will be used for a more detailed explanation. All layout designs however, have similar major components and these operate in much the same way. The main systems of a front engine front wheel drive car are as follows:
• Power train, consisting of; Engine, clutch, gearbox, final drive and drive shafts (engine and transmission system combined).
Power train There are various groupings of engine, clutch, gearbox and final drive. One of the most common is shown
here. The basic power flow, meaning the way in which energy is passed through the system, is as follows:
As fuel and air mixture is
ignited above the pistons, they push on connecting rods which are on cranks, just like a
cyclists legs driving pedals. This makes the crankshaft rotate. Power is passed
Engine A fuel air mixture enters through an inlet
manifold and is fired in each cylinder in turn. This expands and pushes down on the piston. The spent gases leave via the exhaust system. The power is applied to the crankshaft. The pulses of power from each piston are smoothed out by a heavy flywheel. Power leaves the engine through the
flywheel which is fitted on the rear of the rotating
crankshaft and passes to the clutch.
is fixed so that it rotates with the clutch driven plate but it can slide slightly. The clutch, or driven plate has friction linings. The clutch is engaged when the pedal is up because the clutch springs and pressure plate hold the driven plate
against the flywheel. This makes the drive pass to the gearbox. To disengage the clutch the pedal is pressed down. A release bearing makes the pressure plate move back away from the flywheel, and frees the driven plate from the flywheel. No drive is now passed to the gearbox.
in first gear, power is
transferred from a small to a larger gear, and then out to the final drive. Different stages of speed reduction (second and third gear) are created using different sizes of gear. Less speed out of the gearbox has a higher turning force (torque) because the engine is running faster. Fourth gear normally makes the output shaft turn at the same speed as the engine. Fifth gear makes the output shaft run faster than the engine for economical higher speed driving.
Final drive The final drive assembly of a front wheel drive vehicle has two main tasks:
different types of vehicles and engines. • Different speeds to the
drive shafts must be possible by a unit called the differential. This is needed because when the vehicle is cornering the road wheels turn at different speeds.
Drive shafts The two drive shafts each have two constant velocity (CV) joints. They are heavy duty steel shafts and simply pass the drive to the wheels. The joints are needed because the movement of the steering and suspension
Braking system Hydraulic brakes are used to slow down or stop the vehicle. The hand brake uses a mechanical linkage to operate parking brakes. The main brakes work on all four wheels and the hand brake usually just on the rear. The hydraulic principle is that foot pressure on the brake pedal pushes fluid under pressure to all four wheels. Braking
materials (friction linings) are pressed against rotating
surfaces, slowing them down thereby slowing down the
vehicle. Discs, normally on the front, are gripped between pads of friction lining. Drums, normally on the rear, are
gripped on their inside
Steering system Both front wheels are linked mechanically and must turn together to provide steering control. The image here shows a rack and pinion. The steering wheel is linked to the pinion and as this is turned it moves the rack to and fro. This moves both the wheels. Many vehicles have power assisted steering which uses a pump driven by the engine to make turning the steering wheel easier. Some very modern systems use small electric motors for this task.
Suspension system The main reasons for the suspension system are as follows:
steering forces
• Allow for different loads of passengers and luggage A single trailing arm with coil springs and damper on the rear and strut with a coil spring and built in damper on the front are shown here. Many
variations of design are used but the principle is the same. Tyres also absorb road shock and play a very important part in road holding. Most of the remaining shocks and
vibrations are absorbed by springs in the drivers and passengers seats.
Draw the suspension spring before and after the wheel hits a bump…
Summary Layouts of a vehicle vary as do body styles and
shapes. However, the main systems of a light vehicle are very similar. These are the:
• Power train
• Braking system
• Steering system
• Suspension system
• Electrical system
These systems are covered in more detail in other sections of ‘Automotive Technician Training’
HEALTH AND SAFETY ON VEHICLES
This section is an overview of some key aspects relating to safe working practices. Every subject or topic of the
multimedia material has some further guidance that you should also work through as you study each area.
Lifting and Supporting the Vehicle Lifting and supporting the vehicle should follow standard safe working practices
particularly when under vehicle inspection and repair work is required. The vehicle should be lifted on the manufacturer's specified lifting and supporting points. When using a vehicle lift do not exceed the safe weight limit (SWL) and be careful to distribute the weight so that the vehicle does not over balance when the weight of the engine is transferred to the engine crane or taken by a trolley.
Mechanical Lifting Whenever lifting an engine inspect the crane, and chains, slings or ropes before use. Always keep sling legs as long as possible in order to reduce the strain in each leg. Exceeding an angle of 90° should be avoided. The stress in the pair of legs is approximately one and a half times the weight of the engine at a 90° angle. Carefully select the lifting eye
positions to ensure that they will not bend or shear. Keep
squashed. Take care to avoid damage to other components of the vehicle.
Sharp Objects Engine components are made from hard
materials by various manufacturing methods that can produce very sharp corners. Minor cuts are common but more serious cuts can occur. Always treat cuts and grazes immediately. Avoid close work by selecting tools that bring hands away from sharp points. Socket extensions are suitable for this.
Protective Clothing During cleaning operations, chemicals or hot water or steam are used and personal protective clothing and procedures that are described in the manufacturer's manuals or data sheets must be followed.
Engine Oils Particular points to be aware of, and to take care with, are hot oil, the health hazards of engine oils, and proper disposal to avoid environmental contamination.
Oil drainer in use
Oily Rags and Contaminated Clothing Never keep oily rags in overall, or other pockets, and change out of oil-contaminated clothing as soon as reasonably possible.
Disposing of Used Engine Oils Dispose of used engine oil to a licensed waste-disposal company, or to an approved collection point. Never pour any oils into a drain or onto the ground. Oils are often carcinogenic and can cause cancers.
Grade and Type of Oil In consideration of the ‘duty of care’ to
other people’s property, always be careful to use the correct grade and type of oil for oil changes.
Pressure-Relief Valves Pressure-relief valves are controlled by spring tension. Always wear safety goggles when removing and replacing these because they can, in some circumstances, fly out with their own spring force.
Oxyacetylene When removing parts of the exhaust system, it may be necessary to use an oxyacetylene flame to heat up pipes. This is to free them so they can be separated. Always follow standard safety precautions for the use of the equipment. Be very careful that the flame is directed ONLY onto the exhaust-pipe joint, and always pointing away from fuel exhaust-pipes and the vehicle floor. Use protective screens where flammable
battery whenever it is not required for the current task. Mark off with warning signs a ‘no naked flames’ work area. Obtain, and keep close by, a suitable fire extinguisher such as CO2. When
checking cylinder compressions or any similar task disable the ignition system.
Check which extinguishers are safe to use on fuel fires
Draining Fuel Never drain fuel into an open container such as a bowl, oil drain tray or cans where there is a risk of spillage from overfilling. Always use a pumped, sealed and earthed or
grounded tank that is specially constructed for the job.
Fuel drainer
Pressurised Systems Many fuel systems are pressurised. The hazard from pressurised fuel occurs when the pressure is
released. In the case of petrol, the risk is from a spray when a pipe or hose is loosened or punctured. The petrol spray could cause a fire if ignited and a personal injury if sprayed into the eyes. Involuntary movement into a rotating component is also possible. Always wear safety goggles when working with
pressurised fuel lines.
Fuel is under pressure
Compressed Air It is sometimes required to use an air line to clean components or fuel pipelines. Take care with compressed air. It must not be directed towards the skin. Always wear safety goggles when using an air line.
Diesel Injection Systems Diesel injection systems work at very high pressures. Particular care must be exercised to ensure
that diesel fuel is not injected through the skin and into the body. This risk is greatest when carrying out tests on injectors. Always follow correct safety and operational procedures for these tests. Wear a full-face visor when working with high-pressure test equipment.
Arc Welding Electronic modules should be removed from the vehicle whenever any electrical arc welding is being carried out on the vehicle.
Remove ECU before welding
Automatic Transmission For vehicles with automatic
Test Instruments Observe all standard procedures for the use of electrical instruments. Always observe the correct polarity, range, and connections.
High Voltages Ignition circuits use pulses of electrical energy in excess of 10,000 volts. These are created in the ignition coil, and conducted through the coil and spark-plug wires. Although shocks from ignition systems are rarely fatal, the reaction to the shock may cause serious injury, such as the involuntary movement of hands and arms, or whole body movements, into hazardous areas like running engines.
Running Engines Whenever carrying out tests on running engines, an awareness of rotating components must be maintained. This is particularly important when using a
stroboscopic-timing light because it can give the impression that the engine is stationary. Exhaust extraction should always be used.
Cooling Fans Keep fingers clear of electrically operated cooling fans because they are likely to start without warning during running-engine tests.
carried out. Note that it may be necessary to use a ‘keeper’ to keep memory circuits alive if the battery is disconnected.
Working Below Vehicles There are a number of hazards to avoid when working below vehicles. One is the risk of hitting your head, which can obviously cause injury. Another risk is the possibility of getting rust and dirt in the eyes. Avoid these problems by wearing a bump cap and goggles, whenever working below vehicles. The vehicle must always be supported safely before working underneath or alongside it.
Car on a ramp
ignition. Do not allow high-voltage secondary-circuit sparks of more than 5 to 6mm to occur during test procedures. This can cause damage to electronic components. It is recommended that electronic modules be removed if arc welding is required on the vehicle.
Battery Polarity When fitting and connecting a battery it is important to observe the correct polarity. This is necessary to reduce the risk of
damage to the electrical and
electronic systems on the vehicle. A memory saver device may be needed for some vehicles. Check with the vehicle manufacturer’s data before disconnecting the battery.
Battery polarity
Memory saver
Battery Connection When connecting and disconnecting the battery leads ensure that all electrical systems are switched off. This will reduce the risk of arcing, which can cause damage to electronic components.
lifting equipment of the cross grip type, take care that the battery case is not fractured.
Battery Acid Mixing battery acid is not now a common task. However, if acid is to be mixed, all safety rules must be
followed. This operation should only be carried out in a place specially prepared and designated for the purpose. Safety-wear includes a PVC apron and gloves, and a chemicals-rated face
visor. One rule above all others must be remembered, and that is that acid is added to the distilled water. Water added to acid will boil on contact causing an explosive reaction.
Lifting Heavy Objects Batteries should be treated as heavy objects when being lifted. Add to this that there are special conditions attached because of the acid content. It is,
therefore, important to plan the lift procedure beforehand and to have the correct equipment available if required. Many
modern vehicle batteries that are more than 20 kg (40 lbs.) in weight, are fitted with lifting ropes and handles. Check that these are in good condition before lifting.
high concentration of gas, and the risk of a spark, being brought together near the battery. Always ensure that the battery
charging area is a no smoking area and that notices are posted to ensure that this rule is observed.
Disposal of Batteries The disposal of batteries and battery acid is subject to local environmental regulations. If procedures are not in place in your workshop, seek advice from your local environmental agency. Never dispose of batteries with normal waste. Many areas have a collection site for hazardous materials and batteries can normally be taken to those sites.
Battery disposal in accordance with local environmental regulations
Protective Clothing Overalls should ideally be worn at all times. This protects your clothes as well as your skin. Gloves, goggles, breathing masks, hats and strong footwear may also be
necessary. Refer to local regulations for any special requirements.
Skin Contact When servicing vehicle systems avoid skin contact with new and used engine oils. Use barrier cream or non-porous gloves. Be careful with hot oil, particularly when carrying out oil draining operations. Never keep oily rags in overall or other pockets and change out of oil contaminated clothing as soon as reasonably possible.
Wear gloves or use barrier cream
Caution/Attention/Achtung! All types of fuel and particularly the vapours are highly flammable. They can be ignited from a number of sources. Any naked flame, a short circuit, a cigarette or under the right conditions a hot object, will start a fire.
Original Equipment In consideration of other people’s property,
excess of 100 mph! Note how important it is to ensure all driveline components are in good order.
Transmission Wind Up On four-wheel drive vehicles, it is possible for the transmission to ‘wind up’ when the front and rear axles are locked together. This is because the two axles may run at slightly different speeds. When on rough ground it is not a problem because the bouncing and movement allows the tyres to slip. On hard surfaces however, a twist or ‘wind up’ of the components such as driveshafts occurs. When the vehicle is jacked up, the transmission can unwind suddenly causing serious injury. This does not occur on a vehicle with an unlocked centre differential or a viscous drive.
Springs Under Compression When coil springs are removed
from a suspension strut, they should be held using a special tool. If the fixings are removed without compressing the spring, it may release considerable energy and cause damage or personal injury.
Coil spring in a compression tool
times. Use gloves designed for the purpose; leather or fabric gloves are NOT suitable. If refrigerant is exposed to naked flames or hot surfaces, it produces toxic gases. Always ensure adequate ventilation when working on air conditioning systems.
Air conditioning unit and equipment
Pressurised Cooling Systems If work has to be carried out on the vehicle heater or the cooling system, there is a risk of scalding. The coolant is run at a pressure higher than
atmospheric. If the cap is removed when hot, the coolant can boil instantly ejecting boiling water and steam.
MAINTENANCE, REGULATIONS AND INFORMATION
REASONS FOR MAINTENANCE AND INSPECTIONS
Vehicle Protection Clearly, it is important to keep a customer’s vehicle in a clean condition. To do this there are a number of methods as outlined here:
• Seat covers to keep the seats clean
• Floor mats to protect the carpets from dirt
• Steering wheel covers to keep greasy hand prints off the wheel
• Wing covers to keep the paintwork clean and to prevent damage.
Maintenance The purpose of routine maintenance is simple; it is to keep the vehicle in a good working order and in a safe condition.
Inspections The main purpose of regular inspection is to check for the following:
• Malfunction of systems and components
• Damage and corrosion to structural and support regions • Leaks
• Water ingress
• Component and system wear and security Inspections are usually:
• Aural – listening for problems • Visual – looking for problems
• Functional assessment – checking that things work!
Types of Inspection The main types of inspection you may have to carry out are:
• Pre-work • Post-work
• Pre-delivery inspection (PDI) • Used vehicle inspection
well as checking that everything works. After gaining
experience you may be asked to carry out an inspection of a vehicle after an accident to check the brakes condition for example.
In all cases, a recommended checklist should be used and careful records of your findings should be kept.
Timescales Working to timescales, or reporting to a supervisor that timescales cannot be met, is essential for two reasons. Firstly, when a customer books a car in for work to be done they expect it to be ready at the agreed time. Clearly if this time can’t be me the customer needs to be informed.
Secondly, in order to make the running of a workshop efficient and profitable, a technician will have jobs allocated that will take a certain amount of time to complete. If for any reason the allotted time can’t be met then action will need to be taken by the workshop manager of supervisor.
Summary There are more details on the maintenance and
inspection requirements in the main subject area sections. As a summary, remember the following:
INFORMATION SOURCES, RECORDING AND REGULATIONS
Information Sources The main sources of information are: • technical manuals
• technical bulletins • servicing schedules • job card instructions • inspection records • check lists
Documentation and Records It is essential that proper
documentation is used and that records are kept of the work carried out. For example:
• job cards
• stores and material records
• manufacturers’ warranty systems
These are needed to ensure the customer’s bill is accurate and also so that information is kept on file in case future work is required or warranty claims are made.
Regulations The three main regulations that cover the repair and service of motor vehicles are as follows:
• Road Traffic Act – this covers things like road signage and insurance requirements. It also covers issues relating to vehicle safety. For example, if a car suspension was modified it may become unsafe and not conform to the law.
• VOSA regulations – the main one of these being the
annual MOT test requirements. VOSA stands for: Vehicle and Operator Services Agency
• Highway code – which all drivers must follow and forms part of the driving test.
Summary To be able to carry out your work correctly and to the required standard it is important to use up to date and relevant information. Keep proper records of work done and parts used. This is to both keep customers informed and so the invoice can be prepared correctly. Further, it is important to protect yourself in the event of a claim being made against you or your company.
WORKSHOP BENCH SKILLS
INTRODUCTION
As well as the obvious skills such as knowledge of the systems and the ability to use normal hand tools for vehicle repairs, bench fitting and in some cases machining skills are also essential.
This usually involves metal cutting operations but it can involve other materials such as wood and plastics. In this sense the work cutting is a very general term and can refer to:
• Sawing • Drilling • Filing • Tapping • Machining
These aspects will be examined in a little more detail in the following sections.
FITTING AND MACHINING
Repairs using lathe (Source: Wikimedia)
Machinists usually work to very small tolerances, ±0.1 mm for example and deal with all aspects of shaping and cutting. The operations most often carried out by machinists are milling, drilling, turning, and grinding. To carry out fitting or machining operations you should be familiar with:
• Measuring tools such as a micrometer • Hand tools as found in a standard tool kit • Machine tools such as a bench drill
• Work holders for example a vice
Tool kit Bench Drill
FILING
Filing is the process of removing material when manufacturing something; it is used mostly for finishing operations. Filing can be used on a wide range of materials as a finishing process. Emery paper may be considered as a filing tool.
Hand filling (Source: South Thames College)
Files have forward-facing cutting teeth that cut best when pushed over the workpiece. A process known as draw filing
cutting teeth that cut best when pushed over the
workpiece
Files come in a wide variety of sizes, shapes, cuts, and tooth configurations. The most common cross-sections of a file are: flat, round, half-round, triangular and square. The cut of the file refers to how fine its teeth are. They are described, from roughest to smoothest, as: rough, middle, bastard, second cut, smooth, and dead smooth. The picture shows three common file cuts. Most files have teeth on all faces, but some flat files have teeth only on one face or edge, so that the file can work against another edge without causing damage.
Three common types of file (Source: Glenn McKechnie, Wikipedia)
DRILLING
Drilling is a cutting process that uses a drill bit to cut or
In use, drill bits have a tendency to ‘walk’ if not held very steadily. This can be minimized by keeping the drill
perpendicular to the work surface. This walking or slipping
across the surface can be prevented by making a centring mark before drilling. This is most often done by centre punching. If a large hole is needed, then centre drilling with a smaller bit may be necessary.
Make sure the safe guard is in place before drilling
Drill bits used for metalworking will also work in wood.
However, they tend to chip or break the wood particularly at the exit of the hole. Some materials like plastics have a
A hacksaw is a fine-tooth saw with a blade under tension in a frame. Hand-held hacksaws consist of a metal arch with a handle, usually a pistol grip, with pins for attaching a narrow disposable blade. A screw or other mechanism is used to put the blade under tension. The blade can be mounted with the teeth facing toward or away from the handle, resulting in cutting
action on either the push or pull stroke. The push stroke is most common.
Blades are available in standardized lengths, usually 10 or 12 inches (15 or 30 cm) for a standard hacksaw. Junior hacksaws are usually half this size. Powered hacksaws may use large blades in a range of sizes.
Junior hacksaw (Source: Evan-Amos, Wikipedia)
The pitch of the teeth can vary from eighteen to thirty-two teeth per inch (TPI) for a hand hacksaw blade. The blade
Sawing machine (Source: Wikimedia)
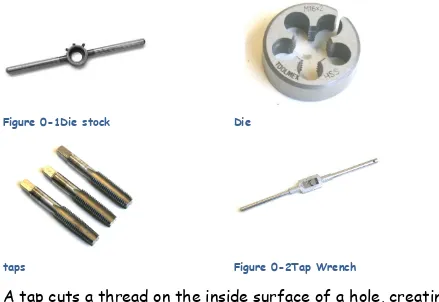
THREAD CUTTING
Figure 0-1Die stock Die
taps Figure 0-2Tap Wrench
A tap cuts a thread on the inside surface of a hole, creating a female surface which functions like a nut. The three taps in picture show the three basic types:
• The bottoming tap has a continuous cutting edge with almost no taper, which allows it to cut threads to the bottom of a blind hole.
• The intermediate tap, second tap, or plug tap has tapered cutting edges, which assist in aligning and starting it into an untapped hole.
Taper, plug and bottoming taps (Source: Glenn McKechnie, Wikipedia)
The process of tapping begins with drilling and slightly
countersinking a hole. The diameter of the hole is determined by using a drill and tap size chart.
Tap drill size chart
A ‘T’ shaped handle is used to rotate the tap. This is often turned in steps of one turn clockwise and about a quarter turn back. This helps to break off the chips, which avoids jamming. With hard materials, it is common to start with a taper tap, because the shallower cut reduces the amount of torque
required to make the threads. If threads are to be cut to the bottom of a blind hole, the taper tap is followed by an
The die cuts a thread on a cylindrical rod, which creates a male threaded piece that functions like a bolt. The rod is usually just less than the required diameter of the thread and is machined with a taper. This allows the die to start cutting the rod gently, before it cuts enough thread to pull itself along. Adjusting
screws on some types of die allow them to be closed or opened slightly to allow small variations in size. Split dies can be
adjusted by screws in the die holder. The action used to cut the thread is similar to that used when tapping.
Die nuts have no split for resizing and are made from a
hexagonal bar so that a wrench or spanner can be used to turn them. Die nuts are used to clean up existing threads and should not be used to cut new threads.
Cylindrical rods
JOINING
strength required. Table 1-26 lists some typical joining methods which include the use of gaskets in some cases. An example of the use and useful notes are also given in the table.
Joining methods
Joining method Example use Notes
Pins, dowels and keys
Clutch pressure plate to the flywheel
Used for strength and alignment in conjunction with nuts or bolts in most cases.
Riveting Some brake
shoe linings
This involves metal pegs which are deformed to make the joint. The picture shows some pop rivets which are a popular repair component
Compression fitting Wheel bearings
Often also called an interference fit. The part to be fitted is slightly too large or small as appropriate and therefore pressure has to be used to make the part fit.
Shrinking Flywheel ring
gear
The ring gear is heated to make it expand and then fitted in position. As it cools it contracts and holds firmly in place.
Adhesives Body panels
and sound deadening
Adhesive or glue is now very popular as it is often cheap, quick, easy and waterproof. Also when two items are bonded together the whole structure becomes stronger.
Welding Exhaust pipes and boxes
There are several methods of welding. Oxy-Acetylene and MIG being the most common. The
principle is simple in that the parts to be joined are melted so they mix together and then set in position.
Brazing Some body
panels
Brazing involves using high
temperatures to melt brass which forms the join between two metal components.
Soldering Electrical
connections
Solder is made from lead and tin. It is melted with an electric iron to make it flow into the joint.
Clips, clamps and ties!
Hoses cables etc.
Hose clips for example, are
designed to secure a hose to say the radiator and prevent it leaking.
A selection of joining or fastening components
Methods of joining are described as permanent or
The nut and bolt is by far the most common method of joining two components together. This picture shows some common nuts and bolts. The head of the bolt is usually a hexagon, but an Allen socket or a Torx® drive or a number of other designs are used. Smaller bolts can have a screwdriver type head such as a slot, cross, Philips, Pozidrive or some other design.
Nuts and bolts
ISO Metric thread profile (the M10 in the given example refers to Dmax and the 1.5 refers to P)
Metric nuts and bolts are described as in the following example:
M10 x 1.5
The M is metric, the 10 is the bolt diameter and the 1.5 is the pitch of the thread.
A bolt
When joining with nuts and bolts it is common to find flat
below shows a selection of locking devices including a Nyloc (nylon lock.)
Nyloc Nut
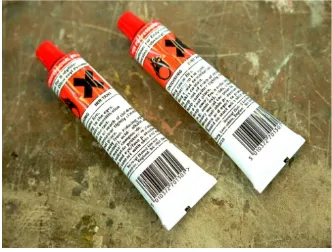
Another common method of securing threads is to use a locking compound such as ‘Loctite’. This is in effect an adhesive which sticks the threads together. When the correct compound is applied with care, it is a very secure way of preventing
important components from working loose (figure 1-90).
Loctite® Threadlocker (Source: © 2010 Henkel AG & Co. KGaA, Düsseldorf. All rights reserved)
ADHESIVES
requirements are the same. It is very important to note however, that manufacturer’s instructions must always be followed. This is because of the following:
• Many adhesives give off toxic fumes and must be used with care
• Most types are highly flammable
• Adhesives are often designed for a specific application
Figure 0-3Warning signs on adhesives
Adhesives also have a number of important terms associated with them:
• Cleanliness - Surfaces to be joined must be clean
• Cure - The process of setting often described as ‘going off’.
• Wetting - This means that the adhesive spreads evenly and fully over the surface
• ‘Super glue’ - Cyanoacrylate adhesive which bonds suitable materials in seconds, including skin - take care!
Loctite super glue
Adhesives have many advantages, which is why they are becoming more widely used. The following are some of the advantages:
• Even stress distribution over the whole surface. • Waterproof
• Good for joining delicate materials • No distortion when joining.
• A wide variety of materials can be joined.
• Neat, clean join can be made with little practice.
when joining rubber to metal. And don’t forget, if the surfaces to be joined are not clean you will make a very good job of
bonding dirt to dirt instead of what you intended!
SOLDERING
Soft soldering is a process used to join materials such as steel, brass, tin or copper. It involves melting a mixture of lead and tin to act as the bond. A common example of a soldered joint is the electrical connection between the stator and diode pack in an alternator. The picture shows this process using the most common heat source, which is an electric soldering iron.
Soldering an electronic circuit
The process of soldering is as follows:
• Prepare the surfaces to be joined by cleaning and using emery cloth or wire wool as appropriate.
• Complete the process as quickly as possible to prevent heat damage.
• Use a heat sink if necessary.
Soldering in common with many other things is easy after some practice; take time to do this in your workshop. Note that some materials such as aluminium cannot be soldered by ordinary methods.
BRAZING
Brazing is a similar process to soldering except a higher temperature is needed and different filler is used. The
materials to be joined are heated to red heat and the filler rod (bronze brass or similar), after being dipped in flux, is applied to the joint. The heat from the materials is enough to melt the rod and it flows into the gap making a good strong, but slightly flexible joint. Dissimilar metals such as brass and steel can also be joined and less heat is required than when fusion welding. Brazing is only used on a few areas of the vehicle body.
WELDING
Welding is a method of joining metals by applying heat,
Welding in Process
The principal processes used today are gas and arc welding, in which the heat from a gas flame or an electric arc melts the faces to be joined. The picture shows a welding process in action.
MIG welding process
Several welding processes are used:
coating that decomposes to protect the weld area from contamination and the rod melts to form filler metal (MMA or manual metal arc).
• Gas-shielded arc welding produces a welded joint under a protective gas (MIG or metal inert gas).
• Arc welding produces a welded joint within an active gas (MAG or metal active gas).
• Resistance welding is a method in which the weld is formed by a combination of pressure and resistance heating from an electric current (Spot welding).
TIG welding MMA Welding
Other, specialised types of welding include laser-beam welding, which makes use of the intensive heat produced by a light beam to melt and join the metals and ultrasonic welding, which
creates a bond through the application of high-frequency
Laser-Beam Welding
SHRINKING
When parts are to be fitted by shrinking they first have to be heated so they expand, or cooled so they contract. In both cases the component to be fitted must be made to an exact size. If parts fitted in this way are to be removed, it is usual to destroy them in the process. For example, a flywheel ring gear has to be cut through with a hacksaw to remove it.
Ring gear on flywheel
For a hot shrink fitting the part will have a smaller internal diameter than the one on which it is to be fitted. It is
expanded, it is placed in position at once. It will then cool and make a good tight joint.
Oxy-Acetylene Welding
Cold shrinking is very similar except the component to be fitted is made very slightly larger, than the hole in which it is to be fitted. A cylinder head valve insert is one example. The process is the opposite of hot shrinking. The component is cooled so it contracts, after which it is placed in position where it warms back up and expands, making a secure joint. Cold shrinking is normally a specialist job, but it is possible to buy aerosols of carbon dioxide under pressure which can be used to make a component very cold (dry ice).
interference fit. This means that the component, say a bearing, is very slightly larger than the hole in which it is to be fitted. Pressure is therefore used to force the bearing onto place. Suspension bushes are often also fitted in this way.
This bearing on a gearbox shaft is held in place by compression
The secret is to apply the force in a way which does not make the components go together on an incorrect angle. They must be fitted true to each other.
RIVETING
Riveting is a method of joining metal plates, fabric to metal or brake linings to the shoes. A metal pin called a rivet, which has a head at one end, is inserted into matching holes in two
The picture below shows some pop rivets, which are one of the most common for motor vehicle repair. These are hollow rivets which are already mounted on to a steel pin. The rivet is placed through the holes in the parts to be joined and a special rivet gun grips the pin and pulls it with great force. This causes the second rivet head to be formed and when the pin reaches a set tension it breaks off, leaving the rivet securely in place. The great advantage of this method is that you can work blind. In other words, you don’t need access to the other side of the hole!
Pop rivets
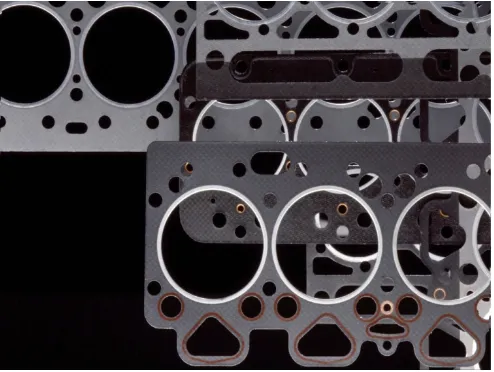
GASKETS
Gaskets and typical uses
Gasket material Examples of where used
Paper or card General purpose such as thermostat
housings
Fibre General purpose
Cork Earlier type rocker covers
Rubber - often synthetic Water pump sealing ring Plastics - various types Fuel pump to engine block
Copper asbestos - or similar Exhaust flange - note safety issues of asbestos
Copper and aluminium Head gaskets
Metal and fibre compounds - with metal composites
Head gaskets
Figure 4 Cylinder head gaskets
• Use of the correct materials
• Follow manufacturer’s instructions (such as tighten to the correct torque in the correct sequence)
• Safe working (this applies to everything you do)
SEALANTS
Many manufacturers are now specifying the use of sealants in place of traditional gaskets. The main reason for this is a
better quality of joint. Liquid sealants, often known as instant gasket, are a type of liquid rubber which forms into a perfect gasket as the surfaces are mated together. The three major advantages of this technique are:
• Easier to apply.
• A perfect seal is made with very small space being taken up.
Loctite® Sealant (Source: © 2010 Henkel AG & Co. KGaA, Düsseldorf. All rights reserved)
The picture shows a sealant being applied. A major advantage as far as the repair trade is concerned is that a good selection of jointing sealants, means you can manufacture a gasket on the spot at any time! Note the recommendations of the
manufacturers however as only the correct material must be used.
OIL SEALS
Oil seals (Source: © 2005 Newsad Energy Company. All Rights Reserved)
VALETING
OVERVIEW, EQUIPMENT AND SAFETY
Introduction When valeting a vehicle it is worth considering the reasons for such an operation. Why should a vehicle be presented to such a high standard? I suggest that there are three main reasons:
• It enhances the value of the vehicle
• A customers first impressions are very important
• It simply looks good. A vehicle will be valeted for a number of reasons:
• A request from a customer • Preparation for sale
• Part of a vehicle service as an incentive to the customer
A wide range of cleaning products is available to assist with the valeting
Safety and PPE The products for vehicle valeting are chosen to do a job quickly and to a good standard but this must never be at the
expense of safety. Let's start with the obvious safety recommendations and remember that safety
precautions are for your benefit: • Only use a product for its
intended purpose
• Store cleaning materials safely and away from children
• Use appropriate PPE
• Always follow manufacturers’ instructions
Safety glasses
Data sheets Detailed data sheets are available from the
manufacturers on request. This is a requirement of the COSHH
regulations.
available from the Autoglym website.
Pressure washers Pressure washers can increase the water pressure
from about 4 bar up to 100 bar. This can actually save water, as the
washing process is much faster. Steam cleaners are similar except that they use high pressure and very high temperature water. The water is pressurized by an electric pump and heated by burning a fuel.
Pressure washer (Source: Karcher)
Steam cleaner safety The potential for accidents is significant if safety procedures are not followed. The steam cleaner has the following safety risks:
• Very hot water - risk of burns or scalding
coils get very hot and will burn • Naked flames - burning paraffin
is often used to create the hot water
• Strong detergents - skin and eye damage
• High voltage electrical supply - serious risk as it is in the
vicinity of water
• Metal lance - gets very hot but can also damage the vehicle paintwork
Polishing tools Polishing tools are useful for exterior cleaning. They can save a lot of time when polishing or buffing up. An important
precaution however, is to take extra care that you do not damage the paintwork.
Interior cleaning equipment The main piece of equipment for interior cleaning is the wet vacuum cleaner. Water and suitable cleaning fluid is forced into the upholstery under pressure. A strong vacuum is then used to suck out the water and dirt. The water is collected in the
machine for later disposal. Carpet cleaners used in the home are very similar. A normal but heavy-duty vacuum cleaner is also an essential interior cleaning tool.
Wet or Dry Vacuum (Source: Karcher)
Summary Remember, valeting: Enhances the value of a vehicle Makes a good first impression
Ensures that the car looks its best!
Always follow manufacturers’ procedures when using cleaning solutions
Look back over the previous section and write out a list of the key bullet points here:EXTERIOR CLEANING
Cleaning the wheels The first step in washing a vehicle will often be to clean the wheels, tyres and wheel arches. If brake dust is allowed to remain on the wheel it can permanently bond with and etch the surface.
Follow the directions provided by the manufacturer. The wheel cleaner will often be sprayed on and worked in with a brush. Use a shampoo solution to remove the wheel cleaner. Make sure you do not allow the wheel cleaning solution to dry on the wheel and tyre surface. Some cleaning solutions will etch the wheel, if allowed to dry without rinsing. Thoroughly spray with water to rinse of all the cleaner to complete the job.
Washing the paint Washing the vehicle by hand with a bodywork
Washing process To wash the vehicle:
1. Make sure that the paint surface is cool to the touch 2. Wash from the top down
3. Use either a natural fibre mitt or a shampoo sponge
4. Follow the instructions regarding the amount of shampoo to use 5. Wash the vehicle in small
sections with frequent rinsing to prevent the water and the
contaminants that you are removing from drying on the surface of the paint
6. Rinse your mitt or sponge
frequently as you progress down the sides of the vehicle, since there is more dirt and
contaminants closer to the ground
7. Finish with a complete rinse of
Start at the top…
…and work down the sides
Drying There are five steps in the drying process to get the best results:
Remove the largest volume of the water from the entire vehicle with a chamois
Blow out all the channels where water can accumulate
Further dry all surfaces, including windows and wheels
Open all the doors, the engine compartment and the boot to
eliminate any remaining run off and water tracks
Wind the windows down a little to clean any dirt from the seal area at the top and sides of the glass.
Drying with a chamois leather
Examples of these include: Wax and grease strippers Solvents and cleaners Tar and road oil removers
”Clay” - to remove paint overspray and other imbedded contaminants Abrasives and glazes
…inspecting the vehicle
Tar and road film removers These products are harsh on the paint surface and care should be taken. They should not remain on the surface over a few seconds. These products may soften the paint and cause discoloration.
Additional cleaning product in use
surface through use of compounds that contain abrasives. The clays may sometimes be used in conjunction with soapy water as a wetting agent for the gentle rubbing of the paint surface with the clay.
Abrasives compounds Caution - these products remove paint from the
vehicle’s surface. There is no way to put the paint back on when you go too far! The range of abrasive grit can be thought of as roughly comparable to wet and dry rubbing down paper. The types of paint damage that will
require this product include heavy oxidation, serious water spotting, paint overspray that has bonded and several types of air pollution that contain acid components. In other words when the paint surface itself has been damaged. The normal
procedure is to cover a small area with a back and forth motion. The
Polymers and waxes There are two main products for protecting
automotive paint finishes:
• Polymers - synthetic, manmade substances
• Waxes - naturally occurring substances found in trees (and bees!)
There is a much discussion regarding the merits of each product. The cost of most polymers will be higher than their counterpart waxes but
polymers will last up to four times longer. This durability factor is a significant consideration. There is an edge to the polymers when comparing ease of use; they go on easier and come off faster. An additional
benefit is the clarity and refractive consistency that the polymers
produce on the finish surface. When comparing depth of gloss however,
minutes to days, to achieve maximum bonding for some
polymers. I suggest a product that dries in a few minutes will be most appropriate for professional valeting.
All polymer and wax products should ideally be hand finished. However use of an orbital buffer with a high quality pad can reduce the effort of removal of the finish product. In all cases, the final step in removal should be by hand.
Glass cleaning Products, which contain ammonia, do a good job of removing the dirt and film that is found on vehicle glass. One of the main problems with cleaning the inside surfaces is the buildup of contaminants. These come from the decomposition of the vinyl and plastic components. This decomposition and transfer to the surface of the glass is caused by the ultra violet action of the sun.
It is recommended that two cotton cloths are used to clean and then dry the surface. Spray the cleaner on one cloth to prevent the cleaner from getting on the surface of the
Apply the cleaner to a cloth
Clean the outside first as this makes it easier to see where there are any streaks when you do the interior. Lower the door windows to get both sides of the glass, which is recessed, into the door.
Cleaning the engine First remove the debris that you will find in the
channels of the body, bonnet and the grill openings. The best way to
accomplish this job is with an air line. Next cover all electrical connections such as sensors, distributor, and spark plug openings with either
plastic bags or film bags. Use tape to seal the plastic surrounding these connections to prevent water from reaching them if necessary.
Completely wet down the wings, grill, top and bottom of the bonnet and the entire engine compartment. A
pressure washer is ideal, but not
Before washing the engine check carefully…
…for areas that may be
for cleaning may strip the protective coatings on these surfaces.
Note that if the engine is to be cleaned, it will normally be done before the rest of the vehicle.
Engine degreaser A pressure tank sprayer or a spray bottle for
application of this product is best. Engine cleaners work most
effectively when all of the surfaces to be cleaned have received a
thorough soaking. The product should be allowed to stay on the engine
components for a few minutes but check the instructions on the
container. Use of a brush on the engine and other surfaces may help to remove heavy oil deposits if you are not using a pressure washer. To remove the engine cleaner, completely soak down the entire compartment and the surrounding
connectors. When the compartment has dried, spray on a rubber and plastic conditioner.
Rubber and plastic There are two causes of damage to exterior rubber and plastic surfaces:
• UV light • Ozone
Most products that are designed to condition plastic and rubber have silicone as an ingredient. There is however some controversy regarding silicone as a component in both non-porous and non-porous surface
conditioning. There are some people that believe that it will dissolve
certain components in the rubber and cause cracking. It looks good when you first apply it though!
Cleaning the plastic trim
There are two main types of protection often referred to as: Hard wax
Soft wax
An appropriate solvent is used to soften the wax. The vehicle is then washed in the normal manner most often with a pressure washer or steam cleaner.
removed with a solvent and a steam cleaner
Summary Always follow
manufacturers’ instructions relating to cleaning products and equipment. Finally, remember to give the vehicle a last look over to ensure there are no small marks or smears, because you can be sure that these would be the first thing your customer will see!
Look back over the previous section and write out a list of the key bullet points here:INTERIOR CLEANING
Vinyl and leather After vacuuming use a cloth and a spray bottle for the application of an interior cleaner. Be careful to test a small area of the surface before you begin to make sure that the product will not produce any damage or significant colour removal.
Following cleaning, the conditioning step will be essentially the same process. In most cases the
manufacturers will recommend
A stained leather seat
leather will extend the life of the product by a significant degree. It is particularly important to ‘feed’
leather regularly.
Carpet and upholstery products
Care should be taken when using products for cleaning carpets and upholstery, to ensure that the
product will not cause any unwanted result such as colour removal. The surface should be thoroughly
vacuumed both before and after use of a cleaner. The benefit of through re-vacuuming is that it will remove the contaminants that the cleaner has lifted from the surface. Most professional valeters will use a wet vacuum with a detergent in the
water. The fluid is sprayed in to the upholstery under pressure and then vacuumed out.