Copyright © 2018 by McGraw-Hill Education. All rights reserved. Except as permitted under the United States Copyright Act of 1976, no part of this publication may be reproduced or distributed in any form or by any means, or stored in a data base or retrieval system, without the prior written permission of the publisher.
ISBN: 978-1-26-011759-2 MHID: 1-26-011759-6
The material in this eBook also appears in the print version of this title: ISBN: 978-1-26-011758-5, MHID: 1-26-011758-8.
eBook conversion by codeMantra Version 1.0
All trademarks are trademarks of their respective owners. Rather than put a trademark symbol after every occurrence of a trademarked name, we use names in an editorial fashion only, and to the benefit of the trademark owner, with no intention of infringement of the trademark. Where such designations appear in this book, they have been printed with initial caps.
McGraw-Hill Education eBooks are available at special quantity discounts to use as premiums and sales promotions or for use in corporate training programs. To contact a representative, please visit the Contact Us page at www.mhprofessional.com.
Information has been obtained by McGraw-Hill Education from sources believed to be reliable. However, because of the possibility of human or mechanical error by our sources, McGraw-Hill Education, or others, McGraw-Hill Education does not guarantee the accuracy, adequacy, or completeness of any information and is not responsible for any errors or omissions or the results obtained from the use of such information.
TERMS OF USE
This is a copyrighted work and McGraw-Hill Education and its licensors reserve all rights in and to the work. Use of this work is subject to these terms. Except as permitted under the Copyright Act of 1976 and the right to store and retrieve one copy of the work, you may not decompile, disassemble, reverse engineer, reproduce, modify, create derivative works based upon, transmit, distribute, disseminate, sell, publish or sublicense the work or any part of it without McGraw-Hill Education’s prior consent. You may use the work for your own noncommercial and personal use; any other use of the work is strictly prohibited. Your right to use the work may be terminated if you fail to comply with these terms.
To my mother Anne Kemp,
About the Author
Simon Monk (Preston, UK) has a bachelor’s degree in cybernetics and computer science and a Ph.D. in software engineering. He has been an active electronics hobbyist since his early teens and since 2012 has divided his work life between writing books and designing products for the business he started with his wife (http://monkmakes.com), which manufactures hobby electronics kits and boards.
ACKNOWLEDGMENTS
I’d like
to thank my editor, Mike McCabe, and everyone at TAB/McGraw-Hill Education for being such a great publisher to work for. Special thanks are due to Patty Wallenburg for her wonderful organizational skills, keen eye, and ability to make my books look as good as they possibly can.Many thanks to David Whale for taking the time to complete a detailed and helpful technical review of the book and to all at the micro:bit foundation who have been friendly and helpful during the writing of this book.
Once again, thanks to Linda for believing in me and giving me the support and encouragement to make a success of writing.
1
Introduction
The micro:bit was designed for use in education, but this useful little device has also endeared itself to electronics hobbyists and makers around the world.
Plug Me In!
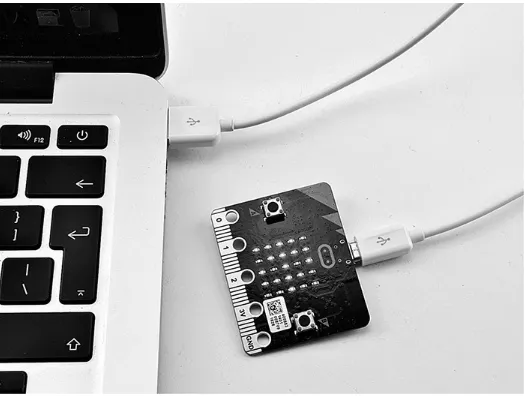
To use your micro:bit, you will need a USB to micro-USB lead to connect it to your computer. You may have bought one at the same time as you bought your micro:bit. But if not, don’t worry because this lead is probably the most common USB lead in existence. The micro-USB connector on the end that plugs into the micro:bit is the same plug as is used on most non-Apple cellphones and countless other electronics devices. You will occasionally come across USB leads that are “charge only.” This means that they do not have the necessary wires inside to provide a data connection for the micro:bit. So, if you have problems when it comes to connecting to your micro:bit, try changing the lead for one that claims to be a “data” lead.
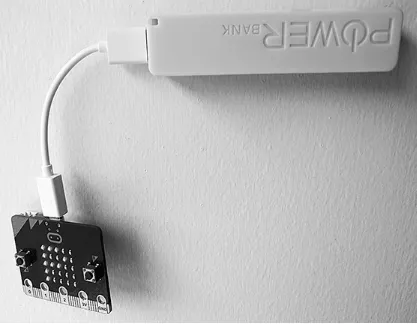
Figure 1-2 shows a micro:bit attached to a laptop. This laptop happens to be an Apple, but the micro:bit can be used with a Windows, Linux, Apple, or even Raspberry Pi computer.
Figure 1-2 Connecting your micro:bit to your computer.
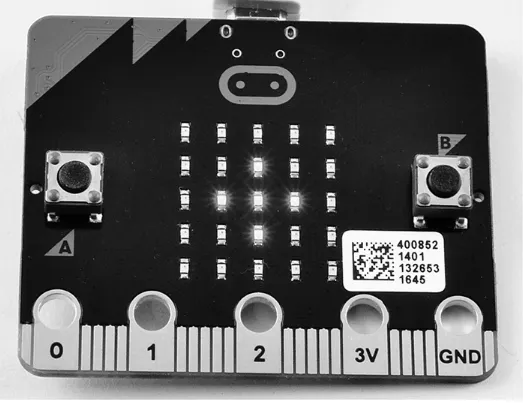
Plug your new micro:bit in, and a little animation will start that displays a welcome “Hello” message and then goes on to point out the two A and B buttons built into the board. Take some time to familiarize yourself with the board, and follow the prompts on the scrolling display.
History
The micro:bit is more correctly called the BBC micro:bit. The BBC (British Broadcasting Corporation) is the United Kingdom’s largest public-service broadcaster. The BBC micro:bit project was designed to provide an easy-to-use platform to teach children how to code while realizing that coding can also be used to control electronics and not just make things happen on screens.
As part of this initiative, in 2016, around a million micro:bits were given out free of charge to every school child in UK school year 7 (11- or 12-year-olds) in the UK public school system. Since then, the running of the micro:bit project has passed from the BBC to the Microbit Educational Foundation. This not-for-profit organization is now spreading the use of the micro:bit to educational communities around the world and also making this handy little device available to electronics hobbyists and makers.
What Can It Do?
When you plug in your micro:bit, it will give you a quick rundown of its own features. Let’s go through these features in a little more detail.
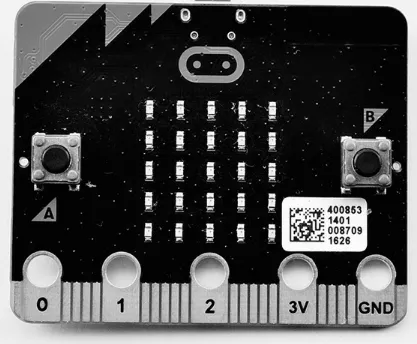
LED display. This display is made up of 25 LEDs arranged in a 5 × 5 grid. You can control the brightness of any of these LEDs separately and display text messages on the screen that scroll from right to left.
Push buttons A and B. You can write programs that will perform certain actions (perhaps display a message) when one of these buttons is pressed.
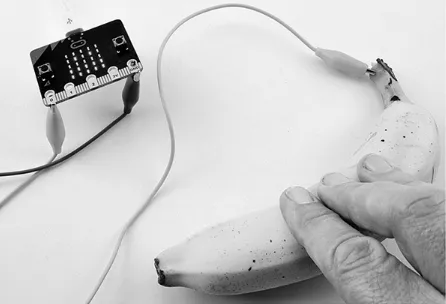
Figure 1-3 micro:bit and fruit.
Accelerometer. An accelerometer measures acceleration—that is, the rate of change of speed. It does this by measuring the forces acting on a little weight built into a chip. There is such a chip on the micro:bit, and it allows you to do such things as detect the orientation of the micro:bit (like a Wii controller) or whether it is being shaken or just moved slightly, opening up all sorts of project opportunities.
Compass. The micro:bit also has a built-in electronic compass that lets you detect the direction in which it is facing or detect whether you place a magnet near it.
Radio. The micro:bit has a radio transmitter/receiver that can be used to send messages from one micro:bit to another.
micro:bit versus Raspberry Pi and Arduino
Figure 1-4 (From left to right) micro:bit, Arduino Uno, and Raspberry Pi 3.
Table 1-1 Comparing the micro:bit with an Arduino Uno and Raspberry Pi
As you can see from this table, the micro:bit actually represents a pretty good value compared with the Arduino Uno. Where the Arduino scores is in its connectors, which allow wires to be plugged in directly, as well as a vast range of plug-in “shield” circuit boards that sit on top of the Arduino, providing extra features.
The Raspberry Pi 3 is really a very different beast, actually being a fully fledged computer to which you can attach a keyboard, mouse, and monitor. However, unlike most computers, the Raspberry Pi has general-purpose “pins” to which you can attach external electronics just like micro:bit and the Arduino.
control’s keys are connected and an infrared LED that will send out a series of pulses that transmit a code to the receiver on the TV.
A smartphone or media center will have something very similar to the processing part of a Raspberry Pi at its core. This will be a much more powerful device than the micro:bit or Arduino because it will need to be capable of generating video signals and also running an operating system that can do more than one thing at a time.
So What Is Programming?
As we have already established, many of the electronics goodies that you buy contain a microcontroller like the micro:bit’s microcontroller. This is a tiny computer designed to monitor buttons and switches as inputs and control outputs. You will find microcontrollers in car radios, kitchen timers, TV remotes, and even disposable greetings cards that play a tune when you open them. Pretty much anything that has push buttons and some kind of display will also have a microcontroller in it.
Without programming, a microcontroller doesn’t do anything. It will just sit there idly until someone uploads a program to it telling it what to do. Telling a microcontroller what to do involves writing a computer program (called programming or coding) and then installing the program on the microcontroller.
If you look at your TV remote, it’s unlikely to have a USB port through which to program it. In cases such as this, where a large number of devices are made, special programming hardware is used to program the device while it is being manufactured. Once programmed, the device probably will never have another program installed on it. This is quite different from the micro:bit, which has a built-in programming interface that allows you to install a new program hundreds of thousands of times if you want. Figure 1-5 shows how the whole programming process works on a micro:bit when using MicroPython.
Figure 1-5 Programming a micro:bit.
program running on your computer. When you are ready to transfer the program to the micro:bit, the editor program first converts the text version of the program along with MicroPython itself into a file in a format called hex (short for hexadecimal). This file is then transferred to the micro:bit (uploaded or flashed) simply by copying the hex file from your computer’s disk drive to the micro:bit’s virtual USB device. This is made possible by a neat trick of the micro:bit’s to look like a data storage device to your computer. The uploaded file is then processed by the micro:bit into a binary form that it can run (called compiling). Once the process is complete, the program will run automatically.
Why MicroPython?
There are many computer languages with which you can program your micro:bit. The two most popular and the two being promoted by the Microbit Educational Foundation are MicroPython and JavaScript Blocks. JavaScript Blocks uses a graphical-type interface to plug together code blocks to put your program together, whereas MicroPython is a more conventional free text language that is completely text based. Chapter 12 provides an introduction to JavaScript Blocks.
Both languages have their pros and cons, but this book concentrates on MicroPython, which is an implementation of Python created by Damien George specifically for use on low-power microcontrollers such as the micro:bit. Python is a popular language in educational settings because it is considered to be one of the easiest programming languages to learn that is also well used in the software industry.
Summary
2
Getting Started
In this
chapter, you will learn how to run your first program on your micro:bit and also come to grips with the two most popular editors used to write and upload code onto the device.MicroPython Editors
When it comes to programming the micro:bit using MicroPython, there are two main options for the editor with which to type your programs. The first is browser based. It doesn’t really have a formal name, so let’s just call it the online editor. Because it works in your browser, there is nothing to install. To use the MicroPython online editor, all you need to do is navigate to http://python.microbit.org/editor.html, and the Editor window will appear (see Figure 2-1).
Figure 2-1 The MicroPython browser editor.
There are some disadvantages to this option. For one, it is all too easy to accidentally lose the page and your code before you get around to saving it. The process of uploading the program to your micro:bit is also a bit fiddly. You also have to have an Internet connection to be able to use the editor. The second option is an editor called Mu that is a normal application that you run on your computer. Mu also has a neat feature that allows you to try out individual lines of code directly on the micro:bit without having to upload an entire program.
you prefer to use for the rest of this book. The code will work equally well with both editors, but some of the coding experiments do require the use of Mu if you want to follow along.
Online Editor
Visit http://python.microbit.org/editor.html in your browser (you may want to bookmark this page), and you will see something like Figure 2-1. You can see that there is already a short program in the editor that will display the message “Hello, World!” on the LED display.
Across the top of the online editor is a row of toolbar buttons. The important ones are Download and Save. When you click on Download, the online editor will generate a hex file that is ready to flash onto your micro:bit and also download it into your computer’s Downloads area. Where this Downloads area is depends on your browser and operating system. Try this out now with the code already in the online editor by clicking on Download (the leftmost button). The download won’t take long because the file is small. You now have to transfer this program from your computer to your micro:bit.
When you connect a micro:bit to your computer, it “mounts” the micro:bit as if it were a USB flash drive. This makes copying the hex file from your computer to the micro:bit simply a matter of dragging the file from your computer to the micro:bit. The exact way to do this depends on your computer’s operating system.
Installing micro:bit Programs Using Windows
When you click on Download on a Windows computer using the Microsoft Edge browser, you will see the message “Microbit.hex finished downloading” along with two options, Open and View Downloads (Figure 2-2).
Click on the option View Downloads, and a panel will open on the window (Figure 2-3) showing the file downloads made by the browser, including the one you just downloaded (microbit.hex).
Figure 2-3 Viewing the file downloads.
Figure 2-4 Dragging the hex file onto the micro:bit drive.
When you do this, the file copying dialog of Figure 2-5 will appear. A yellow LED on the micro:bit will flicker during the flashing. After a few seconds, the upload will be complete, the micro:bit will reset, and your micro:bit should start displaying the scrolling message.
Figure 2-5 File upload progress.
Congratulations, you have uploaded your first program to your micro:bit! Having taken the long route to opening the File Explorer to copy hex files onto the micro:bit, you can just leave the File Explorer of Figure 2-4 open, ready to copy over another hex file.
Installing micro:bit Programs Using a Mac
Figure 2-6 Downloading a micro:bit hex file on a Mac.
Click on the Menu button next to the download (Figure 2-7), and select the option Show in Finder. This will open the Finder with the hex file selected and ready to drag onto the micro:bit in the Devices section of the Finder window (Figure 2-8).
Figure 2-8 Dragging the hex file onto the micro:bit drive (on a Mac).
Installing micro:bit Programs Using Linux
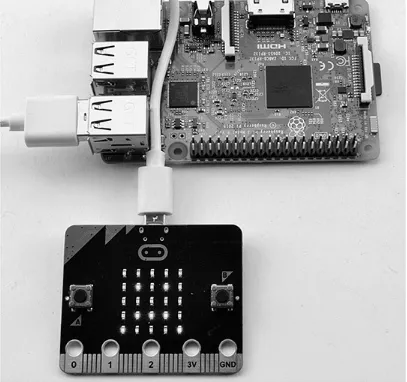
Figure 2-9 Using micro:bit with a Raspberry Pi.
Figure 2-10 The online editor on a Raspberry Pi.
When you plug your micro:bit into your Raspberry Pi or other Linux computer, you may be prompted with a dialog like the one shown in Figure 2-11 that offers to treat the micro:bit as a removable storage device and open it in the File Manager so that you can copy hex files onto it (Figure 2-12).
Figure 2-12 Using the Linux File Manager to install a program on the micro:bit.
Saving and Loading Programs
You will find the Save button in the button area at the top of the editor window. You might expect this to offer you a file dialog to let you save the file in a particular location. However, when you click on it, what it actually does is simply download the Python script shown in the editor into your computer’s Downloads area. You can then move the file somewhere else if you want to, probably after renaming it.
Loading files into the editor is simply a matter of dragging a file onto the online editor’s main editing area. But be careful because this will replace any text already in the editor.
The Mu Editor
Figure 2-13 The Mu editor.
Installing Mu on Windows
Figure 2-14 Downloading Mu.
Figure 2-15 Moving Mu to the desktop.
To run Mu, double-click on the Mu icon on your desktop. Near the Download for Windows button on the Mu website’s download page, you will also find a link called “Install this Driver.” This is not essential, but it is well worth doing because it is needed if you want to experiment with the micro:bit’s REPL command-line interface. This will take you to a webpage hosted by ARMmbed for instructions on downloading and installing the driver. Follow the instructions there. Note that the installer program will not install the driver without your micro:bit being connected to your computer. Note also that you will need admin privileges on your computer to install the driver.
Installing Mu on a Mac
used by the micro:bit, so there is no need to install anything for the REPL to work.
Installing Mu on Linux
To install Mu on your Linux computer, including the Raspberry Pi, open a terminal session, and run the command:
Once installed, you will find a shortcut to Mu in the Programing submenu of your window manager.
Using Mu
Mu (see Figure 2-13) has a lot more buttons on its toolbar than the online editor but otherwise looks fairly similar. The main feature is a big area in the middle of the window for you to write your code. Let’s try the “Hello World!” example in Mu.
When you first start Mu, it will look like Figure 2-13. Mu is editing an unsaved program with the following content:
The first line is an import command that tells Mu that we need to use the “microbit” module that contains the micro:bit-specific code for controlling the LEDs and other hardware. The second line, which starts with a #, is a comment line. Comments are not actually program code; they are like notes that you the programmer can leave in the code to either explain something tricky going on in the program or (as is the case here) an instruction for someone else reading the code to do something.
Replace the comment line with the following code:
You will find that after the first line, Mu will automatically indent the next line when you press
ENTER. Any line that ends with a colon (:) will indicate to Mu that the line that follows it should be
indented.
You can also indent lines of code manually by pressing the TAB key before you type the first
Figure 2-16 “Hello World!” in Mu.
Mu won’t stop you from downloading faulty programs onto your micro:bit, and Mu has a Check button that is intended to check your code before uploading. At the time of writing, this checking is a little overly zealous, so it will tell you such things as “Blank line contains whitespace,” which just means that there is a blank line with a few space characters on it. This means that the advice offered by the Check feature is somewhat verbose and makes it hard to pick out the genuine errors. Try it, because Mu is a young product that is improving all the time.
If your program does have errors when it is flashed onto your micro:bit, you will see the message scroll across the micro:bit’s display. The most useful piece of information is often the line number of the error. But remember that an error on one line is quite often caused by an error on the preceding line.
If you open the REPL (see the next section) before you flash the program, any error messages will appear there, where they are a lot easier to read than on the scrolling display.
Now is a good time to save your program, so click on the Save button, and choose a file name (perhaps hello.py). The file extension .py indicates that the file is a Python program. By default, Mu will save your programs in a folder called mu_code, but you can save the programs anywhere.
You can now transfer the program onto the micro:bit by clicking on the Flash button. If your micro:bit is connected to your computer, this will install the program automatically without you having to copy the file yourself. If you forget to plug your micro:bit in, before clicking Flash, Mu will open a file dialog allowing you to save the hex file for manual installation.
The REPL
program. To try it out, plug in your micro:bit, and then click on the Repl button in the toolbar. The result is shown in Figure 2-17.
Figure 2-17 The REPL.
If you don’t see something like Figure 2-17, then try pressing CTRL-C on your keyboard. You are
now communicating with the micro:bit, which is awaiting your command. So let’s have it do a bit of math for us. Type the following text into the REPL:
and then hit the ENTER key. You can see the result in Figure 2-18. Your micro:bit has added 2 and 2
Figure 2-18 Sums in the REPL.
Next, let’s try using the display to scroll a message from the REPL. To do this, you need to type the following two lines of code:
Be careful not to forget the single-quote marks around the text to be displayed. The message should appear on your micro:bit’s display as soon as you press ENTER after the second line.
You will find the first line of code at the top of all micro:bit MicroPython programs, and it “imports” all the micro:bit-specific code for things such as the display and buttons into the MicroPython environment, ready for you to use.
Downloading This Book’s Programs
Although it can be a good thing to actually copy in simple code examples by hand, as the programs in this book get longer, you definitely don’t want to be typing them in by hand. So all the programs used in this book can be downloaded from the book’s Github repository.
Figure 2-19 Downloading the example programs.
If you are using Mu, then it is worth moving the files to the special directory where Mu expects to find your programs. This is in a directory called mu_code in your home directory. For example, in Windows 10, this is in C:\Users\YourName\mu_code. So move the downloaded and unzipped files from prog_mb into mu_code.
To load a file into Mu, click on the Load button, and navigate to the file you want to open.
Summary
3
MicroPython Basics
In this
chapter, you will learn a bit about programming in MicroPython and get your micro:bit running a few programs. MicroPython is one of many implementations of the Python language, and it is designed specifically for low-power microcontroller boards such as the micro:bit. All the general information in this book about MicroPython is equally applicable to other implementations of Python. The real differences arise when it comes to using the micro:bit hardware.Numbers
Remember the Read Eval Print Loop (REPL) from Chapter 2? Well let’s start by carrying out a few experiments using the REPL. Start Mu, connect your micro:bit to your computer, and click on the REPL button. Start by repeating the REPL experiment of Chapter 2 and type 2 + 2 after the >>>
prompt to see the result shown in Figure 3-1.
Figure 3-1 2 + 2 in the REPL.
Note that when you use the REPL like this, it doesn’t matter what program you have loaded onto your micro:bit. It will be halted while you use the REPL and only restart if you reset the micro:bit by pressing the RESET button, unplugging it and plugging it back in, or uploading a new program. The
Traceback message that you see before the >>> prompt is a result of the halting of whatever program was running.
numbers such as 1, 2, 3, and so on, and floats (floating points), which have a decimal place such as 1.1, 2.5, 10.5, and so on. In many situations, you can use them interchangeably. Now try typing the following after the REPL prompt:
As you can see, the result is 15.5, as you would expect. Try out a few sums for yourself. If you want to do multiplication, use * and for division use /.
Doing some simple sums on your micro:bit is all very well, but you could do that on a pocket calculator. Note that from now on, the things you need to type will be proceeded by >>>, and the micro:bit’s response will start on a new line.
Enter the following into the REPL:
You are likely to get a different answer than 5. Repeat the randint(1, 6) line a few times by pressing the up arrow on your keyboard, and you will see a succession of random numbers between 1 and 6. You have made a die of sorts!
The first line you typed imports the randint function from the module random. Modules are used to contain Python code that you may not need all the time. This helps to keep the size of the code small enough to run on a micro:bit.
Variables
Try typing the following line into the REPL:
You can put spaces either side of the equals sign (=) or not—it’s a matter of personal preference. I think it looks neater with spaces, so that’s the standard I will be sticking to in this book.
This line of code uses a variable called x. Now that the variable x has been given the value 10, try just typing x in the REPL:
Python is telling us that it remembers that the value of x is 10. You don’t have to use single-letter names for variables; you can use any word that starts with a letter, but variables can include numbers and the underscore character (_). Sometimes you need a variable name that’s made up of more than one human language word. For example, you might want to use the name my number rather than x. You can’t use spaces in variable names, so you use the underscore character to join the words like this: my_number.
Returning to our experiments with REPL, now that Python knows about x, you can use it in sums. Try out the following examples:
In this last command (x = x + 1), we have added 1 to x (making 11) and then assigned the result to x, so x is now 11. Increasing a variable by a certain amount is such a common operation that there is a shorthand way of doing it. Using += combines the addition and the assignment into one operation. Try the following, and x will now be 21.
You can also use parentheses to group together parts of an arithmetic expression. For example, when converting a temperature from degrees centigrade to degrees Fahrenheit, an approximation is to multiply the temperature in degrees centigrade by 5/9 and then add 32. Assuming that the variable c
contains a temperature in degrees centigrade, you could write the following in Python:
The parentheses are not strictly necessary here because MicroPython will automatically perform multiplication and division before it does addition. But including them does make the code clearer.
Strings
Computers are really good at numbers. After all, this is what they were originally created for. However, in addition to doing math, computers often need to be able to use text. Most often this is to be able to display messages that we can read. In computer-speak, bits of text are called strings. You can give a variable a string value, just like numbers. Type the following into the REPL.
So first we assign a value of Hello to the variable s. The quotation marks around "Hello" tell Python that this is a string and not, say, the name of some variable. You can use either single or double quotation marks, but they must match. We then check that s does contain "Hello".
This might not be quite what we were expecting. Our strings have been joined together, but it would be better with a space between the words. Let‘s fix this:
Converting Numbers to Strings
Try the following example, which tries to combine a string with a number:
You assigned an int value of 2 to x and a string "answer is:" to a variable s. However, when you try to add the number onto the end of the string, you get an error message. The key part of this error message is the last line TypeError: must be str, not int. This is saying that there is an error with the type of the variable and that you are trying to add an int to a str (string).
To get around this problem, you need to convert the integer to a string before trying to add it, like this:
The command str is what’s called a function, and you will find out a lot more about functions in Chapter 4. For now, though, all you need to know is that if you place a number or a variable containing a number inside the ( and ) after str, the resulting string version of the number can be added to another string.
Programs
The commands that we have been typing into the REPL are single-line commands that just do one thing. You can see how typing them one after the other leads to their being run (or executed) one after the other. For example, revisiting this example:
put all four lines into a file and then tell the micro:bit to execute the whole file, you would have written a program.
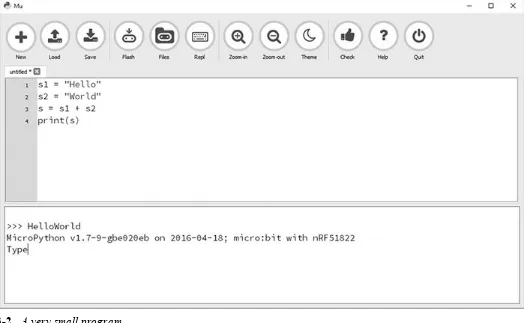
Let’s try this now, but first we need to make one slight change. When you use the REPL command line and simply type the name of a variable, the REPL will display the value in that variable. However, when you run the same commands as a program, you must use the print function for any value that you want to display. So click on New in Mu to create a new program, and then type the following lines into the window (Figure 3-2):
Figure 3-2 A very small program.
Click on the REPL button so that we can see the output from the micro:bit, and then click on Flash to upload the program. When the program has uploaded, you will see the text "HelloWorld" in the output of the REPL. Your program has worked; it joined two strings together and printed out the result. You can now easily change the program so that instead of using print to display the string, it scrolls the message across the micro:bit’s display.
You can either change the code in the Mu editor so that it looks like this:
open the program ch03_strings.py. Now when you run the program, the message
"HelloWorld" will scroll across the screen just once.
The micro:bit has run each of these command lines in turn and then finished by showing s on the display. Having run all its commands, the micro:bit has nothing further to do. The program has ended.
Looping Forever
Generally speaking, you don’t want the program running on a micro:bit to end. It’s not like running an app on your computer that you can just quit when you have finished using it. A program on a micro:bit will basically run until you unplug it. It might be waiting for button presses, reading a sensor, or displaying information, but it will be running. This is why you find something called a while loop at the end of most micro:bit programs.
Either load program ch03_loops.py or type the following code into Mu:
Before we look at what this code does, an important point about indentation needs to be made. You will notice that after the while True: line, the remaining lines are all indented by four spaces. This indicates that those lines belong inside the while command. Python insists that they line up exactly (or you will get an error message), and the convention is to use four spaces of indentation. Helpfully, in Mu, when you press the TAB key, you get four spaces inserted for you.
What happens when you upload (flash) this program onto the micro:bit is that the messages
"Hello" and "Bye" appear in turn on the display and repeat until you unplug the micro:bit or upload a different program.
Here’s how the code works. The command while True: tells the micro:bit to repeat all the indented lines (after the colon on the end of the line) forever. The "Hello" message is then displayed. The line sleep(5000) tells the micro:bit to do nothing (sleep) for 5,000 milliseconds. A milliscond is 1/1,000 of a second, so 5,000 of them is 5 seconds. The "Bye" message is displayed, followed by another 5-second sleep, and then the cycle begins again.
The line:
requires some special attention. The variable display is called an object, and it mirrors what is going on with the physical hardware of the micro:bit—in this case the LED display. The function
scroll() is a special kind of function called a method because it belongs to the display object. The dot between the object and its method is how you tell Python to use the method.
If this all seems a bit mysterious, don’t worry; Chapter 7 is all about objects and their relatives: classes and methods.
for
Loops
times rather than just once. In the following example, you will need to enter more than one line of Python using the REPL.
When you hit RETURN and go to the second line, you will notice that Python is waiting. It has not
immediately run what you have typed because it knows that you have not finished yet. The colon (:) at the end of the line means that there is more to do.
For the second line, type:
The REPL will automatically indent the second line for you.
To get the two-line program to actually run, press BACKSPACE and then ENTER after the second line
is entered. Pressing BACKSPACE deletes the indentation so that the REPL knows that you have finished.
Thus:
This program has printed out the numbers between 1 and 9 rather than 1 and 10. The range
command has an exclusive end point—that is, it doesn’t include the last number in the range, but it does include the first.
There is some punctuation here that needs a little explaining. The parentheses are used to contain what are called parameters. In this case, range has two parameters from (1) and to (10)
separated by a comma.
The for in command has two parts. After the word for, there must be a variable name. This variable will be assigned a new value each time around the loop. So the first time it will be 1, the next time 2, and so on. After the word in, Python expects to see something that works out to be a list of things. In this case, that list of things is a sequence of the numbers between 1 and 9.
The print command also takes an argument that displays it in the REPL area of Mu. Each time around the loop, the next value of x will be printed out.
ifs
and
elses
To illustrate this, we are going to make your micro:bit respond to presses of button A by displaying a message. Either load program ch03_button.py or type in the following code:
Inside the while loop we have an if. Immediately following the if is a condition that must be e i the r True or False and then a colon. In this case, the condition is that
button_a.was_pressed(). button_a is another object like display and is an object that mirrors what is going on with the physical button A. There is a counterpart for button B called (you guessed it) button_b. Whereas the scroll method of display instructs the micro:bit’s processor to scroll a message across the screen (in other words, to do something), the was_pressed method asks a question of the hardware (“Were you pressed?”). This answer can only be yes or no, which in Python is represented as True or False.
Notice how the last line is double indented, one indent to put the code inside the if and another because the if is inside the while.
It is not uncommon to want your code to do one thing if the condition is True and another if it is
False. Let’s modify the preceding example. You can find the modified code in
ch03_button_else.py.
The lines after else will only be run if the condition of the if was False. So now the micro:bit will repeatedly display the message Press button A until such time as you do, and then it will tell you not to do it again.
More on
while
Earlier we saw how while True: is used to keep the micro:bit running indefinitely. The while
command is actually more flexible than this. Whereas if will do something once if its condition is
True, while will keep doing the things below it repeatedly while its condition is True.
By using while True:, the condition of the while will always be True, so the while loop will never finish. You can also put a condition after the while that could be True or False, as in the example of ch03_while.py:
Flash the program and try it out. The while loop ensures that as long as button A is not pressed, the message "Press A" will be displayed. When the button is pressed, the condition for staying inside the loop is no longer True (note use of not), so the last line of the program that is outside of the loop will run, and then the program will quit. Your micro:bit will look like it has died. Don’t worry, it will revive when you upload another program.
Timer Example
In the next few chapters, you will gradually build a kitchen timer project using the micro:bit. Using what you have learned so far, you can make a start on the part of the timer that will let you set the number of minutes to time for by pressing button A. When the number of minutes exceeds 10, you will set it back to 1. You can find this code in ch03_timer_01.py.
The variable mins is used to remember the current number of minutes. This is initially set to 1. This has to happen outside the while loop; otherwise, mins would just keep getting reset back to 1 each time around the loop.
Inside the loop, the if checks for a button press, and if there is one, it adds 1 to mins. This might make mins greater than 10, so we have a second if inside the first that checks for this and, if it’s the case, sets mins back to 1.
In this case, the condition for the if is that mins > 10. This means “if the value of the variable
are equal in value (==), not equal (!=), less than (<), greater than (>), less than or equal to (<=), or greater than or equal to (>=). These comparisons are like questions and always give a result of either
True or False (mins is greater than 10 or it isn’t—there is no middle ground).
Note that the == (double equals) comparison is used a lot, and a common mistake is to accidentally use a single equals sign in comparisons. The single equals sign is only ever used to set the value of a variable.
Conditions can be combined into more complicated forms. For example, if for some bizarre reason you only wanted the number of minutes to be increased if both buttons were pressed, you could modify the program to look like this:
Try making the change, and then upload the code. You may have noticed that buttons A and B do not have to be actually down at the same time; you can also press one after the other quickly. This is so because the button object remembers when it has been pressed for the next time that the question
was_pressed() is asked.
Summary
4
display do what it does. In addition to all the built-in functions and methods in Python, you can write your own functions. This helps to keep your code neat and easy to follow.What Are Functions?
You can think of functions as commands that you can use in your programs, such as str (convert something to a string) or sleep (wait a while). These might be built-in functions, or they might be functions that you have written yourself. Writing your own functions allows you to have your program in small chunks of code so that it’s easier to understand how the program works and to fix things when they don’t work. It also means that you can use the function over and over again without having to repeat chunks of code.
These chunks of code (functions) are given a name when you make them, and the name has the same rules as when you create a variable. That is, the name must start with a letter and not contain any spaces. Words are connected by an underscore, so typical function names might be sleep, print, or, for a home-made function that you will see in a moment, display_mins. Whereas the names of variables are normally nouns (e.g., message and mins), the names of functions are often verbs (e.g., sleep, print, and display_mins).
Parameters
Functions can be built to have parameters. For example, the built-in function sleep has a parameter that is the number of milliseconds for the program to sleep. The function sleep expects to receive this parameter whenever sleep is called. In the case of sleep, it expects this parameter to be a number. For example:
If you were to pass a string to sleep as its parameter, you would get an error. When calling a function, the parameter always comes after the method name and is enclosed in parentheses. If a function has more than one parameter, the parameters are separated by commas.
The time has come for you to write your own function in our timer example. So load the example
Figure 4-1 Function definition and calling.
Flash the program onto your micro:bit, and notice that now it displays either min or mins after the number of minutes to which the timer is set. The next thing to notice about the code is that now there is a block of code that starts with def after the mins variable. The word def marks the start of a method definition. This is where our custom function called display_mins is defined.
And here is a really important point: although the function is defined here, it will not actually do anything until it is called. This calling of the function only happens right at the end of the while loop in the last line of the program.
In the same way as if, else, and while, all the lines that belong to the function definition must be indented.
After the word def is the name of the function and then its parameters between parentheses. In this case, there is just the one parameter called m. m is short for mins, and we could have called m by the name mins like the variable. But I have used a different name here to make it clearer how functions work and the relationship between m inside the function and mins outside it.
In addition to being a parameter, m is also a special type of variable called a local variable. It is local in the sense that it can only be used within the function of which it is a parameter (in this case,
display_mins). The value of m is set when the function is called, so jumping for a moment to the end of the program, we have:
This line of code calls (runs) the function display_mins, specifying that it will supply mins as the parameter to the function. Python will take whatever value is in mins and assign it to m within
inside the loop, the first line inside the loop will run again.
Returning for a moment to the lines of code in the function (called the function’s body), you can see that the variable message is defined inside the function and is given a value of m converted into a string. This variable m, although not a parameter like m, is still a local variable. That is, the variable
message will only exist inside the function while the function is actually running. So a new
message is created each time that the display_mins function is called and is then automatically destroyed after the function finishes running. This may seem inefficient, but actually microprocessors are designed to be able to do this kind of thing really quickly.
The if on line 7 checks to see if the number of minutes m is 1, and if it is, it adds the string
"min" to message. Note the use of +=, which adds the string "min" onto the end of message. If
m isn’t 1, then "mins" (plural) is added to the message. Finally, display.scroll is called to display the message.
Global Variables
Earlier I described m and message as local variables. The variable mins sits at the top of the program and is accessible from anywhere within the code. This type of variable is called a global variable. The discussion about just how bad it is to use global variables takes on almost religious overtones. There is no doubt that overuse of global variables does lead to unmanageable code, but if you are writing a few dozen lines of Python for a micro:bit, it’s really not the same problem as the thousands or millions of lines of code in a large program.
If you wanted to, you could just use the global variable mins throughout the program. You might like to load up ch04_timer_02_globals.py and verify that it does work the same as the previous version.
The differences between this and the previous version are highlighted in bold. First, the parameter
uses the global variable mins directly rather than having mins passed to it.
This version works just fine in this simple example, but it does mean that you can now only use
display_mins to display the value in the global variable mins. So if we had another global variable called something else, we couldn’t use display_mins to display it. By giving it a parameter, we make it more flexible.
Return Values
The display_mins function does a task rather than calculate a value. It’s not like the built-in function str, which takes a number as a parameter and converts it into a string. Functions like str
are said to return a value. This allows you to write things like this:
which gives the variable message the value returned by str (in this case, the string "123").
You can write your own functions that return a value using the word return. For example, we can modify our timer example so that the code to add min or mins to the end of the number of minutes is contained in its own function. You can find this modified version in
ch04_timer_03.py.
Most of the code is the same, but display_mins has been changed, and a new function,
pluralize, has been added. Let’s look at pluralize first.
This function has two parameters: word, which is a text string, and x, which is an integer. If x is 1, then the function returns the parameter word unchanged. However, if x is not 1, then the value of
word plus an "s" is returned. Once the word return is encountered, nothing further happens in the function. So in addition to returning a value, return also ends the function, continuing with the main program.
We can now use the pluralize function in the display_mins function by changing
display_mins to:
The body of display_mins is now just a single line that contains two calls to other functions. First, it calls the built-in function str to convert the number into a string, and then it calls
pluralize to add an s if necessary. The results of these two function calls are combined into a single string using a plus sign, and the result is scrolled across the display.
Advanced Parameters
just one.
Summary
5
Lists and Dictionaries
There are
two ways of structuring data that are extremely useful and are found in most programming languages. One is a way of representing lists of things (called Lists in Python), and the other links data with a key (called Dictionaries in Python). In this chapter, you will learn all about Lists and Dictionaries and also build on what we have learned so far to write some more programs. To distinguish Python Lists and Dictionaries from the everyday use of those words, I will capitalize their first letter.Lists
To get to know Python Lists, we will use the example program of a message board that allows us to select one message to be displayed from a number of predefined messages. You could, for example, make this into a physical project that you could leave on your door to express messages to other people in your house without having to resort to anything so crude as pen and paper.
Message Board Example
Figure 5-1 Message board example.
The full code for this project can be found in ch05_message_board.py. The Listing for this program is broken into chunks. The first thing to note is the messages List.
The variable messages is similar to other variables that you have used, but instead of having a value that is a single number or string, messages is given a value that is a list of strings. Python knows that it’s a List because the values for the List are enclosed in square brackets. Each element of the List is separated by a comma, and to make the messages easier to read, each is on its own line indented by four spaces. The first message is a simple "-" to indicate no message. You can replace my messages with messages of your own, and you do not have to have the same number of messages.
this is initially set to 0 rather than 1. This is so because index positions in Python start at 0. So the first element in the List is 0, the second 1, the third 2, and so on.
The function show_current_message calls display.scroll. The first parameter in the message to be displayed is messages[message_index]. The square bracket after the List name containing an index number allows you to fetch one particular element from the List. The two optional parameters to display.scroll tell the micro:bit not to wait until the message display has finished before carrying on with the rest of the program, and the loop parameter tells it to keep displaying the message repeatedly. Immediately after show_current_message is defined, it is also run, so the first message of "-" is displayed.
Next, we come to the main while loop. This checks for a button press on button A, and if it finds one, it adds one to message_index. To make sure that we don’t run off the end of the List and cause a range error, the built-in function len is used to find the length of the List and compare it with message_index. If message_index is greater to or equal to the length of the messages
List, then message_index is set back to 0.
Finally, and still only if button A is pressed, the message to be displayed is changed to the message from the List with the index position message_index.
The Lowdown on Lists
This is quite a high-speed tour of the program, so now let’s go into more detail about how Lists work and what you can do with them. There is also a section in Appendix A that provides a reference for using Lists.
Accessing Elements of a List
Here you have created a List in a variable called x that has five elements, which are a mixture of four integers and one string. When you come to try and access the element with index 5, you get an error message telling you that the index is out of range.
In addition to being able to get a particular element, you can also set it. Now try entering the following lines:
Entering just x on its own allows you to see the contents of the List. You then set list element 2 (the third element) to "bbb". Displaying the contents of the list again confirms the change.
In addition to being able to get individual elements of a List, you can also get a section of a List. For example, if you wanted the second and third elements of the List, you would type:
This is a little confusing because you might expect the number after the colon to be 2, but actually the end point of the range is exclusive. That is, it is one more than the last index.
Adding to a List
You can add elements to the end of a List using append, as illustrated in the next piece of code. Note that we are starting with a fresh List.
The first parameter of insert is the position in the array where the new element should go, and the second parameter is the element to insert (in this case, the integer 11).
Deleting from a List
The pop command allows you to remove an element from the List. By default, pop removes the last element from the List and returns it.
You can also “pop” a specific element from the List by using pop with a parameter of the position of the element to be popped.
Joining Lists Together
In the same way that you can join together strings using the plus sign (+), you can also use plus to join to arrays like this:
Note that this does not alter either l1 or l2; it returns a new List that is a combination of the two.
Strings as a List of Characters
Python lets you do many of the things that you can do to a List to strings. After all, a string is actually a list of characters. So you can do things like this to access a particular character of a string:
You can also splice off sections of a string (called substrings) like this:
The function len works on both Lists and strings:
You will find a handy reference for using strings in Appendix A.
Dictionaries
Whereas you access elements of a List by their position, elements of a Dictionary are accessed by a key that can be a string or a number or pretty much anything. A value is associated with each key, so to find an element in a dictionary, you supply a key, and the Dictionary responds with the appropriate value.
An Example
Figure 5-2 The gesture-detector project.
You will learn more about gestures in Chapter 9, but the basic idea is that the micro:bit can use its accelerometer to detect the orientation of the board (face up, face down, tilted left, tilted right, tilted forward, or tilted backward). The program displays a different symbol for each type of gesture.
Whereas a List uses square brackets around its contents, a Dictionary uses curly braces ({ and }). Within the curly braces, each element is in two parts: the key before the colon and the value after it. You do not have to put each key/value pair on a new line, but I have done so here to make it easier for you to see what’s going on.
Looking at the Dictionary gesture_chars, you can see that the key of "up" has a value of
"^" and that of "down" has a value of "v", and so on. The while loop first gets the current gesture, which will be a text string, and then, as long as the string is not empty (length is greater than
0), it looks up the character to “show” using the same square-bracket syntax that you use with a List, except that in this case you have a key (in this case, a string) inside the square brackets rather than a position index.
Upload the program, and try tilting and shaking the micro:bit to see the display change.
Dictionaries in Detail
Let’s look in more detail at how to use Dictionaries. To get the hang of Dictionaries, open the REPL, and be prepared to try some experiments. You will also find a section in Appendix A that gives more information on using Dictionaries.
Accessing Elements of a Dictionary
Try this example in the REPL:
This line creates a new Dictionary with three elements. Each element has an integer as its key and a string as its value.
To retrieve one of the values, you must know its key. The following line will return the element with a key of 5:
error message:
The word KeyError tells you that the key has not been found. This can be inconvenient, especially if you just want to see if the key exists in a Dictionary. To avoid such errors, use get rather than the square-bracket notation.
Now, when you try to get the value of a key that doesn’t exist, you get the special value of None.
None is used in Python to signify the absence of something.
Adding Items to a Dictionary
You can add items to a Dictionary like this:
To remove an element from the Dictionary, you can use pop. The parameter to pop is the key of the element to remove, and pop modifies the Dictionary and then returns the value for that key.
Summary
6
Writing Your Own Programs
Writing Software
Writing programs for a device such as the micro:bit is actually a little different from the job of writing software for a “real” computer. When you are writing an app for a computer or phone, you will be writing a user interface that uses a large-resolution display (compared with the micro:bit) and have the benefit of a keyboard and mouse or touch screen to use as an input device. Also, an app for a computer or phone will be running on a processor hundreds of times faster with thousands of times more memory.
One of the joys of writing for a micro:bit is that by necessity the programs need to be short and sweet and work efficiently. There is no room for “bloat-ware.” Software written for small devices such as the micro:bit is called embedded software and (influenced by electronics engineers) comes with its own culture that is a little different from large-scale software development, although there are many good tricks to be taken from “big” software.
Keep It Simple
In particular, when you first start programming, it is better to start small with simple examples and gradually build on them rather than to type in hundreds of lines of code and then be faced with a mountain of errors and a confusing program that will then consume days of your time to fix. It takes time to track down and fix problems. Although it might seem like you waste a lot of time waiting while your latest version of the code is flashed onto the micro:bit, believe me, it’s much quicker to make small changes between each flashing than it is to track down tricky bugs.
Spikes and the REPL
When learning something new—perhaps exploring how the “sound” library works—try things out in the REPL. Reading the documentation is one thing, but actually trying things makes everything a lot more concrete. If you end up stringing a few lines together in the REPL, then you can always copy and paste them into your program later.
Similarly, professional programmers will often write spike solutions, small programs to test out a tiny part of a much bigger system. Once the spike has done its job of proving that something works, it is generally thrown away, although bits of it might be copied and pasted into the real program.
Versioning
In professional software development, every file that a programmer works on will be kept in a version management system, and whenever a change is made to a file of code that completes a small task of work, a new version of the file will be created. The version management system allows the programmer to, at any time, revert to how the code looked in an earlier version.
idea just to make a copy of your micro:bit program file before you make any major changes. You can do this in your computer’s file system, and a common convention is to make a copy of the file with
_org (for “original”) after the program’s name but before the .py. In this way, if you mess up your program, you can just delete the broken program and rename the last working version, removing the
_org to reinstate it.
Another option, if you do mess up your program, is Mu’s undo feature. This can be really useful. Mu remembers the recent changes you have made. On Windows and Linux computers, to undo your latest change, press CTRL-Z, and on a Mac, use CMD-Z.
Comments
Any line in Python that has a # indicates that the rest of the line after the # is a comment. Comments are ignored by MicroPython. They are just messages to anyone reading the program (including you). Good reasons for adding comments to your code include
To explain what the program does and maybe who wrote it
To explain how to tweak parts of the program that someone might need to change
To insert before a function, where the purpose of the function requires more explanation than just the function name itself
To explain anything that is tricky to understand and you can’t make obvious by refactoring (see later section)
As an aid to beginners who are learning to program
Aside from the “aid to beginners” reason, there is no point in commenting on the glaringly obvious. For example, writing the following is not only pointless, but it can also actually be misleading:
The code is already self-documenting, so it doesn’t need an extra comment. The reason that such comments are bad is that you now have two things to maintain and keep in step. So, if you later find that the code is supposed to subtract 1 rather than add 1, you have to change both comment and code. Often this double change doesn’t happen, leaving inconsistency. People who program for a living will generally mistrust comments and “let the code speak.”
Usually, when programming, comments have no effect on the size of the final running program. However, MicroPython is a little different in that the whole text of the program (comments and all) is stored in the micro:bit’s flash memory. So, if when you try to flash your program onto a micro:bit you get the error message, “Unable to flash. Your script is too long,” try removing the comments.
Refactoring
Good programmers are not judged by how many lines of code they write a day but by how few they need to write to get the job done. Good programmers have a need to keep things neat and tidy, and when they find code that is overcomplicated or repeats itself, they will refactor it, simplifying it and thereby reducing its size and making it easier to work on.
fine but could be improved:
The two fairly long highlighted lines are identical. They both display the current message, but this needs to be done in these two places in the program. The fact that both lines are preceded by a comment saying what the next line does is a dead giveaway that this line should be made into its own function so that the comments become unnecessary because the meaning is there in the function name.
Here is the DRY version of the relevant part of the program:
do is alter the one line inside show_current_message() to be
State Machine Design
The timer example that we started back in Chapter 3 actually gets surprisingly complicated when you start to think about how it should behave. What happens when you press the buttons is different depending on whether you are setting the time on the timer, or the timer is counting down, or the timer is buzzing to indicate that time is up. Programs for devices such as the micro:bit often need to make use of the idea of the program being in different modes or states, and a useful way to plan out exactly how the program should work and move between these modes is called a state machine. Actually, this concept, which has come from mathematics, is more properly called finite state machines (FSMs). But don’t worry, despite the very formal name, it’s actually pretty easy to draw a state machine diagram as an aid to writing your code.
The first step is to identify the states (think modes) that the timer can be in. It can be in one of the following three states:
SET—setting the number of minutes from which the timer will start RUN—counting down
ALARM—sounding the alarm because the countdown has finished
By convention, constants such as SET, RUN, and ALARM are written in uppercase letters.
You now need to plan out just what will cause your program to change from one state to another and anything that may happen as that transition occurs. The best way to do this is as a diagram like the one in Figure 6-1.
The first arrow from Start indicates that when the program runs; SET should be the first state that it enters. Once in the SET state, pressing button A will increase the number of minutes by one. This is indicated by a piece of text above the line (button_a.pressed())—this is the condition. Below the line is the “action” to carry out (mins += 1), and the arrow bends all the way back to
SET, indicating that after button A has been pressed, we still stay in the SET state. Here mins += 1 is actually shorthand for the whole adding of 1 to the minutes and wrapping around back to 1 when you get to 10 that we explored in Chapter 3.
If we are in the SET state and button B is pressed, then we change state to RUN, and we don’t need to do anything else when we change state, so there is no need for a line or an action. From the RUN
state, pressing button B again will take you straight back to SET. Also, while in the RUN state, the time will count down every second and be displayed. When the numbers of minutes and seconds both reach zero, the buzzer will be turned on, and we will enter the ALARM state, from which we will return to the SET state, turning the buzzer off, when button B is pressed.
Revisiting the Timer Example
It’s time to revisit the code for the timer example and use the state machine diagram of Figure 6-1 to rewrite the code. So disregard what we have done so far in the timer example; we are going to start again.
Rather than trying to type in all the following code, I suggest loading the program
ch06_timer_03 to program ch06_timer_06 as they are referenced in the following discussion.
A State Machine Framework
Let’s start with the basic template for representing the SET, RUN, and ALARM states of our program. The following code isn’t a complete program, so don’t try to run it.
The first line above assigns the values 0, 1, and 2 to SET, RUN, and ALARM. Each state has a unique number, but we don’t need to use the number for anything other than telling the states apart because we will always refer to the state by its variable name to make the code easier to read.
The variable state is a global variable used by the program to keep track of the current state. To help keep the state in manageable units, three functions will be used to “handle” what goes on in each state. These are empty at the moment, but we can start to fill them out.
Switching Between States
Let’s now expand the program so that when we press button B, we toggle back and forth between the
SET and RUN states. The handlers for SET and RUN are listed in the next piece of code—you can run this example now using the program ch06_timer_3.py.
The first thing to note is that the first line of the handler is:
By default, Python will allow you to read values from a global variable from within a function, but if you try to change the value of a variable inside a function, Python creates a local variable with the same name as the global variable unless you use the global command. Most programming languages do not do this; they allow unfettered access to global variables. So if you have come from another language and your Python program appears to be defying all logic, check that you are not accidentally “shadowing” a global variable.
The next line displays the letter "S" just so that we can see that we are in the SET state. If button B has been pressed (since last time we checked), the global variable state is set to RUN. The handler for the RUN state is pretty much a mirror image of the one for SET.
Adding Code to the
SET
State
Let’s add a bit more to handle_set_state so that we can adjust the minutes. We are now reintroducing code that we originally wrote back in Chapter 4. You can find the revised program in