North Brunswick Public Library Advanced Word Tips & Tricks
Page 1 of 16 rev 2.0 ©North Brunswick Public Library May 2009
ADVANCED WORD 2007 Tips & Tricks
THERIBBON
Ack! What’s this? Where’s FILE or EDIT? Where’s PRINT? Where’s SAVE???
Welcome to the new look of Word 2007. The blue part across the top of the screen is called the
RIBBON. The 7 tabs across the top of the ribbon (HOME, INSERT etc.) are general areas. When you click on one of them, their subcategories will fill the ribbon.
But the most important question is: HOW DO I SAVE? In the top left of the screen you will see this large circle with the multi colored squares. It’s called the BUTTON. When you click on it, the following window will drop down. As you can see, it contains all of the most basic commands: Open, Save, Print, etc. There is also a list of recently opened documents.
Most of the items are simple to use. For a New Document, click
NEW
. To open a folder clickOPEN
.PRINTING
Print Preview is in the Print menu. If you move your mouse over the Print icon, a new window will open with three options. Just select Print Preview to Preview.
Click Close Print Preview to close the preview and return to your document.
And to EXIT Word, click Exit Word.
Page 2 of 16 rev 2.0 ©North Brunswick Public Library May 2009
SAVING
SAVE AS calls up a new menu with a couple of options on it. Hold your mouse over SAVE AS to access this menu. The two most common functions will be the first and third ones:
Word Document
. This will save the file inWord 2007 format, which can only be opened on other Word 2007 computers. This is the same as clicking
Save (or the little disc at the top of the screen. The file will be saved in .docx format.
Word 97-2003 Document
. Clicking this will save your file in a Word 2003 compatible format. If you save the file this way, you will be able to open it on any computer with either Word 2003 or Word 2007. The file will be saved in .doc format. You can save a file in both formats if you like.When you save the documents, they will show up in your folder with the above icons next to them to help you distinguish between them.
You can also save directly as a PDF format which is very useful for creating files that cannot be altered.
QUICK ACCESS TOOLBAR
At the top of the screen is a Quick Access Toolbar. You can customize this with whatever
icons you use most. They are mostly familiar from Word 2003. Save is the disc.
Undo is the blue arrow. By clicking on the arrow at the right, you can add whichever icons you like.
The most frequently used options are listed when you click that arrow. But near the bottom is More Commands.
North Brunswick Public Library Advanced Word Tips & Tricks
Page 3 of 16 rev 2.0 ©North Brunswick Public Library May 2009
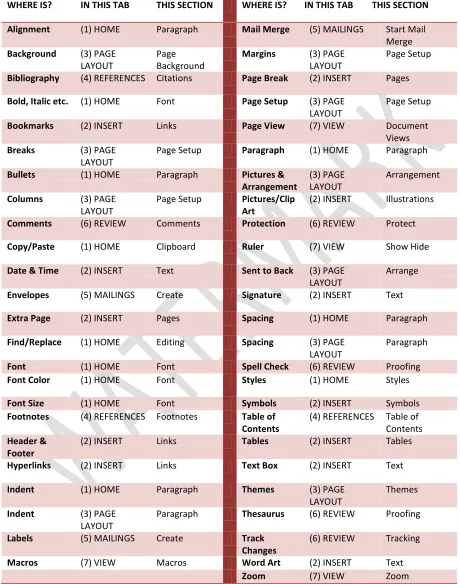
ANYTHING ELSE YOU MIGHT BE LOOKING FOR
WHERE IS? IN THIS TAB THIS SECTION WHERE IS? IN THIS TAB THIS SECTION
Alignment (1) HOME Paragraph Mail Merge (5) MAILINGS Start Mail Merge
Bibliography (4) REFERENCES Citations Page Break (2) INSERT Pages
Bold, Italic etc. (1) HOME Font Page Setup (3) PAGE
Page Setup Paragraph (1) HOME Paragraph
Bullets (1) HOME Paragraph Pictures & Arrangement
Comments (6) REVIEW Comments Protection (6) REVIEW Protect
Copy/Paste (1) HOME Clipboard Ruler (7) VIEW Show Hide
Date & Time (2) INSERT Text Sent to Back (3) PAGE LAYOUT
Arrange
Envelopes (5) MAILINGS Create Signature (2) INSERT Text
Extra Page (2) INSERT Pages Spacing (1) HOME Paragraph
Footnotes (4) REFERENCES Footnotes Table of Contents
Paragraph Thesaurus (6) REVIEW Proofing
Labels (5) MAILINGS Create Track
Changes
(6) REVIEW Tracking
Macros (7) VIEW Macros Word Art (2) INSERT Text
Page 4 of 16 rev 2.0 ©North Brunswick Public Library May 2009
WE’RE NOT DONE WITH THE RIBBON YET!
At the bottom right of many of the subsections, there is a tiny square with an arrow. If you click on that little box, a menu will open up allowing you to do many of the detailed features that you were used to from Word 2003.
In the HOME Tab:
FONT POP OUT
FONT POP OUT allows you detailed font effects like strikethrough, outline etc. PARAGRAPH POP OUT allows you to modify spacing,
indents tabs etc.
In the PAGE LAYOUT Tab:
PAGE SETUP POP OUT allows you to change margins, page numbers etc.
In the REFERENCE Tab:
FOOTNOTE AND ENDNOTE POP OUT allows you to modify your references. (No picture shown).
North Brunswick Public Library Advanced Word Tips & Tricks
Page 5 of 16 rev 2.0 ©North Brunswick Public Library May 2009
ONE LAST THING ABOUT THE RIBBON
If you can’t stand that ribbon, you can make it go away. Click on the arrow to the right of the Quick Access bar and on that drop down menu, select Minimize the Ribbon.
When you minimize the ribbon, you are left with just the Tabs. If you click on any of the Tabs the ribbon will come back and let you do anything. Once you click back in your document, the ribbon will go away again. Uncheck Minimize the Ribbon to have it show up again.
OKAY, WE’RE NOT TOTALLY DONE WITH THE RIBBON
There are some actions that create new tabs to appear on the ribbon. Whenever you insert a Header or Footer (in the Insert tab), a new Header & Footer Tools Tab will appear. When you click on the Design
part of Header & Footer Tools, you’ll see this new ribbon which allows you to modify the Header or
Footer. Either click Close on the right side to get rid of the ribbon, or just double click in the body of your text, and the Header Ribbon will go away. To get that ribbon back, just double click in the Header/Footer area again and it will reappear.
The same is true for pictures. When you add a picture to a document or if you click on a picture that is already in the document, the
Picture Tools
window will open. Click on Format, and the picture formatting ribbon will open. In here you can modify pictures (brightness, color changes); crop pictures; or wrap text around the pictures to make them fit better. And, with a new feature, you can use the Picture Styles to frame the pictures, or change the shape of the pictures or even add shadows. Just click on the down arrow on the right side of Picture Styles to see all of the selections. More on pictures later.MINI TOOLBAR
Page 6 of 16 rev 2.0 ©North Brunswick Public Library May 2009 mouse. If you move your mouse toward the box, it will reveal itself to be a small toolbar, giving you quick access to most of the text effects. Change the font, the color, Bold or Italicize. The changes will affect everything that is highlighted. You can also access this toolbar by right clicking. It will pop up automatically.
OFFICE 2007’S AUTO PREVIEW
With Office 2007, any of the changes you may make from Font to Color to Style will automatically be Previewed for you. Highlight any text or even a whole document. Then roll over any of the options and the screen will change to show you what it will look like. Click on the option and it will take effect, move your mouse away and it will go away.
STYLES
A new feature in Office 2007 is the Styles window in the HOME tab. If you select the entire document, the Styles will provide formatting for the whole document. (You can also choose a style before you start you document). The style options allow for various color schemes, as well as changing type fonts
throughout the document. The Change Styles arrow provides even more Styles available. The Style Set shows some standard overall styles. This includes an automatic return to Windows 2003 (!) by slecting that it will look exactly like it used to. And, as with all of the new features of 2007, by rolling over a Style, it will preview it for you automatically.
TEMPLATES
When you click the Button and choose New, the New Document window opens. On the left side of the window is a list of Templates. If you click on any of them, Word will search for Templates that you can use for your documents. The list is quite lengthy, and they include Award Certificates, Brochures, Envelopes, a variety of Forms,
including things like a Vacation Planner. There’s also schedules, and something that may be especially useful: A Resume template. Download the template and you can simply modify the data to reflect you and your skills.
And speaking of Word 2003…
Why is the default in this new Word so weird? Why is the font Calibri, and why does it
automatically double space…? Let’s get it back to the way it used to be. You can do a lot of these things manually, including changing the default font etc. Or you can just select a Template that changes it all back to Word 2003:
1. Click the Microsoft Office Button , and then click New. 2. On the left menu, click on Installed Templates.
3. Scroll to the very bottom right, click on Office Word 2003 Look.
4. It will appear in the window on the right. Then click Create on the bottom.
North Brunswick Public Library Advanced Word Tips & Tricks
Page 7 of 16 rev 2.0 ©North Brunswick Public Library May 2009 Now if you want ALL of your documents to look like this from now on, you can set this as the default. To do this:
1. Click the Microsoft Office Button , and then click New. 2. Double-click on Blank document to create a new document. 3. On the Home tab, click Change Styles.
4. Select Style Set.
5. Click on Word 2003 Quick Style set. 6. Click Change Styles again
7. Select Fonts.
8. Click on Office Classic.
9. One more time, click Change Styles. 10. Then click Set as Default.
Every document from now on will open in this format. You can always change it to something else in the future if you like.
BUT CAN’T I JUST CHANGE THE STUPID LINE SPACING BACK TO NORMAL?
Yes.
Click on the Pop Out arrow in the Paragraph subsection.
A new window will open. Select Line Spacing: Single. Put a check in the Don’t add space between paragraphs button and set Before and After to 0 pt. Then click Default… And then click
Yes.
And, to change the
default font
, click the Pop Out arrow in the Font subsection. Select your font and size and anything else and then click Default and then Yes.IS THE MOUSE AT LEAST THE SAME?
Yes.
The right mouse button performs a lot of tricks that we’ll cover above; however, if you prefer to use the mouse, they are handy here.
If you have a misspelled word (Word underlines what it thinks are misspelled words with a jagged red line) and you right click on the word, it will offer a list of corrections)
If you start with a word that is spelled correctly, you can change the FONT, insert bullet points, add a hyperlink or even look for synonyms.
Page 8 of 16 rev 2.0 ©North Brunswick Public Library May 2009
BULLET POINTS
If you have already typed a section and you decide you would like it to have bullet points or numbers, simply highlight all of the text, and click either the number or bullet icon at the top (in the Paragraph section.) If you select numbers, Word will add numbers to each paragraph. If you select the bullets, you will be given a new menu to choose which style you would like.
These are Bullet points
1. These 2. are 3. Numbered 4. points
These
Are
Fancy
INSERTING A PICTURE
Click the Insert Tab and click Picture. The Insert Picture menu will allow you to choose a picture from somewhere on the computer. [Clip Art gives you access to a staggering amount of clip art online.] Once the picture is inserted you can change the size or position of the picture. If you click on the picture, the Picture Tools Tab will appear in Red and circles will appear on the corners and sides of the picture. If you click and hold on one of those circles, you can drag the box to make it bigger or smaller.
To adjust the way text flows with the picture, click on the picture. Select the Picture Tools menu and click on Text Wrapping. A small box will open with several options for text wrapping.
In line with text means that the picture will stay right where you put the cursor, and the bottom of the picture will be aligned with that row of text.
Square means the text will wrap around the picture (if you put the picture left or right, the text will stay on the side of the picture.
Tight means the text will wrap even more closely to the picture (and if there is white space, it may fill in that white space).
Behind text means the text will cover the picture (with varying degrees of legibility).
In front of text means that it will cover the text.
ADVANCED TIPS AND TRICKS FOR MICROSOFT WORD 2007
Page 9 of 16 version 2.0 ©North Brunswick Public Library May 2009
If you select the Picture tab you can adjust the strength of the picture with the Brightness and Contrast levers, and you can make the picture a watermark by selecting Watermark from the Color drop down menu. This will put the picture faintly in the background of the page.
TABLES
Tables are useful for creating charts, or grids. Simply click on the Insert Tab. Tables is right below. A pop up menu will let you decide the number of vertical columns and horizontal rows. Just drag your mouse over the number of cells you want. Once you click, it will insert the table into your document where your cursor is. You can also do the manual work by selecting Insert Table. Or, by using the Draw Table feature you
can “draw” your own….the pencil allows for boxes within boxes. You can always adjust the height and width of each table if you put your cursor over a line and the line turns into a double arrow.
When you click on your table, a new Tables Tools Tab lights up. The Design submenu allows you all kinds of modifications to the look of your Table. The styles section shows pre-designed colors and shadings. The Table Style Options on the left allows you to change specific aspects of the Table. And the Shading and Borders buttons do just what they say.
The Layout submenu allows for more specific alterations of your table: adding or deleting rows, merging cells, changing text direction and sorting.
SORTING
When you have a table, you can sort the cells of the table so that they are in alphabetical order. Click in your table and on the Layout submenu, click on the AZ Sort icon. When the new pop up window opens, you can choose which column you would like it sorted by (for instance if you had your columns set up First Name, Last Name, you could sort by column 2 to sort them alphabetically by last name) and sort by Text (Alphabetical, Number or Date).
Page 10 of 16 version 2.0 ©North Brunswick Public Library May 2009
example of book titles, and you have created it in a random order, you can highlight all of the titles and then click AZ arrow and sort the list alphabetically by selecting Paragraph, Text, Ascending.
MARGINS AND INDENTATION
If there is no Ruler, click on the View Tab. Check the box next to Ruler and the Ruler will show up.
The top triangle is the First Line Indent the rest of the paragraph will go to the edge of the page
The bottom triangle is the “hanging indent” if you want the first line to be at
the edge of the page and each line below to be indented. The Box at the bottom sets the margin for the whole thing.
You can also set the margins with the arrows. It uses preset measurements and jumps ½ an inch for each click.
Another option is to set them manually. Either double-click in the light blue area to the left of the ruler, or click on Page Layout Tab and click the pop out box in Page Setup.
From this menu you can adjust the different margins to accommodate your needs. The preview window at the bottom will show you sort of what your changes will make the document look like.
Zoom lets you increase the screen size without affecting the actual size of the document. There is also a slide bar in the bottom right corner that also zooms and reduces the screen size.
This does not affect Printing.
In the Window subsection, New Window opens a New Document with the same content as what you
ADVANCED TIPS AND TRICKS FOR MICROSOFT WORD 2007
Page 11 of 16 version 2.0 ©North Brunswick Public Library May 2009
To create a page break click the Insert Tab. Page Break is all the way on the left in Pages. The Break will signify the end of a page without having to hit the return key to find the end of the page, which doesn’t
always work, especially if you add or remove text. It inserts a hard page break so that the next line starts a new page.
ACCENTS AND NON ENGLISH CHARACTERS.
Click on the Insert Tab and select Symbol (all the way to the right). The most
common symbols will open in a small box. If you don’t see the one you want, click
on More Symbols. A new window will pop up which is a grid of every accented character and symbol that this computer can print for you. As you scroll up and down the right side, the text will be grouped together with similar letters. When
you see the one you want, click on the character and then click the Insert
button. The character will appear where your mouse was. You can also change the Font that these characters are in. New items will appear in the boxes as you change fonts.
If you just want to type these characters without using this chart, keyboard shortcuts for accents are somewhat easy to do. Hold down the ALT key and type the following numbers on the numbers only keyboard section (on the right side of the keyboard). The grid also shows shortcut keys. Some are easier than others!
COMMON SHORTCUTS:
Á --ALT+0193
á --ALT+160
Ú --ALT+0218
ü --ALT+129
É --ALT+144
é --ALT+130
Ñ --ALT+165
ñ --ALT+164
Í --ALT+0205
í --ALT+161
¿ --ALT+168
¡ --ALT+173
Ó --ALT+0211
ó --ALT+162
º --ALT+167 to indicate degrees.
Word specific Keyboard shortcuts for common accents (these don’t work in Excel or PowerPoint). Hold down the CTRL key, press the first key, then the second.
Page 12 of 16 version 2.0 ©North Brunswick Public Library May 2009
COLORS/BORDERS
If you need colors or borders in your document either as a background, or as a highlight, click Page Layout. The Page Background section offers Page Color (to color the whole page), Page Borders (and a large variety to choose from) or Watermark as something that appears faintly in the background (on every page in this document). The Borders shows some options for borders around either a paragraph or the whole document.
If you would like to highlight something, as if you were using a highlighter, click on the Home Tab. Select the text you would like highlighted, click on the little pen icon next to the letter A at the top right of the menu bar. That will allow you to choose a color. Click to accept. You can also change text color by using the arrow next to the A.
WORD COUNT
This is useful if you need to do a project with a word minimum or maximum. In the Review Tab, in the Proofing section on the left, Word Count is the little ABC123 on the bottom right.
RESEARCH
Also in the Review Tab, in left section Proofing, you have Research: this allows you to do some simple research: definitions, spelling etc. There’s also a TRANSLATION key as well. When you click on it a side bar will open. Type in any word you wish to look up or hold down the ALT key and double click on any word to find out the definition.
The drop down menu that says All Reference Books lists all of the different resources available. Other things available include Encarta, Live Stock Quotes and Gale Company Profiles (!) For instance if you type in Microsoft, financial information will come up.
FORMATTING SPECIALTIES
DATE AND TIME
Are available on the Insert Tab in the Text area.
DROP CAP
rop Cap allows you to add a very large letter at the beginning of a block of text. Click on Insert, and Text (on the right side) and select Drop Cap.
SIGNATURE LINE
Signature Line is quite literally a line for a signature.
CHANGE CASE
On the Home Tab, this icon allows you to automatically change the style of the highlighted text. Options are Sentence case; lowercase; UPPERCASE; Title Case and tOGGLE cASE (which automatically changes what you have to the opposite)
ADVANCED TIPS AND TRICKS FOR MICROSOFT WORD 2007
Page 13 of 16 version 2.0 ©North Brunswick Public Library May 2009
SHORTCUT for this: to change the case of your text from UPPER to lower to First Letters Capitalized, highlight the text with the mouse, then hold down Shift and click F3 to cycle through these options.
SHAPES:
Click Insert Tab in Illustrations. Shapes: A menu drops down with many many shapes to choose from, most are self explanatory.
The other options include basic shapes, stars, arrows, and speech balloons. Just drag your mouse to the size of the shape, and you can resize as you see fit.
You can type inside a shape by right clicking on it and selecting Add Text. You can then type in the shape, and the text will, for the most part, fit into shape. You can always make the shape bigger to accommodate the text. You can then color in the shape by clicking on the paint bucket (click on the arrow next to it to select color). The circular arrow near the left side of the bar will allow you to rotate the shape. Click on the arrow and little circles will appear at the corners of the shape. You can then rotate it however you like.
Smart Art is slightly more sophisticated shapes, designed for charts and graphs.
WordArt (Insert Tab, in the Text section, it is the blue tilted A) allows you to use preset designs to create fancy word shapes. When you click on the A, a new window pops open showing the templates that you can use. When you select the style you want, a new box opens in which you type your message. Your text will then appear on the document, and a new Word Art menu will open up. Using this you can change the style of lettering, the color, the angle of the letters, or even if you want the text to be vertical rather than horizontal.
ENVELOPES AND LABELS
Click the Mailings Tab. On the left, Create: Envelopes and Labels. This includes the templates for
addressing envelopes. It also has many standard templates for labels/stickers. Click on Labels Options to see the various installed labels (the Avery number is what comes on the package of labels).
Note: When you use either envelopes or labels you have to manually feed the item into the printer
(which you can’t do in the library, I’m afraid).
TECHIE STUFF, IF YOU’RE STILL WITH ME
TRACKING CHANGES
Page 14 of 16 version 2.0 ©North Brunswick Public Library May 2009
MACROS
Macros are ways to create shortcuts to repeat tasks that you do frequently. So if you know you will be writing the same thing over and over, you can create a macro to automatically write that phrase or sentence or page or whatever.
In the View Tab, click Macros on the right side.
Click Record Macro… and a little toolbar will open up. It is best to give it each Macro a name so you remember what is it (you can also add a description at the bottom). You can assign your Macro to either a Button on the Quick Access Toolbar or to a keyboard shortcut key, (by
selecting one of those icons) but we will just create one and then select it from a list later. Click OK.
The Macro immediately begins recording everything you type, including returns and spaces. (Your cursor will show a cassette tape shape to indicate it is recording). When
you’re done, click the Macros button again and select Stop Recording.
When you’re ready to execute a Macro, click on the Macro icon, or use Alt+F8. This will show all the macros that you have made (this is why it’s very helpful to give them all names). Select the one you want and click Run. It will do exactly what you recorded exactly where your mouse currently is. You can see that by assigning it a Quick Access button or keyboard shortcut, it would be very easy to do this many times.
MAIL MERGE
Mail merge is a way to have a document or an envelope addressed to all of the people in your address book. It helps if you have an address book already created in Microsoft (if you use Outlook, you may have one already). To start, click Mailings. The Start Mail Merge section offers a very simple Wizard that shows how to do a Mail Merge. The task pane on the right will help you through the steps.
Click on Start Mail Merge and Select Step by Step Mail Merge Wizard.
First: Select which type of document you are working on Letters, Emails, Envelopes etc. Click next (at the bottom of the pane).
Second: Either create a new document or use the existing document. Click next.
Third: You create or select a list of people. If you need to create your new list, it will give you a rolodeck looking thing where you fill in all of the fields for the contacts that you wish to mail to. Save this list and then can format it by any of the fields you filled in. (Sort by Last name, first name or anything else). Fourth: Select where in your document you would like the names to show up. So, if you want the names to be at the top of a letter, put your cursor there. It gives you some options to choose from for
the salutation. After you’ve selected you will get something like this: «GreetingLine» «AddressBlock» After you click next, it will fill in the name of the recipients you have added into your contacts. You can click through the various recipients if you want to make sure the names look right. Finally, the last step allows you to print everything or to edit and change all of the documents. If you click edit it will open one document that contains multiple copies of your document, each one address to the recipients. So your document could easily be twenty pages long, with each page being your document addressed to a
different person. It’s pretty powerful if you find yourself addressing multiple people.
ADVANCED TIPS AND TRICKS FOR MICROSOFT WORD 2007
Page 15 of 16 version 2.0 ©North Brunswick Public Library May 2009
There are a number of shortcuts available in Word, which means you do not have to use your mouse to perform certain actions. If you click on any of the menus (File, Edit etc) you will see something like Ctrl+S next to most of the options. These are the shortcuts. You hold down the Ctrl key and push the letter (or number) that it lists. Some of the most frequently used include:
Ctrl+S = Saving a document.
Ctrl+F2 (the key above the numbers) = Print Preview.
Ctrl+P = Printing a document.
Ctrl+Z = Undo the last thing you did (if you type the word you are looking for and click Find Next. (This is also in the Edit menu, near the bottom).
Ctrl+J = Justify the text so it reaches each margin
Further, if you want to replace one word with another, throughout the entire document, you can. Let's say you spelled Library like this: liberry. If you do Ctrl+F the Find/Replace window will pop up. Click on the replace tab. Type the word liberry in the top and library in the bottom. If you have many examples of this and you want to change them all at once, click Replace All. If you want to leave one like that for some reason, you can click Replace, and then click Find Next and then Replace and so on.
Ctrl+C = Copy Ctrl+X = Cut Ctrl+V = Paste
For all copy and paste, highlight the text by putting your mouse in front of the letter you want to start with and then, while holding down the left button on the mouse, drag the mouse to the end of the text (or pictures) that you want copied. [If you use the CUT method it will remove the text entirely from the original document]
You can also move highlighted text to another place on the document (including on the same line) simply by highlighting it and dragging it where you would like it to be.
PASTE SPECIAL
Paste Special allows you to paste text or more from another source, such as Excel, or even the internet, and allows you to paste the items so they fit nicely into Word. When you click Paste Special, a new box pops up. If you select Formatted Text (RTF) it will paste the text so that it fits into the format that you are currently using in your document (including font, and bullets etc.). If you select Unformatted Text it will paste all of the text in a block of text with no real formatting. You will have to do some extra work, but it is easier than trying to figure out how to "undo" what the web page looks like.