HTML5 Canvas
by Steve Fulton and Jeff Fulton
Copyright © 2011 8bitrocket Studios. All rights reserved. Printed in the United States of America.
Published by O’Reilly Media, Inc., 1005 Gravenstein Highway North, Sebastopol, CA 95472.
O’Reilly books may be purchased for educational, business, or sales promotional use. Online editions are also available for most titles (http://my.safaribooksonline.com). For more information, contact our corporate/institutional sales department: (800) 998-9938 or [email protected].
Editors: Mike Loukides and Simon St.Laurent Production Editor: Kristen Borg
Copyeditor: Marlowe Shaeffer Proofreader: Sada Preisch
Indexer: Ellen Troutman Zaig Cover Designer: Karen Montgomery Interior Designer: David Futato Illustrator: Robert Romano
Printing History:
May 2011: First Edition.
Nutshell Handbook, the Nutshell Handbook logo, and the O’Reilly logo are registered trademarks of O’Reilly Media, Inc. HTML5 Canvas, the image of a kaka parrot, and related trade dress are trademarks of O’Reilly Media, Inc.
Many of the designations used by manufacturers and sellers to distinguish their products are claimed as trademarks. Where those designations appear in this book, and O’Reilly Media, Inc., was aware of a trademark claim, the designations have been printed in caps or initial caps.
While every precaution has been taken in the preparation of this book, the publisher and authors assume no responsibility for errors or omissions, or for damages resulting from the use of the information con-tained herein.
ISBN: 978-1-449-39390-8
[LSI]
Table of Contents
Preface . . . xv
1. Introduction to HTML5 Canvas . . . 1
The Basic HTML Page 2
<!doctype html> 3
<html lang="en"> 3
<meta charset="UTF-8"> 3
<title>…</title> 3
A Simple HTML5 Page 3
Basic HTML We Will Use in This Book 4
<div> 4
<canvas> 5
The Document Object Model (DOM) and Canvas 5
JavaScript and Canvas 6
JavaScript Frameworks and Libraries 6
Where Does JavaScript Go and Why? 6
HTML5 Canvas “Hello World!” 7
Encapsulating Your JavaScript Code for Canvas 8
Adding Canvas to the HTML Page 9
Testing to See Whether the Browser Supports Canvas 10
Retrieving the 2D Context 11
The drawScreen() Function 11
Debugging with Console.log 14
The 2D Context and the Current State 15
The HTML5 Canvas Object 16
Another Example: Guess The Letter 17
How the Game Works 17
The “Guess The Letter” Game Variables 17
The initGame() Function 19
The eventKeyPressed() Function 19
The drawScreen() Function 21
The Final Game Code 23
What’s Next 26
2. Drawing on the Canvas . . . 27
The Basic File Setup for This Chapter 27
The Basic Rectangle Shape 28
The Canvas State 29
What’s Not Part of the State? 30
How Do We Save and Restore the Canvas State? 30
Using Paths to Create Lines 30
Starting and Ending a Path 31
The Actual Drawing 31
Examples of More Advanced Line Drawing 32
Advanced Path Methods 34
Arcs 34
Bezier Curves 36
The Canvas Clipping Region 37
Compositing on the Canvas 39
Simple Canvas Transformations 41
Rotation and Translation Transformations 42
Scale Transformations 47
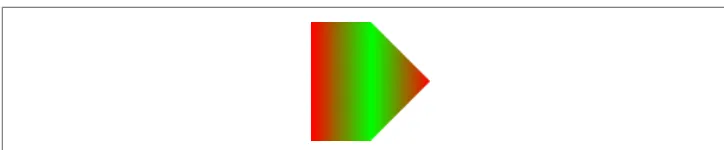
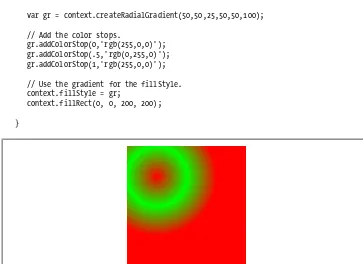
Combining Scale and Rotation Transformations 49 Filling Objects with Colors and Gradients 51
Setting Basic Fill Colors 51
Filling Shapes with Gradients 52
Filling Shapes with Patterns 61
Creating Shadows on Canvas Shapes 64
What’s Next 67
3. The HTML5 Canvas Text API . . . 69
Displaying Basic Text 69
Basic Text Display 69
Handling Basic Text in Text Arranger 70
Communicating Between HTML Forms and the Canvas 71
Using measureText 71
fillText and strokeText 73
Setting the Text Font 78
Font Size, Face Weight, and Style Basics 78 Handling Font Size and Face in Text Arranger 79
Font Color 83
Font Baseline and Alignment 86
Text Arranger Version 2.0 90
Text and the Canvas Context 94
Global Alpha and Text 94
Global Shadows and Text 96
Text with Gradients and Patterns 100
Linear Gradients and Text 100
Radial Gradients and Text 102
Image Patterns and Text 102
Handling Gradients and Patterns in Text Arranger 103 Width, Height, Scale, and toDataURL() Revisited 106
Dynamically Resizing the Canvas 106
Dynamically Scaling the Canvas 109
The toDataURL() Method of the Canvas Object 110
Final Version of Text Arranger 112
What’s Next 121
4. Images on the Canvas . . . 123
The Basic File Setup for This Chapter 123
Image Basics 124
Preloading Images 125
Displaying an Image on the Canvas with drawImage() 125 Resizing an Image Painted to the Canvas 127 Copying Part of an Image to the Canvas 128
Simple Cell-Based Sprite Animation 130
Creating an Animation Frame Counter 130
Creating a Timer Loop 131
Changing the Tile to Display 131
Advanced Cell-Based Animation 132
Examining the Tile Sheet 133
Creating an Animation Array 133
Choosing the Tile to Display 133
Looping Through the Tiles 134
Drawing the Tile 134
Moving the Image Across the Canvas 135
Applying Rotation Transformations to an Image 137
Canvas Transformation Basics 137
Animating a Transformed Image 140
Creating a Grid of Tiles 142
Defining a Tile Map 143
Creating a Tile Map with Tiled 143
Displaying the Map on the Canvas 145
Zooming and Panning an Image 149
Creating a Window for the Image 149
Drawing the Image Window 150
Zoom and Pan the Image 153
Application: Controlled Pan and Zoom 154
Pixel Manipulation 158
The Canvas Pixel Manipulation API 158
Application Tile Stamper 159
Copying from One Canvas to Another 166
What’s Next 169
5. Math, Physics, and Animation . . . 171
Moving in a Straight Line 171
Moving Between Two Points: The Distance of a Line 174
Moving on a Vector 179
Bouncing Off Walls 183
Bouncing a Single Ball 184
Multiple Balls Bouncing Off Walls 188
Multiple Balls Bouncing with a Dynamically Resized Canvas 193 Multiple Balls Bouncing and Colliding 198 Multiple Balls Bouncing with Friction 210
Curve and Circular Movement 216
Uniform Circular Motion 217
Moving in a Simple Spiral 220
Cubic Bezier Curve Movement 223
Moving an Image 228
Creating a Cubic Bezier Curve Loop 232
Simple Gravity, Elasticity, and Friction 236
Simple Gravity 236
Simple Gravity with a Bounce 240
Gravity with Bounce and Applied Simple Elasticity 243 Simple Gravity, Simple Elasticity, and Simple Friction 246
Easing 249
Easing Out (Landing the Ship) 249
Easing In (Taking Off) 253
What’s Next? 257
6. Mixing HTML5 Video and Canvas . . . 259
HTML5 Video Support 259
Theora + Vorbis = .ogg 260
H.264 + $$$ = .mp4 260
VP8 + Vorbis = .webm 260
Combining All Three 261
Converting Video Formats 261
Basic HTML5 Video Implementation 262
Plain-Vanilla Video Embed 263
Video with Controls, Loop, and Autoplay 265 Altering the Width and Height of the Video 266
Preloading Video in JavaScript 271
A Problem with Events and Embedded Video in HTML5 274
Video and the Canvas 275
Displaying a Video on HTML5 Canvas 275
HTML5 Video Properties 281
Video on the Canvas Examples 285
Using the currentTime Property to Create Video Events 285 Canvas Video Transformations: Rotation 289
Canvas Video Puzzle 294
Creating Video Controls on the Canvas 307
Animation Revisited: Moving Videos 316
What’s Next? 320
7. Working with Audio . . . 321
The Basic <audio> Tag 321
Audio Formats 322
Supported Formats 322
Audacity 322
Example: Using All Three Formats 323
Audio Tag Properties, Functions, and Events 324
Audio Functions 325
Important Audio Properties 325
Important Audio Events 326
Loading and Playing the Audio 326
Displaying Attributes on the Canvas 327
Playing a Sound with No Audio Tag 331
Dynamically Creating an Audio Element in JavaScript 331
Finding the Supported Audio Format 332
Playing the Sound 333
Look Ma, No Tag! 334
Creating a Canvas Audio Player 336
Creating Custom User Controls on the Canvas 337
Loading the Button Assets 337
Setting Up the Audio Player Values 339
Mouse Events 340
Sliding Play Indicator 340
Play/Pause Push Button: Hit Test Point Revisited 342
Loop/No Loop Toggle Button 343
Click-and-Drag Volume Slider 344
Iterations 353
Space Raiders Game Structure 353
Iteration #1: Playing Sounds Using a Single Object 362 Iteration #2: Creating Unlimited Dynamic Sound Objects 362
Iteration #3: Creating a Sound Pool 365
Iteration #4: Reusing Preloaded Sounds 368
What’s Next 378
8. Canvas Game Essentials . . . 379
Why Games in HTML5? 379
Canvas Compared to Flash 379
What Does Canvas Offer? 380
Our Basic Game HTML5 File 380
Our Game’s Design 382
Game Graphics: Drawing with Paths 382
Needed Assets 382
Using Paths to Draw the Game’s Main Character 383
Animating on the Canvas 385
Game Timer Loop 385
The Player Ship State Changes 386
Applying Transformations to Game Graphics 388
The Canvas Stack 388
Game Graphic Transformations 390
Rotating the Player Ship from the Center 390
Alpha Fading the Player Ship 392
Game Object Physics and Animation 393
How Our Player Ship Will Move 393
Controlling the Player Ship with the Keyboard 395 Giving the Player Ship a Maximum Velocity 399
A Basic Game Framework 400
The Game State Machine 400
The Update/Render (Repeat) Cycle 404
The FrameRateCounter Object Prototype 406
Putting It All Together 407
Geo Blaster Game Structure 407
Geo Blaster Global Game Variables 410
The player Object 412
Geo Blaster Game Algorithms 412
Arrays of Logical Display Objects 412
Level Knobs 415
Level and Game End 415
Awarding the Player Extra Ships 416
Applying Collision Detection 417
The Geo Blaster Basic Full Source 419
Rock Object Prototype 443
What’s Next 445
9. Combining Bitmaps and Sound . . . 447
Geo Blaster Extended 447
Geo Blaster Tile Sheet 448
Rendering the Other Game Objects 454
Adding Sound 459
Pooling Object Instances 463
Adding in a Step Timer 466
Geo Blaster Extended Full Source 468
Creating a Dynamic Tile Sheet at Runtime 497
A Simple Tile-Based Game 501
Micro Tank Maze Description 501
The Tile Sheet for Our Game 503
The Playfield 504
The Player 505
The Enemy 506
The Goal 507
The Explosions 507
Turn-Based Game Flow and the State Machine 508
Simple Tile Movement Logic Overview 512
Rendering Logic Overview 514
Simple Homegrown AI Overview 515
Micro Tank Maze Complete Game Code 516
What’s Next 534
10. Mobilizing Games with PhoneGap . . . 535
Going Mobile! 535
Introducing PhoneGap 536
The Application 536
The Code 537
Examining the Code for BSBingo.html 542
The Application Code 545
Creating the iOS Application with PhoneGap 546
Installing Xcode 546
Installing PhoneGap 547
Creating the BS Bingo PhoneGap Project in Xcode 549 Testing the New Blank Application in the Simulator 551 Integrating BS Bingo into the Project 553
Setting the Orientation 555
Testing on the Simulator 558
Adding in an iPhone “Gesture” 561
Adding the Gesture Functions to index.html 561
Testing on a Device 563
Using Xcode to Target a Test Device 564
Beyond the Canvas 565
What’s Next 566
11. Further Explorations . . . 567
3D with WebGL 567
What Is WebGL? 568
How Do I Test WebGL? 568
How Do I Learn More About WebGL? 569
What Does a WebGL Application Look Like? 569
Full Code Listing 575
Further Explorations with WebGL 581
WebGL JavaScript Libraries 581
Multiplayer Applications with ElectroServer 5 583
Installing ElectroServer 583
The Basic Architecture of a Socket-Server Application 585 The Basic Architecture of an ElectroServer Application 587 Creating a Chat Application with ElectroServer 588 Testing the Application in Google Chrome 593 Further Explorations with ElectroServer 598
This Is Just the Tip of the Iceberg 606
Conclusion 607
Index . . . 609
Preface
HTML5 Canvas offers developers the chance to create animated graphics in ordinary web browsers using common tools: HTML and JavaScript. Canvas is one of the most visible parts of HTML5, fueling demo after demo, game after game. It offers interactivity with great visuals, and provides tremendous freedom to do whatever you want in the browser window. However, it differs enough from typical JavaScript development (as well as Flash and Silverlight development) that it needs careful exploration!
Running the Examples in the Book
The best part about programming HTML5 Canvas is that the entry barrier is very low— all you need is a modern web browser and a text editor.
As far as compatibility, we suggest you download and/or use the latest version of the web browsers as ordered below.
1. Chrome 2. Safari 3. Opera 4. Firefox
5. Internet Explorer (version 9 or higher)
Every example in this book was tested with Google Chrome, Safari, and Opera. Late in the development of the example code, Firefox started causing issues. While we made every attempt to ensure these examples worked across as many browsers as possible, we recommend you use Google Chrome or Safari for the best results until Canvas support improves.
We suggest that if you have purchased the electronic version of this book, you should use the printed code samples as a guide only, and instead download the code from the book distribution. With that code, you will also get all the images, libraries, and assets necessary to make all the examples work in a web browser.
What You Need to Know
Ideally, you know your way around programming in some kind of modern language, such as C, C++, C#, ActionScript 2, ActionScript 3, Java, or JavaScript. However, if you’re new to this space, we will introduce Canvas in a way that should familiarize you with web programming at the same time.
Web developers with a foundation in HTML and JavaScript should easily be able to pick up this book and run with it.
If you are a Flash developer, JavaScript and ActionScript 1 are essentially the same language. While Adobe took some liberties with ActionScript 2, you should be very comfortable with JavaScript. If you only have experience with ActionScript 3, Java-Script might feel like a step backward.
If you are a Silverlight or C# developer, take a deep breath and think about a time before ASP.NET/C# when you might have had to develop web apps in VBScript. You are about to enter a similar space.
How This Book Is Organized
This book is organized into 11 chapters. The first four chapters walk you through the HTML Canvas API by example. The topics covered include text, images, and drawing. These chapters contain a few finished apps, but mainly consist of demos designed to show you the facets of the Canvas API. The following six chapters build upon the Canvas API by expanding the scope of the examples to application length. In these chapters, we discuss math and physics applications, video, audio, games, and mobile. The final chapter introduces a couple experimental areas: 3D and multiplayer. What you won’t get in this book is a simple rundown and retelling of the published W3C Canvas API. While we cover portions of the API in detail, some of it is not ap-plicable to games. Furthermore, you can just read the documentation here:
http://dev.w3.org/html5/2dcontext
Our goal is to feature the ways Canvas can be used to create animation, games, and entertainment applications for the Web.
Conventions Used in This Book
The following typographical conventions are used in this book: Plain text
Indicates menu titles, menu options, menu buttons, and keyboard accelerators (such as Alt and Ctrl).
Italic
Indicates new terms, URLs, email addresses, filenames, file extensions, pathnames, directories, and Unix utilities.
Constant width
Indicates commands, options, switches, variables, attributes, keys, functions, types, classes, namespaces, methods, modules, properties, parameters, values, ob-jects, events, event handlers, XML tags, HTML tags, macros, the contents of files, or the output from commands.
Constant width bold
Shows commands or other text that should be typed literally by the user.
Constant width italic
Shows text that should be replaced with user-supplied values.
This icon signifies a tip, suggestion, or general note.
This icon indicates a warning or caution.
Using Code Examples
This book is here to help you get your job done. In general, you may use the code in this book in your programs and documentation. You do not need to contact us for permission unless you’re reproducing a significant portion of the code. For example, writing a program that uses several chunks of code from this book does not require permission. Selling or distributing a CD-ROM of examples from O’Reilly books does require permission. Answering a question by citing this book and quoting example code does not require permission. Incorporating a significant amount of example code from this book into your product’s documentation does require permission.
If you feel your use of code examples falls outside fair use or the permission given above, feel free to contact us at [email protected].
We’d Like to Hear from You
Please address comments and questions concerning this book to the publisher: O’Reilly Media, Inc.
1005 Gravenstein Highway North Sebastopol, CA 95472
(800) 998-9938 (in the United States or Canada) (707) 829-0515 (international or local)
(707) 829-0104 (fax)
We have a web page for this book, where we list errata, examples, and any additional information. You can access this page at:
http://www.oreilly.com/catalog/9781449393908
To comment or ask technical questions about this book, send email to:
For more information about our books, courses, conferences, and news, see our website at http://www.oreilly.com.
Find us on Facebook: http://facebook.com/oreilly
Follow us on Twitter: http://twitter.com/oreillymedia
Watch us on YouTube: http://www.youtube.com/oreillymedia
Safari® Books Online
Safari Books Online is an on-demand digital library that lets you easily search over 7,500 technology and creative reference books and videos to find the answers you need quickly.
With a subscription, you can read any page and watch any video from our library online. Read books on your cell phone and mobile devices. Access new titles before they are available for print, and get exclusive access to manuscripts in development and post feedback for the authors. Copy and paste code samples, organize your favorites, down-load chapters, bookmark key sections, create notes, print out pages, and benefit from tons of other time-saving features.
O’Reilly Media has uploaded this book to the Safari Books Online service. To have full digital access to this book and others on similar topics from O’Reilly and other pub-lishers, sign up for free at http://my.safaribooksonline.com.
Acknowledgments
First, Steve would like to thank his beautiful wife, Dawn, for the amazing patience, guidance, and support she lovingly provided before, during, and after this book was written. Steve would also like to thank his girls—Rachel, Daphnie, and Katie—for all their enthusiastic support and for not getting too frustrated every time they asked him to play and Daddy said, “Sure, yeah, in just a couple minutes” because his head was buried in these pages. He’d also like to thank his mom and dad, plus his sisters, Mari and Carol for everything they taught us; and his uncle Richard and cousin John for all their love and support. Also thanks to Sue, Morgan, and Lauren Miller; Jen, Eric, Sarah, and Paige Garnica; Dietrich; Chantal Martin; and Ryan and Justin Fulton.
Jeff would like to thank his amazing wife, Jeanne, and his two wonderful boys, Ryan and Justin, for putting up with him writing this second book in two years. The writing process is a time- and energy-consuming endeavor that demands patience and under-standing from those in close proximity to the temperamental author. Jeff would also like to thank his mom and dad, as well as sisters Mari and Carol, for the morale and babysitting support that was needed during the crucial writing times. Also, special thanks to the Perry and Backlar clans for all of their love and support.
The authors would also like to acknowledge all the fine people at O’Reilly, especially Mike Loukides, who took the chance on us for this book; and Simon St.Laurent, who led us out of the wilderness; our copyeditor, Marlowe Shaeffer, who made the text sparkle in her own special way; and our production editor, Kristen Borg, for finishing the job.
We’d also like to thank our technical reviewers, Raffaele Cecco, Shelley Powers, and Andres Pagella.
Thanks to everyone at Electrotank, especially Jobe Makar, Matthew Weisner, and Teresa Carrigan; as well as our friends at Jett Morgan, Creative Bottle, Producto Stu-dios, Mattel, Mochi, Adobe, Microsoft, Zynga, The SPIL Group, Giles Thomas from
Learningwebgl.com, Ari Feldman, and Terry Paton, plus Ace The Super Villain, Bas Alicante, egdcltd, Tony Fernando, SeuJogo, Hayes, Jose Garay, Richard Davey (@PhotonStorm), Squize and nGfx (@GamingYourWay), and all our other friends at
8bitrocket.com. We would also like to give a huge shout out to the simply outstanding team at 444 Deharo, especially the entire FV team and the Foo Fighters pod!
CHAPTER 1
Introduction to HTML5 Canvas
HTML5 is the current iteration of HTML, the HyperText Markup Language. HTML was first standardized in 1993, and it was the fuel that ignited the World Wide Web. HTML is a way to define the contents of a web page using tags that appear within pointy brackets, < >.
HTML5 Canvas is an immediate mode bitmapped area of the screen that can be ma-nipulated with JavaScript. Immediate mode refers to the way the canvas renders pixels on the screen. HTML5 Canvas completely redraws the bitmapped screen on every frame using Canvas API calls from JavaScript. As a programmer, your job is to set up the screen display before each frame is rendered so that the correct pixels will be shown. This makes HTML5 Canvas very different from Flash, Silverlight, or SVG, which op-erate in retained mode. In this mode, a display list of objects is kept by the graphics renderer, and objects are displayed on the screen according to attributes set in code (i.e., the x position, y position, and alpha transparency of an object). This keeps the programmer away from low-level operations, but gives her less control over the final rendering of the bitmapped screen.
The basic HTML5 Canvas API includes a 2D context that allows a programmer to draw various shapes, render text, and display images directly onto a defined area of the browser window. You can apply colors; rotations; alpha transparencies; pixel manip-ulations; and various types of lines, curves, boxes, and fills to augment the shapes, text, and images you place onto the canvas.
In itself, the HTML5 Canvas 2D context is a display API used to render graphics on a bitmapped area, but there is very little in that context to create applications using the technology. By adding cross-browser-compatible JavaScript functionality for keyboard and mouse inputs, timer intervals, events, objects, classes, sound, math functions, etc., you can learn to take HTML5 Canvas and create stunning animations, applications, and games.
Here’s where this book comes in. We are going to break down the Canvas API into digestible parts and then put it back together, demonstrating how to use it to create
applications. Many of the techniques you will learn in this book have been tried and used successfully on other platforms, and now we are applying them to this exciting new technology.
Browser Support for HTML5 Canvas
With the exception of Internet Explorer 8, HTML5 Canvas is supported in some way by most modern web browsers, with specific feature support growing on an almost daily basis. The best support seems to be from Google Chrome, followed closely by Safari, Firefox, and Opera. We will utilize a JavaScript library named modernizr.js that will help us figure out which browsers support which Canvas features. At the same time, if you are worried about Internet Explorer, version 9 promises to have support for Canvas. In the meantime, you can check out Google Chrome Frame (http://code .google.com/chrome/chromeframe/), which delivers Canvas support for IE.
The Basic HTML Page
Before we get to Canvas, we need to talk a bit about the HTML5 standards we will be using to create our web pages.
HTML is the standard language used to construct pages on the World Wide Web. We will not spend much time on HTML, but it does form the basis of <canvas>, so we
cannot skip it entirely.
A basic HTML page is divided into sections, commonly <head> and <body>. The new HTML5 specification adds a few new sections, such as <nav>, <article>, <header>, and <footer>.
The <head> tag usually contains information that will be used by the HTML <body> tags
to create the HTML page. It is a standard convention to put JavaScript functions in the
<head>, as you will see later when we discuss the <canvas> tag. There may be reasons
to put some JavaScript in the <body>, but we will make every attempt to keep things
simple by having all JavaScript in the <head>.
Basic HTML for a page might look like Example 1-1.
Example 1-1. A basic HTML page
<!doctype html> <html lang="en"> <head>
<meta charset="UTF-8">
<title>CH1EX1: Basic Hello World HTML Page</title> </head>
<!doctype html>
This tag informs the web browser to render the page in standards mode. According to the HTML5 spec from W3C, this is required for HTML5 documents. This tag simplifies a long history of oddities when it came to rendering HTML in different browsers. This should always be the first line of HTML in a document.
<html lang="en">
This is the <html> tag with the language referenced: for example, “en” = English. Some
of the more common language values are: Chinese – lang = “zh”
French – lang = “fr”
German – lang = “de”
Italian – lang = “it”
Japanese – lang = “ja”
Korean – lang = “ko”
Polish – lang = “pl”
Russian – lang = “ru”
Spanish (Castilian) – lang = “es”
<meta charset="UTF-8">
This tag tells the web browser which character-encoding method to use for the page. Unless you know what you’re doing, there is no need to change it. This is a required element for HTML5 pages.
<title>…</title>
This is the title that will be displayed in the browser window for the HTML page. This is a very important tag, as it is one of the main pieces of information a search engine uses to catalog the content on the HTML page.
A Simple HTML5 Page
Now let’s look at this page in a web browser (this would be a great time to get your tools together to start developing code). Open your chosen text editor, and get ready to use your preferred web browser: Safari, Firefox, Opera, Chrome, or IE.
1. In your text editor, type in the code from Example 1-1.
2. Save the code as CH1EX1.html in a directory of your choosing.
3. Under the File menu in Chrome, Safari, or Firefox, you should find the option Open File. Click that selection. You should then see a box to open a file. (On Windows using Chrome, you might need to press Ctrl+O to open a file.)
4. Locate the CH1EX1.html that you just created. 5. Click Open.
You should see something similar to Figure 1-1.
Figure 1-1. HTML Hello World!
This is one of only two examples in this entire book that will work with Internet Explorer 8 or earlier.
Basic HTML We Will Use in This Book
Many HTML tags can be used to create an HTML page. In past versions of HTML, tags that specifically instructed the web browser on how to render the HTML page (e.g., <font> and <center>) were very popular. However, as browser standards have
become more restrictive in the past decade, those types of tags have been pushed aside, and the use of CSS (Cascading Style Sheets) has been adopted as the primary way to style HTML content. Because this book is not about creating HTML pages (i.e., pages that don’t have Canvas in them), we are not going to discuss the inner workings of CSS. We will focus on only two of the most basic HTML tags: <div> and <canvas>.
<div>
This is the main HTML tag that we will use in this book. We will use it to position
<canvas> on the HTML page.
Example 1-2 uses a <div> tag to position the words “Hello World!” on the screen, as
shown in Figure 1-2.
Example 1-2. HTML5 Hello World!
<!doctype html> <html lang="en"> <head>
<meta charset="UTF-8">
<title>CH1EX2: Hello World HTML Page With A DIV </title> </head>
<body>
<div style="position: absolute; top: 50px; left: 50px;"> Hello World!
</div> </body> </html>
The style="position: absolute; top: 50px; left: 50px;" code is an example of inline
CSS in an HTML page. It tells the browser to render the content at the absolute position
of 50 pixels from the top of the page, and 50 pixels from the left of the page.
<canvas>
Our work with <canvas> will benefit from using the absolute positioning method with <div>. We will place our <canvas> inside the <div> tag, and it will help us retrieve
in-formation, such as the relative position of the mouse pointer when it appears over a canvas.
The Document Object Model (DOM) and Canvas
The Document Object Model represents all the objects on an HTML page. It is language- and platform-neutral, allowing the content and style of the page to be up-dated after it is rendered in the web browser. The DOM is accessible through JavaScript, and has been a staple of JavaScript, DHTML, and CSS development since the late 1990s. The canvas element itself is accessible through the DOM in a web browser via the
Canvas 2D context, but the individual graphical elements created on Canvas are not accessible to the DOM. As we stated earlier, this is because Canvas works in immediate mode and does not have its own objects, only instructions on what to draw on any single frame.
Our first example will use the DOM to locate the <canvas> tag on the HTML5 page so
that we can manipulate it with JavaScript. There are two specific DOM objects we will need to understand when we start using <canvas>: window and document.
The window object is the top level of the DOM. We will need to test this object to make sure all the assets and code have loaded before we can start our Canvas applications. The document object contains all the HTML tags that are on the HTML page. We will
need to look at this object to find the instance of <canvas> that manipulates with
JavaScript.
JavaScript and Canvas
JavaScript, the programming language we will use to create Canvas applications, can be run inside nearly any web browser in existence. If you need a refresher on the topic, read Douglas Crockford’s JavaScript: The Good Parts (O’Reilly), which is a very popular and well-written reference on the subject.
JavaScript Frameworks and Libraries
There are many popular JavaScript frameworks that developers use to help get their JavaScript off the ground, including libraries such as jQuery, Processing.js, and others. We expect these frameworks to add robust support for Canvas in the next 6–12 months. In the meantime, we will focus on straight JavaScript to control the canvas. However, where appropriate, we will introduce you to frameworks and JavaScript libraries that will help augment Canvas development (e.g., Modernizr, JSColor, and WebGL).
Where Does JavaScript Go and Why?
Because we will create the programming logic for the Canvas in JavaScript, a question arises: where does that JavaScript go in the pages we have already created?
It’s a good idea to place your JavaScript in the <head> of your HTML page because it
makes it easy to find. However, placing JavaScript there means that the entire HTML page needs to load before your JavaScript can work with the HTML. This also means that the JavaScript code will start to execute before the entire page loads. As a result, you will need to test to see whether the HTML page has loaded before you run your JavaScript program.
There has been a recent move to put JavaScript right before the </body> at the end of
an HTML document to make sure the whole page loads before the JavaScript runs. However, because we are going to test to see whether the page has loaded in JavaScript before we run our <canvas> program, we will put our JavaScript in the traditional <head> location. If you are not comfortable with this, you can adapt the style of the code
to your liking.
No matter where you put the code, you can place it inline in the HTML page or load an external .js file. The code for loading an external JavaScript file might look like this:
<script type="text/javascript" src="canvasapp.js"></script>
In HTML5 you no longer have to specify the script type.
HTML5 Canvas “Hello World!”
As we just mentioned, one of the first things we need to do when putting Canvas on an HTML5 page is test to see whether the entire page has loaded and all HTML elements are present before we start performing any operations. This will become essential when we start working with images and sounds in Canvas.
To do this, you need to work with events in JavaScript. Events are dispatched by objects when a defined event occurs. Other objects listen for events so they can do something based on the event. Some common events that an object in JavaScript might listen for are key presses, mouse movements, and when something has finished loading. The first event we need to listen for is a window object’s load event, which occurs when the HTML page has finished loading.
To add a listener for an event, use the addEventListener() method that belongs to
objects that are part of the DOM. Because window represents the HTML page, it is the
top level of the DOM.
The addEventListener() function accepts three arguments:
Event: load
This is the named event for which we are adding a listener. Events for existing objects like window are already defined.
Event handler function: eventWindowLoaded()
Call this function when the event occurs. In our code, we will then call the
canvasApp() function, which will start our main application execution. useCapture: true or false
This sets the function to capture this type of event before it propagates lower in the DOM tree of objects. We will always set this to false.
Below is the final code we will use to test to see whether the window has loaded: window.addEventListener("load", eventWindowLoaded, false);
function eventWindowLoaded () { canvasApp();
}
Alternatively, you can set up an event listener for the load event in a number of other
ways:
window.onload = function() {
canvasApp(); }
or:
window.onload = canvasApp();
We will use the first method throughout this book.
Encapsulating Your JavaScript Code for Canvas
Now that we have created a way to test to see whether the HTML page has loaded, we can start creating our JavaScript application. Because JavaScript runs in an HTML page, it could be running with other JavaScript applications and code simultaneously. Usu-ally, this does not cause any problems. However, there is a chance that your code might have variables or functions that conflict with other JavaScript code on the HTML page. Canvas applications are a bit different from other apps that run in the web browser. Because Canvas executes its display in a defined region of the screen, its functionality is most likely self-contained, so it should not interfere with the rest of the page, and vice versa. You might also want to put multiple Canvas apps on the same page, so there must be some kind of separation of JavaScript when defining the code.
To avoid this issue, you can encapsulate your variables and functions by placing them inside another function. Functions in JavaScript are objects themselves, and objects in JavaScript can have both properties and methods. By placing a function inside another function, you are making the second function local in scope to the first function. In our example, we are going to have the canvasApp() function that is called from the
window load event contain our entire Canvas application. This “Hello World!” example
will have one function named drawScreen(). As soon as canvasApp() is called, we will
call drawScreen() immediately to draw our “Hello World!” text.
The drawScreen() function is now local to canvasApp(). Any variables or functions we create in canvasApp() will be local to drawScreen(), but not to the rest of the HTML
page or other JavaScript applications that might be running.
Here is the sample code for how we will encapsulate functions and code for our Canvas applications:
function canvasApp() { drawScreen();
...
function drawScreen() {
...
}
Adding Canvas to the HTML Page
In the <body> section of the HTML page, add a <canvas> tag using code such as the
following:
<canvas id="canvasOne" width="500" height="300"> Your browser does not support HTML5 Canvas. </canvas>
Now, let’s break this down to understand what we are doing. The <canvas> tag has
three main attributes. In HTML, attributes are set within pointy brackets of an HTML tag. The three attributes we need to set are:
id
The id is the name we will use to reference this <canvas> tag in our JavaScript code. canvasOne is the name we will use.
width
The width, in pixels, of the canvas. The width will be 500 pixels. height
The height, in pixels, of the canvas. The height will be 300 pixels.
HTML5 elements, including canvas, have many more attributes: tabindex, title, class, accesskey, dir, draggable, hidden, etc.
Between the opening <canvas> and closing </canvas> tags, you can put text that will be displayed if the browser executing the HTML page does not support Canvas. For our Canvas applications, we will use the text “Your browser does not support HTML5 Canvas.” However, you can adjust this text to say anything.
Using document to reference the canvas element in JavaScript
We will now make use of the DOM to reference the <canvas> we defined in HTML.
Recall that the document object represents every element of an HTML page after it has
loaded.
We need a reference to the Canvas object so that we will know where to display the Canvas API calls we will make from JavaScript.
First, we will define a new variable named theCanvas that will hold the reference to the Canvas object.
Next, we retrieve a reference to canvasOne by calling the getElementById() function
of document, and passing the name canvasOne, which we defined as the id of the <canvas> tag we created in the HTML page:
var theCanvas = document.getElementById("canvasOne");
Testing to See Whether the Browser Supports Canvas
Now that we have a reference to the canvas element on the HTML page, we need to
test to see whether it contains a context. The Canvas context refers to the drawing surface defined by a web browser to support Canvas. Simply put, if the context does not exist, neither does the canvas. There are several ways to test this. This first test looks to see whether the getContext method exists before we call it using Canvas, as
we have already defined it in the HTML page:
if (!theCanvas || !theCanvas.getContext) { return;
}
Actually, this tests two things. First, it tests to see whether theCanvas does not contain false (the value returned by document.getElementById() if the named id does not exist).
Then, it tests whether the getContext() function exists.
The return statement breaks out and stops execution if the test fails.
Another method—popularized by Mark Pilgrim on his HTML5 website, http://divein tohtml5.org—uses a function with a test of a dummy canvas created for the sole purpose of seeing whether browser support exists:
function canvasSupport () {
return !!document.createElement('testcanvas').getContext; }
function canvasApp() { if (!canvasSupport) { return;
}
}
Our favorite method is to use the modernizr.js library, which you can find here: http:// www.modernizr.com/. Modernizr—an easy-to-use, lightweight library for testing sup-port for various web-based technologies—creates a set of static Booleans that you can test against to see whether Canvas is supported.
To include modernizr.js in your HTML page, download the code from http://www.mod ernizr.com/ and then include the external .js file in your HTML page:
<script src="modernizr-1.6.min.js"></script>
To test for Canvas, change the canvasSupport() function to look like this: function canvasSupport () {
return Modernizr.canvas; }
Retrieving the 2D Context
Finally, we need to get a reference to the 2D context so we can manipulate it. HTML5 Canvas is designed to work with multiple contexts, including a proposed 3D context. However, for the purposes of this book, we only need to get the 2D context:
var context = theCanvas.getContext("2d");
The drawScreen() Function
It’s time to create actual Canvas API code. Every operation we perform on Canvas will be through the context object, as it references the object on the HTML page.
We will delve into writing text, graphics, and images to HTML5 Canvas in later chap-ters, so for now, we will only spend a very short time on the code of the drawScreen()
function.
The “screen” here is really the defined drawing area of the canvas, not the whole browser window. We refer to it as such because within the context of the games and applications you will write, it is effectively the “window” or “screen” into the canvas display that you will be manipulating.
The first thing we want to do is clear the drawing area. The following two lines of code draw a yellow box on the screen that is the same size as the canvas. fillStyle() sets
the color, and fillRect() creates a rectangle and puts it on the screen: context.fillStyle = "#ffffaa";
context.fillRect(0, 0, 500, 300);
Notice that we are calling functions of the context. There are no screen objects, color objects, or anything else. This is an example of the im-mediate mode we described earlier.
Again, we will discuss the text functions of Canvas in the next chapter, but here is a short preview of the code we will use to put the text “Hello World!” on the screen. First, we set the color of the text in the same way we set the color of the rectangle:
context.fillStyle = "#000000";
Then we set the font size and weight:
context.font = "20px _sans";
Next, we set the vertical alignment of the font:
context.textBaseline = "top";
Finally, we print our test on the screen by calling the fillText() method of the context object. The three parameters of this method are text string, x position, and y
position:
context.fillText ("Hello World!", 195, 80);
Let’s add some graphics to our “Hello World!” text. First, let’s load in an image and display it. We will dive into images and image manipulation in Chapter 4, but for now, let’s just get an image on the screen. To display an image on the canvas, you need to create an instance of the Image() object, and set the Image.src property to the name of
the image to load.
You can also use another canvas or a video as the image to display. We will discuss these topics in Chapters 4 and 6.
Before you display it, you need to wait for the image to load. Create a callback()
function for the Image load event by setting the onload function of the Image object. callback() will be executed when the onload event occurs. When the image has loaded, you then call context.drawImage(), passing three parameters to put it on the canvas: Image object, x position, and y position:
var helloWorldImage = new Image(); helloWorldImage.src = "helloworld.gif"; helloWorldImage.onload = function () {
context.drawImage(helloWorldImage, 160, 130); }
Finally, let’s draw a box around the text and the image. To draw a box with no fill, use the context.StrokeStyle() method to set a color for the stroke (the border of the box), and then call the context.strokeRect() method to draw the rectangle border. The four
parameters for the strokeRect() method are the upper left x and y coordinates, and the
lower right x and y coordinates:
context.strokeStyle = "#000000"; context.strokeRect(5, 5, 490, 290);
The full code for the HTML5 Hello World! application is shown in Example 1-3, and its results are illustrated in Figure 1-3.
Example 1-3. HTML5 Canvas Hello World!
<!doctype html> <html lang="en"> <head>
<meta charset="UTF-8">
<title>CH1EX3: Your First Canvas Application </title> <script src="modernizr-1.6.min.js"></script>
<script type="text/javascript">
var Debugger = function () { }; Debugger.log = function (message) { try {
console.log(message); } catch (exception) { return;
} }
function eventWindowLoaded () { canvasApp();
}
function canvasSupport () { return Modernizr.canvas; }
function canvasApp () {
if (!canvasSupport()) { return;
}
var theCanvas = document.getElementById("canvasOne"); var context = theCanvas.getContext("2d");
Debugger.log("Drawing Canvas");
function drawScreen() { //background
context.fillStyle = "#ffffaa"; context.fillRect(0, 0, 500, 300);
//text
context.fillStyle = "#000000"; context.font = "20px _sans"; context.textBaseline = "top";
context.fillText ("Hello World!", 195, 80 );
//image
var helloWorldImage = new Image(); helloWorldImage.src = "helloworld.gif"; helloWorldImage.onload = function () {
context.drawImage(helloWorldImage, 160, 130); }
//box
context.strokeStyle = "#000000"; context.strokeRect(5, 5, 490, 290);
}
drawScreen();
}
</script> </head> <body>
<div style="position: absolute; top: 50px; left: 50px;"> <canvas id="canvasOne" width="500" height="300"> Your browser does not support HTML5 Canvas. </canvas>
</div> </body> </html>
Figure 1-3. HTML5 Canvas Hello World!
Debugging with Console.log
There is one more thing to discuss before we explore bigger and better things beyond “Hello World!” In this book, we have implemented a very simple debugging method-ology using the console.log functionality of modern web browsers. This function lets
you log text messages to the JavaScript console to help find problems (or opportunities!) with your code. Any browser that has a JavaScript console (Chrome, Opera, Safari, Firefox with Firebug installed) can make use of console.log. However, browsers
with-out console.log support throw a nasty error.
To handle this error, we use a wrapper around console.log that only makes the call if
the function is supported. The wrapper creates a class named Debugger, and then creates
a static function named Debugger.log that can be called from anywhere in your code,
like this:
Here is the code for the console.log() functionality: var Debugger = function () { };
Debugger.log = function (message) { try {
console.log(message); } catch (exception) { return;
} }
The 2D Context and the Current State
The HTML5 2D context (the CanvasRenderingContext2D object), retrieved by a call to
the getContext() method of the Canvas object, is where all the action takes place. The CanvasRenderingContext2D contains all the methods and properties we need to draw onto the canvas. The CanvasRenderingContext2D (or context, as we will call it hereafter)
uses a Cartesian coordinate system with 0,0 at the upper left and corner of the canvas, and coordinates increasing in value to the left and down.
However, all of these properties and methods are used in conjunction with current state, a concept that must be grasped before you can really understand how to work with HTML5 Canvas. The current state is actually a stack of drawing states that apply globally to the entire canvas. You will manipulate these states when drawing on the canvas. These states include:
Transformation matrix
Methods for scale, rotate, transform, and translate
Clipping region
Created with the clip() method
Properties of the context
Properties include strokeStyle, fillStyle, globalAlpha, lineWidth, lineCap, line Join, miterLimit, shadowOffsetX, shadowOffsetY, shadowBlur, shadowColor, global CompositeOperation, font, textAlign, and textBaseline.
Don’t worry; these should not look familiar to you just yet. We will discuss these prop-erties in depth in the next three chapters.
Remember earlier in this chapter when we discussed immediate mode versus retained mode? The canvas is an immediate mode drawing surface, which means everything needs to be redrawn every time something changes. There are some advantages to this; for example, global properties make it very easy to apply effects to the entire screen. Once you get your head around it, the act of redrawing the screen every time there is an update makes the process of drawing to the canvas straightforward and simple. On the other hand, retained mode is when a set of objects is stored by a drawing surface and manipulated with a display list. Flash and Silverlight work in this mode. Retained mode can be very useful for creating applications that rely on multiple objects with
their own independent states. Many of the same applications that could make full use of the canvas (games, activities, animations) are often easier to code with a retained mode drawing surface, especially for beginners.
Our challenge is to take advantage of the immediate mode drawing surface, while add-ing functionality to our code to help it act more like it works in retained mode. Throughout this book we will discuss strategies that will help take this immediate mode operation and make it easier to manipulate through code.
The HTML5 Canvas Object
Recall that the Canvas object is created by placing the <canvas> tag in the <body> portion
of an HTML page. You can also create an instance of a canvas in code like this:
var theCanvas = document.createElement("canvas");
The Canvas object has two associated properties and methods that can be accessed through JavaScript: width and height. These tell you the current width and height of
the canvas rendered on the HTML page. It is important to note that they are not read-only; i.e., they can be updated in code and changed on an HTML page. What does this mean? It means you can dynamically resize the canvas on the HTML page without reloading.
You can also use CSS styles to change the scale of the canvas. Unlike resizing, scaling takes the current canvas bitmapped area and resamples it to fit into the size specified by the width and height attributes of the CSS style. For example, to scale the canvas to a 400×400 area, you might use this CSS style:
style="width: 400px; height:400px"
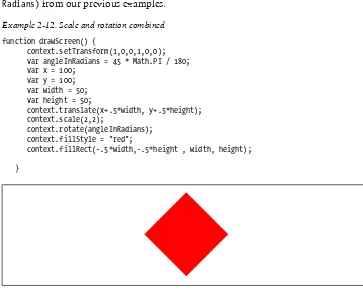
We include an example of scaling the Canvas with a transformation matrix in Chapter 3.
There are also two public methods for the Canvas object. The first is getContext(), which
we used earlier in this chapter. We will continue to use it throughout this book to retrieve a reference to the Canvas 2D context so we can draw onto the canvas. The second property is toDataURL(). This method will return a string of data that represents
Another Example: Guess The Letter
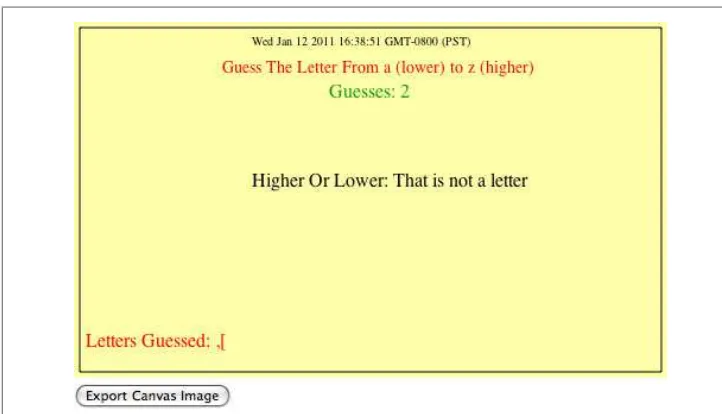
[image:32.504.63.424.173.380.2]Now we will take a quick look at a more involved example of a “Hello World!”-type application, the game “Guess The Letter.” We’ve included this example to illustrate how much more Canvas programming is done in JavaScript than in the Canvas API. In this game, shown in Figure 1-4, the player’s job is to guess the letter of the alphabet the computer has chosen randomly. The game keeps track of how many guesses the player has made, lists the letters he has already guessed, and tells the player whether he needs to guess higher (toward Z) or lower (toward A).
Figure 1-4. HTML5 Canvas “Guess The Letter” game
How the Game Works
This game is set up with the same basic structure as “Hello World!” canvasApp() is the
main function, and all other functions are defined as local to canvasApp(). We use a drawScreen() function to render text on the canvas. However, there are some other functions included as well, which are described next.
The “Guess The Letter” Game Variables
Here is a rundown of the variables we will use in the game. They are all defined and initialized in canvasApp(), so they have scope to the encapsulated functions that we define locally.
guesses
This variable holds the number of times the player has pressed a letter. The lower the number, the better he has done in the game.
message
The content of this variable is displayed to give the user instructions on how to play.
letters
This array holds one of each letter of the alphabet. We will use this array to both randomly choose a secret letter for the game, and to figure out the relative position of the letter in the alphabet.
today
This variable holds the current date. It is displayed on the screen but has no other purpose.
letterToGuess
This variable holds the current game’s secret letter that needs to be guessed.
higherOrLower
This variable holds the text “Higher” or “Lower” depending on where the last guessed letter is in relation to the secret letter. If the secret letter is closer to “a,” we give the “Lower” instruction. If the letter is closer to “z,” we give the “Higher” instruction.
lettersGuessed
This array holds the current set of letters the player has guessed already. We will print this list on the screen to help the player remember what letters he has already chosen.
gameOver
This variable is set to false until the player wins. We will use this to know when to put the “You Win” message on the screen, and to keep the player from guessing after he has won.
Here is the code:
var guesses = 0;
var message = "Guess The Letter From a (lower) to z (higher)"; var letters = [
"a","b","c","d","e","f","g","h","i","j","k","l","m","n","o", "p","q","r","s","t","u","v","w","x","y","z"
];
The initGame() Function
The initGame() function sets up the game for the player. The two most important blocks
of code are as follows. This code finds a random letter from the letters array and stores it in the letterToGuess variable:
var letterIndex = Math.floor(Math.random() * letters.length); letterToGuess = letters[letterIndex];
This code adds an event listener to the window object of the DOM to listen for the
keyboard keyup event. When a key is pressed, the eventKeyPressed event handler is called to test the letter pressed:
window.addEventListener("keyup",eventKeyPressed,true);
Here is the full code for the function:
function initGame() {
var letterIndex = Math.floor(Math.random() * letters.length); letterToGuess = letters[letterIndex];
guesses = 0; lettersGuessed = []; gameOver = false;
window.addEventListener("keyup",eventKeyPressed,true); drawScreen();
}
The eventKeyPressed() Function
This function, called when the player presses a key, contains most of the action in this game. Every event handler function in JavaScript is passed an event object that has
information about the event that has taken place. We use the e argument to hold that
object.
The first test we make is to see whether the gameOver variable is false. If so, we continue to test the key that was pressed by the player; the next two lines of code are used for that purpose. The first line of code gets the key-press value from the event, and converts it to an alphabetic letter that we can test with the letter stored in letterToGuess:
var letterPressed = String.fromCharCode(e.keyCode);
The next line of code converts the letter to lowercase so that we can test uppercase letters if the player unintentionally has Caps Lock on:
letterPressed = letterPressed.toLowerCase();
Next, we increase the guesses count to display, and use the Array.push() method to add the letter to the lettersGuessed array:
guesses++;
lettersGuessed.push(letterPressed);
Now it is time to test the current game state to give feedback to the player. First, we test to see whether letterPressed is equal to letterToGuess. If so, the player has won
the game:
if (letterPressed == letterToGuess) { gameOver = true;
If the player has not won, we need to get the index of letterToGuess and the index of letterPressed in the letters array. We are going to use these values to figure out
whether we should display “Higher,” “Lower,” or “That is not a letter.” To do this, we use the indexOf() array method to get the relative index of each letter. Because we
alphabetized the letters in the array, it is very easy to test which message to display:
} else {
letterIndex = letters.indexOf(letterToGuess); guessIndex = letters.indexOf(letterPressed);
Now we make the test. First, if guessIndex is less than zero, it means that the call to indexOf() returned -1, and the key press was not a letter. We then display an error message:
if (guessIndex < 0) {
higherOrLower = "That is not a letter";
The rest of the tests are simple. If guessIndex is greater than letterIndex, we set the
higherOrLower text to “Lower.” Conversely, if guessIndex is less than letterIndex, we
set the higherOrLower test to “Higher”: } else if (guessIndex > letterIndex) { higherOrLower = "Lower";
} else {
higherOrLower = "Higher"; }
}
Finally, we call drawScreen() to paint the screen: drawScreen();
Here is the full code for the function:
function eventKeyPressed(e) { if (!gameOver) {
var letterPressed = String.fromCharCode(e.keyCode); letterPressed = letterPressed.toLowerCase(); guesses++;
lettersGuessed.push(letterPressed);
if (letterPressed == letterToGuess) { gameOver = true;
} else {
if (guessIndex < 0) {
higherOrLower = "That is not a letter"; } else if (guessIndex > letterIndex) { higherOrLower = "Lower";
} else {
higherOrLower = "Higher"; }
}
drawScreen(); }
}
The drawScreen() Function
Now we get to drawScreen(). The good news is that we have seen almost all of this
before—there are only a few differences from “Hello World!” For example, we paint multiple variables on the screen using the Canvas Text API. We only set context.text Baseline = 'top'; once for all the text we are going to display. Also, we change the
color using context.fillStyle, and the font with context.font.
The most interesting thing we display here is the content of the lettersGuessed array.
On the canvas, the array is printed as a set of comma-separated values, like this:
Letters Guessed: p,h,a,d
To print this value, all we do is use the toString() method of the lettersGuessed array, which prints out the values of an array as—you guessed it—comma-separated values:
context.fillText ("Letters Guessed: " + lettersGuessed.toString(), 10, 260);
We also test the gameOver variable. If it is true, we put You Got It! on the screen in giant 40px text so the user knows he has won.
Here is the full code for the function:
function drawScreen() { //Background
context.fillStyle = "#ffffaa"; context.fillRect(0, 0, 500, 300); //Box
context.strokeStyle = "#000000"; context.strokeRect(5, 5, 490, 290);
context.textBaseline = "top"; //Date
context.fillStyle = "#000000"; context.font = "10px _sans"; context.fillText (today, 150 ,10); //Message
context.fillStyle = "#FF0000"; context.font = "14px _sans";
context.fillText (message, 125, 30);
//Guesses
context.fillStyle = "#109910"; context.font = "16px _sans";
context.fillText ('Guesses: ' + guesses, 215, 50); //Higher Or Lower
context.fillStyle = "#000000"; context.font = "16px _sans";
context.fillText ("Higher Or Lower: " + higherOrLower, 150,125); //Letters Guessed
context.fillStyle = "#FF0000"; context.font = "16px _sans";
context.fillText ("Letters Guessed: " + lettersGuessed.toString(), 10, 260); if (gameOver) {
context.fillStyle = "#FF0000"; context.font = "40px _sans";
context.fillText ("You Got It!", 150, 180); }
}
Exporting Canvas to an Image
Earlier, we briefly discussed the toDataUrL() property of the Canvas object. We are going to use that property to let the user create an image of the game screen at any time. This acts almost like a screen-capture utility for games made on Canvas.
We need to create a button in the HTML page that the user can press to get the screen capture. We will add this button to <form> and give it the id createImageData:
<form>
<input type="button" id="createImageData" value="Export Canvas Image"> </form>
In the init() function, we retrieve a reference to that form element by using the
getElementById() method of the document object. We then set an event handler for the
button “click” event as the function createImageDataPressed(): var formElement = document.getElementById("createImageData"); formElement.addEventListener('click', createImageDataPressed, false);
In canvasApp(), we define the createImageDataPressed() function as an event handler.
This function calls window.open(), passing the return value of the Canvas.toDataUrl()
method as the source for the window. Since this data forms a valid PNG, the image is displayed in the new window:
function createImageDataPressed(e) {
We will discuss this process in depth in Chapter 3.
The Final Game Code
Example 1-4 shows the full code for the Guess The Letter game.
Example 1-4. Guess The Letter game
<!doctype html> <html lang="en"> <head>
<meta charset="UTF-8">
<title>CH1EX4: Guesss The Letter Game</title> <script src="modernizr-1.6.min.js"></script> <script type="text/javascript">
window.addEventListener('load', eventWindowLoaded, false);
var Debugger = function () { }; Debugger.log = function (message) { try {
console.log(message); } catch (exception) { return;
} }
function eventWindowLoaded() {
canvasApp(); }
function canvasSupport () { return Modernizr.canvas; }
function eventWindowLoaded() {
canvasApp(); }
function canvasApp() { var guesses = 0;
var message = "Guess The Letter From a (lower) to z (higher)"; var letters = [
"a","b","c","d","e","f","g","h","i","j","k","l","m","n","o", "p","q","r","s","t","u","v","w","x","y","z"
];
var today = new Date(); var letterToGuess = ""; var higherOrLower = "";
var lettersGuessed; var gameOver = false;
if (!canvasSupport()) { return;
}
var theCanvas = document.getElementById("canvasOne"); var context = theCanvas.getContext("2d");
initGame();
function initGame() {
var letterIndex = Math.floor(Math.random() * letters.length); letterToGuess = letters[letterIndex];
guesses = 0; lettersGuessed = []; gameOver = false;
window.addEventListener("keyup",eventKeyPressed,true); var formElement = document.getElementById("createImageData"); formElement.addEventListener('click', createImageDataPressed, false); drawScreen();
}
function eventKeyPressed(e) { if (!gameOver) {
var letterPressed = String.fromCharCode(e.keyCode); letterPressed = letterPressed.toLowerCase(); guesses++;
lettersGuessed.push(letterPressed);
if (letterPressed == letterToGuess) { gameOver = true;
} else {
letterIndex = letters.indexOf(letterToGuess); guessIndex = letters.indexOf(letterPressed); Debugger.log(guessIndex);
if (guessIndex < 0) {
higherOrLower = "That is not a letter"; } else if (guessIndex > letterIndex) { higherOrLower = "Lower";
} else {
higherOrLower = "Higher"; }
}
drawScreen(); }
}
function drawScreen() { //Background
//Box
context.strokeStyle = "#000000"; context.strokeRect(5, 5, 490, 290); context.textBaseline = "top"; //Date
context.fillStyle = "#000000"; context.font = "10px _sans"; context.fillText (today, 150 ,10); //Message
context.fillStyle = "#FF0000"; context.font = "14px _sans";
context.fillText (message, 125, 30); //Guesses
context.fillStyle = "#109910"; context.font = "16px _sans";
context.fillText ('Guesses: ' + guesses, 215, 50); //Higher Or Lower
context.fillStyle = "#000000"; context.font = "16px _sans";
context.fillText ("Higher Or Lower: " + higherOrLower, 150,125); //Letters Guessed
context.fillStyle = "#FF0000"; context.font = "16px _sans";
context.fillText ("Letters Guessed: " + lettersGuessed.toString(), 10, 260); if (gameOver) {
context.fillStyle = "#FF0000"; context.font = "40px _sans";
context.fillText ("You Got It!", 150, 180); }
}
function createImageDataPressed(e) {
window.open(theCanvas.toDataURL(),"canvasImage","left=0,top=0,width=" + theCanvas.width + ",height=" + theCanvas.height +",toolbar=0,resizable=0"); }
}
</script> </head> <body>
<div style="position: absolute; top: 50px; left: 50px;"> <canvas id="canvasOne" width="500" height="300"> Your browser does not support HTML5 Canvas. </canvas>
<form>
<input type="button" id="createImageData" value="Export Canvas Image"> </form>
</div> </body> </html>
What’s Next
CHAPTER 2
Drawing on the Canvas
Using HTML5 Canvas effectively requires a strong foundation in drawing, coloring, and transforming basic two-dimensional shapes. While the selection of built-in shapes is relatively limited, we can draw any shape we desire using a series of line segments called paths, which we will discuss in the upcoming section “Using Paths to Create Lines” on page 30.
The HTML5 Canvas API is well covered in many online forms. The W3C site has an exhaustive and constantly updated reference that de-tails the features of the Canvas 2D Drawing API. It can be viewed at
http://dev.w3.org/html5/canvas-api/canvas-2d-api.html.
However, this online reference lacks concrete examples on using the API. Rather than simply reprinting this entire specification, we will spend our time creating examples to explain and explore as many fea-tures as we have space to cover.
The Basic File Setup for This Chapter
As we proceed through the Drawing API, all the examples in this chapter will use the same basic file setup, shown below. Use this code as the basis for all of the examples we create. You will only have to change the contents of the drawScreen() function:
<!doctype html> <html lang="en"> <head>
<meta charset="UTF-8">
<title>Ch2BaseFile - Template For Chapter 2 Examples</title> <script src="modernizr-1.6.min.js"></script>
<script type="text/javascript">
window.addEventListener('load', eventWindowLoaded, false); function eventWindowLoaded() {
canvasApp();
}
function canvasSupport () { return Modernizr.canvas; }
function canvasApp(){
if (!canvasSupport()) { return; }else{
var theCanvas = document.getElementById("canvas"); var context = theCanvas.getContext("2d");
}
drawScreen();
function drawScreen() { //make changes here.
context.fillStyle = '#aaaaaa'; context.fillRect(0, 0, 200, 200); context.fillStyle = '#000000'; context.font = '20px _sans'; context.textBaseline = 'top'; context.fillText ("Canvas!", 0, 0);
} }
</script> </head> <body&g