iPhone® and iPad® aPP
24-hour Trainer
inTroducTion . . . . xxv
LeSSon 1 Hello iOS! . . . . 1
LeSSon 2 The iOS Simulator . . . .17
LeSSon 3 A Tour of Xcode . . . .21
LeSSon 4 iOS Application Basics . . . . 39
LeSSon 5 Introduction to Storyboards . . . .61
LeSSon 6 Handling User Input . . . .81
LeSSon 7 Communicating with Your Users . . . . 93
LeSSon 8 Adding Images to Your View . . . . 103
LeSSon 9 Pickers . . . . 111
LeSSon 10 Date Pickers . . . . 119
LeSSon 11 Custom Pickers . . . .127
LeSSon 12 Navigation Controllers . . . . 135
LeSSon 13 Table Views . . . .147
LeSSon 14 Static Table Views . . . . 161
LeSSon 15 Tab Bars and Toolbars . . . 173
LeSSon 16 Creating Page-Based Applications . . . . 187
LeSSon 17 Creating UI Elements Programmatically . . . . 197
LeSSon 18 Creating Views That Scroll . . . . 205
LeSSon 19 Popovers and Modal Views . . . . 217
LeSSon 20 Tweeting with Twitter . . . . 231
LeSSon 21 Basic File Handling . . . . 239
LeSSon 22 Property Lists . . . . 249
LeSSon 23 Application Settings . . . . 259
LeSSon 24 iTunes File Sharing Support . . . . 269
LeSSon 26 Introduction to Core Data . . . . 303
LeSSon 27 XML Parsing with NSXMLParser . . . .317
LeSSon 28 Consuming SOAP Web Services . . . . 335
LeSSon 29 Touches and Gestures . . . . 349
LeSSon 30 Printing . . . . 359
LeSSon 31 Basic Animation with Timers . . . . 367
LeSSon 32 Introduction to Core Image . . . . 375
LeSSon 33 Building Universal Applications . . . . 383
LeSSon 34 Where Am I? Introducing Core Location . . . . 391
LeSSon 35 Introducing Map Kit . . . . 403
LeSSon 36 Using the Camera and Photo Library . . . . 413
LeSSon 37 Introduction to Core Motion . . . . 421
LeSSon 38 Building Background-Aware Applications . . . . 435
aPPendix a What’s on the DVD? . . . . 447
index . . . .451
⊲ BonuS MaTeriaL
aPPendix B Introduction to Programming with Objective-C . . . . 1aPPendix c Introduction to ARC . . . . 37
aPPendix d Testing on an iOS Device . . . . 55
aPPendix e Ad Hoc Distribution . . . . 65
iPhone
®and iPad
®iPhone
®and iPad
®app
24-hour Trainer
iPhone® and iPad® App 24-Hour Trainer
Published by
John Wiley & Sons, Inc. 10475 Crosspoint Boulevard Indianapolis, IN 46256 www.wiley.com
Copyright © 2012 by John Wiley & Sons, Inc., Indianapolis, Indiana ISBN: 978-1-118-13081-0
ISBN: 978-1-118-22507-3 (ebk) ISBN: 978-1-118-23837-0 (ebk) ISBN: 978-1-118-26314-3 (ebk)
Manufactured in the United States of America 10 9 8 7 6 5 4 3 2 1
No part of this publication may be reproduced, stored in a retrieval system or transmitted in any form or by any means, electronic, mechanical, photocopying, recording, scanning or otherwise, except as permitted under Sections 107 or 108 of the 1976 United States Copyright Act, without either the prior written permission of the Publisher, or authorization through payment of the appropriate per-copy fee to the Copyright Clearance Center, 222 Rosewood Drive, Danvers, MA 01923, (978) 750-8400, fax (978) 646-8600. Requests to the Publisher for permission should be addressed to the Permissions Department, John Wiley & Sons, Inc., 111 River Street, Hoboken, NJ 07030, (201) 748-6011, fax (201) 748-6008, or online at http:// www.wiley.com/go/permissions.
Limit of Liability/Disclaimer of Warranty: The publisher and the author make no representations or warranties with respect to the accuracy or completeness of the contents of this work and specifically disclaim all warranties, including without limita-tion warranties of fitness for a particular purpose. No warranty may be created or extended by sales or promolimita-tional materials. The advice and strategies contained herein may not be suitable for every situation. This work is sold with the understanding that the publisher is not engaged in rendering legal, accounting, or other professional services. If professional assistance is required, the services of a competent professional person should be sought. Neither the publisher nor the author shall be liable for damages arising herefrom. The fact that an organization or Web site is referred to in this work as a citation and/or a poten-tial source of further information does not mean that the author or the publisher endorses the information the organization or Web site may provide or recommendations it may make. Further, readers should be aware that Internet Web sites listed in this work may have changed or disappeared between when this work was written and when it is read.
For general information on our other products and services please contact our Customer Care Department within the United States at (877) 762-2974, outside the United States at (317) 572-3993 or fax (317) 572-4002.
Wiley publishes in a variety of print and electronic formats and by print-on-demand. Some material included with standard print versions of this book may not be included in e-books or in print-on-demand. If this book refers to media such as a CD or DVD that is not included in the version you purchased, you may download this material at http://booksupport .wiley.com. For more information about Wiley products, visit www.wiley.com.
Library of Congress Control Number: 2012930548
To my wife Sonam, for her love and support
through all the years we’ve been together.
—Abhishek Mishra
This book is being dedicated to the family unit,
past, present and future. May it never lose
sight of its existence.
aBouT The auThorS
aBhiShek MiShra has been developing software for over 12 years and has experience with a diverse set of programming languages and platforms. He holds a master’s degree in computer science from the University of London and is a freelance consultant and trainer specializing in iOS development. He lives with his wife in London, and when not working, spends his time stargazing under Scottish skies.
Gene BackLin’S first calculating machine was a slide rule. If you ask him about the information revolution, his response would be “fascinating.” He has developed on computers that loaded programs from paper tape, the revo-lutionary NeXT computer, which he still has two of, to the iPhone and iPad. Gene feels very fortunate to have not only seen an industry evolve, but also to have been an active participant in it. His childhood interest in electronics helped him break into the computer industry. He started building Heathkit walkie-talkies, leading him to build the Heathkit H-8 digital computer and H-9 video terminal, which he still has, in 1978. He taught himself programming using Extended Benton Harbor Basic and after the IBM-PC was introduced, Gene built the Heathkit H-151 PC-compatible computer, which is still running today.
Gene is owner and principal consultant of MariZack Consulting, formed in 1991 with one purpose — to help. He has been helping clients for over 30 years, including IBM, McDonnell Douglas, Waste Management, U.S. Environmental Protection Agency, Nations Bank, Bank of America, Bank One, and Sears to name a few. He is also a faculty member of DePaul University’s College of Computing and Digital Media and has previously penned Developing NeXTSTEP Applications in 1995, and
TechnicaL ediTor
acquiSiTionS ediTor
acknoWLedGMenTS
ThiS Book WouLd noT have Been PoSSiBLe without the support of the team at John Wiley and Sons—Mary James, Ed Connor, and Kim Cofer. I would also like to thank Allan Evans for his keen eye for detail and Gene Backlin for his continued support throughout the project. It has been my privilege to work with you. Thank you.
—Abhishek Mishra
i WouLd FirST Like To Thank My WiFe, Roseann, my son Zachary, and my daughter Marissa, for putting up with me once again while I was writing this book, and my son Ethan for keeping me young and remembering what you are to do if this idea ever comes up again, but this time really hold me to it!
I would also like to thank my mother Mary Louise, father Eugene William and daughter Hannah Angel, for giving me the gift of themselves and spirit, which I carry with me every day of my life. I miss you.
To Helen and Jerry, you will never know how much you mean to me, especially the gum!
To Allan, I am glad we were able to work together again. To Abby, it has been fun working together on this.
This book is more than just words and code. It is time and people. The pages you hold in your hand are a snapshot of events that somehow managed to come together with the very hard work of a lot of people; Ed, Mary and Kim specifically, I want to thank you all for everything that you did, it is greatly appreciated.
Finally I would like to thank Jean-Marc Krikorian especially for once again really doing nothing as he did in 1995 and 2010.
conTenTS
INTRODUCTION xxv
LeSSon 1: heLLo ioS! 1
iOS Developer Essentials
1
A Suitable Mac 1
A Device for Testing 2
Device Differences 2
An iOS Developer Account 4
The Official iOS SDK 6
The Typical App Development Process 8
Home Screen Icon 10
Application Launch Image 10
Try It
11
Lesson Requirements 11
Hints 12
Step by Step 12
LeSSon 2: The ioS SiMuLaTor 17
Features of the iOS Simulator
17
Installing and Uninstalling Applications 19
Limitations of the iOS Simulator
20
LeSSon 3: a Tour oF xcode 21
The Welcome Screen
21
Selecting a Project Template
21
Setting up Project Options
23
An Overview of the Xcode IDE
24
The Navigator Area 24
The Editor Area 29
The Utility Area 32
The Library Area 34
The Debugger Area 35
The Toolbar 35
Try It
37
Lesson Requirements 37
CONTENTS
LeSSon 4: ioS aPPLicaTion BaSicS 39
Application States
39
Windows, Views, and View Controllers
41
Frameworks 43
The UIButton Class 44
The UILabel Class 45
Creating User Interface Elements
46
Creating Outlets 50
LeSSon 5: inTroducTion To SToryBoardS 61
Try It
68
Lesson Requirements 68
Hints 69 Step-by-Step 69
LeSSon 6: handLinG uSer inPuT 81
Text Fields
81
LeSSon 7: coMMunicaTinG WiTh your uSerS 93
Alert Views
93
LeSSon 8: addinG iMaGeS To your vieW 103
xv
LeSSon 10: daTe PickerS 119
Dates in Objective-C
121
Try It
122
Lesson Requirements 123
Hints 123 Step-by-Step 123
LeSSon 11: cuSToM PickerS 127
Try It
128
Lesson Requirements 128
Hints 129 Step-by-Step 129
LeSSon 12: naviGaTion conTroLLerS 135
CONTENTS
LeSSon 13: TaBLe vieWS 147
Table View Workflow
148
LeSSon 14: STaTic TaBLe vieWS 161
Table View Types
161
LeSSon 15: TaB BarS and TooLBarS 173
Tab Bars
173
XIB-Based Xcode 4.2 Changes
175
Try It
176
Lesson Requirements 176
xvii
CONTENTS
LeSSon 16: creaTinG PaGe-BaSed aPPLicaTionS 187
The PageViewController Class
187
Instantiation 187
Delegate and Data Source 189
Preparing the Initial Page 189
The Page-Based Application Template
190
Try It
193
Lesson Requirements 193
Hints 194 Step-by-Step 194
LeSSon 17: creaTinG ui eLeMenTS ProGraMMaTicaLLy 197
UIButton 197
LeSSon 18: creaTinG vieWS ThaT ScroLL 205
The UIScrollView Class
205
Scroll Views and Text Fields
208
Try It
209
Lesson Requirements 209
Hints 210 Step-by-Step 210
LeSSon 19: PoPoverS and ModaL vieWS 217
Popovers 217
Presenting the Modal View 219
CONTENTS
Try It
220
Lesson Requirements 220
Hints 220 Step-by-Step 220
LeSSon 20: TWeeTinG WiTh TWiTTer 231
The Tweet Sheet
232
Try It
234
Lesson Requirements 234
Hints 234 Step-by-Step 234
LeSSon 21: BaSic FiLe handLinG 239
The IOS File System
239
Introducing the NSFileManager Class
240
Object Serialization
241
Try It
242
Lesson Requirements 242
Hints 243 Step-by-Step 243
LeSSon 22: ProPerTy LiSTS 249
Property List Types
249
Creating Property Lists
250
Programmatically 250
Property List Editor 251
Try It
251
Lesson Requirements 251
Hints 252 Step-by-Step 252
LeSSon 23: aPPLicaTion SeTTinGS 259
Adding a Settings Bundle
259
Reading Preferences with Code
263
Try It
263
Lesson Requirements 264
xix
CONTENTS
LeSSon 24: iTuneS FiLe SharinG SuPPorT 269
Try It
271
Lesson Requirements 271
Hints 271 Step-by-Step 271
LeSSon 25: inTroducTion To icLoud SToraGe 277
Basic Concepts
277
Preparing to Use the iCloud Storage APIs
278
Create an iCloud-enabled App ID 278
Create an Appropriate Provisioning Profile 281
Enable Appropriate Entitlements in Your Xcode Project 283
Checking for Service Availability
285
Using iCloud Document Storage
285
Creating a New iCloud Document 287
Opening an Existing Document 288
Saving a Document 288
Searching for Documents on iCloud 289
Try It
290
Lesson Requirements 290
Hints 291 Step-by-Step 291
LeSSon 26: inTroducTion To core daTa 303
Basic Concepts
303
Managed Object 303
Managed Object Context 303
Persistent Store Coordinator 303
Managed Object Model 304
Instantiating Core Data Objects
307
Writing Managed Objects
308
LeSSon 27: xML ParSinG WiTh nSxMLParSer 317
XML Fundamentals
318
Elements and Tags 318
CONTENTS
Special Characters 319
Comments and Processing Instructions 319
The NSXMLParser Class
320
SAX and DOM Parsers 320
The NSXMLParserDelegate Protocol
321
A Simple XML File and How it Is Parsed
322
Loading the XML Document into an NSData Object 323
Instantiating an NSXMLParser Object 323
Instantiating a Delegate Object 324
Begin Parsing 324
The XMLParser Delegate Methods 324
Try It
328
Lesson Requirements 328
Hints 328 Step-by-Step 328
LeSSon 28: conSuMinG SoaP WeB ServiceS 335
Try It
341
Lesson Requirements 341
Hints 341 Step-by-Step 341
LeSSon 29: ToucheS and GeSTureS 349
Touch Events
349
Preparing Content for Printing
360
UIPrintInfo 360
UIPrintPaper 361
xxi
LeSSon 31: BaSic aniMaTion WiTh TiMerS 367
Animating UIView Subclasses
368
Try It
370
Lesson Requirements 370
Hints 370 Step-by-Step 370
LeSSon 32: inTroducTion To core iMaGe 375
Images and Filters
375
LeSSon 33: BuiLdinG univerSaL aPPLicaTionS 383
Examining the Universal Application Template
383
Try It
386
Lesson Requirements 386
Hints 386 Step-by-Step 387
LeSSon 34: Where aM i? inTroducinG core LocaTion 391
Handling Location Updates
393
Handling Errors and Checking Hardware Availability
394
Geocoding and Reverse Geocoding 396
Obtaining Compass Headings
397
Try It
398
Lesson Requirements 398
Hints 398
Step by-Step 399
LeSSon 35: inTroducinG MaP kiT 403
CONTENTS
Try It
407
Lesson Requirements 407
Hints 408 Step-by-Step 408
LeSSon 36: uSinG The caMera and PhoTo LiBrary 413
Try It
416
Lesson Requirements 416
Hints 417 Step-by-Step 417
LeSSon 37: inTroducTion To core MoTion 421
Accelerometers and Gyroscopes
421
LeSSon 38: BuiLdinG BackGround-aWare aPPLicaTionS 435
Understanding Background Suspension
435
aPPendix a: WhaT’S on The dvd? 447
xxiii
CONTENTS
BonuS MaTeriaL
aPPendix B: inTroducTion To ProGraMMinG WiTh oBjecTive-c 1
Fundamental Programming Concepts
1
Typing Your Program 2
Compiling 2
Linking to Create an Executable 2
Testing and Debugging 3
How Xcode Fits Into This Picture 3
Variables, Statements, and Expressions
3
Variables 5 Statements 7
Expressions and Operators 8
Making Decisions and Performing Repetitive Tasks
10
The if and if . . . else statements 10
The for Statement 13
The while Statement 15
The do…while Statement 16
The break and continue Statements 17
Introduction to Object-Oriented Programming (OOP)
17
The Need for Object-Oriented Programming 19
Key Concepts of Object-Oriented Programming 20
Creating an Objective-C Class 25
Implementing the Class 30
Sending Messages to Objects 32
Instantiating Objects 33
Objective-C Properties 33
aPPendix c: inTroducTion To arc 37
Object Ownership
37
Converting Projects to ARC
40
aPPendix d: TeSTinG on an ioS device 55
CONTENTS
aPPendix e: ad hoc diSTriBuTion 65
Obtaining and Registering UDIDs
65
Creating an App ID (Bundle Identifier)
66
Creating a Distribution Certificate
66
Creating a Provisioning Profile
69
Configuring Your Project for Distribution
70
aPPendix F: aPP STore diSTriBuTion 75
Creating an Application Profile
75
Preparing and Uploading the Application Binary
80
inTroducTion
When FirST LearninG The ioS deveLoPMenT environMenT, it is natural to be overwhelmed with new concepts like view controllers and table views. While experience with previous development environments and languages is helpful, and iOS developing resources are available from Apple and forums, it is still a daunting task to become proficient.
This book is written to help someone new to iOS development come to grips with the basic concepts, and hopefully avoid making the mistakes we made when we were starting out. This book adopts a hands-on Try It approach, and you get to try out each new concept as you progress through the book.
iOS application development is a huge topic, and it is just not possible to put every single topic related to iOS application development in this book. That being said, the aim of this book is to help you get started and to understand the fundamentals of the SDK.
This book has been written for you, the reader. We hope that after reading this book, you can take your first steps into the wildly exciting world of iOS app development.
Who ThiS Book iS For
This book is for beginners with little or no prior programming experience who want to pursue a career in the exciting world of iOS development.
If you are a beginner and are looking for a book to help you get up to speed with basic concepts and start you down your journey of iOS application development, this is the book for you.
Although you do not need to have any prior programming experience, a little knowledge will help you move faster through the initial lessons. If you are a more experienced developer, this book can help you get up to speed with new concepts relating specifically to iOS 5 development.
WhaT ThiS Book coverS
This book covers iOS 5 application development. That includes development for both the iPhone and the iPad. The lessons in this book use Xcode 4.2.1 and make use of new iOS 5 features like storyboards and Automatic Reference Counting. Most lessons use Interface Builder to create the user interface; however, creating user interfaces programmatically is covered in Lesson 17.
inTroducTion
hoW ThiS Book iS STrucTured
This book consists of 38 short lessons and 6 appendixes. Most lessons introduce a single topic and end with a step-by-step Try It section where you get to apply the concepts you’ve learned in the lesson to create a simple iOS application. Lessons toward the beginning of the book are simpler, and progress in complexity as you work your way through the book.
If you are an absolute beginner to programming, you should read Appendix B for an introduction to computer programming with Objective-C and then progress through the lessons from cover to cover, sequentialy.
If you have prior experience with iOS development and want to read this book for a particular topic of interest, you can jump right in to the relevant lessons. iOS development is a vast topic, and no book can attempt to cover everything related to it; this book is no exception. However, several lessons contain links to places on the Web where you can obtain additional information.
When you’re finished reading the book and watching the DVD, you’ll find lots of support in the P2P forums.
inSTrucTionaL videoS
Learning is often enhanced by seeing in real-time what’s being taught, which is why most lessons in the book have a corresponding video tutorial on the DVD accompanying the print book and on the book’s website (www.wrox.com/go/iphoneipadappvideo). And, of course, it’s vital that you play along at home—fire up Xcode and try out what you read in the book and watch on the videos.
convenTionS
To help you get the most from the text and keep track of what’s happening, we’ve used a number of conventions throughout the book.
Notes, tips, hints, tricks, and asides to the current discussion are offset and placed in italics like this.
xxvii
inTroducTion
As for styles in the text:
➤ We highlight new terms and important words when we introduce them.
➤ We show URLs and code within the text like so: persistence.properties.
➤ We present code in the following way:
We use a monofont type for code examples.
Source code
As you work through the examples in this book, you may choose either to type in all the code manually, or to use the source code files that accompany the book. All the source code used in this book is available for download at www.wrox.com. When at the site, simply locate the book’s title (use the Search box or one of the title lists) and click the Download Code link on the book’s detail page to obtain all the source code for the book.
Because many books have similar titles, you may find it easiest to search by ISBN; this book’s ISBN is 978-1-118-13081-0.
Once you download the code, just decompress it with your favorite compression tool. Alternately, you can go to the main Wrox code download page at www.wrox.com/dynamic/books/download.aspx to see the code available for this book and all other Wrox books.
erraTa
We make every effort to ensure that there are no errors in the text or in the code. However, no one is perfect, and mistakes do occur. If you find an error in one of our books, like a spelling mistake or faulty piece of code, we would be very grateful for your feedback. By sending in errata you may save another reader hours of frustration and at the same time you will be helping us provide even higher quality information.
To find the errata page for this book, go to www.wrox.com and locate the title using the Search box or one of the title lists. Then, on the Book Search Results page, click the Errata link. On this page you can view all errata that has been submitted for this book and posted by Wrox editors.
A complete book list including links to errata is also available at www.wrox.com/ misc-pages/booklist.shtml.
inTroducTion
P2P .Wrox .coM
For author and peer discussion, join the P2P forums at p2p.wrox.com. The forums are a web-based system for you to post messages relating to Wrox books and related technologies and interact with other readers and technology users. The forums offer a subscription feature to e-mail you topics of interest of your choosing when new posts are made to the forums. Wrox authors, editors, other industry experts, and your fellow readers are present on these forums.
At http://p2p.wrox.com you will find a number of different forums that will help you not only as you read this book, but also as you develop your own applications. To join the forums, just follow these steps:
1 .
Go to p2p.wrox.com and click the Register link.2 .
Read the terms of use and click Agree.3 .
Complete the required information to join as well as any optional information you wish to provide and click Submit.4 .
You will receive an e-mail with information describing how to verify your account and complete the joining process.You can read messages in the forums without joining P2P, but in order to post your own messages, you must join.
Once you join, you can post new messages and respond to messages other users post. You can read messages at any time on the Web. If you would like to have new messages from a particular forum e-mailed to you, click the Subscribe to this Forum icon by the forum name in the forum listing.
Hello iOS!
Hello and welcome to the exciting world of iOS application development. iOS is Apple’s operat-ing system for mobile devices; the current version as of writoperat-ing this book is 5.0. It was originally developed for the iPhone (simply known as iPhone OS back then), and was subsequently extended and renamed in June 2010 to iOS to support the iPad, iPhone, and iPod Touch.
iOS at its core is Unix-based, and has its foundations in MacOS X, which is Apple’s desktop operating system. In fact, both iOS and MacOS X share a common code base. As new versions of mobile operating systems have appeared, Apple has brought over more functionality from MacOS X. This is part of Apple’s strategy to bridge the difference between desktop and mobile computing.
With the launch of version 5.0, Apple has once again pushed the boundaries of what is achievable on smart phones and tablet computers. iOS 5.0 has more than 200 new features and is without a doubt the most significant update to the family.
This lesson introduces you to the arena of iOS development.
ioS deveLoPer eSSenTiaLS
Before you get started on your journey of becoming an iOS developer, you will need some essential resources. This section covers these basic requirements.
a Suitable Mac
To develop apps for the iPhone and the iPad using the official set of tools provided by Apple, you will first need an Intel-based Mac running Mac OS X Lion with a minimum 2GB of RAM and at least 11GB of free space on your hard disk. You do not need a top-spec model to get started. In fact a Mac Mini or a low-end MacBook will work just fine.
Processor speed is not going to make much difference to you as a developer. You will be bet-ter off investing your money toward more RAM and hard disk space instead. These are things you can never get enough of. A large screen does help, but it is not essential.
2
❘
LeSSon 1 Hello ioS!a device for Testing
If you are reading this book, chances are that you have used an iPhone/iPad/iPod Touch and probably even own one or more of these nifty devices.
As far as development is concerned, there aren’t many differences between developing for any of these devices. When you are starting out as an iOS developer, you will test your creations on the iOS Simulator. The iOS Simulator is an application that runs on your Mac and simulates several functions of a real iOS device (more on this later).
At some point, though, you will want to test your apps on a physical device. As good as the iOS Simulator may be, you must test on a physical device before submitting your app to the App Store.
Another good reason to test on a physical device is that the processor on your Mac is much faster than that on the iPhone/iPad. Your app may appear to execute much faster on your Mac (in the iOS Simulator) than it does on the real thing.
If the app you are going to make is targeted at iPhone users, you can also use an iPod Touch as the test device. These are significantly cheaper than iPhones and for the most part offer the same functionality as their phone counterparts.
device differences
Though many similarities exist in developing apps for the iPhone and the iPad, there are some obvious differences between the devices.
iPhone 3GS
The iPhone 3GS was a major increment from the iPhone 3G. It included a 600Mhz ARM processor, 256MB RAM, and several enhancements to support 3D games. All iPhone models come with at least one camera.
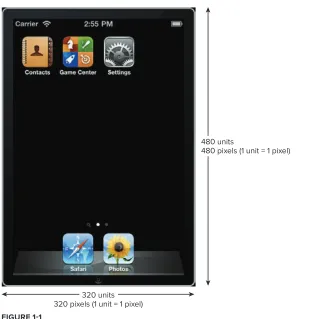
The iPhone 3GS has a screen size of 320 n 480 units. Notice the unit of measurement is not “pixel.” Starting with iOS4 and the introduction of the Retina display on the iPhone 4, Apple has introduced a new device-independent coordinate system. Application developers express sizes and positions in this new system. Depending on the physical device on which the app is executed, these device-independent coordinates are converted to device-dependent coordinates by multiplying them with a scale factor. In the case of a device that does not have a Retina display (such as the iPhone 3GS), this scale factor happens to be 1.
Thus the screen size of the iPhone 3GS (Figure 1-1) happens to be 320 n 480 pixels because 1 unit is exactly 1 pixel on this device.
iPhone 4
The iPhone 4 has a generous 512MB RAM, and a super-fast 1GHz Apple A4 processor. It also introduced a new high-resolution display called the Retina display that packs twice as many pixels in the same physical screen area.
iOS Developer Essentials
❘
3480 units
480 pixels (1 unit = 1 pixel)
320 units 320 pixels (1 unit = 1 pixel)
FiGure 1-1
iPhone 4S
The iPhone 4S is the newest member of the iOS family. Like its predecessor, it also has a high-resolution Retina display. In addition, the iPhone 4S has a dual-core Apple A5 processor.
iPad
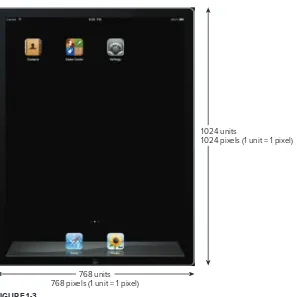
The iPad has a much larger screen size than the iPhone (768 n 1024 units); however, it does not have a camera. The first generation iPad is equipped with a 1GHz Apple A4 processor and has 256MB RAM. The iPad does not have a Retina display, hence the conversion factor from units to pixels for this device is 1. This means the number of pixels in an iPad screen is 768 n 1024 (Figure 1-3).
iPad 2
4
❘
LeSSon 1 Hello ioS!480 units
960 pixels (1 unit = 2 pixels)
320 units 640 pixels (1 unit = 2 pixels)
FiGure 1-2
an ioS developer account
To develop your apps you will need to download the latest version of Xcode and the iOS SDK (Software Development Kit). To do this you must sign up for the Apple Developer Program to become a registered developer.
The signup process is free and you can immediately begin to develop your first apps. Limitations exist as to what you can do for free. To submit your apps to the App Store, get access to beta versions of the iOS/SDK, or test your apps on a physical device, you need to become a paying member.
Most of the concepts and apps presented in this book will work just fine with the free membership. The only exceptions would be examples that require the camera, accelerometer, and GPS for which you really do need to try the app on a physical device.
iOS Developer Essentials
❘
51024 units
1024 pixels (1 unit = 1 pixel)
768 units 768 pixels (1 unit = 1 pixel)
FiGure 1-3
Standard
The Standard iOS Developer Program costs $99 a year and is for individuals or companies that want to develop apps that will be distributed through the App Store.
You can also test/distribute your apps on up to 100 devices without having to go through the App Store. This form of deployment (without having to submit them to the App Store) is called Ad-Hoc distribution and is a great way to submit a preview of the app to a client. This form of distribution is covered in detail in Appendix C.
Enterprise
The Enterprise iOS Developer Program costs $299 a year and is for large companies that want to develop apps for internal use and will not distribute these apps through the App Store. With the Enterprise iOS Developer Program there is no restriction to the number of devices on which your in-house application can be installed.
6
❘
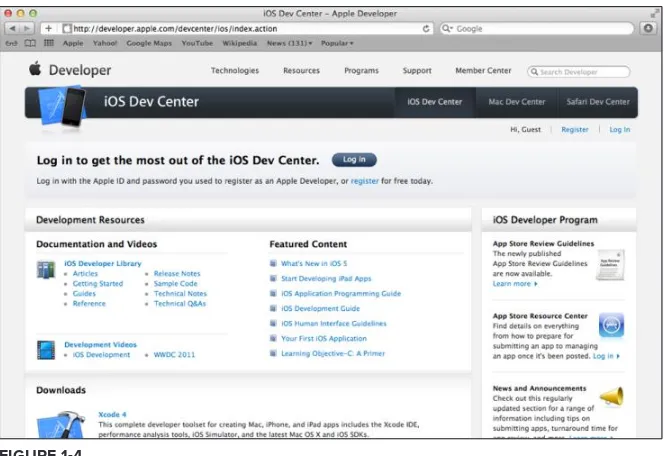
LeSSon 1 Hello ioS!FiGure 1-4
The official ioS Sdk
The Apple iOS SDK (Software Development Kit) is a collection of tools and documentation that you can use to develop iOS apps. The main tools that make up the SDK are:
➤ Xcode: Apple’s integrated development environment (IDE) that lets you manage your products,
type your code, trace and fix bugs (debugging), and lots more.
➤ Interface Builder: A tool fully integrated into the Xcode IDE that lets you build your
application’s user interface visually.
➤ iOS Simulator: A software simulator to simulate the functions of an iPhone or an iPad on
your Mac.
➤ Instruments: A tool that will help you find memory leaks and optimize the performance of
your apps. Instruments are not covered in this book.
In addition to these tools, the iOS SDK also includes extensive documentation, sample code, How-To’s, and access to the Apple Developer Forums.
The iOS SDK is available as a free download to registered members (registration is free). However there are benefits to paid membership, including the ability to debug tour code on an iOS device, distribute your applications, and two technical support incidents a year where Apple engineers will provide you code-level assistance.
Downloading and Installing
iOS Developer Essentials
❘
7FiGure 1-5
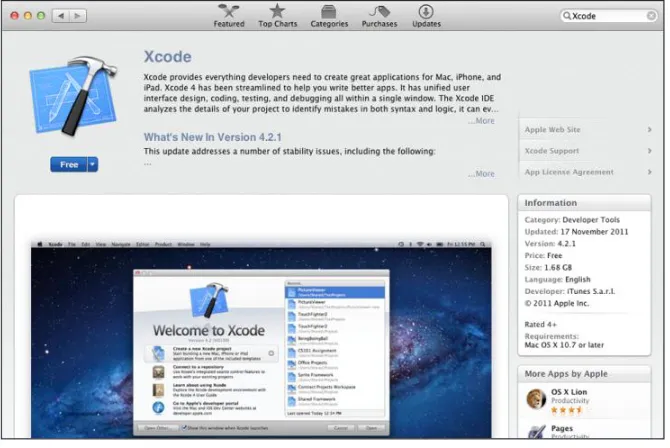
If you do not have the paid membership, you will only see a single version of Xcode and the iOS SDK to download. If you do have a paid membership you will have the option to download prior versions (Figure 1-6). This book is based on Xcode 4.2.1.
8
❘
LeSSon 1 Hello ioS!After downloading Xcode and the iOS SDK, begin the installation process by double-clicking the Install Xcode icon in Launchpad (Figure 1-7). You don’t have to change any of the defaults for the installer, so just read and agree to the software license and click Continue to proceed through the steps.
FiGure 1-7
The Typical app development Process
Whether you intend to develop iOS apps yourself or manage the development of one, there is a basic sequence of steps involved in the development process (Figure 1-8). This section covers these steps briefly.
Written Specification
Wireframes
and Design Coding
Final
Product Testing
FiGure 1-8
Writing a Specification
iOS Developer Essentials
❘
9As you build your experience developing iOS applications, this difference will become smaller. The specification must address the following points:
➤ A short description in 200 words or less
➤ The target audience/demographic of the users
➤ How will it be distributed (App Store, or direct to a small number of devices)
➤ A list of similar competing apps
➤ A list of apps that best illustrate the look-and-feel your app is after
➤ The pricing model of competing apps and potential pricing for your app
Wireframes and Design
A wireframe is large drawing that contains mockups of each screen of your app as well as lines connecting different screens that indicate the user’s journey through your application.
Wireframes are important because they can help identify flaws in your design early on (before any coding has been done). They can also be used to show potential clients how a particular app is likely to look when it’s completed.
There is no right or wrong way to make a wireframe. If it is for your personal use; you can just use a few sheets of paper and a pen. If it is for a client you might want to consider using an illustration package.
Coding
The actual process of creating an iOS app involves using the Xcode IDE to type your code. iOS apps are usually written in a language called Objective-C. An iOS app typically consists of several files of Objective-C code along with resource files (such as images, audio, and video).
These individual files are combined together by a process called compilation into a single file that is installed onto the target device. This single file is usually referred to as the application binary or a build.
Testing
It might sound obvious, but you must test your app after it has been developed. As a developer you test your code frequently as you write it. You must also perform a comprehensive test of the entire application as often as possible to ensure things that were working in the past continue to do so. This form of testing is called regression testing. It helps to make a test plan document. Such a document basically lists all the features that you want to test, and the steps required to carry out each test. The document should also clearly list which tests failed. The ones that fail will then need to be fixed and the test plan document can provide the replication procedure for the defect in question.
When your app is ready you will want to list it on the iTunes App Store. To do so involves submitting your app for review to Apple. Apple has several criteria against which it reviews applications and if your app fails one or more of these criteria it will be rejected—in which case you will need to fix the appropriate code and resubmit. It is best to test your apps thoroughly before submitting them in the first place. Distributing your apps via the App Store is covered in Appendix E.
10
❘
LeSSon 1 Hello ioS!If you are developing for a client, you will probably need to send them a testable version of your work periodically for them to review. To do this you will need to give them something they can install on their devices. This is covered in Appendix F.
home Screen icon
Unless you provide an icon for your application, iOS will use a standard gray icon to represent your application in the home screen (Figure 1-9).
To replace this icon, simply create a PNG file with the appropriate dimensions, as shown in Table 1-1.
TaBLe 1-1: Standard Icon Sizes
DEvIcE IcON SIzE (IN pIxELS)
iPhone 57n57
iPhone 4 (Retina) 114n114
iPad 72n72
These dimensions are in pixels and are different for iPhone-based and iPad-iPhone-based applications.
If you are building an iPhone application that should run on both the iPhone 4 (Retina-based) and the iPhone 3GS (non-Retina–based), you will need to create two versions of each image resource that your application requires. One version of each file will be twice the size of other; your icon images are no exceptions.
You will also need to name the Retina display versions of your images using a special convention. For example, if your standard icon file is called icon.png, then the Retina display version of the icon should be called [email protected].
You learn to use these icons in this lesson’s Try It section.
application Launch Image
A launch image is a special PNG image that you may provide as part of your iOS application. When a user taps your application’s icon on the home screen, iOS looks for this launch image, and if found, shows this launch image before loading the rest of the application. While this launch image is displayed, iOS proceeds to load the rest of your application in the background.
Once your application has finished loading, iOS gives it control and simultaneously hides the place-holder launch image that was displayed in its stead. The overall effect of the launch image is to give your users the perception that your application has launched quickly.
Try It
❘
11The launch image must be of a specific size; these sizes are listed in Table 1-2. Once again, these sizes are different for iPhone-based and iPad-based applications. Retina display devices (iPhone 4) require images that are twice the size of their non-Retina counterparts.
An additional requirement applies for iPad-based applications. These applications must provide a launch image for each supported orientation (landscape/portrait).
TaBLe 1-2: Application Launch Image Sizes
device iMaGe Size (in PixeLS)
iPhone 320n480
iPhone 4 (Retina) 640n960
iPad (portrait orientation) 768n1024
iPad (landscape orientation) 1024n768
The usual naming convention of appending @2x applies to the Retina display versions of images. You learn to use launch images in this lesson’s Try It.
Try iT
In this Try It, you build a simple iPhone application using Xcode 4.2.1 that displays the text “Hello iOS” on the screen.
Lesson requirements
➤ Launch Xcode.
➤ Create a new project based on the Single View Application template
➤ Open a storyboard in Interface Builder
➤ Display the Xcode Utilities area
➤ Change the background color of the default scene in the storyboard
➤ Add a Label from the Xcode Object library
➤ Set up an application icon
➤ Setup a launch image
➤ Test an app in the iOS Simulator
12
❘
LeSSon 1 Hello ioS!hints
➤ Download and install the latest version of Xcode and the iOS SDK on your Mac.
➤ Launch Xcode.
Step by Step
1 .
Create a Single View Application in Xcode called HelloIOS.1 .
Launch Xcode.2 .
To create a new project, select the FiledNewdNew Project menu item.3 .
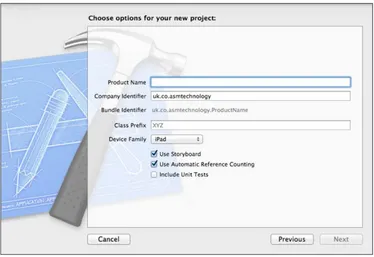
Choose the Single View Application (Figure 1-10) template and click Next.FiGure 1-10
4 .
Use the following information in the project options dialog box (Figure 1-11) and click Next.➤ Product Name: HelloIOS
➤ Company Identifier: com.wileybook
➤ Class Prefix: Lesson1
➤ Define Family: iPhone
Try It
❘
13➤ Use Automatic Reference Counting: Checked
➤ Include Unit Tests: Unchecked
For Company Identifier, we used com.wileybook, but you can use any unique identifier for your application.
FiGure 1-11
5 .
Select a folder where this project should be created.6 .
Ensure the Create Local Git Repository for This Project checkbox is not selected.7 .
Click Create.2 .
Open the MainStoryboard.storyboard file in Interface Builder (Figure 1-12).1 .
Ensure the project navigator is visible and the HelloIOS project is selected and expanded. To show the project navigator, use the ViewdNavigatorsdShow Project Navigator menu item. To expand a project, click the triangle next to the project name in the project navigator.2 .
Click the MainStoryboard.storyboard file.14
❘
LeSSon 1 Hello ioS!FiGure 1-12
3 .
Change the background color.1 .
Click the white background area of the default scene in the storyboard and switch to the Attributes inspector by selecting the ViewdUtilitiesdShow Attributes Inspector menu item.2 .
Under the View section of the Attributes inspector, click once on the Background item to change the background color. This is shown in Figure 1-13.4 .
Add a Label from the Xcode Object library.1 .
From the Object library, select Label and drop it onto the View (Figure 1-14).2 .
Change the text displayed in the Label to “Hello iOS” by editing the value of theText in the Attribute inspector.
3 .
Resize and reposition the Label using the mouse.5 .
Set up an application icon.1 .
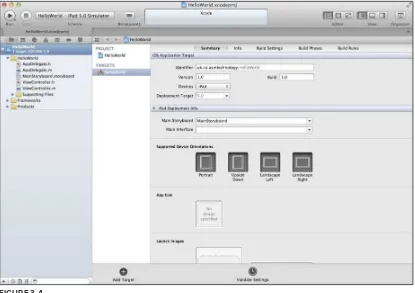
In Xcode, make sure the project navigator is visible.2 .
Select the HelloIOS project in the project navigator to bring up the project proper-ties editor. Make sure the HelloIOS target is selected, and the Summary tab is vis-ible (Figure 1-15).3 .
Scroll down to the App Icons section.Try It
❘
15FiGure 1-13
16
❘
LeSSon 1 Hello ioS!6 .
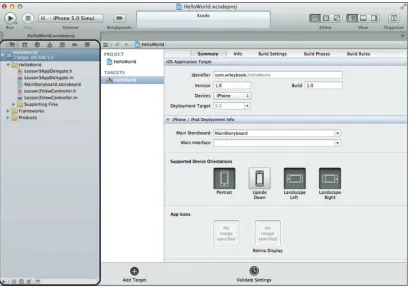
Set up a launch image.1 .
Make sure the project navigator is visible.2 .
Select the HelloIOS project in the project navigator to bring up the project proper-ties editor. Make sure the Summary tab is selected.3 .
Scroll down to the Launch Images section4 .
Right-click each placeholder and set up a launch image using the Select File option in the popover menu. Select the HelloLaunch.png file and the [email protected] files for the standard and Retina display launch images, respectively. Both these files are located in the resources folder of this lesson’s Try It folder on the DVD.1
2 3
4
FiGure 1-15
7 .
Test your app in the iOS Simulator by clicking the Run button in the Xcode toolbar. Alternatively, you can use the Project Run menu item.The iOS Simulator
The iOS Simulator is an application that runs on your Mac and allows you to test your apps without using an actual iOS device. The iOS Simulator is located in the /Developer/ Platforms/iPhoneSimulator.platform/Developer/Applications folder and is a part of the standard iOS SDK installation. When you run your app in Xcode, you have the choice of launching it in the simulator or an actual device. If you choose to launch it in the simulator, Xcode will launch the iOS Simulator automatically.
FeaTureS oF The ioS SiMuLaTor
You can use the iOS Simulator to simulate different device (iPad, iPhone 3GS, iPhone 4) and SDK versions. You can change the iOS version being simulated using the Hardware ➪ Version menu (Figure 2-1). The actual list of options you see here will depend on the different versions of the iOS SDK that you have installed on your Mac.
To switch devices use the Hardware ➪ Device menu. You can choose between an iPhone (iPhone 3GS), iPhone Retina (iPhone 4), or an iPad. Figure 2-2 shows the iPhone4 and iPad simulators.
You can rotate the simulator by using the Rotate Left or Rotate Right menu items from the Hardware menu (Figure 2-3).
The iOS Simulator allows you to simulate a vari-ety of one and two-finger multi-touch gestures. Single-finger gestures such as taps and swipes can be performed by clicking and dragging with the
mouse. The only two-finger gesture that you can simulate is the pinch. To do so, hold down the Option key on your keyboard while clicking and dragging with the mouse in the simulator window. Shake gestures can be performed by using the Hardware ➪ Shake Gesture menu item.
FiGure 2-1
18
❘
LeSSon 2 THe ioS SimulaTorIf you are developing an app that requires location data, you can now use the iOS Simulator to simulate a test location while you are running your application within the simulator. Select the Debug ➪ Location ➪ Custom Location menu item (Figure 2-4) to specify a latitude and longitude pair. Creating location-based applications is covered in Lessons 34 and 35.
FiGure 2-2
FiGure 2-3 FiGure 2-4
The simulator can also simulate changing locations. This is particularly useful if your app is designed to be used while on the move. From the Debug ➪ Location menu, you can select from a list of prerecorded location sets. The simulator will then periodically cycle between the locations in the selected set. The sets are:
➤ Apple Stores
Features of the iOS Simulator
❘
19➤ City Run
➤ Freeway Drive
If you are developing an app that allows the user to print something and do not have an AirPrint-compatible printer, you can simulate a printer using the iOS Printer Simulator. The Printer Simulator is not loaded automatically when you switch on your Mac; to load it simply select the File ➪ Open Printer Simulator menu item.
installing and uninstalling applications
To install an application to the iOS Simulator you need to open its corresponding .xcodeproj file in Xcode and click the Run button in the Xcode toolbar.
You cannot delete the default iOS Simulator applications (such as Photos, Settings, Game Center, Safari, and so on). To uninstall (delete) one of your applications from the iOS Simulator, click and hold the mouse button down on the icon of the app until all the icons start to wiggle. Once they start to wiggle you will notice an X button on the top-left corner of each icon (Figure 2-5).
Release the mouse button if you are still holding it down; the icons will still continue to wiggle. Click the X button on the icon of the app you want to delete. An alert window will appear asking you to confirm this action (Figure 2-6).
20
❘
LeSSon 2 THe ioS SimulaTorLiMiTaTionS oF The ioS SiMuLaTor
As good as the iOS Simulator may be, it has its limitations. For starters you cannot make calls, send or receive text messages, or install apps from the App Store.
The performance of the iOS Simulator depends on the speed of your Mac, and in certain cases your application may appear to execute much faster on your Mac (in the iOS Simulator) than it does on the real device.
Accelerometer, camera, and microphone functions are not supported in the iOS Simulator. If you are developing OpenGL/ES-based applications, you should keep in mind that several OpenGL/ES func-tions are not supported on the iOS Simulator.
A Tour of Xcode
Xcode is Apple’s IDE (Integrated Development Environment), which you use to create iOS applications. The word “integrated” refers to the fact that Xcode brings together several differ-ent tools into a single application.
Xcode contains several tools, but the ones you’ll use most of the time are the source code editor, debugger, and Interface Builder. The current version of Xcode when this book is being written is 4.2.
In this lesson you explore various commonly used features of Xcode.
The WeLcoMe Screen
When you launch Xcode, you are presented with the welcome dialog (Figure 3-1). You can use the welcome dialog to quickly create a new project, connect to a source code repository, open a recently used project, and access documentation.
The first step toward creating an iOS application is the creation of an appropriate project in Xcode. An Xcode project has the file extension .xcodeproj, and tells the Xcode IDE (among other things) the name of your application, what kind of application it is (iPhone/iPad/ Universal), and where to find the code files and resources required to create the application.
SeLecTinG a ProjecT TeMPLaTe
When you create a new project in Xcode, you first need to select a template on which to base the project. Xcode templates contain files that you need to start developing a new application. Xcode provides a list of project templates to select from (Figure 3-2).
The Xcode template window has two categories of templates to choose from. In this book you create iOS applications, and hence need to make sure the iOS template category is selected.
22
❘
LeSSon 3 a Tour of XcodeFiGure 3-1
Setting up Project Options
❘
23SeTTinG uP ProjecT oPTionS
After you have selected a suitable template, Xcode presents the project options dialog box (Figure 3-3).
FiGure 3-3
This is where you provide the name of the project, and specify the target device—iPhone, iPad, or Universal. To uniquely identify your application on the iTunes store (and on an iOS device), each project must have a unique identifier. This identifier is known as a Bundle Identifier, and is created by combining the name of the project along with a company identifier that you provide in the project options dialog. It is best to provide your website domain name in reversed format as the company identifier, because domain names are guaranteed to be globally unique.
Xcode can also create unit tests for your project. A unit test is a small program that is written for the sole purpose of testing another program. Unit testing is beyond the scope of this book, so just uncheck the Include Unit Tests option in the dialog box.
24
❘
LeSSon 3 a Tour of Xcodean overvieW oF The xcode ide
The Xcode IDE features a single window, called the workspace window (Figure 3-4), where you get most of your work done.
FiGure 3-4
The navigator area
The left side of the workspace window is the navigator area (Figure 3-5).
The navigator area consists of seven tabs; each of these tabs (called navigators) shows different aspects of the same project. You can switch between navigators using the navigator selector bar at the top of the navigator area (Figure 3-6).
The Project Navigator
An Overview of the Xcode IDE
❘
25FiGure 3-5
FiGure 3-6
This node represents your project.
This node represents a Group.
These nodes represent individual files.
26
❘
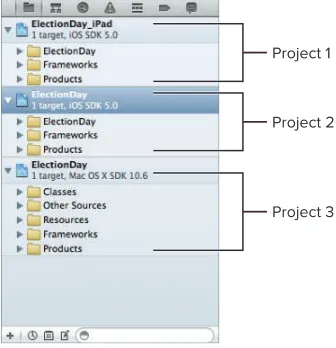
LeSSon 3 a Tour of XcodeIn most cases, you will work with a single project at a time in the Xcode workspace window; however, it is possible to open multiple projects in the workspace window using a workspace file. A workspace file has the file extension .xcworkspace and contains references to one or more project files. You will not be creating workspaces in this book; however, if you were to open a workspace file, the workspace window would display information on multiple projects contained within the workspace (Figure 3-8).
Project 1
Project 2
Project 3
FiGure 3-8
To create a new group, right-click an existing node in the project navigator and select New Group from the context menu. You can move files between groups by using simple drag-and-drop opera-tions in the project navigator. If the groups in the project navigator correspond to actual folders on your Mac, then moving things around in the project navigator would not move the corresponding files into new locations on your Mac.
To delete a file, simply select the item and hit the backspace key on your keyboard. Xcode then asks you if you intended to delete the actual file from your Mac or just remove the reference from the project. The process of deleting a group is similar to that of a file; keep in mind that deleting a group deletes any files within that group.
To learn more about the project navigator read the Project Navigator Help document at http://developer.apple.com/library/ios/#recipes/xcode_ help-structure_navigator/_index.html.
Although you are free to create any number of groups in your project, Xcode creates three groups for you by default (Figure 3-9). The first is the project group, which is usually the same name as the project itself, and this is where all your code and resources will go.
The second is the Frameworks group. Frameworks are libraries of code supplied by Apple to use in your application. The third is the Products group, which contains the actual iOS application.
An Overview of the Xcode IDE
❘
27Your code and resources go here.
Frameworks (Apple supplied code) that your application uses
The final product
FiGure 3-9
Add a new file
Show only recently edited files
Show only files that are under source-control
Show only unsaved files
Show files with mathing name
FiGure 3-10
The Symbol Navigator
The symbol navigator (Figure 3-11) shows the classes in your project along with their methods and member variables. A top-level node in a tree-like structure represents each class. Expanding the class node reveals all its member variables and methods.
This node represents a class.
This node represents another class. These nodes represent
member variables and methods within the class.
28
❘
LeSSon 3 a Tour of XcodeThe Search Navigator
The search navigator (Figure 3-12) lets you find all occurrences of some text, across all files of the project.
The text to search for
Files that contain the text These nodes represent
individual lines where matching text was found.
FiGure 3-12
A root-level node in a tree represents each file that has one or more occurrences of matching text. Expanding the node reveals the exact positions within that file where these matches were made.
The Issue Navigator
The issue navigator (Figure 3-13) lists all compile-time errors and warnings in your project. While compiling a file, Xcode raises an issue each time it finds a problem with the file. Severe show-stopping issues are flagged as errors, whereas less severe issues are flagged as warnings.
This node represents a specific issue within the file.
An Overview of the Xcode IDE
❘
29Each file having one or more errors/warnings is represented by a root-level node in a tree-like struc-ture. Expanding the node reveals the exact positions within that file where these errors/warnings were encountered.
The Debug Navigator
The debug navigator is used during an active debugging session and lists the call stack for each running thread. Debugging is an advanced topic and is not covered in this book.
The Breakpoint Navigator
The breakpoint navigator lists all breakpoints in your code, and allows you to manage them. A break-point is an intentional pause-break-point that you can set in your project. When the app is being executed, Xcode interrupts the execution of the application when it encounters one of these pause-points and transfers control to the debugger. This is extremely useful when trying to figure out why a particular piece of code does not work and you want to inspect the values of variables and content of memory. Breakpoints and the debugger work only when the application is being executed in a special debug mode. Breakpoints and debugging are advanced topics, and are not covered in this book.
The Log Navigator
The log navigator shows you a history of build logs and console debug sessions. Building is the com-plete process of creating an executable application from your source code files. Compilation is a part of the build process. Each time you build a new executable, Xcode creates a build log that contains, among other things, a list of files that were compiled.
The editor area
The right side of the workspace window is the editor area (Figure 3-14). Xcode includes editors for many file types, including source code, user interface files, XML files, and project settings, to name a few.
The content of the editor area depends on the current selection in the navigator area. When you select a file in the navigator area, Xcode tries to find an appropriate editor for that file type. If it can’t find one, it opens the file using Quick Look (which is also used by the Finder).
Jump Bars
At the top of the editor area is the jump bar (Figure 3-15). The jump bar displays the path to the current file being edited and can be used to quickly select another file in the workspace. The jump bar also has back and forward buttons to move through a history of files edited.
Each element in the path displayed in the jump bar is a pop-up menu (Figure 3-16) that you can use to navigate around your project.
30
❘
LeSSon 3 a Tour of XcodeFiGure 3-14
An Overview of the Xcode IDE
❘
31FiGure 3-16
The Source Editor
When you select a source-code file in the navigator area, or a text/XML file, Xcode uses the source editor to open the file. This is the editor with which you will spend most of your time when you write your code. The source editor has several helpful features, such as syntax highlighting and code com-pletion hints. You can configure individual features of the source editor using Xcode preferences.
The Assistant Editor
The assistant editor (Figure 3-17) was introduced in Xcode 4 and enables you to view multiple files side-by-side.
32
❘
LeSSon 3 a Tour of XcodeThe assistant editor is not visible by default, and can be accessed by using the editor selector buttons (Figure 3-18) in the Xcode toolbar. Option-clicking a file in the project navigator or symbol navigator opens it in the assistant editor.
You can create additional assistant editor panes by using the + and x buttons (Figure 3-19). You can also use the jump bar in the additional panes to specify which file to show in each pane; however, it is often helpful to let Xcode find a related file for you. The assistant editor can find, for example, the header file that corresponds to the source code file you’re viewing.
Close this Assistant Editor pane.
Create a new Assistant Editor pane.
FiGure 3-19
The Version Editor
If your project is under version control, you can use the version editor to compare the current version of a file with a previous version. Like the assistant editor, the version editor is not visible by default, and can be accessed by using the editor selector buttons in the Xcode toolbar. Version control is not covered in this book.
The utility area
The utility area (Figure 3-20) supplements the editor area. You can display it by choosing the View UtilitiesdShow Utilities menu item or by clicking the utility button in the toolbar.
The Inspector Area
The top portion of the utility area contains the inspector area (Figure 3-21). Like the navigator area, the inspector area also contains multiple tabs that can be switched using a selector bar at the top of the inspector area.
An Overview of the Xcode IDE
❘
33FiGure 3-20
Selector bar
Inspector Area
34
❘
LeSSon 3 a Tour of XcodeThe number of tabs available depends on the currently selected item in the project navigator. Regardless of what is selected in the project navigator, the first two tabs are always the file inspector and the quick help inspector. The file inspector provides access to the properties of the current file. The quick help inspector provides a short description of the current file.
The Library area
The bottom portion of the utility area contains the library area (Figure 3-22). This area contains a library of file templates, user interface objects, and code snippets that you can use in your applications.
Selector bar
Library Area
FiGure 3-22
The library area also provides a convenient method to access all the media files in your project. A selector bar at the top of the library area provides access to four different library categories.
File Template Library
The File Template library (Figure 3-23) contains templates for several types of files (such as settings bundles and property lists) and subclasses of commonly used classes. To use a file template, simply drag it into the project navigator.
Code Snippet Library
An Overview of the Xcode IDE
❘
35FiGure 3-23 FiGure 3-24
Object Library
The Object library (Figure 3-25) contains a collection of user interface objects that you can use in your project.
Media Library
The Media library (Figure 3-26) contains all graphics, icons, audio, and other media files that you use in your project.
FiGure 3-25 FiGure 3-26
The debugger area
The debugger area (Figure 3-27) also supplements the editor area. You can access it by selecting the ViewdShow Debug Area menu item or by clicking the debugger button in the toolbar.
The debugger area is used while debugging an application and to access the debug console window. You can use this area to examine the values of variables in your programs.