Configuring Passwords and Privileges
Using passwords and assigning privilege levels is a simple way of providing terminal access control in your network.
For a complete description of the commands used in this chapter, refer to the “Password and Privileges Commands” chapter in the Cisco IOS Security Command Reference. To locate documentation of other commands that appear in this chapter, use the command reference master index or search online.
To identify the hardware platform or software image information associated with a feature, use the Feature Navigator on Cisco.com to search for information about the feature or refer to the software release notes for a specific release. For more information, see the “Identifying Supported Platforms” section in the chapter “Using Cisco IOS Software.”
In This Chapter
This chapter includes the following sections:
• Protecting Access to Privileged EXEC Commands
• Configuring Multiple Privilege Levels
• Recovering a Lost Enable Password
• Recovering a Lost Line Password
• Configuring Identification Support
• Passwords and Privileges Configuration Examples
Protecting Access to Privileged EXEC Commands
The following tasks provide a way to control access to the system configuration file and privileged EXEC (enable) commands:
• Setting or Changing a Static Enable Password
• Protecting Passwords with Enable Password and Enable Secret
• Setting or Changing a Line Password
Configuring Passwords and Privileges Protecting Access to Privileged EXEC Commands
Setting or Changing a Static Enable Password
To set or change a static password that controls access to privileged EXEC (enable) mode, use the following command in global configuration mode:
For examples of how to define enable passwords for different privilege levels, see the section “Multiple Levels of Privileges Examples” at the end of this chapter.
Protecting Passwords with Enable Password and Enable Secret
To provide an additional layer of security, particularly for passwords that cross the network or are stored on a TFTP server, you can use either the enable password or enable secret commands. Both commands accomplish the same thing; that is, they allow you to establish an encrypted password that users must enter to access enable mode (the default), or any privilege level you specify.
We recommend that you use the enable secret command because it uses an improved encryption algorithm. Use the enable password command only if you boot an older image of the Cisco IOS software, or if you boot older boot ROMs that do not recognize the enable secret command.
If you configure the enable secret command, it takes precedence over the enable password command; the two commands cannot be in effect simultaneously.
Caution If neither the enable password command nor the enable secret command is configured, and if there is a line password configured for the console, the console line password will serve as the enable password for all VTY (Telnet and Secure Shell [SSH]) sessions.
To configure the router to require an enable password, use either of the following commands in global configuration mode:
Use either of these commands with the level option to define a password for a specific privilege level. After you specify the level and set a password, give the password only to users who need to have access at this level. Use the privilege level configuration command to specify commands accessible at various levels.
Command Purpose
Router(config)# enable password password Establishes a new password or change an existing password for the privileged command level.
Command Purpose
Router(config)# enable password [level level] {password| encryption-type encrypted-password}
or
Router(config)# enable secret [level level] {password | encryption-type encrypted-password}
Establishes a password for a privilege command mode.
Configuring Passwords and Privileges
Protecting Access to Privileged EXEC Commands
If you have the service password-encryption command enabled, the password you enter is encrypted. When you display it with the more system:running-config command, it is displayed in encrypted form.
If you specify an encryption type, you must provide an encrypted password—an encrypted password you copy from another router configuration.
Note You cannot recover a lost encrypted password. You must clear NVRAM and set a new password. See the section “Recovering a Lost Enable Password” or “Recovering a Lost Line Password” in this chapter if you have lost or forgotten your password.
Setting or Changing a Line Password
To set or change a password on a line, use the following command in global configuration mode:
Encrypting Passwords
Because protocol analyzers can examine packets (and read passwords), you can increase access security by configuring the Cisco IOS software to encrypt passwords. Encryption prevents the password from being readable in the configuration file.
To configure the Cisco IOS software to encrypt passwords, use the following command in global configuration mode:
The actual encryption process occurs when the current configuration is written or when a password is configured. Password encryption is applied to all passwords, including authentication key passwords, the privileged command password, console and virtual terminal line access passwords, and BGP neighbor passwords. The service password-encryption command is primarily useful for keeping unauthorized individuals from viewing your password in your configuration file.
Caution The service password-encryption command does not provide a high level of network security. If you use this command, you should also take additional network security measures.
Although you cannot recover a lost encrypted password (that is, you cannot get the original password back), you can recover from a lost encrypted password. See the section “Recovering a Lost Enable Password” or “Recovering a Lost Line Password” in this chapter if you have lost or forgotten your password.
Command Purpose
Router(config)# password password Establishes a new password or change an existing password for the privileged command level.
Command Purpose
Router(config)# service password-encryption
Configuring Passwords and Privileges Configuring Multiple Privilege Levels
Configuring Multiple Privilege Levels
By default, the Cisco IOS software command-line interface (CLI) has two levels of access to commands: user EXEC mode (level 1) and privileged EXEC mode (level 15). However, you can configure additional levels of access to commands, called privilege levels, to meet the needs of your users while protecting the system from unauthorized access. Up to 16 privilege levels can be configured, from level 0, which is the most restricted level, to level 15, which is the least restricted level.
Access to each privilege level is enabled through separate passwords, which you specify when configuring the privilege level.
For example, if you want a certain set of users to be able to configure only certain interfaces, but not allow them access to other configuration options, you could create a separate privilege level for only specific interface configuration commands and distribute the password for that level to those users.
In addition to configuring the privilege levels locally on the Cisco networking device, these command privileges can also be implemented using AAA with TACACS+ and RADIUS. For example, TACACS+ provides two ways to control the authorization of router commands on a per-user or per-group basis. The first way is to assign privilege levels to commands and have the router verify with the TACACS+ server whether or not the user is authorized at the specified privilege level. The second way is to explicitly specify in the TACACS+ server, on a per-user or per-group basis, the commands that are allowed. For more information about implementing AAA with TACACS+ and RADIUS, see the technical note How to Assign Privilege Levels with TACACS+ and RADIUS.
The following tasks describe how to configure additional levels of security:
• Setting the Privilege Level for a Command
• Changing the Default Privilege Level for Lines
• Displaying Current Privilege Levels
• Logging In to a Privilege Level
Setting the Privilege Level for a Command
To create a new privilege level and associate commands with that privilege level, use the following commands in beginning in global configuration mode:
Command Purpose
Step 1 Router(config)# privilege mode level level command-string
Configures the specified privilege level to allow access to the specified command.
Step 2 Router(config)# enable secret level level {0 |5} password-string
Sets the password for the specified privilege level. This is the password users will enter after entering the
enable level command to access the specified level.
Configuring Passwords and Privileges
Recovering a Lost Enable Password
Changing the Default Privilege Level for Lines
To change the default privilege level for a given line or a group of lines, use the following command in line configuration mode:
Displaying Current Privilege Levels
To display the current privilege level you can access based on the password you used, use the following command in EXEC mode:
Logging In to a Privilege Level
To log into a router at a specified privilege level, use the following command in EXEC mode:
To exit to a specified privilege level, use the following command in EXEC mode:
Recovering a Lost Enable Password
You can restore access to enable mode on a router when the password is lost using one of the three procedures described in this section. The procedure you use depends on your router platform.
Step 3 Router(config)# exit Exists global configuration mode and returns to EXEC mode.
Step 4 Router# do copy running-config startup-config (Optional) Saves the configuration to the startup configuration file in NVRAM.
Note The do keyword allows execution of EXEC commands in configuration mode.
Command Purpose
Command Purpose
Router(config-line)# privilege level level
Specifies a default privilege level for a line.
Command Purpose
Router# show privilege Displays your current privilege level.
Command Purpose
Router# enable level Logs in to a specified privilege level.
Command Purpose
Configuring Passwords and Privileges Recovering a Lost Enable Password
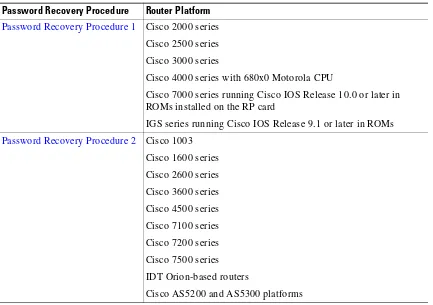
You can perform password recovery on most of the platforms without changing hardware jumpers, but all platforms require the configuration to be reloaded. Password recovery can be done only from the console port on the router. Table 27 shows which password recovery procedure to use with each router platform.
This section includes the following sections:
• Password Recovery Process
• Password Recovery Procedure 1
• Password Recovery Procedure 2
Password Recovery Process
Both password recovery procedures involve the following basic steps:
Step 1 Configure the router to boot up without reading the configuration memory (NVRAM). This is sometimes called the test system mode.
Step 2 Reboot the system.
Step 3 Access enable mode (which can be done without a password if you are in test system mode).
Step 4 View or change the password, or erase the configuration.
Step 5 Reconfigure the router to boot up and read the NVRAM as it normally does.
Table 27 Platform-Specific Password Recovery Procedures
Password Recovery Procedure Router Platform
Password Recovery Procedure 1 Cisco 2000 series Cisco 2500 series
Cisco 3000 series
Cisco 4000 series with 680x0 Motorola CPU
Cisco 7000 series running Cisco IOS Release 10.0 or later in ROMs installed on the RP card
IGS series running Cisco IOS Release 9.1 or later in ROMs
Password Recovery Procedure 2 Cisco 1003 Cisco 1600 series
Cisco 2600 series
Cisco 3600 series
Cisco 4500 series
Cisco 7100 series
Cisco 7200 series
Cisco 7500 series
IDT Orion-based routers
Configuring Passwords and Privileges
Recovering a Lost Enable Password
Step 6 Reboot the system.
Note Some password recovery requires that a terminal issue a Break signal; you must be familiar with how your terminal or PC terminal emulator issues this signal. For example, in ProComm, the keys Alt-B by default generates the Break signal, and in a Windows terminal you press Break or CTRL-Break. A Windows terminal also allows you to define a function key as a BREAK signal. To do so, select function keys from the Terminal window and define one as Break by entering the characters
^$B(Shift 6, Shift 4, and uppercase B).
Password Recovery Procedure 1
Use this procedure to recover lost passwords on the following Cisco routers:
• Cisco 2000 series
• Cisco 2500 series
• Cisco 3000 series
• Cisco 4000 series with 680x0 Motorola CPU
• Cisco 7000 series running Cisco IOS Release 10.0 or later in ROMs installed on the RP card. The router can be booting Cisco IOS Release 10.0 software in Flash memory, but it needs the actual ROMs on the processor card too.
• IGS series running Cisco IOS Release 9.1 or later in ROMs
To recover a password using Procedure 1, perform the following steps:
Step 1 Attach a terminal or PC with terminal emulation software to the console port of the router.
Step 2 Enter the show version command and record the setting of the configuration register. It is usually 0x2102 or 0x102.
The configuration register value is on the last line of the display. Note whether the configuration register is set to enable Break or disable Break.
The factory-default configuration register value is 0x2102. Notice that the third digit from the left in this value is 1, which disables Break. If the third digit is not 1, Break is enabled.
Step 3 Turn off the router, then turn it on.
Step 4 Press the Break key on the terminal within 60 seconds of turning on the router.
The rommon> prompt with no router name appears. If it does not appear, the terminal is not sending the correct Break signal. In that case, check the terminal or terminal emulation setup.
Step 5 Enter o/r0x42 at the rommon> prompt to boot from Flash memory or o/r0x41 to boot from the boot ROMs.
Configuring Passwords and Privileges Recovering a Lost Enable Password
Step 6 At the rommon> prompt, enter the initialize command to initialize the router.
This causes the router to reboot but ignore its saved configuration and use the image in Flash memory instead. The system configuration display appears.
Note If you normally use the boot network command, or if you have multiple images in Flash memory and you boot a non-default image, the image in Flash might be different.
Step 7 Enter no in response to the System Configuration Dialog prompts until the following message appears: Press RETURN to get started!
Step 8 Press Return.
The Router> prompt appears.
Step 9 Enter enable.
The Router# prompt appears.
Step 10 Choose one of the following options:
• To view the password, if it is not encrypted, enter more nvram:startup-config.
• To change the password (if it is encrypted, for example), enter the following commands: Router# configure memory
Router# configure terminal
Router(config)# enable secret 1234abcd Router(config)# ctrl-z
Router# write memory
Note The enable secret command provides increased security by storing the enable secret password using a non-reversible cryptographic function; however, you cannot recover a lost password that has been encrypted.
Step 11 Enter configure terminal at the EXEC prompt to enter configuration mode.
Step 12 Enter config-register andwhatever value you recorded in Step 2.
Step 13 Press Ctrl-Z to quit from the configuration editor.
Step 14 Enter reload at the privileged EXEC prompt and enter write memory to save the configuration.
Password Recovery Procedure 2
Use this procedure to recover lost passwords on the following routers:
• Cisco 1003
• Cisco 1600 series
• Cisco 2600 series
• Cisco 3600 series
• Cisco 3810
Configuring Passwords and Privileges
Recovering a Lost Enable Password
• Cisco 7100 series
• Cisco 7200 series
• Cisco 7500 series
• IDT Orion-Based Routers
• Cisco AS5200 and AS5300 platforms
To recover a password using Procedure 2, perform the following steps:
Step 1 Attach a terminal or PC with terminal emulation software to the console port of the router.
Step 2 Enter show version and record the setting of the configuration register. It is usually 0x2102 or 0x102.
The configuration register value is on the last line of the display. Note whether the configuration register is set to enable Break or disable Break.
The factory-default configuration register value is 0x2102. Notice that the third digit from the left in this value is 1, which disables Break. If the third digit is not 1, Break is enabled.
Step 3 Turn off the router, then turn it on.
Step 4 Press the Break key on the terminal within 60 seconds of turning on the router.
The rommon> prompt appears. If it does not appear, the terminal is not sending the correct Break signal. In that case, check the terminal or terminal emulation setup.
Step 5 Enter confreg at the rommon> prompt.
The following prompt appears:
Do you wish to change configuration [y/n]?
Step 6 Enter yes and press Return.
Step 7 Enter no to subsequent questions until the following prompt appears:
ignore system config info [y/n]?
Step 8 Enter yes.
Step 9 Enter no to subsequent questions until the following prompt appears:
change boot characteristics [y/n]?
Step 10 Enter yes.
The following prompt appears:
enter to boot:
Step 11 At this prompt, either enter 2 and press Return if Flash memory or, if Flash memory is erased, enter 1. If Flash memory is erased, the Cisco 4500 must be returned to Cisco for service. If you enter 1, you can only view or erase the configuration. You cannot change the password.
A configuration summary is displayed and the following prompt appears:
Do you wish to change configuration [y/n]?
Step 12 Enter no and press Return.
The following prompt appears:
Configuring Passwords and Privileges Recovering a Lost Line Password
Step 13 Enter reset at the rommon prompt or, for Cisco 4500 series and Cisco 7500 series routers, power cycle the router.
Step 14 As the router boots, enter no to all the setup questions until the following prompt appears: Router>
Step 15 Enter enable to enter enable mode.
The Router# prompt appears.
Step 16 Choose one of the following options:
• To view the password, if it is not encrypted, enter more nvram:startup-config.
• To change the password (if it is encrypted, for example), enter the following commands: Router# configure memory
Router# configure terminal
Router(config)# enable secret 1234abcd Router(config)# ctrl-z
Router# write memory
Note The enable secret command provides increased security by storing the enable secret password using a non-reversible cryptographic function; however, you cannot recover a lost password that has been encrypted.
Step 17 Enter configure terminal at the prompt.
Step 18 Enter config-register and whatever value you recorded in Step 2.
Step 19 Press Ctrl-Z to quit from the configuration editor.
Step 20 Enter reload at the prompt and enter write memory to save the configuration.
Recovering a Lost Line Password
If your router has the nonvolatile memory option, you can accidentally lock yourself out of enable mode if you enable password checking on the console terminal line and then forget the line password. To recover a lost line password, perform the following steps:
Step 1 Force the router into factory diagnostic mode.
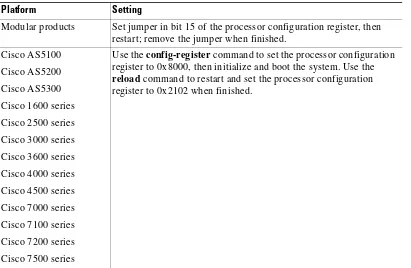
See the hardware installation and maintenance publication for your product for specific information about setting the processor configuration register to factory diagnostic mode. Table 28 summarizes the hardware or software settings required by various products to set factory diagnostic mode.
Step 2 Enter Yes when asked if you want to set the manufacturers’ addresses.
The following prompt appears:
TEST-SYSTEM >
Step 3 Enter enable to enter enable mode:
Configuring Passwords and Privileges
Configuring Identification Support
Step 4 Enter more nvram:startup-config to review the system configuration and find the password. Do not change anything in the factory diagnostic mode.
TEST-SYSTEM # more nvram:startup-config
Step 5 To resume normal operation, restart the router or reset the configuration register.
Step 6 Log in to the router with the password that was shown in the configuration file.
Note All debugging capabilities are turned on during diagnostic mode.
See the hardware installation and maintenance publication for your product for specific information about configuring the processor configuration register for factory diagnostic mode. Table 28 summarizes the hardware or software settings required by the various products to set factory diagnostic mode.
Configuring Identification Support
Identification support allows you to query a Transmission Control Protocol (TCP) port for identification. This feature enables an unsecure protocol, described in RFC 1413, to report the identity of a client initiating a TCP connection and a host responding to the connection. With identification support, you can connect a TCP port on a host, issue a simple text string to request information, and receive a simple text-string reply.
Table 28 Factory Diagnostic Mode Settings for the Configuration Register
Platform Setting
Modular products Set jumper in bit 15 of the processor configuration register, then restart; remove the jumper when finished.
Cisco AS5100
Cisco AS5200
Cisco AS5300
Cisco 1600 series
Cisco 2500 series
Cisco 3000 series
Cisco 3600 series
Cisco 4000 series
Cisco 4500 series
Cisco 7000 series
Cisco 7100 series
Cisco 7200 series
Cisco 7500 series
Use the config-register command to set the processor configuration register to 0x8000, then initialize and boot the system. Use the
Configuring Passwords and Privileges Passwords and Privileges Configuration Examples
To configure identification support, use the following command in global configuration mode:
Passwords and Privileges Configuration Examples
The following sections provide password and privileges configuration examples:
• Multiple Levels of Privileges Examples
• Username Examples
Multiple Levels of Privileges Examples
This section provides examples of using multiple privilege levels to specify who can access different sets of commands. This section includes the following sections:
• Allowing Users to Clear Lines Examples
• Defining an Enable Password for System Operators Examples
• Disabling a Privilege Level Example
Allowing Users to Clear Lines Examples
If you want to allow users to clear lines, you can do either of the following:
• Change the privilege level for the clear and clear line commands to 1 or “ordinary user level,” as follows. This allows any user to clear lines.
privilege exec level 1 clear line
• Change the privilege level for the clear and clear line commands to level 2. To do so, use the
privilege level global configuration command to specify privilege level 2. Then define an enable password for privilege level 2 and tell only those users who need to know what the password is.
enable password level 2 pswd2 privilege exec level 2 clear line
Defining an Enable Password for System Operators Examples
In the following example, you define an enable password for privilege level 10 for system operators and make clear and debug commands available to anyone with that privilege level enabled.
enable password level 10 pswd10 privilege exec level 10 clear line privilege exec level 10 debug ppp chap privilege exec level 10 debug ppp error privilege exec level 10 debug ppp negotiation
The following example lowers the privilege level of the more system:running-config command and most configuration commands to operator level so that the configuration can be viewed by an operator. It leaves the privilege level of the configure command at 15. Individual configuration commands are
Command Purpose
Configuring Passwords and Privileges
Passwords and Privileges Configuration Examples
displayed in the more system:running-config output only if the privilege level for a command has been lowered to 10. Users are allowed to see only those commands that have a privilege level less than or equal to their current privilege level.
enable password level 15 pswd15 privilege exec level 15 configure enable password level 10 pswd10
privilege exec level 10 more system:running-config
Disabling a Privilege Level Example
In the following example, the show ip route command is set to privilege level 15. To keep all show ip
and show commands from also being set to privilege level 15, these commands are specified to be privilege level 1.
privilege exec level 15 show ip route privilege exec level 1 show ip privilege exec level 1 show
Username Examples
The following sample configuration sets up secret passwords on Routers A, B, and C, to enable the three routers to connect to each other.
To authenticate connections between Routers A and B, enter the following commands:
On Router A:
username B password a-b_secret
On Router B:
username A password a-b_secret
To authenticate connections between Routers A and C, enter the following commands:
On Router A:
username C password a-c_secret
On Router C:
username A password a-c_secret
To authenticate connections between Routers B and C, enter the following commands:
On Router B:
username C password b-c_secret
On Router C:
username B password b-c_secret
For example, suppose you enter the following command:
username bill password westward
The system displays this command as follows:
Configuring Passwords and Privileges Passwords and Privileges Configuration Examples
The encrypted version of the password is 21398211. The password was encrypted by the Cisco-defined encryption algorithm, as indicated by the “7.”
However, if you enter the following command, the system determines that the password is already encrypted and performs no encryption. Instead, it displays the command exactly as you entered it.