Cascading Style Sheets,
JavaScript Style Sheets,
& JavaScripted Layers
plus advanced
JavaScript 1.2 & 1.3
JavaScript
Gilorien
Prentice Hall PTR
Preface xvi
Regarding HTML Syntax xviii
Regarding JavaScript Syntax xviii
Regarding Section Header Capitalization xix
About the CD-ROM xx
Part I
Dynamic HTML
C h a p t e r 1
S t y l e S h e e t s
1
Introduction to Style Sheets 4
1.1) Style Sheets Overview 4
1.2) The Golden Rules for Styles 6
1.3) Cascading Style Sheets & JavaScript Style Sheets 8
Cascading Style Sheets 8
1.4) CSS Syntax Property Chart 11
1.5) CSS & JavaScript Syntax Property Comparison Chart 12
1.6) CSS Layer Properties and <LAYER> Attributes Chart 13
1.7) JavaScript Layer Object Properties Chart 14
1.8) Generic { font-family: } Names Chart 14
1.9) Styles Chart for HTML Elements 15
The <STYLE> Element 1 6
1.10) Handling Comments in Styles 18
1.11) <STYLE> Element Style 20
Cascading Style Sheet Properties 2 3
1.12) The { font-size: } Property 23
1.13) The { font-family: } Property 24
1.14) The { font-weight: } Property 25
1.15) The { font-style: } Property 25
1.16) The { line-height: } Property 27
1.17) The { text-decoration: } Property 28
1.18) The { text-transform: } Property 28
1.19) The { text-align: } Property 28
1.20) The { text-indent: } Property 29
1.21) Margins Overview 30
1.22) The { margin: } Property 31
1.23) The { margin-top: } Property 32
1.24) The { margin-right: } Property 32
1.25) The { margin-bottom: } Property 32
1.26) The { margin-left: } Property 32
1.27) Padding Overview 34
1.28) The { padding: } Property 34
1.29) The { padding-top: } Property 35
1.30) The { padding-right: } Property 35
1.31) The { padding-bottom: } Property 35
1.32) The { padding-left: } Property 35
1.33) Color Overview 37
1.34) The { color: } Property 38
1.35) The { background-color: } Property 40
1.36) The { background-image: } Property 42
1.37) Setting Borders Overview 46
1.38) The { border-style: } Property 46
1.39) The { border-color: } Property 48
1.40) Border Widths 52
1.41) The { border-width: } Property 52
1.42) The { border-top-width: } Property 53
1.43) The { border-right-width: } Property 53
1.44) The { border-bottom-width: } Property 53
1.45) The { border-left-width: } Property 53
1.46) The { width: } Property 59
1.47) Horizontal Alignment, Floating, and Clear 62
1.48) The { float: } Property 62
1.49) The { clear: } Property 64
1.50) The { white-space: } Property 66
1.51) The { list-style-type: } Property 68
Using Styles in the <STYLE> Element 7 2
1.52) <STYLE> Element with CLASS of STYLE 72
1.53) Naming your CLASS of STYLE 74
1.54) Defining a CLASS of STYLE without attaching it to an Element 75
1.55) The Keyword all 75
1.56) Attaching the same CLASS to more than one Element 78
1.57) Bordered Link workaround example 81
1.58) <STYLE> Element with ID Definition for CLASS Exceptions 83
1.59) Styles and Tables 85
1.60) <STYLE> Element with CONTEXTUAL SELECTION CRITERIA 93
1.61) Inheritance issues for CONTEXTUAL STYLEs 98
1.62) CONTEXTUAL SELECTION with CLASSes of STYLE and NAMED INDIVIDUAL STYLEs 99
M o r e S t y l e U s e s 1 0 4
1.63) The STYLE Attribute 104
1.64) The <SPAN> Element 105
1.65) The <SPAN> Element with STYLE Attribute 106
1.66) The <SPAN> Element with CLASS Attribute 110
1.67) The <SPAN> Element with ID Attribute for CLASS Exceptions 112
1.68) External Style Sheets with the <LINK> Element 114
1.69) The <LINK> Element 114
1.70) Multiple External Style Sheets in one document 121
1.71) External Style Sheet precedence issues 121
C h a p t e r 2
L a y e r s & S t y l e s
1 2 7
Creating Layers with Styles 1 2 9
2.1) Overview 129
Creating Layers with CSS Syntax 1 3 0
2.2) Creating a LAYER with the STYLE Attribute 130
2.3) Creating a LAYER with a CLASS of STYLE 131
2.4) The { position: } Property 132
2.5) The { left: } Property 132
2.6) The { top: } Property 133
2.7) The NAMED LAYER Style ( Creating a LAYER with the ID Attribute ) 135
2.8) The { width: } Property 136
2.9) The { height: } Property 137
2.10) The { clip: } Property 139
2.11) The bugged version of the { clip: } Property 139
2.12) The unbugged version of the { clip: } Property 142
2.13) The { z-index: } Property 146
2.14) The { visibility: } Property 149
2.15) The { layer-background-color: } Property 151
2.16) The { layer-background-image: } Property 152
2.17) The { include-source: } Property 158
2.18) CSS Layer Properties and <LAYER> Attributes Chart 161
Creating Layers with the <LAYER> Element 1 6 2
2.19) The <LAYER> Element 162
2.20) The <ILAYER> Element 173
2.21) The <NOLAYER> Element 176
C h a p t e r 3
L a y e r s & J a v a S c r i p t
1 7 9
Introducing JavaScript Layers 1 8 2
3.1) Overview 182
3.2) Style Sheet Comments for JavaScript Syntax 182
New JavaScript Properties 1 8 3
3.3) New document Object Properties 183
3.4) The tags Property 183
3.5) The classes Property 185
3.6) The ids Property 187
JavaScript Style Sheets 1 8 9
3.7) JavaScript Style Sheets 189
3.8) Using the with() Statement 189
3.9) The JavaScript Keyword all 190
3.10) The contextual() Method 191
JavaScript and Layers 1 9 6
3.13) The JSS position Property 196
3.14) The HTML <SCRIPT> Element 196
3.15) Comment Tag to hide the contents of the <SCRIPT> Element 197
3.16) The JavaScript Keyword var 198
3.17) The JavaScript Layer Object 199
3.18) The JavaScript layers[i] Array 199
3.19) The two types of document Objects 200
Properties of the Layer Object 2 0 3
3.20) Properties of the Layer Object — Chart 203
3.21) The document Property of the Layer Object 204
3.22) Invoking Methods on a Layer Object 204
3.23) The Layer Object name Property 205
3.24) The Layer Object left Property 205
3.25) The Layer Object top Property 206
3.26) The Layer Object pageX Property 207
3.27) The Layer Object pageY Property 207
3.28) The Layer Object visibility Property 208
3.29) The Layer Object zIndex Property 209
3.30) The Layer Object siblingAbove Property 209
3.31) The Layer Object siblingBelow Property 210
3.32) The Layer Object above Property 210
3.33) The Layer Object below Property 210
3.34) The Layer Object parentLayer Property 211
3.35) The Layer Object and Clipping Rectangles 211
3.36) Default Values for the Clipping Properties 212
3.37) The Layer Object clip.top Property 212
3.38) The Layer Object clip.left Property 212
3.39) The Layer Object clip.bottom Property 213
3.40) The Layer Object clip.right Property 213
3.41) The Layer Object clip.width Property 213
3.42) The Layer Object clip.height Property 214
3.43) The Layer Object bgColor Property 214
3.44) The Layer Object background Property 215
3.45) The Layer Object src Property 215
Methods of the Layer Object 2 1 6
3.46) The moveBy(dx, dy) Method 217
3.47) The moveTo(x, y) Method 217
3.48) The moveToAbsolute(x, y) Method 218
3.49) The resizeBy(dwidth, dheight) Method 218
3.50) The resizeTo(width, height) Method 219
3.51) The moveAbove(layerName) Method 220
3.52) The moveBelow(layerName) Method 221
Using JavaScript with Layers 2 3 0
3.54) The JavaScript write() Method 230
3.55) Using the write() & close() Methods 230
3.56) Using the moveAbove() Method 232
3.57) Show & Hide Layers & writing Layer content 236
3.58) The new Operator for creating new Layers in real-time 240
3.59) Dynamically create new Layers with tags Property Style 241
3.60) Localized JavaScript <SCRIPT>s within a Layer 246
3.61) Animating a Clipping Rectangle to reveal an Image 250
3.62) The JavaScript setTimeout() Method 250
3.63) The JavaScript clearTimeout() Method 250
3.64) Animating Clipping Rectangles and popping Images 251
3.65) Some JavaScript Tips 264
3.66) Animating control Layers and Images offscreen and onscreen 264
3.67) The JavaScript setInterval() Method 284
3.68) The JavaScript clearInterval() Method 284
3.69) Three examples to cycle through Background Colors repeatedly 285
3.70) A Tic Tac Toe game example 296
3.71) The JavaScript Date Object 307
3.72) Creating Date Objects with the four Date Constructors 308
3.73) Creating a Time Counter and Displaying the Current Time 308 3.74) Creating a Time Counter and Displaying the Current Time in a Frameset 310
3.75) The JavaScript Conditional Operator ? : 316
3.76) The JavaScript Math Object 321
3.77) Math Object Property Summaries 322
3.78) Math Object Method Summaries 322
3.79) Randomly load different Background Images into a Layer 323
3.80) Using Math Methods in a quasi-calculator 325
3.81) Math Methods of Math.max(x,y), Math.min(x,y) and Math.pow(x,y) 334
3.82) The JavaScript toString() Method 336
3.83) The JavaScript parseFloat() Function 337
3.84) The JavaScript parseInt() Function 337
3.85) The JavaScript isNaN() Function 338
3.86) The JavaScript charAt() Method 338
3.87) The JavaScript split() Method 338
3.88) The JavaScript slice() Method 339
3.89) The length Property of String Object 339
3.90) A really cool color conversion calculator 340
Part II
JavaScript 1.2
C h a p t e r 4
O b j e c t s & F u n c t i o n s
3 6 3
JavaScript Objects 3 6 6
4.1) The JavaScript Object Hierarchy 366
4.2) Using JavaScript Objects 367
4.3) Object Properties and Methods 367
JavaScript Functions 3 7 1
4.4) Defining a Function with the Function Statement 371
4.5) Calling a Function by Attribute Assignment 372
4.6) Calling a Function by Name 373
4.7) Calling a Function from within a Function 375
4.8) Calling a Function by Property Assignment 376
4.9) The JavaScript Core Function Object 378
4.10) The arguments[i] Array Property of a Function 380
4.11) Nesting a Function within a Function 384
Summaries Charts 3 8 6
4.12) Predefined JavaScript Objects 386
4.13) Predefined JavaScript Arrays as Object Properties 387
4.14) Predefined JavaScript Core Objects 388
4.15) Predefined JavaScript Core Functions 388
The JavaScript Core Object 3 8 9
4.16) The JavaScript Core Object Overview 389
4.17) Creating Objects with its Constructor Function 390
4.18) Creating Methods for an Object 392
4.19) An Object as a Property in an Object Definition 396
4.20) The prototype Property to add a Method to an Object Type 399 4.21) Add a Property to an Object Instance after it is defined 402 4.22) The prototype Property to add a Property to an Object Type 402
4.23) Indexing Properties of an Object 404
4.24) Creating Objects with Literal Notation 407
4.25) Deleting an Object 411
4.26) The watch() Method of the Core Object 411
4.27) The unwatch() Method of the Core Object 415
Predefined JavaScript Objects 4 1 6
4.28) The JavaScript window Object 416
4.29) The open() Method of the window Object 422
4.30) The close() Method of the window Object 427
4.31) The scrollBy() Method of the window Object 430
4.32) The JavaScript document Object 432
4.33) The cookie Property of the document Object 436
4.34) The JavaScript screen Object 445
4.35) The JavaScript Location Object 447
4.37) The JavaScript navigator Object 456
4.38) Creating Frames on the fly 457
4.39) The JavaScript Number Core Object 460
4.40) The JavaScript select Object 462
4.41) The JavaScript options[i] Array 464
4.42) The JavaScript option Object 465
New JavaScript Core Functions 4 6 7
4.43) The JavaScript Number Core Function 467
4.44) The JavaScript String Core Function 468
C h a p t e r 5
S t a t e m e n t s & O p e r a t o r s
4 7 1
JavaScript Statements 4 7 3
5.1) What are JavaScript Statements 473
5.2) Categories of Statements 473
5.3) Chart of all JavaScript Statements 474
Conditional Statements 4 7 5
5.4) The JavaScript if () Statement 475
5.5) The JavaScript if ()...else Statement 477
5.6) Nested if () Statement 478
5.7) Nested if ()...else Statement 479
5.8) The ( ) ? : Conditional Operator Statement 480
5.9) The switch( ) Statement 481
Loop Statements 4 8 4
5.10) The for( ) Statement 484
5.11) The while( ) Statement 486
5.12) The do while( ) Statement 488
5.13) The labeled : Statement 490
5.14) The break Statement 491
5.15) The continue Statement 494
Object Manipulation Statements 4 9 8
5.16) The for...in Statement 498
5.17) The with( ) Statement 500
5.18) The with( ) Statement in a <STYLE> Element 502
5.19) The var Statement 503
5.20) The function Statement 505
5.21) The return Statement 506
5.22) The export Statement 506
5.23) The import Statement 507
5.24) The delete Statement 508
Comment Statements 5 0 8
5.25) Single & multiple-line Comment Statements 508
JavaScript Operators 5 0 9
5.26) What are JavaScript Operators? 509
5.28) Special Operators 510
5.29) The Keyword new Operator 510
5.30) The Keyword this Operator 510
5.31) The Keyword typeof Operator 512
5.32) The Keyword void Operator 514
5.33) The ( , ) comma Operator 514
5.34) Comparison Operators 515
5.35) Arithmetic Operators 515
5.36) String Operators 516
5.37) Logical Operators 516
5.38) Assignment Operators 517
5.39) Bitwise Operators 517
JavaScript Expressions 5 1 8
C h a p t e r 6
J a v a S c r i p t E v e n t s
5 2 1
Event Objects & Handlers 5 2 4
6.1) The JavaScript Event Model 524
6.2) JavaScript Event Objects and Event Handlers 525
6.3) Event Properties Summaries Chart 526
6.4) Modifiers Keys and ASCII Values Chart 527
6.5) The Structure of an Event Object 527
6.6) Specifying an Event by name with dot notation 528
6.7) Available Event Properties for each Event Object 529
6.8) Defining Event Handlers 530
6.9) Defining Event Handlers by Property Assignment 530
6.10) Testing for Modifiers Keys in Conditionals 530
6.11) Defining Event Handlers by Attribute Assignment 532
6.12) The JavaScript event Keyword 532
6.13) Testing for Multiple Modifiers Keys in Conditionals 534
6.14) Testing for Modifiers Keys pressed during Mouse Events 535
6.15) The load() Method of the Layer Object with Key Events 536
6.16) The fromCharCode() Method of the String Object with Key Events 538 6.17) Using Modifiers Keys with Regular Keys to Trigger Events 540
6.18) Determining the ASCII Value of a Pressed Key 541
Capturing & Releasing Events 5 4 3
6.19) The JavaScript captureEvents() Method 543
6.20) Capturing Events in Nested Layers 543
6.21) The JavaScript releaseEvents() Method 544
6.22) Using the type Property and captureEvents() Method on a Layer 544
6.23) Dragging an Image with the Mouse 547
6.24) The name Property of the target Property of the Event Object 549 6.25) Capturing Events for the window Object to Drag an Image 553
6.26) Using Localized Scripts to Drag an Image 556
6.27) Capturing and using KEYPRESS and KEYUP Events 580
6.27.1) Tic Tac Toe played from the Keyboard 580
6.28) Using the JavaScript switch() Statement & KEYDOWN, KEYPRESS, and KEYUP Events 586
6.29) Moving Layers with the switch() Statement 588
6.30) Animating Layers and Images 590
6.31) Animating Layers automatically and by clicking on an Image 591
6.32) Animating Layers with the e.target.name Property 595
6.33) Animating Layers in a Frameset environment 604
6.34) Controlling an External Frame document with JavaScript 609 6.35) The JavaScript linkColor, alinkColor and vlinkColor Properties 610
6.36) Using Key Events to hide and show Layers 610
Scrolling, Resizing, & Moving Windows with Key Events 6 2 2
6.37) The JavaScript scrollBy() Method 622
6.38) The JavaScript scrollTo() Method 622
6.39) Controlling your Window with a variety of Methods 623
6.40) ASCII Values for the which Property of the Event Object 628
6.41) Using Key Events to open a new Window 648
6.42) Creating user-customizable Documents 650
6.43) Drag on a Layer to Resize it 661
Routing & Handling Events 6 6 3
6.44) The JavaScript routeEvent(e) Function 663
6.45) Using the JavaScript routeEvent(e) Function 663
6.46) The JavaScript handleEvent(e) Method 668
6.47) Using the JavaScript handleEvent(e) Method 669
6.48) Handling and Routing Events in Nested and Unnested Layers 673
C h a p t e r 7
J a v a S c r i p t A r r a y s
6 7 9
J a v a S c r i p t A r r a y O b j e c t s 6 8 1
7.1) The JavaScript Array Object 681
7.2) Create an Array with the Array Object Constructor 681
7.3) Create a dense Array 683
7.4) Create an Array with Literal notation 685
7.5) Creating Two-Dimensional Arrays 687
7.6) Creating Three-Dimensional Arrays 690
7.7) Array Property Summaries 693
7.8) Array Method Summaries 693
7.9) An Overview Example that uses all of the Array Methods 694
A r r a y O b j e c t M e t h o d s 6 9 6
7.10) The concat() Method of the Array Object 696
7.11) The join() Method of the Array Object 703
7.12) The pop() Method of the Array Object 705
7.13) The push() Method of the Array Object 707
7.14) The shift() Method of the Array Object 709
7.16) The slice() Method of the Array Object 713
7.17) The splice() Method of the Array Object 716
7.18) The toString() Method of the Array Object 719
7.19) The toString() Method of the Array Element 719
7.20) The reverse() Method 722
7.21) The sort() Method 722
7.22) The compareFunction Function 723
Working with returned Arrays 7 2 9
7.23) Working with returned Arrays and Regular Expressions 729
7.24) The returned Array from the match() Method of String Objects 729 7.25) The returned Array from the match() Method with the "g" Flag 731 7.26) The returned Array from the exec() Method of RegExp Objects 733
7.27) The index Property of the Array Object 735
7.28) The returned Array from the split() Method of String Objects 736
7.29) The input Property of the Array Object 739
7.30) Using Arrays to fill <TABLE> Element Data Dynamically 740
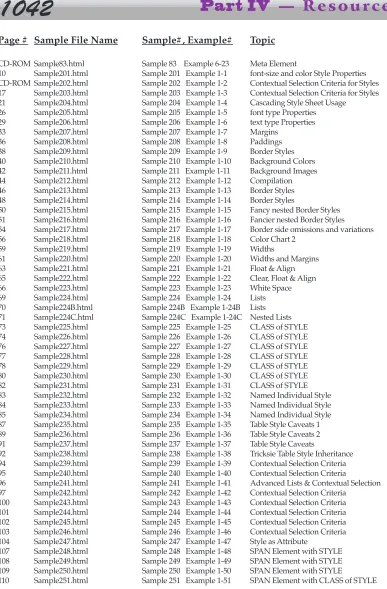
7.31) Chart of Sample Files that use Arrays 745
C h a p t e r 8
J a v a S c r i p t S t r i n g s
7 4 7
JavaScript String Objects 7 4 9
8.1) The JavaScript String Object 749
8.2) String Object Property Summaries 750
8.3) String Object Method Summaries 750
8.4) Using the String Object Constructor Function 752
8.5) Create a String Object with Literal notation 752
8.6) JavaScript Special Characters in Strings 753
8.7) String Object Character Array 754
Manipulative String Object Methods 7 5 5
8.8) The concat() Method of String Object 755
8.9) The charAt() Method of String Object 759
8.10) The charCodeAt() Method of String Object 761
8.11) The fromCharCode() Static Method of String Object 763
8.12) The indexOf() Method of String Object 766
8.13) The lastIndexOf() Method of String Object 769
String Object Methods used with Regular Expressions 7 7 0
8.14) The search() Method of String Object 771
8.15) The match() Method of String Object 774
8.16) The replace() Method of String Object 778
8.17) The split() Method of String Object 782
More String Object Methods 7 8 8
8.18) The slice() Method of String Object 788
8.19) The substring() Method of String Object 790
Creating Anchors & Links 7 9 4
8.21) The anchor() Method of String Object 794
8.22) The link() Method of String Object 795
Decorative Methods of String Object 7 9 7
8.23) Overview 797
8.24) The toLowerCase() Method of String Object 797
8.25) The toUpperCase() Method of String Object 798
8.26) The fontcolor() Method of String Object 798
8.27) The fontsize() Method of String Object 798
C h a p t e r 9
J a v a S c r i p t R e g E x p s
8 0 1
J a v a S c r i p t R e g E x p O b j e c t s 8 0 3
9.1) Regular Expression Objects Overview 803
P r e d e f i n e d R e g E x p O b j e c t 8 0 4
9.2) The Predefined RegExp Core Object 804
9.3) The input Property of the Predefined RegExp Core Object 805 9.4) The multiline Property of the Predefined RegExp Core Object 806 9.5) Property Summaries of the Predefined RegExp Core Object 807
I n d i v i d u a l R e g E x p O b j e c t s 8 0 8
9.6) RegExp Objects created with Literal notation 808
9.7) RegExp Objects created with its Constructor Function 809
9.8) Patterns in Regular Expressions 810
9.9) Literal Characters in Patterns in Regular Expressions 810
9.10) Special Characters in Patterns in Regular Expressions 811
9.11) Parentheses in Patterns in Regular Expressions 812
9.11.1) Parenthesized SubStrings 812
9.12) Exploring Regular Expressions 813
9.13) Chart of all Special Characters for Regular Expressions 814
9.14) Method Summary of Individual RegExp Objects 819
9.15) Summary of String Methods used with Individual RegExp Objects 819
9.16) Property Summary of Individual RegExp Objects 820
9.17) The test() Method of Individual RegExp Objects 821
9.17.1) When to test() or exec() 821
9.18) The exec() Method of Individual RegExp Objects 825
9.19) The compile() Method of Individual RegExp Objects 830
9.20) The lastIndex Property of Individual RegExp Objects 832
9.21) Example to verify phone number using Regular Expressions 838
9.22) exec() & match() Method differences 840
9.23) Example to verify name & address using Regular Expressions 843
9.24) A full Regular Expression example 845
Part III
JavaScript 1.3
C h a p t e r 1 0
W h a t ' s N e w & C h a n g e d
8 5 3
What's New in JavaScript 1.3 & Changed in JavaScript 1.2 8 5 5
10.1) Overview of Features 855
10.2) JavaScript 1.3 and ECMA-262 Compliance 855
10.3) JavaScript 1.3 and Unicode 856
10.3.1) Unicode Character Escape Sequences 857
Changes to Objects 8 5 8
10.4) Changes to the Array Object 858
10.5) Changes to the Array Constructor 858
10.6) Change to the length Property of Array Object 859
10.7) New toSource() Method of Array Object 859
10.8) Change to the toString() Method of Array Object 860
10.9) Change to the push() Method of Array Object 861
10.10) Change to the splice() Method of Array Object 861
10.11) Changes to the Date Object 862
10.12) Changes to the Date Constructor 862
10.13) New Methods for the Date Object 863
10.14) Changes to preexisting Methods of the Date Object 875
10.15) Changes to the Function Object 880
10.16) The apply() Method of the Function Object 880
10.17) The call() Method of the Function Object 886
10.18) Changes to the String Object 888
New Method 8 9 2
10.19) The toSource() Method for several Objects 892
New Top-Level Properties 8 9 4
10.20) Infinity Property 894
10.21) NaN Property 894
10.22) undefined Property 895
New Top-Level Function 8 9 5
10.23) isFinite() Function 895
Changes to Top-Level Functions 8 9 6
10.24) eval() Function 896
New Operators 8 9 6
10.25) The === Operator 896
10.26) The !== Operator 897
Changes to Operators 8 9 7
10.27) The == Operator 897
10.28) The != Operator 897
Changes to Conditional Test Behaviors 8 9 8
10.29) Assignment Behaviors 898
10.30) null and undefined Values for Objects 898
Part IV
Resources
A p p e n d i x A
H T M L P r i m e r
9 0 1
A p p e n d i x B
C o l o r N a m e s a n d V a l u e s
1 0 2 9
A p p e n d i x C
S a m p l e F i l e s R e f e r e n c e d
1 0 3 9
A p p e n d i x D
L a n g u a g e A b b r e v i a t i o n s
1 0 4 9
A p p e n d i x E
C h a r t s
1 0 5 3
This book is designed to guide the reader in developing web sites that can use the new features and capabilities for using Style Sheets and Layers in both Cascading Style Sheet Syntax and JavaScript Syntax that are reflected in Netscape's Navigator 4.0+ browser. Additionally, it covers all of the new abilities of JavaScript 1.2 and including the Layer Object and advanced Event Handling for capturing Events and using them to dynamically alter the appearance and content of documents. There is also a chapter devoted to the new functionality of JavaScript 1.3 and changes from version 1.2.
If you are a complete beginner, then check out Appendix A in Part IV which will introduce you to all of the basics for using HTML Elements to design your web pages including Images, Area Maps, Tables, Frames, Forms, and Embedded Objects for advanced content like VRML, QTVR, QD3D, and Audio files. Appendix A contains a truncated version of the HTML Elements Primer but there is a much more complete version on the CD-ROM, in both HTML and PDF formats. Both of these online versions have about 100 additional examples that are linked to the documentation from separate files. If you are already deep into web site design, then Appendix A can serve as a reference when you need a quick memory fix.
Part I covers Styles and Layers. It starts with an introduction to using Cascading Style Sheet (CSS) Syntax and the Properties that are used to define Styles for your Elements. Chapter 2 demonstrates how to position Layers, which are Blocks of Content and introduces additional Properties associated with Layers. Chapter 3 moves on to Style Sheets created with JavaScript Syntax, focusing on using JavaScript to manipulate Layers in real-world examples.
The Layer Object in JavaScript is new and has many Properties and Methods that facilitate the manipulation of Layers both programmatically and dynamically from user input. Many of the Methods and Properties of other JavaScript Objects which can enhance this process are covered in both theory and in Sample Listings which are both in the book and in separate files on the CD-ROM for you to run. Generally speaking, you can digest a concept faster if you run the examples in a browser.
Part II covers all the vast array of new features of JavaScript 1.2 and changes to previous Object functionality. There are new Statements to consider and many Objects that required Constructor Functions can now be created with Literal Notation. String Objects, Array Objects and Event Objects have been massively enhanced with a plethora of new Properties and Methods. There is a new RegExp Object which uses Regular Expressions to perform pattern matches in text searches that opens up a whole new range of possibilities.
Additionally, Part II covers many of the essential tools for using JavaScript such as basic and advanced Object Theory, Statements and Operators, Functions, Methods, Expressions, Variables and Properties.
Part III covers the new features and minor changes to JavaScript 1.3. Version 1.2 is a major upgrade but version 1.3 is not. However, one really useful feature of 1.3 is the JavaScript Console that you can use to debug your code from Navigator/Communicator.
Most of the examples in this book will require that you use the Navigator 4.0 version of the browser and make sure that you have JavaScript enabled in the Preferences dialogue box. This book follows the standard conventions of using a fixed-width font (Courier or Geneva) for displaying HTML and JavaScript code except when it occurs in the context of a normal paragraph. In that circumstance, the code is displayed with a bold font. Usually HTML code is displayed in allcaps and JavaScript is either all lowercase or interCap.
Appendix E in Part IV consists of a group of charts that contain a lot of condensed information that can serve as Syntax references. These charts are all in a file named:
Charts.pdf
on the CD-ROM. It is suggested that you print out the whole file for use while you are learning the book and even more importantly for when you are writing your own code.
In summary, this book thoroughly covers CSS Style Sheets and JavaScript Style Sheets in theory and by example, along with all of the new features of JavaScript versions 1.2 and 1.3. It also serves as a Syntax Reference for these topics. Most importantly, after learning the theory, this book demonstrates how to effectively integrate JavaScript with DHTML to create innovative and advanced web sites. Finally, this book is heavily focused on examples as a learning mechanism; there are over 400 working examples in the book and even more on the CD-ROM.
Have FUN!! Gilorien
About the Author
Regarding HTML Syntax
The way that Syntax (your HTML code) is laid out in this book is with the Element Name first which in this case would be BODY. Then there is a list of the Attribute Names with their respective Value possibilities which compose the NAME="value" pair as men-tioned previously. When you see a vertical bar (|) between the valuesthat means that you have a choice of value Types to choose from. The Character (|) just means (or). For the first Attribute Name of TEXT you can choose to use either a HEXADECIMAL Color or a Color Name.
The value placeholder names between the quote marks (like colorName) are descriptive only and are just an attempt to try to explain what kind of value you should replace it with except when it is allcaps, which signifies that it is a Keyword that can be used as is. One exception to this is "URL" (or "URI" if you want to be cutting edge).
Most Attributes are optional and are used to modify the Element to your own tastes. When an Attribute is required for the Element to work I will let you know.
Regarding JavaScript Syntax
The way that Syntax for JavaScript code is displayed in this book is similar to what was just mentioned for HTML Syntax with the following additions. When Brackets []are used they signify, in most circumstances, that what they surround is/are optional Parameter(s). The one exception to this is when they are used to create an Array with Literal notation.
Curly Braces are used to enclose Statement Blocks in Functions and other types of special Statements like if(). They are also used to create an Object with Literal notation.
InterCap words, such as statementsIfTrue, usually signify that this is a Parameter that you should replace with your own specification. However, don’t confuse that with Keywords, Properties, Methods or Function Names, etc., that use interCap spelling.
Regarding Section Header Capitalization
The capitalization scheme for the Section Header Names in this book is somewhat unorthodox. To make it as easy as possible for the reader to identify the topic or whatever s/he is looking for, I have implemented the following general rules:
1. The first word of each section header is capitalized in all circumstances.
2. All other normal words are in lowercase letters, which is the most atypical aspect of this scheme. The reason for this is to quickly identify code words.
3. All CSS, JSS, HTML, and JavaScript Keywords, Properties, Attributes, and Objects, etc., have the capitalization that is appropriate for that particular word when it is used as actual code. If a JavaScript Object such as the layers[i]Array is used in a title, then the word layersis usually followed by the [i]which immediately shows that it is an Array.
Similarly, CSS Properties are usually identified like this: { font-size: }
4. Ordinarily, underlined words, if any, signify that they are the primary focus of the topic to be discussed. Underlining a word also signals that this is definitely a code word, which is especially useful for lowercase code words like the Keyword all. Just in case you are wondering why I don't just make them bold like in regular paragraphs, the answer is simple: The whole header is already bold.
5. Certain words like Element, while technically aren't code words themselves, are important enough to warrant capitalizing the first letter all the time. Actual HTML Elements are always written in all uppercase letters and are usually surrounded by angle brackets (< >) like this: <SCRIPT>.
6. Finally, there are some words which are capitalized according to the conventions that seem to have been adopted or initiated. For instance, Netscape started using allcaps for CONTEXTUAL SELECTION CRITERIA and I've continued the tradition.
7. Regarding the capitalization of the word Layer: Layer and LAYER are only used for emphasis and should be considered interchangeable in most cases; although I do use LAYER for usages of the <LAYER> Element, this is still a conventional choice because HTML is case-insensitive. When LAYER is used in a topic concerning CSS Syntax, it more than likely refers to a NAMED LAYER, but not always. Sometimes it is used that way just to draw attention to it within the surrounding text. When Layer is used, it usually refers to a generic usage.
There are two instances when the spelling of the word "Layer" is case-sensitive. The first is when you access the layers[i]Array, and the second is when you create a new Layer with the Layer()Constructor Function and the Keyword new, like this:
myContainer = new Layer(500);
About the CD-ROM
All of the more than 400 examples in the book have an associated BBEdit HTML Sample file on the CD-ROM in the folder named DHTML-JS_BOOK-Main_Files. Each of these files starts with the word "Sample" and are intended to be run on the Netscape Navigator/Communicator browser. You can also check out the source code for copying/pasting or alteration in any text editor. If you work on a Macintosh, you might want to get the BBEdit text editor from Bare Bones Software, which is specifically designed to work with HTML and other types of coding.
Netscape's homepage on the web is: http://home.netscape.com/
Netscape's "DevEdge" (Developer Edge) on the web is:
http://developer.netscape.com/index_home.html?cp=hom07cnde
Netscape's "DevEdge - Library" on the web is:
http://developer.netscape.com/docs/manuals/index.html
Bare Bones Software's homepage on the web is: http://www.bbedit.com/
The CD-ROM also contains a wealth of additional information of a technical nature on a variety of subjects including HTML 4.0 white papers, Netscape's final HTML 4.0 Guide, JavaScript 1.2 and 1.3 References and Guides.
See the last two pages of the book, after the Index, for more information about the contents of the CD-ROM.
Acknowledgments
Chapter 1
Style Sheets
Chapter 1
Style Sheets
Contents
Introduction to Style Sheets 4
1.1) Style Sheets Overview 4
1.2) The Golden Rules for Styles 6
1.3) Cascading Style Sheets & JavaScript Style Sheets 8
Cascading Style Sheets 8
1.4) CSS Syntax Property Chart 11
1.5) CSS & JavaScript Syntax Property Comparison Chart 12
1.6) CSS Layer Properties and <LAYER> Attributes Chart 13
1.7) JavaScript Layer Object Properties Chart 14
1.8) Generic { font-family: } Names Chart 14
1.9) Styles Chart for HTML Elements 15
The <STYLE> Element 16
1.10) Handling Comments in Styles 18
1.11) <STYLE> Element Style 20
Cascading Style Sheet Properties 23
1.12) The { font-size: } Property 23
1.13) The { font-family: } Property 24
1.14) The { font-weight: } Property 25
1.15) The { font-style: } Property 25
1.16) The { line-height: } Property 27
1.17) The { text-decoration: } Property 28
1.18) The { text-transform: } Property 28
1.19) The { text-align: } Property 28
1.20) The { text-indent: } Property 29
1.21) Margins Overview 30
1.22) The { margin: } Property 31
1.23) The { margin-top: } Property 32
1.24) The { margin-right: } Property 32
1.25) The { margin-bottom: } Property 32
1.26) The { margin-left: } Property 32
1.27) Padding Overview 34
1.28) The { padding: } Property 34
1.29) The { padding-top: } Property 35
1.30) The { padding-right: } Property 35
1.32) The { padding-left: } Property 35
1.33) Color Overview 37
1.34) The { color: } Property 38
1.35) The { background-color: } Property 40
1.36) The { background-image: } Property 42
1.37) Setting Borders Overview 46
1.38) The { border-style: } Property 46
1.39) The { border-color: } Property 48
1.40) Border Widths 52
1.41) The { border-width: } Property 52
1.42) The { border-top-width: } Property 53
1.43) The { border-right-width: } Property 53
1.44) The { border-bottom-width: } Property 53
1.45) The { border-left-width: } Property 53
1.46) The { width: } Property 59
1.47) Horizontal Alignment, Floating, and Clear 62
1.48) The { float: } Property 62
1.49) The { clear: } Property 64
1.50) The { white-space: } Property 66
1.51) The { list-style-type: } Property 68
Using Styles in the <STYLE> Element 72
1.52) <STYLE> Element with CLASS of STYLE 72
1.53) Naming your CLASS of STYLE 74
1.54) Defining a CLASS of STYLE without attaching it to an Element 75
1.55) The Keyword all 75
1.56) Attaching the same CLASS to more than one Element 78
1.57) Bordered Link workaround example 81
1.58) <STYLE> Element with ID Definition for CLASS Exceptions 83
1.59) Styles and Tables 85
1.60) <STYLE> Element with CONTEXTUAL SELECTION CRITERIA 93
1.61) Inheritance issues for CONTEXTUAL STYLEs 98
1.62) CONTEXTUAL SELECTION with CLASSes of STYLE and NAMED INDIVIDUAL STYLEs 99
More Style Uses 104
1.63) The STYLE Attribute 104
1.64) The <SPAN> Element 105
1.65) The <SPAN> Element with STYLE Attribute 106
1.66) The <SPAN> Element with CLASS Attribute 110
1.67) The <SPAN> Element with ID Attribute for CLASS Exceptions 112
1.68) External Style Sheets with the <LINK> Element 114
1.69) The <LINK> Element 114
1.70) Multiple External Style Sheets in one document 121
1.71) External Style Sheet precedence issues 121
∞∞∞∞∞∞∞∞∞∞∞∞∞∞∞∞∞∞∞∞∞∞∞∞∞∞∞∞∞∞∞∞∞∞∞∞∞∞∞∞∞∞∞∞∞
Introduction to Style Sheets
Style Sheets Overview
Cascading Style Sheets (CSS) and JavaScript Style Sheets used in concert with Scripting is what puts the dynamism in Dynamic HTML. It allows you to precisely format, embellish, and position the content in your documents instead of acquiescing to the whims of each browser's rendering choices. You can also create documents that change by themselves, or in response to user interaction, and have inline animations contained within them. Inline is the key word here because that means faster downloading and no plug-ins to load or have compatibility issues with or annoy the user because, if after downloading seventy-five plug-ins, the one for your content isn't on his/her system. It also means that you can have an image that not only animates but can move around the page instead of being confined to a stationary rectangular space.
You embellish your content by making stylistic choices that affect the color, size, font face, boldness, and other aspects of text markup, and you can create margins and borders for your text. Then you can position your content exactly where you want it to appear in the page instead of the old inline flow method. Transparent and opaque blocks of content are now possible which you can change, move, resize, make appear or disappear on-the-fly, or respond to user input. If so inclined, you could let each user custom design how the website will appear for them.
Time will definitely be saved if you have a particular style that you want to use for your whole site or section of it by creating the Style Sheet just once and saving it in its own file and then accessing it multiple times with one line of code. You just LINK to the Style Sheet when you want it to apply to that specific page.
Using the TYPE Attribute of <STYLE> Element
When you use the <STYLE> Element, you have to declare with the TYPE Attribute which type of Style Sheet it is, either TYPE="text/CSS" or TYPE="text/JavaScript".
For the purposes of clarity and brevity CSS syntax (Cascading Style Sheet syntax) refers to syntax declared as:
TYPE="text/CSS"
When the term JavaScript syntaxis used it refers to syntax declared as: TYPE="text/JavaScript"
Creating a Style
You can create Styles for your content in several ways. By using the <STYLE> Element, the STYLE Attribute, the CLASS Attribute, the ID Attribute with the CLASS Attribute, or the <SPAN> Element.
Once you get familiar with the new terms and how they are used together, and especially the fact that there is a STYLE Element and a STYLE Attribute, it's easy.
Here's the new Elements (Tags) associated with using Styles: • <STYLE> specifies a Style or Layer or inflow Layer • <SPAN> on-the-fly Style for one section of content in the
BODY Element
• <LINK> loads a Style Sheet from another Document • <LAYER> specifies a Layer
• <ILAYER> specifies an inflow Layer or Offset inflow Layer Here's the new Attributes that you use with all the old Elements that you're familiar with that are associated with creating Styles:
• STYLE on-the-fly Style for one Element only at a time in the BODY Element
• CLASS on-the-fly Style for one Element only at a time in the BODY Element that addresses a NAMED CLASS of Style that was created in the HEAD Element
The Golden Rules for Styles
This is a reference list of the idiosyncrasies and general parameters you will need at your fingertips until you've synaptically burned them in.
Element Names are always case-insensitive. HTML Attribute Names are always case-insensitive. HTML Attribute Values are generally case-insensitive. HTML
CLASS Names are case-sensitive. HTML / CSS Style ID Names are case-sensitive. HTML / CSS Style Style Property Names are always case-sensitive. CSS / JavaScript Style Style Property Values are generally case-sensitive. CSS / JavaScript Style JavaScript classesNames are always case-sensitive. JavaScript Style JavaScript idsNames are always case-sensitive. JavaScript Style
LayerObject Properties are always case-sensitive. JavaScript
LayerObject Method Names are always case-sensitive. JavaScript STYLE is used as both an Element and as an Attribute of other Elements.
Only one CLASS of STYLE can be applied to each HTML Element.
There are several ways to apply a STYLE to your document content. They are: STYLE as Element
STYLE as Attribute of most Elements CLASS as Attribute of most Elements
ID as Exception Attribute for the CLASS Attribute STYLE with CONTEXTUAL SELECTION CRITERIA SPAN Element with STYLE Attribute
SPAN Element with CLASS Attribute
SPAN Element with CLASS Attribute and ID Exception Attribute for CLASS It can be useful to think of:
STYLE as Element as the Cascading Style Sheet or JavaScript Style Sheet where you set all of your global stylistic Attributes for the entire document and which always goes in the HEAD Element.
CLASS as Attribute as a way to add a Style on-the-fly by referencing the NAME of the CLASS of STYLE to a single Element that is contained between the BODY Start and End Tags.
ID as Attribute as a way to add a Style on-the-fly by addressing a reference to a NAMED INDIVIDUAL STYLE which is used to create an EXCEPTION to a CLASS of STYLE.
STYLE with CONTEXTUAL SELECTION CRITERIA creates a Style that is only applicable when a specified Element is nested within other Elements in a prescribed way by the STYLE definition.
These different possibilities vary in their range of applicability or, put another way, in how global they are.
Never put double quotes around the Values in Cascading Style Sheet Attributes. This is the correct way to do it:
H2 { color: red; }
The one exception to the double quotes rule is when you specify a font-family
Value Name that is composed of more than one word and separated by a space like this: H2 { font-family:"Brush Script"; }
HTML documents usually load faster if you use lowercase letters for Element and Attribute names because the compression algorithms used by the browser software are more efficient at storing data patterns that occur more often than those that are infrequent. In general circumstances lowercase letters occur more frequently than uppercase ones.
Remember that Cascading Style Sheet Syntax is a scripting language that has rules of its own that are distinct from HTML and JavaScript but is designed to interact with HTML and JavaScript. Expect subtle differences in syntax and new capabilities and terms. The same is true for Style Sheets that use JavaScript Syntax.
In an effort to establish distinctions between HTML Syntax and Style Sheet Syntax and in keeping with tradition: When the term Attributeis used, it refers to an Attribute of an HTML Element, and when the term Property is used, it refers to a Style Sheet Syntax Property. Just remember that in a generic sense they accomplish the same thing but point to different types of code. Propertyalso refers to a JavaScript Property of Objects.
All of the Examples have a corresponding Sample HTML file on the CD-ROM so you can see the results in a browser. They are located in the folder named:
DHTML-JS_BOOK-Main_Files
Cascading Style Sheets &
JavaScript Style Sheets
Chapter 1 deals with laying the foundation for creating Style Sheets using Cascading Style Sheet (CSS) Syntax. Then in Chapter 2 we explain how the Layers that are created with Style Sheets or the LAYER Elements are positioned in a browser window. Chapter 3 covers JavaScript Style Sheets and using JavaScript to dynamically manipulate Layers.
When you use the <STYLE> Element, you have to declare with the TYPE Attribute which type of Style Sheet it is, either: TYPE="text/CSS"or TYPE="text/JavaScript". In this book, the term:
CSS syntax(Cascading Style Sheet syntax) refers to syntax declared as: TYPE="text/CSS"
and when the term JavaScript syntaxis used it refers to syntax declared as: TYPE="text/JavaScript"
Cascading Style Sheets
To create a Cascading Style Sheet, you use CSS syntax to define the parameters of a Style by first specifying the HTML Element that you want to assign a Style to and then, inside of curly braces{}, you list the ATTRIBUTE NAME and VALUE pair or pairs. You separate each NAME and VALUE with a colon like this: NAME:VALUE. Then you separate each NAME:VALUE; pair with a semicolon, even if there is only one pair, like this:
{ NAME:VALUE; }
{ NAME:VALUE; NAME:VALUE; NAME:VALUE; }
Here are three different examples of real NAME:VALUE; pairs: { color:red; }
{ text-align:left; float:right; }
{ background-color:purple; margin:10pt; border-style:ridge; }
Putting that all together, here's a simple Style that causes all H2 Element headings to be displayed with a font that is sized at 14 point and colored aqua:
and here is the complete syntax using the STYLE Tags, which are always located in the HEAD Element:
<HEAD>
<STYLE TYPE="text/CSS">
H2 { font-size: 14pt; color: aqua; }
</STYLE>
</HEAD>
Just one more thing: While it isn't required, most people put the CSS Style Definition parameters inside of a Comment Tag (<!-- ... -->) so that they will be hidden from browsers that don't recognize Style Sheets or the STYLE Tags. However, be careful that you don't put the STYLE Tags themselves inside the Comment Tag or they will be ignored even by Style-Savvy browsers like Navigator. Here's how the last example would look when properly placed within a Comment Tag:
<HEAD>
<STYLE TYPE="text/CSS">
<!--H2 { font-size: 14pt; color: aqua; }
-->
</STYLE>
</HEAD>
Special Notice:
It is absolutely critical that you code your syntax correctly. Pay special attention to your colons and semicolons so that they are in the correct place. This is how the browser knows how to distinguish between just an ordinary piece of text and CSS NAME: VALUE; syntax.
So far we have created a Style Sheet, but we haven't actually applied it to any Elements in the BODY of the document yet. This is the easy part because it works just like normal HTML that you're used to. Expanding on the above example one last time, here is what it looks like when you apply the Style defined for the H2 in the Style Sheet to an actual H2 heading in the BODY section of the document.
Example 1-1:
Sample201.html
<!DOCTYPE HTML PUBLIC "-//W3C//DTD HTML 3.2//EN"> <HTML>
<HEAD> <TITLE> Sample 201 - CSS Example 1-1 </TITLE> <STYLE TYPE="text/CSS">
<!--H2 { font-size: 14pt; color: aqua; } -->
</STYLE> </HEAD> <BODY> <P>
Style Sheet Use:
<H2>This is a level-two heading that is aqua and sized at 14 points.</H2>
Notice that this text which is not inside the H2 tags is rendered with the default colors of the BODY Tag.
</BODY> </HTML>
I've included the following charts because when you're trying to organize all this theory inside your head, it's very useful to have the options that you use in the real world at your fingertips to improve how you remember how it all fits together. Just look it over to get a feel for what the possibilities are and then use it for reference when you need a quick memory jog. If you want a printout of all these charts, then print Charts.pdf, in the PDF-Files folder on the CD-ROM. Other charts are in the Charts folder in HTML format.
CSS Syntax Property Chart
∞∞∞∞∞∞∞∞∞∞∞∞∞∞∞∞∞∞∞∞∞∞∞∞∞∞∞∞∞∞∞∞∞∞∞∞∞∞∞∞∞∞∞∞∞
Property All All
Name Possible Possible
CSS Syntax Categories Values
font-size absolute-size xx-small, x-small, small, medium, large, x-large, xx-large
relative-size larger, smaller
length | percentage 10pt, 12pt, 14pt, 20pt, 24pt,... 20%, 25%, 50%, 80%, 120%,150%, 200%,... font-family any system font Helvetica, Times, Geneva, Courier,...
font-weight keyword |number normal, bold, bolder, lighter | 100-900 font-style keyword normal, italic
line-height number multiplied by a number or decimal
length | percentage em, ex, px, pt, pc, in, mm, cm | 1%-1000%, ...n%
keyword normal
text-decoration keyword none, underline, line-through, blink text-transform keyword capitalize, uppercase, lowercase, none text-align keyword left, right, center, justify
text-indent length | percentage em, ex, px, pt, pc, in, mm, cm | 1%-1000%, ...n% margin length | percentage em, ex, px, pt, pc, in, mm, cm | 1%-1000%, ...n%
keyword auto (is available for all 5 margin Properties)
margin (example) { margin: 24pt 30pt 30pt 17pt; } sets each margin to diff. value The order is: top right bottom left margin-top length | percentage em, ex, px, pt, pc, in, mm, cm | 1%-1000%, ...n% margin-right length | percentage em, ex, px, pt, pc, in, mm, cm | 1%-1000%, ...n% margin-bottom length | percentage em, ex, px, pt, pc, in, mm, cm | 1%-1000%, ...n% margin-left length | percentage em, ex, px, pt, pc, in, mm, cm | 1%-1000%, ...n% padding length | percentage em, ex, px, pt, pc, in, mm, cm | 1%-1000%, ...n% padding (example) { padding: 25px 20px 45px 35px; } sets each padding to diff. value padding-top length | percentage em, ex, px, pt, pc, in, mm, cm | 1%-1000%, ...n% padding-right length | percentage em, ex, px, pt, pc, in, mm, cm | 1%-1000%, ...n% padding-bottom length | percentage em, ex, px, pt, pc, in, mm, cm | 1%-1000%, ...n% padding-left length | percentage em, ex, px, pt, pc, in, mm, cm | 1%-1000%, ...n% color colorvalue none, name, #$$$$$$, rgb(0-255,0-255,0-255), rgb(?%,?%,?%) background-color colorvalue none, name, #$$$$$$, rgb(0-255,0-255,0-255), rgb(?%,?%,?%)
the 16 color names are aqua, black, blue, fuchsia, gray, green, lime, maroon, navy, olive, purple, red, silver, teal, white, yellow
background-image imageurl url( ) { background-image: url(JPEG-Images/ExampleImage.jpeg); } border-style keyword none, solid, double, inset, outset, groove, ridge
border-color colorvalue none, name, #$$$$$$, rgb(0-255,0-255,0-255), rgb(?%,?%,?%) border-width length |percentage em, ex, px, pt, pc, in, mm, cm | 1%-1000%, ...n% border-width same { border-width: 20px 30px 40px 50px; } sets each width to diff. value border-top-width length |percentage em, ex, px, pt, pc, in, mm, cm | 1%-1000%, ...n% border-right-width length |percentage em, ex, px, pt, pc, in, mm, cm | 1%-1000%, ...n% border-bottom-width length |percentage em, ex, px, pt, pc, in, mm, cm | 1%-1000%, ...n% border-left-width length |percentage em, ex, px, pt, pc, in, mm, cm | 1%-1000%, ...n% width length |percentage em, ex, px, pt, pc, in, mm, cm | 1%-1000%, ...n%
keyword auto
float keyword left, right, center, none clear keyword none, left, right, both display keyword block, inline, list-item
list-style-type keyword disc, circle, square, decimal, lower-roman, upper-roman, lower-alpha,
keyword upper-alpha, none
white-space keyword normal, pre { white-space: pre; } { white-space: normal; }
CSS & JavaScript Syntax Property Comparison Chart
∞∞∞∞∞∞∞∞∞∞∞∞∞∞∞∞∞∞∞∞∞∞∞∞∞∞∞∞∞∞∞∞∞∞∞∞∞∞∞∞∞∞∞∞∞
Property Property Simple
Name Name CSS Syntax
CSS Syntax JavaScript Syntax Examples
font-size fontSize { font-size: 14pt; }
font-family fontFamily { font-family: Helvetica, Times, Geneva, Courier; } font-weight fontWeight { font-weight: bold; }
font-style fontStyle { font-style: italic; } line-height lineHeight { line-height: 22pt; }
text-decoration textDecoration { text-decoration: underline; } text-transform textTransform { text-transform: uppercase; } text-align textAlign { text-align: right; }
text-indent textIndent { text-indent: 40px; }
margin margins( ) { margin: 75px; } sets all 4 margins to same value margin margins( ) { margin: 24pt 30pt 30pt 17pt; } sets each margin to diff. value
The order is: top right bottom left margin-top marginTop { margin-top: 40mm; }
margin-right marginRight { margin-right: 4cm; } margin-bottom marginBottom { margin-bottom: 12pc; } margin-left marginLeft { margin-left: 1in; }
padding paddings( ) { padding: 25px; }
padding paddings( ) { padding: 25pt 20px 45pt 35px; } padding-top paddingTop { padding-top:.5in; }
padding-right paddingRight { padding-right: 25pt; } padding-bottom paddingBottom { padding-bottom: 15pt; } padding-left paddingLeft { padding-left: 5pt; }
color color { color: blue; } { color:#0000ff; }
color color { color: rgb(0%, 0%, 100%); } { color: rgb(0,20, 255); } background-color backgroundColor { background-color: maroon; } same options as color background-image backgroundImage { background-image: url(JPEG-Images/ExampleImage.jpeg); } border-style borderStyle { border-style: groove; }
border-color borderColor { border-color:#335a77; }
border-color borderColor { border-color: rgb(20%, 50%, 70%); } border-color borderColor { border-color: rgb(255, 20, 150); } border-width borderWidths( ) { border-width: 20px; }
border-width borderWidths( ) { border-width: 20px 30px 40px 50px; } border-top-width borderTopWidth { border-top-width: 20px; }
border-right-width borderRightWidth { border-right-width: 30px; } border-bottom-width borderBottomWidth{ border-bottom-width: 40px; } border-left-width borderLeftWidth { border-left-width: 50px; }
width width { width: 50%; } { width: 500px; } { width: 7in; } float align { float: left; } { float: right; } { float: center; } clear clear { clear: left; } { clear: right; } { clear: both; } display display { display: block; } { display: list-item; }
list-style-type listStyleType { list-style-type: square; } { list-style-type: upper-roman; } white-space whiteSpace { white-space: pre; } { white-space: normal; }
∞∞∞∞∞∞∞∞∞∞∞∞∞∞∞∞∞∞∞∞∞∞∞∞∞∞∞∞∞∞∞∞∞∞∞∞∞∞∞∞∞∞∞∞∞
relative units
em -- the height of the element's font ex -- half the height of the element's font px -- pixels, relative to rendering surface absolute units
Note that in the chart on pages 11 and 195, for any of the Properties that have the scenario:
Possible Possible Categories Values
length | percentage em, ex, px, pt, pc, in, mm, cm | 1%-1000%, ...n%
It means that if you use a lengthtype Value, then it should be a number suffixed by one of these units of measurement: em, ex, px, pt, pc, in, mm, cm, like this: "200px".
If you use a percentagetype Value then it should be a number that is followed by a percent (%) sign, like this: "75%".
CSS Layer Properties and <LAYER> Attributes Chart
Notice that the preceding two charts do not include the Properties that are used to POSITION your content. Those are listed in the chart below within the Layers model.
Also note that there are no corresponding Properties in CSS Syntax for the LAYER Attributes of PAGEX, PAGEY, ABOVEand BELOWor the five Event Handlers.
∞∞∞∞∞∞∞∞∞∞∞∞∞∞∞∞∞∞∞∞∞∞∞∞∞∞∞∞∞∞∞∞∞∞∞∞∞∞∞∞∞∞∞∞∞
Property Attribute Simple Simple
Name Name CSS <LAYER>
CSS <LAYER> Syntax Syntax
Syntax Syntax Examples Examples
position { position: absolute; } <LAYER></LAYER> position { position: relative; } <ILAYER></ILAYER> #myLayerName ID { position: absolute; } ID="myLayerName"
left LEFT { left: 40px; } LEFT=40
top TOP { top: 20px; } TOP=20
PAGEX PAGEX=72
PAGEY PAGEY=144
width WIDTH { width: 550px; } WIDTH=550
height HEIGHT { height: 400px; } HEIGHT=400
clip CLIP { clip: rect('10, 20, 30, 40'); } CLIP="10, 20, 30, 40"
z-index Z-INDEX { z-index: 3; } Z-INDEX=3
ABOVE ABOVE="myLayerName5"
BELOW BELOW="myLayerName7"
visibility VISIBILITY { visibility: show; } VISIBILITY="SHOW" background-color BGCOLOR { background-color: purple; } BGCOLOR="#0000ff" layer-background-color { layer-background-color: blue; }
background-image BACKGROUND { background-image:url('image1.jpg'); } BACKGROUND="image3.jpg" layer-background-image { layer-background-image:url('image2.jpg'); }
include-source SRC { include-source: url('myPage.html'); } SRC="myPage.html"
JavaScript Layer Object Properties Chart
∞∞∞∞∞∞∞∞∞∞∞∞∞∞∞∞∞∞∞∞∞∞∞∞∞∞∞∞∞∞∞∞∞∞∞∞∞∞∞∞∞∞∞∞∞
Layer Object Simple Read-Only
Property JavaScript Syntax or
Name Examples Read/Write
JavaScript Syntax (assume there is a Layer named myLayer1)
document document.write(document.myLayer1.document); Read-Only
name myVar=document.name; Read-Only
left document.myLayer1.left=20; Read-Write
top document.myLayer1.top=30; Read-Write
pageX document.myLayer1.pageX=10; Read-Write
pageY document.myLayer1.pageY=15; Read-Write
zIndex document.myLayer1.zIndex=7; Read-Write
visibility document.myLayer1.visibility="hide"; Read-Write
clip.top document.myLayer1.clip.top=50; Read-Write
clip.left document.myLayer1.clip.left=-200; Read-Write
clip.right document.myLayer1.clip.right=700; Read-Write
clip.bottom document.myLayer1.clip.bottom=500; Read-Write
clip.width document.myLayer1.clip.width=640; Read-Write
clip.height document.myLayer1.clip.height=480; Read-Write
background.src document.myLayer1.background.src="myImage.jpeg"; Read-Write bgColor document.myLayer1.bgColor = "#ff0000"; Read-Write document.myLayer1.bgColor = "green"; Read-Write
document.myLayer1.bgColor = null; Read-Write
siblingAbove document.myLayer1.siblingAbove; Read-Only
siblingBelow document.myLayer1.siblingBelow; Read-Only
above document.myLayer1.above; Read-Only
below document.myLayer1.below; Read-Only
parentLayer document.myLayer1.parentLayer; Read-Only
src document.myLayer1.src="myFile.html"; Read-Write
∞∞∞∞∞∞∞∞∞∞∞∞∞∞∞∞∞∞∞∞∞∞∞∞∞∞∞∞∞∞∞∞∞∞∞∞∞∞∞∞∞∞∞∞∞
Generic { font-family: } Names Chart
These are the generic Name Values for the font-family Property, followed by an example of each that the browser might select from the user's System Fonts:
Generic font-family Names Example serif Times
sans-serif Helvetica
cursive Zapf-Chancery
fantasy Western
Styles Chart for HTML Elements
This is a list of all the Elements, including those in HTML 4.0, that you can use the STYLE Attribute or the CLASS Attribute or the ID Attribute with:
∞∞∞∞∞∞∞∞∞∞∞∞∞∞∞∞∞∞∞∞∞∞∞∞∞∞∞∞∞∞∞∞∞∞∞∞∞∞∞∞∞∞∞∞∞
A ACRONYM ADDRESS B BIG BLOCKQUOTE BODY BR BUTTON CAPTION CENTER CITE CODE COL COLGROUP DD
DEL DFN DIR DIV
DL DT EM FIELDSET
FORM H1 H2 H3
H4 H5 H6 HR
I IMG INPUT INS ISINDEX KBD LABEL LEGEND
LI LINK MAP MENU
OBJECT OL OPTION P
PRE Q S SAMP
SELECT SMALL SPAN STRIKE STRONG SUB SUP TABLE TBODY TD TEXTAREA TFOOT TH THEAD TR TT
U UL VAR XMP
∞∞∞∞∞∞∞∞∞∞∞∞∞∞∞∞∞∞∞∞∞∞∞∞∞∞∞∞∞∞∞∞∞∞∞∞∞∞∞∞∞∞∞∞∞
You can also use them with the following Elements, but at the time of this writing, they will only work in Navigator 4.0+, but more than likely by the time you read this all the other major browsers will recognize them also. If you use cutting-edge code then you should create parallel code to include in Elements like <NOLAYER> and <NOSCRIPT> and additional pages with alternative content to cover all the cross-browser compatability issues. Note that Internet Explorer does not support Style Sheets with JavaScript Syntax.
ILAYER LAYER
∞∞∞∞∞∞∞∞∞∞∞∞∞∞∞∞∞∞∞∞∞∞∞∞∞∞∞∞∞∞∞∞∞∞∞∞∞∞∞∞∞∞∞∞∞
Special Notice:
The <STYLE> Element
The <STYLE> Element is what you use to declare and define a Style Sheet. It always goes in the header of your document between the <HEAD> Element Start and End Tags. There is only one required Attribute called TYPE and its default Value is "text/CSS", which specifies a Style Sheet in Cascading Style Sheet Syntax. You may also declare it as
TYPE="text/JavaScript"to create a Style Sheet using JavaScript Syntax.
There are certain Keywords that make life much easier. The Keyword allis used when you want to define the same Style for all possible HTML Elements all at once. You can define a Style for as many Elements as you want within the STYLE Element, hence the term "Style Sheet." Each Attribute is covered individually in Chapters 1 and 2.
Syntax:
<STYLE
TYPE="text/CSS"|"text/JavaScript" SRC="URL">
[ Element { PropertyName: Value; } ]
[ Element.className { PropertyName: Value;} ] [ #IDname { PropertyName: Value; } ]
[ Element Element ... { PropertyName: Value; } ] ...
</STYLE>
Attributes Defined:
TYPE="text/CSS" specifies a Style Sheet in the Cascading Style Sheet Syntax.
TYPE="text/JavaScript" specifies a Style Sheet in the JavaScript Syntax.
SRC="URL" specifies the URL of an external Style Sheet to load. See pages 116-123.
Parameters Defined:
Element specifies an HTML Element to apply a Style to.
PropertyName specifies a CSS Property Name followed by a colon and then a Value, which is the specific value parameter for that Property and is followed by a semicolon, and together they form a Name:Value; pair that is enclosed within curly braces that defines a Style. If you use multiple Name:Value;pairs to define a Style they would all be enclosed within the curly braces as a complete Style Definition for that Element.
IDname specifies a named Style Exception which is identified as such by the preceding hashmark(#) and which can be called to apply to an Element by the ID Attribute.
Element Element ... this is a special way to apply Styles that is called CONTEXTUAL APPLICATION or you could say that it's implemented by specifying CONTEXTUAL SELECTION CRITERIA. When you have sequential Elements in your definition, or put another way, one Element followed by another Element, like this:
DIV BLOCKQUOTE
then the Style that you define will only apply to BLOCKQUOTE Elements that are also contained within DIV Elements. The following mini-example demonstrates this by defining a Style that creates a border that is 20 pixels thick and makes the text blue for only BLOCKQUOTE Elements inside DIV Elements. (See Sample202.html on CD-ROM.)
DIV BLOCKQUOTE { color: blue; border-width: 20px; }
The next example defines three Styles. It first creates a Style for all PARAGRAPH Elements, which will have green text at a point size of 20. Next, a Style creates bold red text for all BLOCKQUOTE Elements and another Style creates a purple border that is 10 pixels thick and makes the text blue for all BLOCKQUOTE Elements, which are also inside DIV Elements.
P { color: green; font-size: 20pt; }
BLOCKQUOTE { color: red; font-weight: bold; }
DIV BLOCKQUOTE { color: blue; border-width: 10px; border-color: purple; }
Here's the complete code:
Example 1-3:
Sample203.html
<!DOCTYPE HTML PUBLIC "-//W3C//DTD HTML 3.2//EN"> <HTML>
<HEAD><TITLE> Sample 203 - CSS Example 1-3</TITLE> <STYLE TYPE="text/CSS">
<!--P { color: green; font-size: 20pt; }
BLOCKQUOTE { color: red; font-weight: bold; }
DIV BLOCKQUOTE { color: blue; border-width: 10px; border-color: purple; } -->
</HEAD> <BODY> <P>
Style Sheet Use for Contextual Selection Criteria: <BR><BR> Notice how the P Element has green text sized at 20 point.
</P>
<BLOCKQUOTE>
There are two Blockquotes in this example. This is the first one and as this Style demonstrates, it has bold and red text for all BLOCKQUOTE Elements.
</BLOCKQUOTE> <DIV><BLOCKQUOTE>
This Style creates a purple border that is 10 pixels thick and overrides the red text setting above but does not change the Bold parameter which applies to all BLOCKQUOTE Elements, even CONTEXTUAL ones. The result is that the text is Bold and Blue for all BLOCKQUOTE Elements inside of DIV Elements like this one.
</BLOCKQUOTE> </DIV>
</BODY> </HTML>
The concept of CONTEXTUAL SELECTION CRITERIA is covered in much more detail later in this chapter starting at page 93.
Special Notice:
Putting Comments inside Style Sheets is different from putting them inside HTML code. First, they are not Elements and cannot go inside their own Tag. The syntax is also different: For CSS Syntax you include Comments like this:
/* This is a comment. It can be on as many lines as you need. */
For JavaScript Syntax you have two options and can include Comments like this: /* This is a comment. It can be on
as many lines as you need. */
// This is a comment that can only be on one line