All rights reserved. No part of this work may be reproduced or transmitted in any form or by any means, electronic or mechanical, including photocopying, recording, or by any information storage or retrieval system, without the prior written permission of the copyright owner and the publisher.
ISBN-13 (pbk): 978-1-4302-3446-3
ISBN-13 (electronic): 978-1-4302-3447-0
Printed and bound in the United States of America (POD)
Trademarked names, logos, and images may appear in this book. Rather than use a trademark symbol with every occurrence of a trademarked name, logo, or image we use the names, logos, and images only in an editorial fashion and to the benefit of the trademark owner, with no intention of infringement of the trademark.
The use in this publication of trade names, trademarks, service marks, and similar terms, even if they are not identified as such, is not to be taken as an expression of opinion as to whether or not they are subject to proprietary rights.
President and Publisher: Paul Manning Lead Editor: Matthew Moodie Technical Reviewer: Kunal Mittal
Editorial Board: Steve Anglin, Mark Beckner, Ewan Buckingham, Gary Cornell, Jonathan Gennick, Jonathan Hassell, Michelle Lowman, Matthew Moodie, Jeff Olson, Jeffrey Pepper, Frank Pohlmann, Douglas Pundick, Ben Renow-Clarke, Dominic Shakeshaft, Matt Wade, Tom Welsh
Coordinating Editor: Corbin Collins
Copy Editors: Marilyn Smith, Sharon Terdeman, Tracy Brown Compositor: MacPS, LLC
Indexer: BIM Indexing & Proofreading Services Artist: April Milne
Cover Designer: Anna Ishchenko
Distributed to the book trade worldwide by Springer Science+Business Media, LLC., 233 Spring Street, 6th Floor, New York, NY 10013. Phone 1-800-SPRINGER, fax (201) 348-4505, e-mail [email protected], or visit www.springeronline.com.
For information on translations, please e-mail [email protected], or visit www.apress.com. Apress and friends of ED books may be purchased in bulk for academic, corporate, or promotional use. eBook versions and licenses are also available for most titles. For more information, reference our Special Bulk Sales–eBook Licensing web page at
www.apress.com/info/bulksales.
The information in this book is distributed on an “as is” basis, without warranty. Although every precaution has been taken in the preparation of this work, neither the author(s) nor Apress shall have any liability to any person or entity with respect to any loss or damage caused or alleged to be caused directly or indirectly by the information contained in this work.
Contents
Contents at a Glance ... iv
About the Author ... x
About the Technical Reviewer ... xi
Acknowledgments ... xii
Introduction ... xiii
■
Chapter 1: Preliminary Information: Before We Get Started ... 1
Some History: What Is Android? ... 2
Advantage Android: How Can Android Benefit Me? ... 3
The Scope of This Book ... 4
What’s Covered ... 4
What’s Not Covered ... 5
Preparing for Liftoff: SDK Tools to Download ... 5
Java ... 6
Eclipse ... 7
Android SDK ... 8
Summary ... 8
■
Chapter 2: What’s Next? Our Road Ahead ... 11
Your Android Development IDE ... 11
Java, XML, and How Android Works ... 13
The Android Application Framework ... 14
Screen Layout Design ... 14
User Interface Design ... 15
Graphics and Animation Design ... 15
Interactivity ... 16
Content Providers ... 16
Intents and Intent Filters ... 17
The Future of Android ... 17
Summary ... 18
■
Chapter 3: Setting Up Your Android Development Environment ... 19
Installing Java, Eclipse, and Android ... 19
Eclipse IDE: The Development Environment ... 21
Android SDK: The Android Tool Kit for Eclipse ... 25
Android Development Tool: Android Tools for Eclipse ... 26
The Android Environment Within Eclipse ... 30
Updating the Android SDK ... 31
Setting Up AVDs and Smartphone Connections ... 33
AVDs: Smartphone Emulators ... 33
USB Smartphone Drivers: External Devices ... 35
Developing on 64-Bit Computing Platforms ... 36
Summary ... 38
■
Chapter 4: Introducing the Android Software Development Platform ... 41
Understanding Java SE and the Dalvik Virtual Machine ... 42
The Directory Structure of an Android Project ... 43
Common Default Resources Folders ... 44
The Values Folder ... 45
Leveraging Android XML (Your Secret Weapon) ... 46
Screen Sizes ... 47
Desktop Clocks ... 47
Using Your Android Application Resources ... 48
Bitmap Images ... 48
Alternate Resource Folders ... 49
Launching Your Application: The AndroidManifest.xml File ... 50
Creating Your First Android Application ... 51
Launching Eclipse ... 51
Creating an Android Project ... 52
Inspecting and Editing the Application Files ... 55
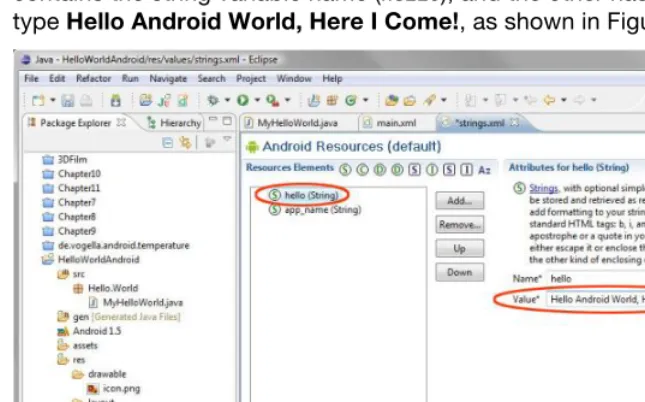
Setting a Variable Value in strings.xml ... 59
Running the App ... 60
Adding an Application Icon ... 61
Summary ... 65
■
Chapter 5: Android Framework Overview ... 67
The Foundation of OOP: The Object ... 68
Some OOP Terminology ... 69
The Blueprint for an Object: The Class ... 70
Providing Structure for Your Classes: Inheritance ... 75
Defining an Interface ... 76
Bundling Classes in a Logical Way: The Package ... 77
An Overview of XML ... 78
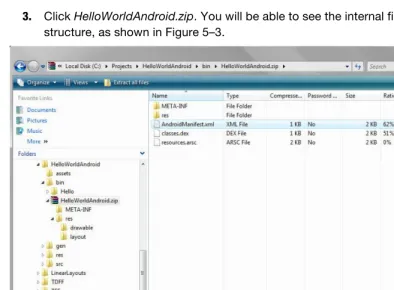
The Anatomy of an Android Application: The APK File ... 79
Android Application Components ... 80
Android Activities: Defining the UI ... 81
Android Services: Processing in the Background ... 82
Broadcast Receivers: Announcements and Notifications ... 82
Content Providers: Data Management ... 83
Android Intent Objects: Messaging for Components ... 84
Android Manifest XML: Declaring Your Components ... 85
■ CONTENTS
■
Chapter 6: Screen Layout Design: Views and Layouts ... 89
Android View Hierarchies ... 89
Using the View Class ... 90
Nesting Views: Using the ViewGroup Class ... 90
Defining Screen Layouts: Using XML ... 92
Setting Up for Your Screen Layout ... 92
Using Linear Layouts ... 93
Using Relative Layouts ... 104
Sliding Drawers: Expanding Your UI ... 108
Using Padding and Margins with Views and Layouts ... 111
Setting Padding in Views ... 112
Setting Margins in ViewGroups ... 112
Summary ... 112
■
Chapter 7: UI Design: Buttons, Menus, and Dialogs ... 115
Using Common UI Elements ... 115
Adding an Image Button to Your Layout ... 116
Adding a Text to Your Layout ... 126
Adding an Image ... 127
Using Menus in Android ... 129
Creating the Menu Structure with XML ... 130
Defining Menu Item Strings ... 131
Inflating the Menu Structure via Java ... 134
Running the Application in the Android Emulator ... 136
Making the Menu Work ... 136
Adding Dialogs ... 140
Using Custom Dialog Subclasses ... 140
Displaying an Alert Dialog ... 140
Summary ... 145
■
Chapter 8: An Introduction to Graphics Resources in Android ... 147
Introducing the Drawables ... 148
Implementing Images ... 148
Core Drawable Subclasses ... 149
Using Bitmap Images in Android ... 149
PNG Images ... 150
JPEG and GIF Images ... 151
Creating Animation in Android ... 151
Frame-based or Cel 2D Animation ... 151
Tween Animation in Android ... 160
Using Transitions ... 166
Creating 9-Patch Custom Scalable Images ... 170
Playing Video in Your Android Apps ... 176
Adding a VideoView Object ... 176
Adding the Java for Video ... 178
Summary ... 181
■
Chapter 9: Adding Interactivity: Handling UI Events ... 183
An Overview of UI Events in Android ... 183
Handling UI Events via the View Class ... 184
Event Callback Methods ... 184
Handling onClick Events ... 185
Implementing an onClick Listener for a UI Element ... 186
Adding an onClick Listener to an Activity in Android ... 187
Android Touchscreen Events: onTouch ... 195
Touchscreen’s Right-Click Equivalent: onLongClick ... 195
Keyboard Event Listeners: onKeyUp and onKeyDown ... 198
Adding the XML for Keyboard Events ... 199
Adding the Java for Keyboard Events ... 199
Context Menus in Android: onCreateContextMenu ... 202
Adding the XML for Context Menus ... 202
Adding the Java for Context Menus ... 204
Controlling the Focus in Android ... 209
Adding the XML for Focus Control ... 210
Adding the Java for Focus Control ... 214
Setting Focus Availability ... 216
Summary ... 216
■
Chapter 10: Understanding Content Providers ... 217
An Overview of Android Content Providers ... 217
Databases and Database Management Systems ... 218
Android Built-in Content Providers ... 219
Defining a Content Provider ... 222
Creating the Content Providers Example Project in Eclipse ... 223
Defining Security Permissions ... 224
Adding Data to the Contacts Database ... 228
Working with a Database ... 231
Querying a Content Provider: Accessing the Content ... 231
Appending to a Content Provider: Adding New Content ... 237
Modifying Content Provider Data: Updating the Content ... 243
Removing Content Provider Data: Deleting Content ... 248
Summary ... 253
■
Chapter 11: Understanding Intents and Intent Filters ... 255
What Is an Intent? ... 255
Android Intent Messaging via Intent Objects ... 256
Intent Resolution: Implicit Intents & Explicit Intents ... 259
Explicit Intents ... 259
Implicit Intents ... 260
Using Intents with Activities ... 261
Writing the Digital Clock Activity ... 266
Wiring up the Application ... 269
Sending Intents ... 271
Android Services: Data Processing in its own Class ... 274
Using Intents with Services ... 274
Creating a Service ... 277
Implementing Our MediaPlayer Functions ... 281
■ CONTENTS
Running the Application ... 283
Using Intents with Broadcast Receivers ... 284
Creating the Timer User Interface via XML ... 285
Creating a Timer Broadcast Receiver ... 286
Configuring the AndroidManifest.xml file <receiver> Tag ... 288
Implementing our Intent ... 289
Running the Timer Application via the Android 1.5 Emulator ... 294
Summary ... 295
■
Chapter 12: The Future ... 297
Widgets: Creating Your Own Widgets in Android ... 297
Location-Based Services in Android ... 299
Google Maps in Android ... 300
Google Search in Android ... 303
Data Storage in Android ... 304
Shared Preferences ... 304
Internal Memory ... 305
External Memory ... 305
Using SQLite ... 306
Device Administration: Security for IT Deployments ... 306
Using the Android Camera Class to control a Camera ... 307
3D Graphics: Using OpenGL ES 1.x in Android ... 307
FaceDetector ... 308
SoundPool ... 308
MediaRecorder ... 309
Summary ... 310
About the Author
Wallace Jackson is the CEO of Mind Taffy Design, a new media content design and production company founded in 1991. Mind Taffy specializes in leveraging free for commercial use open source technologies to provide an extremely compact data footprint, royalty-free, digital new media advertising and branding campaigns for the leading international brands and manufacturers worldwide.
Wallace has been pushing the cutting edge of i3D and Rich Media Application Design via viral digital content deliverables, using under 512KB of Total Data Footprint, for over two decades. He has worked for leading international brands to create custom new media digital campaigns for industry-leading companies, including brand marketing, PR, product demonstration, digital signage, e-learning, AdverGaming, logo design, and end-user training for top Fortune 500 companies.
He has produced new media projects in a number of digital media "verticals" or content deliverable areas, including: interactive 3D [i3D], Rich Internet Applications (RIA) content production, virtual world design, user interface (UI) design, user experience (UX) design, multimedia production, 3D modeling, sound design, MIDI synthesis, music composition, image compositing, 3D animation, game programming, mobile application programming, BrandGame creation, website design, CSS programming, data optimization, digital imaging, digital painting, digital video editing, special effects, morphing, vector illustration, IPTV Programming, iTV application design, interactive product demos, and tradeshow multimedia.
Wallace has created new media digital campaigns for leading international branded manufacturers, including Sony, Samsung, Tyco, Dell, Epson, IBM, Mitsubishi, Compaq, TEAC, KDS USA, CTX International, ADI Systems, Nokia, Micron, ViewSonic, OptiQuest, SGI, Western Digital, Sun Microsystems, ProView, Sceptre, KFC, ICM, EIZO, Nanao, Digital Equipment [DEC], TechMedia, Pacific Digital, ArtMedia, Maxcall, Altrasonic, DynaScan, EZC, Smile, Kinoton GMBH, and many others.
Acknowledgments
My sincere thanks go to:
Matthew Moodie, my lead editor, for his patience and thoughtful guidance in shaping this first edition of Android Apps for Absolute Beginners. Matthew, thanks for guiding me as a new Apress author, and I look forward to future collaborations with you.
Kunal Mittal, my esteemed technical reviewer, for his hard work and insightful suggestions in shaping this edition of the book.
Steve Anglin, my acquisitions editor, for bringing me into the Apress family to write this book. I wouldn’t have done it at all if it were not for you!
Dominic Shakeshaft, editorial director, for overseeing the editorial process while I wrote. I appreciate your help with the higher-level issues involved.
Corbin Collins, my coordinating editor, for listening to all of my miscellaneous and sundry problems during the writing of this book and helping to get them all sorted out.
Marilyn Smith, Sharon Terdeman, and Tracy Brown, my copy editors, for their excellent editing and book-polishing skills and for all the great suggestions for making this a fantastic Android book.
My Editorial Board, including Steve Anglin, Mark Beckner, Ewan Buckingham, Gary Cornell, Jonathan Gennick, Jonathan Hassell, Michelle Lowman, James Markham, Matthew Moodie, Jeff Olson, Jeffrey Pepper, Frank Pohlmann, Douglas Pundick, Ben Renow-Clarke, Dominic
Shakeshaft, Matt Wade, and Tom Welsh, for making sure this is the best book for beginners about the esteemed open source Android operating system.
Contents at a Glance
Contents ... v
About the Author ... x
About the Technical Reviewer ... xi
Acknowledgments ... xii
Introduction ... xiii
■
Chapter 1: Preliminary Information: Before We Get Started ... 1
■
Chapter 2: What’s Next? Our Road Ahead ... 11
■
Chapter 3: Setting Up Your Android Development Environment ... 19
■
Chapter 4: Introducing the Android Software Development Platform ... 41
■
Chapter 5: Android Framework Overview ... 67
■
Chapter 6: Screen Layout Design: Views and Layouts ... 89
■
Chapter 7: UI Design: Buttons, Menus, and Dialogs ... 115
■
Chapter 8: An Introduction to Graphics Resources in Android ... 147
■
Chapter 9: Adding Interactivity: Handling UI Events ... 183
■
Chapter 10: Understanding Content Providers ... 217
■
Chapter 11: Understanding Intents and Intent Filters ... 255
■
Chapter 12: The Future ... 297
Introduction
Over the last two years, Google’s Android operating system (OS) has gone from a virtually unknown open source solution to the current mobile OS market leader among all mobile
handsets, with over one-third of the market share, and it’s still climbing rapidly. Android has even started to dominate the tablet OS marketplace, and is also the foundation for the popular iTV OS known as GoogleTV. There seems to be no end in sight for Android’s rocketing success, which is great news for owners of this book.
I’ve heard a great many people say, “I have a really phenomenal idea for a smartphone application! Can you program it for me!?” Rather than sit back and code all of these applications for everyone, I thought it might be a smarter idea to write a book about how an absolute beginner could code an Android application using open source tools that cost nothing to download and that are free for commercial use, and then leverage that new found knowledge to reach their dream of making their application idea a revenue-generating reality.
Thanks to open source and Google’s Android development environment, Oracle’s Java programming Language, Linus Torvald’s Linux operating system, the Eclipse code editing software, and this book, vaporizing a software product out of thin air, and at no production cost other than your PC and “sweat equity,” is now a complete reality.
The Target: The Programming Neophyte
As you may have inferred from the title, this book assumes that you have never programmed before in any programming language. It is written for someone who has never written a single line of code before, and who is thus unfamiliar with object-oriented programming (OOP) languages such as Oracle’s Java and mark-up languages such as XML. Both of these open source languages are used extensively in creating Android applications.
There are lots of Java and Android books out there, but all of these books assume you have programmed before, and know all about OOP. I wanted to write a book that takes readers from knowing absolutely nothing about programming or knowing how to install a Software
Development Kit (SDK) and Integrated Development Environment (IDE)all the way to being able to program Android applications using Java and XML.
The Weapon: Android, the Innovative Mobile Code
Environment
• Smartphones
• Tablets
• iTV or Interactive Television
The other reason I place my bets on Android is because it is open source, and thus free from royalties and politics. I do not have to submit my Android application to any company and ask permission to publish it, as long as it is not harmful in any way to others. For this reason, and due to the free for commercial use nature of open source software, there is little external risk involved in developing an application for the Android Platform.
How This Book Is Organized
Because this is a book for absolute beginners, we start at the very beginning, showing where to download and how to install the various Android, Java, and Eclipse environments, as well as how to configure these environments and how to set them up for application development and testing. This in itself is no easy task, and must be done correctly, as these tools provide the foundation for all of our Android development, debugging, and testing for the remainder of the book.
Next I will provide you with an overview of where Android came from, why, how, and when Google acquired it, and how it is uniquely structured among software development platforms. I will introduce XML, Java, OOP, and Android concepts soon after that, as well as cover how Android manages its screen layout. We will then move these concepts into use in later chapters in the second half of the book; these chapters explain the most important concepts in Android in their most logical order as they pertain to applications development.
In that second half of the book, we’ll start getting into developing a user interface (UI), as that is the front-end or interface for your user to your Android application. Soon after we'll cover how your UI talks to your application via events processing. To spice up your application’s visual appearance, we’ll get into graphics, animation, and video, and then get into even more advanced topics after that, such as databases and communications.
Finally we will look at some of the advanced features of Android that you will want to visit after finishing the book; these are topics that are too advanced for a first book on Android but which provide some of the coolest features in smartphone development today.
We’ll walk you through all of these topics and concepts with screenshots of the IDE and visual examples and then take you though step-by-step examples reinforcing these concepts. Sometimes we will repeat previous topics to reinforce what you have learned and apply these skills in new ways. This enables new programmers to re-apply development skills and feel a sense of accomplishment as they progress.
The Formula for Success
Learning to develop an Android application is an interactive process between you and the tools and technologies (Eclipse, XML, Java, Android, and so on) that I cover in this book. Just like learning to play a sport, you have to develop skills and practice them daily. You need to work through the examples and exercises in this book, more than once if necessary to become comfortable with each concept.
Just because you understand a concept that doesn’t necessarily mean you will know how to apply it creatively and use it effectively; that takes practice, and ultimately will happen when the “ah-ha” moment occurs, when you understand the concept in context with the other concepts that interconnect with it.
■ INTRODUCTION
to find out why it is not working the way you want, or trying to add new features to it, is a learning process that is very valuable.
The downside of debugging is it can sometimes be quite frustrating to the new developer. If you have never wanted to put a bullet in your computer monitor, you will soon. You will question why you are doing this, and whether you are savvy enough to solve the problem. Programming can be very humbling, even for the most experienced of developers.
Like an athlete, the more you practice, the better you will become at your skill. You can do some truly amazing things as an Android programmer. The world is your oyster. It is one of the most satisfying accomplishments you can have, seeing your app in the Android App Store. However, there is a price, and that price is time spent practicing your coding.
Here is our formula for success:
• Trust that you can pull it off. You may be the only one who says you can’t do this. Don’t tell yourself that.
• Work through all the examples and exercises in this book, twice if necessary, until you understand them.
• Code, code some more, and keep coding – don't stop. The more you code, the better you’ll get.
• Be patient with yourself. If you were fortunate enough to have been a star pupil who can memorize material simply by reading it, this will not happen with Java and XML coding. You are going to have to spend lots of time coding in order to understand what is happening inside the OS.
• Whatever you do: DON’T GIVE UP!
Required Software, Materials, and Equipment
One of the great things about Java, Android and Eclipse is they are available in both 32-bit and 64-bit versions on the three primary operating systems in use today:
• Windows
• Mac
• Linux
The other great thing about Java, Android and Eclipse is that they are free. You can download Android at http://developer.android.com/SDK/. For equipment, any modern computer will do. Fortunately they are only $250 to $500 brand new on www.PriceWatch.com and an OS such as SUSE Linux is free and an amazing development operating system. SUSE Linux V11 can be downloaded at www.OpenSUSE.com and is currently at version 11.4 and very stable.
Operating System and IDE
Software Development Kits
You will need to download the Eclipse IDE from Eclipse and the Android SDK from Google. This is available at http://developer.android.com/SDK/.
Dual Monitors
Chapter
Preliminary Information:
Before We Get Started
This chapter introduces the Android operating system, giving you a little background information to put things into perspective. We’ll visit just how expansive this platform has become in today’s Internet 2.0 environment of portable consumer electronic
devices. Internet 2.0 here refers to the consumption of the Internet over a wide variety of different types of data networks using highly portable consumer electronic devices, including smartphones, tablets, e-book readers, and even new emerging consumer electronic products such as interactive television (iTV).
As this is an introductory book on the subject, not all of the advanced new media-related areas, such as 3D and video streaming, will be covered. Some specifics of what the book will and will not cover are outlined in this chapter.
At the end of the chapter, you’ll learn which tools you need to obtain in order to develop for the Google Android platform, with instructions on how to download them.
Those of you who already recognize the significance of the Android revolution and know which tools are needed to develop Android applications development may want to skip this chapter. However, may be some tidbits in here that could spawn development ideas —so skip along at your own risk!
Just a bit of fair warning: developing reliable applications for Android is not in any way a trivial task. It takes a fair amount of knowledge of both high-level programming
languages such as Java and markup languages like XML. Building useful and engaging new media applications also requires a deep knowledge of related new media
technologies such as 2D imaging, 3D rendering, audio processing, video streaming, GPS localization, and database design.
Don’t expect to learn all of this at one sitting. Becoming a top-notch Android
programmer will take years of dedication and practice, as well as diligent research and trial and error. In this book, you will gain the foundation that you need to build future expertise, as well as learn the work process for eventually building your Android masterpeice.
Some History: What Is Android?
Android was originally created by Andy Rubin as an operating system for mobile phones, around the dawn of this twenty-first century. In 2005, Google acquired Android Inc., and made Andy Rubin the Director of Mobile Platforms for Google. Many think the acquisition was largely in response to the emergence of the Apple iPhone around that time; however, there were enough other large players, such as Nokia Symbian and Microsoft Windows Mobile, that it seemed like a salient business decision for Google to purchase the talent and intellectual property necessary to assert the company into this emerging space, which has become known as Internet 2.0.
Internet 2.0 allows users of consumer electronics to access content via widely varied data networks through highly portable consumer electronic devices, such as
smartphones, touchscreen tablets, and e-books, and even through not so portable devices, such as iTVs, home media centers, and set-top boxes. This puts new media content such as games, 3D animation, digital video, digital audio, and high-definition imagery into our lives at every turn. Android is one of the vehicles that digital artists will leverage to develop media creations that users have never before experienced.
Over the past decade, Android has matured and evolved into an extremely reliable, bulletproof, embedded operating system platform, having gone from version 1.0 to stable versions at 1.5, 1.6, 2.0, 2.1, 2.2, 2.3, and, recently, 3.0. An embedded operating system is like having an entire computer on a chip small enough to fit into handheld consumer electronics, but powerful enough to run applications (commonly known as apps).
Android has the power of a full-blown computer operating system. It is based on the Linux open source platform and Oracle’s (formerly Sun Microsystems’s) Java, one of the world’s most popular programming languages.
NOTE: The term open source refers to software that has often been developed collaboratively by an open community of individuals, is freely available for commercial use, and comes with all of the source code so that it can be further modified if necessary. Android is open source, though Google develops it internally before releasing the source code; from that point on, it is freely available for commercial use.
It is not uncommon for an Android product to have a 1GHz processor and 1GB of fast, computer-grade DDR2 memory. This rivals desktop computers of just a few years ago and netbooks that are still currently available. You will see a further convergence of handheld operating systems and desktop operating systems as time goes on. Some examples are the Windows Mobile 7 and iPhone 4 mobile platforms.
CHAPTER 1: Preliminary Information: Before We Get Started
3
Today, more brand manufacturers use Android as an operating system on their consumer electronic devices than any other operating system.
This development of the OHA is a major benefit to Android developers. Android allows developers to create their applications in a single environment, and support by the OHA lets developers deliver their content across dozens of major branded manufacturer’s products, as well as across several different types of consumer electronic devices: smartphones, iTV sets, e-book readers, home media centers, set-top boxes, and touchscreen tablets. Exciting possibilities—to say the least.
So, Android is a seasoned operating system that has become one of the biggest players in computing today, and with Google behind it. Android uses freely available open source technologies such as Linux and Java, and standards such as XML, to provide a content and application delivery platform to developers as well as the world’s largest consumer electronics manufacturers. Can you spell O-P-P-O-R-T-U-N-I-T-Y? I sure can ... it’s spelled ANDROID.
Advantage Android: How Can Android Benefit Me?
There are simply too many benefits of the Android platform to ignore Android development.First of all, Android is based on open source technology, which was at its inception not as refined as paid technologies from Apple and Microsoft. However, over the past two decades, open source software technology has become equally as sophisticated as conventional development technologies. This is evident in Internet 2.0, as the majority of the consumer electronics manufacturers have chosen Linux and Java over the Windows and Macintosh operating systems. Therefore, Android developers can develop not only for smartphones, but also for new and emerging consumer electronic devices that are network-compatible and thus available to connect to the Android Market. This translates into more sales onto more devices in more areas of the customer’s life, and thus more incentive to develop for Android over closed and PC operating systems.
The Scope of This Book
This book is an introduction to developing applications on Android. It’s intended for absolute beginners—that is, people who have never created an application on the Android platform for a consumer electronic device. I do not assume that you know what Java is or how XML works.
What’s Covered
This book covers the basic and essential elements of Android development, including the following:
The open source tools required to develop for this platform
Where to get these free tools
How to properly install and configure the necessary tools for applications development
Which third-party tools are useful to use in conjunction with the Android development tools
Which operating systems and platforms currently support development for the Android using these tools
The concepts and programming constructs for Java and XML, and their practical applications in creating Android applications
How Android goes about setting up an Android application
How it defines the user interfaces
How it writes to the display screen
How it communicates with other Android applications
How it interfaces with data, resources, networks, and the Internet
How it alerts users to events that are taking place inside and outside the application
How Android applications are published
How Android applications are ultimately sold, downloaded, and updated automatically through the Android Market
Realize that Android has more than 44 Java packages that contain over 7,000 pieces of programming code functionality to allow you to do just about anything imaginable—from putting a button on the screen to synthesizing speech and accessing advanced
CHAPTER 1: Preliminary Information: Before We Get Started
5
NOTE: A package in Java is a collection of programming utilities that all have related and interconnected functionality. For example, the java.io package contains utilities to deal with input and output to your program, such as reading the contents of a file or saving data to a file. Later chapters describe how to organize your own code into packages.
What does this mean? It means that even the most advanced Android books cannot cover the plethora of things that the Android platform can do. In fact, most books specialize in a specific area in the Android APIs. There is plenty of complexity in each API, which ultimately, from the developer’s viewpoint, translates into incredible creative power.
What’s Not Covered
So, what isn’t covered in this book? What cool, powerful capabilities do you have to look forward to in that next level book on Android programming?
On the hardware side, we will not be looking at how to control the camera, access GPS data from the smartphone, and access the accelerometer and gyroscope that allow the user to turn the phone around and have the application react to phone positioning. We will not be delving into advanced touchscreen concepts such as gestures, or accessing other hardware such as the microphone, Bluetooth, and wireless connections.
On the software side, we will not be diving into creating your own Android MySqLite Database Structure, or its new media codecs for digital video and digital audio, and its real-time 3D rendering system (called OpenGL ES). We will not be exploring speech synthesis and recognition, or the universal language support that allows developers to create applications that display characters correctly in dozens of international languages and foreign character sets. We will not be getting into advanced programming such as game development, artificial intelligence, and physics simulations. All of these topics are better suited to books that focus on these complex and detailed topical areas.
Preparing for Liftoff: SDK Tools to Download
In Chapter 3, you’ll learn how to set up a complete Android development environment. We'll focus on Windows, because that's what I use to develop for Android, but the process on Mac or Linux systems is similar, and I'll make sure you can follow along if you prefer either of those systems.
There are three major components of an Android development environment:
Java
Eclipse
Android
In Chapter 3, when you install and configure the packages you are downloading now, you will see that Eclipse requires the Java package to be installed in order to install and run. Therefore, we will walk through downloading them in the order of installation, from Java to Eclipse to Android.
Java
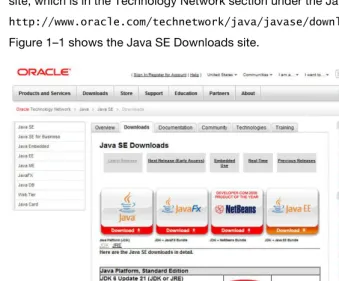
Let’s start with the foundation for everything we are doing, the Java Platform, Standard Edition (Java SE). Java SE contains the core Java programming language.
To download Java SE, simply go to the Java SE Downloads section of Oracle’s web site, which is in the Technology Network section under the Java directory, at this URL:
http://www.oracle.com/technetwork/java/javase/downloads/index.html Figure 1–1 shows the Java SE Downloads site.
CHAPTER 1: Preliminary Information: Before We Get Started
7
Click the Download JDK button to start downloading the Java SE Java Development Kit (JDK). Then choose your platform from the drop-down menu that appears, accept the license, and click the Continue button. You will be shown a link to the download that you selected. Click that link to start the download.
NOTE: Make sure not to download Java Platform, Enterprise Edition (Java EE), JavaFX, or Java with NetBeans.
Eclipse
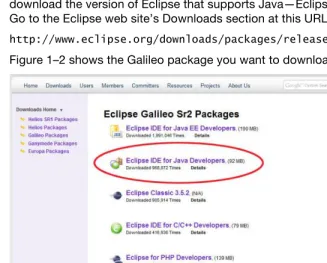
Eclipse is an integrated development environment (IDE), which is a piece of software dedicated to allowing you to more easily write programming code, and run and test that code in an integrated environment. In other words, you write all your code into its text editor, before running and testing that code using commands in Eclipse, without ever needing to switch to another program.
Currently, Android requires the Galileo version of Eclipse (not Helios). You should download the version of Eclipse that supports Java—Eclipse IDE for Java Developers. Go to the Eclipse web site’s Downloads section at this URL:
http://www.eclipse.org/downloads/packages/release/galileo/sr2 Figure 1–2 shows the Galileo package you want to download.
Click the link in the right-hand column that matches your system, and then choose the site from which to download.
Android SDK
The Android Software Development Kit (SDK) is a collection of files and utilities that work hand in hand with the Eclipse IDE to create an Android-specific development tool. To dowload the Android SDK, go to the Android Developers web site, located at this URL:
http://developer.android.com/sdk/index.html
Figure 1–3 shows the Android SDK packages available. Download the latest SDK for the platform you are using.
Figure 1–3. Download the Android SDK.
NOTE: We will walk through installing the other minor packages (shown on the left side of Figure 1–3) using Eclipse in Chapter 3. For now, you don’t need to worry about anything except downloading the main SDK.
Once the Eclipse and Android SDKs are installed and configured, you can further enhance them by installing phone emulators and other add-ins, which are covered in Chapter 3. In that chapter, we will go through the detailed setup of the Eclipse IDE for Android development.
Summary
CHAPTER 1: Preliminary Information: Before We Get Started
9
then, the Android phenomenon has grown to encompass an open industry alliance of the leading manufacturers and become the fastest growing mobile platform today. It is the horse to bet on for the future of not only mobile devices, but also other types of consumer electronic devices, including tablets and iTV.
What you will learn about in this book spans from how and where to get the Android development environment to how to set it up properly, how to configure it optimally, and how to use it to create applications that employ the powerful features of Android. The three basic components you’ll need for Android development are Java, Eclipse, and of course, Android. You can download these various components for free, as described in this chapter. Once the Android SDK is installed in Eclipse, that IDE becomes a comprehensive Android application development environment.
Chapter
What’s Next?
Our Road Ahead
Before getting into the details of Android development, we’ll take a look at our “road ahead.” This chapter provides an overview of what is covered in this book, and why it’s covered in the order we will cover it.
You will see the logical progression throughout the book of how each chapter builds upon the previous ones. We’ll move from setting up the IDE in Chapter 3, to learning how Android works in Chapters 4 and 5, to adding exciting visuals and user interfaces (UIs) in Chapters 6 through 8, to adding interactivity and complexity in Chapters 9 through 11. The final chapter inspires you to keep learning about the more advanced features of the Android platform.
Your Android Development IDE
In Chapter 1, you downloaded the Java SE, Eclipse, and Android SDK packages you need to build an environment for creating Android applications. In Chapter 3, you’ll learn how to set up the tools you’ll use throughout the rest of the book. You’ll do this by creating, step by step, from scratch, the very latest Android IDE out there—right on your very own development workstation.
Note that part of this process must be done while online, so be sure to have your Internet connection active and firing on all cylinders. We’ll be connecting in real time, via Google’s Android Developers web site, to the latest Android application development tools, plug-ins, drivers, and documentation.
Although it might seem that the setup of Java SE, Eclipse IDE, Android’s SDK, and an Android Virtual Device (an emulator that mimics the behavior of a real Android
smartphone) is a topic too trivial for an entire chapter, that task is actually one of the most critical in this book. If your IDE does not work 100% perfectly, your code will not work 100% perfectly. In fact, without a robust and properly configured IDE, you may not be able to develop any code at all!
CHAPTER 2: What’s Next? Our Road Ahead
12
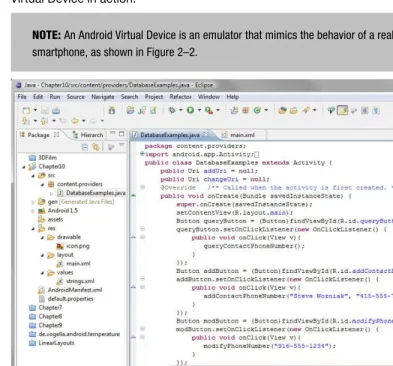
The Eclipse IDE is a sophisticated programming environment that features code
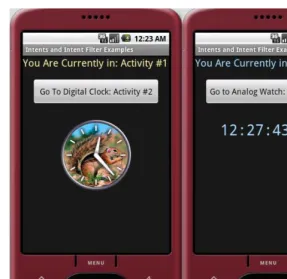
highlighting, device emulation, logic tracing, debugging, and a plethora of other features. Figure 2–1 shows an example of working in Eclipse, and Figure 2–2 shows an Android Virtual Device in action.
NOTE: An Android Virtual Device is an emulator that mimics the behavior of a real Android smartphone, as shown in Figure 2–2.
Figure 2–2. An Android Virtual Device (AVD) in action
In Chapter 3, you will learn how to customize the Eclipse IDE with Android plug-ins, which will morph the tool into one tailored to the particular needs of an Android developer like you. As you will see, setting up this IDE for your specific development goals is not a trivial undertaking.
Java, XML, and How Android Works
As you’ll learn in Chapter 4, an Android application is “stratified.” Its functionality is spelled out in Java code, XML markup, and the Android manifest in a way that is truly unique. This adds a great deal of extensibility, or development flexibility, to applications. Android makes heavy use of an XML-based markup language to define the basic components of an application, especially its visual components. Markup is not
technically code, but rather consists of tags, similar to the HTML tags web developers use to format their online documents. XML is used in Android to define everything from UIs to data access, and even programmatic constructs like Java object definitions and configurations.
CHAPTER 2: What’s Next? Our Road Ahead
14
Android application development, yet this will still give you the ability to make your apps look very elegant and professional. I call it getting the maximum return on your
investment, and XML makes this possible.
The Android Application Framework
By the time you reach Chapter 5, you’ll have built a rock-solid integrated Android software development environment and acquired a basic understanding of the components that make up an application development project (images, text, layout, buttons, code, audio, video, animation, XML, and so on).
In Chapter 5, you’ll learn the unique lingo of Android application design—that is, what the various components of an Android application are called.
I'll outline how Java programming code and XML, along with any new media resources, are compiled, compressed, and bundled into Android’s signature .apk file type (APK stands for Android PacKage), and how logical Android components talk to each other in an application.
The chapter also provides an overview of Android activities, which define the user experience on the screen, and explains how they operate. You’ll learn about Android services as well, which run in the background, separate from the application’s activities, and provide the user with advanced functions through the UI.
You’ll also take an initial look at broadcast receivers, which alert an Android application to events of interest, such as the activation of a camera on an Android device or an incoming phone call. In fact, your app can even send out its own broadcasts, if there is some reason to let other applications know of a change in state in one of your
application’s data constructs.
The chapter finishes up with a look at content providers, which are often databases filled with information, such as a contact list, that applications may want to access to provide functionality of their own. Android ships with a number of preconfigured content
providers, and you can also write your own.
Screen Layout Design
By Chapter 6, you will have a better idea of how the Android operating system works internally, and how it wants to see applications put together. You’ll be ready to design graphics, UIs, and even user experiences for your applications.
You’ll do all of this using screen constructs called views and view groups (grouped views) and flexible layout containers, which can all be nested within each other to create the UI your application needs.
also extend these classes to create your own custom View objects and Layout
containers when you need a more complex design. These containers ultimately hold the other visual and UI content in your application in its proper place, and thus are the foundation of your application design. You’ll want to learn these screen view and layout concepts thoroughly, as they are core to implementing everything else that Android can do.
You’ll revisit XML yet again in this chapter, and learn how it allows you to define
complex screen layouts and UI designs without writing a single line of Java code. You’ll learn about the different types of layout containers, and how each can be useful in different UI design scenarios, and even code a really cool application that is written almost completely with XML.
User Interface Design
In Chapter 7, we’ll start building usable UI designs, using the XML foundation of the previous chapters, via your screen layout and view control.
We’ll cover the three main screen resolutions that you can design UIs for under Android and which options you have for providing high-, medium-, and low-resolution graphics to allow Android to fit your application to each major screen size. We’ll also cover the creation of standardized Android icons for use in your UI designs.
Android has a large number of UI elements, such as buttons, text fields, radio buttons, check boxes, menus, alert dialogs, and all of those familiar controls that allow users to interface with application software. These items can be implemented both in Java and in XML.
In Chapter 7, we’ll design and code a usable application. We’ll design views, layouts, and UI elements, as well as attach their XML design elements to Java code that performs some simple functions when the UI elements are used by the application’s users.
We’ll look at the differences between option menus and context-sensitive menus, as well as submenus for both of these types of menu constructs. We’ll also review different types of dialog boxes, such as alert dialogs, progress dialogs, and dialogs for picking dates and times.
Graphics and Animation Design
In Chapter 8, we’ll start adding application media elements through images, video, and animation. These elements are key to making your application look great across all Android phones.
CHAPTER 2: What’s Next? Our Road Ahead
16
In Chapter 8, we’ll explore the following:
How to use bitmap images in Android applications
How to animate bitmaps and vectors to create some pretty realistic effects
The different screen sizes, and how to create icons and graphics that scale between widely varying screen resolutions
An interesting user-controlled image-scaling technology called 9-patch The Android media player functionality, which allows you to control both video and audio with minimal programming logic
How Android allows you to control images directly
How to draw directly to the underlying canvas via Java code
Interactivity
In Chapter 9, we’ll talk about adding interactivity to applications, so that they respond to user input and actually do something. You do this by handling UI events. We’ll look at the most efficient way of handing events that are triggered by your users using the UI elements that are attached to the views and layouts defined in your XML files. The following topics are covered:
Event listeners, which execute the proper code in response to an event that is triggered when a UI element is used by the user (for instance, you can run some code when a user touches a UI element or presses a key on the keyboard)
Default event handlers that allow you to build event handling right into your UI elements
Touch mode and navigation via the directional keys and the trackball, and the differences between these, mainly having to do with a concept called focus
How focus movement is handled in Android
How the operation of focus in Android can be controlled via Java code How focus preferences can be set in your XML files
Content Providers
Content providers are the only method Android provides for sharing data across applications, which is why they are important enough to merit their own chapter. We’ll take a close look at the features of Android that allow you to query data from items common to the Android platform, such as images, video, audio, and contacts.
Additionally, you can create your own content providers or add data to one. You’ll see how to create a content resolver so that you can interface with whatever content providers you choose (and have permissions to access).
You’ll learn about how content providers expose their data via data models similar to databases, and how to use cursors to traverse the database in various ways.
Finally, we’ll investigate URI objects and how to use them to identify and access data sets. Each set of data in the database will have its own Uniform Resource Identifier (URI), which is similar to an HTTP URL.
Intents and Intent Filters
In Chapter 11, we are going to tackle one of the more complex concepts in the Android environment: intents. Intents are asynchronous messages (members of the Intents class) that travel between Android’s activities, services, and broadcast receiver
components. Asynchronous means not synchronized; that is, messages can be sent and received independently (not in sync, but without pattern or reason) from each other. Using intents allows you to take your current Android applications to an entirely new level of complexity. Prior to this chapter, you’ll have added functionality to your application by accessing the cool functions that Android provides. But all easy things must come to an end, so they say.
Armed with intents (no pun intended), you can create advanced programming logic of your own that ties together everything you have learned in the previous chapters. This allows for far more powerful and useful programming constructs, and takes you from beginner to intermediate.
You’ll learn how to spawn Intent objects that can carry highly customized messages back and forth between your Android UI (activities) and your programming logic (services) for instance, as well as to and from broadcast receiver components.
We’ll also look at intent resolution and intent filters. These allow you to filter out events that your apps do not need to be concerned with, allowing you to optimize the progress of internal communications.
The Future of Android
CHAPTER 2: What’s Next? Our Road Ahead
18
The 3D engine inside Android is called OpenGL ES 1.2. You’ll see how it allows you to create real-time rendered 3D games and applications. And I’ll give you some great resources to find out more about this powerful 3D engine.
The SQLite database exists inside the Android operating system. We’ll uncover the power it offers in allowing client-side databases to be created and used as content providers.
Smartphone hardware such as the high-definition camera, GPS, accelerometer, and microphone can be used to capture and digitize real-world events around us as images, audio, and gestures, and turn them into data that can be used in your applications. Computer programming has never been so powerful and innovation-oriented.
Inter-Android communication is another hot area, especially since Android devices can be used as wireless hubs, giving access to many. We will look at Android’s integrated Bluetooth APIs, which allow Android applications to wirelessly connect with any Bluetooth device, and even provide for multiple connections.
We’ll cover the concept of creating app widgets, or miniature applications that can be embedded in other applications (think: the Android home screen) and receive real-time updates (for things like clocks, radios, and weather stations).
Finally, we’ll consider the popular area of locations and maps using the Android location package and Google Maps as an external data library. These tools are valuable for Android application development, due to the mobile nature of the smartphone and the fact that it has a built-in GPS.
Summary
As you can see from this chapter, this book will take you on a wild journey through the various parts and components of the Android operating environment—from UI design, to new media assets, to database access, to more complicated background services and interapplication messaging. We’ll be dealing with adding some pretty cool elements to Android applications, mainly by leveraging the power of “design via XML” and some of Android’s built-in features.
Chapter
Setting Up Your Android
Development Environment
It’s time to get your hands dirty. In this chapter, starting from scratch, you’ll equip a computer system to develop Android applications. You’ll first install Oracle’s (formerly Sun’s) Java SE JDK and the Java Runtime Environment, then the Eclipse IDE, and finally the Android SDK, the tool set that provides Eclipse with the tools you’ll need to create Android apps. Sound convoluted? It is. After all, this is high-end software development, remember. What these are and how they relate to each other will become clear as you proceed through this chapter.
Once the installation is complete, you’ll finish up by fine-tuning your Android
environment within Eclipse to include smartphone emulators, which let you test your app with a representation of an Android phone on your workstation. You’ll also have USB driver support, which makes it possible for you to test your applications on a real-live Android smartphone. With these tools in place, you’ll be ready to rock and roll, and can begin to explore how Android does things.
Installing Java, Eclipse, and Android
If you have not downloaded the required software as described in Chapter 1, you will need to do that before proceeding, so those packages are ready to install. Here, we will walk through installing Java SE and the JRE, Eclipse 3.5 (Galileo) or 3.6 (Helios)both of which are supported by the Android SDK, the Android SDK, and the Android
Development Tools. For the examples in this chapter (and book), we will install the software on a Windows system.
Figure 3–1. Installing the JDK
4. After installing the JDK files, the installer will suggest a folder for the JRE, usually in C:/ProgramFiles/Java/jre6. Simply hit the Next button to accept the default setting.
5. Once the JDK and JRE have finished installing, the final screen will tell of a successful installation and provide a button for you to register the product online if you are connected to the Internet. It is most likely a good idea to register JDK (as well as the Eclipse and Android SDK), so that you can receive updates regarding its development progress.
Eclipse IDE: The Development Environment
Now that you have successfully installed Java on your computer, you can install Eclipse Galileo (Version 3.5) or Helios (Version 3.6), which is the IDE you will use for your Android projects. You need to have Java installed before you install and run Eclipse because Eclipse is written in Java.
CHAPTER 3: Setting Up Your Android Development Environment
22
In Chapter 1, you downloaded Eclipse from the Eclipse web site, so the Eclipse .zip file is on your desktop and ready to install. Eclipse is a little harder to install than Java, because it does not have an installation program (an .exe file in the case of Windows), but instead has a folder structure of files inside a .zip archive. The trick is to extract this file structure properly onto your hard drive, so that Eclipse can find the files it needs, and they are in the folders where it is going to look for them.
Follow these steps to install Eclipse:
1. Double-click the Eclipse Galileo or Helios .zip file to launch WinZip extractor, as shown in Figure 3–2 (notice that the Extract button is highlighted).
TIP: If you don’t have WinZip, a free alternative called PKZIP is available for Windows, Mac, and Linux. Simply Google “PKZIP” and download the free version for your operating system type now. Got it? Good. If you have Windows Vista or Windows 7, you can also open .zip files natively using the Windows Explorer application, so you don’t need to download an extractor utility.
2. Click Extract, and make sure that the location to extract the Eclipse file structure is the root of your C:\ disk drive, as shown in Figure 3–3. This will put Eclipse into a folder structure (defined in the .zip file) under c:\eclipse, which is exactly where other software (in the case the Android SDK) is going to look for (and find) it. Note that you must leave the Use folder names check box checked for this to work properly.
Figure 3–3. Unzipping your Eclipse package with “Use folder names” checked
3. Go to Windows Explorer and click the c:\eclipse folder to view its file structure. Look for a file called eclipse.exe, which is the actual Eclipse program
“executable” (hence .exe) file that you’ll want to use to launch the IDE.
inside Eclipse, and you’ll be ready to develop Android applications ad infinitum. Cool beans.
Android SDK: The Android Tool Kit for Eclipse
The last major step in putting together an Android development environment is to install the latest Android SDK (currently, version 10).
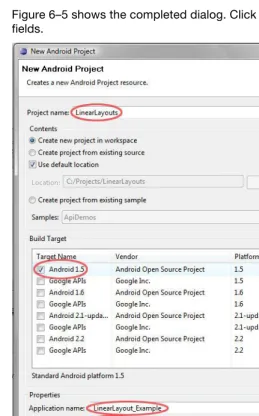
In Chapter 1, you downloaded the Android SDK from the Android web site, so the file android-sdk_r10-windows.zip is on your desktop and ready to extract. This process is quite similar to the installation of the Eclipse IDE. As you did with Eclipse, extract the Android SDK to your C:\ root folder now, as shown in Figure 3–6.
Figure 3–6. Unzipping the Android SDK onto your hard disk drive
Notice that the software installs into a folder called C:\android-sdk-windows. Because this is the folder where other software, like Eclipse, will look for the Android SDK, it is best to use the folder name Google already set for it in the .zip file.
CHAPTER 3: Setting Up Your Android Development Environment
26
What you need to do now is show Eclipse where the Android SDK is located so that Eclipse can make the Android SDK functionality an integrated part of the Eclipse IDE. This is done by installing the Android Development Tool plug-in for Eclipse, which we will do in the next section.
Android Development Tool: Android Tools for Eclipse
It’s time to fire up Eclipse and add the Android Development Tool (ADT) plug-in to the IDE.NOTE: To perform the rest of the configuration and updates described in this chapter, you need to be connected to the Internet.
Follow these steps to perform the installation:
1. Click the Eclipse Quick Launch bar icon to start Eclipse.
2. Accept the default workspace location (it will be under your Documents folder). If a graphic with some circular buttons comes up, select
Workspace to enter the programming workspace environment.
3. From the main Eclipse menu, select Help Install New Software…, as shown in Figure 3–7.
4. In the Install dialog that appears, click the Add button at the upper right, as shown in Figure 3–8.
Figure 3–8. Adding the Android plug-in site to Eclipse
5. In the Add Site dialog that appears, enter the name Android Plug-In in the Name field. In the Location field, enter one of the following:
For the secure site, https://dl-ssl.google.com/android/eclipse/ For the nonsecure site, http://dl-ssl.google.com/android/eclipse/
CHAPTER 3: Setting Up Your Android Development Environment
28
6. Once you’ve added the new Android plug-in option, its name appears at the top of the Install dialog, and after a few moments, a hierarchy of Developer Tools options populates the center of the Install dialog. Select the first (highest) level, called Developer Tools (which will select them all), as shown in Figure 3–9. Then click Next to continue with the ADT installation. The plug-in proceeds to calculate installation
requirements and dependencies for several seconds.
NOTE: When you select Android Plug-In as the add-in, Google provides a URL, which appears next to its name in the Install dialog.
Figure 3–9. Installing the ADT plug-in in Eclipse
8. Select the Accept Terms of License Agreement radio button, and then click Finish. The Android development environment will be installed and updated from the Google Android web site. If a message comes up that asks you to approve an unsigned certificate, click OK to continue the installation, which will leave you with a screen like the one shown in Figure 3–10.
Figure 3–10. Approving the unsigned content
9. Select the check box next to the Eclipse Trust Certificate and select OK.
CHAPTER 3: Setting Up Your Android Development Environment
30
The Android Environment Within Eclipse
Once Eclipse restarts, the final step is to configure the ADT plug-in to point to your Android SDK installation. Follow these steps:
1. In Eclipse, select Window Preferences. Click the Android node on the left to select the Android Preferences option.
2. In the Preferences window, use the Browse button to locate the
android-sdk-windows folder and select it, as shown in Figure 3–11. Click the OK button, and the Android SDK will be part of Eclipse, meaning the Android environment within Eclipse will be configured.
NOTE: You do not need to restart Eclipse for the Android SDK to become a part of it, because the SDK just needs to be referenced in Eclipse in case any of the SDK tools need to be called by Eclipse.
3. Select Help Check for Updates to make sure you have the latest versions of everything.
Your Android development environment is now installed. Next, you will update the software to make sure that you have the most recent releases available.
Updating the Android SDK
SDK updates often offer new elements that have been added since the SDK was originally released, so this step brings you up to the most current status, in real-time relative to today. Eclipse makes it easy to perform these updates though the Android SDK and AVD Manager window. Follow these steps to open the window and get updates:
1. Click the Android SDK and AVD Manager icon (it’s the one with the cute green Android robot peeking over the edge of a down arrow, located at the top left of the Eclipse toolbar) or select Window Android SDK and AVD Manager
2. In the Android SDK and AVD Manager window, click Available Packages to display the updated packages available to you for download, as shown in Figure 3–12.
CHAPTER 3: Setting Up Your Android Development Environment
32
3. Click the top check box in the Sites, Packages and Archives panel. This selects all of the listed packages for installation. Then click the Install Selected button.
NOTE: You are installing a whole lot of development power here. In the example shown in Figure 3– 12, this includes every SDK and API from 1.5 through 3.0, as well as documentation and even the USB Driver package, revision 4, which you’ll use in an upcoming section. The reason we also install the older versions of Android is that we usually want to develop our application with the earliest version of Android to obtain the most backward-compatibility and the widest user base possible.
4. On the next screen, make sure all packages, documentation, and APIs, as well as the USB drivers, are selected with a green check mark. If any of the entries have a black question mark next to them, click to select those entries, and then select the Accept radio button option (circled in Figure 3–13) to replace the black question mark with a green check mark.
5. When the all the packages are selected, click Install. The installation process may take some time, even on a fast Internet connection. My updates took about 50 minutes at 200 Kbps. Yes, this is a significant amount of data you are getting to update your Android development environment.
6. At the end of the installation, the installer may ask you if it is OK to restart the Android Debug Bridge (ADB). Reply Yes, and you are finished updating everything Android. Now when you select Installed Packages in the Android SDK and AVD Manager window, all of the packages you just installed will be listed there.
At this point, you have downloaded, configured, and updated hundreds of megabytes of Android-related development software for Java and Eclipse. You now have a finely tuned, up-to-date, open source, professional Android software development environment on your system and ready for use.
We have made significant progress at this point. Let’s finish up by installing some emulators for our testing, as well as USB drivers for connecting to a physical Android handset.
Setting Up AVDs and Smartphone Connections
The Android development environment ships with AVDs, which let you run your applications on a graphical representation of an Android handset, otherwise known as an emulator. You’ll want to install one now, before you begin to write code, so that you can test your apps.AVDs: Smartphone Emulators
To install an AVD, you use the same Android SDK and AVD Manager window you used in the previous section. Here are the steps:
1. To open the Android SDK and AVD Manager window, click the icon located at the top left of the Eclipse toolbar (see Figure 3–12, shown earlier) or select Window Android SDK and AVD Manager.
Figure 3–15. The Android 1.5 emulator added to the list of existing AVDs
USB Smartphone Drivers: External Devices
Since the latest USB driver for Android was installed as part of your environment upgrade in a previous section, you’ve already taken care of installing the most up-to-date USB drivers to interface the Eclipse IDE with your Android smartphone.
It is important to note that this driver is only for Windows. Using the external Android smartphone on Mac and Linux does not require this driver download.
CHAPTER 3: Setting Up Your Android Development Environment
36
Developing on 64-Bit Computing Platforms
Since Android development does not require a 64-bit computer like other advanced development types such as 3D and audio synthesis do, most of us are going to use a standard 32-bit operating system (possibly on a 64-bit capable computer) to run and develop with Eclipse.
The primary advantage of running a 64-bit operating system, such as Windows 7 64-bit, is that you can address more than the 3.3GB physical memory limit imposed
(mathematically) by a 32-bit operating system environment. Why mathematically? Because a 32-bit system allows 3.3 billion as its largest number, and cannot count any higher, and that includes memory addressing. Fortunately, the Android Eclipse
development environment does not need gigabytes of memory in order to function, so you do not need a 64-bit system or operating system to develop for Android.
If you have a computer with 6GB or 8GB of memory, you are probably running a 64-bit operating system. Therefore, you will need to download 64-bit (compatible) versions of Java and Eclipse and substitute these packages for the 32-bit versions used in the examples in this chapter. Other than the version you are installing or extracting, there should be no difference from the process described in this chapter to install and configure the Android environment. (I have Android development environments working on both 64-bit Windows 7 and 32-bit Vista systems, so I know the process works as far as JDK 6u24 and Eclipse Galileo or Helios are concerned.)
To download the 64-bit version of the Java SE JDK, go to the following URL: https://cds.sun.com/is-bin/INTERSHOP.enfinity/WFS/CDS-CDS_Developer- Site/en_US/-/USD/ViewProductDetail-Start?ProductRef=jdk-6u24-oth-JPR@CDS-CDS_Developer
Your next major step is to install the Android SDK, which contains all of the tools and utilities that you need to develop Android applications. Once the SDK is installed on the hard drive, you go into Eclipse and point Eclipse to the Android SDK installation
directory, so that Eclipse and Android’s SDK can work seamlessly hand in hand.
After installation, you can use Eclipse to check on the Internet for the very latest versions of the Android SDK tools. You can install those you’ve found (which takes a while even on a fast connection). Finally, you want to add an AVD on which to test your
applications.
You also can include 64-bit software addresses, on the off chance you are using a 64-bit development system. To do this, just download and install the 64-bit versions of the software.