Designing Forms for
Scott Roberts
Hagen Green
Designing Forms
for Microsoft Office
InfoPath and
Forms Services 2007
have been printed with initial capital letters or in all capitals.
The .NET logo is either a registered trademark or trademark of Microsoft Corporation in the United States and/or other countries and is used under license from Microsoft.
The authors and publisher have taken care in the preparation of this book, but make no expressed or implied war-ranty of any kind and assume no responsibility for errors or omissions. No liability is assumed for incidental or con-sequential damages in connection with or arising out of the use of the information or programs contained herein. The publisher offers excellent discounts on this book when ordered in quantity for bulk purchases or special sales, which may include electronic versions and/or custom covers and content particular to your business, training goals, marketing focus, and branding interests. For more information, please contact:
U.S. Corporate and Government Sales (800) 382-3419
For sales outside the United States please contact: International Sales
Visit us on the Web: www.awprofessional.com Library of Congress Cataloging-in-Publication Data Roberts, Scott, 1969–
Designing forms for Microsoft Office Infopath and forms services 2007 / Scott Roberts, Hagen Green. p. cm.
Includes bibliographical references and index. ISBN 0-321-41059-9 (pbk. : alk. paper)
1. Microsoft InfoPath. 2. Business—Forms—Computer programs. I. Green, Hagen. II. Title. HF5371.R63 2007
651'.29028553—dc22
2006036478 Copyright © 2007 Pearson Education, Inc.
All rights reserved. Printed in the United States of America. This publication is protected by copyright, and per-mission must be obtained from the publisher prior to any prohibited reproduction, storage in a retrieval system, or transmission in any form or by any means, electronic, mechanical, photocopying, recording, or likewise. For information regarding permissions, write to:
Pearson Education, Inc. Rights and Contracts Department 75 Arlington Street, Suite 300 Boston, MA 02116
Fax: (617) 848-7047 ISBN 0-321-41059-9
It is due to your constant love and support that I was able to
complete this project. Thank you for always being there for me
no matter what project I undertake. I love you all a million times
more than you could ever possibly know.
—Scott
To Jaime, my love and my life, for putting up with my two jobs
and helping me stay strong through the end. And to my parents,
Stuart and Christine, for their perseverance in love and for being
List of Figures xxi List of Tables xlvii Foreword li Preface lv
About the Authors lxv
PART I
Designing Forms 1
1
Introduction to InfoPath 2007 3
2
Basics of InfoPath Form Design 25
3
Working with Data 85
4
Advanced Controls and Customization 155
5
Adding Logic without Code 215
6
Retrieving Data from External Sources 241
7
Extended Features of Data Connections 297
8
Submitting Form Data 327
9
Saving and Publishing 397
10
Building Reusable Components 431
11
Security and Deployment 455
12
Creating Reports 553
13
Workflow 613
14
Introduction to Forms Services 665
PART II
Advanced Form Design 727
15
Writing Code in InfoPath 729
16
Visual Studio Tools for Microsoft Office InfoPath 2007 833
17
Advanced Forms Services 865
18
Hosting InfoPath 965
19
Building Custom Controls Using ActiveX Technologies 1037
20
Add-ins 1073
21
Importers and Exporters 1115
Appendix: Further Reading 1149
List of Figures xxi List of Tables xlvii Foreword li Preface lv
About the Authors lxv
PART I
Designing Forms 1
1
Introduction to InfoPath 2007 3
What Is InfoPath? 3InfoPath 2003 7
InfoPath 2003 Service Pack 1 12 InfoPath 2007 17
What’s Next? 24
2
Basics of InfoPath Form Design 25
Getting Started 25
What Is a Form Template Anyway? 26 Design a Form Template Dialog 27 Creating a New Blank Form Template 30 Designing the Layout of Your Form 34
Using the Layout Task Pane 34 Color Schemes 39
Using Controls 41
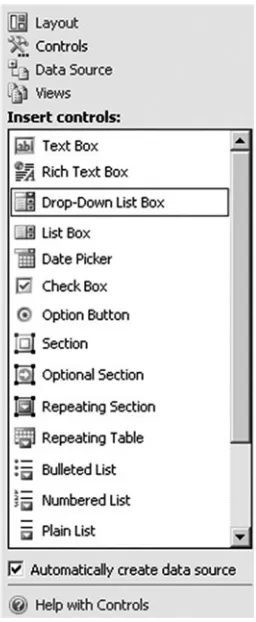
Standard Controls 43
Repeating and Optional Controls 49 File and Picture Controls 67
Creating Multiple Views 73 Advanced Formatting 76
Control Formatting 78 Format Painter 79
Formatting Multiple Controls 80
What’s Next? 83
3
Working with Data 85
Getting Started 85 Data Binding 86Creating the Data Source Automatically 86 Understanding Data Source Details 93
Data Source Field and Group Properties 95 Name Property 95
Data Type Property 98 Cannot Be Blank Property 101 Repeating Property 102 Default Value Property 106 Data Source Details 108
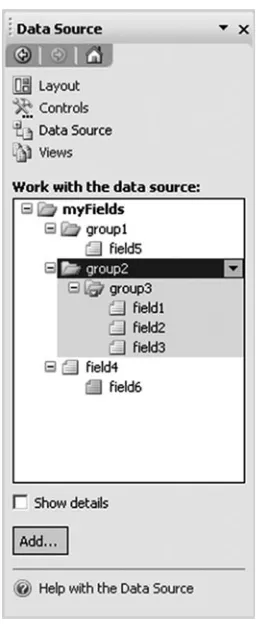
Manually Editing the Data Source 110 Adding Nodes 116
Moving Nodes 119 Deleting Nodes 121 Referencing Nodes 122
Starting with Your Own Data Source 124 Advanced Data Binding 137
Understanding Data Binding 138 Design-Time Visuals 149
4
Advanced Controls and Customization 155
Getting Started 155Advanced Controls 156 Hyperlink 156
Expression Box 158 Vertical Label 163
Scrolling Region and Horizontal Region 164
Choice Group, Repeating Choice Group, and Choice Section 167 Repeating Recursive Section 171
Custom Controls 173 Control Properties 174
Data Tab 176 Display Tab 182 Size Tab 189 Advanced Tab 193
Creating Master/Detail Relationships 198 Advanced Customizations 204
Editing Default Values 204 Customizing Commands 210 What’s Next? 213
5
Adding Logic without Code 215
Getting Started 215Conditional Formatting 215 Data Validation 222
Adding Data Validation to a Form Template 223 Pattern Matching 227
Rules 229
Logic Inspector 235 What’s Next? 240
6
Retrieving Data from External Sources 241
Getting Started 241 Data Connections 242
Conceptually Understanding Data Connections and Data Sources 242 All Data Connections Are Not Created Equal 244
Creating a Data Connection 245
XML Files 247 Databases 256
Setting Up a Connection to a Database 257
Integrating the Database Connection into the Form Template 268
Web Services 273
What Is a Web Service? 273
Creating a Simple Web Service Using Visual Studio 2005 274 Using the Simple Web Service 279
InfoPath Web Services 280 Web Service Repository 291
SharePoint Libraries and Lists 292 What’s Next? 296
7
Extended Features of Data Connections 297
Getting Started 297Extended Features of Web Services 298 Searching with UDDI 299
ADO.NET Web Services 300
Secondary Data Source Binding 307 Designing the Form Template 307 Filling Out the Form 310
Offline Mode Query Support 312
List Box Controls Connected to Secondary Data Sources 316 Showing Secondary Data in a List Box Control 317
Using the Main Data Source for List Box Items 321 Filtering List Box Items 323
What’s Next? 325
8
Submitting Form Data 327
Getting Started 327Why Submit? 328
Submitting Forms 334
Introduction to Submit Data Connections 334
What Submit Method Is Best for My Form Template? 335 Submitting via E-Mail 337
Submitting to a Database 341 Submitting to a Web Service 344
Including Text and Child Elements Only 358 XML Subtree, Including the Selected Element 361 Entire Form 362
Submitting Digitally Signed Form Data 365
ADO.NETDataSetSubmit 369
Designing a Form Template with a Dataset 370 Filling Out the Dataset Form 375
Submitting to a SharePoint Library 377 Submitting to a Web Server via HTTP 380 Custom Submit Using Form Code 383 Custom Submit Using Rules 384
Submitting to a Hosting Environment 391
Submit Options 392 What’s Next? 395
9
Saving and Publishing 397
Getting Started 397Saving and Publishing a Form Template with InfoPath 398 Network Locations 400
SharePoint or Forms Services 404 E-Mail 413
Installable Form Templates 417 Common Conveniences 420
Saving Templates as Extracted Source Files 421 Previewing Form Templates 424
10
Building Reusable Components 431
Getting Started 431Designing a New Template Part 432 Template Part Design Mode 434 Using a Template Part 438
Adding a Template Part to the Controls Task Pane 438 Inserting a Template Part into a Form Template 442 Updating Template Parts 447
Updating a Form Template That Contains the AddressBlock Template Part 449
Locating All Template Parts That Need to Be Updated 451 Customizing Existing Template Parts 452
What’s Next? 454
11
Security and Deployment 455
Getting Started 455
Introduction to InfoPath Security 456 InfoPath Security Levels 458
Designing Security into Form Templates 459 Restricted Security Level 460
Domain Security Level 467 Automatic Security Level 482 Full Trust Security Level 484
Trust and Designer Lockdown 499 Trust Center 499
Designer Lockdown 504 Digital Signatures 507
Using Digitally Signed Data in Forms 509 Allowing Only One Signature 527
Using Independent Signatures (Co-signing) 531 Setting Up Counter-Signatures 532
Digital Signatures in the XML Data and Schema 533 Information Rights Management 538
Permission with Document Libraries 548
What’s Next? 552
12
Creating Reports 553
Getting Started 553 Merging Forms 554
Merging Forms in InfoPath 555
Design Recommendations for Merging Forms 561 Customizing Merge Behavior in Design Mode 564 Custom Merge XSL (Advanced) 580
Printing 586 Print Views 586 Headers and Footers 589 Multiple View Printing 592 Word Print Views 596
Print Views in Browser-Enabled Forms 603 Exporting Forms 605
What’s Next? 612
13
Workflow 613
Getting Started 613 User Roles 614Creating User Roles 616
Determining a User’s Role When Filling Out a Form 620 User Roles in Action 621
Role-Based Views 631
Workflow with Microsoft Office SharePoint Server 2007 634
14
Introduction to Forms Services 665
Getting Started 665What Is InfoPath in the Browser? 666 Why Use the Browser? 668
What Is Forms Services? 669
Installing and Configuring Forms Services 671 Installing Forms Services 673
Configuring Forms Services 675 Is Forms Services Installed? 677
Publishing a Form Template to Forms Services 678 Getting Familiar with Browser Forms 682
Creating a New Form 682 Toolbar 683
Controls 688
Supported Web Browsers 690
Designing a Browser-Enabled Form Template 690 Design Once 692
Design Checker 693
Browser-Enabled Forms without the Design Checker 701 Designing Browser-Enabled Template Parts 701
Getting Familiar with the Browser Form Experience 701 SharePoint Integration 705
Document Libraries 705 Site Content Type 709 Data Connections 710
Data Connection Libraries 711
Security and Data Connection Libraries 713 Filling Out Browser Forms 714
Configurations Supported by Forms Services 715 URL-Based Options 716
Mobile Support: Smart Phone and PDA 720 Mobile Compatibility 722
Part II
Advanced Form Design 727
15
Writing Code in InfoPath 729
Getting Started 729
Writing Code Behind a Form 730 Settings Related to Adding Code 732 Adding Code to a Form Template 737
Filling Out and Debugging a Form with Code 738 The InfoPath Object Model 741
Form Events 742 XML Data Events 744
UsingXPathNavigatorObjects 777 Registering Event Handlers 780 Script and the Custom Task Pane 782
Programming InfoPath . . . in Action! 790 The MOI Consulting Request Form 791
Filling Out the MOI Consulting Request Form 792 Designing the MOI Consulting Request Form 797 What’s Next? 832
16
Visual Studio Tools for Microsoft Office InfoPath 2007 833
Getting Started 833What Is VSTO? 834
Bringing InfoPath into Visual Studio 835 Installing VSTO 836
Designing a Form Template with VSTO 836 Start Designing a Form Template 837
17
Advanced Forms Services 865
Getting Started 865Controls and Browser Optimizations 867 Postback Settings 871
The Update Button 872
Designing Accessible Forms 874 Form Code 875
Executing Form Code in the Browser 876 Circumventing Browser-Enabled Limitations 878 Detecting the Browser or the InfoPath Client 883 Form Code Compatibility with Forms Services 884 SharePoint Integration 885
Advanced Publishing 888 Managing Form Templates 904
Configuring InfoPath Forms Services 906 Configuring Shared Services and Providers 907 Filling Out a Form on a SharePoint Page 928 Data Connections 929
Data Connections Administration Settings 931 Centrally Managed Connection Library 936 Authentication Considerations 943
E-Mail Data Connections 948
Performance Tips and Best Design Practices 950 Form Template Deployment 951
Views 952 Form Code 953
Reduction of Form Postbacks 953 Data-Heavy Features 954 Data Connections 956 Form View State 956
18
Hosting InfoPath 965
Getting Started 965 Hosting Scenarios 966Document Information Panel 966
Creating an InfoPath Host Application 977 Creating an InfoPath Host Application in .NET 979 Host to InfoPath Communication 990
Handling Events from the Form 1001 Using the Host Property 1004 Submitting a Form to the Host 1007
Hosting the InfoPath Form Control in a Web Browser 1011 Host to InfoPath Communication 1020
InfoPath to Host Communication 1028 What’s Next? 1036
19
Building Custom Controls Using ActiveX Technologies 1037
Getting Started 1037
Installing and Using ActiveX Controls 1038
Adding an ActiveX Control to the Controls Task Pane 1038 Property Pages 1047
Building Custom Controls for InfoPath Using ActiveX 1049 Building an ActiveX Control for InfoPath Using C++ 1049
Building an ActiveX Control for InfoPath Using C# 1061 What’s Next? 1072
20
Add-ins 1073
Getting Started 1073Introduction to COM Add-ins 1074 IDTExtensibility2Interface 1075 Adding User Interface Items 1076
Building a COM Add-in for InfoPath 1076 OnConnectionMethod 1079
Custom Task Panes 1093
Creating a Custom Task Pane 1093
Writing Add-ins and Custom Task Panes Using VSTO 2005 SE 1105
Implementing a Managed Add-in 1105
Adding a Custom Task Pane in a Managed Add-in 1108
Managing InfoPath Add-ins 1111 What’s Next? 1114
21
Importers and Exporters 1115
Getting Started 1115Built-in Form Importers 1116 Importing a Form into InfoPath 1119 Fixing the Imported Form 1125 Post-Import Warnings 1126
Creating Your Own Form Importers and Exporters 1128 InfoPath Import/Export Framework 1128
How Post-Import Warnings Work 1140 Importing Form Data 1142
Data Importer Framework 1142
IInfoPathDataImporterInterface 1143 What’s Next? 1148
Appendix: Further Reading 1149
Figure P.1: Open With Form Template dialog lviii
Figure P.2: Dialog shown when InfoPath cannot find the Visual C# project with the form code lx
Figure 1.1: Controls task pane in InfoPath 2003 8 Figure 1.2: Data Source task pane in InfoPath 2003 9 Figure 1.3: Insert Layout Table toolbar item 13 Figure 1.4: Tables toolbar 13
Figure 1.5: Fill Out a Form dialog in InfoPath 2003 SP1 17
Figure 1.6: Filling out a browser-enabled form template in Internet Explorer 18 Figure 1.7: Getting Started dialog 21
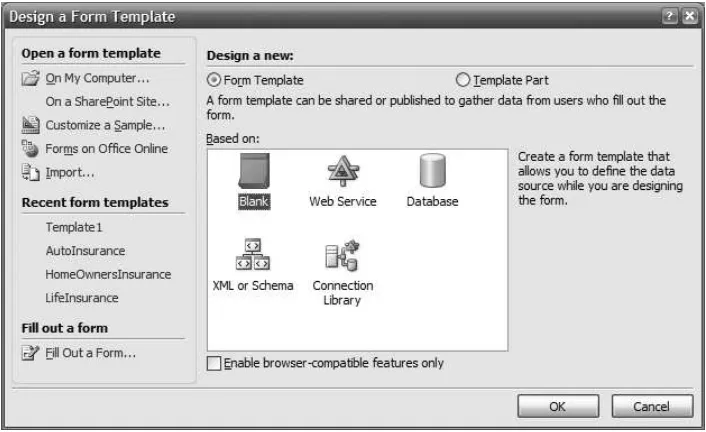
Figure 1.8: Design a Form Template dialog 22
Figure 2.1: Getting Started dialog 27
Figure 2.2: Design a Form Template dialog 28 Figure 2.3: New blank form 33
Figure 2.4: Layout task pane 35
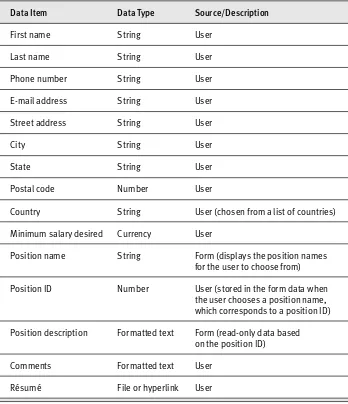
Figure 2.5: Employment application form template with title added by using Table with Title 36
Figure 2.6: Merge and split cells category of the Layout task pane 37 Figure 2.7: Employment application form template with cells for first
and last names 38
Figure 2.8: Employment application form template with a row for address information 38
Figure 2.9: Color Schemes task pane 40 Figure 2.10: Controls task pane 42
Figure 2.11: Employment application form template after adding standard
controls 46
Figure 2.12: Section control selected in design mode 47 Figure 2.13: Preview of the employment application form 48 Figure 2.14: Employment application form template with Optional
Section controls 50
Figure 2.15: Optional controls when previewing the form 51
Figure 2.16: Optional controls after clicking on the link, Click here to insert 51 Figure 2.17: Context menu for the Optional Section control when filling
out a form 52
Figure 2.18: Employment application form template with Repeating
Section control 53
Figure 2.19: Repeating Section control when previewing the form 54 Figure 2.20: Context menu for Repeating Section control when
previewing the form 54
Figure 2.21: Three instances of the Repeating Section control inserted
into the form 55
Figure 2.22: Insert Repeating Table dialog 57
Figure 2.23: Repeating Table control in design mode 57 Figure 2.24: Change To menu 58
Figure 2.25: Repeating Table control after changing from a Repeating
Section control 58
Figure 2.26: Repeating Table control when previewing the form 60 Figure 2.27: Horizontal Repeating Table control in design mode 61 Figure 2.28: Horizontal Repeating Table control when filling out a form 62 Figure 2.29: Insert Master/Detail dialog 63
Figure 2.30: Master and detail controls in design mode 63 Figure 2.31: Master/Detail control in the application review form
when filling out a form 64
Figure 2.32: Master/Detail control showing more applicant data 64 Figure 2.33: Binding design-time visual showing the name of the control 65 Figure 2.34: List controls in design mode 66
Figure 2.35: List controls when filling out a form 66
Figure 2.37: File Attachment control in design mode 68 Figure 2.38: File Attachment control when filling out a form 68 Figure 2.39: File Attachment control with résumé file attached 69 Figure 2.40: File Attachment control commands 69
Figure 2.41: Insert Picture Control dialog 71
Figure 2.42: Picture control when filling out the form 72 Figure 2.43: Picture control with picture inserted 72
Figure 2.44: Ink Picture control that contains text entered with
a Tablet PC stylus 73
Figure 2.45: Views task pane 74 Figure 2.46: Add View dialog 75 Figure 2.47: View Properties dialog 75 Figure 2.48: Font task pane 77
Figure 2.49: Selected Text Box control 78
Figure 2.50: Format Painter on the Standard toolbar 79 Figure 2.51: Format Painter cursor 80
Figure 2.52: Text Settings tab in the View Properties dialog 83
Figure 3.1: Clicking on a control in the view to select the bound control
in the data source 87
Figure 3.2: A Hyperlink control bound to field1in the data source, with a link to the text of field1 88
Figure 3.3: Warning dialog when changing the name of a data source field or group
for a published form 97
Figure 3.4: Data type validation error that occurs when a field contains
invalid data 100
Figure 3.5: Warning when saving a form with validation errors 100 Figure 3.6: Validation error for the cannot be blank property, delineated
by a red asterisk 102
Figure 3.7: Repeatingfield4, which is bound to the Numbered List control and repeats in group1 104
Figure 3.8: Airline form with default value for FlightTypeas
"Roundtrip" 106
Figure 3.9: The default value calculation button 107
Figure 3.10: The Insert Formula dialog, with a formula that sets this field’s default
Figure 3.11: Data source details for the FlightTypefield bound to the option buttons in the airline form 108
Figure 3.12: Label for the node PurposeOfVisit,created when inserting the control into the view 118
Figure 3.13: Move Field or Group dialog used to move an existing field
or group 119
Figure 3.14: Validation error that appears when opening a form created before
theFlightType–FlightDatenode swap 121
Figure 3.15: Setting the Employeegroup to repeat and reference itself 123
Figure 3.16: Filling out the MOI Company’s employee information form 124 Figure 3.17: Design a form from an existing XML document or schema instead
of creating the data source from scratch 125
Figure 3.18: Selecting the location of an XML document or schema 125
Figure 3.19: Choosing whether to include data from a selected XML file as the form
template default data 127
Figure 3.20: The first prompt when starting from an ambiguous schema 129 Figure 3.21: Disambiguating the data source by using the Edit Settings dialog 130 Figure 3.22: Prompt that appears when starting from a schema with multiple
top-level elements 131
Figure 3.23: The Type drop-down menu, with an option for adding a complete
XML Schema or XML document 134
Figure 3.24: Data source created from the XML document 136
Figure 3.25: Text Box Binding dialog that appears when Automatically create data
source is disabled or Change Binding is used from a control 139
Figure 3.26: Changing binding via the context menu by right-clicking on any control
that can be bound 140
Figure 3.27: Context menu of most popular control bindings 143 Figure 3.28: Dialog that results from clicking More on the menu shown
in Figure 3.27 143
Figure 3.29: Insertingfield1in the data source 144
Figure 3.30: An absurd control nesting: Attributecontains
DocumentElement, which contains Attribute 145
Figure 3.32: NumberOfChildrenattribute is nonexistent in the form and XML data 147
Figure 3.33: NumberOfChildrenattribute field inserted in the form and XML with a default value of 1 147
Figure 3.34: A simple repeating field: field1 147
Figure 3.35: Three controls multiply bound to field1 148
Figure 3.36: Critical design-time visual on an unbound Text Box control 150 Figure 3.37: Edit Default Values dialog, which offers the quickest way to edit data
source defaults 152
Figure 3.38: Cutaway of the Edit Default Values dialog when Choice exists
in the data source 153
Figure 4.1: Insert Hyperlink dialog 157 Figure 4.2: Select a Field or Group dialog 157 Figure 4.3: Hyperlink control in design mode 158 Figure 4.4: Insert Expression Box dialog 159
Figure 4.5: Insert Formula dialog after choosing a field 159
Figure 4.6: Insert Formula dialog after checking the Edit XPath checkbox 160 Figure 4.7: Insert Function dialog 160
Figure 4.8: Repeating Table control for expenses 161 Figure 4.9: Data source for the expense report example 161
Figure 4.10: Insert Formula dialog after inserting the sumfunction 162 Figure 4.11: Expense report form during preview 163
Figure 4.12: Insert Vertical Label dialog 164 Figure 4.13: Vertical Label control 164
Figure 4.14: Scrolling Region control in design mode 165
Figure 4.15: Application review form with Scrolling Region when filling
out the form 166
Figure 4.16: Horizontal Region controls in design mode 167 Figure 4.17: Choice Group control in design mode 168
Figure 4.18: Employment application form with Choice Group control 170 Figure 4.19: Default Choice Section with context menu commands 170 Figure 4.20: Employment application form after replacing the default
Choice Section 170
Figure 4.22: Repeating Recursive Section when filling out the employee information
form 173
Figure 4.23: Properties dialog for the Text Box control 175
Figure 4.24: Dialog that warns about data loss when changing field names 177 Figure 4.25: Binding design-time visual for the FirstNameText Box control 178
Figure 4.26: Integer Format dialog for Whole Number (integer) data types 179 Figure 4.27: Field for minimum salary desired formatted as currency 179 Figure 4.28: Properties dialog for the Optional Section for the minimum salary
desired 181
Figure 4.29: Display tab of the Text Box Properties dialog 183 Figure 4.30: Placeholder text in a Text Box control 184 Figure 4.31: Display tab for the Rich Text Box control 186 Figure 4.32: Insert Picture dialog 187
Figure 4.33: Size tab of the Text Box Properties dialog 189
Figure 4.34: Text Box control with inner text not aligned to outer text 190 Figure 4.35: Text Box control with inner text aligned to outer text 191 Figure 4.36: Properties dialog for resizing multiple controls 192 Figure 4.37: Advanced tab for the Hyperlink control 193
Figure 4.38: Advanced tab of the Text Box Properties dialog showing the Input
recognition section 194
Figure 4.39: Input Scope dialog showing standard input scopes 196 Figure 4.40: Input Scope dialog showing custom input scopes 197 Figure 4.41: New Input Scope dialog showing Phrase List option 197 Figure 4.42: Sample data source for the Master/Detail example 200
Figure 4.43: Master/Detail tab for a Repeating Table set as the master control 200 Figure 4.44: Master/Detail tab for a Repeating Section set as a detail control 202 Figure 4.45: Master/Detail control when filling out a form 204
Figure 4.46: Section Properties dialog for an Optional Section control 205 Figure 4.47: Edit Default Values dialog for an Optional Section control 206 Figure 4.48: Repeating Section Properties dialog 207
Figure 4.49: Section Properties dialog for a Repeating Section fragment 208 Figure 4.50: Repeating Section Properties dialog showing three sections—Apples,
Oranges, and Bananas 209
Figure 4.51: Filling out the grocery shopping list 209
Figure 5.1: Conditional Formatting dialog 216 Figure 5.2: Conditional Format dialog 217
Figure 5.3: Conditional Format dialog with multiple conditions 219
Figure 5.4: Conditional Format dialog with condition, where StockPriceis less than or equal to $18.00 220
Figure 5.5: Conditional Formatting dialog with one condition 220
Figure 5.6: Conditional Format dialog specifying the four conditions needed to set
the background color to yellow 221
Figure 5.7: Conditional Formatting dialog showing all three conditions 222 Figure 5.8: Data Validation dialog 223
Figure 5.9: Validation tab on the Field or Group Properties dialog 224 Figure 5.10: Data Validation condition builder 225
Figure 5.11: Inline alert for a data validation error 225
Figure 5.12: Full error description for a data validation error 226
Figure 5.13: Data Validation dialog listing two conditions to validate the total
number of guests 227
Figure 5.14: Data Entry Pattern dialog 228 Figure 5.15: Red asterisk error 228
Figure 5.16: Custom pattern 229
Figure 5.17: Adding or modifying an existing rule so that four actions are always run
when the form is submitted 230
Figure 5.18: Specifying the action for a rule to run when a user clicks the Button
control 231
Figure 5.19: Entry points and structure of the Rules feature 232
Figure 5.20: Dialog displayed when an action on a rule fails to execute when the user
fills out the form 234
Figure 5.21: Form template for the Logic Inspector sample 236
Figure 5.22: Logic Inspector showing the logic for the entire form template 237 Figure 5.23: Detailed view of the DataValidationnode 239
Figure 6.1: Relationships between a form and its external data sources 243 Figure 6.2: Design a Form Template dialog, the starting point for creating a main
query connection 245
Figure 6.3: Creating a secondary query connection for a form template 246 Figure 6.4: Data to fill into a form and save to Sample.xml, to be read later by using
Figure 6.5: Entering the file location to use when creating a secondary connection
to XML data 249
Figure 6.6: XML file connection settings to opt in or out of including the data
as a file in your template 249
Figure 6.7: Final page of the Data Connection Wizard for an XML file 251 Figure 6.8: Data Connections dialog after finishing the XML file Data Connection
Wizard 252
Figure 6.9: Data Source task pane showing secondary data source 253 Figure 6.10: Clicking on the Button to query the Sampledata connection 254
Figure 6.11: Data Connection Wizard when creating a new database connection 259 Figure 6.12: Connecting to SQL Server after clicking Select Database 260
Figure 6.13: Select Database and Table dialog 261
Figure 6.14: Database connection’s data source structure showing the added
CustomersandOrderstables 262
Figure 6.15: Adding the Orderschild table to the Customersparent table 262
Figure 6.16: Defining a relationship between the child and parent tables 263 Figure 6.17: Sort Order dialog for setting three levels of sorting order 265 Figure 6.18: Edit SQL dialog, which allows hand-editing of the query statement
used by InfoPath to create the data source 267
Figure 6.19: Customerssecondary data source 268
Figure 6.20: A nested database table (Orders), which is hard to represent when the parent table (Customers) is in the view as a Repeating Table 270
Figure 6.21: Our rendition of displaying the CustomersandOrdersdata 271
Figure 6.22: Preview of the modified form layout with Northwind customers and
orders data 272
Figure 6.23: New Web Site dialog with a template for an ASP.NET Web service 274 Figure 6.24: Part of the browser-friendly test page when navigating to the Web
service 278
Figure 6.25: Browser test form for the SaveItemWeb service method 280
Figure 6.26: Entering an address to the WSDL 281
Figure 6.27: List of methods from the Web service that can be used to
receive data 283
Figure 6.28: Setting up the parameter to the SaveItemsWeb service method, which involves selecting which data source node provides its value 284
Figure 6.29: Choosing the data source node to submit to the SaveItems
Figure 6.30: InfoPath design mode after finishing the Web service Data Connection
Wizard 286
Figure 6.31: Querying and submitting our Web service form during preview 287 Figure 6.32: Designing the TerraServer form using the GetTile
Web service method 290
Figure 6.33: Querying the TerraServer for a section of the San Francisco Bay near
Highway 80 291
Figure 6.34: Pictureslibrary on Windows SharePoint Services 293
Figure 6.35: The libraries and lists available for querying from the
SharePoint server 293
Figure 6.36: Choosing which fields from the SharePoint list you want to use for
the data connection 294
Figure 6.37: Filling out the music and photos form 295
Figure 7.1: Searching for Web services by using UDDI in InfoPath 300 Figure 7.2: Creating a typed dataset from our CustomersandOrders
SqlDataAdapterobjects 304
Figure 7.3: The Visual Studio schema editor 305
Figure 7.4: Adding a relationship to the CustomersandOrderstables in the dataset 305
Figure 7.5: Secondary data source–bound controls allow for little customization 308 Figure 7.6: Form after querying the XML file secondary data connection 310 Figure 7.7: Enabling query support for offline mode when adding or modifying
a secondary data connection 313
Figure 7.8: Configuring a form template for offline mode queries 313 Figure 7.9: InfoPath global cached queries setting 315
Figure 7.10: Error dialog shown if querying an external data source fails when filling
out the form 315
Figure 7.11: Error dialog that results from clicking Try to Connect in Figure 7.10
if the data connection is unavailable 316
Figure 7.12: Grocery list form template, unchanged, from Chapter 4 318 Figure 7.13: Drop-Down List Box Properties dialog 319
Figure 7.14: Selecting a secondary data source node from the XML file connection
that provides data for the List Box entries 319
Figure 7.15: Filling out the grocery list form when the items are retrieved from a data
Figure 7.16: Using the main data source to provide data for a List Box control 321 Figure 7.17: Adding a note-taking capability to our grocery form 322
Figure 7.18: Filling out the form after we’ve added the note-taking feature 322 Figure 7.19: Specifying a filter to show only grocery items from a selected
category 324
Figure 7.20: Filling out the grocery form with category filters 325
Figure 8.1: Dialog asking the user whether to save or submit the form 329 Figure 8.2: Settings for enabling and disabling certain features for users, such
as the ability to save a form 330
Figure 8.3: The first view of the job application form 332 Figure 8.4: The last page of the job application form 333
Figure 8.5: Dialog about the submit error that occurs when the user clicks
the Submit button after not filling in a name in the first view 333
Figure 8.6: Submit Options dialog, the starting point for enabling submit 335 Figure 8.7: First page of the Data Connection Wizard for setting properties of the
e-mail sent when users submit the form 338
Figure 8.8: Configuring the attachment options for submitting via e-mail 340 Figure 8.9: Dialog prompt in which the user must click Send in order to submit
a helpdesk request 341
Figure 8.10: Specifying whether your form only receives data, only submits data,
or does both with a Web service 346
Figure 8.11: Selecting a Web service method for submit 348
Figure 8.12: Design mode after finishing the Data Connection Wizard for submitting
data to a Web service 348
Figure 8.13: Error dialog that results when submitting a form with validation errors
that are in the current view 349
Figure 8.14: Student sign-in form during preview 350 Figure 8.15: Dialog confirming that submit succeeded 350
Figure 8.16: Student sign-in form showing the instructor’s Class Information view
with default data 352
Figure 8.17: Designing the sign-in form view 354
Figure 8.18: Configuring conditional formatting to hide the LateReasonsection if the start time is later than now 354
Figure 8.20: Defining parameter mappings for Web service submit 356 Figure 8.21: Tardy Johnny signs in to Philosophy 101 357
Figure 8.22: Debugging the Web service by using Visual Studio 359 Figure 8.23: Debugger paused at our breakpoint 360
Figure 8.24: Data source for the student sign-in form 362
Figure 8.25: Parameter mappings dialog configured to submit the entire form 363 Figure 8.26: Dialog that gives the user a chance to digitally sign a form before
continuing with submit 367
Figure 8.27: Controlling whether or not to display the prompt shown in
Figure 8.26 368
Figure 8.28: Configuring change tracking for an ADO.NET dataset Web service 371 Figure 8.29: Setting up a parameter mapping for a DataSetobject 372
Figure 8.30: Data source representative of a dataset structure 373
Figure 8.31: Designing the view of the form receiving and submitting an ADO.NET
DataSetobject 374
Figure 8.32: Filling out a dataset form template with default data 375 Figure 8.33: After querying the form shown in Figure 8.32 375
Figure 8.34: Error that results from trying to modify dataset form data after
submit 376
Figure 8.35: Configuring SharePoint document library submit for the student
sign-in form 378
Figure 8.36: Submit Options dialog configured to submit to a SharePoint document
library 379
Figure 8.37: SharePoint document library that contains submitted form data 380 Figure 8.38: Submit Options dialog for Web server submit via HTTP 381 Figure 8.39: Setting the destination option to use an ASP.NET page 381 Figure 8.40: Setting up submit using rules 385
Figure 8.41: List of rules that run when the form is submitted 386 Figure 8.42: Actions for the actual submit to the Web services 387
Figure 8.43: Expression shown in a popup message when a student signs in late
to class 387
Figure 8.44: Dialog that appears when Johnny signs in tardy 388
Figure 8.45: Dialog that appears when submit with rules fails on a secondary
connection 390
Figure 8.46: Dialog shown when submit using rules fails on the main submit
Figure 8.47: Generic success dialog for the main submit connection 393 Figure 8.48: Generic failure dialog for the main submit connection 393 Figure 8.49: Advanced section of the Submit Options dialog 393
Figure 9.1: InfoPath prompt that appears when choosing Save or Save As for a new
form template 399
Figure 9.2: First page of the Publishing Wizard, offering a variety of publishing
options 400
Figure 9.3: Publishing a MeetingRequest template to a Web server via a “backdoor”
network share 401
Figure 9.4: Specifying the users’ access path 402
Figure 9.5: Error dialog that appears when opening a form from a path that
is not the access path 403
Figure 9.6: Flowchart for determining whether the form template publishes
to a SharePoint server or a Forms Services site 404
Figure 9.7: Specifying a server location for publishing to a SharePoint site or Forms
Services site 406
Figure 9.8: Choosing whether to publish the form template to a SharePoint
document library or a site content type 406
Figure 9.9: Saving the template somewhere on the SharePoint server when creating
a site content type 407
Figure 9.10: Wizard page showing promoted properties from the template’s data
source, which appear as columns in SharePoint libraries and lists 408
Figure 9.11: Form library on SharePoint 409
Figure 9.12: Adding site content types to a document library 410 Figure 9.13: Selecting a field from the data source to promote 411
Figure 9.14: First wizard page for publishing a form to e-mail recipients 414 Figure 9.15: Promoting properties to make them available as columns
in Outlook 415
Figure 9.16: Resulting e-mail in Outlook after finishing the Publishing Wizard for
e-mail 416
Figure 9.17: First page of the Publishing Wizard for creating an installable
form template 418
Figure 9.18: Choosing a location to save the Installer file 418
Figure 9.19: Final page of the Publishing Wizard when creating an installable
Figure 9.20: Browse For Folder dialog for selecting a location to save template source
files 422
Figure 9.21: Dialog warning that appears when saving source files to a folder
that already contains existing source files 423
Figure 9.22: Configuring preview settings 426
Figure 9.23: Error message that results from attempting to open a form that was
saved while previewing 429
Figure 10.1: Address block section of the MOI employment application form 432 Figure 10.2: Data source for the address block template part 433
Figure 10.3: Design a Form Template dialog with Template Part
option selected 433
Figure 10.4: Design Tasks pane when designing a template part 434 Figure 10.5: Address block after pasting it into the view 437 Figure 10.6: Add or Remove Custom Controls dialog 439
Figure 10.7: Add Custom Control Wizard’s Select a Control Type page 439 Figure 10.8: Add Custom Control Wizard’s Select an InfoPath Template
Part page 440
Figure 10.9: Add Custom Control Wizard’s Custom Control Added page 441 Figure 10.10: Custom category of the Controls task pane after adding the AddressBlock
template part 441
Figure 10.11: AddressBlock template part inserted into a blank form 444
Figure 10.12: AddressBlock template part with cascading Combo Box controls 448 Figure 10.13: Template Part Properties dialog 449
Figure 10.14: Design-time visual shown on the new AddressBlock template part 450 Figure 10.15: More details for the new template part 450
Figure 10.16: Design Checker task pane showing template parts that need
to be updated 452
Figure 10.17: Template Part Properties dialog after changing name and ID 453
Figure 11.1: Configuring security and trust settings for a form template 459 Figure 11.2: Form Template Properties dialog for setting the form ID 460 Figure 11.3: Error dialog when opening a restricted form template that attempts
to query an external data source 461
Figure 11.4: Setting an access path, which is not required when publishing
Figure 11.5: Cache conflict that occurs when a different version of the same form
template is opened 464
Figure 11.6: Getting Started dialog showing form templates in the
InfoPath cache 465
Figure 11.7: Resource Files dialog, which shows files accessible by all
form templates 466
Figure 11.8: Internet Explorer Web content zones, each of which has
its own security level 469
Figure 11.9: Settings for defining the local intranet zone 470 Figure 11.10: Security prompt for cross-domain data access 474
Figure 11.11: Office Configuration Tool security settings for InfoPath 477 Figure 11.12: Error dialog that appears when a domain form is not opened from its
access path and the published template is unavailable 480
Figure 11.13: Opening a domain form whose access path doesn’t match the .xsn location,
but the form template exists at the originally published location 481
Figure 11.14: Entering a domain for the template when previewing the form 482 Figure 11.15: List of any settings or features resulting in the form template being
at domain trust level 484
Figure 11.16: Security and Trust tab of the Form Options dialog 485 Figure 11.17: Trusted root certification authorities for the current user 488 Figure 11.18: Security and Trust category settings for signing a form template 489 Figure 11.19: Selecting a certificate to use for digital signing 490
Figure 11.20: Creating a self-signed certificate for code signing 490
Figure 11.21: General tab of the Certificate dialog, which shows whether the publisher
of a certificate is trusted 491
Figure 11.22: InfoPath prompt that appears when a signed template’s CA isn’t
trusted 492
Figure 11.23: Error that occurs when opening a full trust form template that is neither
digitally signed nor installed 494
Figure 11.24: Error that occurs when attempting to remove an installed form from
the dialog 495
Figure 11.25: Trusted Publishers category of the Trust Center dialog 500 Figure 11.26: Add-ins category of the Trust Center dialog 501
Figure 11.29: Enabling protection to discourage users from changing your form
template 504
Figure 11.30: Warning dialog that appears when users attempt to change a protected
form template 505
Figure 11.31: Disabling InfoPath design mode as an administrative policy 506 Figure 11.32: Configuring digital signatures for a form template 509
Figure 11.33: Our sample MOI Consulting performance review form 510 Figure 11.34: Setting up the template to allow signing the entire form 512 Figure 11.35: Filling out the MOI performance review before using a digital
signature 514
Figure 11.36: Digital Signatures dialog, which tracks who has signed this form 514 Figure 11.37: Selecting what form data to sign 515
Figure 11.38: Clicking the Sign button to apply a digital signature to the form 515 Figure 11.39: Additional Information dialog, which shows exactly what you’re signing
before you sign it 516
Figure 11.40: Digitally signed form with read-only controls 518
Figure 11.41: Error dialog that appears when trying to change signed form data 518 Figure 11.42: Friendly reminder that the form being opened is digitally signed 519 Figure 11.43: Choosing whether or not to show a notification when signed forms
are opened 520
Figure 11.44: Setting up the Personal Information part of the view for partial
signing 523
Figure 11.45: Creating a new set of signable data (partial signing) on a Section
control 524
Figure 11.46: Setting up digital signatures on a Section control 526
Figure 11.47: Signing the “Info” set of signable data when filling out the form 527 Figure 11.48: Using the Select the Data to Sign dialog opened by clicking the Digital
Signatures button 527
Figure 11.49: Signing a set of signable data when filling out the form 528 Figure 11.50: Form showing that the set of signable data has been signed 529 Figure 11.51: Signature Details dialog for a signed Section control 530 Figure 11.52: Form showing that Robert co-signed John’s review rating 531 Figure 11.53: Permission button on the Standard toolbar 539
Figure 11.54: Defining IRM permission on a form template (top checkbox) and forms
Figure 11.55: Dialog about verifying credentials when opening a form template 541 Figure 11.56: Restricted permission for user Dana while designing a form
template 541
Figure 11.57: Specifying permission during design mode to apply when the form
is filled out 543
Figure 11.58: Specifying permission for the current form while filling it out 544 Figure 11.59: Form Permission task pane 545
Figure 11.60: Permission dialog after clicking the More Options button 546 Figure 11.61: Enabling Information Rights Management on the SharePoint Central
Administration site 549
Figure 11.62: IRM settings for a document library 550
Figure 12.1: Weekly status report form 555 Figure 12.2: Merge Forms dialog 556
Figure 12.3: Merge Forms dialog showing the Views menu 557
Figure 12.4: Weekly status report document library in Merge Forms view 558 Figure 12.5: Merge error dialog for forms with a schema that doesn’t match
the target form 558
Figure 12.6: Merged status report form 559
Figure 12.7: Data source for the status report form template 561 Figure 12.8: Weekly Status Report view in the weekly status report form
template 563
Figure 12.9: Team Status Report view for merging multiple status report forms 564 Figure 12.10: Rules and Merge tab on the Field or Group Properties dialog 566 Figure 12.11: Advanced tab of the Repeating Section Properties dialog 567 Figure 12.12: Merge settings error dialog 567
Figure 12.13: Merge Settings dialog for the StatusReportsrepeating group node 569
Figure 12.14: Merge Settings dialog with merge customizations 572
Figure 12.15: Merge Settings dialog for the EmployeeInformationnode 573
Figure 12.16: Team status report after merging three status reports 574 Figure 12.17: Merge Settings dialog for the Summarynode 575
Figure 12.18: Merge Settings dialog for the Summarynode after customizations are complete 577
Figure 12.19: Merge Settings dialog for the ThisWeeknode after customization 577
Figure 12.21: Advanced tab of the Form Options dialog 579
Figure 12.22: Field or Group Properties dialog after specifying a custom merge XSL
in the manifest 582
Figure 12.23: Create Print Version dialog 586 Figure 12.24: Printed team status report 587
Figure 12.25: Print Settings tab of the View Properties dialog 588 Figure 12.26: Header format dialog 590
Figure 12.27: Header format dialog after adding Teamfield and date 591
Figure 12.28: Team status report with header and footer information 591 Figure 12.29: Sales Report view 592
Figure 12.30: Merged sales report data 593 Figure 12.31: Print dialog 593
Figure 12.32: Print Multiple Views dialog when filling out a form 594 Figure 12.33: Print Multiple Views dialog in design mode 595 Figure 12.34: XML Structure task pane in Microsoft Office Word 598 Figure 12.35: Word document used to generate the Word print view XSL 599 Figure 12.36: Word Print Views dialog 600
Figure 12.37: Choosing the path and file name from the Add Print View for Word
Wizard 601
Figure 12.38: Specifying the Word print view name in the Add Print View for Word
Wizard 602
Figure 12.39: Filling out the Team Status Report view in the browser 604 Figure 12.40: Print View button on the Forms Services toolbar 604
Figure 12.41: Team Status Report view shown as a print view in the browser 605 Figure 12.42: Export To menu item expanded 606
Figure 12.43: Choosing the type of data to export 607
Figure 12.44: Choosing the forms from which to export data 608 Figure 12.45: Status report data exported to Microsoft Office Excel 608 Figure 12.46: Export to Excel Wizard after choosing to export only the data
from a specific table 609
Figure 12.47: Selecting the data to export 610
Figure 12.48: Sales data exported to Microsoft Office Excel 611 Figure 12.49: Open and Save tab of the Form Options dialog 612
Figure 13.3: Select Users dialog 618
Figure 13.4: Manage User Roles dialog after adding a few roles 620 Figure 13.5: Open and Save tab of the Form Options dialog 622
Figure 13.6: Selecting User’s current role as the qualifier in the Condition dialog
for rules 623
Figure 13.7: Rule dialog after setting the condition and action 623 Figure 13.8: Rules for Opening Forms dialog after adding all rules 624 Figure 13.9: Preview tab on the Form Options dialog 625
Figure 13.10: Preview drop-down toolbar menu 625
Figure 13.11: Selecting the UserRolefield that corresponds to the TeamName
field in the secondary data source 628
Figure 13.12: Insert Formula dialog after adding a calculated default value 628 Figure 13.13: Specifying a user role in the condition for data validation 630 Figure 13.14: Conditional Format dialog after changing the condition to use a
user role 631
Figure 13.15: Manage User Roles dialog after adding “Team Manager” and “Sales
Manager” roles 632
Figure 13.16: Conditional Format dialog after adding conditions for manager
roles 633
Figure 13.17: Rule dialog after adding a rule to switch to the Team Status
Report view 634
Figure 13.18: Add a Workflow page 637
Figure 13.19: Customizing the Travel Request Approval workflow 638 Figure 13.20: Workflow initiation e-mail message 639
Figure 13.21: E-mail task requesting approval of the travel request 639 Figure 13.22: Travel Request form showing the Workflow Task message bar 640 Figure 13.23: Workflow dialog 641
Figure 13.24: Workflows dialog 642
Figure 13.25: Food survey form template 646
Figure 13.26: Choosing which properties to make available in Outlook folders 647 Figure 13.27: Sending the form to a list of e-mail recipients 647
Figure 13.28: Rules Wizard showing the rule specific to InfoPath forms 648 Figure 13.29: Choose InfoPath Form dialog 649
Figure 13.33: InfoPath e-mail form in Outlook’s reading pane 653 Figure 13.34: Filling out an InfoPath e-mail form 653
Figure 13.35: Submit dialog when submitting an InfoPath e-mail form 654 Figure 13.36: Mail Options task pane 655
Figure 13.37: Team Lunch folder showing responses to the food preference
survey 656
Figure 13.38: Team Lunch folder grouped by food preference 657 Figure 13.39: Expense Reports InfoPath form folder 659 Figure 13.40: InfoPath actions context menu 659
Figure 13.41: E-Mail Attachments tab in the Form Options dialog 661
Figure 14.1: Filling out the status report form in InfoPath 667
Figure 14.2: Filling out the status report form in the browser by using Forms
Services 667
Figure 14.3: Message indicating that a feature cannot be used in a browser-enabled
form template 670
Figure 14.4: Message indicating that a feature can be used in a browser-enabled form
template but is not active in the browser 671
Figure 14.5: Choosing the type of server to install 674
Figure 14.6: SharePoint database configuration settings for a farm 675 Figure 14.7: Choosing to publish to Forms Services via the Document Library
option 679
Figure 14.8: Last page of the Publishing Wizard before clicking the Publish
button 681
Figure 14.9: Last page of the Publishing Wizard after clicking the Publish
button 682
Figure 14.10: Toolbar shown when filling out a form in the browser 684
Figure 14.11: Configuring toolbars for a browser-enabled form template filled out
in the browser 685
Figure 14.12: Saving a form in the browser 686
Figure 14.13: Editing a Rich Text Box control in the browser 689
Figure 14.14: Commonality of InfoPath and Forms Services feature sets 692 Figure 14.15: MOI Consulting feedback form 694
Figure 14.16: Compatibility settings in the Form Options dialog 695
Figure 14.17: Errors and messages in the Design Checker after making the feedback
Figure 14.18: Browser-compatibility message within the Digital Signatures category
under the Form Options dialog 696
Figure 14.19: Remake of the Overall Satisfaction table without vertical text 699 Figure 14.20: Filling out the MOI Consulting feedback form in the browser 702 Figure 14.21: Promoted properties in a form library 706
Figure 14.22: Converting an InfoPath data connection to use a server-defined data
connection file 712
Figure 14.23: Filling out the status report form on a Pocket PC device 721 Figure 14.24: Repeating Section control with three items in a mobile form 723 Figure 14.25: Editing the first row from the mobile form shown in Figure 14.24 723 Figure 14.26: Mobile form toolbar with the Pocket PC Internet Explorer toolbar
showing below it 724
Figure 15.1: Programming category in the Form Options dialog 732 Figure 15.2: Confirmation dialog shown before removing code 733 Figure 15.3: Upgrading code from a form template compatible with
InfoPath 2003 733
Figure 15.4: Programming options, which are saved as defaults for all new form
templates 736
Figure 15.5: VSTA development environment 737
Figure 15.6: EventBubbling sample, which shows SiteandSendernode names as events bubble up the data source 746
Figure 15.7: MOI Consulting morale event scheduler form in design mode 750 Figure 15.8: Password dialog prompt 751
Figure 15.9: Custom error message that appears when a Changingevent handler is canceled 755
Figure 15.10: Error that occurs when calling unsupported OM during the Changing
event 756
Figure 15.11: Show Error Message dialog 767
Figure 15.12: Supporting entry of last and first names in a Repeating Table
control 769
Figure 15.13: MultipleNotifications sample form in design mode 775
Figure 15.14: One of the notifications when adding underline to a rich text (XHTML)
field 776
Figure 15.17: Welcome view of the MOI Consulting request form 791
Figure 15.18: Dialog that results when the Time-sensitive / Critical request type
is selected 793
Figure 15.19: Dialog that appears when form errors exist in the current view 793 Figure 15.20: Informing the user that signing is required to continue 794
Figure 15.21: Dialog that appears after using the Click here to sign this section link
in the MOI request form 795
Figure 15.22: Request Details view of the MOI Consulting request form 795 Figure 15.23: Confirm view of the MOI Consulting request form 796 Figure 15.24: Thank You view of the MOI Consulting request form 797
Figure 15.25: Main data source for the MOI Consulting request form template 801 Figure 15.26: Error dialog that appears when user attempts to open an existing MOI
request form 808
Figure 15.27: Dialog for clearly presenting to the user any form errors 811 Figure 15.28: GetSubAreassecondary data source 821
Figure 15.29: Request Details view 825
Figure 15.30: Finding the xmlToEditandActionTypecapability of a structurally editable control 828
Figure 15.31: Setting up the form’s main submit to use code 830
Figure 16.1: Visual Studio’s New Project dialog 837 Figure 16.2: Structure of a VSTO InfoPath project 838 Figure 16.3: Design a Form Template dialog in VSTO 839
Figure 16.4: Dialog informing that VSTO never modifies an existing form
template 840
Figure 16.5: VSTO environment while designing a form template 843 Figure 16.6: Design Tasks task pane in VSTO 844
Figure 16.7: InfoPath controls in a list view 846 Figure 16.8: InfoPath controls as icons 846
Figure 16.9: Microsoft Office InfoPath category options in the VSTO Options
dialog 850
Figure 16.10: Notification for managed code errors, which makes debugging easier 851 Figure 16.11: Quick Find in VSTO 854
Figure 16.12: Resource Files dialog used in InfoPath and VSTO 858 Figure 16.13: Visual Studio 2005 refactoring tools 859