Docker for Java Developers
Package, Deploy, and Scale with Ease
Docker for Java Developers
by Arun Gupta
Copyright © 2016 O’Reilly Media, Inc. All rights reserved. Printed in the United States of America.
Published by O’Reilly Media, Inc., 1005 Gravenstein Highway North, Sebastopol, CA 95472.
O’Reilly books may be purchased for educational, business, or sales promotional use. Online editions are also available for most titles (http://safaribooksonline.com). For more information, contact our corporate/institutional sales department: 800-998-9938 or
corporate@oreilly.com. Editor: Brian Foster
Production Editor: Melanie Yarbrough
Copyeditor: Christina Edwards
Proofreader: Colleen Toporek
Interior Designer: David Futato
Cover Designer: Karen Montgomery
Illustrator: Rebecca Demarest
Revision History for the First Edition
2016-06-08: First Release
The O’Reilly logo is a registered trademark of O’Reilly Media, Inc. Docker for Java Developers, the cover image, and related trade dress are trademarks of O’Reilly Media, Inc.
While the publisher and the author have used good faith efforts to ensure that the information and instructions contained in this work are accurate, the publisher and the author disclaim all responsibility for errors or omissions, including without limitation responsibility for damages resulting from the use of or reliance on this work. Use of the information and instructions contained in this work is at your own risk. If any code samples or other technology this work contains or describes is subject to open source licenses or the
intellectual property rights of others, it is your responsibility to ensure that your use thereof complies with such licenses and/or rights.
Preface
The Java programming language was created over 20 years ago. It continues to be the most popular and widely used programming language after all these years. The design patterns and antipatterns of Java deployment are well
known. The usual steps to deploy a Java application involve using a script that downloads and installs the operating system package such as JDK on a machine — whether physical or virtual. Operating system threads and memory need to be configured, the network needs to be set up, the correct database identified, and several other such requirements need to be
configured for the application to work. These applications are typically deployed on a virtual machine (VM). Starting up these VMs is an expensive operation and can take quite a few minutes in most cases. The number of VMs that can run on a host is also limited because the entire operating system needs to be started, and thus there are stringent requirements on CPU and memory of the host.
Containers provide several benefits over traditional VM-based deployments. Faster startup and deployments, security and network sandboxing, higher density, and portability across different environments are some of the
commonly known advantages. They also improve portability across machines and reduce the impedance mismatch between dev, test, and prod
environments.
There are efforts like the Open Container Initiative (OCI) that aim to create an industry standard around container formats and runtime. Docker is the first container implementation based on OCI specifications, and is unarguably the most popular container format. Docker nicely complements the Java
containers can then be connected to each other using orchestration
frameworks. The entire setup can then be deployed in a variety of operating systems and run as containers.
This book is targeted toward developers who are interested in learning the basic concepts of Docker and commonly used orchestration frameworks around them. The first chapter introduces the basic concepts and terminology of Docker. The second chapter explains, using code samples, how to build and run your first Docker container using Java. The third chapter explains how support for Docker is available in popular developer toolchains. The fourth chapter is a quick summary. The examples in this book use the Java programming language, but the concepts are applicable for anybody
Acknowledgments
I would like to express gratitude to the people who made writing this book a fun experience. First and foremost, many thanks to O’Reilly for providing an opportunity to write this book. The team provided excellent support
throughout the editing, reviewing, proofreading, and publishing processes. At O’Reilly, Brian Foster believed in the idea and helped launch the project. Nan Barber was thorough and timely with her editing, which made the book fluent and consistent. Thanks also to the rest of the O’Reilly team, some of whom we may not have interacted with directly, but who helped in many other ways. Daniel Bryant (@danielbryantuk) and Roland Huß (@ro14nd) did an excellent technical review of the book. This ensured that the book stayed true to its purpose and explained the concepts in the simplest possible ways. A vast amount of information in this book is the result of delivering the Docker for Java Developers workshop all around the world. A huge thanks goes to all the attendees of these workshops whose questions helped clarify my
Chapter 1. Introduction to
Docker
This chapter introduces the basic concepts and terminology of Docker. You’ll also learn about different scheduler frameworks.
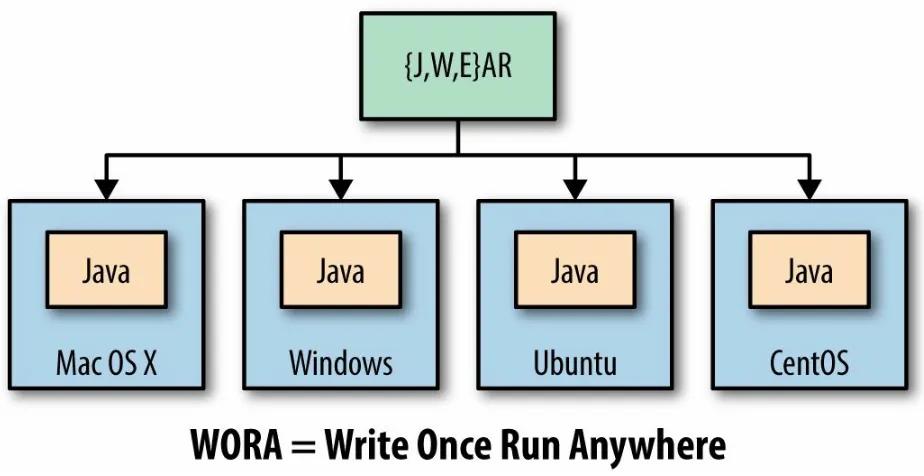
The main benefit of the Java programming language is Write Once Run Anywhere, or WORA, as shown in Figure 1-1. This allows Java source code to be compiled to byte code and run on any operating system where a Java virtual machine is available.
Figure 1-1. Write Once Run Anywhere using Java
Java provides a common API, runtime, and tooling that works across multiple hosts.
memory. It may need to tune the configuration files and include multiple other dependencies. The application, its dependencies, and infrastructure together may be referred to as the application operating system.
Typically, building, deploying, and running an application requires a script that will download, install, and configure these dependencies. Docker
simplifies this process by allowing you to create an image that contains your application and infrastructure together, managed as one component. These images are then used to create Docker containers that run on the container virtualization platform, which is provided by Docker.
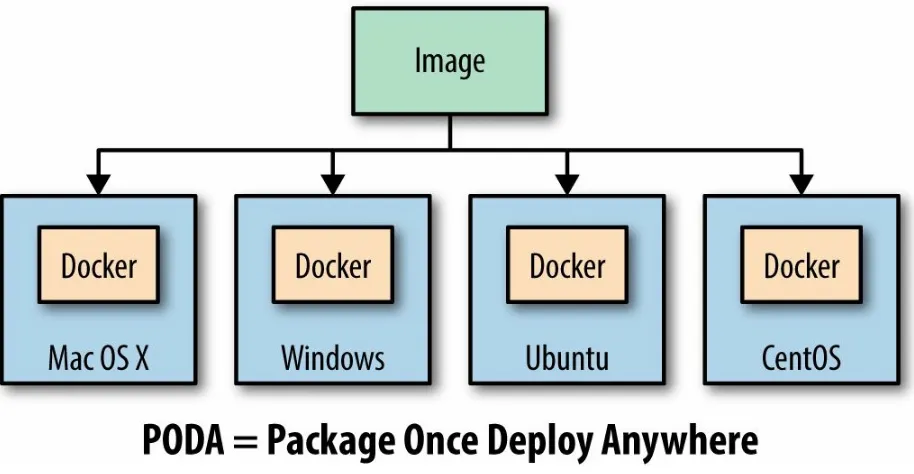
Docker simplifies software delivery by making it easy to build, ship, and run distributed applications. It provides a common runtime API, image format, and toolset for building, shipping, and running containers on Linux. At the time of writing, there is no native support for Docker on Windows and OS X. Similar to WORA in Java, Docker provides Package Once Deploy
Anywhere, or PODA, as shown in Figure 1-2. This allows a Docker image to be created once and deployed on a variety of operating systems where
Docker virtualization is available.
NOTE
Docker Concepts
Docker simplifies software delivery of distributed applications in three ways:
Build
Provides tools you can use to create containerized applications.
Developers package the application, its dependencies and infrastructure, as read-only templates. These are called the Docker image.
Ship
Allows you to share these applications in a secure and collaborative manner. Docker images are stored, shared, and managed in a Docker registry.
Docker Hub is a publicly available registry. This is the default registry for all images.
Run
The ability to deploy, manage, and scale these applications. Docker container is a runtime representation of an image. Containers can be run, started, scaled, stopped, moved, and deleted.
Figure 1-3. Docker architecture
These steps are now explained in detail:
Docker host
A machine, either physical or virtual, is identified to run the Docker Engine.
Configure Docker client
The Docker client binary is downloaded on a machine and configured to talk to this Docker Engine. For development purposes, the client and Docker Engine typically are located on the same machine. The Docker Engine could be on a different host in the network as well.
Client downloads or builds an image
The client can pull a prebuilt image from the preconfigured registry using the pull command, create a new image using the build
command, or run a container using the run command.
Docker host downloads the image from the registry
The Docker Engine checks to see if the image already exists on the host. If not, then it downloads the image from the registry. Multiple images can be downloaded from the registry and installed on the host. Each image would represent a different software component. For example,
Client runs the container
Docker Images and Containers
Docker images are read-only templates from which Docker containers are launched. Each image consists of a series of layers. Docker makes use of a
union filesystem to combine these layers into a single image. Union filesystems allow files and directories of separate filesystems, known as branches, to be transparently overlaid, forming a single coherent filesystem. One of the reasons Docker is so lightweight is because of these layers. When you change a Docker image — for example, update an application to a new version — a new layer gets built. Thus, rather than replacing the whole image or entirely rebuilding, as you may do with a VM, only that layer is added or updated. Now you don’t need to distribute a whole new image, just the update, making distributing Docker images faster and simpler.
Docker images are built on Docker Engine, distributed using the registry, and run as containers.
Multiple versions of an image may be stored in the registry using the format
image-name:tag. image-name is the name of the image and tag is a version assigned to the image by the user. By default, the tag value is latest and typically refers to the latest release of the image. For example,
Docker Toolbox
Docker Toolbox is the fastest way to get up and running with Docker in development. It provides different tools required to get started with Docker. The complete set of installation instructions are available from the Docker website as well.
Here is a list of the tools included in the Docker Toolbox: 1. Docker Engine or the docker binary
2. Docker Machine or the docker-machine binary 3. Docker Compose or the docker-compose binary 4. Kitematic, the desktop GUI for Docker
5. A preconfigured shell for invoking Docker commands
6. Oracle VirtualBox
Docker Engine, Docker Machine, and Docker Compose are explained in detail in the following sections. Kitematic is a simple application for managing Docker containers on Mac, Linux, and Windows. Oracle
VirtualBox is a free and open source hypervisor for x86 systems. This is used by Docker Machine to create a VirtualBox VM and to create, use, and
manage a Docker host inside it. A default Docker Machine is created as part of the Docker Toolbox installation. The preconfigured shell is just a terminal where the environment is configured to the default Docker Machine.
Boot2Docker ISO is a lightweight Linux distribution based on Tiny Core Linux. It is used by VirtualBox to provision the VM.
Get a more native experience with the preview version of Docker for Mac or Windows.
Docker Engine
Docker Engine is the central piece of Docker. It is a lightweight runtime that builds and runs your Docker containers. The runtime consists of a daemon that communicates with the Docker client and execute commands to build, ship, and run containers.
Docker Engine uses Linux kernel features like cgroups, kernel namespaces, and a union-capable filesystem. These features allow the containers to share a kernel and run in isolation with their own process ID space, filesystem
structure, and network interfaces.
Docker Engine is supported on Linux, Windows, and OS X.
On Linux, it can typically be installed using the native package manager. For example, yum install docker-engine will install Docker Engine on CentOS.
On Windows and Mac, it is installed using Docker Machine. This is
Docker Machine
Docker Machine allows you to create Docker hosts on your computer, on cloud providers, and inside your own data center. It creates servers, installs Docker on them, and then configures the Docker client to talk to them. The
docker-machine CLI comes with Docker Toolbox and allows you to create and manage machines.
Once your Docker host has been created, it then has a number of commands for managing containers:
Start, stop, restart container
Upgrade Docker
Configure the Docker client to talk to a host
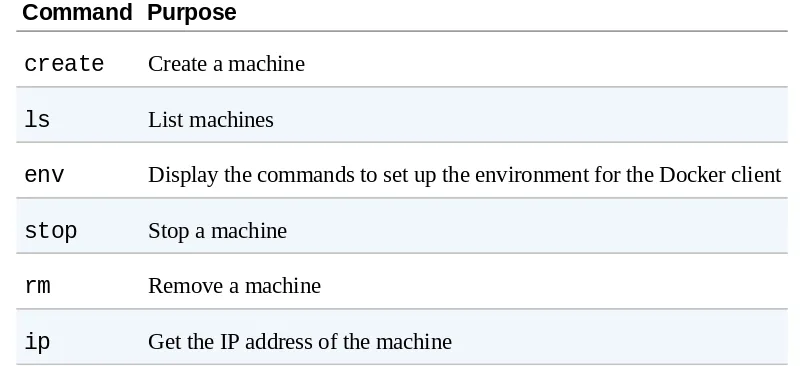
Commonly used commands for Docker Machine are listed in Table 1-1.
Table 1-1. Common commands for Docker Machine
Command Purpose
create Create a machine
ls List machines
env Display the commands to set up the environment for the Docker client
stop Stop a machine
rm Remove a machine
ip Get the IP address of the machine
The complete set of commands for the docker-machine binary can be found using the command docker-machine --help.
created on a local machine uses boot2docker as the operating system. Docker Machine created on a remote cloud provider uses "Ubuntu LTS" as the operating system.
Installing Docker Toolbox creates a Docker Machine called default. Docker Machine can be easily created on a local machine as shown here:
docker-machine create -d virtualbox my-machine
The machine created using this command uses the VirtualBox driver and my-machine as the machine’s name.
The Docker client can be configured to give commands to the Docker host running on this machine as shown in Example 1-1.
Example 1-1. Configure Docker client for Docker Machine eval $(docker-machine env my-machine)
Docker Compose
Docker Compose is a tool that allows you to define and run applications with one or more Docker containers. Typically, an application would consist of multiple containers such as one for the web server, another for the application server, and another one for the database. With Compose, a multi-container application can be easily defined in a single file. All the containers required for the application can be then started and managed with a single command. With Docker Compose, there is no need to write scripts or use any additional tools to start your containers. All the containers are defined in a configuration file using services, and then docker-compose script is used to start, stop, restart, and scale the application and all the services in that application, and all the containers within that service.
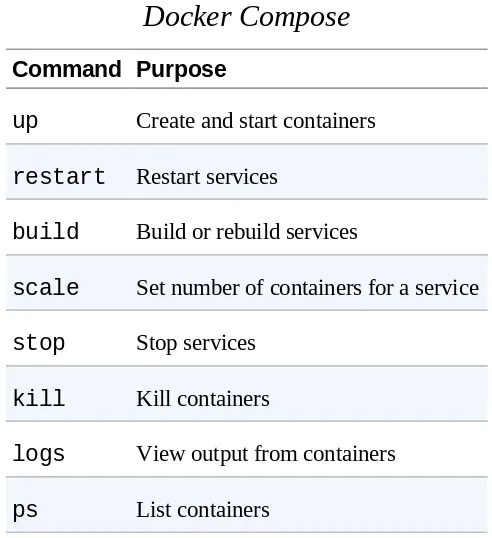
Commonly used commands for Docker Compose are listed in Table 1-2.
Table 1-2. Common commands for Docker Compose
Command Purpose
up Create and start containers
restart Restart services
build Build or rebuild services
scale Set number of containers for a service
stop Stop services
kill Kill containers
logs View output from containers
ps List containers
found using the command docker-compose --help.
The Docker Compose file is typically called docker-compose.yml. If you decide to use a different filename, it can be specified using the -f option to docker-compose script.
All the services in the Docker Compose file can be started as shown here:
docker-compose up -d
Docker Swarm
An application typically consists of multiple containers. Running all
containers on a single Docker host makes that host a single point of failure (SPOF). This is undesirable in any system because the entire system will stop working, and thus your application will not be accessible.
Docker Swarm allows you to run a multi-container application on multiple hosts. It allows you to create and access a pool of Docker hosts using the full suite of Docker tools. Because Docker Swarm serves the standard Docker API, any tool that already communicates with a Docker daemon can use Swarm to transparently scale to multiple hosts. This means an application that consists of multiple containers can now be seamlessly deployed to multiple hosts.
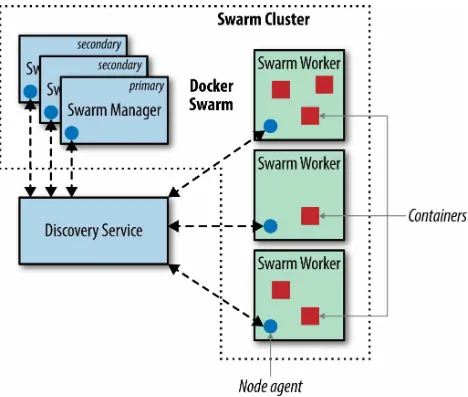
Figure 1-4. Docker Swarm Architecture
Let’s learn about the key components of Docker Swarm and how they avoid SPOF:
Swarm manager
Docker Swarm has a manager that is a predefined Docker host in the cluster and manages the resources in the cluster. It orchestrates and schedules containers in the entire cluster.
The Swarm manager can be configured with a primary instance and multiple secondary instances for high availability.
The Swarm manager talks to a hosted discovery service. This service maintains a list of IPs in the Swarm cluster. Docker Hub hosts a
discovery service that can be used during development. In production, this is replaced by other services such as etcd, consul, or
zookeeper. You can even use a static file. This is particularly useful if there is no Internet access or you are running in a closed network.
Swarm worker
The containers are deployed on nodes that are additional Docker hosts. Each node must be accessible by the manager. Each node runs a Docker Swarm agent that registers the referenced Docker daemon, monitors it, and updates the discovery services with the node’s status.
Scheduler strategy
Different scheduler strategies (spread (default), binpack, and
random) can be applied to pick the best node to run your container. The default strategy optimizes the node for the least number of running
containers. There are multiple kinds of filters, such as constraints and
affinity. A combination of different filters allow for creating your own scheduling algorithm.
Standard Docker API
Docker Swarm serves the standard Docker API and thus any tool that talks to a single Docker host will seamlessly scale to multiple hosts. This means that a multi-container application can now be easily deployed on multiple hosts configured through Docker Swarm cluster.
Docker Machine and Docker Compose are integrated with Docker Swarm. Docker Machine can participate in the Docker Swarm cluster using --swarm, --swarm-master, --swarm-strategy, --swarm-host, and other similar options. This allows you to easily create a Docker Swarm sandbox on your local machine using VirtualBox.
Multiple containers talk to each other using an overlay network. This type of network is created by Docker and supports multihost networking natively out-of-the-box. It allows containers to talk across hosts.
Kubernetes
Kubernetes is an open source orchestration system for managing
containerized applications. These can be deployed across multiple hosts. Kubernetes provides basic mechanisms for deployment, maintenance, and scaling of applications. An application’s desired state, such as “3 instances of WildFly” or “2 instances of Couchbase,” can be specified declaratively. And Kubernetes ensures that the state is maintained.
Kubernetes is a container-agnostic system and Docker is one of the container formats supported.
The main application concepts in Kubernetes are explained below:
Pod
The smallest deployable units that can be created, scheduled, and managed. It’s a logical collection of containers that belong to an application. An application would typically consist of multiple pods. Each resource in Kubernetes is defined using a configuration file. For example, a Couchbase pod can be defined as shown here:
apiVersion: v1 kind: Pod
# labels attached to this pod
metadata:
Each pod is assigned a unique IP address in the cluster. The image
attribute defines the Docker image that will be included in this pod.
A label is a key/value pair that is attached to objects, such as pods. Multiple labels can be attached to a resource. Labels can be used to organize and to select subsets of objects. Labels defined identifying for the object and is only meaningful and relevant to the user.
In the previous example, metadata.labels define the labels attached to the pod.
Replication controller
A replication controller ensures that a specified number of pod replicas are running on worker nodes at all times. It allows both up- and down-scaling of the number of replicas. Pods inside a replication controller are re-created when the worker node reboots or otherwise fails.
A replication controller creates two instances of a Couchbase pod can be defined as shown here:
# that this replication controller is responsible
# for managing
selector:
app: couchbase-rc-pod
# "cookie cutter" used for creating new pods when
Service
Each pod is assigned a unique IP address. If the pod is inside a
replication controller, then it is re-created but may be given a different IP address. This makes it difficult for an application server such as WildFly to access a database such as Couchbase using its IP address. A service defines a logical set of pods and a policy by which to access them. The IP address assigned to a service does not change over time, and thus can be relied upon by other pods. Typically the pods belonging to a service are defined by a label selector.
For example, a Couchbase service might be defined as shown here:
apiVersion: v1 kind: Service metadata:
name: couchbase-service labels:
app: couchbase-service-pod spec:
ports:
- port: 8091
# label keys and values of the pod started elsewhere
selector:
app: couchbase-rc-pod
Note that the labels used in selector must match the metadata used for the pods created by the replication controller.
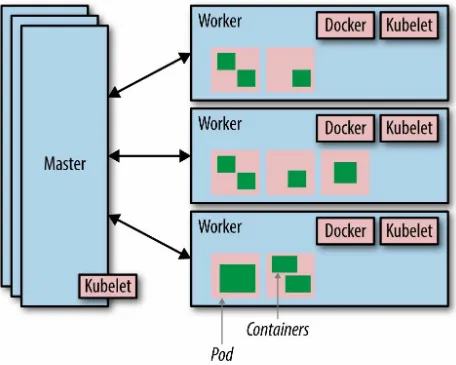
Figure 1-5. Kubernetes architecture
Let’s break down the pieces of Kubernetes architecture:
Cluster
A Kubernetes cluster is a set of physical or virtual machines and other infrastructure resources that are used to run your applications. The machines that manage the cluster are called masters and the machines that run the containers are called workers.
Node
A node is a physical or virtual machine. It has the necessary services to run application containers.
cluster.
A worker node runs tasks as delegated by the master; it can run one or more pods.
Kubelet
This is a service running on each node that allows you to run containers and be managed from the master. This service reads container manifests as YAML or JSON files that describe the application. A typical way to provide this manifest is using the configuration file.
A Kubernetes cluster can be started easily on a local machine for
development purposes. It can also be started on hosted solutions, turn-key cloud solutions, or custom solutions.
Kubernetes can be easily started on Google Cloud using the following command:
curl -sS https://get.k8s.io | bash
Other Platforms
Docker Swarm allows multiple containers to run on multiple hosts.
Kubernetes provides an alternative to running multi-container applications on multiple hosts. This section lists some other platforms allow you to run
Apache Mesos
Apache Mesos provides high-level building blocks by abstracting CPU, memory, storage, and other resources from machines (physical or virtual). Multiple applications that use these blocks to provide resource isolation and sharing across distributed applications can run on Mesos.
Amazon EC2 Container Service
Amazon EC2 Container Service (ECS) is a highly scalable and
high-performance container management service that supports Docker containers. It allows you to easily run applications on a managed cluster of Amazon EC2 instances.
Amazon ECS lets you launch and stop container-enabled applications with simple API calls, allows you to get the state of your cluster from a centralized service, and gives you access to many familiar Amazon EC2 features such as security groups, elastic load balancing, and EBS volumes.
Docker containers run on AMIs hosted on EC2. This eliminates the need to operate your own cluster management systems or worry about scaling your management infrastructure.
Rancher Labs
Rancher Labs develops software that makes it easy to deploy and manage containers in production. They have two main offerings — Rancher and RancherOS.
Rancher is a container management platform that natively supports and
manages your Docker Swarm and Kubernetes clusters. Rancher takes a Linux host, either a physical machine or virtual machine, and makes its CPU,
memory, local disk storage, and network connectivity available on the
Joyent Triton
Triton by Joyent virtualizes the entire data center as a single, elastic Docker host. The Triton data center is built using Solaris Zones but offers an
endpoint that serves the Docker remote API. This allows Docker CLI and other tools that can talk to this API to run containers easily.
Red Hat OpenShift
OpenShift is Red Hat’s open source PaaS platform. OpenShift 3 uses Docker and Kubernetes for container orchestration. It provides a holistic and
simplistic experience of provisioning, building, and deploying your applications in a self-service fashion.
It provides automated workflows, such as source-to-image (S2I), that takes the source code from version control systems and converts them into ready-to-run, Docker-formatted images. It also integrates with continuous
Chapter 2. Docker and Your
First Application
This chapter explains how to build and run your first Docker container using Java.
Dockerfile
Docker builds images by reading instructions from a text document, usually called a Dockerfile. This file contains all the commands a user can usually call on the command line to assemble an image. The docker build
command uses this file and executes all the instructions in this file to create an image.
The build command is also passed a context that is used during image creation. This context can be a path on your local filesystem or a URL to a Git repository. The context is processed recursively, which means any subdirectories on the local filesystem path and any submodules of the repository are included.
It’s recommended to start with an empty directory in order to keep the build process simple. Any directories or files that need to be included in the image can be added to the context.
A file named .dockerignore may be included in the root directory of the context. This file has a newline-separated list of patterns for the files and directories to be excluded from the context.
Docker CLI will send the context to Docker Engine to build the image. Take a look at the complete list of commands that can be specified in the Dockerfile. The common commands are listed in Table 2-1.
Table 2-1. Common commands for Dockerfiles
Command Purpose Example
FROM First noncomment instruction in the Dockerfile FROM ubuntu
COPY Copies multiple source files from the context to the
filesystem of the container at the specified path COPY .bash_profile/home
ENV Sets the environment variable ENV HOSTNAME=test
CMD Default for an executing container CMD ["/bin/echo", "hello world"]
EXPOSE Informs the network ports that the container will listen on EXPOSE 8093
Build Your First Docker Image
Any valid Dockerfile must have FROM as the first non-comment instruction. The argument to FROM defines the base image upon which subsequent instructions in the Dockerfile are executed, such as add packages or install JDK. This base image could be for an operating system such as ubuntu for the Ubuntu operating system, or centos for the CentOS operating system. There are base images available for different operating systems at the Docker website. Additional packages and software can then be installed on these images.
Other images can use this new image in the FROM command. It allows you to create a chain where multipurpose base images are used and additional
software is installed — for example, the Dockerfile for WildFly. The complete chain for this image is shown here:
jboss/wildfly -> jboss/base-jdk:7 -> jboss/base-jdk -> jboss/base -> centos
Often the base image for your application will be a base image that already has some software included in it — for example, the base image for Java. So your application’s Dockerfile will have an instruction as shown here:
FROM java
Each image has a tag associated with it that defines multiple versions of the image. For example, java:8 is the JDK that has OpenJDK 8 already included in it. Similarly, the java:9-jre image has the OpenJDK 9 Java runtime environment (JRE) included in it.
Our First Dockerfile
Let’s create our first Dockerfile: 1. Create a new directory.
This directory will contain the Dockerfile and any other artifacts that need to be included in the image.
2. In this directory, create a new text file and name it Dockerfile. In this file, enter the following code:
FROM java
CMD ["java", "-version"]
Here’s a breakdown of the image definition:
This Dockerfile uses java as the base image. This is a prebuilt image on Docker Hub and can generally be used as the base image for all images that need Java runtime.
This java image is built on the Debian Jessie release and uses OpenJDK. By default, the OpenJDK 8 release is used. For example, the OpenJDK 8 JRE may be specified using 8-jre
as the base image.
The CMD instruction defines the command that needs to run. The command in this case is simply printing the version of Java interpreter.
Build Your First Docker Image
Build the image as shown in Example 2-1.
Example 2-1. Build your first Docker image docker build -t hello-java .
Sending build context to Docker daemon 2.048 kB Step 1 : FROM java
Status: Downloaded newer image for java:latest ---> f298aed75633
Step 2 : CMD java -version ---> Running in 60b49b2e20a5 ---> aae0104e1169
Removing intermediate container 60b49b2e20a5 Successfully built aae0104e1169
The output shows:
The docker build command builds the image. -t provides a name for the image. hello-java is the name of the image. . is the context for the command. This context is used as the base directory for copying any files to the image. No files are copied in this case.
The java image is downloaded from Docker Hub. It also downloads the complete chain of base images.
List the Docker Image
List the images available using the docker images command as shown in Example 2-2.
Example 2-2. List of Docker images
REPOSITORY TAG IMAGE ID CREATED SIZE hello-java latest 2547fe6782bd 3 minutes ago 642.9 MB java latest 97d87da6866e 9 days ago 642.9 MB
Our image hello-java and the base image java are both shown in this list.
Run Your First Docker Container
You can run a Docker container using the docker run command and specify the image name. Let’s run our image as shown here:
docker run hello-java
This shows the following output:
openjdk version "1.8.0_72-internal"
OpenJDK Runtime Environment (build 1.8.0_72-internal-b15) OpenJDK 64-Bit Server VM (build 25.72-b15, mixed mode)
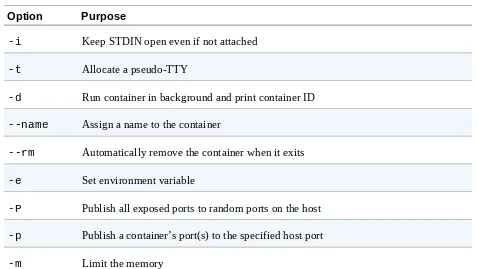
The docker run command has multiple options that can be specified to customize the container. Multiple options can be combined together. Some of the common options are listed in Table 2-2.
Table 2-2. Common options for the docker run command
Option Purpose
-i Keep STDIN open even if not attached
-t Allocate a pseudo-TTY
-d Run container in background and print container ID
--name Assign a name to the container
--rm Automatically remove the container when it exits
-e Set environment variable
-P Publish all exposed ports to random ports on the host
-p Publish a container’s port(s) to the specified host port
The following command runs the container in the background, gives it a name, and automatically removes it when it exits:
Push Image to Docker hub
Docker Hub is a software-as-a-service (SaaS) registry service. You can search, manage, push, and pull images to this registry. The images can be manually pushed to the registry using the docker push command. Alternatively, they can be built when changes are pushed to a GitHub or Bitbucket repository. User and team collaboration can be facilitated by creating public and private registries.
Table 2-3 lists some of the common Docker CLI commands used to interact with Docker Hub.
Table 2-3. Common Docker Hub commands
Command Purpose
login Register or log in to a Docker registry
search Search the Docker Hub for images
pull Pull an image or a repository from a registry
push Push an image or a repository to a registry
logout Log out from a Docker registry
tag Tag an image into a repository
The search and pull commands can be invoked without having an
account on Docker Hub. However, the push command requires you to have an account on Docker Hub, which can be created using the docker login
command or at the Docker Hub website.
The list of Docker images already downloaded on your Docker host is shown in Example 2-2.
The IMAGE ID column in the following code block shows a unique
identifier assigned to this image. A Docker Hub username can be associated with this image using the docker tag and the image ID as shown here:
docker tag aae0104e1169 arungupta/hello-java:latest
The Docker Hub username here is arungupta. Make sure to change this to your Docker Hub username. By default, the latest tag is assigned to the image. In this case, an explicit latest tag is assigned.
Listing the images using the docker images command shows the updated output as shown in Example 2-3.
Example 2-3. List of Docker images with tags
REPOSITORY TAG IMAGE ID CREATED SIZE arungupta/hello-java latest 2547fe6782bd 4 minutes ago 642.9 MB hello-java latest 2547fe6782bd 4 minutes ago 642.9 MB java latest 97d87da6866e 9 days ago 642.9 MB
The newly tagged image now shows up correctly. Now push this image to Docker Hub:
docker push arungupta/hello-java:latest
It shows the output as:
The push refers to a repository [docker.io/arungupta/hello-java] 6d9adc4dcda7: Pushed
Multi-Container and Multi-Host Application
A typical application consists of multiple components, such as an application server, a web server, and a database server. A Docker container does one thing only, and does it well. Each component from the application thus would be a Docker container. And your application would consist of multiple
Docker containers.
These containers need to communicate with each other. For example, the application deployed on the application server will need to know the host address and port on which the database server is running. This can be achieved by using a framework that allows Docker containers to be scheduled. These containers need to be distributed over multiple hosts to avoid SPOF.
The following sections explain how to deploy a simple Java EE application on an application server and access a NoSQL database. WildFly is used as the application server and Couchbase is used as the NoSQL database. The Java EE application will use Java API for RESTful services (JAX-RS) to publish REST endpoints. You’ll learn how the application can be deployed using the following orchestration frameworks:
Docker Compose and Docker Swarm
Deploying Application Using Docker Compose
and Swarm
Defining the Application Using the Compose File
The section on Docker Compose (“Docker Compose”) explained how an application consisting of multiple containers can be defined using a Compose file. The Compose file definition for our Java EE application is defined here:
version: '2' services: db:
container_name: "db"
image: arungupta/oreilly-couchbase ports:
image: arungupta/oreilly-wildfly depends_on:
This file is available on GitHub. This Compose file has:
Two services named db and web.
An image name for each service defined using the image attribute.
Port forwarding from host to container defined using the ports
attribute.
The arungupta/oreilly-couchbase image, which starts the Couchbase server and configures it using Couchbase REST API. The image is built using this Dockerfile.
WildFly application server and deploys the WAR file built from GitHub. The image is built using this Dockerfile.
This Java EE application uses JAX-RS to publish REST endpoints over JSON documents stored in the Couchbase server.
The Couchbase container is given the name db using
container_name attribute.
depends_on requires the web service to start before the db service. This will create a dependency between the containers but the
application-level health check is still up to the user. For example, the Couchbase database may not be completely ready before the application is deployed in WildFly. In this case, the web service needs to be
restarted as docker-compose restart web.
COUCHBASE_URI environment variable identifies the database
container to be used by this web container. This environment variable is then used in the application to connect to the Couchbase server using the
Set Up the Docker Swarm Cluster
This application can be targeted to a single host. But as mentioned earlier, this will be a SPOF. Let’s set up a Docker Swarm cluster to avoid that. Setting up a Docker Swarm cluster using Docker Machine and running an application on it typically involves the following steps:
1. Define discovery service.
All nodes in Docker Swarm cluster need to register with a discovery service. By default, Docker Hub has a hosted service that returns a token. This token can be used to register a Docker Machine as part of the cluster.
Optionally, a new Docker Machine may be created. This machine can run a discovery service, e.g., using Consul. This machine does not need to be part of the Docker Swarm cluster.
2. Create Swarm manager and Worker nodes.
Create at least one Docker Swarm manager node and one Docker Swarm worker node. Make sure to use --swarm-discovery to point to the discovery service. All machines need to use --swarm
and other related options to ensure they are part of the cluster. Swarm manager node is identified by the --swarm-master
option.
3. Configure Docker CLI. Docker CLI is configured to talk to the Docker Swarm cluster using the code shown here:
eval $(docker-machine env --swarm <SWARM-MASTER-NAME>)
<SWARM-MASTER-NAME> is the name of the Docker Machine, which was identified to be the Swarm master. Use docker info
to check the number of nodes in the cluster.
4. Run application.
on the Docker Swarm cluster.
A sample script to create a three-node Docker Swarm cluster is in Example 2-5.
Example 2-5. Three-node Swarm cluster
echo "Creating Docker Machine for Consul ..." docker-machine \
create \
-d virtualbox \ consul-machine
echo "Starting Consul ..."
docker $(docker-machine config consul-machine) run -d \ --restart=always \
-p "8500:8500" \ -h "consul" \
progrium/consul -server -bootstrap
echo "Creating Docker Swarm master ..." docker-machine \
create \
-d virtualbox \ --swarm \
--swarm-master \
--swarm-discovery="consul://$(docker-machine ip \ consul-machine):8500" \
--engine-opt="cluster-store=consul://$(docker-machine ip \ consul-machine):8500" \
--engine-opt="cluster-advertise=eth1:2376" \ swarm-master
echo "Creating Docker Swarm worker node 1 ..." docker-machine \
create \
-d virtualbox \ --swarm \
--swarm-discovery="consul://$(docker-machine ip \ consul-machine):8500" \
--engine-opt="cluster-store=consul://$(docker-machine ip \ consul-machine):8500" \
--engine-opt="cluster-advertise=eth1:2376" \ swarm-node-01
echo "Creating Docker Swarm worker node 2 ..." docker-machine \
create \
-d virtualbox \
--swarm \
--swarm-discovery="consul://$(docker-machine ip \ consul-machine):8500" \
--engine-opt="cluster-store=consul://$(docker-machine ip \ consul-machine):8500" \
--engine-opt="cluster-advertise=eth1:2376" \ swarm-node-02
echo "Configure to use Docker Swarm cluster ..." eval "$(docker-machine env --swarm swarm-master)"
Run Application on Docker Swarm Cluster
After you’ve configured the Docker CLI for the Docker Swarm cluster, start the services using the Compose file from Example 2-4 and using the
command docker-compose up -d.
Check the services using docker-compose ps. Alternatively, the containers can be seen using docker ps. This shows the worker node on which WildFly and Couchbase containers are running. The relevant output is shown in Example 2-6.
Example 2-6. WildFly and Couchbase containers on Docker Swarm nodes IMAGE NAMES
arungupta/oreilly-wildfly:latest swarm-node-02/hellojavaee_web_1 arungupta/oreilly-couchbase:latest swarm-node-01/db
The output shows that WildFly is running on swarm-node-02 and Couchbase is running on swarm-node-01.
Check the logs using docker-compose logs. You may have to restart the web service as previously explained.
The application expects a JSON document that represents a book entity as input, which can be added as shown in Example 2-7.
Example 2-7. Add new entity using REST curl -v \
-H "Content-Type: application/json" \ -X POST -d '{
"isbn": "978-1-4919-1889-0",
"name": "Minecraft Modding with Forge", "cost": 29.99
}' \
http://$(docker-machine ip swarm-node-02): 8080/books/resources/book
Make sure to change the node to where WildFly is running, which is
swarm-node-02 in this case.
This will display the output in Example 2-8.
{"name":"Minecraft Modding with Forge","cost":29.99,"id":"1", "isbn":"978-1-4919-1889-0"}
The complete list of entities can be queried, as shown in Example 2-9.
Example 2-9. Query entities using REST
curl http://$(docker-machine ip swarm-node-02): 8080/books/resources/book
If the Docker Compose application is started on a Docker Swarm cluster then a default, application-specific overlay network is created. A user-defined overlay network can be created as shown in the following code and assigned to the application using the networks attribute in the Docker Compose file:
docker network create --driver overlay my-network
Deploying an Application Using Kubernetes
Defining an Application Using a Kubernetes
Configuration File
“Kubernetes” explained how an application can be defined using a
configuration file. This section will use the Java EE application used in the previous section and deploy it using Kubernetes.
Kubernetes configuration for the application is defined in Example 2-10.
Example 2-10. Kubernetes configuration for the application apiVersion: v1
kind: Service metadata:
name: couchbase-service labels:
name: couchbase-service-pod context: oreilly-docker-book spec:
# receive traffic for this service
selector:
name: couchbase-rc-pod
context: oreilly-docker-book
name: couchbase-rc-pod
context: oreilly-docker-book spec:
One service and two replication controllers. The service is for Couchbase and the replication controllers are for WildFly and
Couchbase. A service is required for Couchbase only as this provides a reliable IP address on which the application deployed in WildFly can rely.
The service, which uses the metadata name: couchbase-rc-pod
and context: oreilly-docker-book in the selector
spec.template.metadata.labels attribute of the Couchbase replication controller.
The image specified using the image attribute in the
spec.template.spec.containers.image attribute.
The arungupta/oreilly-couchbase:latest image, which starts the Couchbase server and configures it using the Couchbase REST API. The image is built using this Dockerfile.
The arungupta/oreilly-wildfly:latest image, which starts the WildFly application server and deploys the WAR file built from Java EE NoSQL sample. The image is built using this Dockerfile.
This Java EE application deployed in WildFly uses JAX-RS to publish REST endpoints over the JSON documents stored in the Couchbase server.
Kubernetes provides two primary means of service discovery.
The Java EE application uses Kubernetes Service-style environment variables to talk to the database. This environment variable is then used in the
application to connect to the Couchbase server using the Couchbase Java SDK API. Using environment variables for service discovery also means that any service a pod wants to access must be created before the pod itself, or the environment variables will not be populated.
An alternative, and strongly recommended, way to discover a service is by using DNS server. There is no ordering restriction between a service and a pod when using the DNS server. The DNS server watches the Kubernetes API for new services and creates a set of DNS records for each.
Run the Application on Kubernetes Cluster
This application can be started as shown here:
kubectl create -f app.yml
The list of created replication controllers can be seen using the command
kubectl get rc, which gives the output shown here:
NAME DESIRED CURRENT AGE couchbase-rc 1 1 6m wildfly-rc 1 1 6m
The list of services can be seen using the command kubectl get svc, which gives this output:
NAME CLUSTER-IP EXTERNAL-IP PORT(S) AGE couchbase-service 10.0.54.170 <none> 8091/TCP,... 6m kubernetes 10.0.0.1 <none> 443/TCP 2h
The list of ports is truncated here, but the command will show a complete output. Similarly, the list of pods can be seen using the command kubectl get po.
Replication controllers, pods, and services are accessible within the
Kubernetes cluster. The WildFly replication controller needs to be exposed as an external service outside the Kubernetes cluster as shown in the following code. This allows us to perform the CRUD operation on the application deployed in WildFly:
kubectl expose rc wildfly-rc --target-port=8080 --port=8080 --type=LoadBalancer
The complete service description can now be seen using the command
kubectl describe svc wildfly-rc, which produces this output:
Namespace: default
Labels: context=oreilly-docker-book,name=wildfly-rc Selector: context=oreilly-docker-book,name=wildfly NodePort: <unset> 30591/TCP Endpoints: 10.244.2.3:8080 Session Affinity: None
Events:
FirstSeen LastSeen Count From SubobjectPath Type... --- --- --- ---- --- ----... 1m 1m 1 {service-controller } Normal Crea... 1m 1m 1 {service-controller } Normal Crea...
The output is truncated, but executing the command will show the complete output. Wait about three minutes for the load balancer to settle. The value of attribute LoadBalancer Ingress shows the externally accessible
address of the service. The application is now fully deployed and ready to be accessed.
The application expects a JSON document as input that defines a book entity, which can be added as shown in Example 2-7. Make sure to change the IP address obtained from the previous step. Executing this command will display the exactly output shown in Example 2-8.
The complete list of entities can be queried as shown in Example 2-9. Make sure to change the IP address obtained in the previous step. Executing the command will display the output shown in Example 2-9.
Chapter 3. Docker and Java
Tooling
A typical toolchain of Java developers consists of an integrated development environment (IDE) such as NetBeans, Eclipse, or IntelliJ IDEA. These IDEs assist in easily writing and debugging the Java application. They also provide features like syntax highlighting and code completion, making the developer more effective.
These applications are packaged as an archive using a build system such as Maven, Gradle, or Ant. All required dependencies of the project are specified in these scripts. Typically one command can create an archive that can then be used for deployment.
This chapter explains how Docker images and containers can be easily managed in NetBeans, Eclipse, and IntelliJ IDEA. It will then show how a Docker image can be created and a container can be started using a Maven plug-in.
NetBeans
NetBeans is adding integrated support for Docker in their next release. At the time of writing, this feature is currently available in the nightly build, which can be downloaded from the NetBeans website.
A new Docker node is added in the Services tab as shown in Figure 3-1.
Configure a Docker Machine
A new Docker host can be configured by specifying the remote API URL of the Docker host as shown in Figure 3-2.
Pull an Image
A new image can be downloaded by right-clicking the newly created connection and selecting “Pull…” as shown in Figure 3-3.
Figure 3-3. Pull or build an image using NetBeans
The exact image name can then be specified, and this image is downloaded from the Docker Hub or the specified registry.
Build an Image
A new image can be created by selecting “Build…” as shown in Figure 3-3 and specifying the directory name that contains Dockerfile. This directory serves as the build context for creating the image.
The Dockerfile editor provides syntax coloring to highlight instructions from comments.
Run a Container
Once an image is downloaded, a container can be started by right-clicking on the image and selecting “Run…” as shown in Figure 3-4.
Figure 3-4. Run Docker Container in NetBeans
Eclipse
Docker support in Eclipse is available by installing a plug-in.
Eclipse introduces a new perspective as shown in Figure 3-5. It contains Docker Explorer, which allows you to manage images and containers.
Figure 3-5. Docker perspective in Eclipse
This perspective offers the following views:
Docker Explorer
A tree view showing Docker connections plus their images and containers.
Docker Images
A table view of all downloaded images for a selected connection.
Docker Containers
A table view of all containers for a selected connection (filter enabled).
Display logs of stdout/stderr output from containers and in some instances allow input to stdin.
Properties
Configure Docker Machine
A new Docker host can be configured by specifying either the Unix socket or the remote API URL of the Docker host as shown in Figure 3-6.
Figure 3-6. Configure Docker Host in Eclipse
Pull an Image
A new image can be downloaded by right-clicking on the newly created connection and selecting “Pull…” as shown in Figure 3-7.
Figure 3-7. Pull an image using Eclipse
Build an Image
A new image can be created by clicking the Build Image wizard as shown in Figure 3-8.
Figure 3-8. Build image in Eclipse
You need to specify the image name. A directory where Dockerfile exists or will be generated also needs to be specified. This directory serves as the build context for creating the image.
Run a Container
Once an image is downloaded, a container can be started by right-clicking on the image and selecting “Run…” as shown in Figure 3-9.
Figure 3-9. Run Docker Container in Eclipse
IntelliJ IDEA
Docker support in IntelliJ IDEA is available by installing a plug-in from the plug-in repository. Install the plug-in as shown in Figure 3-10.
Figure 3-10. Install Docker plug-in in IntelliJ
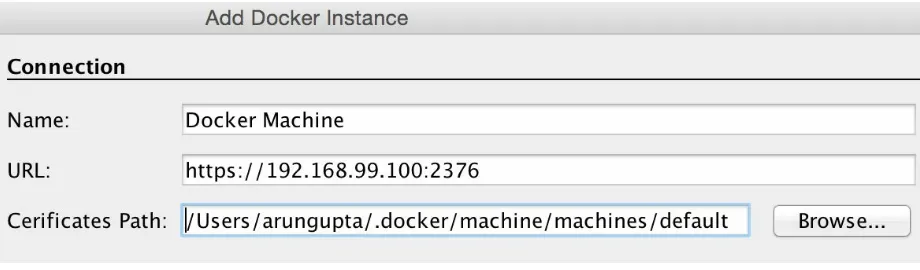
Configure Docker Machine
A new Docker host can be configured by specifying the remote API URL of the Docker host (see Figure 3-11):
1. Select “Import credentials from Docker Machine” to show the list of currently running Docker machines. This also allows you to
configure them with a single click.
2. Navigate to View→Tool Windows→Docker to bring up the Docker Tooling window.
3. Connect to the selected remote server.
Pull an Image
A new image can be downloaded by right-clicking on the newly created connection and selecting “Pull image” as shown in Figure 3-12.
Figure 3-12. Pull an image using IntelliJ
The exact image name can then be specified. By default, Docker Hub is the registry. A different registry can be specified by clicking “New…” as shown in Figure 3-13.
Figure 3-13. Registry name in IntelliJ
Build an Image
Creating a new image requires us to create a new directory, typically called
docker-dir. This directory will contain Dockerfile, the application archive such as the .war file, and a file that has settings for running the container. This directory serves as the build context for creating the image.
Figure 3-14. Build Image in IntelliJ
You need to specify the image name. A directory where Dockerfile exists or will be generated also needs to be specified.
Run a Container
Once an image is downloaded, a container can be started by right-clicking on the image and selecting “Create container”, as shown in Figure 3-15.
Figure 3-15. Run Docker Container in IntelliJ
More details about the container are available in the output console.
Maven
Maven is a build tool for Java applications that makes the build process easy by providing a uniform build system. Maven projects are built using a project object model (POM) defined in a file in the main directory of the project. This file, typically called pom.xml, contains a set of plug-ins that builds the project.
Each Maven project has a well-defined location for source, tests, resources, and other related files of the project. The process for building and distributing a project is clearly defined. There are predefined phases that map to the
lifecycle of a project. For example, the compile phase will compile the code and the package phase will take the compiled code and package it into a distributable format, such as a JAR.
Each plug-in in pom.xml offers multiple goals and the plug-in associates a goal with one or more phases. For example, maven-compiler-plugin
is the plug-in that compiles your source. One of the goals offered by this plug-in is compiler:compile, and it’s tied to the compile phase. So the developer can invoke the mvn compile command, which invokes the associated goal from the plug-in. Read more about the Maven lifecycle at the Apache website.
There are a few Maven plug-ins that provide goals to manage Docker images and containers:
fabric8io/docker-maven-plugin
spotify/docker-maven-plugin
wouterd/docker-maven-plugin
alexec/docker-maven-plugin
the compiled code into a JAR or WAR archive. Associating a goal from the plug-in to this phase can take the created archive and package it as a Docker image. Similarly, the standard Maven install phase installs the archive in the local repository. Attaching a plug-in’s goal to this phase can run the container as well.
The plug-ins listed here offer similar functionality. In this book, we use the
fabric8io/docker-maven-plugin plug-in. It is recommended to look at the latest state of plug-ins and pick the one that meets your
requirements.
Maven allows profiles to be specified using <profile> element in
pom.xml. These profiles allow you to modify certain elements of the POM. The profiles can be triggered in a variety of ways. It’s often convenient to create a separate profile that includes one of the Docker Maven plug-ins and its configuration elements. This allows you to keep the usual build process and still trigger the Docker image and container lifecycle elements by invoking the profile.
Each profile is given a unique name. One of the common ways to invoke the profile is by using -P<profile-name> with the mvn CLI.
Example 3-1 shows a Maven profile that uses the fabric8io/docker-maven-plugin plug-in to create Docker images and run container.
Example 3-1. Docker Maven plug-in profile <profiles>
<profile>
<id>docker</id> <build>
<plugins> <plugin>
<groupId>io.fabric8</groupId>
<descriptorRef>artifact</descriptorRef>
This profile has the following elements:
The profile’s name given by the <id> element, appropriately named "docker" in our case.
The plug-in configuration section defined by the <configuration>
element. The plug-in configuration has a general part and a list of
image-specific configurations, one for each image. With Docker
Machine, the general configuration is not required if the environment is configured as explained in Example 1-1.
This particular plug-in has an image-specific configuration for one image only. The image-specific configuration has three parts, described in items 3, 4, and 5.
A general part containing the image’s name and alias.
<from>, which defines the base image for the generated image.
The <assembly> element is used to define what needs to be bundled in the image using the standard assembly descriptor format. Using
artifact ensures that the generated artifact is packaged in the image.
<cmd>, which specifies the command that will run when the container is started.
An optional <run> configuration defining how the containers should be created and started.
The plug-in used here offers the goals listed in Table 3-1.
Table 3-1. Docker Maven plug-in goals
Goal Description
docker:start Create and start containers
docker:stop Stop and destroy containers
docker:build Build images
docker:watch Watch for doing rebuilds and restarts
docker:push Push images to a registry
docker:remove Remove images from local Docker host
docker:logs Show container logs
Building this project using mvn package docker:build -Pdocker
REPOSITORY TAG IMAGE ID CREATED SIZE hello-maven latest 3432332a5c80 32 seconds ago 642.9 MB
The command mvn install docker:start -Pdocker will not only install the generated JAR file in the local Maven repository but will also run the container, which generates this output:
[INFO] --- docker-maven-plugin:0.14.2:start (docker:start) @... [INFO] DOCKER> [hello-maven] : Start container 6fd55878c304 [INFO] DOCKER> [hello-maven] : Waited on log out 'Hello' 505 ms [INFO]
[INFO] --- docker-maven-plugin:0.14.2:logs (docker:start) @... 6fd558> Hello World!
Chapter 4. Conclusion
Containers are changing the way Java applications are deployed.
The predominant and classical way to deploy an application is to install a JDK, application server, web server, database, and other required components in your data center, whether on-premises or on the public cloud. The
application archive (e.g., .war) is then deployed to the application server. This application will then talk to the database and be exposed using the web server. Typically each component of the application can be scaled
independently, which allows for optimum resource utilization.
During installation, the exact version of the JAR, the number of threads in the operating system, the correct parameters for Java runtime, and many other similar parameters must be configured. There are a variety of tools available to get these right, and they’ve worked well, but each tool come with its own APIs and workflows.
Docker provides a common runtime API, image format, and toolset for
building, shipping, and running containers on both Windows and Linux. This allows you to package your application as Docker containers in an easy and portable way, and to resolve dependencies between them. These applications can run in your on-prem data center or on public clouds. The applications can be packaged using your usual Java toolchain such as NetBeans and Maven. There are Docker images available for JDK, application servers, databases, web servers, and other components.
Big players like Google (Kubernetes, Container Engine), Microsoft (Azure), Red Hat (OpenShift), and Amazon (Container Service) have been continually evolving their container story. Companies that have been doing Linux
around container formats and runtime.
Even though not a strict requirement, containers simplify microservices deployment. There are some common principles behind both: single
responsibility principle, isolation, explicitly published interface, and ability to scale.
There is a lot of excitement and an equal amount of work happening. This is not just hype — Docker provides real and credible benefits of simplicity and portability.
Getting Started with Java and Docker
Docker Labs is a self-paced hands-on introduction to packaging and deploying your Java applications using Docker.
You can take the blue pill and continue to deploy applications in the classical way. Or you can take the red pill and get ready to explore the world of
About the Author
Arun Gupta is the vice president of developer advocacy at Couchbase. He has built and led developer communities for 10+ years at Sun, Oracle, and Red Hat. He has expertise in leading cross-functional teams in developing and executing strategy, and planning and executing content, marketing campaigns, and programs. Prior to that, he led engineering teams at Sun and is a founding member of the Java EE team.
Preface
2. Docker and Your First Application Dockerfile
Build Your First Docker Image Our First Dockerfile
List the Docker Image
Run Your First Docker Container
Push Image to Docker hub
Multi-Container and Multi-Host Application
Deploying Application Using Docker Compose and Swarm Defining the Application Using the Compose File
Set Up the Docker Swarm Cluster
Run Application on Docker Swarm Cluster
Deploying an Application Using Kubernetes Defining an Application Using a Kubernetes Configuration File
Run the Application on Kubernetes Cluster
Run a Container
IntelliJ IDEA
Configure Docker Machine
Pull an Image
Build an Image
Run a Container
Maven
4. Conclusion