•
Migrating to
Android
for
iOS
For your convenience Apress has placed some of the front
matter material after the index. Please use the Bookmarks
iii
Contents at a Glance
About the Author ...
xi
About the Technical Reviewer ...xiii
Acknowledgments ...
xv
Introduction ...
xvii
Part 1: Prepare Your Tools
■
...
1
Chapter 1: Setting Up the Development Environment
■
...3
Chapter 2: Android Programming Basics
■
...27
Part 2: Come Sail Away: A Roadmap for Porting
■
...
59
Chapter 3: Structure Your App
■
...61
Chapter 4: Implement Piece by Piece
■
...173
Part 3: One Step Further
■
...
285
Chapter 5: More About Android Application Components
■
...287
Chapter 6: Android Application Resources
■
...
315
Chapter 7: Common Mobile Use Cases
■
...337
Part 4: Final: The Beginning of Disparity
■
...
489
Appendix A: The Official Android Developers Site
■
...491
xvii
Introduction
In 2000, I started my first PalmOS mobile app for an inventory-tracking project. The initial project was a full-staffed team effort that consisted of mobile developers, SAP consultants, supply-chain SME, J2EE middleware developers, QA testers, solution architects, business sponsors, and so forth. JavaME came up strong in 2002, followed by Pocket/Windows Mobile. I did several mobile projects converting the mobile apps to the PocketPC platform by blindly translating JavaME mobile code to C# .NETCF mobile code. The “translation” efforts prolonged the whole product life cycle. The project achieved higher ROI as the product life extended, because the extra cost of translating mobile code was surprisingly low. Ever since then, I have been translating front-end mobile apps among JavaME, BlackBerry, and Windows Mobile platforms.
In 2009, by repeating the same porting process, I created my first simple iOS app by translating a Windows mobile app. That started my iOS programming journey and which eventually led me to becoming a fulltime iOS developer. It was a no-brainer for me to try porting to Android later.
When you have the whole solution completed for your iOS app, all the issues have been verified and the other deliverables and project artifacts are already reusable. Knowing the Android market share, I always clone my iOS apps to Android. The return on investment (ROI) immediately gets improved because the level of efforts for the Android porting proves to be only a fraction of the entire project’s effort—again and again. It would be just a waste to not do it.
The primary objective of this book is to help experienced iOS developers leap into native Android mobile development. It is easier than you think, and this book will make it even easier with iOS analogies (and mapping guidelines) so you can immediately translate common mobile use cases to Android.
Who Is This Book For?
You don’t need experience in the Java language, although it does help a lot. The most important qualities of Android developers do not include Java programming language experience. It is the mobile SDK and framework knowledge that distinguishes you from other Java programmers. You know one programming language already since you are an iOS developer, so you should be comfortable reading Java code. I also made the sample code extra-readable, so you will have no problem following through the programming subjects and the Java sample code.
There are tons of Java language references out there; you should find them handy sooner or later when you are ready to get serious.
How This Book Is Organized
In Part I, you will get the Android development toolkit up and running in no time. With the Android IDE, you will be guided in creating tutorial projects that will become your porting sample projects. I believe this is the best way for you to get hands-on experience while learning programming topics.
Part II of this book shows you how to plan and structure your Android apps by following the same iOS thinking process: create a storyboard and break the app into model-view-controller (MVC) classes. You will be able to reuse most of the existing software artifacts and design from the iOS counterparts. The common mobile topics are followed, including user interface, managing data, and networking with remote services. After you finish Part II, you will be able to create simple but meaningful Android apps with rich UI components, and to handle common CRUD (create, read, update, delete) operations locally and remotely. There are still more Android goodies to come.
In Part III, this book recaps the Android framework fundamentals with code instead of just descriptions. You will discover the uniqueness of the Android framework and appreciate many features that you normally don’t have in iOS. Several powerful and repeatable mobile UX patterns are also introduced. Once you get here, you should be fully convinced that you can do everything in Android just like you do in iOS. The last chapter walks you through a case study that ports a complete iOS app to Android. It recaps how to use the iOS analogies and mapping guidelines from the topics in previous chapters. You can also use the book’s table of contents to help find the porting guidelines as needed.
1
Part
1
Prepare Your Tools
A handy tool makes a handy man. This is very true for creating software, too. You use Xcode to write, compile, debug, and build code; it is an Integrated Development Environment (IDE) for iOS programming. ADT in Eclipse is an IDE for Android programming, which offers comparable tools and features as Xcode. The first part of the chapter walks you through the installation options and steps for getting it up and running. All the topics in this book come with sample code. You will need to use the IDE to learn from these sample projects and you will use the IDE to create world-class Android apps, too.
3
Chapter
1
Setting Up the Development
Environment
It is more fun to see apps run than to read the source code, and you cannot get hands-on programming experience by just reading books. Let’s get the development environment up and running first so that we can use it—and learn Android programming along the way.
The Android Developer Tools Plugin for Eclipse
IOS ANALOGY
Just as Xcode is an IDE for creating iOS apps, the ADT plugin for Eclipse is an IDE for creating Android apps.
The Android Developer Tools (ADT) plugin for Eclipse is the Android-programming integrated development environment (IDE) that we will go over in detail. It is a full Java IDE that includes the Android SDK to help you build, test, debug, and package your Android apps. It is free, open source, and runs on most major operating system (OS) platforms, including the Mac OS. The ADT plugin is not a developer’s only choice, but probably the one most commonly used. We will use it throughout this book.
Installing the All-in-One Bundled Package
With a single download, the ADT Bundle includes everything you need, including the following:
Eclipse
The ADT plugin for Eclipse
Android SDK Tools
Android Platform-tools
The latest Android platform
The device emulator image for the latest Android platform
Get the single download for your Mac at http://developer.android.com/sdk/index.html#mac-bundle.
It is a ZIP file. Unzip it and put the contents of the ZIP file anywhere you want; for example, if you put it in /Applications/adt-bundle-mac, it should look like Figure 1-1.
Figure 1-1. The adt-bundle-mac folder structure
All you need to do is download it and unzip it. Please allow me to repeat: you won’t need to configure it after you install it. Go ahead and launch the Eclipse.app. Let’s keep it in the Mac OS Dock so that you can launch it at any time.
Installing the Eclipse ADT Plugin
You may choose to manually install the components in the ADT Bundle and go through the
configuration steps. The ADT plugin for Eclipse is a custom plugin for the Eclipse IDE that provides an integrated environment to develop Android apps. It extends the capabilities of Eclipse to let you quickly set up new Android projects, build an app user interface (UI), debug your app, and create app packages (APKs) for distribution.
I installed and configured the ADT plugin manually because I also use Eclipse for JavaEE
programming, and I want to share common Java classes between JavaEE server code and Android client code. If you choose to install the plugin to your existing Eclipse instance, chances are you already have experience with the Eclipse IDE.
If you are not a JavaEE developer or just want to keep things simple for now, you should skip the following instructions and do the all-in-one bundled package installation.
Note Even if you already have Eclipse installed, you still can have multiple Eclipse instances. You should only need to go through this plugin option if you need to share Java classes between Android projects and J2EE projects.
If you decide to go with the manual ADT plugin option for your existing Eclipse app, please visit the Android official site (http://developer.android.com/sdk/installing/installing-adt.html) for detailed instruction.
For the Mac OS, you can also follow the “Installing the ADT Plugin Cheat Sheet,” which is modified from the preceding URL for your convenience.
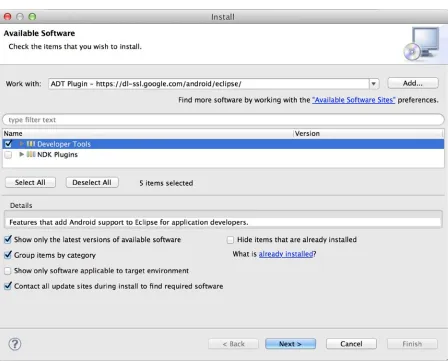
INSTALLING THE ADT PLUGIN CHEAT SHEET
Do the following to download the ADT plugin:
1. Open the Install wizard from the Eclipse top menu bar by selecting Help➤Install New Software
2. In the Add Repository dialog, enter the following and then click OK. a. Enter ADT Plugin in the Name field.
b. Enter https://dl-ssl.google.com/android/eclipse/ in the Location URL.
Figure 1-2. Install New Software ➤ Add Repository
Note If you have trouble acquiring the plugin, try using “http” in the Location URL instead of “https”.
a. Select the Developer Tools check box and then click Next.
4. You should see a list of the tools to be downloaded. Click Next and follow the onscreen instructions to complete the installation. When the installation completes, restart Eclipse.
Do the following to specify the Android SDK location:
1. Get the Android SDK, which contains the framework libraries and the development toolkit.
a. Download the ZIP file from http://developer.android.com/sdk/index.html#download. b. Unzip the file to your SDK Location folder, which is /Applications/adt-bundle-mac/sdk.
2. From the Eclipse top menu bar, select Eclipse➤Preferences . . . to open the Eclipse Preferences screen (see Figure 1-4). Select Android from the left panel and enter your SDK Location:
/Applications/adt-bundle-mac/sdk.
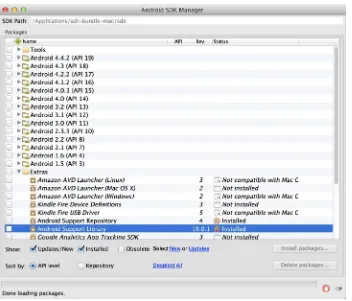
Do the following to add platforms and packages:
1. You need at least one platform-specific SDK and tools. Use the Android SDK Manager to obtain them for the latest platform (API 19 is the latest as of this writing).
2. From the Eclipse top menu bar, select Window➤Android SDK Manager to launch the Android SDK Manager. Figure 1-5 shows the platform API and tool packages that I have installed.
3. You want to install at least the following three packages (actually the first two, but you will need the last one later):
a. Tools
b. The latest Android API: Android 4.4.2 (API 19) as of this writing c. Extra: The Android Support Library
Follow the onscreen instructions to complete the installation.
MacBook Retina Display
If you have a Mac with a beautiful retina display, the Eclipse screen resolution looks awfully bad because it is not yet optimized for retina display. My eyes simply cannot stand the low resolution on my retina screen. It really has zero effect on any code you write, but please do the following so that you don’t waste the beauty of a retina display:
1. In the Finder, right-click Eclipse.app and then select Show Package Contents.
2. Modify the Info.plist file with any text editor, such as TextEdit.app. If you have Xcode, double-clicking will open the file in the Xcode editor as well. Note that your modifications (see Listing 1-1) go inside <dict> </dict>.
Listing 1-1. Eclipse Info.plist File
<plist version="1.0">
3. Force your Mac OS to reload the preceding changes the next time you launch Eclipse.app. This can be easily achieved using the shell touch
command.
4. Open the Terminal program and issue the touch command, as shown in Listing 1-2.
Listing 1-2. The Touch Command
[/Applications/adt-bundle-mac/eclipse]$ cd /Applications/adt-bundle-mac/eclipse [/Applications/adt-bundle-mac/eclipse]$ ls
Eclipse.app configuration epl-v10.html notice.html plugins artifacts.xml dropins features p2 readme [/Applications/adt-bundle-mac/eclipse]$ touch Eclipse.app/
Bingo! Eclipse should have a retina display now.
The Eclipse Workbench
Figure 1-6. The Eclipse Workspace Launcher
for almost any Java solutions, including JavaEE, JavaME, the Blackberry SDK, various third-party vendor solutions, or SDKs. There is also a C/C++ plugin called Eclipse CDT for the C/C++ toolchain and make utility. There is an Eclipse plugin for the Symbian mobile development toolkit as well.
The Eclipse Workspace
Enough of the motivational talk, let’s start using Eclipse and create a workspace.
IOS ANALOGY
Same as the Xcode workspace idea, the Eclipse workspace is a logical grouping of related projects; however, the Eclipse workspace needs to be a physical folder.
Please complete the following steps to create an Eclipse workspace:
1. Launch Eclipse and enter a folder name for the Workspace (see Figure 1-6), such as /Users/sliao/Documents/adtWs.
Figure 1-7. The ADT Welcome! screen
Figure 1-8. The Eclipse Workbench
3. Go ahead and play with this window to satisfy your curiosity if you wish. Don’t be afraid of messing up anything. For example, there are many options in the menu bar and a few buttons on the toolbar. The context menu always contains hidden gems. You can get back any time by going to the menu bar and selecting Windows ➤ Reset Perspective . . . .
Learning Eclipse has been one of my best investments of time. It is the only tool that I am still using since Y2K. I did not get many chances to reuse the same tool for other technologies. If you have been in IT for a long time, you know what I am talking about.
Eclipse can do a lot, more than the Android IDE. But you don’t need to know everything today. After all, it is a tool, and you naturally get better at it when you use it often. We will focus on using it for Android programming.
Create an Android Project Using the Template
You just got the right tool, and it is up and running. Wouldn’t you like to see some real action—like creating an Android app and see it running? I’d like that, too! You can make sure your IDE is working properly as well.
My very first Xcode app was actually created using the Create a new Xcode project template (see Figure 1-9) when I had no idea what Objective-C looked like. All I wanted was to see something running in no time. Yep, Xcode did it for me nicely. I was very happy with myself when I felt I created an iOS app without knowing anything! Hey, there is nothing wrong with making yourself happy right?
Figure 1-10. Create a new Android Application project
The objective of this lesson is to create an Android app as quickly as possible. Let’s hold any programming questions for now to finish the project as fast as you can. Please complete the following steps:
1. Launch the Eclipse.app if it is not launched yet.
2. Open the Android Application wizard from the Eclipse top menu bar and select File ➤ New ➤ Android Application Project (see Figure 1-10).
3. Do the following in the New Android Application section (see Figure 1-11), and then click Next.
a. Enter LessonOne in the Application Name field.
b. Select the latest SDK, which is the last option on the Minimum Required SDK drop-down menu. The latest SDK package is preinstalled with the bundled ADT; otherwise, you might need to install the corresponding SDK version.
4. On the next screen, keep all the default values in the Configure Project section (see Figure 1-12). Click Next.
Figure 1-11. New Android Application section
5. You can supply an optional launcher icon on the next screen. Click Next to use the default Android robot icon (see Figure 1-13).
Figure 1-13. Configure Launcher Icon
6. The next screen is Create Activity (see Figure 1-14), where you do the following:
a. Select the Create Activity check box.
b. Select Master/Detail Flow. It is the most sophisticated template among the three choices, making it more fun to play with this app later. Click Next
You just created an ADT project, the LessonOne project. It should appear in the Package Explorer view (see Figure 1-16). Just like using Xcode project creation templates, the ADT New Android Application wizard creates the ADT project folder, the application source code, and all the resources for building the template apps.
Figure 1-16. LessonOne project in Project Explorer
Build the Project
IOS ANALOGY
The Xcode Build action keyboard shortcut on the Mac is Command-B (⌘B).
The Eclipse workbench is set to Build Automatically by default (see Figure 1-18); you don’t need to build ADT projects explicitly. Let’s keep this option; I just wanted to point out that you can disable this option and do a manual build (⌘B) if you wish to.
When I have a lot projects in the workspaces, I may choose to disable the automated build option to avoid the build actions that kick in automatically. This takes up a lot of your CPU whenever any resource is being saved. When this feature annoys me, I turn it off.
Launch the App
IOS ANALOGY
The Xcode Run action keyboard shortcut on the Mac is Command-R (⌘R).
The LessonOne project should have no errors. You can launch the app and see it run on device emulators or on Android-powered devices. The emulator is a very important piece of any IDE. In the following steps, you will prepare an Android Virtual Device (AVD) and launch the LessonOne project onto a device emulator.
1. From the LessonOne project context menu, select Debug As ➤ Android Application (see Figure 1-19).
Figure 1-19. Debug As Android Application
Figure 1-21. AVD Manager
Figure 1-20. Android AVD Error: No compatible targets were found
4. Click the New. . . button to continue creating your first AVD (see Figure 1-22). Leave everything as the default, except the following:
a. Enter any name, such as nexus7, in the AVD Name field. b. Select Nexus 7 from the Device drop-down menu.
c. Select the highest API level from the Target drop-down menu. This is the most significant attribute. The Target needs to be compatible with the Minimum Required SDK specified for your app in Figure 1-11, which should be what you entered when creating the LessonOne project.
d. Optionally, enter information for any other fields with your app’s required specific hardware. For example, if your app saves data on external storage, you will experience an error if information in the SD Card section is not specified.
5. Figure 1-23 shows the newly created AVD, which is compatible with the LessonOne project.
Figure 1-23. AVD list
Note I always experience a timeout error on the first try. You might experience the same error if your machine is not fast enough. The newly created AVD seems to take too long to start up. If you get an error message, relaunch again after the emulator has started.
Figure 1-24. LessonOne app in emulator
Play with the app and the emulator. A mouse-click event on an emulator is equivalent to a touch event on a real Android device. If you don’t have a device yet, definitely play with the emulator to get familiar with the emulated Android device.
Tip Rotate the emulator (fn+Ctrl+F12) in landscape mode to see how the LessonOne app does. Check
To launch the app onto physical Android devices, the steps are basically the same. However, it might not work immediately, depending on your device model. We will talk about on-device debugging in detail in a later chapter. For now, if your app is launched and running on an AVD, your mission is completed!
Summary
By downloading the Xcode-like all-in-one ADT installation package, you can get your Android IDE ready without hassle. This chapter walked you through the basic Android programming tasks in the Eclipse workspace, with a template to build an ADT project. This chapter also showed you how to debug and run your Android app in an ADT emulator. You haven’t written any code yet, but your tool is working and verified. You will learn more and gain hands-on programming experience from the guided exercises along this journey.
CHECKPOINT
You have installed the ADT on your computer. It is working and verified.
•
You have created one to three Android projects using the ADT template.
•
You have built and run an Android project onto the ADT emulator.
•
27
Chapter
2
Android Programming Basics
Creating mobile apps for both iOS and Android is fun and rewarding. With the right tools in place, you are ready to write code, build, and run Android apps now. Java is the programming language for writing Android apps. Also, the Java programming model is different from other Java platforms. Your next steps should be learning the fundamentals of the following:
The Java programming language
The Android framework
If you are able to read Java code, go ahead and skip the Java programming subchapter if you want. The programming language is more of a tool than a technology for creating meaningful apps. For this book, I will not dive too deeply into Java techniques. The best way to learn new tools and languages is with practical experience and practice. However, the whole book uses code to explain Android concepts and technologies. The purpose of the first part of this chapter is to ensure that you can read the Java code in this book. To achieve this goal, you will be creating a HelloJava project. You will be able to read the Java code in this book when you are able to write the code.
Regarding the second part of the chapter, I actually don’t think you can be a good Android developer without a good understanding of the fundamentals of the Android Application Framework. There are shortcuts to getting into Android programming. You definitely can take advantage of your existing mobile knowledge to shorten the learning curve. In the long run, however, I believe you will be limited and will still need to come back to the fundamentals when you want to fly freely with any creative ideas. You may not need to understand everything about the Android framework in the beginning, but I believe knowing “just enough” to feel the different programming paradigm will allow you to march into Chapters 3 and 4. Later, the materials are heavily step-by-step instructions based; while you follow these mapping instructions, I also want you to have the right thinking process so that the ideas stick better with you.
The Java Language in a Nutshell
Java, which is used to create Android apps, is one of the easiest object-oriented programming (OOP) languages. Java has simpler syntactical rules than Objective-C. I am very confident that learning the Java language won’t be the highest hurdle for you. You will start writing Java code soon. If you have been in software programming since before the iPhone evolution, you probably already know C/C++/C#, or JavaScript—or maybe you know Java already. Java is just another natural programming language for the C++/C# developer.
You can choose to skip this chapter if you have no problem reading Java code. If you are totally new to it and you only know Objective-C, please go over this chapter to quickly get familiar with Java programming tasks in the Eclipse environment. You will create the HelloJava program in Eclipse. It will help you read the Java code and build your Android projects throughout the book.
IOS ANALOGY
Language Syntax Comparison in an Absolute Nutshell
Objective-C Java
#import "Xyz.h" import packagename.Xyz; @interface Xyz : NSObject public class Xyz extends Object @protocol Abc public interface Abc
@interface Xyz : NSObject <Abc> class Xyz extends Object implements Abc @property int mProperty; private int mProperty;
-(id)init public Xyz() // no return value Xyz* obj = [[Xyz alloc] init]; Xyz obj = new Xyz();
-(void) doWork: (NSString*) arg; public void doWork(String arg) [obj doWork: arg]; obj.doWork(arg);
// comments ... // comments ...
HelloJava with Eclipse
Instead of my describing the usages and syntax rules in a formal way, you are going to create a HelloJava project and write the code list from the iOS analogy table yourself. You really don’t need to remember exact Java syntax rules because the compiler will tell you if you are doing something wrong. Eclipse actually gives you suggestions on how to fix it, too. Not only will you learn Java in a nutshell from writing the code yourself, you will also do the following common programming tasks in Eclipse: create a class, build and compile a project, and use the debugger.
Create a Java Project
Eclipse.app is used to create Java programs for various Java platforms, including Android, JavaEE, JavaSE, and so forth. To demonstrate basic Java and to highlight the syntactical differences
between Java and Objective-C, you are going to create a stand-alone JavaSE program, because it is really simple and you can focus on the subject without being sidetracked by other questions.
To create a Java project in Eclipse, follow these instructions:
1. Launch the Eclipse.app if it is not launched yet.
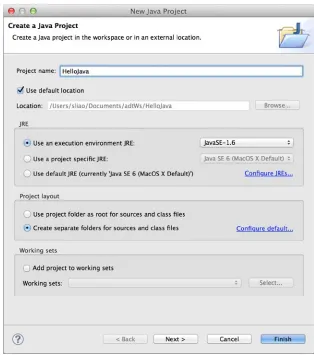
2. Start the New Java Project wizard (see Figure 2-1) from the top menu bar by selecting File ➤ New ➤ Java Project. Then do the following:
a. Enter HelloJava in the Project name field.
The HelloJava project appears in the Eclipse Package Explorer view, just like the LessonOne Android project in Chapter 1.
Create a Java Class
IOS ANALOGY
Objective-C @interface
You are going to create two classes. The first one demonstrates how to instantiate an object instance and invoke methods by sending messages to the other Java object. This class also contains the Java app entry method. The second class demonstrates very fundamental Java declarations, including class, fields, and methods.
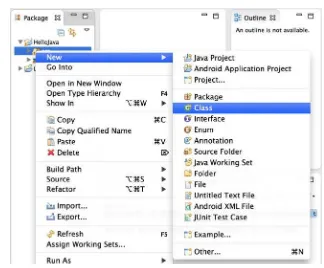
To create the first class, complete the following steps:
1. Expand the newly created HelloJava project, right-click the $PROJ/src folder to bring up the folder context menu (see Figure 2-2), and select New ➤ Class.
Figure 2-2. Create a new class from the folder context menu
2. Complete the following requirements in the New Java Class dialog (see Figure 2-3):
a. Enter com.pdachoice.hellojava in the Package (a.k.a. namespace) field. b. Enter Main in the Name (class name) field.
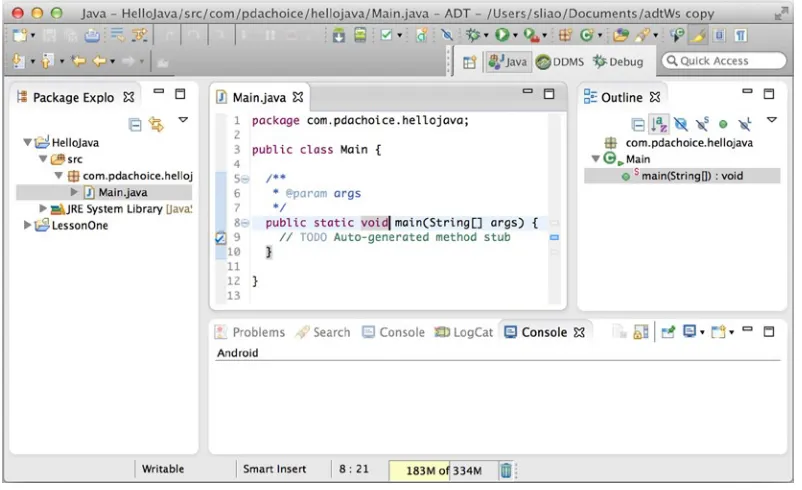
3. Click Finish to complete the wizard. The barebones Main class with the Java app entry method is created in the src/com.pdachoice.hellojava/Main.java
file, as shown in Figure 2-4. Figure 2-3. New Java class dialog
This Main class has one method, the Java program entry method. Just for fun, let’s add one line of code to print out some string; for example, “Hello, Java!” (see Listing 2-1).
Listing 2-1. Java Program Entrance Method
public static void main(String[] args) { // print out "Hello Java" in Console String message = "Hello, Java!";
System.out.println(message); // same as NSLog(@"...") in iOS }
IOS ANALOGY
• iOS app main.m:int main(int argc, char *argv[ ])
• iOS app log output:NSLog(@"Hello, Java")
• Xcode Type Ahead with autocompletion feature: Ctrl+<space> (same as the Eclipse Java editor)
Eclipse Tip Eclipse Java editor command shortcut keys:
Auto Completion: Ctrl+<space>
Auto Import: Shift+command+o
Auto Indention/format: Shift+command+f
There are many more. From the top menu bar, select ADT (or Eclipse) Preferences...➤General ➤Keys for key bindings.
To create the second class that I mentioned earlier, complete the following steps:
1. Create a POJO (Let’s talk like a Java guru!). POJO is a well-known Java acronym for Plain Old Java Object. Basically, it is just a simple domain object with conventional accessors. Use the same New Java Class dialog
(see Figure 2-3) to create a one.
a. Enter Programmer in the Name field.
b. Uncheck the public static void main(...) check box.
c. Click Finish. The Programmer.java file should be created and displayed in the Eclipse Java editor, as shown in Listing 2-2.
Listing 2-2. A Simple POJO Class
package com.pdachoice.hellojava;
public class Programmer {
public Programmer() {
// TODO Auto-generated constructor stub }
}
2. Create a Programmer property (a.k.a. Java field): name. Manually create the conventional getter and setter: getName() and setName(...) as shown in Listing 2-3.
Listing 2-3. Java Property
public class Programmer {
...
public String getName() { return name;
}
public void setName(String name) { this.name = name;
} ...
}
Note There are no header files in Java. Unlike Objective-C header files that define the public methods or properties, Java uses an access modifier to control the accessibility, that is, public, protected, private, and so forth. Whereas the private method can only be used inside the Java class implementation, public methods are like the Objective-C defined in the header files, which are accessible by other classes outside of the implementation class.
In Java, a property is implemented as a private Java field with public accessors, very similar to the Objective-C @property.
Eclipse Tip There are lots of goodies everywhere in the context menu. For example, the Java class Context Menu➤Source➤Generated Getters and Setters... Eclipse IDE generates the conventional getters and setters, as you did in Listing 2-3.
Create a Java Interface
IOS ANALOGY
The Objective-C @protocol defines object obligations.
In object-oriented programming, it is important to define a set of behaviors that are expected of certain objects. In Objective-C, you use the @protocol. In Java, you declare interface.
These terminologies seem a little bit confusing here because the @interface is a keyword in Objective-C that defines class, whereas interface is a keyword in Java for object obligation, a.k.a. contract, or @protocol in Objective-C.
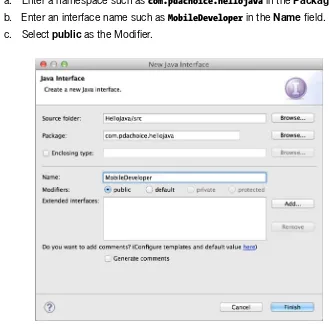
Create a Java interface called MobileDeveloper by doing the following:
1. Similar to creating a new class, right-click the $PROJ/src/com.pdachoice. hellojava folder. From the context menu, select New ➤ Interface. Complete the following requirements as shown in Figure 2-5:
a. Enter a namespace such as com.pdachoice.hellojava in the Package field. b. Enter an interface name such as MobileDeveloper in the Name field. c. Select public as the Modifier.
Figure 2-5. The create Java interface dialog
2. From the Java editor, add a method, writeCode. Listing 2-4 shows the entire MobileDeveloper interface.
Listing 2-4. MobileDeveloper Java Interface
package com.pdachoice.hellojava;
Implement the Interface
IOS ANALOGY
@interface MyClass: NSObject <MyProtocol>
For a Java class to confront to the expected behavior, we make the class implement the Java interface that defines the expected behavior. To make the Programmer class implement the MobileDeveloper interface, do the following:
1. From the Java editor, modify src/com.pdachoice.hellojava/Programmer.java
and declare the Programmer class to implement the MobileDeveloper interface as shown in Listing 2-5.
Listing 2-5. Declare Java Interface Implementation
public class Programmer implements MobileDeveloper { ...
}
Note Until you complete the next step, the Eclipse compiler complains that the class must implement the required method.
2. Provide the writeCode method implementation body, as shown in Listing 2-6.
Listing 2-6. Java Method Body
package com.pdachoice.hellojava;
public class Programmer implements MobileDeveloper {
... @Override
public void writeCode(String arg) { // some dummy implementation
String str = String.format("%s wrote: Hello, %s!", this.name, arg); System.out.println(str);
} ...
}
Use the Java Class and Method
You have created a Java Programmer class and implemented the MobileDeveloper obligations, pretty much the same way you normally do in Xcode except with different syntax. Next, you will use the class you just created. No surprise, it is the same in principle but in a different syntax, sending a message to the receiver from the sender.
IOS ANALOGY
Programmer* you = [[Programmer alloc] init]; [you setName:@"You"];
[you doWork:@"Java"];
Do the following to see how the Eclipse debugger works:
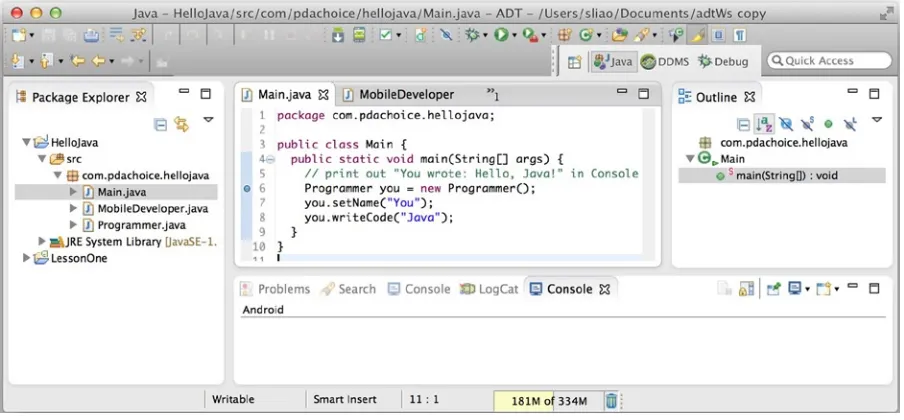
1. Modify the Java app entry method in src/com.pdachoice.hellojava/Main.java
to use the Programmer class, as shown in Listing 2-7.
Listing 2-7. Java Entry Method: main(...)
package com.pdachoice.hellojava;
public class Main {
public static void main(String[] args) {
// print out "You wrote: Hello, Java!" in Console Programmer you = new Programmer();
you.setName("You"); you.writeCode("Java"); }
}
The Eclipse Java Debugger
Debugging and fixing code is one of the most fun and most common programming tasks. To be productive, knowing how to use the debugger in an integrated development environment (IDE) makes a big difference. You normally would set a breakpoint in the right line of code to see the programming flow by step thru code and/or inspect variables. Do the following to see how the Eclipse debugger works:
Note To turn on line numbers in Eclipse editors, go to the ADT top menu bar and select Preferences...➤ General➤Editors➤Text Editors➤Show Line Numbers.
Figure 2-6. Breakpoint
2. To run the HelloJava project in the debugger, from the HelloJava project context menu, select Debug as ➤ Java Application. If the Confirm Perspective Switch dialog appears, click Yes.
Note I have highlighted four views in the Debug Perspective for your attention: Debug Toolbar (A),
Stack Trace (B), Variables (C), and Console (D).
Figure 2-7. Debug Perspective, Stack Trace view
4. The Debug Toolbar (A) contains those common debugger action
buttons—Resume, Suspend, Step Into, Step Out, Step Over, and so forth. The icons actually look similar to those in Xcode. Let’s step to line 7 using the
Step Over button in the Debug Toolbar.
Eclipse Tip Move the mouse over the buttons in the Debug Toolbar (A) to see the hover text.
6. Keep an eye on the Output Console (see region D in Figure 2-7). Step Over one more line to execute the last line of code. The screenshot in Figure 2-9 shows the program output in the Output Console.
7. Stack Trace, Variables, and Console views all have a similar look and feel in most of the IDE, including Xcode. The only one that might not be that trivial in Eclipse is the Console Selector. If you don’t see any output in Console view, the right console might not be selected. Make sure the right Console view is selected by using the Console Selector button, as highlighted in Figure 2-9.
Eclipse Tip During a debug session, you can bring up a context menu from any variable or statement. You can choose Context Menu➤Inspect during the debug session to inspect a variable or evaluate a statement.
You have completed the HelloJava project and wrote the code listed in the language syntax comparison table at the start of this chapter. You also set a breakpoint in the Eclipse debugger to step through code and inspect variables. The Eclipse debugger is as good as Xcode, with one more advantage: you actually can evaluate any code during an active debugger session. Simply highlight any variable or an expression, and select Inspect or Display from the context menu. You can get the results immediately, without restarting the Java program. I think that this is very handy and saves a lot of debugging time.
As you follow through Android projects in this book, you will discover more tips and get more productive in the Eclipse IDE environment.
Android Application Framework Fundamentals
The fundamental app architecture, project setup, and project source files are not similar to iOS projects. In my opinion, it appears quite different from most of the application architectures in most of the common platforms. I personally was not able to comprehend the beauty of the differences when I read them the first time on the official Android Developers site. I had to come back to revisit these topics when I needed to. I did appreciate everything more after I got more experience. Kind of a chicken-and-egg scenario, isn’t it?
I decided to briefly cover Android Application framework fundamentals just enough for now so that you can get your head around the differences between Android and iOS. We will revisit the same topics in Chapter 5 with practical use cases. In this chapter, you will gain a high-level understanding of what an Android application is composed of and learn what the software artifacts are for in a typical Android project for the HelloAndroid project that you will be creating yourself. No programming techniques will be introduced; you should just focus on understanding the software components.
Android Applications
QUICK OVERVIEW
1. Android applications are composed of one or more application components (activities, services, content providers, and broadcast receivers).
2. Each component performs a different role in the overall application behavior and each one can be activated individually (even by other applications).
3. Each project contains a manifest file that declares all components in the application and also declares the application requirements, such as the minimum API version and any hardware configurations required.
4. Noncode application resources (images, strings, layout files, etc.) should include alternatives for different device configurations (such as different strings for different languages and different layouts for different screen sizes).
Android applications are written in the Java programming language along with resource files and any software artifacts required by the SDK tools. You use Android SDK tools to compile all the software artifacts and bundle them into an archive file with an .apk file extension, called an Android package file. A single Android package (.apk) file normally contains one application that can be loaded onto Android devices.
Each Android application is assigned a unique user ID. Only the same user ID has access to any of the files in the application. Also, when the application runs, it runs in its own Linux process that has its own Java virtual machine (JVM). This ensures that the application code and the runtime memory are used in isolation from other applications. This way, each app can only access the files and memory belonging to itself by default. In other words, unless you explicitly share data using allowed techniques, you can assure your users that your application and user data are protected in a secure environment.
Note The Principle of Least Privilege: Each Android application, by default, has access only to the components that it requires to do its work, and no more.
IOS ANALOGY
Both iOS and Android are Unix-like BSD-compliant operating systems. The iOS apps are archived with an .app suffix and each lives in its own security sandbox, too.
Application Components
There are four application components defined in Android system:
Activity
Each Android application contains one or more Android application components. Activity is the component that most straightforwardly compares to an iOS app; it is the Android component that presents the user interface to users and normally is executed in the foreground to interact with users, just like iOS apps do. There are also three other types of application components. Each type serves a distinct purpose.
When it comes to creating Android apps, the application components are the essential building blocks. As a developer, you write code to create application components that define how the system or other apps activate your component. When the application component is activated, the component lifecycle methods that perform the intended application behaviors are executed.
All Android developers should know the four Android application components, but I think it could be fairly dry for a beginner to just read the definitions and rules of the application components. Let’s go over this topic in simplified terms first. In this chapter, I am going to put a little more weight on the activity component. You will create a HelloAndroid project that contains only an activity, so that you can visualize it. Although the other three application components are intended for different usages, the Android framework treats them the same in many regards (of course, there are some differences as well). We will revisit these topics with sample code in Chapter 5.
Activity
Although an activity is not a must-have application component in every Android application, it is likely the most-used component among the four. Every Android app with a user interface must have an activity component, because an activity is the only application component that provides a user interface with which users can interact with, such as dialing the phone, taking a photo, sending an e-mail, viewing a map, or anything else your application wants to convey to users via the user interface.
Prior to fragment being introduced in API 11 in 2011, you had to create multiple activity application components for multiple screens in an Android app, which always seemed like overkill to me. Fragment is similar to activity from user interface perspectives, but it is not an application component. It is bounded with a layout file just like activity.
I like to use the iOS UIViewController as an analogy to an Android fragment, and the iOS container view controller as an analogy to an Android activity:
One fragment manages one content view: for example, an iOS storyboard scene
or XIB file vs. Android layout file.
An activity coordinates child fragment(s) just like iOS container view controller
coordniates child UIViewController(s).
Both Android and iOS have lifecycle callback methods: for example, an iOS
viewDidAppear vs. an Android onResume, and so forth.
To port an iOS app to Android, you will certainly use fragment with activity. Details are coming up in Chapters 3 and 4.
Service
In contrast to activity, the service application component doesn’t have a user interface. Since it doesn’t need to interact with users directly, the service component is a good choice for computing tasks that don’t require users to attend to the app. Users can be away from or switch to other apps while the service code continues to run in the background. Playing music or downloading large files while the user is away are good examples of using service components.
Content Provider
As the name implies, the content provider manages shared application data. Recall from earlier in the chapter (see the note about the Principle of Least Privilege) that an application cannot share its data by default. For applications to provide data service, you can create a content provider to manage shared data and provide information services. For example, Android system apps like Calendar and Contacts contain a content provider to allow other apps to retrieve or insert data.
Broadcast Receiver
You can think of Android broadcast receiver usage as similar to the iOS NSNotificationCenter mechanism, but it can live on its own. It is designated to respond to any broadcast announcements, such as system shutdown or low-battery broadcasts. You can also send your own broadcast intents and use broadcast receiver components to receive data from other apps for implementing certain interprocess communication (IPC) use cases.
Intents and Intent Filters
IOS ANALOGY
A unique aspect of the Android system design is that any application can start another application’s component. This makes integrating any existing app fairly easy. If some apps already contain certain screens or certain features, you can incorporate them into your apps by simply activating the particular application components from your code, including those preloaded system apps. For example, if you want the user to be able to make a phone call from within your app, instead of writing your phone call features and creating the dial-pad UI, and so forth, you can simply use the preloaded system phone app. To your users, it seems as if the phone dialer is a part of your application.
These are fairly unique aspects not presented in iOS; there is very limited interprocess
communication support in the iOS SDK. You will write code for reusing the preloaded system apps, as well as your own application components, after you become more familiar with basic Android development tasks.
Application Resources
Most of the apps are composed of more than programming code; for example, a typical iOS project contains Object-C source code, libraries, one or more storyboard files, images or multimedia files, property archive files, an info.plist, and so forth. Xcode compiles and builds the whole project and bundles all the artifacts required for an app. Similarly, an Android application is composed of more than just Java code—it requires other resources, application resources, such as images, audio files, and anything relating to the visual presentation of the application; for example, you need to define animations, menus, styles, colors, and the screens with XML files.
For every application resource that you include in your Android project, the SDK build tools define a unique integer ID, which you can use to reference the resource from your Java code or from other resources defined in XML. For example, if your application contains an image file named logo.png
(saved in the res/drawable/directory), the SDK tools generate a resource ID named R.drawable.logo, which you can use to reference the image and to insert it in your user interface.
Your Android application normally runs on a wide range of Android devices with different device configurations, such as screen sizes and resolutions, language and locales, and so forth. The Android framework recognizes many types of device configurations and loads the appropriate application resources if applications provide different sets of application resources for any particular device configuration. This is called an alternative resource. When providing a specific type of alternative resource, you append the appropriate configuration qualifier to the resource folder so that the Android system can clearly load the right set based on this identifier. You will revisit this topic in Chapter 5.
Let’s take a break from the preceding lectures and create the HelloAndroid project next. You are going to use the live project to visualize how the concepts are translated into software artifacts in the Android project.
The HelloAndroid Project
As an iOS developer, you know this iOS project can be created in three minutes. The same Android project can be created with the same effort as well. However, let’s do it more slowly and cross-reference the lectures mentioned earlier.
Create an ADT Project
To create a new Android Development Tools (ADT) project, use the New Android Application dialog (see Figure 2-11) to start. The following steps are repeated from an exercise in Chapter 1.
1. In Eclipse, start the Android Application Project wizard from the top menu bar and select File ➤ New (or start from the Package Explorer context menu):
a. For the Application Name, select HelloAndroid. This is the app name that appears to users.
b. For the Project Name, enter HelloAndroid. This is the name of your project directory and the project name in Eclipse.
c. For the Package Name, enter com.pdachoice.helloandroid. Each Android app has a package name attribute that must be unique across all applications installed on the Android system. It’s generally best if you use a name that begins with the reverse domain name of your organization or publisher entity.
d. For the Minimum Required SDK, select API 19. This setting lets you select the lowest version of Android platforms that your app will support. Older devices run on a lower API. The lower you can declare here, the more devices you can support. However, you might lose the new API features in your apps. You need to choose between supporting older devices and newer API features.
e. For the Target SDK, select API 19, which is the latest version (default), of this writing. The Target SDK indicates the highest version of Android with which you have tested your application.
f. For Compile With, select API 19 (the latest version as of this writing). By default, this setting is set to the latest version of Android available in your ADT so that you can take advantage of the latest framework API. The devices supported are limited to the minimum required SDK specified earlier.
g. Select a Theme. This specifies the Android UI style to apply for your app. SDK provides many system themes; you can choose one to start with before customizations.
2. On the next screen, which configures the project, make sure that Create Activity is checked and that Mark this project as a library is not checked. Activity is one of the most frequently used Android app components with a user interface. This app will contain one activity. Leave the rest at the default settings and click Next (see Figure 1-12).
3. The next screen will help you create a launcher icon for your app. You can play with it if you like; whatever you do here will probably not break anything. Or, you can just click Next (see Figure 1-13).
4. For a barebones Android app, select Blank Activity and click Next. 5. To keep the project simple, make sure the Navigation Type is none. The
default Activity Name, the Layout Name and Fragment Layout Name are just fine. Leave them as is and click Finish.
Note The layout files are the screen associated with the activity. Similar to an XIB file or a storyboard scene in an iOS app, you call it layout in Android.
Figure 2-12. Android project folder structure
All the project files need to be in the correct folder (as shown in Figure 2-12) as follows:
$PROJ/src: Java source files. This is where you will find the Java source files, including the implementation of Android application components. For example, you have created an activity called MainActivity.
$PROJ/libs: Java libraries, or JAR files, go in the folder. Java libraries are just like static libraries used in your Xcode project.
$PROJ/res: This is where you find all the application resource files, including layout files, strings, image files, and so forth. The folder and subfolder names have significant meanings that cannot be changed; different types of resources are organized in appropriate subfolders.
The Application Manifest File
IOS ANALOGY
Information property list file, Info.plist.
The Android system needs to know all the concepts you have read about regarding Android app fundamentals. The Android system gets the information from a file in the application bundle package called the Android manifest file. It is a human-readable file in XML format that the developer creates. Each Android app must name this file AndroidManifest.xml and be located in the project root folder. This file explicitly tells the Android system what the app is all about; for example, the application components in it and the attributes of these components, and so forth. Recall that I mentioned you can activate any component in any app by sending the appropriate intent message to the Android system (not to the app directly). This is how the Android system knows how to forward the intent message to the right target: by reading the application manifest file that describes the application’s components and the intent matching rules.
AndroidManifest.xml also describes the following important information to the Android system: Certain sensitive or security-related API that requires a user’s explicit
permission; for example, using the Internet or any communication adapters, reading the user’s contacts or current location, and so forth.
A minimal Android API level. This is to avoid your app getting installed on
Android devices that cannot execute any of the API used in your app.
The hardware required by the app, such as a camera, GPS, NFC, SD card, or
any other hardware, or the minimum screen resolution you chose for your app, and so forth.
There are many more.
Let’s take a close look at the HelloAndroid AndroidManifest.xml, as shown in Listing 2-8.
Listing 2-8. HelloAndroid AndroidManifest.xml
<?xml version="1.0" encoding="utf-8"?>
<manifest xmlns:android="http://schemas.android.com/apk/res/android"
package="com.pdachoice.helloandroid"
android:versionCode="1"
android:versionName="1.0" >
<uses-sdk
android:minSdkVersion="8"
android:targetSdkVersion="19" /> <application
android:allowBackup="true"
android:icon="@drawable/ic_launcher"
android:label="@string/app_name"
<activity
android:name="com.pdachoice.helloandroid.MainActivity"
android:label="@string/app_name" > </application>
</manifest>
The Android manifest file content is written in XML format. Those XML tags and attributes define the intended purposes to the Android system. Pay attention to the following tags, which clearly describe the concepts you have read earlier in this chapter.
package="com.pdachoice.helloandroid": Earlier I mentioned that each app must have a unique name (see the “Android Application” section). Use this attribute of manifest to define a unique name for your app.
android:minSdkVersion="8": This attribute of <uses-sdk> defines the minimal Android SDK level required to install the app.
<activity> ... </activity>: This is how you declare any application
component in your app. In the HelloAndroid app, you created one activity and you declared the activity here to let the system know.
<intent-filter>: Earlier I mentioned that a developer needs to define how application components can be activated by appropriated intent. This tag tells the system how intent can be used to activate this component. For this activity in the HelloAndroid app, the combination of the action and category attributes actually tells the system that this Activity can be launched from the system launch app. More details in Chapter 5.
I can define more in-depth attributes, but you probably don’t need to know them all at once. You can look up the syntax and official definitions for the complete XML attributes online from: http://developer.android.com/guide/topics/manifest/manifest-element.html.
Device Debugging
Now I’ll demonstrate one of the most important attributes: android:minSdkVersion. You always need to answer an important question in the Android manifest file for almost all Android projects. Recall the Android Virtual Device (AVD) emulator from Chapter 1. How do you feel about the emulator? It’s not bad, right? But do you run out of patience waiting for the emulator to come up? AVDs are free and have practical values in Android development because not many developers can buy all the different types of devices needed to certify their apps. Device fragmentation is for sure a bigger problem on Android platforms. (Watch out, iOS is catching up on this issue, too.)
To run the HelloAndroid project on your Android device, do the following:
1. Enable USB debugging on your device (a one-time setup).
a. On most devices running Android 3.2 or older, you can find the option under Settings ➤ Applications ➤ Development.
b. On Android 4.0 and newer, it’s in Settings ➤ Developer options.
Note On Android 4.2 and newer, the Developer options feature is hidden by default. To make it available, go to Settings➤About phone and tap Build number seven times. Return to the previous screen and you will be able to find Developer options.
2. Set up your computer to detect your device. Most of you are developing on Mac OS X since you are already iOS developers, so this should work and you can skip this step.
Note If you are not developing on Mac OS, please use the online instructions to install the USB driver with appropriate configurations: http://developer.android.com/tools/device.html.
3. Connect your device to your computer’s USB port.
4. The rest of the steps are the same as those in the “Launch the App” section in Chapter 1, except you need to select the run target from the Android Device Chooser screen (see Figure 2-13).
a. If you see your device on the list, you are lucky to have one of the latest and greatest devices on the market. Choose it to run the app on your device. The screenshot shown in Figure 2-13 shows that I have a Nexus 4 Android phone connected to my computer.
5. If your device doesn’t meet the required application requirements declared by the HelloAndroid project, your device won’t appear on the Android Device Chooser. Only eligible AVDs or devices will appear on the list. Check the
minSdkVersion attribute in the ADT HelloAndroid manifest file. Same as with the Google Play Store, your phone can only see the apps that your device is eligible to use. The Android system avoids the apps that cannot run on your device. Figure 2-13. Android Device Chooser
Note Just like an iOS app, you can limit you app runtime target at a certain iOS version. You want to make sure that only qualified devices can install your app, rather than letting your apps just crash from runtime on nonsupported devices.
6. Check the Android version of your phone. On the device, launch the Settings
ADT is smart enough to recognize that it is not a legible device for this Android project. One quick fix is to lower the HelloAndroid app requirement by changing it to 8 or below; for example, by changing it to 4 (android:minSdkVersion="4").
Build and relaunch the HelloAndroid project. Android 2.3.6 version supports API 8 or below, and this device will now appear in in the Android Device Chooser. You should see the barebones HelloAndroid app running on the device (see Figure 2-15).
Figure 2-15. HelloAndroid
Note It doesn’t look like the iOS app yet (see Figure 2-10). We will complete the app in Chapter 3.
If you were not able to run the HelloAndroid project on your device, you will not be able to run the LessonOne project for the same reason. Can we do the same thing by changing the following in the LessonOne manifest file?
android:minSdkVersion="4"
It doesn’t even compile!
IOS ANALOGY
You don’t use an iOS 7–specific API in your project and expect the app to run on older versions of iOS; for example:
• Auto Layout was introduced in iOS 6. Do you want to use this feature for the ease of development? Or do you not use it so that you can reach iOS 5 devices?
• Social Framework was also introduced in iOS 6. Do you want to use this feature for your app? Or do you not use it, considering there are users still using iOS 5? Or do you write additional code for iOS 5 and below to achieve what essentially the new iOS 6 APIs do?
I have no clear answers for your project because it requires business justifications. You should follow a similar thinking process to make intelligent decisions for your mobile apps, just as you and your business sponsors normally do. Most likely, you have done that for your iOS apps. More or less, similar business and mobile factors apply to your Android apps as well. After you make the business decision, you declare this decision in the application manifest file.
Android publishes and updates device distribution statistics charts frequently, that you can find it on the official Android Developers site: http://developer.android.com/about/dashboards/index.html.
Summary
We actually talked about a lot of things on the surface, starting with Java language comparisons to Objective-C. The purpose of these comparisons is not to emphasize the differences, it is just a way to quickly show you that the object-oriented programming concepts actually are very similar— except the syntactical differences that you can clearly identify in side-by-side listings. You still create classes, and send and receive messages to objects by calling the receiver’s methods.
The second part of this chapter, Android Application Framework Fundamentals, was actually hard for me to write because these are new concepts to iOS and not easy to comprehend without prior experience. I could have chosen to defer these topics to the end of the book, but I feel it is very important to prepare you for accepting the Android programming mind-set from the beginning. If you don’t have questions now, great, you are ready for next step. If you do have questions, this is truly better because that is what every learning journey is all about: find the questions first and find the answers to the questions next.
CHECKPOINT
Does the following sound familiar to you now?
Java syntax looks different from Objective-C. But many object-oriented programming tasks are
•
similar: create classes and methods, then send messages to the receiver by calling the receiver’s methods.
The Eclipse editor and debugger aren’t bad, right? The context menu contains gems everywhere.
•
There are four application components. How many can you name?
•
The activity component is the application component with a user interface to interact to users,
•
just like iOS apps.
Android apps contain various application resources, such as strings, images, screens, and so forth.
•
Does
• alternative resource ring a bell?
The Android manifest file tells an Android system what the app is in XML format.
•
59
Part
2
Come Sail Away: A Roadmap
for Porting
In Part II, you will receive the porting guidelines and the matching techniques from the start to the end of the Android project. You will plan and structure your Android apps following the same thinking process you normally use with iOS apps. After you finish Part II, you will be able to create simple but meaningful Android apps with rich UI components, and to handle common CRUD operations locally and remotely.
Your migrating-to-Android roadmap is similar to the iOS Getting Started roadmap at a high level, with translation guidelines in lower-level implementation. This Android “getting started” roadmap is customized for iOS developers, which fits with your comfortable iOS thinking process:
1. Create an iOS-like simplified Android storyboard using the counterpart iOS app and storyboard as your Android app wireframe.
2. Detail the Android content views using the counterpart iOS storyboard scenes as your user interface (UI) mockups.
3. For each Android class, continue with the top-down approach to port the Objective-C properties and the signatures of every method from the counterpart Objective-C class. Focus on preserving the method signatures with an empty method body.
61
Chapter
3
Structure Your App
Recall the roadmap for porting iOS apps to Android, which we just talked about in the introduction of Part II. It is the first step in setting the foundation and structure of your Android app. In this software implementation phase, you naturally need to make design decisions on how you’d like to structure your app in terms of organizing your code into classes. In iOS, you naturally break down your iOS GUI app into MVC classes, starting with creating a storyboard prototype using the Xcode storyboard feature. For your porting purposes, you want to follow your iOS thinking process using the same top-down approach: create the iOS-like storyboard first.
In this key step, you are aiming at class-level mappings from iOS counterparts. We will discuss the well-known model-view-controller (MVC) concept in Android first, followed by how to create the iOS-like storyboard deliverable in Android. With the guided screen navigation patterns, the iOS-like storyboard naturally breaks your Android apps into MVC components that can be mapped to iOS counterparts.
Model-View-Controller in Android
IOS ANALOGY
• Content view: A scene in a storyboard file or in an XIB file using Interface Builder. There is no storyboard-like feature in ADT.
• Content view controller: UIViewController.
• Event listener: In Java, this is much like the delegate object in Objective-C in the well-known event-delegation design pattern, or in the publisher-subscriber design pattern described in the Gang of Four’s (GoF) design pattern book.