P E N E T R A T I O N
T E S T I N G
A H a n d s - O n I n t r o d u c t i o n
t o H a c k i n g
San Francisco
PENETRATION TESTING. Copyright © 2014 by Georgia Weidman.
All rights reserved. No part of this work may be reproduced or transmitted in any form or by any means, electronic or mechanical, including photocopying, recording, or by any information storage or retrieval system, without the prior written permission of the copyright owner and the publisher.
Printed in USA
For information on distribution, translations, or bulk sales, please contact No Starch Press, Inc. directly:
No Starch Press, Inc.
245 8th Street, San Francisco, CA 94103
phone: 415.863.9900; fax: 415.863.9950; [email protected]; www.nostarch.com
Library of Congress Cataloging-in-Publication Data
Weidman, Georgia.
Penetration testing : a hands-on introduction to hacking / Georgia Weidman. pages cm
Includes index.
ISBN 978-1-59327-564-8 (paperback) -- ISBN 1-59327-564-1 (paperback)
1. Penetration testing (Computer security) 2. Kali Linux. 3. Computer hackers. I. Title. QA76.9.A25W4258 2014
005.8'092--dc23
2014001066
No Starch Press and the No Starch Press logo are registered trademarks of No Starch Press, Inc. Other product and company names mentioned herein may be the trademarks of their respective owners. Rather than use a trademark symbol with every occurrence of a trademarked name, we are using the names only in an editorial fashion and to the benefit of the trademark owner, with no intention of infringement of the trademark.
About the Author
Georgia Weidman is a penetration tester and researcher, as well as the founder of Bulb Security, a security consulting firm. She pre-sents at conferences around the world includ-ing Black Hat, ShmooCon, and DerbyCon, and teaches classes on topics such as penetration testing, mobile hacking, and exploit develop-ment. Her work in mobile security has been featured in print and on television internation-ally. She was awarded a DARPA Cyber Fast Track grant to continue her work in mobile device security.
B R I E F C O N T E N T S
Foreword by Peter Van Eeckhoutte . . . xix
Acknowledgments . . . xxiii
Introduction . . . .xxv
Chapter 0: Penetration Testing Primer . . . 1
PART I: THE BASICS Chapter 1: Setting Up Your Virtual Lab . . . 9
Chapter 2: Using Kali Linux. . . 55
Chapter 3: Programming . . . 75
Chapter 4: Using the Metasploit Framework . . . 87
PART II: ASSESSMENTS Chapter 5: Information Gathering . . . 113
Chapter 6: Finding Vulnerabilities . . . 133
Chapter 7: Capturing Traffic . . . 155
PART III: ATTACKS Chapter 8: Exploitation. . . 179
Chapter 9: Password Attacks. . . 197
Chapter10: Client-Side Exploitation . . . 215
Chapter 11: Social Engineering. . . 243
Chapter 12: Bypassing Antivirus Applications . . . 257
Chapter 13: Post Exploitation . . . 277
Chapter 14: Web Application Testing . . . 313
PART IV: EXPLOIT DEVELOPMENT
Chapter 16: A Stack-Based Buffer Overflow in Linux . . . 361
Chapter 17: A Stack-Based Buffer Overflow in Windows . . . 379
Chapter 18: Structured Exception Handler Overwrites . . . 401
Chapter 19: Fuzzing, Porting Exploits, and Metasploit Modules. . . 421
PART V: MOBILE HACKING Chapter 20: Using the Smartphone Pentest Framework . . . 445
Resources . . . 473
C O N T E N T S I N D E T A I L
FOREWORD by Peter Van Eeckhoutte xix
ACKNOWLEDGMENTS xxiii
INTRODUCTION xxv
A Note of Thanks . . . .xxvi
About This Book. . . .xxvi
Part I: The Basics. . . xxvii
Part II: Assessments . . . xxvii
Part III: Attacks . . . xxvii
Part IV: Exploit Development. . . xxviii
Part V: Mobile Hacking . . . xxviii
0 PENETRATION TESTING PRIMER 1 The Stages of the Penetration Test . . . 2
Pre-engagement . . . 2
Information Gathering . . . 4
Threat Modeling . . . 4
Vulnerability Analysis . . . 4
Exploitation . . . 4
Post Exploitation . . . 4
Reporting . . . 5
Summary . . . 6
PART I
THE BASICS
1 SETTING UP YOUR VIRTUAL LAB 9 Installing VMware . . . 9Setting Up Kali Linux . . . 10
Configuring the Network for Your Virtual Machine . . . 13
Installing Nessus . . . 17
Installing Additional Software . . . 20
Setting Up Android Emulators . . . 22
Smartphone Pentest Framework. . . 27
Target Virtual Machines . . . 28
Creating the Windows XP Target . . . 29
VMware Player on Microsoft Windows . . . 29
VMware Fusion on Mac OS . . . 31
John the Ripper . . . 210
Cracking Linux Passwords . . . 212
Cracking Configuration File Passwords . . . 212
Rainbow Tables . . . 213
Online Password-Cracking Services. . . 213
Dumping Plaintext Passwords from Memory with Windows Credential Editor . . . 213
Local File Inclusion . . . 324
Remote File Inclusion . . . 327
Command Execution. . . 327
Cross-Site Scripting. . . 329
Checking for a Reflected XSS Vulnerability . . . 330
Leveraging XSS with the Browser Exploitation Framework . . . 331
Cross-Site Request Forgery . . . 335
Web Application Scanning with w3af . . . 335
Summary . . . 337
15 WIRELESS ATTACKS 339 Setting Up . . . 339
Viewing Available Wireless Interfaces . . . 340
Scan for Access Points . . . 341
Monitor Mode . . . 341
Capturing Packets . . . 342
Open Wireless . . . 343
Wired Equivalent Privacy . . . 343
WEP Weaknesses . . . 346
Cracking WEP Keys with Aircrack-ng . . . 347
Wi-Fi Protected Access . . . 350
WPA2 . . . 351
The Enterprise Connection Process . . . 351
The Personal Connection Process . . . 351
The Four-Way Handshake . . . 352
Cracking WPA/WPA2 Keys . . . 353
Wi-Fi Protected Setup . . . 356
Problems with WPS . . . 356
Cracking WPS with Bully . . . 357
Summary . . . 357
PART IV
EXPLOIT DEVELOPMENT
16 A STACK-BASED BUFFER OVERFLOW IN LINUX 361 Memory Theory . . . 362Linux Buffer Overflow . . . 364
A Vulnerable Program . . . 365
Causing a Crash. . . 366
Running GDB . . . 367
Controlling EIP . . . 373
Hijacking Execution. . . 375
Endianness. . . 376
Summary . . . 378
PART V
MOBILE HACKING
20
USING THE SMARTPHONE PENTEST FRAMEWORK 445
Mobile Attack Vectors. . . 446
Text Messages . . . 446
Near Field Communication. . . 446
QR Codes . . . 447
The Smartphone Pentest Framework . . . 447
Setting Up SPF . . . 447
Android Emulators. . . 449
Attaching a Mobile Modem . . . 449
Building the Android App . . . 449
Deploying the App . . . 450
Attaching the SPF Server and App. . . 452
Remote Attacks . . . 453
Default iPhone SSH Login . . . 453
Client-Side Attacks . . . 454
Client-Side Shell . . . 454
USSD Remote Control . . . 456
Malicious Apps . . . 458
Creating Malicious SPF Agents . . . 459
Mobile Post Exploitation . . . 464
Information Gathering . . . 464
Remote Control . . . 465
Pivoting Through Mobile Devices . . . 466
Privilege Escalation . . . 471
Summary . . . 472
RESOURCES 473
F O R E W O R D
I met Georgia Weidman at a conference almost two
years ago. Intrigued by what she was doing in the
mobile device security field, I started following her
work. At nearly every conference I’ve attended since
then, I’ve run into Georgia and found her
passion-ately sharing knowledge and ideas about mobile
device security and her Smartphone Pentesting
Framework.
In fact, mobile device security is only one of the things Georgia does. Georgia performs penetration tests for a living; travels the world to deliver training on pentesting, the Metasploit Framework, and mobile device secu-rity; and presents novel and innovative ideas on how to assess the security of mobile devices at conferences.
hacker—always willing to share her findings and knowledge with our great infosec community—and when she asked me to write the foreword to this book, I felt very privileged and honored.
As a chief information security officer, a significant part of my job revolves around designing, implementing, and managing an information security program. Risk management is a very important aspect of the pro-gram because it allows a company to measure and better understand its current position in terms of risk. It also allows a company to define priori-ties and implement measures to decrease risk to an acceptable level, based on the company’s core business activities, its mission and vision, and legal requirements.
Identifying all critical business processes, data, and data flows inside a company is one of the first steps in risk management. This step includes compiling a detailed inventory of all IT systems (equipment, networks, applications, interfaces, and so on) that support the company’s critical busi-ness processes and data from an IT perspective. The task is time consuming and it’s very easy to forget about certain systems that at first don’t seem to be directly related to supporting critical business processes and data, but that are nonetheless critical because other systems depend on them. This inventory is fundamentally important and is the perfect starting point for a risk-assessment exercise.
One of the goals of an information-security program is to define what is necessary to preserve the desired level of confidentiality, integrity, and availability of a company’s IT systems and data. Business process owners should be able to define their goals, and our job as information-security professionals is to implement measures to make sure we meet these goals and to test how effective these measures are.
There are a few ways to determine the actual risk to the confidentiality, integrity, and availability of a company’s systems. One way is to perform a technical assessment to see how easy it would be for an adversary to under-mine the desired level of confidentiality, break the integrity of systems, and interfere with the availability of systems, either by attacking them directly or by attacking the users with access to these systems.
That’s where a penetration tester (pentester, ethical hacker, or what-ever you want to call it) comes into play. By combining knowledge of how systems are designed, built, and maintained with a skillset that includes finding creative ways around defenses, a good pentester is instrumental in identifying and demonstrating the strength of a company’s information-security posture.
If you would like to become a penetration tester or if you are a systems/ network administrator who wants to know more about how to test the security of your systems, this book is perfect for you. You’ll learn some of the more technical phases of a penetration test, beginning with the initial information-gathering process. You’ll continue with explanations of how to exploit vulnerable networks and applications as you delve deeper into the network in order to determine how much damage could be done.
designed around a lab—a set of virtual machines with vulnerable applica-tions—so you can safely try various pentesting techniques using publicly available free tools.
Each chapter starts with an introduction and contains one or more hands-on exercises that will allow you to better understand how vulner-abilities can be discovered and exploited. You’ll find helpful tips and tricks from an experienced professional pentester, real-life scenarios, proven tech-niques, and anecdotes from actual penetration tests.
Entire books can be written (and have been) on the topics covered in each chapter in this book, and this book doesn’t claim to be the Wikipedia of pentesting. That said, it will certainly provide you with more than a first peek into the large variety of attacks that can be performed to assess a tar-get’s security posture. Thanks to its guided, hands-on approach, you’ll learn how to use the Metasploit Framework to exploit vulnerable applications and use a single hole in a system’s defenses to bypass all perimeter protections, dive deeper into the network, and exfiltrate data from the target systems. You’ll learn how to bypass antivirus programs and perform efficient social-engineering attacks using tools like the Social-Engineer Toolkit. You’ll see how easy it would be to break into a corporate Wi-Fi network, and how to use Georgia’s Smartphone Pentest Framework to assess how damaging a com-pany’s bring your own device policy (or lack thereof) could be. Each chap-ter is designed to trigger your inchap-terest in pentesting and to provide you with first-hand insight into what goes on inside a pentester’s mind.
I hope this book will spark your creativity and desire to dive deeper into certain areas; to work hard and learn more; and to do your own research and share your knowledge with the community. As technology develops, environments change, and companies increasingly rely on technology to support their core business activities, the need for smart pentesters will increase. You are the future of this community and the information-security industry.
Good luck taking your first steps into the exciting world of pentesting. I’m sure you will enjoy this book!
A C K N O W L E D G M E N T S
Many thanks go to the following people and organizations (in no particular order).
My parents, who have always supported my career endeavors—including paying for me to go to my first conference and get my first certifications when I was still a broke college student.
Collegiate Cyber Defense Competition, particularly the Mid-Atlantic region Red Team, for helping me find what I wanted to do with my life.
ShmooCon for accepting my first talk ever and also being the first con-ference I ever attended.
Peiter “Mudge” Zatko and everyone who involved in the DARPA Cyber Fast Track program for giving me the opportunity to start my own company and build the Smartphone Pentest Framework.
James Siegel for being my lucky charm and making sure I get on stage on time at events.
Rob Fuller for taking the time to come to James Madison University and visit the CCDC team after the competition. That day I decided to make a career of infosec.
Joe McCray, my infosec big brother, for being my mentor as I learn to navigate the infosec business.
Leonard Chin for giving me my first big international conference expe-rience and the confidence to become a conference trainer.
Brian Carty for helping me build my online lab.
Tom Bruch for letting me live in his house when I had no job and my DARPA money hadn’t come through yet.
Dave Kennedy for providing introductions for several great opportunities. Grecs for helping me market my classes on his website.
Raphael Mudge for getting me in touch with the DARPA Cyber Fast Track program and many other great opportunities.
Peter Hesse and Gene Meltser for forcing me to have the courage to move up at key junctures in my career.
Jayson Street for being a pickier eater than me so I almost pass as nor-mal at speaker dinners in foreign countries. You are the best.
Ian Amit for recommending me for some great speaking slots when I was just starting out.
Martin Bos for being awesome. You know what I mean.
Jason Kent for all those global premier upgrades and wonderful tau-tologies for definitions, some of which appear herein.
My professors at James Madison University, particularly Samuel T. Redwine—you inspired me more than you will ever know.
I N T R O D U C T I O N
I decided to write this book because it was the sort
of book I wish I had had when I was starting out in
information security. Though there are certainly
more informative websites out there than when I
first started, I still find it’s difficult for a beginner to
know what to read first and where to get the expected prerequisite skills. Likewise, there are a lot of books on the market—several great ones on advanced topics, which require some background knowledge, and many good books aimed at beginners, which cover a significant amount of theory. But I haven’t found anything that says everything I want to say to the aspiring pentester who emails me looking for a place to start in information security.
A Note of Thanks
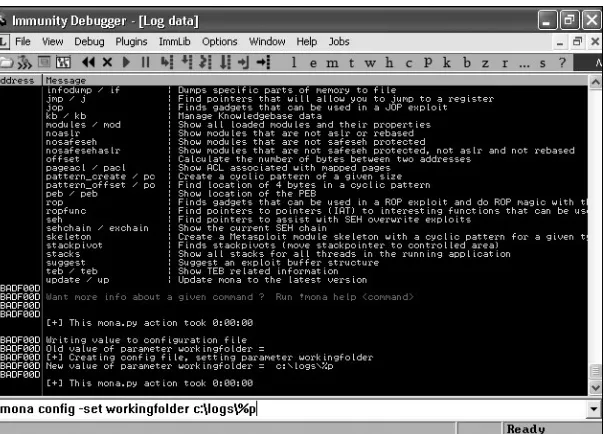
A book like this would not be possible without many years of dedicated work on the part of the information security community. The tools and techniques discussed throughout this book are some of the ones my col-leagues and I use regularly on engagements, and they’ve been developed through the combined efforts of pentesters and other security experts all over the world. I’ve contributed to some of these open source projects (such as Mona.py, which we’ll use in the exploit development chapters), and I hope this book will inspire you to do the same.
I want to take this opportunity to thank Offensive Security for creating and maintaining the Kali Linux pentesting distribution used widely in the field and throughout this book. A huge amount of credit also goes to the core developers of the Metasploit Framework, as well as its numerous com-munity contributors. Thanks too to all the pentesters and researchers who have shared their knowledge, discoveries, and techniques with the com-munity so that we can use them to assess the security posture of our clients more effectively, and so that teachers like me can use them with our students.
Thanks as well to the creators of the great books, blog posts, courses, and so on that have helped me achieve my goal of becoming a professional pentester. I now hope to share the knowledge I’ve gained with other aspir-ing pentesters.
You’ll find a list of additional resources (including courses and blogs) at the end of this book. These are some of the resources that I have found helpful on my own journey in infosec, and I encourage you to use them to learn more about the many penetration testing topics covered in this book. I hope you enjoy your journey as much as I have.
About This Book
To work through this book, you will need to know how to install software on your computer. That’s it. You don’t need to be a Linux expert or know the nitty-gritty of how networking protocols work. When you encounter a topic that is not familiar to you, I encourage you to do some outside research beyond my explanations if you need to—but we will walk step-by-step through all the tools and techniques that may be new to you, starting with the Linux command line. When I started in information security, the closest thing I’d ever done to hacking was making the Windows XP pre-SP2 Start menu say Georgia instead of Start. And I was pretty proud of myself at the time.
Part I: The Basics
In Chapter 0, we start out with some basic definitions of the phases of pene-tration testing. In Chapter 1, we build our small practice laboratory, which we will use to work through the exercises in this book. With many books, it’s pos-sible to just download a few programs onto your existing platform, but to sim-ulate a penetration test, our approach is a bit more involved. I recommend that you take the time to set up your lab and work through the hands-on examples with me. Though this book can serve as a reference and reminder in the field, I believe it is best to first practice your pentesting skills at home.
In Chapter 2, we start with the basics of using Kali Linux and Linux operating systems in general. Next, Chapter 3 covers the basics of program-ming. Some readers may already have a working knowledge in these areas and can skip past them. When I first started out, I had some programming experience in C and Java, but I didn’t have a background in scripting, and I had practically no background in Linux—a skillset that was assumed by most of the hacking tutorials I encountered. Thus, I have provided a primer here. If you are new to these areas, please do continue your studies outside of this book. Linux-based operating systems are becoming more and more prevalent as the platforms for mobile devices and web services, so skills in this area will benefit you even if you don’t pursue a career in information security. Likewise, knowing how to script your common tasks can only make your life easier, regardless of your career.
We look at the basics of using the Metasploit Framework, a tool we will leverage throughout this book, in Chapter 4. Though we will also learn to perform many tasks without Metasploit, it is a go-to tool for many pentest-ers in the field and is constantly evolving to include the latest threats and techniques.
Part II: Assessments
Next we start working through a simulated penetration test. In Chapter 5, we begin by gathering data about our target—both by searching freely available information online and by engaging our target systems. We then start searching for vulnerabilities using a combination of querying the sys-tems and research in Chapter 6. In Chapter 7, we look at techniques to cap-ture traffic that might include sensitive data.
Part III: Attacks
Next, in Chapter 8, we look at exploiting the vulnerabilities we found on the network with a variety of tools and techniques, including Metasploit and purely manual exploitation. We then look at methods for attacking what is often the weakest link in a network’s security—password management—in
Chapter 9.
at leveraging client-side attacks in Chapter 10. In Chapter 11, we combine client-side attacks with a look at social engineering, or attacking the human element—the part of the environment that cannot be patched. After all, with client-side attacks, the software in question must open a malicious file of some sort, so we must convince the user to help us out. In Chapter 12, we look at some methods of bypassing antivirus software, as many of your cli-ents will deploy it. If you have high enough privileges on a system, you may be able to just turn antivirus programs off, but a better solution is to breeze right past antivirus programs undetected, which can be done even if you are saving malicious programs to the hard drive.
In Chapter 13, we pick up with the next phase of our penetration test, post exploitation. Some say the pentest truly begins after exploitation. This is where you leverage your access to find additional systems to attack, sensi-tive information to steal, and so on. If you continue your penetration test-ing studies, you will spend a good deal of time worktest-ing on the latest and greatest post-exploitation techniques.
After post exploitation, we look at a few additional skills you will need to be a well-rounded penetration tester. We will take a brief look at assess-ing the security of custom web applications in Chapter 14. Everyone has a website these days, so it’s a good skill to cultivate. Next we will look at assess-ing the security of wireless networks in Chapter 15, looking at methods for cracking commonly deployed cryptographic systems.
Part IV: Exploit Development
Chapters 16, 17, 18, and 19 discuss the basics of writing your own exploits. We will look at finding vulnerabilities, exploiting them with common tech-niques, and even writing our own Metasploit module. Up until these chap-ters, we have relied on tools and publicly available exploits for a lot of our exercises. As you advance in infosec, you may want to find new bugs (called zero-days) and report them to vendors for a possible bounty. You can then release a public exploit and/or Metasploit module to help other pentesters test their customers’ environments for the issue you discovered.
Part V: Mobile Hacking
Finally, in Chapter 20, we close with a relatively new area of penetration test-ing—assessing the security of mobile devices. We look at my own tool, the Smartphone Pentest Framework. Perhaps after mastering the skills in this book, you will endeavor to develop and release a security tool of your own.
0
P E N E T R A T I O N T E S T I N G P R I M E R
Penetration testing
, or
pentesting
(not to be confused
with testing ballpoint or fountain pens), involves
sim-ulating real attacks to assess the risk associated with
potential security breaches. On a pentest (as opposed
to a vulnerability assessment), the testers not only
dis-cover vulnerabilities that could be used by attackers
but also exploit vulnerabilities, where possible, to
assess what attackers might gain after a successful
exploitation.
words, companies are losing proprietary data and exposing their clients’ personal details through security holes that could have been fixed. On a penetration test, we find these issues before an attacker does, and we rec-ommend how to fix them and avoid future vulnerabilities.
The scope of your pentests will vary from client to client, as will your tasks. Some clients will have an excellent security posture, while others will have vulnerabilities that could allow attackers to breach the perimeter and gain access to internal systems.
You may also be tasked with assessing one or many custom web applica-tions. You may perform social-engineering and client-side attacks to gain access to a client’s internal network. Some pentests will require you to act like an insider—a malicious employee or attacker who has already breached the perimeter—as you perform an internal penetration test. Some clients will request an external penetration test, in which you simulate an attack via the Internet. And some clients may want you to assess the security of the wire-less networks in their office. In some cases, you may even audit a client’s physical security controls.
The Stages of the Penetration Test
Pentesting begins with the pre-engagement phase, which involves talking to the client about their goals for the pentest, mapping out the scope (the extent and parameters of the test), and so on. When the pentester and the client agree about scope, reporting format, and other topics, the actual test-ing begins.
In the information-gathering phase, the pentester searches for publicly available information about the client and identifies potential ways to con-nect to its systems. In the threat-modeling phase, the tester uses this informa-tion to determine the value of each finding and the impact to the client if the finding permitted an attacker to break into a system. This evaluation allows the pentester to develop an action plan and methods of attack.
Before the pentester can start attacking systems, he or she performs a
vulnerability analysis. In this phase, the pentester attempts to discover vul-nerabilities in the systems that can be taken advantage of in the exploitation
phase. A successful exploit might lead to a post-exploitation phase, where the result of the exploitation is leveraged to find additional information, sensi-tive data, access to other systems, and so on.
Finally, in the reporting phase, the pentester summarizes the findings for both executives and technical practitioners.
N O T E For more information on pentesting, a good place to start is the Penetration Testing Execution Standard (PTES) at http://www.pentest-standard.org/.
Pre-engagement
penetration testing. Miscommunication between a pentester and a client who expects a simple vulnerability scan could lead to a sticky situation because penetration tests are much more intrusive.
The pre-engagement stage is when you should take the time to under-stand your client’s business goals for the pentest. If this is their first pentest, what prompted them to find a pentester? What exposures are they most worried about? Do they have any fragile devices you need to be careful with when testing? (I’ve encountered everything from windmills to medical devices hooked up to patients on networks.)
Ask questions about your client’s business. What matters most to them? For example, to a top online vendor, hours of downtime could mean thou-sands of dollars of lost revenue. To a local bank, having online banking sites go down for a few hours may annoy a few customers, but that downtime wouldn’t be nearly as devastating as the compromise of a credit card data-base. To an information security vendor, having their homepage plastered with rude messages from attackers could lead to a damaged reputation that snowballs into a major revenue loss.
Other important items to discuss and agree upon during the pre-engagement phase of the pentest include the following:
Scope
What IP addresses or hosts are in scope, and what is not in scope? What sorts of actions will the client allow you to perform? Are you allowed to use exploits and potentially bring down a service, or should you limit the assessment to merely detecting possible vulnerabilities? Does the client understand that even a simple port scan could bring down a server or router? Are you allowed to perform a social-engineering attack?
The testing window
The client may want you to perform tests only during specific hours or on certain days.
Contact information
Whom should you contact if you find something serious? Does the cli-ent expect you to contact someone 24 hours a day? Do they prefer that you use encryption for email?
A “get out of jail free” card
Make sure you have authorization to perform a penetration test on the target. If a target is not owned by the company (for instance, because it’s hosted by a third party), make sure to verify that the client has formal approval from the third party to perform the penetration test. Regardless, make sure your contract includes a statement that limits your liability in case something unexpected happens, and get written permission to perform the test.
Payment terms
Finally, include a nondisclosure agreement clause in your contract. Clients will appreciate your written commitment to keep the penetration test and any findings confidential.
Information Gathering
Next is the information-gathering phase. During this phase, you analyze freely available sources of information, a process known as gathering open source intelligence (OSINT). You also begin to use tools such as port scanners to get an idea of what systems are out there on the Internet or internal net-work as well as what software is running. We’ll explore information gather-ing in more detail in Chapter 5.
Threat Modeling
Based on the knowledge gained in the information-gathering phase, we move on to threat modeling. Here we think like attackers and develop plans of attack based on the information we’ve gathered. For example, if the client develops proprietary software, an attacker could devastate the organization by gaining access to their internal development systems, where the source code is developed and tested, and selling the company’s trade secrets to a competitor. Based on the data we found during information gathering, we develop strategies to penetrate a client’s systems.
Vulnerability Analysis
Next, pentesters begin to actively discover vulnerabilities to determine how successful their exploit strategies might be. Failed exploits can crash ser-vices, set off intrusion-detection alerts, and otherwise ruin your chances of successful exploitation. Often during this phase, pentesters run vulnerabil-ity scanners, which use vulnerabilvulnerabil-ity databases and a series of active checks to make a best guess about which vulnerabilities are present on a client’s sys-tem. But though vulnerability scanners are powerful tools, they can’t fully replace critical thinking, so we also perform manual analysis and verify results on our own in this phase as well. We’ll explore various vulnerability-identification tools and techniques in Chapter 6.
Exploitation
Now for the fun stuff: exploitation. Here we run exploits against the vul-nerabilities we’ve discovered (sometimes using a tool like Metasploit) in an attempt to access a client’s systems. As you’ll see, some vulnerabilities will be remarkably easy to exploit, such as logging in with default passwords. We’ll look at exploitation in Chapter 8.
Post Exploitation
otherwise networked to high-value targets, and that system contains no information of interest to an attacker, that vulnerability’s risk is significantly lower than if you were able to exploit a domain controller or a client’s devel-opment system.
During post exploitation, we gather information about the attacked sys-tem, look for interesting files, attempt to elevate our privileges where neces-sary, and so on. For example, we might dump password hashes to see if we can reverse them or use them to access additional systems. We might also try to use the exploited machine to attack systems not previously available to us by pivoting into them. We’ll examine post exploitation in Chapter 13.
Reporting
The final phase of penetration testing is reporting. This is where we convey our findings to the customer in a meaningful way. We tell them what they’re doing correctly, where they need to improve their security posture, how you got in, what you found, how to fix problems, and so on.
Writing a good pentest report is an art that takes practice to master. You’ll need to convey your findings clearly to everyone from the IT staff charged with fixing vulnerabilities to upper management who signs off on the changes to external auditors. For instance, if a nontechnical type reads, “And then I used MS08-067 to get a shell,” he or she might think, “You mean, like a seashell?” A better way to communicate this thought would be to men-tion the private data you were able to access or change. A statement like “I was able to read your email,” will resonate with almost anyone.
The pentest report should include both an executive summary and a technical report, as discussed in the following sections.
Executive Summary
The executive summary describes the goals of the test and offers a high-level overview of the findings. The intended audience is the executives in charge of the security program. Your executive summary should include the following:
Background A description of the purpose of the test and definitions of any terms that may be unfamiliar to executives, such as vulnerability
and countermeasure.
Overall posture An overview of the effectiveness of the test, the issues found (such as exploiting the MS08-067 Microsoft vulnerability), and general issues that cause vulnerabilities, such as a lack of patch management.
Risk profile An overall rank of the organization’s security posture compared to similar organizations with measures such as high, moder-ate, or low. You should also include an explanation of the ranking.
Recommendation summary A high-level overview of the tasks required to remediate the issues discovered in the pentest.
Strategic road map Give the client short- and long-term goals to improve their security posture. For example, you might tell them to apply certain patches now to address short-term concerns, but without a long-term plan for patch management, the client will be in the same position after new patches have been released.
Technical Report
This section of the report offers technical details of the test. It should include the following:
Introduction An inventory of details such as scope, contacts, and so on.
Information gathering Details of the findings in the information-gathering phase. Of particular interest is the client’s Internet footprint.
Vulnerability assessment Details of the findings of the vulnerability-analysis phase of the test.
Exploitation/vulnerability verification Details of the findings from the exploitation phase of the test.
Post exploitation Details of the findings of the post-exploitation phase of the test.
Risk/exposure A quantitative description of the risk discovered. This section estimates the loss if the identified vulnerabilities were exploited by an attacker.
Conclusion A final overview of the test.
Summary
PART I
1
S E T T I N G U P Y O U R V I R T U A L L A B
As you work through this book, you’ll get hands-on
experience using different tools and techniques for
penetration testing by working in a virtual lab
run-ning in the VMware virtualization software. I’ll walk
you through setting up your lab to run multiple operating systems inside your base operating system in order to simulate an entire network using just one physical machine. We’ll use our lab to attack target systems throughout this book.
Installing VMware
additional features such as the ability to take snapshots of the virtual machine that you can revert to in case you break something. VMware Workstation is available for free for 30 days, but after that, you will need to buy it or switch back to using VMware Player.
Mac users can run a trial version of VMware Fusion (http://www.vmware .com/products/fusion/) free for 30 days, and it costs only about $50 after that. As a Mac user, I’ll use VMware Fusion throughout the book, but setup instructions are also included for VMware Player.
Download the version of VMware that matches your operating system and architecture (32- or 64-bit). If you encounter any problems installing VMware, you’ll find plenty of support at the VMware website.
Setting Up Kali Linux
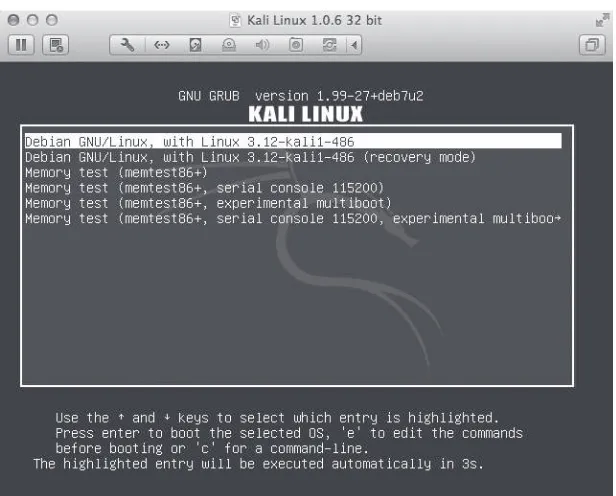
Kali Linux is a Debian-based Linux distribution that comes with a wide variety of preinstalled security tools that we’ll use throughout this book. This book is written for Kali 1.0.6, the current version as of this writing. You’ll find a link to a torrent containing a copy of Kali 1.0.6 at this book’s website (http://nostarch.com/pentesting/). As time passes, newer versions of Kali will be released. If you would like, feel free to download the latest ver-sion of Kali Linux from http://www.kali.org/. Keep in mind, though, that many of the tools we’ll use in this book are in active development, so if you use a newer version of Kali, some of the exercises may differ from the walk-throughs in this book. If you prefer everything to work as written, I recom-mend using the version of Kali 1.0.6 provided in the torrent (a file called
kali-linux-1.0.6-vm-i486.7z), which is a prebuilt VMware image compressed with 7-Zip.
N O T E You can find 7-Zip programs for Windows and Linux platforms at http://www
.7-zip.org/download.html. For Mac users, I recommend Ez7z from http://ez7z .en.softonic.com/mac/.
1. Once the 7-Zip archive is decompressed, in VMware go to File4Open
and direct it to the file Kali Linux 1.0.6 32 bit.vmx in the decompressed
Kali Linux 1.0.6 32 bit folder.
2. Once the virtual machine opens, click the Play button and, when prompted as shown in Figure 1-1, choose I copied it.
Figure 1-1: Opening the Kali Linux virtual machine
4. Once Kali Linux boots, you will be presented with a login screen like the one shown in Figure 1-3.
Figure 1-3: Kali login screen
5. Click Other and enter the default credentials for Kali Linux, root:toor, as shown in Figure 1-4. Then click the Log In button.
6. You will be presented with a screen like the one shown in Figure 1-5.
Figure 1-5: The Kali Linux GUI
Configuring the Network for Your Virtual Machine
Because we’ll be using Kali Linux to attack our target systems over a net-work, we need to place all our virtual machines on the same virtual network (we will see an example of moving between networks in Chapter 13, which covers post exploitation). VMware offers three options for virtual network connections: bridged, NAT, and host only. You should choose the bridged option, but here’s a bit of information about each:
• The bridged network connects the virtual machine directly to the local network using the same connection as the host system. As far as the local network is concerned, our virtual machine is just another node on the network with its own IP address.
• NAT, short for network address translation, sets up a private network on the host machine. The private network translates outgoing traffic from the virtual machine to the local network. On the local network, traffic from the virtual machine will appear to come from the host machine’s IP address.
N O T E Because our target virtual machines will have multiple known security vulnerabili-ties, use caution when attaching them to your local network because anyone else on that network can also attack these machines. For this reason, I do not recommend work-ing through this book on a public network where you do not trust the other users.
By default, the Kali Linux virtual machine network adapter is set to NAT. Here’s how to change that option on both Windows and Mac OS.
VMware Player on Microsoft Windows
To change the virtual network on VMware Player for Windows, start VMware Player and then click your Kali Linux virtual machine. Choose Edit virtual machine settings, as shown in Figure 1-6. (If you’re still running Kali Linux in VMware Player, choose Player4Manage4Virtual machine settings.)
Figure 1-6: Changing the VMware network adapter
Figure 1-7: Changing the network adapter settings
Now click the Configure Adapters button and check the network adapter that you’re using with your host operating system. As you can see in Figure 1-8, I’ve selected only the Realtek wireless adapter. Once you’ve made your selection, press OK.
VMware Fusion on Mac OS
To change the virtual network connection in VMware Fusion, go to Virtual Machine4Network Adapter and change from NAT to Bridged, as shown in Figure 1-9.
Figure 1-9: Changing the network adapter
Connecting the Virtual Machine to the Network
Kali Linux should automatically pull an IP address from the Bridged network once you make the switch. To verify your IP address, open a Linux terminal by clicking the terminal icon(a black rectangle with the symbols >_) at the top left of the Kali screen (or choose Applications4Accessories4Terminal). Then run the command ifconfig to see your network information, as shown in Listing 1-1.
root@kali:~# ifconfig
eth0 Link encap:Ethernet HWaddr 00:0c:29:df:7e:4d
inet addr:192.168.20.9 Bcast:192.168.20.255 Mask:255.255.255.0 inet6 addr: fe80::20c:29ff:fedf:7e4d/64 Scope:Link
--snip
--Listing 1-1: Networking information
The IPv4 address for this virtual machine is 192.168.20.9, as highlighted in bold in Listing 1-1. (The IP address for your machine will likely differ.)
Testing Your Internet Access
Now let’s make sure that Kali Linux can connect to the Internet. We’ll use the ping network utility to see if we can reach Google. Make sure your com-puter is connected to the Internet, open a Linux terminal, and enter the following.
root@kali:~# ping www.google.com
If you see something like the following in response, you’re online. (We’ll learn more about the ping command in Chapter 3.)
PING www.google.com (50.0.2.221) 56(84) bytes of data.
64 bytes from cache.google.com (50.0.2.221): icmp_req=1 ttl=60 time=28.7 ms 64 bytes from cache.google.com (50.0.2.221): icmp_req=2 ttl=60 time=28.1 ms 64 bytes from cache.google.com (50.0.2.221): icmp_req=3 ttl=60 time=27.4 ms 64 bytes from cache.google.com (50.0.2.221): icmp_req=4 ttl=60 time=29.4 ms 64 bytes from cache.google.com (50.0.2.221): icmp_req=5 ttl=60 time=28.7 ms 64 bytes from cache.google.com (50.0.2.221): icmp_req=6 ttl=60 time=28.0 ms --snip
--If you do not receive a response, make sure that you have set your net-work adapter to Bridged, that Kali Linux has an IP address, and, of course, that your host system currently has Internet access.
Installing Nessus
Although Kali Linux has just about every tool we’ll need, we do need to install a few additional programs. First, we’ll install Tenable Security’s Nessus Home vulnerability scanner. This scanner is free for home use only (you’ll see a description of limitations on the Nessus website). Note that Nessus is very actively developed, so the current version as well as its GUI may have changed a bit since this book went to press.
Use the following steps to install Nessus Home from within Kali:
1. Open Applications4Internet4Iceweasel Web Browser and enter
http://www.tenable.com/products/nessus-home/ in the address bar. Complete the Register for an Activation Code information and click Register. (Use a real email address—you’ll need the activation code later.) 2. Once you reach the Downloads page, choose the latest version of Nessus
for the Linux Debian 32-bit platform (Nessus-5.2.5-debian6_i386.deb as of this writing) and download it to your root directory (the default down-load location).
4. Enter ls to see a list of the files in your root directory. You should see the Nessus file that you just downloaded.
5. Enter dpkg -i followed by the name of the file you downloaded (you can type the first letter of the filename and press TAB to use tab completion)
and press ENTER to begin the install process. Installation may take a while
as Nessus processes various plugins. Progress is shown by a line of hash symbols (#).
Selecting previously unselected package nessus.
(Reading database ... 355024 files and directories currently installed.) Unpacking nessus (from Nessus-5.2.5-debian6_amd64.deb) ...
Setting up nessus (5.2.5) ...
nessusd (Nessus) 5.2.5 [build N25109] for Linux
Copyright (C) 1998 - 2014 Tenable Network Security, Inc
Processing the Nessus plugins...
[########### ]
6. Once you’re returned to the root prompt with no errors, Nessus should be installed, and you should see a message like this.
All plugins loaded
Fetching the newest plugins from nessus.org... Fetching the newest updates from nessus.org...
Done. The Nessus server will start processing these plugins within a minute
nessusd (Nessus) 5.2.5 [build N25109] for Linux
Copyright (C) 1998 - 2014 Tenable Network Security, Inc
Processing the Nessus plugins...
[##################################################]
All plugins loaded
- You can start nessusd by typing /etc/init.d/nessusd start - Then go to https://kali:8834/ to configure your scanner
7. Now enter the following to start Nessus.
root@kali:~# /etc/init.d/nessusd start
8. Open the URL https://kali:8834/ in the Iceweasel web browser. You should see a SSL certificate warning, similar to that in Figure 1-10.
N O T E If you access Nessus from outside the Iceweasel browser in Kali, you will need to go to
Figure 1-10: Invalid SSL certificate warning
9. Expand I Understand the Risks and click Add Exception. Then click
Confirm Security Exception, as shown in Figure 1-11.
10. Click Get Started at the bottom left of the opening Nessus page and enter a username and password on the following page. I’ve chosen
georgia:password for my example. If you choose something else, remember it because we’ll use Nessus in Chapter 6. (Note that I use poor passwords throughout this book, as will many clients you encounter. In production, you should use much better passwords than password.)
11. At the next page, enter the activation code you received via email from Tenable Security.
12. Once registered with Tenable Security, choose the option to download plugins (downloading will take some time). Once Nessus processes the plugins, it will initialize.
When Nessus finishes downloading plugins and configuring the soft-ware, you should see the Nessus login screen, as shown in Figure 1-12. You should be able to use the credentials for the account you created during setup to log in.
Figure 1-12: Login screen of the Nessus web interface
To close Nessus, just close its tab in the browser. We will come back to Nessus in Chapter 6.
Installing Additional Software
We’re not done yet. Follow these instructions to complete your Kali Linux install.
The Ming C Compiler
We need to install a cross compiler so we can compile C code to run on Microsoft Windows systems. The Ming compiler is included in the Kali Linux repositories but is not installed by default. Install it with this command.
Hyperion
We’ll use the Hyperion encryption program to bypass antivirus software. Hyperion is not currently included in the Kali repositories. Download Hyperion with wget, unzip it, and compile it with the Ming cross compiler you installed in the previous step, as shown in Listing 1-2.
root@kali:~# wget http://nullsecurity.net/tools/binary/Hyperion-1.0.zip root@kali:~# unzip Hyperion-1.0.zip
Archive: Hyperion-1.0.zip creating: Hyperion-1.0/
creating: Hyperion-1.0/FasmAES-1.0/
root@kali:~# i586-mingw32msvc-c++ Hyperion-1.0/Src/Crypter/*.cpp -o hyperion.exe --snip
--Listing 1-2: Installing Hyperion
Veil-Evasion
Veil-Evasion is a tool that generates payload executables you can use to bypass common antivirus solutions. Install Veil-Evasion Kali (see Listing 1-3) by first downloading it with the command wget. Next, unzip the downloaded file
master.zip and change to the Veil-master/setup directory. Finally, enter ./setup.sh
and follow the default prompts.
root@kali:~# wget https://github.com/ChrisTruncer/Veil/archive/master.zip --2015-11-26 09:54:10-- https://github.com/ChrisTruncer/Veil/archive/master.zip --snip
--2015-11-26 09:54:14 (880 KB/s) - `master.zip' saved [665425]
root@kali:~# unzip master.zip Archive: master.zip
948984fa75899dc45a1939ffbf4fc0e2ede0c4c4 creating: Veil-Evasion-master/ --snip
inflating: Veil-Evasion-master/tools/pyherion.py root@kali:~# cd Veil-Evasion-master/setup
root@kali:~/Veil-Evasion-master/setup# ./setup.sh
========================================================================= [Web]: https://www.veil-evasion.com | [Twitter]: @veilevasion
=========================================================================
[*] Initializing Apt Dependencies Installation --snip—
Do you want to continue? [Y/n]? Y --snip
--root@kali:~#
Ettercap
Ettercap is a tool for performing man-in-the-middle attacks. Before run-ning it for the first time, we need to make a couple of changes to its config-uration file at /etc/ettercap/etter.conf. Open its configuration file from a Kali root prompt in the nano editor.
root@kali:~# nano /etc/ettercap/etter.conf
First change the userid and groupid values to 0 so Ettercap can run with root privileges. Scroll down to where you see the following lines in the file. Replace whatever values you see following the equal signs (=) with a 0.
[privs]
ec_uid = 0 # nobody is the default ec_gid = 0 # nobody is the default
Now scroll down to the Linux section of the file and uncomment (remove the leading # characters) before the two lines shown at u and v
in Listing 1-4 to set Iptables firewall rules to redirect the traffic.
#---# Linux
#---# if you use ipchains:
#redir_command_on = "ipchains -A input -i %iface -p tcp -s 0/0 -d 0/0 %port -j REDIRECT %rport"
#redir_command_off = "ipchains -D input -i %iface -p tcp -s 0/0 -d 0/0 %port -j REDIRECT %rport"
# if you use iptables:
uredir_command_on = "iptables -t nat -A PREROUTING -i %iface -p tcp --dport %port -j REDIRECT --to-port %rport"
vredir_command_off = "iptables -t nat -D PREROUTING -i %iface -p tcp --dport %port -j REDIRECT --to-port %rport"
Listing 1-4: Ettercap configuration file
Save and exit the file by pressing CTRL-XandthenY to save the changes.
Setting Up Android Emulators
Now we’ll set up three Android emulators on Kali to use for mobile testing in Chapter 20. First we’ll need to download the Android SDK.
1. Open the Iceweasel web browser from within Kali and visit https:// developer.android.com/sdk/index.html.
3. Open a terminal, list the files there (ls), and extract the compressed archive that you just downloaded with unzip (the x’s represent the name of your file, as versions may have changed since this was written).
root@kali:~# unzip adt-bundle-Linux-x86-xxxxxxxxxxx.zip
4. Now use cd to go into the new directory (with the same name as the file without the .zip extension).
# cd sdk/tools # ./android
5. The Android SDK Manager should open, as shown in Figure 1-13.
Figure 1-13: The Android SDK Manager
Figure 1-14: Installing Android software
Now it’s time to set up our Android virtual devices. Open the Android SDK Manager and choose Tools4Manage AVDs. You should see the win-dow shown in Figure 1-15.
We’ll create three Android emulators based on Android 4.3, 2.2, and 2.1, as shown in Figure 1-16. Use the values shown in the figure for each emulator but set the value of Target to the Android version of the emulator you would like to build (the Google API versions of Android 4.3 [Google APIs version 18], 2.2 [Google APIs version 8], and 2.1 [Google APIs version 7]). Fill the AVD Name field with a descriptive value. Add a small SD Card value (100MB should be more than sufficient) so you can download files to your Android emulators. Set Device to Nexus 4 and Skin to Skin with dynamic hardware controls. Leave the rest of the options at their defaults.
Figure 1-16: Creating an Android emulator
Figure 1-17: Android emulators created in Android Virtual Device Manager
To start an emulator, highlight it and click Start. Then click Launch in the pop-up, as shown in Figure 1-18.
Figure 1-18: Launching an Android emulator
Figure 1-19: Android 4.3 emulator
N O T E To run the Android emulators in Kali, you will likely need to increase the perfor-mance of your virtual machine by increasing its RAM and CPU cores. I am able to run all three emulators with 3GB RAM and two CPU cores allocated to Kali. You can make these changes in the virtual machine settings in your VMware product. The amount of power you can give to Kali will, of course, depend on the resources avail-able on your host machine. As an alternative, instead of running the Android emula-tors on Kali Linux, you can install Android and the emulaemula-tors on your host system or even another system on the local network. The exercises in Chapter 20 will work as long as the emulators can communicate with Kali.
Smartphone Pentest Framework
Next, download and install the Smartphone Pentest Framework (SPF), which we’ll use for mobile attacks. Use git to download the source code. Change to the downloaded Smartphone-Pentest-Framework directory as shown here.
root@kali:~# git clone -b SPFBook https://github.com/georgiaw/Smartphone-Pentest-Framework.git root@kali:~# cd Smartphone-Pentest-Framework
root@kali:~/Smartphone-Pentest-Framework# nano kaliinstall #!/bin/sh
## Install needed packages
echo -e "$(tput setaf 1)\nInstallin serialport, dbdpg, and expect for perl\n"; echo "$(tput sgr0)"
echo -e "$(tput setaf 1)#########################################\n"; echo "$(tput sgr0)" echo $cwd;
#apt-get -y install libexpect-perl libdbd-pg-perl libdevice-serialport-perl; apt-get install ant
/root/adt-bundle-linux-x86-20131030/sdk/tools/android update sdk --no-ui --filter android-4 -a /root/adt-bundle-linux-x86-20131030/sdk/tools/android update sdk --no-ui --filter addon-google_ apis-google-4 -a
/root/adt-bundle-linux-x86-20131030/sdk/tools/android update sdk --no-ui --filter android-14 -a /root/adt-bundle-linux-x86-20131030/sdk/tools/android update sdk --no-ui --filter addon-google_ apis-google-14 -a
--snip
--Listing 1-5: Installing Smartphone Pentest Framework
Now run the kaliinstall script, as shown here.
root@kali:~/Smartphone-Pentest-Framework# ./kaliinstall
This will set up the SPF, which we’ll use in Chapter 20.
Finally, we need to make one more change to the configuration file for SPF. Change directories to Smartphone-Pentest-Framework/frameworkconsole
and open the file config in nano. Look for the option #LOCATION OF ANDROID SDK. If your ADT bundle folder name has changed since the version current at the time of this writing, change it accordingly in the line that begins with
ANDROIDSDK=.
We’ll use three custom-built target machines to simulate vulnerabilities often found in client environments: Ubuntu 8.10, Windows XP SP3, and Windows 7 SP1.
To set up the Windows virtual machines, you’ll need to install and con-figure Windows XP SP3 and 32-bit Windows 7 SP1. Sources for the installa-tion media include TechNet and MSDN (the Microsoft Developer Network), among others. (You should be able to use your Windows virtual machines on a trial basis for 30 days without a license key.)
Creating the Windows XP Target
Your Windows XP target should be a base installation of Windows XP SP3 with no additional security updates. (Visit my website at http://www .bulbsecurity.com/ for more information about finding a copy of Windows XP.) Once you have a copy of Windows XP SP3, here’s how to install it on Microsoft Windows or Mac OS.
VMware Player on Microsoft Windows
To install Windows XP on VMware Player for Windows:
1. Choose Create A New Virtual Machine in VMware Player and point the New Virtual Machine Wizard to the Windows XP installation disk or ISO image. Depending on your source disk or image, you may be offered the option to use Easy Install (if you’re installing a version with a license key), or you may see a yellow triangle warning, “Could not detect which operating system is in this disc image. You will need to specify which operating system will be installed.” In the latter case, just press Next.
2. In the Select a Guest Operating System dialog, select Microsoft Windows
in the Guest operating system section and your version of Windows XP in the drop-down box, as shown in Figure 1-20, and press Next.
3. In the next dialog, enter Bookxp XP SP3 as the name of your virtual machine and press Next.
4. In the Specify Disk Capacity dialog, accept the recommended hard disk size for your virtual machine of 40GB and check the box for Store vir-tual disk as a single file, as shown in Figure 1-21, and press Next.
Figure 1-21: Specifying the disk capacity
N O T E The Virtual Machine will not take up the entire 40GB; it will only take up space on your hard drive as needed. This is just a maximum value.
5. In the Ready to Create Virtual Machine dialog, shown in Figure 1-22, click Customize Hardware.
6. In the Hardware dialog, choose Network Adapter, and in the Network Connection field that appears, select Bridged: Connected directly to the physical network. Next, click Configure Adapters and select the adapter you’re using to connect to the Internet, as shown in Figure 1-23. Then press OK, Close, and Finish.
Figure 1-23: Configuring your network adapter as bridged
You should now be able to play your Windows XP virtual machine. Continue to the instructions for installing and activating Windows XP in “Installing and Activating Windows” on page 32.
VMware Fusion on Mac OS
In VMware Fusion, go to File4New4Import from disk or image
and point it to the Windows XP installation disk or image, as shown in Figure 1-24.
Figure 1-24: Creating a new virtual machine
Installing and Activating Windows
As part of the installation process, you will be prompted for a Windows license key. If you have one, enter it here. If not, you should be able to use the virtual machine on a trial basis for 30 days. To continue without enter-ing a license key, click Next when prompted for the key. A pop-up will warn you that entering a license key is recommended and ask if you would like to enter one now, as shown in Figure 1-25. Just click No.
As shown in Figure 1-26, when prompted, set Computer name to Bookxp. Set Administrator password to password.
Figure 1-26: Setting the computer name and Administrator password
You can leave the date/time and TCP/IP settings at their defaults when prompted. Likewise, leave the Windows XP target as part of the workgroup WORKGROUP instead of joining it to a domain, as shown in Figure 1-27.
Tell Windows not to automatically install security updates, as shown in Figure 1-28. This step is important, because some of the exploits we will run rely on missing Windows patches.
Figure 1-28: Turning off automatic security updates
You will then be prompted to activate Windows. If you entered a license key, go ahead and activate it. Otherwise you can choose No, remind me every few days, as shown in Figure 1-29.
Now create user accounts georgia and secret, as shown in Figure 1-30. We will create passwords for these users after setup is finished.
Figure 1-30: Adding users
When Windows starts up, log in as the user georgia with no password.
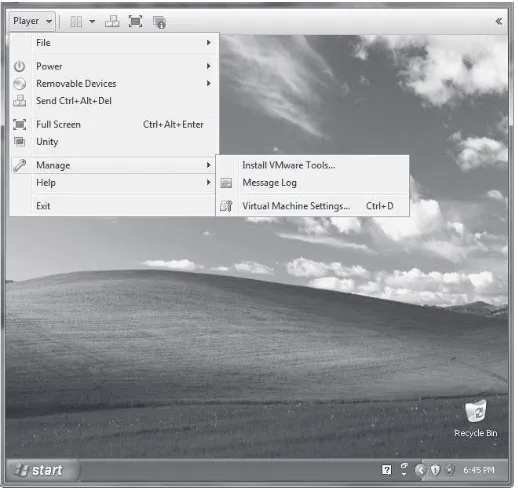
Installing VMware Tools
Now install VMware Tools, which will make it easier to use your virtual machine by, for example, letting you copy/paste and drag programs onto the virtual machine from the host system.
VMware Player on Microsoft Windows
Figure 1-31: Installing VMware Tools in VMware Player
VMware Fusion on Mac OS
Install VMware Tools from Virtual Machines4Install VMware Tools, as shown in Figure 1-32. The VMware Tools installer should automatically run in Windows XP.
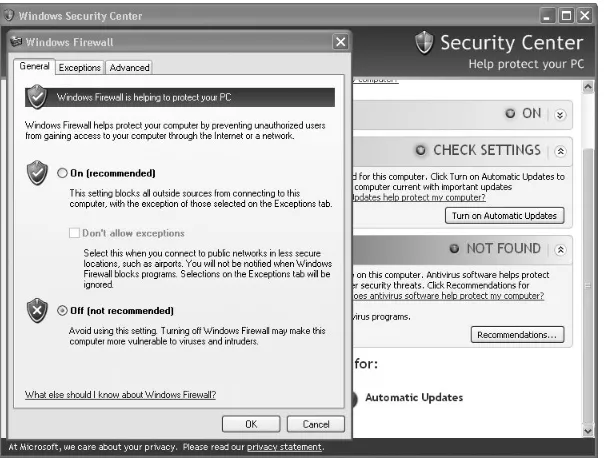
Turning Off Windows Firewall
Now open the Control Panel from the Windows Start menu. Click Security Center4Windows Firewall to turn off the Windows Firewall, as shown in Figure 1-33.
Figure 1-33: Turning off the Windows firewall
Setting User Passwords
Again in the Control Panel, go to User Accounts. Click the user georgia
and then select Create a password. Set georgia’s password to password, as shown in Figure 1-34. Do the same thing for the user secret, but set secret’s password to Password123.
Setting a Static IP Address
Next, set a static IP address so your networking information won’t change as you work through the book. But first we need to figure out the address of our default gateway.
Ensure that your Windows XP system is set to use bridged networking in VMware. By default, your virtual machine will automatically pull an IP address using DHCP.
To find the default gateway, open a Windows command prompt by going to Start4Run, entering cmd, and clicking OK. In the command prompt, enter ipconfig. This will show you the networking information, including the default gateway.
C:\Documents and Settings\georgia>ipconfig
Windows IP Configuration
Ethernet adapter Local Area Connection:
Connection-specific DNS Suffix . : XXXXXXXX IP Address. . . : 192.168.20.10 Subnet Mask . . . : 255.255.255.0 Default Gateway . . . : 192.168.20.1
C:\Documents and Settings\georgia>
In my case, the IP address is 192.168.20.10, the subnet mask is 255.255.255.0, and the default gateway is 192.168.20.1.
1. In the Control Panel, go to Network and Internet Connections and click Network Connections at the bottom of the screen.
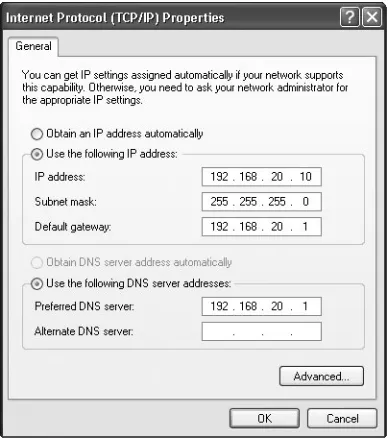
2. Right-click Local Area Connection and then select Properties. 3. Highlight Internet Protocol (TCP/IP) and select Properties. Now
enter a static IP address and set the Subnet mask and Default gateway to match the data you found with the ipconfig command, as shown in Figure 1-35. Set the Preferred DNS server to your default gateway as well.
Now it’s time to see if our virtual machines can communicate. Once you’re sure that the settings match, return to the Kali virtual machine (start it if you had shut it down) and enter ping <static ip address of your Windows XP virtual machine>, as shown here.
N O T E My IP address is 192.168.20.10. Throughout the book, you should replace this value with the IP address of your systems.
root@kali:~# ping 192.168.20.10
Figure 1-35: Setting a static IP address
Enter CTRL-C to stop the ping command. If you see output beginning with 64 bytes from <ip address of XP>, as shown previously, your virtual machines are able to communicate. Congratulations! You’ve set up a net-work of virtual machines.
If instead you see a message including the text Destination Host Unreachable, troubleshoot your networking: Make sure your virtual machines are on the same bridged virtual network, check that your default gateway is correct, and so on.
Making XP Act Like It’s a Member of a Windows Domain
Finally, we need to modify a setting in Windows XP so that it will behave as if it were a member of a Windows domain, as many of your clients will be. I’m not having you set up an entire Windows domain here, but during post exploitation, a couple of exercises will simulate a domain environment. Return to your XP virtual machine and follow these steps.
1. Select Start4Run and enter secpol.msc to open the Local Security Settings panel.
2. Expand Local Policies on the left and double-click Security Options
on the right.
Figure 1-36: Changing a local security setting to make your target act like a member of a Windows domain
4. Click Apply and then OK.
5. Close any open windows in your virtual machine.
Installing Vulnerable Software
In this section we’ll install some vulnerable software on our Windows XP virtual machine. We’ll be attacking this software in later chapters. Open your Windows XP virtual machine and, while still logged in as user georgia, follow the directions to install each of the packages listed here.
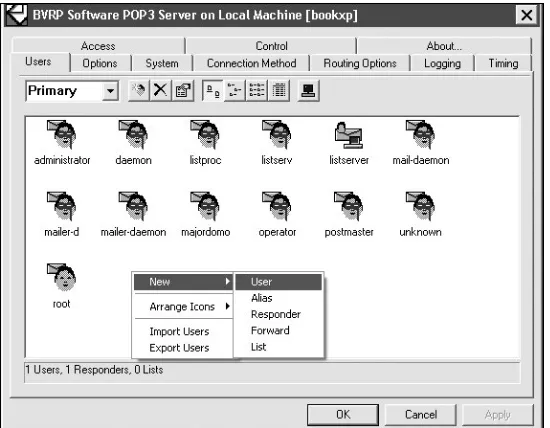
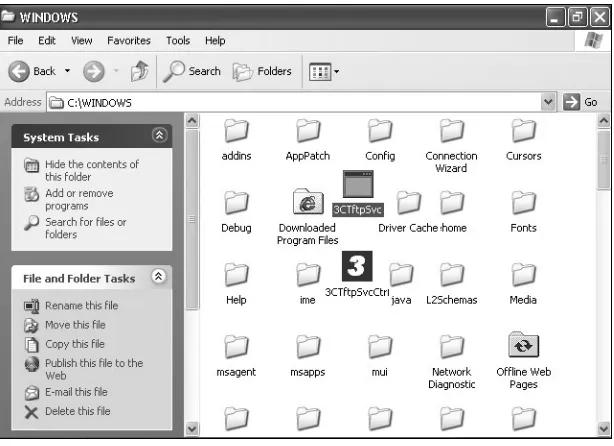
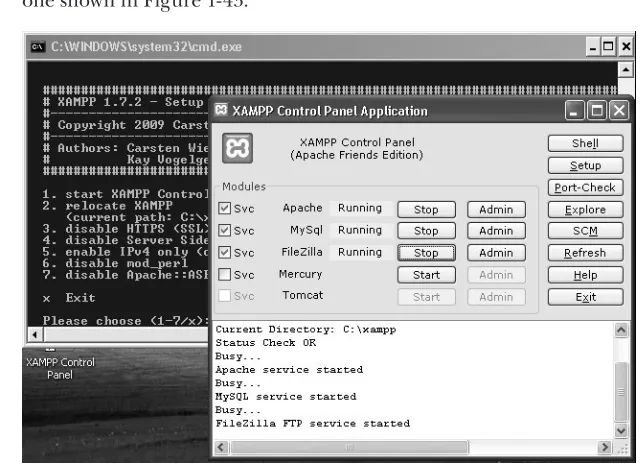
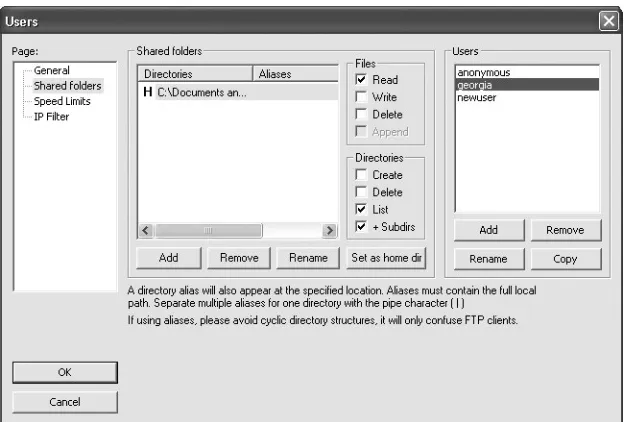
Zervit 0.4