THE EXPERT’S VOICE
®IN LINUX
Foundations of
CentOS Linux
Enterprise Linux On the Cheap
Ryan Baclit, Chivas Sicam,
Peter Membrey,
and
John Newbigin
Companion ailable
A truly free enterprise alternative
to Red Hat Enterprise Linux
Foundations of CentOS
Linux
Enterprise Linux On the Cheap
■ ■ ■
Ryan Baclit, Chivas Sicam,
Peter Membrey, and
Foundations of CentOS Linux: Enterprise Linux On the Cheap
Copyright © 2009 by Ryan Baclit, Chivas Sicam, Peter Membrey, and John Newbigin
All rights reserved. No part of this work may be reproduced or transmitted in any form or by any means, electronic or mechanical, including photocopying, recording, or by any information storage or retrieval system, without the prior written permission of the copyright owner and the publisher.
The Evolution Mail Client logo is a copyright of Evolution project and was printed with permission. ISBN-13 (pbk): 978-1-4302-1964-4
ISBN-13 (electronic): 978-1-4302-1965-1
Printed and bound in the United States of America 9 8 7 6 5 4 3 2 1
Trademarked names may appear in this book. Rather than use a trademark symbol with every
occurrence of a trademarked name, we use the names only in an editorial fashion and to the benefit of the trademark owner, with no intention of infringement of the trademark.
President and Publisher: Paul Manning Lead Editor: Frank Pohlmann
Technical Reviewers: Peter Membrey and Ann Tan-Pohlmann
Editorial Board: Clay Andres, Steve Anglin, Mark Beckner, Ewan Buckingham, Tony Campbell, Gary Cornell, Jonathan Gennick, Michelle Lowman, Matthew Moodie, Jeffrey Pepper, Frank Pohlmann, Ben Renow-Clarke, Dominic Shakeshaft, Matt Wade, Tom Welsh
Coordinating Editor: Debra Kelly
Copy Editors: James A. Compton, Heather Lang, Patrick Meader, and Sharon Terdeman Compositor: Bob Cooper
Indexer: BIM Indexing and e-Services Artist: April Milne
Cover Designer: Anna Ishchenko
Distributed to the book trade worldwide by Springer-Verlag New York, Inc., 233 Spring Street, 6th Floor, New York, NY 10013. Phone 1-800-SPRINGER, fax 201-348-4505, e-mail [email protected], or visit http://www.springeronline.com.
For information on translations, please e-mail [email protected], or visit http://www.apress.com. Apress and friends of ED books may be purchased in bulk for academic, corporate, or promotional use. eBook versions and licenses are also available for most titles. For more information, reference our Special Bulk Sales—eBook Licensing web page at http://www.apress.com/info/bulksales.
The information in this book is distributed on an “as is” basis, without warranty. Although every precaution has been taken in the preparation of this work, neither the author(s) nor Apress shall have any liability to any person or entity with respect to any loss or damage caused or alleged to be caused directly or indirectly by the information contained in this work.
I dedicate this book to all current and future users of Linux.
— Ryan Baclit
To Anna. May all your dreams come true.
— Chivas Sicam
For my granddad, Bill “Pappy” Membrey. Without his unwavering support and guidance (not to mention patience), I would not be where I am today.
— Peter Membrey
To my fiancée, Jenna.
Contents at a Glance
■
About the Authors ... xvii
■
About the Technical Reviewer ... xx
■
Acknowledgments ... xxi
■
Introduction ... xxii
■
Chapter 1: Installation ... 1
■
Chapter 2: BASH ... 31
■
Chapter 3: Client/Host Configuration ... 55
■
Chapter 4: Data Storage Management ... 71
■
Chapter 5: User Management ... 87
■
Chapter 6: X Window System ... 105
■
Chapter 7: Package Management ... 133
■
Chapter 8: Basic Linux Security ... 153
■
Chapter 10: Network Security ... 203
■
Chapter 11: Network Services ... 227
■
Chapter 12: Open Source Databases ... 261
■
Chapter 13: Linux Web Services ... 289
■
Chapter 14: File Sharing Services ... 313
■
Chapter 15: Linux Mail Servers ... 335
■
Chapter 16: Directory Services ... 373
■
Chapter 17: The Linux Kernel ... 415
■
Chapter 18: Linux Virtualization ... 435
■
Chapter 19: Linux Troubleshooting ... 457
■ CONTENTS
v
Contents
■
About the Authors ... xvii
■
About the Technical Reviewer ... xx
■
Acknowledgments ... xxi
■
Introduction ... xxii
■
Chapter 1: Installation ... 1
Preinstallation Steps ... 1
Installation ... 3
Troubleshooting ... 29
Summary ... 30
■
Chapter 2: BASH ... 31
Working with the Command-Line Interface ... 31
Identifying the Working User ... 32
The Linux Filesystem ... 33
Directory Management ... 35
Listing the Contents of a Directory ... 36
Traversing Directories ... 39
Absolute and Relative Paths ... 39
Creating Directories ... 40
Renaming and Moving Files ... 40
Deleting Directories and Files ... 41
Creating and Viewing Text Files ... 42
Viewing the Contents of a File ... 44
Text Processing ... 45
Standard I/O Devices ... 46
Redirection ... 47
Piping ... 47
Getting Help ... 48
Environment Variables ... 51
Creating and Running Your Own Script ... 52
Summary ... 54
■
Chapter 3: Client/Host Configuration ... 55
The Boot Process ... 55
■ CONTENTS
Kernel, Init, and Runlevels ... 60
Services ... 62
Keyboard Settings ... 63
Language Settings ... 64
Date and Time Settings ... 65
Network Settings ... 67
Graphics Settings ... 68
Printer Settings ... 69
Summary ... 70
■
Chapter 4: Data Storage Management ... 71
Provisioning a New Hard Drive ... 71
Partitioning a Disk Using RAID ... 77
Understanding RAID Types and Levels ... 78
RAID 0 ... 78
RAID 1 ... 78
RAID 5 ... 79
Checking on RAID ... 81
Partitioning with LVM ... 81
Understanding How LVM Works ... 82
Volume Groups ... 83
Physical Volumes ... 83
Logical Volumes ... 84
Making Sure Your Volumes Work ... 85
Finding More Information on LVM ... 85
Summary ... 85
■
Chapter 5: User Management ... 87
Managing Users and Groups with the Graphical Interface ... 87
Adding a User ... 87
User Management on the Command Line ... 93
Adding a User ... 94
Enabling User and Group Quotas on a Filesystem ... 99
■ CONTENTS
vii
Setting Up Quotas ... 100
Setting Grace Periods ... 101
Managing Quotas for Groups ... 101
Enabling Quotas ... 101
Making a New xorg.conf File ... 111
The GNOME Desktop ... 111
Separator, Update, Clock, and Sound Applet ... 121
Bottom Panel ... 121
XDMCP Remote Connections ... 122
GDM Configuration ... 123
Reloading Options with gdmflexiserver ... 125
Using XDMCP with GDM ... 125
Requesting an X Session with XDMCP ... 126
XDMCP with X Query... 126
XDMCP with Xnest ... 128
X with SSH ... 130
Summary ... 131
■
Chapter 7: Package Management ... 133
RPM ... 133
The RPM Filename Convention ... 134
■ CONTENTS
Upgrading a Package ... 139
Removing a Package ... 140
Querying a Package ... 141
Information and File Contents of a Package ... 141
Source RPMs ... 142
The Spec File ... 143
The rpmbuild Command ... 144
Building a Binary Package from a Source Package ... 144
YUM ... 145
Installing Packages with YUM ... 146
Removing Packages with YUM ... 146
Updating Packages with YUM ... 147
Searching Packages with YUM ... 148
Adding Sources for YUM ... 148
Creating Repositories for YUM ... 150
Summary ... 151
■
Chapter 8: Basic Linux Security ... 153
System Logger... 153
Using syslog.conf ... 154
Selectors ... 155
Actions ... 157
Detecting Intruders with the System Logger ... 158
Automating Tasks with cron ... 160
Using crontab ... 161
Using cron.allow and cron.deny ... 161
Working with the crontab File ... 161
The crontab Task ... 161
Browsing Available Tasks ... 163
Removing Tasks ... 163
Pluggable Authentication Modules ... 163
Understanding PAM Rules and Configuration Files ... 165
servicename ... 166
Management Groups ... 167
Control ... 167
modulepath ... 168
Testing PAM ... 168
Testing pam_time.so with crond ... 169
Finding Other PAM Modules ... 170
Summary ... 170
■
Chapter 9: Advanced Security ... 171
Using Digital Certificates ... 171
Creating Certificates ... 172
■ CONTENTS
ix
Configuration Files ... 176
Intermediate Certificates ... 178
Certificate File Formats ... 178
Signing Your Own Certificates ... 179
Go Wild... 181
Intrusion Detection ... 181
Monitoring the filesystem with RPM ... 182
Monitoring the Filesystem with AIDE ... 185
Monitoring the Network with Netfilter ... 188
Security Enhanced Linux ... 191
Why Use SELinux ... 192
Enabling and Disabling SELinux ... 192
SELinux Policy ... 193
Drilling Down on Context ... 194
Booleans ... 196
Access Vectors ... 199
Interactive Users ... 200
Summary ... 201
■
Chapter 10: Network Security ... 203
The Firewall ... 203
A Basic Firewall ... 203
An Advanced Firewall ... 207
How netfilter Works ... 207
Viewing the Current Firewall ... 209
Building netfilter Rules ... 211
Using CentOS as a Router ... 216
Using netfilter for IP Masquerading ... 217
Handling Complex Protocols with netfilter ... 218
tcp_wrappers ... 218
Centralized Logging ... 222
Configuring the Server to Receive Logs ... 225
Configuring the Client to Send Logs ... 225
Summary ... 226
■
Chapter 11: Network Services ... 227
OpenSSH... 227
The OpenSSH Configuration File... 227
Connecting to the OpenSSH Server ... 228
Copying Files Securely with scp ... 229
OpenSSH Keys ... 229
OpenSSH Fingerprints ... 230
Getting the Fingerprint Value ... 230
The known_hosts File ... 231
■ CONTENTS
The DHCP Server ... 231
Setting Up the DHCP Server ... 232
The DHCP Configuration File ... 233
Assigning Fixed Addresses ... 234
Name Servers and Zones ... 242
Name Resolution ... 242
The Contents of rndc.conf ... 245
The Contents of named.conf ... 246
Caching DNS ... 246
The hints File ... 246
dig ... 247
nslookup ... 248
Configuring a Caching DNS ... 248
Configuring a Forwarder ... 251
Configuring a Slave DNS ... 251
Configuring a Master DNS ... 252
Reverse Lookup ... 255
The Squid Web Caching Server ... 256
Installing Squid ... 256
The Squid Main Configuration File ... 256
The visible_hostname directive ... 256
The cache_dir directive ... 257
ACLs and ACL-operators ... 258
Adding ACLs and ACL-operators ... 258
How ACL-operators Work ... 259
Talking to Squid Peers ... 259
More Squid ... 260
Summary ... 260
■
Chapter 12: Open Source Databases ... 261
ACID ... 261
MySQL ... 262
■ CONTENTS
xi
Running the MySQL Server ... 264
MySQL Users ... 264
MySQL Monitor ... 264
Securing the MySQL Root User ... 265
Creating a Database ... 266
Getting a List of Available Databases ... 269
Creating Database Backups... 269
Restoring Databases Using Backups ... 270
Restoring the toys Database ... 271
Customizing the MySQL Server Configuration ... 271
PostgreSQL ... 272
Setting up PostgreSQL ... 272
Starting PostgreSQL ... 273
PostgreSQL Interactive Terminal ... 273
Using the Interactive Terminal ... 273
PostgreSQL Roles ... 274
Granting Privileges to Objects ... 276
Revoking Privileges on Objects ... 276
Changing Role Attributes ... 277
Getting the List of Databases ... 277
Creating Database Backups... 278
Verifying the Newly Created Tables ... 282
Viewing the Structures of the Tables ... 283
Adding Entries to the Table ... 283
Reading ... 284
Updating ... 285
Dropping Entries from a Table ... 286
Summary ... 287
■ CONTENTS
The Apache Configuration File ... 293
Apache Configuration File Sections ... 293
Commonly Used Directives ... 294
Section 1: Global Environment ... 294
Section 2: Main Server Configuration ... 295
Distributed Configuration Files ... 297
DirectoryIndex ... 298
Alias ... 298
ScriptAlias ... 298
Creating Another Document and cgi-bin Directory ... 299
Virtual Hosts ... 302
IP-Based and Name-Based Virtual Hosting ... 303
The VirtualHost Directive ... 304
Configuring Name-Based Virtual Hosting ... 304
Adding PHP to Apache ... 308
Secure Apache with SSL ... 309
Securing with OpenSSL ... 310
Startup Without a Passphrase ... 311
Summary ... 312
■
Chapter 14: File Sharing Services ... 313
Very Secure FTP Daemon ... 313
Configuring vsftpd ... 313
Sharing a Directory Using NFS ... 317
Sharing Directories Using NFS Daemons ... 318
Mounting a Shared Directory As the Client ... 318
Unmounting a Shared Directory as the Client ... 319
Using exportfs ... 319
Mounting Shared Directories at Boot Time ... 320
Setting Up a Samba Server ... 321
Installing Samba ... 322
Configuring Samba ... 322
lmhosts ... 322
■ CONTENTS
xiii
smb.conf ... 323
Configuring Stand-Alone Server Options ... 323
server string ... 323
netbios name ... 324
passdb backend ... 324
Adding a Samba User ... 324
Testing the Samba Stand-Alone Server ... 325
Adding Shares ... 326
Sharing a Printer ... 328
Preparing the Printer to Pass Print Data in Raw Form ... 329
Configuring Samba to Share a Printer ... 332
Installing the Samba Printer to the Windows Client ... 333
Summary ... 334
■
Chapter 15: Linux Mail Servers ... 335
Basic Email Concepts ... 335
Sending Email with Sendmail ... 339
Checking Mail with the mail Command ... 339
sendmail.mc ... 342
sendmail.cf ... 344
The Sendmail Administrative Configuration Files ... 345
local-host-names ... 345
Sending Email with Postfix ... 351
The Postfix Main Configuration File ... 351
Postfix Administrative Configuration Files ... 354
■ CONTENTS
Mail Servers and DNS ... 358
Dovecot ... 359
Installing Dovecot ... 359
The dovecot.conf Configuration File ... 359
Configuration Options ... 360
Configuring Dovecot for Maildir ... 361
Configuring an Email Client to Send and Receive Email Using IMAP ... 362
Checking the IMAP Maildir contents ... 366
Receiving Email with POP3 ... 367
Checking the POP3 Maildir contents ... 369
Dovecot and OpenSSL ... 370
Using Evolution with OpenSSL ... 370
Troubleshooting Tactics ... 372
Summary ... 372
■
Chapter 16: Directory Services ... 373
The Need for Unified Authentication ... 373
Network Information System ... 375
Setting up NIS ... 375
The NIS Server ... 375
Creating Your First Domain ... 376
■ CONTENTS
xv
Modules ... 387
Schemas ... 388
Your First Database ... 390
Using the my-domain.com database ... 391
LDIF Format ... 392
Starting OpenLDAP ... 393
Adding Entries with ldapadd ... 393
Searching Entries with ldapsearch ... 396
Changing Entries with ldapmodify ... 397
Removing Entries Using ldapdelete ... 398
Creating a Backup ... 399
OpenLDAP and Samba ... 399
Installing Perl Modules ... 400
nss_ldap ... 402
The nss_ldap Configuration File ... 403
ldap.secret ... 404
nsswitch.conf ... 404
OpenLDAP ... 405
OpenLDAP Client Configuration File ... 405
Samba... 406
Smbldap-tools ... 408
smbldap.conf ... 408
smbldap_bind.conf ... 408
Installing and Configuring smbldap-tools ... 409
Joining the DCTOYS Domain Controller ... 411
Testing the Samba and OpenLDAP Setup ... 412
Troubleshooting Tactics ... 413
Pitfall #1: Cannot log into the domain controller ... 413
Pitfall #2: Cannot start the Samba server properly because only the nmbd process is running ... 413
Summary ... 413
■
Chapter 17: The Linux Kernel ... 415
History of the Linux Kernel ... 415
Types of Linux Kernels ... 415
Kernel Modules ... 417
When to Recompile the Kernel ... 422
■ CONTENTS
Preparing to Configure the New Linux Kernel... 423
Ways to Configure the Kernel Sources ... 424
Configuring the Kernel with the Command Line ... 424
Configuring the Kernel Graphically ... 426
Configuring the Kernel with menuconfig ... 428
Preparing for Kernel Compilation ... 430
Building the Kernel ... 431
Building the Kernel Modules ... 432
Making the Boot Loader Initialized RAM Disk ... 432
Adding the New Kernel into the GRUB Boot Loader... 432
Your Turn ... 434
Summary ... 434
■
Chapter 18: Linux Virtualization ... 435
Understanding Virtualization ... 435
Deciding to Use Virtualization ... 436
Xen ... 437
The xend Configuration Files ... 441
xend-config.sxp ... 441
xend-pci-permissive.sxp and xend-pci-quirks.sxp ... 442
qemu-ifup ... 442
The xend Network Configuration Scripts Directory ... 443
Checking Dom-0 ... 443
Making a Guest with virt-install ... 444
Preparing the Installation Media ... 446
Using the virt-install Command ... 446
Understanding the Guest Configuration File ... 448
Xen Guest Example Configuration Files ... 450
Connecting to a Guest ... 450
Using xm ... 450
Using virt-viewer ... 451
Using vncviewer ... 452
Shutting Down a Guest ... 453
Starting a Guest ... 453
Cloning a Guest ... 453
Cleaning Up ... 454
■ CONTENTS
xvii
■
Chapter 19: Linux Troubleshooting ... 457
The CentOS Rescue Environment ... 457
Exploring the Rescue Environment ... 460
Troubleshooting Checklist ... 461
Changed the Root Password ... 461
Bootloader Was Overwritten ... 462
You’re Experimenting with the Files in /etc ... 463
Skipping /mnt/sysimage ... 463
Finding the Affected System’s Root (/) Directory ... 464
Mounting Logical Volumes ... 464
Mounting Logical Volumes ... 465
Single-User Mode ... 466
Booting into Single-User Mode ... 466
My New Kernel Is Stuck! ... 467
Creating the Required Device Files ... 468
Summary ... 469
■ CONTENTS
About the Authors
■Ryan Baclit started to use Linux during his college days at De La Salle University. His natural interest in computer technology prompted him to study the operating system and its tools. Knowing that he needed to learn more about open source technology to advance in Linux and the proper use of open source tools, he enrolled in Bluepoint Institute of Higher Technology’s Total Linux course in 2005. After graduating, he eventually became an instructor T that institute. As an instructor, he usually teaches open source programming tools like Bash shell scripting and software analysis and design with UML. When not playing with Linux, he studies manga illustration, reads manga, and collects anime toys.
■Chivas Sicam works as an entrepreneur and IT consultant. Chivas takes pride in being part of the DOST-ASTI (Department of Science and Technology Advanced Science and Technology Institute) Bayanihan Linux project. His team has
advocated the use of open source software for the computing needs of government agencies, schools, and small and medium-size enterprises in the Philippines. He also scored 100% in his RHCE exam in March 2005. He enjoys technology, road trips, and keeping up-to-date on news of the Utah Jazz.
■ ABOUT THE AUTHORS
xix ■John Newbigin has been passionate about Linux for more than 10 years. In that time he has channeled much of his enthusiasm into writing a number of tools and utilities. Ironically it is his Windows programs such as RawWrite for Windows and Explore2fs that have generated the most interest, though they all help to bring Linux to a larger audience.
John’s involvement with CentOS dates back to the early days when it was still part of the CAOS Foundation. From late 2003 until mid-2009 when the product was retired, John was the CentOS-2 lead developer. He still helps out on the other releases where possible.
■ CONTENTS
About the Technical Reviewer
■Ann Tan-Pohlmann has experience in many fields, including slinging regular expressions, watching Linux servers, writing telecom billing systems, being an obsessive-compulsive spreadsheet user, and arguing about machine learning. She is learning Italian, has forgotten most of her Mandarin, trains cats using Cat-Kwan-Do, and sings Videoke to survive the Manila night. She currently does GUI
■ ABOUT THE AUTHORS
xxi
Acknowledgments
Thanks to all of the following:
Dad, Mom, Joel (who gave me my very first Linux CDs), Eric, and Adrian. They were always there to help me push forward when challenges got tough.
Bluepoint Institute of Higher Technology. They gave me the proper training to have concrete Linux skills for the enterprise and to interact with their wonderful BLUE community.
Chivas and Frank. You two introduced me to the world of writing books with Apress.
The CentOS community. They created the alternative Linux distribution to RHEL for the use of all. The rest of the open source community. They have shown a commitment to providing great open source software.
God. If it were not for Him, I would not have everything I have now. –Ryan Baclit
I would like to thank the people of Apress for their support in this endeavor. –Chivas Sicam
The one person I would really like to acknowledge is my wife, Sarah.
Despite being pregnant through the majority of the work on this book, and despite somehow managing to seemingly suffer all the potential side effects of pregnancy (which the doctor joyfully insisted was "completely normal"), she always had a smile for me. I can honestly say that after pulling an all-nighter (alas, entirely my own fault), there could be no better sight. So, please allow me to thank her for her unlimited patience and tolerance. She is my best friend, and I love her dearly. Without her love and support, I would never have been able to finish the book.
■ INTRODUCTION
Introduction
Community Enterprise Operating System, or CentOS, is an enterprise Linux distribution. It was developed by the CentOS Project community using the source code of the commercial Linux distribution from Redhat, the Redhat Enterprise Linux (RHEL). They created CentOS to have a free alternative to RHEL and to have a Linux distribution that's as stable as its commercial counterpart and can keep up with the requirements of the enterprise. Using CentOS is a good choice to learn Linux not only for its RHEL roots but also for its compatibility, quality, and support.
CentOS is binary compatible with the RHEL because it was built using the source code of RHEL. Also, the developers made sure to adhere to the redistribution rules of RHEL when they built CentOS so it would be a truly free alternative to the original.
CentOS is continuously being developed by its core developers and its community. They make security and software updates and quality assurance measures to maintain the stability of the distribution. The packages they build for CentOS are placed on their distributed mirror network to allow users to download and install software on their system manually if needed. Because of the core developers and its community, CentOS is able to have a constant release upgrade schedule to allow users to use new software and to support new hardware. They are also increasing in numbers, and that means there's always a better CentOS after each release.
CentOS has an interactive community, and you can ask them for assistance (go to http://centos.org) if you need it. You can send email to community members to share ideas or ask for solutions on the problems that you may have encountered while using CentOS. For business users that plan to use CentOS on their organization, they can avail of commercial support for CentOS through companies that specialize in it.
The Book
Foundations of CentOS Linux: Enterprise Linux on the Cheap was written for beginning to intermediate level administrators who want to learn Linux using CentOS. This book was designed to be a hands-on type of book to enable you to grasp Linux concepts fast. Starting with Chapter 1, you will be given background and instructions on how to install CentOS in your computers properly. Then you will install CentOS on your computers. This pattern continues throughout the book to optimize your Linux learning experience.
■ INTRODUCTION
xxiii Here is a brief summary of what each chapter covers on the book:
Chapter 1 will give you a walkthrough on how to install CentOS into your computers. You will be given advice on how to prepare for your first Linux installations such as where to get an install CentOS DVD and having a checklist for an enterprise server setup and enterprise workstation setup. After this chapter, you now have at least two working CentOS machines that are good enough for you to experiment with Linux.
Chapter 2 will introduce you to the command-line interface of Linux using the Bourne-again shell or BASH. With BASH, you will be able to find out who is currently logged in, see the concepts behind the Linux filesystem and why the directories are arranged like that, and how to manage directories such as making symbolic links (or shortcuts) or removing directories. If you ever get stumped on any of the shell commands, you will be given an overview on how to get help about it using the man pages.
Chapter 3 will show you how to customize your installed CentOS systems depending on your
requirements. You will be given an overview of the Linux boot process, the importance of a bootloader, the runlevels your systems can use, and configuring the system services needed to be started at boot. In addition, you will see how you can configure other system settings such as the keyboard, the current language, the system networking, the graphical adjustment, and the printer.
Chapter 4 will dig deeper into the realm of storage. You will learn how to manage storage devices such as preparing and adding hard drives and what filesystems you can use for them on your system. You will be shown how to set them up for redundancy using RAID or have an extensible partitioning capability with the Logical Volume Manager.
Chapter 5 will show you how to manage users on your systems. You will learn how to add, remove, and modify users, and change passwords on both the graphical desktop and on the command-line interface. Armed with the concepts of Linux users, you will know how to put restrictions on the amount of storage space users can access through the use of disk quotas.
Chapter 6 will introduce you to the X Windows, the base system that is used by graphical Linux
applications such as the GNOME Desktop. You will also learn how to use the GNOME Desktop controls like menus and buttons. Later, you will see how you can use your desktop to connect to another X Windows server for remote graphical administration.
Chapter 7 will show you how to manage packages in your system. You will learn how to install, update, and remove packages, and use repositories to further streamline package management in your system. Chapter 8 will give you a background on basic Linux security to secure your system. You will know how to configure the system logger and view log files to monitor your system in case of a break-in. You will also see how to schedule tasks for automation. Lastly, you will learn how to use Linux-PAM to have a central way of authenticating users with PAM-enabled applications.
■ INTRODUCTION
Chapter 11 will show you how to install and configure different network services on your servers. Some of these network services include the secure shell (SSH) for encrypted connections and the Network Time Protocol server to have synchronized time data on your network. You will see that CentOS is enough to provide the required network services on your network.
Chapter 12 will introduce you to some of the open source databases that you can use with CentOS. These include MySQL and PostgreSQL. You will learn how to install and configure each database system and see how to run database queries on them. You will also see the similarities and differences among database systems, which will aid you in choosing the one that is right for you based on your
requirements.
Chapter 13 will show you how to use web services with the Apache Web Server. You will be able to install and configure Apache to serve web pages and scripts such as PHP. If you plan to manage multiple domains using Apache, you will learn that using the virtual hosts.
Chapter 14 will introduce you to the available file services that you can use on your system. These services are FTP to distribute files, NFS to share files with fellow Linux/Unix computers, and Samba to share files on your Windows network. You will also be given a walkthrough on how to share a printer on your Samba server to allow Windows computers to have a central print server.
Chapter 15 will show you how to provide email services on your network. You will see how to install and configure mail servers to send email and IMAP/POP3 servers to retrieve emails.
Chapter 16 will introduce you to the directory services. You will know how to provide central
authentication on Linux- or Unix-only computers and to hybrid systems. This will make user credentials available to computers that can use your directory services.
Chapter 17 will introduce you to the Linux kernel, the core of your CentOS system. You will learn about the different types of kernels you can use, manage additional kernel capabilities through modules, and make yourself a new kernel. Having kernel building techniques on hand will be advantageous because you get to customize your system as you wish.
Chapter 18 will teach you about virtualization, the technology that companies and organizations use to save on cost and energy. You will learn about the various virtualization technologies that you can use later. You will experience virtualization using Xen by creating new separate instances of CentOS systems within your current CentOS system.
Chapter 19 will teach you about the basics of Linux troubleshooting to prepare you for situations when your system cannot boot as expected. You will learn how to use the rescue environment to enter your system to know why it cannot load, and fix it. You will know how to find the correct partitions and directories of your unbootable system to begin your repairs.
■ INTRODUCTION
xxv If you are already an experienced Linux administrator and want to learn CentOS using this book, you will still find some useful advice that can add to your experience. This book will serve as a reference book that you can use from time to time for common commands and base server setups.
C H A P T E R 1
■ ■ ■
1
Installation
In this chapter, you will learn how to install CentOS. To make good use of this book’s information about how to set up and use enterprise services, we recommend that you have at least three computers connected to a LAN (local area network), with one connected to the Internet. Two computers will be used as enterprise servers, while the other computer will be used as an enterprise workstation.
However, if you do not have these resources at the moment, you can use free virtualization software such as Virtual PC (http://www.microsoft.com/windows/downloads/virtualpc/default.mspx) or VMware Server (http://www.vmware.com/products/server/) to simulate running several computers in one computer. We recommend VMware Server because it’s easy to adjust the network connections to match the requirements above, and we’ve never encountered problems using the graphical user interface. The only limitation is that you won’t be able to see the performance and reliability of CentOS if it is running on virtual machines instead of running standalone.
So you’ve decided to learn CentOS, the cheapest enterprise Linux operating system available. When we say cheap, we mean cheap! You can actually download CentOS for free from this link:
http://isoredirect.centos.org/centos/5/isos/i386/. We recommend, though, that you obtain the DVD ISO so that everything you need is in one DVD.
However, whether you download the CD or DVD ISOs, if you have a slow Internet connection, it could take months to download the images. You can try alternative sources such as asking a favor from a friend to download them for you, or you can borrow the CDs or DVD from friends if they already have the images. You can also join the local Linux community to ask for assistance. Check out
http://www.linux.org/groups/ to find a group suitable to your location.
Lastly, if all else fails, and if you have a few bucks to spare, you can opt to purchase the discs online and have them shipped to your doorstep. One of the web sites you can visit to purchase the CDs or DVDs online is OSDisc, http://www.osdisc.com/cgi-bin/view.cgi/products/linux/centos.
If you’re able to get the image files, though, you need to burn them onto a CD/DVD yourself. You will need blank CDs or a DVD and a CD/DVD burner and software. The instructions for burning a CD/DVD of CentOS are available at http://www.centos.org/docs/5/html/CD_burning_howto.html. This link provides instructions on burning your CentOS images once you have downloaded them in both Windows and Linux.
Preinstallation Steps
CHAPTER 1 ■ INSTALLATION
to the LAN. In the chapters ahead, you will learn how to share the Internet connection from the server via gateway or proxy. Also, the computers that you will be using need to be compatible with CentOS.
More often than not they are compatible, but sometimes there are peripherals such as hard disk and network cards that are not supported by the operating system. Based on experience, these are usually new devices. You can check https://hardware.redhat.com/ to see if your hardware supports CentOS. If not, you will need to replace the parts or the whole system, or wait for drivers to become available.
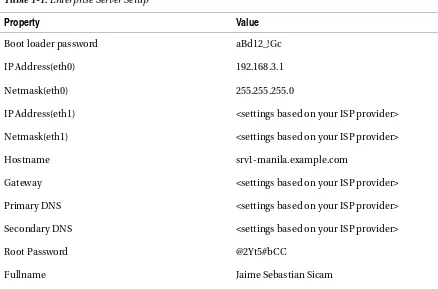
Table 1-1 details how we will set up the servers, and Table 1-2 lists the settings for the enterprise workstation.
Table 1-1. Enterprise Server Setup
Property Value
Boot loader password aBd12_!Gc
IP Address(eth0) 192.168.3.1
Netmask(eth0) 255.255.255.0
IP Address(eth1) <settings based on your ISP provider>
Netmask(eth1) <settings based on your ISP provider>
Hostname srv1-manila.example.com
Gateway <settings based on your ISP provider>
Primary DNS <settings based on your ISP provider>
Secondary DNS <settings based on your ISP provider>
Root Password @2Yt5#bCC
Fullname Jaime Sebastian Sicam
Password TR,34,AUy!
Table 1-2. Enterprise Workstation Setup
Property Value
Boot loader password Ghx_1B7$3
IP Address 192.168.3.20
CHAPTER 1 ■INSTALLATION
3 Table 1-2. Enterprise Workstation Setup (continued)
Hostname wrkstn1-manila.example.com
Gateway 192.168.3.1
Primary DNS 192.168.3.1
Secondary DNS 192.168.3.2
Root Password 1(Am,nP)!
Username ryan
Fullname Ryan Constantine Baclit
Password 4Pr*m@,Ll7
Installation
Now, let’s move forward and start the installation process. Turn on your computer, put the CD/DVD in the CD-ROM/DVD-ROM drive, and wait until you see the installation screen. If the installation screen fails to show up, you may need to change the BIOS setting to boot into CD. Once it is up, follow these steps to set up CentOS.
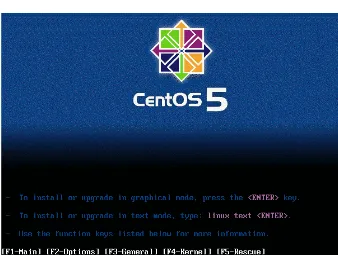
1. You should be able to see the installation screen as shown in Figure 1-1. You have the option to run the installation in graphical mode simply by pressing Enter. If you do not select any option, in 60 seconds, the installer will proceed in graphical mode. In this mode, you can use the keyboard and mouse to navigate the menus. However, if you want the installation to run faster, or you have problems running installation in graphical mode, you can opt to install it in text mode by typing linux text at the prompt and pressing Enter.
2. Once you’ve made this choice, you will only be able to use the keyboard in navigating the installation menus. For other parameters you can use for installation you can navigate the help menus by pressing the function keys F1 to F5. F1 displays the main menu, where you are right now. F2 provides other boot options that are helpful if you are not able to install CentOS through text or graphical mode:
• Run the installer with no hardware probing. This is useful when the installer fails to boot when it fails to identify a particular hardware in your system such as firewire.
• Test the CD for defects to see if your installation fails due to a CD error.
• Run rescue mode, where you use the installation CD as a rescue environment on a system that has CentOS installed but fails to boot.
• Install a driver disk, usually for hardware devices such as the NIC or hard disk for CentOS to be able to operate these devices.
CHAPTER 1 ■ INSTALLATION
• Test your RAM for defects. When you test the memory, you usually leave the test running for days to make sure that RAM is not the cause of any installation problems.
• Set the screen resolution of the graphical installation should you have problems. • If memory cannot be detected, you have the option to specify the size of your memory
manually.
3. Also, these options can be combined, as you can see by pressing F4. F5 shows you that entering linux rescue as an option allows you to enter the rescue environment.
Figure 1-1. You have the option to install CentOS in graphical or text mode, or specify other options to troubleshoot the installation process or rescue an existing CentOS installation.
CHAPTER 1 ■INSTALLATION
5 Figure 1-2. You have the option to test the CD media for defects.
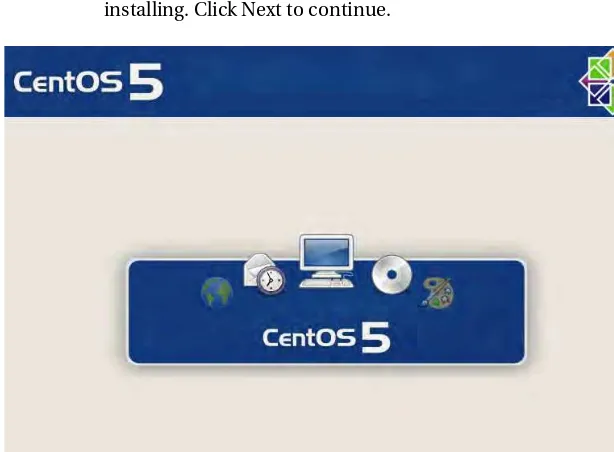
5. Once the media has been tested or if you chose to skip the test, you will see the graphical installation screen shown in Figure 1-3. You can click the Release Notes button to obtain information about the version of CentOS that you are installing. Click Next to continue.
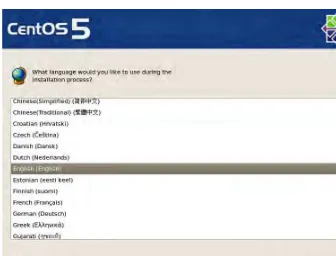
CHAPTER 1 ■ INSTALLATION
6. The next step is to choose the language used in the installation process, as shown in Figure 1-4. The default is English, but if you select a different language here, that language will be reflected as soon as you click Next.
CHAPTER 1 ■INSTALLATION
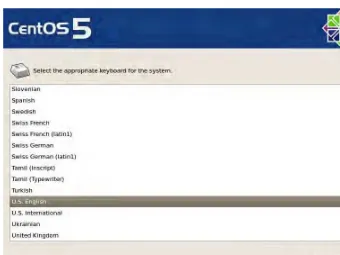
7 7. Next you can select the keyboard layout appropriate for your keyboard as
shown in Figure 1-5. Select the appropriate keyboard and then click Next.
CHAPTER 1 ■ INSTALLATION
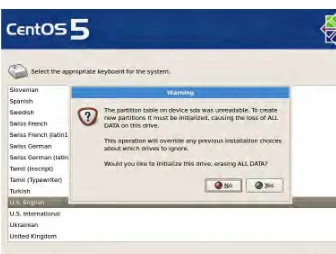
8. If your hard disk is unformatted (has never been used until now), or the partition table of the hard disk is corrupt, the dialog shown in Figure 1-6 will appear. Click Yes to initialize the hard disk to create a new partition table on the hard disk, effectively preparing the hard disk for partitioning.
Figure 1-6. The message appearing when the partition table on the hard disk needs to be re-created to prepare the hard disk for partitioning.
CHAPTER 1 ■INSTALLATION
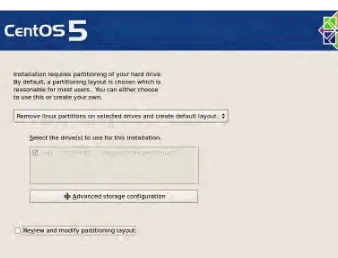
9 9. The next step is creating partitions on the hard disk, as shown in Figure 1-7.
The purpose of partitioning is to allocate meaningful portions of the disk space to the CentOS based on how it will be used. The first option allows you to select the partitioning type:
• Remove All Partitions on Selected Drives and Create Default Layout: This option allows you to consume all disk space on the selected hard disks for CentOS; the disks will be
automatically be partitioned for you. Any existing operating system installed on the hard disk will be erased in favor of CentOS.
• Remove Linux Partitions on Selected Drives and Create Default Layout: This option allows you to consume only partitions used in existing Linux installations for CentOS on the selected drives, which will automatically be partitioned for CentOS. This option is typically used for dual-booting; that is, choosing which operating system to use at boot time. Normally, this option is used for workstations where users can choose to boot into Windows or Linux.
• Use Free Space on Selected Drives and Create Default Layout: If your hard disk has a free, unused partition on the selected drive, it will be consumed by CentOS and will be partitioned automatically. Normally, when Windows is installed on the hard disk, it uses one partition that consumes all the disk space. You will need a third-party tool such as Partition Magic to resize the Windows partition and create an unused partition that can be used for CentOS.
■
Note: Unfortunately, at the time of writing, the CentOS installer cannot resize the Windows partition. However, there are LiveCD (http://www.livecdlist.com/) Linux distributions such as Ubuntu that can resize Windows partitions on the fly, so that you don’t need to purchase commercial third- party tools such as Acronis Partition Manager or Partition Magic to partition your hard drive.• Create Custom Layout: This is the most advanced of the four options; it allows you to create, edit, and delete partitions as you please. Once you’re a seasoned CentOS user, you will likely opt to use this setting since you can tune the partitions based on how the server or workstation will be used.
10. Assuming that there are no existing operating systems on the hard disk, or that any existing operating systems can be deleted, choose Remove Linux
Partitions on Selected Drives and Create Default Layout.
11. The second option allows you to select which hard drive will be used for CentOS. If you have several hard disks, they will be listed here unless the disks are configured as a hardware RAID.
■
Note: RAID (Redundant Array of Independent/Inexpensive Disks) is a hard disk setup that allows you to tune the performance and reliability of your data storage. SeeCHAPTER 1 ■ INSTALLATION
12. With the third option, Advanced Storage Configuration, you can use a SAN (Storage Area Network) in CentOS through the iSCSI protocol but this isn’t in common use at present and is outside the scope of this book.
13. Finally, you have the option Review and Modify Partitioning Layout. Check this option so that you can see on the next screen how the partitions will be allocated on your hard disk(s) and be given the opportunity to revise the partition layout if necessary.
Figure 1-7. This menu allows you to create partitions on your hard disk with a default layout or to manually do it yourself.
CHAPTER 1 ■INSTALLATION
11 15. If you chose the Review and Modify Partitioning Layout option, you will see
the partitioning scheme shown in Figure 1-8. In this screen you can review how the partitions are designed and edit them as well. As you’ve noticed, the hard disk is physically divided into two partitions, one for boot and the other for LVM (Logical Volume Manager). The boot partition contains the files needed to boot CentOS; these are the boot menu configuration and kernel files. LVM allows you to easily adjust or create a virtual/logical partition combined from physical partitions from several hard disks. It is the easiest way of allocating more disk space to a partition while it is still being used. At the moment, there are two logical partitions created under LVM, swap and root (/). The swap partition is used for swapping in and out data to and from the RAM. Normally, the swap size is twice the size of the RAM for optimum performance. The root or (/) partition contains the Linux filesystem. This is where the operating system, applications, and data will be stored. You’ll find more information about the Linux filesystem in Chapter 2. Click Next to continue.
CHAPTER 1 ■ INSTALLATION
16. The screen shown in Figure 1-9 allows you to configure the boot loading options.
• The first two options allow you to install a boot loader or not. You need a boot loader to boot Linux, so just keep the current settings. You only use the second option if there’s another Linux distribution installed in the system and you would rather configure that boot loader to boot this CentOS installation.
• The next option allows you to add operating systems to boot from this boot loader. Normally, if you are dual-booting with Windows, this entry is already available in the list. However, if you are dual-booting with another Linux distribution, you would need to add that entry here.
• The next option allows you to provide a boot loader password. Select this entry and supply the password in Table 1-1 or Table 1-2, depending on whether you’re installing CentOS for the server or workstation. The boot loader password is necessary because without a password, anyone can modify the boot settings and in the worst case, it can be
manipulated in such a way that anyone could have system-level access on your computer without having to key in any password.
• The last option, Configure Advanced Boot Loader Options, allows you to set the partition on which the boot loader record will be installed, the drive order and additional options and kernel parameters. Typically, these options can be left unchanged.
17. Click Next to continue.
CHAPTER 1 ■INSTALLATION
13 18. In the screen shown in Figure 1-10, you will set up the network devices,
hostname, and miscellaneous settings.
CHAPTER 1 ■ INSTALLATION
19. Select a network device and click Edit. Supply the information listed in Table 1-1 or Table 1-2 as shown in Figure 1-11. Under IPv4, select Manual
Configuration and supply the IP address and Netmask. IPv6 or the next generation IP addressing is not applicable in our setup, so remove the check from Enable IPv6 Support.
Figure 1-11. You can set the IP address and netmask of your network device manually or receive the settings through Dynamic IP configuration (DHCP).
20. Take note that on the server, you will be setting up two network devices, one for Internet access and one for the LAN. On the workstation, you will only need to edit one network device.
CHAPTER 1 ■INSTALLATION
15 22. The miscellaneous settings are used to configure the gateway and DNS
settings. The gateway is used for routing. For the server, accessing other networks such as the Internet will go through the gateway server of your ISP provider. For the workstation, it will use the server as the gateway to connect to other networks such as the Internet. This is the best way to control the Internet traffic going in and out of the workstation. It filters what the server can access and forces the workstation to go through that server to access other networks. The DNS or Domain Naming System translates hostnames into IP addresses and vice versa. On the server, use the DNS provided by your ISP until the chapter on DNS, where we set up our own DNS service. For the workstation we use the server for DNS, which will work once the DNS service is configured on the server.
23. Click Next to continue.
24. In the screen shown in Figure 1-12, you can configure the time zone of your system. Choose the area of your time zone by clicking the city nearest your computer location on the map or by selecting an entry from the list. If you need the time to be updated for daylight savings time accordingly, keep System Clock Uses UTC checked. Click Next to continue.
CHAPTER 1 ■ INSTALLATION
25. In the screen shown in Figure 1-13 you will set the password of root, the administrator of this system. With root access, you have full control of the system, so you need to provide it with a password that is difficult to guess but easy to memorize so that you don’t need to write it down. It should use more than seven characters, with uppercase and lowercase letters, digits, and special characters. You can use mnemonics such as converting your special phrase “I’m a Jazz Fan, I rock!”, into “1’m@JF,1r!” For now, just provide the password listed in Table 1-1 or Table 1-2 and click Next when you’re done.
CHAPTER 1 ■INSTALLATION
17 26. In the next screen, you have the option to select what software packages will be
installed in your system, as shown in Figure 1-14. By default, CentOS is set to install the Gnome desktop environment. For now, just leave the option as is for both the server and the workstation. In later chapters you will learn how to install and remove software yourself.
27. You can also add third-party online repositories, such as CentOS Extras. These repositories are useful when the software you need is not in the base CentOS repository but is available elsewhere.
28. At the bottom, you have the option to customize the software packages in detail. For now, just ignore that and accept the option Customize Later.
29. Click Next to continue.
CHAPTER 1 ■ INSTALLATION
30. The next screen, shown in Figure 1-15, prompts you to click Next to proceed with the installation. Installation logs will be stored in the /root/install.log file. These logs are useful for seeing if any errors occurred during the
installation. A kickstart file based on the installation options you have chosen will be stored in /root/anaconda-ks.cfg. This type of file is useful if you want to apply the installation options you’ve chosen here to other servers. It provides a faster way to install the same setup on other servers than setting the same installation options on each server manually. Click Next to continue.
CHAPTER 1 ■INSTALLATION
19 31. During the installation process, the partitions are being created permanently
and software is being installed on the hard disk. As shown in Figure 1-16, advertisements for CentOS are displayed in the middle of the screen, while the status of the installation is shown through the progress bar at the bottom.
CHAPTER 1 ■ INSTALLATION
32. Once the software is completely installed, the confirmation screen will appear, as shown in Figure 1-17. At this point, it’s time to reboot the system. Click Reboot.
CHAPTER 1 ■INSTALLATION
21 33. After the system reboots, the newly installed CentOS will boot up. As shown in
Figure 1-18, there are a few post-installation steps before you are able to log in to the system.
Figure 1-18. The welcome screen of the post-installation steps.
CHAPTER 1 ■ INSTALLATION
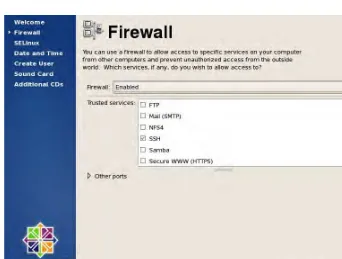
35. The screen to configure the firewall will appear, as shown in Figure 1-19. The first option, Firewall, allows you to enable or disable the firewall. The second option, Trusted Services, allows you to select which services on your system can be accessed through the network. By default, SSH (Secure Shell) is the only one set. SSH is useful for allowing computers over the network to access the system in a remote secure shell. The final option, Other Ports, allows you to specify services on your system that can be accessed through the network but are not defined under Trusted Services. For example, if your server is
configured to run as a chat server such as Jabber, you would need to specify that port 5222 should be open so that chat clients can access the Jabber service your server is offering.
36. There’s no need to change anything in the firewall settings, since SSH is enough for now. Click Forward to continue.
CHAPTER 1 ■INSTALLATION
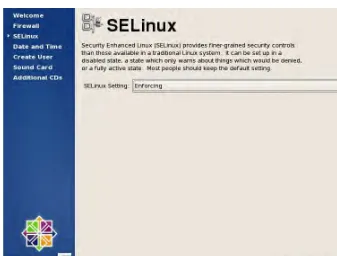
23 37. The next setting to be configured, as shown in Figure 1-20, is SELinux (Security
Enhanced Linux), which was developed by the NSA to provide security policies that harden the system considerably even from the administrators themselves. You can leave the default option unchanged and continue by clicking Forward.
CHAPTER 1 ■ INSTALLATION
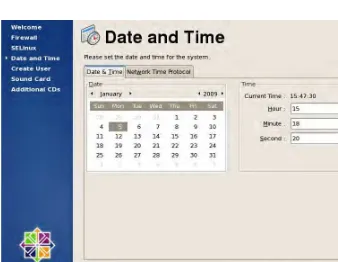
38. The next setting to configure is Date and Time, as shown in Figure 1-21. You can opt to change the date and time manually by editing this information on the Date & Time tab. However, we recommend that you configure the system to use NTP under the Network Time Protocol tab so that the system will periodically poll time servers to keep your time up to date based on the selected time zone set during installation. This effectively prevents the effects of clock skews.
■
Note: For more information on clock skews, see http://en.wikipedia.org/wiki/ Clock_skew.CHAPTER 1 ■INSTALLATION
25 39. The next step is to create a regular (nonadministrative) user, as shown in
Figure 1-22. A regular user is able to use the system but cannot change its overall configuration, such as adding, updating, or deleting software installed by the administrator or creating other users. You can also verify account details by configuring CentOS to check from a network authentication service such as NIS or LDAP. You will learn how to authenticate accounts from a network authentication service in the later chapters. For now, provide the details of the regular user as stated in Tables 1-1 and 1-2. Click the Forward button to continue.
CHAPTER 1 ■ INSTALLATION
40. In the next screen, shown in Figure 1-23, you can test your sound card if CentOS was able to detect one. If a sound card was detected, a Play button will appear. Click the Play button and listen to confirm that you can hear the sound. This is useful if you are installing CentOS on a workstation where you may listen to audio. Click Forward to continue.
CHAPTER 1 ■INSTALLATION
27 41. The next screen, shown in Figure 1-24, is for adding third-party software
through CDs. As far as we know, there are no third-party software CDs you can install in CentOS at this time, so just click Finish.
CHAPTER 1 ■ INSTALLATION
42. At this point, you may now log in to the system via the login prompt as shown in Figure 1-25. You can log in as root or the regular user account that you created during installation.
CHAPTER 1 ■INSTALLATION
29 43. Let’s try logging in as root. Type root in the Username box and press Enter. In
the screen that appears, you’ll see a Password box; type the password you created for root and press Enter. If you were able to provide the right credentials, you be able to see the desktop as shown in Figure 1-26.
Figure 1-26. The Linux desktop is shown after authentication.
Finally, CentOS has been installed as a server and is up and running. To install it as a workstation on a separate computer, repeat the steps but use the settings in Table 1-2 as a guide for setting up the workstation.
Troubleshooting
Should you have trouble installing CentOS in your system, you may want to try Googling the error messages to see how other users were able to overcome the problem. You can also ask for help from Linux forums and mailing lists. Finally, you can try working on the problem yourself by checking out the troubleshooting section of the online installation guide for assistance:
CHAPTER 1 ■ INSTALLATION
Summary
C H A P T E R 2
■ ■ ■
31
Bash
System administration can be done using either text-based utilities (such as Bash, the Bourne-again shell) or graphical tools. There are more text-based utilities than graphical tools, however, and there are cases where it is more convenient to use one or the other. There are also cases where you must rely solely on text-based solutions, such as running the rescue environment. As a system administrator, you will be using a combination of both, deciding case by case which is best to get the job done.
In this chapter, you will learn the basics of running commands and text-based utilities as well as creating and running scripts. You will also learn how to get information should you get stuck. Graphical tools are discussed throughout the book alongside the systems they manage.
Working with the Command-Line Interface
There are three conventional ways of running the command-line interface. You can use virtual consoles, a graphical terminal, or remotely log in through a secure shell.
The virtual consoles are text-based consoles similar to the VT100 terminals that were used to run Unix in the days when personal computers were not yet available. These consoles are used to run programs on the system, input data, and display output. CentOS provides six consoles by default, which are accessible by pressing Alt+F1 to F6, where each function key represents an individual console. However, if you’re in graphical mode, you would need to hold Ctrl+Alt and select a terminal from F1 to F6. You can also navigate from one console to the other by holding Ctrl and pressing the left or right arrow key. In order to use the console, you must supply your username and password. To go back to graphical mode, press Alt+F7.
■
Note: For more information about VT100 terminals, see http://en.wikipedia.org/ wiki/VT100.In graphical mode, simply log in to the graphical desktop and then run the terminal application by selecting Applications Accessories Terminal. This application is called the Gnome Terminal.
CHAPTER 2 ■ BASH
■
Tip You can allow incoming SSH requests by adding SSH to the trusted services using the Security Level Configuration tool, which you can find in System Administration Security Level and Firewall or by entering the command system–config–securitylevel. See Chapter 10 for more information about network security. SSH is allowed by default.From the console, run the command ssh <username>@<IP Address> where username is the username of your account and IP address is the IP address of the Linux host. You will be prompted to provide the password of your account.
■
Note: You can get a copy of PuTTY from www.chiark.greenend.org.uk/~sgtatham/ putty/download.html.At this point, you are actually running a shell. The shell is an environment where you can interact with the system in text mode. It provides you with a prompt to key in your commands. Once you invoke a command it will do your bidding.
The prompt itself provides useful information, as shown in Figure 2-1. The information enclosed inside the square brackets comprises the current working user, the hostname of the system, and the present working directory. The current working user and hostname are separated by the at symbol (@), while the hostname and present working directory are separated by a space. In this case, the username, hostname, and current directory are juan, srv1–manila, and ~, respectively. The tilde (~) refers to the home directory of the user. The symbol after the closing square bracket can be either a dollar sign ($), denoting a regular user, or a hash symbol (#), denoting that the user is the system administrator.
Figure 2-1. Dissection of the command prompt
Identifying the Working User
CHAPTER 2 ■BASH
33
Listing 2-1. Running Your First Command
[juan@srv1-manila ~]$ whoami juan
The next command to be learned is how to switch to a different user; specifically, switching to the root user. This is more prudent than logging in as the system administrator directly. If you log in as root at the start, all programs you run from the desktop will run with system administrator privileges, which could lead to accidents. It is safer to run programs as root only when you need root’s privileges. So the next command is called su, or switch user, which is used to change the current working user to another user. The command to type on the terminal is su –, which says that you would like to log in as root within this shell. If you key in the root password and then press Enter, the prompt will now end with a #, which denotes that the shell is now running as the root user. Again, you can verify the user running the shell by issuing whoami as shown in Listing 2-2.
■ Tip If you would like to switch to a user other than root, all you need to do is pass the username as an argument. For example, to switch to David’s account, just invoke su – david.
Listing 2-2. Switching to the Root User
[juan@srv1-manila ~]$ su - root Password:
[root@srv1-manila ~]# whoami root
As root, you can now do system administration tasks such as managing users, running services, and performing maintenance. To log out from root, type the command exit and then press Enter. This will revert the shell to the previous user.
Before we go further with other commands, you need to understand how data is stored in your system. Here’s a quick look at the Linux filesystem.
The Linux Filesystem
Computer files are basically data that is stored on media such as hard disks, CDs, floppy disks, and memory sticks.
These files can contain programs, databases, images, music, movies, text documents, and so on. To organize files, we group them in directories or folders. For further organization, directories can also be placed inside other directories. (In the Unix world, folders are strictly called directories, but in this book, we will use these terms interchangeably.)
CHAPTER 2 ■ BASH
All directories are placed under one main directory, called the root directory, which is represented by the slash symbol (/).Table 2-1 lists the significant subdirectories.
Table 2-1. Subdirectories in the Root (/) Directory
Directory Contents
root The home directory of root , the system administrator
home Home directories of regular users
bin Shells and command-line utilities, some of which are required to run the system
sbin Command-line system administration utilities, several of which are required to run the system
lib Reusable system libraries needed by programs
usr Programs, configuration settings, libraries, and help files that can be shared with multiple systems
usr/bin Many utilities and applications
usr/sbin Many system administration utilities
usr/lib Many reusable system libraries that are used and dependent on by programs
var Variable data such as logs, database, web files, spool directories for mail, and so on
boot The kernel, initial RAM disk, and boot loader, which are responsible for booting up the system
etc System-wide configuration files
lost+found Files recovered by the file system checker after improper shutdowns such as a system crash or power failure
media Directories used for automatically mounting removable drives such as CD-ROM, DVD, and USB storage devices
misc Directories typically used for mounting NFS directories
srv Data served by your system through services such as web, ftp, or cvs
CHAPTER 2 ■BASH
35
Table 2-1. Subdirectories in the Root (/) Directory (continued)
opt third-party software applications
proc A virtual filesystem that contains special files used for changing or displaying kernel settings
dev Files that represent the hardware devices in your system and virtual devices supplied by the kernel
selinux A virtual filesystem containing special files used for changing or displaying SELinux settings
sys A virtual filesystem that contains special files used for changing or displaying devices that are hot-pluggable
tmp Temporary files and folders that are deleted periodically by the system
For now, understanding each subdirectory under the root directory is a tall order. It takes time, but you will understand all of them as you learn how to execute system administration tasks.
Directory Management
A good way to start learning about the subdirectories under the root directory is to begin with directory management. Table 2-2 lists the directory management utilities at your disposal.
Table 2-2. Directory Management Utilities
Utiltity Description Usage
pwd Displays the present working directory. pwd
cd Changes the working directory. cd <directory>
mkdir Creates a new directory. mkdir <directory>
mv Renames or moves files or directories. mv <source> <target>
ls Lists the contents of a directory. ls <directory>
rm Deletes files. rm <file> [<file2> [<file..>]]