Practical App
Development
with Aurelia
Leverage the Power of Aurelia to Build
Personal and Business Applications
—
Practical App
Development with Aurelia
Leverage the Power of Aurelia to
Build Personal and Business
Applications
Practical App Development with Aurelia
ISBN-13 (pbk): 978-1-4842-3401-3 ISBN-13 (electronic): 978-1-4842-3402-0 https://doi.org/10.1007/978-1-4842-3402-0
Library of Congress Control Number: 2018936370 Copyright © 2018 by Matthew Duffield
This work is subject to copyright. All rights are reserved by the Publisher, whether the whole or part of the material is concerned, specifically the rights of translation, reprinting, reuse of illustrations, recitation, broadcasting, reproduction on microfilms or in any other physical way, and transmission or information storage and retrieval, electronic adaptation, computer software, or by similar or dissimilar methodology now known or hereafter developed.
Trademarked names, logos, and images may appear in this book. Rather than use a trademark symbol with every occurrence of a trademarked name, logo, or image we use the names, logos, and images only in an editorial fashion and to the benefit of the trademark owner, with no intention of infringement of the trademark.
The use in this publication of trade names, trademarks, service marks, and similar terms, even if they are not identified as such, is not to be taken as an expression of opinion as to whether or not they are subject to proprietary rights.
While the advice and information in this book are believed to be true and accurate at the date of publication, neither the authors nor the editors nor the publisher can accept any legal responsibility for any errors or omissions that may be made. The publisher makes no warranty, express or implied, with respect to the material contained herein.
Managing Director, Apress Media LLC: Welmoed Spahr Acquisitions Editor: Louise Corrigan
Development Editor: James Markham Coordinating Editor: Nancy Chen Cover designed by eStudioCalamar Cover image by Freepik (www.freepik.com)
Distributed to the book trade worldwide by Springer Science+Business Media New York, 233 Spring Street, 6th Floor, New York, NY 10013. Phone 1-800-SPRINGER, fax (201) 348-4505, e-mail [email protected], or visit www.springeronline.com. Apress Media, LLC is a California LLC and the sole member (owner) is Springer Science + Business Media Finance Inc (SSBM Finance Inc). SSBM Finance Inc is a Delaware corporation.
For information on translations, please e-mail [email protected], or visit http://www.apress.com/ rights-permissions.
Apress titles may be purchased in bulk for academic, corporate, or promotional use. eBook versions and licenses are also available for most titles. For more information, reference our Print and eBook Bulk Sales web page at http://www.apress.com/bulk-sales.
Any source code or other supplementary material referenced by the author in this book is available to readers on GitHub via the book's product page, located at www.apress.com/9781484234013. For more detailed information, please visit http://www.apress.com/source-code.
For my wife Erica and my kids Dean, Duncan, and Veronica,
who have patiently endured letting me finish a sentence or
a coding sample before asking a question or inviting me to play.
Table of Contents
Chapter 1: Introduction 1
What Is Aurelia? ... 1
What Is MVVM? ... 2
When Do I Need a Front-End Framework? ... 2
Why Should I Use Aurelia? ... 3
Setting Expectations ... 4
Summary... 5
Chapter 2: Getting Set Up 7
Build Options ... 7Configuring your machine ... 8
ES6 and TypeScript ... 9
NodeJS ... 9
Aurelia CLI ... 10
Hello World ... 21
Summary... 22
Chapter 3: Routing 23
Router Configuration ... 23Push State Configuration ... 29
Dynamic Routes ... 30
Child Routers ... 33
About the Author xiii
About the Technical Reviewer xv
vi
View Ports ... 35
Layouts... 37
Redirecting Routes ... 40
Unknown Routes ... 40
Fallback Route ... 41
Summary... 42
Chapter 4: Security and Pipelines 43
Router Pipelines ... 43Authorize Step ... 44
Audit Step ... 47
Summary... 49
Chapter 5: Dependency Injection 51
Dependency Injection in Aurelia ... 51Manual Injection ... 52
Injection by Decorator ... 54
Autoinjection ... 55
Dependency Injection Containers ... 56
Container Management ... 57
Dependency Injection Resolvers ... 58
Summary... 59
Chapter 6: Services 61
Summary... 66Chapter 7: Getting Data 67
HTTP Client ... 67HTTP Fetch Client ... 74
Limitations to Fetch ... 76
Interceptors ... 76
Chapter 8: Data Binding 81
Data Binding and Event Binding ... 81
Binding ... 81
Types of Binding ... 81
Referencing Elements in Bindings ... 82
Input ... 83
Check Box ... 83
Radio ... 86
Select ... 87
Element Content ... 90
Class/Style ... 91
Conditionals ... 93
Binding Scopes ... 95
Looping ... 96
Value Converters ... 97
Binding Behaviors ... 97
DOM Events ... 98
Types of Binding ... 98
Delegate ... 98
Trigger ... 99
Call... 99
Summary... 100
Chapter 9: Templates 101
Templates ... 101String Interpolation ... 101
Conditional Expressions ... 102
View Resource Pipeline ... 103
Slots ... 104
Composition ... 105
“as-element” Attribute ... 105
viii
Chapter 10: Forms and Validation 107
HTML Form Element... 107
Aurelia Validation Plug-in ... 109
Summary... 116
Chapter 11: View and Component Life Cycles 117
View Life Cycles ... 117Component Life Cycles ... 118
Summary... 119
Chapter 12: Event Aggregation 121
Setting Up Our Shell ... 121Manage Your Subscriptions ... 125
Alternative Approach ... 126
Summary... 126
Chapter 13: Custom Elements 127
What Are Custom Elements? ... 127Static Custom Elements ... 127
Standard Custom Elements ... 129
Advanced Custom Elements ... 139
Summary... 146
Chapter 14: Custom Attributes 147
Defining Custom Attributes ... 147Set-Focus Custom Attribute ... 147
Input-Mask Custom Attribute ... 150
Circle Custom Attribute ... 156
Summary... 159
Chapter 15: Value Converters 161
Value Converters ... 161Building Your First Value Converter ... 162
Multiple Parameters ... 164
Parameters as Objects ... 168
Making Your Value Converters Global ... 169
Summary... 170
Chapter 16: Binding Behaviors 171
Binding Behaviors ... 171Custom Binding Behaviors ... 174
Summary... 177
Chapter 17: Compose 179
When Not to Use Compose ... 179When to Use Compose ... 179
Summary... 183
Chapter 18: Dynamic Views 185
getViewStrategy ... 185Enhance ... 189
Summary... 194
Chapter 19: Creating Features 195
What Are Features? ... 195Configuring Global Resources ... 196
Markup Scenario ... 198
Summary... 199
Chapter 20: Creating Plug-ins 201
Going from a Feature to a Plug-in ... 201Existing Aurelia CLI Project ... 202
Publishing your Plug-in ... 208
Using Your Plug-in ... 209
x
Chapter 21: Animations 211
Animation Plug-ins ... 211
Aurelia-Animator-CSS Plug-in ... 211
CSS3 Animations ... 212
Animations and Routes ... 212
Getting Our Animations Set Up ... 213
Adding/Removing Items ... 217
Summary... 223
Chapter 22: Dialogs 225
Aurelia Dialog Plug-in ... 225Global Dialog Settings ... 231
Styling Dialogs ... 231
Summary... 232
Chapter 23: Localization 233
Aurelia i18n Plug-in ... 233Translations with nested objects ... 239
Summary... 240
Chapter 24: Testing and Debugging 241
Unit Testing ... 241Testing Custom Elements ... 242
Mocking Dependencies ... 245
End-to-End Testing ... 247
Interacting with the Browser ... 248
Debugging Aurelia Applications ... 249
View-Spy ... 249
Compile-Spy ... 251
Aurelia Inspector in Chrome ... 252
Chapter 25: Bundling and Deploying 255
Bundling ... 255
Deploying ... 262
Deployment Best Practices ... 264
Summary... 264
Chapter 26: Closing Thoughts 265
xiii
About the Author
Matthew Duffield is an author, consultant, and trainer and has more than 18 years of development experience. He has his own consulting business called Summit Software. He has received various Microsoft MVP awards and always tries to further his knowledge by learning other frameworks and languages. The bulk of his experience is in .NET, JavaScript, NodeJS, and architecting data warehouse solutions along with business intelligence. He is the creator of FrontEnd Creator, an online editor for building Aurelia applications without any server-side setup. You can find it at
About the Technical Reviewer
xvii
Acknowledgments
Thanks go out to my parents for getting our first computer, a TI-99, and letting me spend countless hours writing code from the monthly code magazines and then complain for the rest of the month when there was an error.
Thanks to my loving wife and kids for putting up with my late hours and closed-door policy. You guys were great and I appreciate all of your support.
1
CHAPTER 1
Introduction
Technology is constantly changing, and this makes it difficult to keep up on everything new. Web technology is no different, and it seems that there is a new library or
framework showing up every couple of months. In this chapter we’ll take a quick look at some of these technological developments and what to expect in the rest of the book.
What Is Aurelia?
Aurelia is a relatively new kid on the block when it comes to frameworks. It was first introduced back in 2015 by Rob Eisenberg. It is a framework that is meant to cover the spectrum of web, mobile, and desktop development. It is a framework that utilizes convention over configuration. This is nice in that if you follow the simple conventions you gain a lot of efficiencies. It is also a framework that is unobtrusive, meaning that it does its job extremely well while staying out of your way. You will find, as you develop an application using Aurelia, that you are not fighting the framework to get your work accomplished. This is itself a big point for convincing anyone to using Aurelia. Finally, Aurelia is standards-based. This means that it tries to remain pure to adhering to
ECMAScript specifications. Writing web applications using JavaScript can be frustrating, but with ECMAScript 2015 and ECMAScript 2016, we have a lot of advancements to the language specification. Some of the features you can use natively now, but others require a transpiler like Babel. You will see that the majority of code examples are either ECMAScript 2015 or TypeScript.
One important aspect of how Aurelia came to be so rich and mature as a framework is its creator, Rob Eisenberg. For Eisenberg, Aurelia has been a culmination of
2
He then decided to target the Web with his next framework, Durandal. It is still in use, and it was very much a precursor to what we were going to get with Aurelia. Finally, Aurelia was announced and the rest is history.
Whether it is two-way data binding or routing, Aurelia is a framework that really shines. Because it is standards-based, you find that a lot of what you are being
introduced to is not some proprietary format; rather, it is the same as what you would use in JavaScript.
What Is MVVM?
Most modern frameworks try to solve the issue of binding elements on web pages to some backing controller JavaScript file. Libraries such as Backbone, jQuery, or Knockout tried to help alleviate the amount of work required to get data to and from HTML elements. The term model-view-view-model (MVVM) really came out of the introduction to XAML technology within Microsoft. It was an attempt to create a data context that your page was aware of and could bind to. This same principle applies to Aurelia and most modern front-end frameworks. Your web page has some form of binding context in which it can create binding on HTML elements and then receive updates from the view model.
With MVVM in Aurelia, you have a rich data-binding paradigm. Aurelia takes this even one step further with its conventions. If, for example, you are creating bindings inside an HTML Form element, Aurelia will automatically create those bindings as two- way. This means that you can send changes from the page to the view model as well as update the page from the view model.
If we couple Aurelia with ECMAScript 2015 and string interpolation, we find that we already understand how Aurelia works when it comes to displaying data-bound information.
When Do I Need a Front-End Framework?
You may be a seasoned web developer veteran and can recall the days when you wrote all of your web pages using pure HTML, JavaScript, and CSS. You still can do this, but as your web pages transitioned to fully functional applications, you started seeing the need for a framework to help you with all the architectural concerns when building a web application.
A front-end framework is going to help you with solving the complex patterns of building a modern single-page application. It should handle the following:
• Data binding
• Routing
• Communication across screens
• Support separation of concerns
• Dependency injection/inversion of control
Not all front-end frameworks will handle every one of these bullet points, but the majority of mature ones will. A good rule of thumb for a framework that does its job well is that it can accomplish all of these bullet points while being completely unobtrusive, not forcing you into learning a slew of proprietary concepts.
Why Should I Use Aurelia?
So why should you use Aurelia? What about it makes it compelling and attractive? Aurelia is here to stay and has a very large self-supporting community. There is a Gitter channel for Aurelia where you can ask for help as you develop your applications. Recently a Discourse site was setup for more community interaction. Aurelia has a host of developers that maintain and support its core components. However, since it is open sourced, you have the ability to provide pull requests and make it even better as you start developing your own applications.
Aurelia is extremely easy to learn. There many examples providing capabilities and features including the Skeleton Navigation samples. You can pick the example using JavaScript or TypeScript and the bundler of your choice. You also have the ability to use the Aurelia CLI to quickly get your application up and running from scratch. The Aurelia CLI, or command-line interface, allows developers to quickly scaffold and setup a new Aurelia project with little effort. It provides a wide range of options to choose from or you can just use the default settings.
Aurelia is a framework which uses patterns that are simple yet comprehensive. It is surprising how easy it is to develop applications, even extremely complex ones, using Aurelia.
If you are getting ready to start a new project, or if you are just plain curious, getting started with Aurelia is a breeze.
4
Setting Expectations
Over the remainder of this book, we will be covering different aspects of developing web applications using Aurelia. Here is a quick synopsis of what each chapter will entail.
Chapter 2 is all about getting your development machine set up for creating your first Aurelia application. It will cover options for where you can start, and it will present the language choices of JavaScript (ECMAScript 2015) and TypeScript. It will address dependencies like NodeJS and bundlers like Webpack.
Chapter 3 will cover setting up your first routes and dive deeper into what makes the Aurelia router.
Chapter 4 will piggyback off of routing and handle security and pipelines. Chapter 5 will take a look at dependency injection.
Chapter 6 will cover creating services that will be used across multiple screens. Chapter 7 will look at getting our data using both HTTP Client and Fetch Client. It will also look at interceptors and how we can use them in our application.
In Chapter 8, we will take a look at Aurelia rich data binding, including one-way and two-way events and looping.
In Chapter 9, we cover building your views using templates including string interpolation and requiring dependencies in HTML.
Chapter 10 will go a step further and look at HTML Form and validation.
Chapter 11 will present you with an understanding of Aurelia view and component life cycles.
Chapter 12 will introduce you to the Event Aggregator and how you can use it to communicate across your view model and services.
Chapter 13 will show you how to create custom elements. Chapter 14 will show you how to create custom attributes. Chapter 15 will show you how to create value converters. Chapter 16 will show you how to create binding behaviors.
Chapter 17 will introduce the compose custom element and how it can be used in dynamic scenarios.
Chapter 18 will introduce creating dynamic views.
Chapter 19 will introduce how to take our custom elements and custom attributes and wrap them up in an Aurelia feature.
Chapter 20 will introduce how you can further encapsulate your feature and change it to a stand-alone Aurelia plug-in.
Chapter 21 will introduce using animations when navigating routes as well as adding and removing items.
Chapter 22 will introduce using dialogs in your application. Chapter 23 will introduce using localization in your application.
Chapter 24 will walk you through testing and debugging your application. Chapter 25 will cover bundling and deploying your application.
Chapter 26 will summarize all that we have learned with key reminders of important concepts.
Summary
Learning a new front-end framework can be daunting. To stay relevant and competitive, we need to constantly be evaluating and learning new tools. Aurelia is one of the tools that is a must-have for your collective toolbox. Throughout the rest of this book, we will focus on building your arsenal with the knowledge and understanding to go out and build modern single-page applications using Aurelia.
7 © Matthew Duffield 2018
M. Duffield, Practical App Development with Aurelia, https://doi.org/10.1007/978-1-4842-3402-0_2
CHAPTER 2
Getting Set Up
Getting started in Aurelia gives you a lot of freedom. There are a lot of different
approaches you can take to setting up your environment just the way you like. This is one of the biggest attractions to Aurelia: it is very unobtrusive.
Build Options
Let’s take a look at several different options you have with regard to getting your environment set up using Aurelia:
• Aurelia CLI • Webpack • JSPM
Each of these options provides you with building and bundling your application. Aurelia CLI is by far the newest one and is constantly being updated with new features. Webpack is probably the most popular on the market. JSPM is still viable but no longer the new shiny build tool the other two represent.
Configuring your machine
There are a few dependencies that you will need to have installed in order to use Aurelia effectively. The following is a list of dependencies:
• Node.js – install NodeJS version 4.x or above • Git – install your favorite Git client
After you have these dependencies installed, we will move on with using the Node Package Manager (NPM) to install the Aurelia CLI. From a command line, execute the following command:
npm install -g aurelia-cli
This command will install the Aurelia CLI globally.
Note If your OS is Mac or Linux, it is recommended to always run your command
from a Bash prompt. You may also need to use sudo when you execute global
commands.
If everything was successful, then you should have an output similar to Figure 2-1.
Figure 2-1.
Installing aurelia-cli
9
ES6 and TypeScript
Aurelia is one of the available frameworks that are future facing. What this means is that it was written targeting the latest features of the ECMAScript specification. This allows us to use features that are part of the ECMAScript 2015 and ECMAScript 2016 specification. Most developers will either choose to develop their applications using ECMA-2015 version of JavaScript or use TypeScript. TypeScript is a transpiler that provides typing plus a ton of other great features for developing large JavaScript applications. If you are familiar with C# or Java, you will find using TypeScript very easy to use.
We will be using ECMAScript 2015 as our basis for developing our applications. We still get a lot of cool features that will make creating your Aurelia application very fun. As not all browsers support all of the features currently, we will be using Babel as our transpiler to generate ECMAScript 5.
Note Beginning in Chapter 3, we will be using Chrome as our browser.
NodeJS
Although NodeJS is used heavily with all of the build systems available for Aurelia, you do not need to be an expert on NodeJS. There are only a handful of useful commands that you must be aware of:
• npm install --save aurelia-dialog
This statement installs the Aurelia Dialog plug-in and saves it in the package.json. You will notice a little later that the Aurelia CLI also provides a similar feature that not only installs the plug-in but also configures it so that it is bundled correctly.
• npm install --save https://github.com/<account>/<project>
The preceding statement provides you the ability to install packages that reside on GitHub but have not yet been published to NPM. You will find that not all of the packages that you want have been published to NPM, and this will still give you the flexibility to use both.
Note If you are new to using NodeJS or NPM, it might be helpful to familiarize
yourself so that you understand the syntax and how it works.
Aurelia CLI
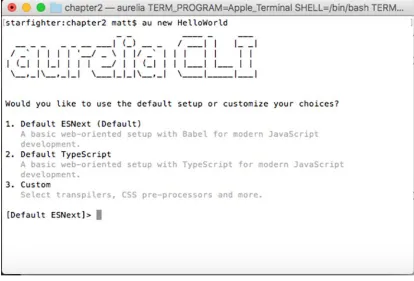
Alright, let’s turn our attention to the Aurelia CLI and walk through all the steps required with setting up your first application. Open up a terminal window or command prompt and execute the following code:
au new
You should see something similar to the output in Figure 2-2.
Figure 2-2.
Aurelia-CLI
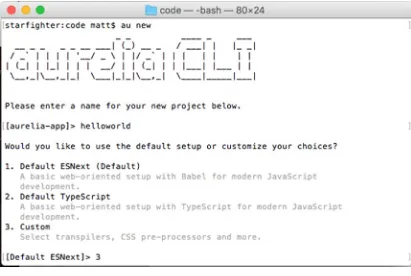
11 As you can see, the Aurelia CLI really tries to help you even if you have never used it before. Let’s go ahead and try creating our first project. We will call it "HelloWorld". Execute the following statement in your terminal:
au new helloworld
You should see the output shown in Figure 2-3.
Figure 2-3.
Aurelia-CLI new project
Select Babel (1) and we are asked about how we would like our templates set up. Here, we have three options as to the level of minification we want the bundler to do (Figure 2-5). When we deploy an application, we are going to want to have the smallest footprint. We will go ahead and select option 3 for maximum minification.
Figure 2-4.
Aurelia-CLI selecting transpiler
We are presented with three different options. We could simply hit enter and select the default setting as it is what we will be using in the book. Select number 3 and you’ll be presented with two more default transpilers (Babel or TypeScript) as shown in Figure 2-4.
Figure 2-5.
Aurelia CLI template minification
13 Again, we are given options as to what type of CSS development we wish to use. We will be using pure CSS, so let’s go ahead and select option 1 (Figure 2-6).
Figure 2-6.
Aurelia CLI CSS processor
We are now presented with the option to have our project configured to handle unit tests. Let’s go ahead and select option 1 (Figure 2-7).
Figure 2-7.
Aurelia CLI unit testing
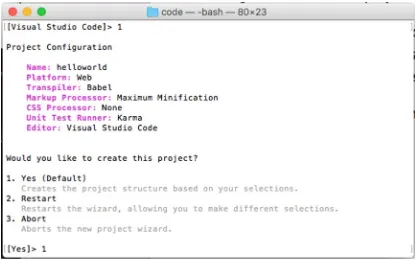
We are finally getting close to finishing the project. A project review screen shows all of our selections (Figure 2-9). Here, you can continue and create the project, restart the wizard, or completely abort. Let’s keep moving forward to select Yes (Option 1).
Next, we are presented with a selection of editors that we are going to use. Visual Studio Code has quickly become a very popular editor in its short lifespan. Although you can use any of the options in Figure 2-8, select default editor (option 1).
Figure 2-8.
Aurelia CLI code editor
15 We are now presented with our final question. We can choose either to have the CLI install all of our dependencies or to decide not to do it now. You can still install the dependencies by executing the following command if you so desire:
npm install
We are going to let the CLI handle the installation for us and select the default option 1 (Figure 2-10).
Figure 2-9.
Aurelia CLI project review
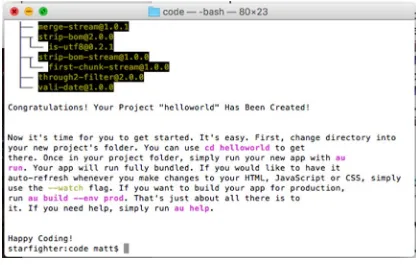
Congratulations! We now have a project configured and ready to use (Figure 2-11).
Figure 2-10.
Aurelia CLI install dependencies
Figure 2-11.
Aurelia CLI install complete
17 We are given a few tips that are worth noting for future reference, namely, the
commands that we can do to run and build our application. Let’s list them out next: • au run
• au run --watch • au build
• au build --env prod • au help
With these commands, we will be able to handle running our application as well as bundling it. As the documentation states, it is possible use a watch flag so that any changes saved in your editor will automatically relaunch your browser so that you don’t have to build with every code change.
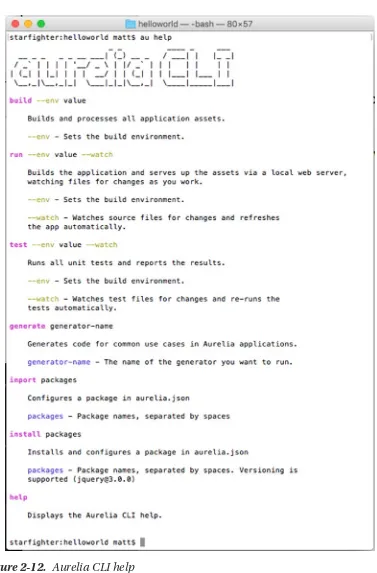
Now that we have the project set up, let’s see what kind of help we get from the CLI:
cd helloworld au help
Figure 2-12 shows the output that the CLI will generate for us.
Figure 2-12.
Aurelia CLI help
19 The following describes the options listed in Figure 2-12:
• build – allows us to build application as well target a specific environment
• run – allows us to run our application targeting a specific
environment as well as setting the watch flag for automatic updates to the browser
• test – provides testing your application as well as targeting a specific environment. You can also use the watch flag for your tests
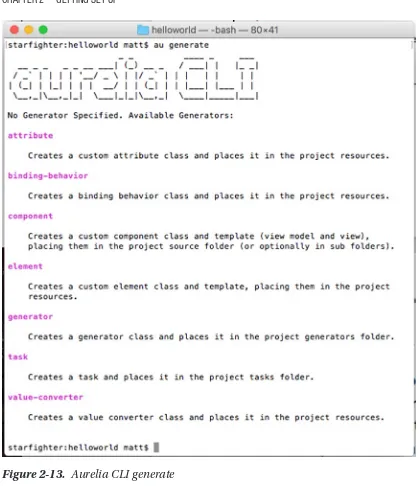
• generate – provides the ability to generate common use cases, as shown in Figure 2-13
• import – provides the ability to configure packages in the aurelia.json file. These packages have already been installed typically by using: ‘npm install …’
• install – provides the ability to install and configure a package in the aurelia.json file
• help – provides help documentation
As you can see from the preceding image, you have several options. If you have used scaffolding tools, such as Yeoman, then this should be very familiar. One nice thing about this generator is that you can extend it and create your generator as well.
Figure 2-13.
Aurelia CLI generate
21
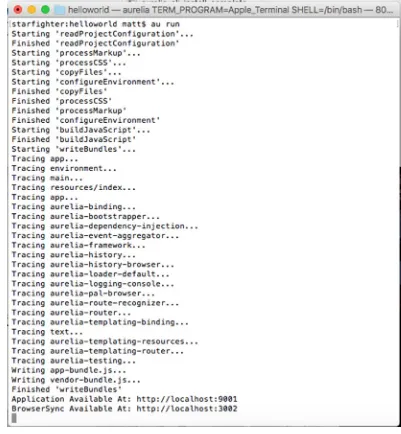
Hello World
We have exhausted what we can do the Aurelia CLI. Let’s wrap up by running the application. Execute the following statement in your bash terminal:
au run
You should see something like the output in Figure 2-14.
Figure 2-14.
Aurelia CLI run
Figure 2-15.
Aurelia CLI browser
Now, in a browser of your choice if you navigate to the URL http://localhost:9001, you should see the result in Figure 2-15.
Summary
We have covered a lot of ground here. We now have a fairly good understanding of the Aurelia CLI and the requirements for getting a project up and running. Remember that there is always help online and with the CLI itself if you get stuck or are not sure of something. There are also a lot of example applications that you can clone from GitHub and use for further understanding.
23 © Matthew Duffield 2018
M. Duffield, Practical App Development with Aurelia, https://doi.org/10.1007/978-1-4842-3402-0_3
CHAPTER 3
Routing
Aurelia supports routing out of the box. There is no additional work needed to bring in the router. You simply need to configure your router and use the ‘router-view’ custom element. In this chapter, we will be going over the capabilities and power of routing in Aurelia.
Router Configuration
Getting your application configured to use Aurelia’s router only takes a few steps. First, you need to ensure that you have a ‘router-view’ custom element on your view. A typical example of this would be placing this custom element in your app.html file. Consider the following example:
<template>
<require from="./app.css"></require> <require from="./nav-bar.html"></require> <nav-bar router.bind="*router"></nav-bar> <div class="page-host router">
<router-view></router-view> </div>
</template>
This example actually has a lot more going on than adding the ‘router-view’ custom element but it is a more comprehensive example of what you would really have on your app.html file. We first are bringing in some custom styling. Next, we are requiring a custom element, ‘nav-bar’. We use this custom element for providing a menu structure for our routes. As you can see from the ‘nav-bar’ custom element tag, we bind the property ‘router’ to a public property on the app.js file with the same name.
Let’s now look at what the app.js file would look like:
import 'jQuery'; import 'bootstrap'; export class App {
configureRouter(config, router) { config.title = 'Routing'; config.map([
{route: ["", "page1"], moduleId: "src/page1", href: "#/page1", title: "Page 1", nav: true},
{route: "page2", moduleId: "src/page2", href: "#/page2", title: "Page 2", nav: true},
{route: "page3", moduleId: "src/page3", href: "#/page3", title: "Page 3", nav: true},
]);
this.router = router; }
}
As you can see from this example, we have a single function in our App class called “configureRouter”. In this function we can set the title of our HTML document by setting the ‘title’ property. We can also supply an array of route objects, RouteConfig, that will make up where our router can navigate. We finally set the ‘router’ object to a class-level member so that we can bind against it like we saw in our app.html file. Notice that we can specify a ‘default’ route by specifying an empty string (“”) as the ‘route’ property. By specifying a default route, you can handle for an URL address that has no hash value.
Let’s take a closer look at everything we can do with the individual RouteConfig objects: • route – this is the pattern the router uses to match against incoming
navigation requests. This can be a single string value or an array of strings. You default a ‘default’ route by adding an empty string (“”) • moduleId – this is the moduleId of a view model that should be
25 • href – this string represents the URL fragment to navigate. This is
required if your route pattern has any dynamic parts to it
• title – this string represents the document title to be set when the route is active
• nav – this Boolean determines if this route will become part of the ‘navigation’ property. It is this property that is used for creating menus. You can also specify a number and this will set the sort order of the route item
Here is a list of other properties that you can set on a RouteConfig object as well: • name – this is a unique name for the route. You can use the router to
navigate by name of a route instead of by the route pattern
• redirect – this string represents a URL fragment to redirect when this route is matched
• navigationStrategy – this is a function that can be used to dynamically select the module or modules to activate. It receives a current
NavigationInstruction and should configure the ‘instruction.config’ with the appropriate moduleId, viewPorts, or redirect
• viewPorts – this allows you to reference named router-view instances. By supplying a moduleId for each viewPort, the router knows what to activate. It is also possible to provide optional properties related to layout: ‘layoutView’, ‘layoutViewModel’, and ‘layoutModel’
• settings – this allows you to attach arbitrary data to the route. This is useful when using pipelines and custom data is needed
• caseSensitive – this Boolean determines if the current route is case sensitive or not
• activationStrategy – this string allows you to determine the
activation strategy of the route’s view model. The available values are ‘invoke- lifecycle’ and ‘replace’
• layoutView – this string represents the file name of the view to be used
• layoutViewModel – this string represents the moduleId of the view model to be used
• layoutModel – this string represents the model parameter to be passed to the view model’s ‘activate’ function
We have our router now configured with three views. Let’s take a quick look at the nav-bar.html file to see how we are creating our menu:
<template bindable="router">
<nav class="navbar navbar-default navbar-fixed-top" role="navigation"> <div class="navbar-header">
<button type="button" class="navbar-toggle" data-toggle="collapse" data-target="#navbar-collapse">
<span class="sr-only">Toggle Navigation</span> <span class="icon-bar"></span>
<span class="icon-bar"></span> <span class="icon-bar"></span> </button>
<a class="navbar-brand" href="#"> <i class="fa fa-home"></i> <span>${router.title}</span> </a>
</div>
<div class="collapse navbar-collapse" id="navbar-collapse"> <ul class="nav navbar-nav">
<li repeat.for="row of router.navigation" class="${row.isActive ? 'active' : ''}">
<a data-toggle="collapse" data-target="#navbar-collapse.in" href. bind="row.href">${row.title}</a>
</li> </ul>
<ul class="nav navbar-nav navbar-right">
<li class="loader" if.bind="router.isNavigating"> <i class="fa fa-spinner fa-spin fa-2x"></i> </li>
27 </ul>
</div> </nav> </template>
If you are familiar with Twitter Bootstrap, then this example should not look foreign. The majority of the markup is necessary for making the menu responsive. Looking at the TEMPLATE tag, we see that we are identifying a property ‘router’ to be bindable for consumers of this custom element. Next, you will see that we see the following, ‘${router. title}’. This simply takes the title from the router object and renders in the SPAN element.
If we continue, we will see the next item we encounter is the LI element, which uses a ‘repeat.for’ syntax. This is where we reference the ‘navigation’ property off of the router. If you recall, we add our routes to this object by setting the ‘nav’ property to true or provide a sort order number. We also see that we are updating the class of the LI element to the value of ‘active’ whenever the route is active; otherwise the value is simply an empty string. Next, we have an A tag that is binding its ‘href’ property to the ‘href’ property of the route. We also see that we are displaying the ‘title’ property of the route inside the A tag.
The final set of markup elements represents a busy indicator. We see that we are binding the ‘if’ attribute of the LI element in order to create this element when the router is navigating.
With our menu complete, let’s take a look at what our application looks like (Figure 3-1).
Figure 3-1.
Page 1 route
As you can see from the preceding screenshot, we have a nice menu with a title as well as the title for each of the routes. Here is the CSS markup that was used to style our application:
.page-host {
position: absolute; left: 0;
right: 0; top: 50px; bottom: 0;
overflow-x: hidden; overflow-y: auto; }
.router section { padding: 20px; position: absolute; width: 100%;
height: 100%; }
.page1 {
background-color: lightskyblue; }
.page2 {
background-color: limegreen; }
.page3 {
background-color: lightsalmon; }
There really isn’t anything notable about the preceding CSS but it is provided for completeness.
29
Push State Configuration
Aurelia’s router also supports push state instead of relying on hashes. The default behavior is to use hashes, but configuring the router for push state is only a matter of a couple steps. In your index.html file, ensure that you add the following:
<!doctype html> <html>
<head>
<title>apress-routing</title> <meta charset="utf-8">
<meta http-equiv="X-UA-Compatible" content="IE=edge">
<meta name="viewport" content="width=device-width, initial-scale=1.0, maximum-scale=1.0, user-scalable=no"/>
<link href="https://maxcdn.bootstrapcdn.com/bootstrap/3.3.6/ css/bootstrap.min.css" rel="stylesheet" integrity="sha384-1q8m TJOASx8j1Au+a5WDVnPi2lkFfwwEAa8hDDdjZlpLegxhjVME1fgjWPGmkzs7" crossorigin="anonymous">
<base href="/"> </head>
<body aurelia-app="main"> <h1>Loading...</h1>
<script src="scripts/vendor-bundle.js" data-main="aurelia- bootstrapper"></script>
</body> </html>
You can see that we have a BASE tag that set’s the ‘href’ property to the value “/”. Let’s now look at what we need to do in order to get our router configured for push state in the app.js file:
import 'jQuery'; import 'bootstrap'; export class App {
configureRouter(config, router) { config.title = 'Routing';
config.options.pushState = true;
config.options.root = "/"; config.map([
{route: ["", "page1"], moduleId: "src/page1", href: "page1", title: "Page 1", nav: true},
{route: "page2", moduleId: "src/page2", href: "page2", title: "Page 2", nav: true},
{route: "page3", moduleId: "src/page3", href: "page3", title: "Page 3", nav: true},
]);
this.router = router; }
}
You can see that we introduced two new config.options entries. The first simply tells the router it is using push state. The next entry specifies the root. This root value must match what we set up on the index.html file using the BASE tag. Finally, you may have noticed that we removed the hashes from the ‘href’ entries for each route.
This is all that you have to do to get the front-end portion of your application to support push state. Just remember that push state requires server-side support. You will need to configure your server accordingly depending on how you are supporting your application.
Dynamic Routes
There will be times where you want your routes to be dynamic with regard to the context of the current route. For example, you may have a route that displays a list of orders. It would be nice if you had a link on each order entry that would show the order details. You want your router to support an order-detail route but you need a dynamic order ID. Let’s look at the following configuration on how this can be accomplished:
import 'jQuery'; import 'bootstrap'; export class App {
31 config.title = 'Routing';
config.map([
{route: ["", "welcome"], moduleId: "src/welcome", href: "#/welcome", title: "Welcome", nav: true},
{route: "orders", moduleId: "src/orders", href: "#/orders", title: "Orders", nav: true},
{route: "orders/:id", moduleId: "src/order-details", title: "Order Details", nav: false},
]);
this.router = router; }
}
We have three routes defined. The first route is a simple welcome page and acts as our default route. The next route is our orders page. Finally, we have the order-detail page. It is defined by the following pattern: ‘orders/:id’. The colon and ID part of the expression are considered a wildcard and representing a parameter in the URL fragment pertaining to the ID of the order. Also notice we have set the ‘nav’ property to false, as this route will not be part of the menu. This also means that we don’t have a static ‘href’ property provided, as this ‘href’ is dynamic.
We have configured our router; let’s look at the order-detail view model and see how it handles the ID wildcard:
export class OrderDetails { constructor() { }
activate(params, routerConfig) { this.id = params.id;
// load order details by provided id }
}
As you can see, dealing with dynamic routes is very straightforward. We are given a ‘params’ object that we can grab the ‘id’ parameter supplied by the route.
Let’s look at the orders view to see how this works:
<template> <section>
<h1>Customer Orders</h1>
<a href="#/orders/5">ACME Order 5</a> </section>
</template>
Although this is arbitrary, it provides a good example of how you can test your own dynamic routes.
Let’s take a look at the application with the added routes (Figure 3-2).
Figure 3-2.
Orders
Figure 3-3.
Order details
33 The order-details page loads based on the passed-in ‘param’. Here is what the order- details.html file looks like:
<template> <section>
<h1>Order Details for ACME Corporation</h1> <p>
Order number ${id} </p>
</section> </template>
As you can see, we are simply echoing out the ‘id’ param that was provided by the ‘activate’ function.
Child Routers
It is possible to nest your router and configure it as your requirements dictate. The nice thing about the Aurelia router is that it automatically supports nesting without any ceremony. You simply configure your router as you would a top-level router. Let’s take a look at what this would look like in the child-router.js view model:
export class ChildRouter { heading = "Child Router";
configureRouter(config, router) { config.map([
{route: ["", "page1"], moduleId: "src/page1", title: "Page 1", nav: true}, {route: "page2", moduleId: "src/page2", title: "Page 2", nav: true}, {route: "page3", moduleId: "src/page3", title: "Page 3", nav: true}, {route: "orders", moduleId: "src/orders", title: "Orders", nav: true}, {route: "orders/:id", moduleId: "src/order-details", title: "Order
Details"},
{route: "child-router", moduleId: "src/child-router", title: "Child Router", nav: true},
]);
this.router = router; }
}
As you can see, we handle the child router exactly as we would a top-level router. Let’s see how we can create a child router menu in our child-router.html file:
<template>
<require from="./app.css"></require> <section class="au-animate">
<h2>${heading}</h2>
<div class="child-router col-md-12"> <div class="col-md-2">
<ul class="well nav nav-pills nav-stacked">
<li repeat.for="row of router.navigation" class="${row.isActive ? 'active' : ''}">
<a href.bind="row.href">${row.title}</a> </li>
</ul> </div>
<div class="col-md-10" style="padding: 0"> <router-view></router-view>
</div> </div> </section> </template>
35 This is all it takes to create a child router with its own contextual menu. The nice thing about this is that you could change the route mappings based on some business requirements so that the user would only see what you want them to have access to.
Figure 3-4 is a simple screenshot of the child-router view in action.
Figure 3-4.
Child router
We can see from the screenshot that it takes very little coding to support some complex menu scenarios.
View Ports
You may have your application structure such that you want to have multiple locations respond independently when you navigate to a new route. Aurelia supports this by allowing you to use view ports. Let’s create a top-level layout where we have an area dedicated to a contextual menu and another area for our content. Consider the child- view- ports.html file:
<template>
<require from="./app.css"></require> <section class="child-router"> <div class="col-md-2">
<router-view name="menu"></router-view> </div>
<div class="col-md-10">
<router-view name="content"></router-view> </div>
</section> </template>
As you can see from the preceding, we don’t have a lot of markup to get our layout set up. We are defining two columns and then we have two instances of the ‘router-view’ custom element. The only new introduction is that we are providing a new view port for each of our ‘router-view’ elements. Let’s see how we target these named view ports in our child-view-ports.js file:
export class ChildViewPorts { heading = "Child View Ports"; configureRouter(config, router) { config.map([
{route: ["", "page1"], viewPorts: { menu: { moduleId: "src/child-nav- bar" }, content: { moduleId: "src/page1"}}, title: "Page 1", nav: true}, {route: "page2", viewPorts: { menu: { moduleId: "src/child-nav-bar"
}, content: { moduleId: "src/page2"}}, title: "Page 2", nav: true}, {route: "page3", viewPorts: { menu: { moduleId: "src/child-nav-bar"
}, content: { moduleId: "src/page3"}}, title: "Page 3", nav: true}, ]);
this.router = router; }
}
In this example, we now have a new property introduced in our routes. We are using the ‘viewPorts’ property. You can see that we reference the names of the view ports as child properties. We have a ‘menu’ and ‘content’ entry for each route. The rest of the syntax is just like before; we have ‘moduleId’ properties that tell the router where to find the corresponding view model. As you can see from the preceding, we are using the same menu view model for all of our routes but different content. Again, this gives us a lot of flexibility and choices when we are creating our overall UI layout strategy. Figure 3-5 is a screenshot of the child-view-ports view in action.
37
Figure 3-5.
Child view ports
View ports give us another option when trying to find the best fit that matches our business requirements and user experience.
Layouts
Another powerful option for defining our UI layout is to use the “layout” set of attributes available on the ‘router-view’ custom element. This approach offers the most control as we can bind to view, view model, and model. The following is a breakdown of each attribute:
• layout-view – identifies the name of the view file to use in the layout • layout-view-model – identifies the name of the view model file to use
in the layout
• layout-model – defines a model parameter that is passed to the view model’s activate function
Consider the following child-layout.html file:
<template> <div>
<router-view layout-view="src/layout.html"></router-view> </div>
</template>
As you can see, we are specifying that we want this ‘router-view’ custom element to use a layout.html file. Let’s take a look at the layout.html file next:
<template>
<section class="col-md-12"> <div class="col-md-6">
<slot name="left-content"></slot> </div>
<div class="col-md-6">
<slot name="right-content"></slot> </div>
</section> </template>
Since we only specified a layout-view attribute in our ‘router-view’ custom element, we only need to have this file available. As you can see from the preceding, we are simply creating a layout template where we want our content to be injected. Also notice how we are using the SLOT element with the name attribute. This is what you would need to share with any consumer of this layout, as these are the two layout locations where content can be placed.
Let’s go back to our child-layout.js file and see how we have our router configured:
export class ChildLayout { heading = "Child Layout";
configureRouter(config, router) { config.map([
{route: "", moduleId: "src/layout-home", title: "Layout Home", nav: true},
]);
this.router = router; }
}
39 Here, we have a single route pointing to a ‘layout-home’ view model. We know from the layout.html file where we can inject content; let’s take a look and see what is contained in the layout-home.html and see how it is set up:
<template>
<div slot="left-content"> <p>${leftMessage}.</p> </div>
<div slot="right-content"> <p>${rightMessage}.</p> </div>
<div>This will not be displayed in the layout because it is not contained in any named slot referenced by the layout.</div>
</template>
In this markup, we are adhering to the contract as defined by the layout.html file. We are referencing the slots using the slot attribute. Next, we simply use the string interpolation syntax to render the ‘leftMessage’ and ‘rightMessage’ properties off of the layout-home.js view model. Notice that we also have another DIV element in our markup. It will not be rendered as it does not target a valid layout location.
Let’s look at the layout-home.js file:
export class LayoutHome {
constructor() {
this.leftMessage = "I'm content that will show up on the left"; this.rightMessage = "I'm content that will show up on the right"; }
}
This view model simply sets two strings to be rendered in the corresponding layout locations. Figure 3-6 shows how this all comes together.
Figure 3-6.
Layouts
Although we only have an example where we are setting the layout-view, it is possible to also set the layout-view-model and layout-model.
With layouts, you should have all of your bases covered as you create your own applications and need a sophisticated layout.
Redirecting Routes
We have already seen how we can create a default route by specifying an empty string (“”), but it is also possible to redirect routes in our route mapping. Consider the following example:
config.map([
{ route: "", redirect: "welcome" },
{ route: "welcome", name: "welcome", moduleId: "src/welcome" } ]);
As you can see, we have two routes defined. If the user navigates to an empty route, then he/she will be redirected to the “welcome” route.
Unknown Routes
There are times that you might want to map unknown routes to an existing view and view model. This can be handy when users try to navigate to routes where they are not authorized or the route does not exist. The following is an example of a router configuration where we identify an unknown route:
import 'jQuery'; import 'bootstrap'; export class App {
configureRouter(config, router) { config.title = 'Routing'; config.map([
{route: ["", "page1"], moduleId: "src/page1", href: "#/page1", title: "Page 1", nav: true},
41 {route: "page2", moduleId: "src/page2", href: "#/page2", title:
"Page 2", nav: true},
{route: "page3", moduleId: "src/page3", href: "#/page3", title: "Page 3", nav: true},
{route: "orders", moduleId: "src/orders", href: "#/orders", title: "Orders", nav: true},
{route: "orders/:id", moduleId: "src/order-details", title: "Order Details"},
]);
config.mapUnknownRoutes("src/unknown-route"); this.router = router;
} }
As you can see from the preceding, we simply need to add a call to the function, mapUnknownRoutes, to let the router know where to navigate when an unknown route is encountered. Besides passing in a string, it is also possible to provide a routeConfig object or a function that takes in a NavigationInstruction object for determining what route should be displayed.
Fallback Route
You will encounter scenarios when your application starts up and navigation is rejected for some reason or another. When this happens Aurelia tries to redirect the router to the previous route. This works fine in the middle of a workflow, but if this is the start of the application your users can have a bad experience. To handle for this, you can provide a call to the fallbackRoute function. Consider the following example:
import 'jQuery'; import 'bootstrap'; export class App {
configureRouter(config, router) { config.title = 'Routing';
config.map([
{route: ["", "page1"], moduleId: "src/page1", href: "#/page1", title: "Page 1", nav: true},
{route: "page2", moduleId: "src/page2", href: "#/page2", title: "Page 2", nav: true},
{route: "page3", moduleId: "src/page3", href: "#/page3", title: "Page 3", nav: true},
{route: "orders", moduleId: "src/orders", href: "#/orders", title: "Orders", nav: true},
{route: "orders/:id", moduleId: "src/order-details", title: "Order Details"},
]);
config.mapUnknownRoutes("src/unknown-route"); config.fallbackRoute("src/welcome");
this.router = router; }
}
In this example we simply make a call to the “welcome” route whenever the redirect route does not exist.
Summary
The Aurelia router is an extremely powerful and flexible tool. As you build more and more applications, you will come to admire the design behind the routing mechanism and all of the capabilities it brings to the table. There are a lot of features and moving parts with the router. Take some time to play with the capabilities of the router. Don’t be afraid to try different scenarios; you will be surprised just how nice it is.
43
© Matthew Duffield 2018
M. Duffield, Practical App Development with Aurelia, https://doi.org/10.1007/978-1-4842-3402-0_4
CHAPTER 4
Security and Pipelines
In Chapter 3, we took a look at the capabilities of the router in Aurelia. In this chapter, we are going to take a look at pipelines and how we can use them to enforce security. After completing this chapter, you will have a solid understanding of pipelines and how they work with the router as well as how to enforce your own security for routes in your applications.
Router Pipelines
The router in Aurelia is extremely powerful as we have already seen in the previous chapter. We actually used two different router classes in the previous chapter. There is an AppRouter class that is the overall application router, and then there is the Router class that is used for all child routers. The biggest difference between these two classes is that the AppRouter adds support for pipelines.
Let’s take a second and understand exactly what pipelines are and how they work with the router. The router has defined slots where pipelines can interact with the router. The following is a listing of the named slots and when they are called by the router:
• authorize – this is called when loading a route’s step but before calling the view model’s canActivate function, if it exists
• preActivate – this is called after the view model’s canActivate function, if it exists, and the previous view model’s deactivate function, if it exists
• preRender – this is called after the view model’s activate function, if it exists and the view is rendered
If you wish to add a pipeline for any of the slots, you would call it as follows:
• addAuthorizeStep(step)
• addPreActivateStep(step)
• addPreRenderStep(step)
• addPostRenderStep(step)
The step referenced in each of these calls must implement a run function that takes in a navigationInstruction and next parameter.
Authorize Step
Let’s set up a simple router with three pages and add an authorize step. Consider the following app.js:
import "jQuery"; import "bootstrap";
import {AuthorizeStep} from "./authorize-step";
export class App {
static inject = [AuthorizeStep];
constructor(authorizeStep) {
this.authorizeStep = authorizeStep; }
configureRouter(config, router) { config.title = "Pipelines";
config.addAuthorizeStep(this.authorizeStep); config.map([
{route: ["", "page1"], moduleId: "./page1", href: "#/page1", title: "Page 1", nav: true},
{route: "page2", moduleId: "./page2", href: "#/page2", title: "Page 2", nav: true},
45
{route: "page3", moduleId: "./page3", href: "#/page3", title: "Page 3", nav: true, settings: { adminOnly: true }},
]);
this.router = router; }
}
We have added a couple of things to our router. First, we are injecting into our constructor an instance of the AuthorizeStep class. Next, we see that we use this
instance and make a call to the addAuthorizeStep off of the config object and pass in our authorizeStep class property. Finally, if you look at the route for ‘page3', you will notice that we attached more information in the form of a ‘settings’ property. We are basically stating that this route should be allowed for admins only.
Let’s take a look at how this is enforced in our AuthorizeStep class:
import {Redirect} from "aurelia-router";
import {SecurityService} from "./security-service";
export class AuthorizeStep {
static inject = [SecurityService];
constructor(securityService) {
this.securityService = securityService; }
run(navigationInstruction, next) {
if (navigationInstruction.getAllInstructions().some(i => i.config. settings.adminOnly)) {
if (!this.securityService.isAdmin) { return next.cancel(new Redirect(""));
In this example, we are injecting a SecurityService instance that would represent the user security permissions. This could be pulled from a Web API call or some other authentication method. Next, we are implementing the only function required for a pipeline step, the run function. In this function, we are only concerned with routes that expressly want to enforce adminOnly. Remember that this was set on the ‘page3’ route. If we find a route that returns true, then we check to see if our currently authenticated user is an administrator. Otherwise, we redirect the user back to the default route. This could be a login page or whatever your business requirements dictate.
For completeness, let’s look at the SecurityService class:
export class SecurityService {
userId; userName;
constructor() {
this.isAdmin = false; }
}
As you can see, this service is very simple. It would be very easy to use a service like this to hold onto a user’s state and keep track of their permissions after they have authenticated.
Figure 4-1 shows our application after clicking the Page 3 route.
As you can tell, the router did not allow us to go to the ‘page3’ route. Instead, it redirected us to the default route, ‘page1’.
47
Audit Step
Now that we have our pipeline set up and are able to check every route to determine if the user has permissions to access it, consider some other uses of these pipelines. It would be easy to instrument in a single pipeline step all user activity regarding navigation with the router. You could save all user navigation activity to a database, for instance.
The following is a simple step that would instrument the user’s activity to some back- end service:
import {SecurityService} from "./security-service"; import {DataService} from "./data-service";
export class AuditStep {
static inject = [SecurityService, DataService];
constructor(securityService, dataService) { this.securityService = securityService; this.dataService = dataService;
}
run(navigationInstruction, next) { const options = {
userId: this.securityService.userId,
pageViewed: navigationInstruction.config.route };
this.dataService.audit(options); console.log('audit-step', options); return next();
} }
As you can see in the preceding, we are injecting the SecurityService plus a
DataService. The DataService is used to facilitate communicating with a Web API back end. Next in the run function, you can see that we are simply calling an audit function on the DataService to record the userId and the route.
Here is how we would set up this pipeline for our router:
import "jQuery"; import "bootstrap";
import {AuthorizeStep} from "./authorize-step"; import {AuditStep} from "./audit-step";
export class App {
static inject = [AuthorizeStep, AuditStep];
constructor(authorizeStep, auditStep) { this.authorizeStep = authorizeStep; this.auditStep = auditStep;
}
configureRouter(config, router) { config.title = "Pipelines";
config.addAuthorizeStep(this.authorizeStep); config.addPostRenderStep(this.auditStep); config.map([
{route: ["", "page1"], moduleId: "./page1", href: "#/page1", title: "Page 1", nav: true},
{route: "page2", moduleId: "./page2", href: "#/page2", title: "Page 2", nav: true},
{route: "page3", moduleId: "./page3", href: "#/page3", title: "Page 3", nav: true, settings: { adminOnly: true }},
]);
this.router = router; }
}
As you can see from the preceding, it is easy to keep your step logic simple and clean. You just add the step to the appropriate named slot and you are off to the races. Figure 4- 2
is a screenshot of using the AuditStep after viewing ‘page1’ and ‘page2’.
49 As you can see from the preceding screenshot, the audit step is tracking every route that the user navigates to.
Summary
In this chapter, we looked at a very powerful feature of the router, pipelines. We examined when we can use them and looked at some examples of where we could enforce security as well as audit user activity. There are many more applications to this feature that you can use. Take some time to play with the feature, as you will find that it will allow you to centralize a lot of logic that you would otherwise need to put into each of your view models.