mgr Agata Emilia WITEK
University of Szczecin: Faculty of Humanities, Institute of Philology (graduate) and
Faculty of Mathematics and Physics, Department of Informatics & Technical Education (graduate)
Uniwersytet Szczeciński: Wydział Nauk Humanistycznych, Instytut Filologii (absolwentka) oraz Wydział Matematyczno-Fizyczny, Katedra Edukacji informatycznej i Technicznej (absolwentka)
TRACING FREEHAND DRAWING OR BITMAP INTO VECTOR
AND ITS PROBLEMS IN COREL DRAW
®
PROGRAM
Abstract
Introduction and aim: The main goal is to identify the basic problems of tracing the manual drawing automatically. Some problems that are waiting for the cartoonist will be presented and explained. The degree of preparation of drawings before the tracing is of the great importance. In this article there will be compared different tracing effects, depending on the quality of the pic-ture.
Material and methods: Manual drawing tracing will be made with using of Corel DRAW pro-gramme. Methods of preparing the drawing to the routing will be presented in GIMP.
Results: The output file can be, by the proper preparation methods, error-free (or almost free from errors) and by this it can save a lot of time.
Conclusion: The proper preparation of the input file, before the tracing, can significantly shorten and simplify the process of converting bitmaps into vector.
Keywords: Tracing process, bitmaps, vector graphics, raster graphics.
(Received: 21.08.2016; Revised: 21.08.2016; Accepted: 05.01.2017)
PROBLEMY TRASOWANI
A RYSUNKU ODRĘCZNEGO
,
CZYLI ZAMIANY BITMAP
Y W GRAFIKĘ WEKTOROWĄ,
W PRO
GRAMIE COREL DRAW®
Streszczenie
Wstęp i cel: Artykuł ma na celu wskazanie podstawowych problemów trasowania rysunku o
d-ręcznego sposobem automatycznym. Wybrane problemy, które czekają na rysownika, zostaną przedstawione i wyjaśnione. Stopień przygotowania rysunku przed trasowaniem ma szczególne znaczenie, w niniejszym artykule zostaną porównane różne efekty trasowania, zależne od jakości
rysunku.
Materiał i metody: Do przedstawienia problemów trasowania rysunku odręcznego w sposób a
u-tomatyczny z wykorzystaniem programu Corel DRAW, posłuży zeskanowany, odręczny rysunek.
Metody przygotowania rysunku do trasowania przedstawione zostaną w programie GIMP.
Wyniki: Pozyskany plik wyjściowy, dzięki odpowiedniemu przygotowaniu może być zupełnie p
o-zbawionym błędów, lub tylko posiadać je w nieznacznym stopniu.
Wniosek: Odpowiednie przygotowanie pliku wejściowego, przed procesem trasowania, może
znacznie skrócić i uprościć proces konwersji bitmapy w wektor.
Słowa kluczowe: Trasowanie, bitmapa, grafika wektorowa, grafika rastrowa.
1. Introduction
1.1. Corel DRAW main window description
Corel DRAW® is a licensed suite of applications for graphic design, photo editing, layout and vector animation. Some programs allows editing only the bitmap-based source, such as Microsoft Paint or GNU Image Manipulation Program (GIMP) (the first one is available with any Microsoft edition, the second one is freeware), Corel DRAW allows to maintain much better quality of work with, not only pixel-based operations, but also vector-like on all the graphic data contained in the project. In order to trace the picture made by hand, there will be used Corel DRAW 9 and Corel TRACE 9 programmes. The suite can be used in free 30-days trial version, but the program itself is unfortunately not available free of charge for the single user.
Menu of the program is built on the classic rule, File, Edit, View, etc. These options allow the standard operations such as: to open, save, import or export a file to another format. Sub-sequent options are further editing of the project.
Tools option is located on the left side of the program, one single option under the other. If
there is an arrow that appears in the corner of the singe tool, this one can be expanded by clicking on it, then an extra bar appears. For example, under the curve, polyline, freehand
drawing options can be find under the Bezier curves, etc.
In order of routing bitmap, some of the tools will be needed only in the final stages of the project, for example one may want to use the Shape option to be able to free edit the line fa-cilities and Bezier curves, with which one can create a new node, for the further edition or removal. These options will be described in the following text.
1.2. The difference between raster and vector graphic
The basic element of the raster graphic is the raster, that is a square-shaped point, a pixel, which can be described in many ways (to-dimensional and made of colours codes), while vec-tor graphics image is not made of a series of pixels, only of mathematically defined geomet-ric objects, such as curves, polygons, lines, etc.
In the case of raster graphics, the single image is being defined by three numbers: height, width and colour. The size of the bitmap (black-and-white defined pixel) or pixmap (colour defined by three bytes - consecutively presenting green, red and blue) gives the picture its quality. It means the bigger is the amount of the pixels, the better is the image quality, but in case of high resolution images, one finds need to create the image of a large size which can be disadvantage of its own.
In case of vector graphics, every single section is defined by a set of points with already given coordinates of the beginning and of the end of the section (for example of the line or of the curve), and the intermediate points are being calculated simultaneously by the computer and displayed in the drawing as lines or sets of points, even at high resolution.
Almost every figure can be presented in a vector way with a bit amount of work and graphic skills, and of course with use of the correct program.
1.3 Vectorisation Definition
the raster is being grouped and transform into the lines and the curves computed in a vector way, described above.
It happens very often, that the process of vectorisation deforms the original image, that is why it is highly important to made some corrections afterwards. It is also advised to have the single image previously prepared for the vectorisation process.
There is also possible to perform so-called manual vectorisation instead of letting it being set automatically. It is needed to use the appropriate program for vector graphics (for example Corel DRAW) where one can simply trace the contours of the figure with the proper tools given in the programs, for example Bezier curves tool, but in the case of complex drawings, it is a time consuming process so it is not being recommended at all because it means indeed to draw the picture from the beginning.
The reverse process to vectorisation is the rasterisation of the graphic. In this case, one does not need any special skills in graphics and usually the whole process is as simple as just saving a file in the desired, raster format (JPED or PNG).
2. Tracing
2.1. Scanning
The file should be scanned in the chosen resolution, but one gets better results with the higher chosen resolution of the input raster file. It is because using of file in a higher resolu-tion allows the faster tracing. Using the image with a low resoluresolu-tion and lower quality like images with grain, visible dirt etc., will involve much longer computing process or the results will be made of so many mistakes that fixing it will mean actually to create an image from the scratch.
The simpler the shape of a picture is, the faster the computer will convert it into vector. For simplifying reasons, there is also advised to scan black and white pictures and colouring them in the program at the very end. It makes the whole process much easier and faster. Scanning of the colour picture will be possible as well but the scanner may define same colour differ-ently, which only rises the amount of the cleaning work.
So it is recommend to scan just bitmaps (black and white images). The scanned file should be save in a raster format, such as JPG, PNG, BMP, TIFF or GIF. Extensions for the vector files are PDF (often used as a medium to move or send the file afterwards), W3C, SWF, CDR or WMF, depending on the program used.
Freshly scanned image should be prepared before tracing. One can use any graphics pro-gram for image editing, in this case, GIMP is being used. As it was said before, it is a free-ware program for image analysing with very rich choice of options and properties. Most of them will not be used here and they are not the subject of this article, so the necessary, initial tools to perform the work will be introduced and discussed in the course of the article.
2.2. The scanned image preparation
The scanned image should be simplified and cleaned before tracing. In the case of a sim-ple, monochrome graphics, the tracing program will not have much problem with the data analysing, however, for more complex drawings, the following pre-treatment process is essen-tial.
As the example there will be used the easy and simple face drawing of the model (Fig. 1).
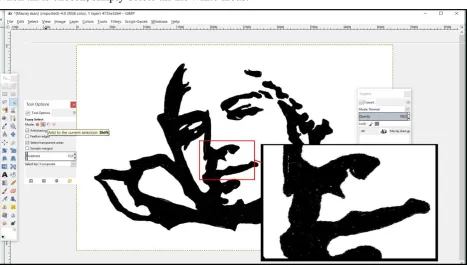
The first step is to align the colour of the image and remove the white spots remain-ing after scannremain-ing. One should always make sure that the Alpha channel is active on the drawing. It is being shown on the figure 3 how to activate the Alpha channel. The next step is to remove the large, white areas by using Fuzzy Select Tool shown in the figure 2, which selects all the pixels of a given colour, in contact with each other. One removes it by clicking on the Delete button on the keyboard.
If one double-clicks on a tool it will bring up a list of options, shown also in Figure 2.
Fig. 1. Simple face drawing of the model Source: Elaboration of the Author
One can speed up the process by choosing the Add to the current selection option and when all is chosen, simply delete all the white areas.
Fig. 2. Fuzzy Select tool and its additive options Source: Elaboration of the Author
Then, using the shortcut Ctrl + A, which selects the whole drawing again in order to fur-ther work, select the Colours menu and after, the Brightness and Contrast to minimize the brightness of the image and maximize the contrast (Fig. 3).
Fig. 3. Active Alpha channel and the Brightness/Contrast option Source: Elaboration of the Author
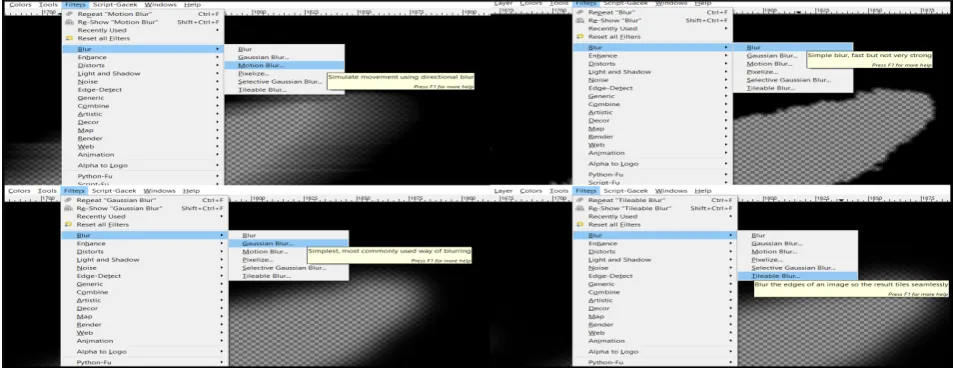
Smoothing of the surface can be performed using a blur option, and then re-pixeling of the image because the pixels shape is what tracing process will compute into the lines. The smoother shapes of the surface are, the smoother vector lines will be.
From the menu Filters, select Blur and use one of the available options, the result they give is being shown in Figure 4.
Fig. 4. Individual options of blur with its descriptions Source: Elaboration of the Author
In the case of this article the author had used the Gaussian Blur, and then the Filters - Blur -
Pixelise option in order to obtain the results shown in Figure 5.
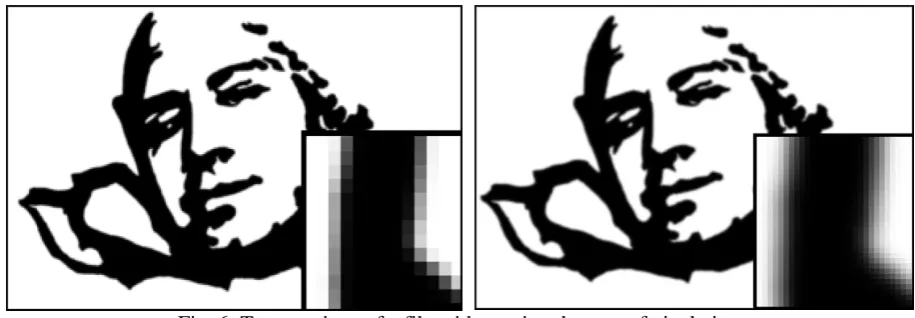
In this two simple steps one can prepare a drawing for further vectorisation. In this article it will be shown the whole process of vectorisation made on two different files with the dif-ferent degree of the pixelation (Fig. 6).
Fig. 6. Two versions of a file with varying degrees of pixelation Source: Elaboration of the Author
So prepared the image can be transferred for the tracing and be imported directly into the Corel DRAW program.
There comes the other options not necessarily available in GIMP, here comes an exam-ples: The bitmap can be prepared also by the command called Edge smoothing, but it does not appear directly in the GIMP.
Bitmap can be also prepared by using the command Path, (available in GIMP) which actually allows the user to redraw the whole image manually in the program, but it is not rec-ommended as time consuming and unnecessary.
So prepared image will be export to JPG format for the further tracing. Despite the active Alpha channel, the program will provide the background for the JPEG format. This will be the current background colour, which is visible in the toolbar (squares on the bottom in tool-bar: foregrounds and backgrounds colours). Then one shall import the image into the Corel DRAW program with using the Import option, after indicating the location and size of the imported image, one can start the tracing process.
2.3. Tracing of the drawing
Fig. 7. Import in Corel DRAW Source: Elaboration of the Author
After importing the image into Corel DRAW's main window, the program will ask for the location of the image in the workspace (Fig. 7). One should then draw an area as shown in the figure below, then the program will place an imported image to be visible.
In the new window one can see a number of options to facilitate the routing of the image. It is recommended to explore as many options as possible to finally adjust the right ones, de-pending on the expected effects, in case of a black and white hand drawn outlines there has been selected Advanced, and Figure option with their default settings because they have been giving best results.
Fig. 8. Command Trace bitmap ... and a new window Corel TRACE Source: Elaboration of the Author
The user has the ability to select multiple routing options, including median lines, number of nodes, the degree of simplification, smoothing, etc. After, to confirm one selects Apply
(Fig. 9).
Fig. 9. Effect routing visible in Corel TRACE. On the right number of nodes on the finished drawing Source: Elaboration of the Author
In the case shown in the figure above, the translated file had greater degree of pixelation. One can see on the picture to the right that there is less number of nodes and the picture comes vectorised with no greater errors. For comparison, there is presented below the transla-tion of the image with less numbers of pixels (Fig. 9 to the right). It shows that the better pre-pared picture is, the less mistakes it will give in the final result.
One should safe its work and when closing the Corel TRACE, the picture will appear in the main programme's window.
Fig. 10. To the right: output effect of the less resolution file: Top left: input file prepared in GIMP Source: Elaboration of the Author
However, even such a simple drawing might need a touch of repairing. This can be done in the Corel DRAW programme as well. Previously, however, one should save a copy of the drawing. The results of the work can be saved in different formats, by clicking the Save icon. Newest picture drags and moves underneath to be compared with the input file still being seen in the main window.
2.4. Improving the tracing results
There may be need for some more cosmetic-like improvements to be made on the picture. To do this, one can use the Shape tool and the Bezier curves tool. To begin, one must select the properties list, with the right mouse clicking, and from the list one should choose Separate
all groups option in order to work on individual groups of objects and editing performance.
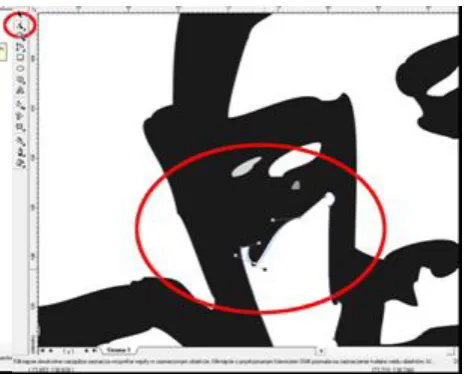
If the figure is composed with the less amount of objects, the faster it can be improved. To the right, on the picture below one can see how to move nodes and transmit their position (Fig. 11). There are some dotted arrows that comes out from the node, when one moves them, the shape of the line will change.
Fig. 11. Improvement the routing result by using the Shape Tool
Source: Elaboration of the Author
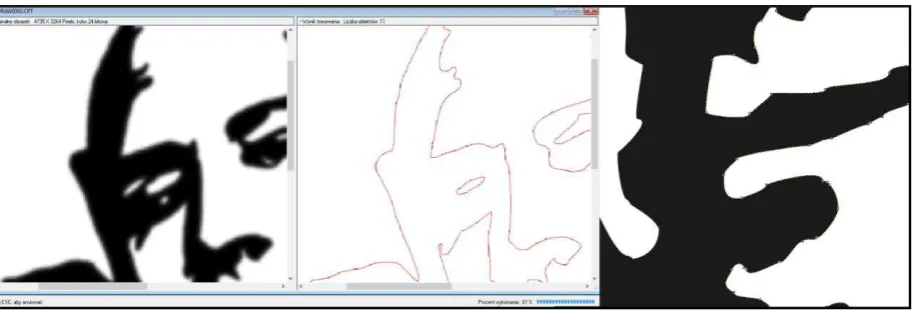
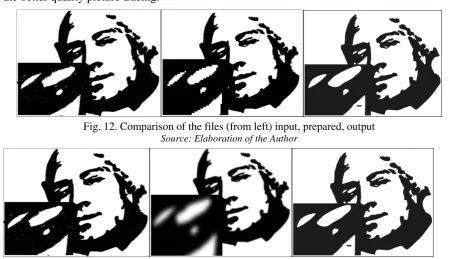
Anyway, there has been performed the tracing of the both mentioned picture: the one with the better quality and the one with less quality. For comparison, the less quality picture is
ing shown during its tracing progress (Fig. 12). In the next figure it is shown the progress of the better quality picture tracing.
Fig. 12. Comparison of the files (from left) input, prepared, output Source: Elaboration of the Author
Fig. 13. Comparison of the files (from left) ) input, prepared, output Source: Elaboration of the Author
There is no big difference between the two output pictures, after some minor reparations made on the picture shown in figure 12. Although the file with a smaller number of pixels generated a smaller number of objects and nodes, as well as streamlined and shortened run-ning time. It has generated at the same time more mistaken nods. The choice between error level and computing time is being indeed left to the user.
2.5. Exporting the finished work to other formats
To export a file from the Corel to PNG or JPG, one should choose from the File menu an
Export option, or use the shortcut Ctrl + E. This is worth underlining that this is at the same
time the process of rasterisation that vector figure. To remain the vector, one should keep the vector graphics format.
3. Conclusion
• In the case of raster graphics tracing, the quality of the input file is of the great importance.
• If one scans freehand drawing, one must save it in a good quality and then prepare it prop-erly in the program for raster graphics analysing for example GIMP.
• The better prepared the input file is, the faster goes the tracing process. In the case of very complex drawings, the proper preparations can help avoiding many mistakes during the proc-ess.
• Although files with a lower resolution can fasten the process of vectorisation, the results can be unsatisfying.
Bibliography
[1] Jankowski M.: Elementy grafiki komputerowej, Warszawa: WNT, 1990.
[2] Jaworski R.: Multimedia i grafika komputerowa, Warszawa: Wydawnictwa Szkolne i Peda-gogiczne, 2009.
[3] Kiciak P.: Podstawy modelowania krzywych i powierzchni: zastosowania w grafice kompute-rowej, Warszawa: Wydawnictwa Naukowo-Techniczne, 2000.
[4] Podręcznik użytkownika pakietu COREL Draw® 9, element oprogramowania.
[5] Jak przygotować projekt do druku,