1
Berbagi Ilmu pengetahuan Teknologi & Seni
Buku Panduan
Share ITS bagi Pengguna
Desain dan Implementasi
Pembelajaran Berpusat kepada Mahasiswa
CONTENT
About Moodle
Chapter 1 Philosophy ... 2
1.1 Constructivism ... 2
1.2 Constructionism ... 2
1.3 Social constructivism ... 3
1.4 Connected and separate ... 3
1.5 Conclusion ... 3
Chapter 2 Pedagogy ... 5
2.1 Definition of Pedagogy... 5
2.2 Moodle in three short paragraphs ... 5
2.3 Social Constructionism as a Referent ... 6
2.4 How Moodle tries to support a Social Constructionist view ... 8
2.5 Finding a balance ... 11
2.6 Progression ... 11
Chapter 3 Moodle Site - Basic Structure ... 14
3.1 How does Moodle work? ... 14
Chapter 4 Moodle Key Terms ... 16
4.1 Activities ... 16
4.2 Resources ... 17
4.3 Blocks ... 17
Chapter 5 Managing Courses ... 20
5.1 Adding a new course... 21
Chapter 6 Editing Text... 55
6.1 Editing text example ... 55
6.2 Text editor ... 56
6.3 Formatting text ... 65
Chapter 7 Course Enrolment ... 69
Chapter 9 Blocks ... 71
9.1 Standard blocks ... 71
9.2 Contributed blocks ... 72
Chapter 10 Resources ... 73
Chapter 11 Tracking Progress ... 74
Chapter 12 Reusing Activities ... 75
Chapter 13 Managing Activities ... 77
13.1 Chat module ... 78
13.2 Forum module ... 86
13.3 Glossary module ... 112
13.4 Survey module... 124
13.5 Wiki module ... 128
Chapter 14 Managing Assignment ... 130
14.1 Two assignment modules ... 131
14.2 Assignment settings ... 131
14.3 Using Assignment ... 156
Chapter 15 Managing Quiz ... 181
15.1 Features ... 181
15.2 Quiz settings ... 182
15.3 Building Quiz ... 198
15.4 Using Quiz ... 209
15.5 Quiz reports... 215
Chapter 16 Questions ... 217
16.1 Question types ... 217
16.2 Calculated question type ... 217
16.3 Simple calculated question type ... 226
16.4 Multiple Choice question type ... 235
16.5 Short-Answer question type ... 238
16.6 Numerical question type... 242
16.7 True/False question type ... 245
16.8 Matching question type ... 246
16.9 Essay question type ... 249
16.10 Embedded Answers (Cloze) question type ... 252
Chapter 17 Managing Questions ... 262
17.1 Managing question types ... 262
17.2 Question bank ... 264
17.3 Question categories ... 266
17.5 Export questions ... 278
Chapter 18 Working with Files ... 280
18.1 Adding files ... 280
18.2 Viewing uploaded files ... 281
18.3 Editing or updating uploaded files ... 282
18.4 Creating an alias/shortcut ... 283
Chapter 19 Repositories... 286
19.1 Standard repositories ... 286
Chapter 20 Portfolios ... 287
20.1 Exporting to portfolio ... 287
20.2 Items which may be exported to portfolio ... 289
20.3 Export formats ... 289
20.4 Managing your own portfolios ... 289
Chapter 21 Working with Media ... 291
21.1 Site administration settings ... 291
21.2 Video ... 291
21.3 Audio ... 298
21.4 Images ... 303
21.5 Media embedding ... 308
Chapter 22 Filters... 310
22.1 Standard filters ... 310
Chapter 23 Licences ... 311
Chapter 24 Plagiarism prevention... 313
24.1 Enabling plagiarism prevention ... 313
FIGURE
FIGURE 4.1MOODLE KEY TERMS ... 16
FIGURE 4.2LINK TO THE ACTIVITY CHOOSER ... 16
FIGURE 4.3DROP DOWN MENU WHEN ACTIVITY CHOOSER IS DISABLED ... 16
FIGURE 4.4LINK TO THE ACTIVITY CHOOSER ... 17
FIGURE 4.5DROP DOWN MENU WHEN ACTIVITY CHOOSER IS DISABLED ... 17
FIGURE 4.6ADD BLOCK ... 18
FIGURE 5.8COURSE PAGE FOR COURSE USING ONE SECTION PER PAGE COURSE LAYOUT ... 28
FIGURE 5.9INDIVIDUAL SECTION OF A COURSE USING ONE SECTION PER PAGE COURSE LAYOUT ... 28
FIGURE 5.10MAXIMUM UPLOAD SIZE SETTING ... 31
FIGURE 5.11GUEST ACCESS ... 32
FIGURE 5.12GROUPS SETTINGS ... 33
FIGURE 5.13AVAILABILITY ... 34
FIGURE 5.14LANGUAGE SETTINGS ... 34
FIGURE 5.15ROLE RENAMING SETTINGS ... 35
FIGURE 5.16MANAGE COURSE FORMATS SCREEN FOR ADMINS ... 36
FIGURE 5.17WEEKLY FORMAT EXAMPLE... 37
FIGURE 5.23CHANGING THE NUMBER OF COURSE SECTIONS ... 44
FIGURE 5.24CROSSHAIR ICON FOR MOVING A BLOCK ... 45
FIGURE 5.25UP/DOWN ARROW ICON FOR MOVING A BLOCK ... 45
FIGURE 5.26THE ACTIVITY CHOOSER ... 47
FIGURE 5.27SCHEMA SELECTION, NO USER DATA SELECTED IN INITIAL SETTINGS... 50
FIGURE 5.28COURSE BACKUP FILE AREAS ... 53
FIGURE 6.1EDITING TEXT EXAMPLE ... 55
6.2EDITING TEXT EXAMPLE AFTER ... 56
FIGURE 6.3THE STANDARD VERSION OF THE TEXT EDITOR TOOL BAR ... 56
FIGURE 6.5FILE PICKER UPLOAD FILE SCREEN ... 59
FIGURE 6.6EQUATION EDITOR ... 59
FIGURE 6.7CUSTOM CHARACTER SELECTOR ... 60
FIGURE 6.8GENERAL TAB ... 60
FIGURE 6.9ADVANCED TAB ... 61
FIGURE 6.10THE TINYMCE EDITOR PLUGINS SCREEN ... 62
FIGURE 6.11CHOOSING A DIFFERENT SPELL ENGINE ... 63
FIGURE 6.12ADD ADDITIONAL LANGUAGES FOR SPELL CHECKING ... 63
FIGURE 6.13SPELL CHECKING IN ACTION IN THE EDITOR ... 63
FIGURE 6.14THE EDITOR TOOLBAR BOX ... 64
FIGURE 6.15FORMAT DROPDOWN ... 65
FIGURE 6.16SMILIES ... 66
FIGURE 6.17HTMLTAGS ... 67
FIGURE 9.1DEFAULT BLOCK POSITIONS FOR A NEW COURSE PAGE ... 71
FIGURE 13.1CHAT EXAMPLE ... 78
FIGURE 13.13ADDING A NEW DISCUSSION TOPIC TO A FORUM SET TO SEPARATE GROUPS... 93
FIGURE 13.14FORUM PERMISSIONS ... 95
FIGURE 13.15SHOW UNREAD ON FORUM PAGE ... 96
FIGURE 13.16STUDENT VIEW OF "A SINGLE SIMPLE DISCUSSION" FORUM TYPE ... 98
FIGURE 13.17STUDENT VIEW OF "EACH PERSON POSTS ONE DISCUSSION" FORUM TYPE ... 98
FIGURE 13.18STUDENT VIEW OF "STANDARD FORUM" TYPE... 99
FIGURE 13.19INITAL VIEW OF Q&A FORUM ... 99
FIGURE 13.20STUDENTS CANNOT SEE POSTS UNTIL THEY POST ... 99
FIGURE 13.21OTHER POSTS VISIBLE WHEN EDITING TIME IS OVER ... 100
FIGURE 13.22BLOG LIKE FORUM ... 100
FIGURE 13.23REPLY DISPLAY OPTIONS ... 100
FIGURE 13.24FLAT FORUM DISCUSSION, EXAMPLE FROM MIDDLE ... 101
FIGURE 13.25POSTS IN THREADED FORM... 101
FIGURE 13.26"NESTED REPLY EXAMPLE" ... 102
FIGURE 13.27FORUM DRAG DROP ... 103
FIGURE 13.29TEACHER VIEW OF A PREVIOUSLY RATED STUDENT POST ... 111
FIGURE 14.20FEEDBACK VIEW FOR STUDENTS ... 146
FIGURE 14.21MULTIPLE FEEDBACK ZIP ... 147
FIGURE 14.22MULTIPLE ZIP 1 ... 147
FIGURE 14.23MULTIPLE ZIP 2 ... 147
FIGURE 14.24THE EMPTY GRADEBOOK ON MOODLE ... 148
FIGURE 14.25THE DROPDOWN TO DOWNLOAD THE LIST ... 148
FIGURE 14.26EDITING THE GRADES OFFLINE ... 148
FIGURE 14.27UPLOADING THE GRADING WORKSHEET ... 149
FIGURE 14.28CONFIRMING THE CHANGES ... 149
FIGURE 14.29GRADES AND FEEDBACK TRANSFERRED INTO MOODLE ... 150
FIGURE 14.31SUBMISSION RECEIPTS SETTINGS ... 154
FIGURE 14.32ADMIN VIEW OF SUBMISSION STATEMENT SET UP SCREEN - CLICK TO ENLARGE ... 154
FIGURE 14.33STUDENT VIEW WHEN ABOUT TO SUBMIT ... 154
FIGURE 14.34SUBMISSION PLUGIN ... 155
FIGURE 14.35MANAGING ASSIGNMENT FEEDBACK PLUGINS ... 156
FIGURE 14.36MULTIPLE FILE SUBMISSION... 158
FIGURE 14.37ONLINE TEXT ... 159
FIGURE 14.38SUBMISSION COMMENTS SETTING... 159
FIGURE 14.39SUBMISSION COMMENTS ... 160
FIGURE 14.40OFFLINE ASSIGNMENT... 161
FIGURE 14.41STATUSES ... 164
FIGURE 14.42EXAMPLE OF SUBMITTED AND GRADED ASSIGNMENT ... 165
FIGURE 14.43FILE UPLOAD ... 166
FIGURE 14.44FILE UPLOADED ... 166
FIGURE 14.45SUBMIT BUTTONS ... 167
FIGURE 14.46ONLINE TEXT EDITOR ... 168
FIGURE 14.47ONLINE TEXT ENTERED ... 168
FIGURE 14.48SUBMIT BUTTON ONLINE TEXT ... 169
FIGURE 14.56PREVENT SUBMISSION CHANGES DROPDOWN ... 174
FIGURE 14.57LOCK SUBMISSION ... 174
FIGURE 14.58REVERT TO DRAFT ... 174
FIGURE 14.59REVERT SUBMISSION TO DRAFT STATUS ... 174
FIGURE 14.60OPTIONS ... 175
FIGURE 14.70DOWNLOAD ALL SUBMISSION ... 179
FIGURE 14.71DOWNLOAD ALL SUBMISSION ... 179
FIGURE 15.2QUIZ TIMER ... 184
FIGURE 15.10STUDENT VIEW OF QUIZ QUESTION WITH FULL SCREEN POPUP ... 195
FIGURE 15.11OVERRIDES QUIZ ... 197
FIGURE 15.12GRUP USER OVERRIDES... 198
FIGURE 15.13ACCESSING THE QUIZ TO ADD OR EDIT QUESTIONS ... 199
FIGURE 15.14ADDING A QUESTION ... 200
FIGURE 15.15SELECTING A QUESTION TYPE ... 201
FIGURE 15.16A QUESTION WHEN IT HAS BEEN CREATED ... 201
FIGURE 15.17USING A PREVIOUSLY MADE QUESTION ... 202
FIGURE 15.18ADDING A RANDOM QUESTION ... 203
FIGURE 15.19RANDOM QUESTION SELECTED FOR QUIZ ... 203
FIGURE 15.20MOVING QUESTIONS AND ADDING PAGES ... 204
FIGURE 15.21ORDER AND PAGING ... 205
FIGURE 15.22REPAGINATING... 205
FIGURE 15.23POINTS PER QUESTION AND MAX GRADE ... 206
FIGURE 15.24PREVIEWING A SINGLE QUESTION ... 206
FIGURE 15.25CLICK TO PREVIEW THE WHOLE QUIZ ... 207
FIGURE 15.26QUIZ IN PREVIEW MODE ... 207
FIGURE 15.27QUIZ FEEDBACK FOR INCORRECT ANSWER... 208
FIGURE 15.28NOT YET ANSWERED ... 210
FIGURE 15.36REPORT SHOWING ONLY BASIC INFORMATION FOR 2 STUDENTS ... 215
FIGURE 16.1SIMPLE CALCULATED FIRST QUESTION TEXT... 226
FIGURE 16.2SIMPLE CALCULATED FIRST QUESTION FORMULA ... 227
FIGURE 16.3SIMPLE CALCULATED FIRST QUESTION FIND WILD CARD ... 227
FIGURE 16.4SIMPLE CALCULATED FIRST QUESTION SET MIN MAX ... 228
FIGURE 16.5SIMPLE CALCULATED VALUE ... 229
FIGURE 16.6PREVIEW SIMPLE CALCULATED RECTANGLE EXAMPLE ... 230
FIGURE 16.8NUMERICAL MULTIPLE CHOICE UNIT EXAMPLE ... 242
FIGURE 16.9CLOZE QUESTION TYPE ... 255
FIGURE 16.10CLOZE EXAMPLE ... 256
FIGURE 17.1MANAGE QUESTION TYPES ... 262
FIGURE 17.2QUESTION CATEGORY AS A FOLDER ... 266
FIGURE 17.3QUESTION CATEGORY SELECTOR ... 267
FIGURE 17.4IMPORT QUESTION FORMATS FROM THE IMPORT TAB... 269
FIGURE 17.5GENERAL AND IMPORT FILE PARAMETERS SECTIONS ... 270
FIGURE 17.6LESSON SCREEN ASKING WHICH FILE TYPE WILL BE IMPORTED ... 270
FIGURE 17.7EXPORT QUESTION ... 279
FIGURE 18.1SELECTING A FILE OR FOLDER IN THE ACTIVITY CHOOSER ... 280
FIGURE 18.2THE "ADD A RESOURCE" DROP DOWN MENU ... 280
FIGURE 18.3AREA FOR DRAGGING AND DROPPING FILES INTO ... 281
FIGURE 18.4FILE PICKER ICON VIEW ... 281
FIGURE 18.5FILE PICKER TABLE VIEW ... 282
FIGURE 18.6FILE PICKER HIERARCHICAL LIST VIEW ... 282
FIGURE 18.7FILE INFO POPUP DIALOGUE... 283
FIGURE 18.8CREATING AN ALIAS... 284
FIGURE 18.9SHORTCUT ... 284
FIGURE 18.10ASSIGNMENT SUBMISSION WITH NO OPTION TO CREATE AN ALIAS ... 285
FIGURE 20.11. FORUM POST FOR EXPORT ... 288
FIGURE 20.2SELECTING THE EXPORT DESTINATION ... 288
FIGURE 20.3SELECTING AN EXPORT FORMAT... 288
FIGURE 20.4MANAGING YOUR OWN PORTFOLIOS ... 289
FIGURE 20.5VIEWING THE RECORD OF EXPORTS TO PORTFOLIOS ... 290
FIGURE 21.18AUDIO PREVIEW ... 302
FIGURE 21.19HTMLCODE ICON ... 303
FIGURE 21.20GROOVE SHARK EMBED ... 303
FIGURE 21.21GROOVE SHARK PLAYER ... 303
FIGURE 21.22IMAGE ICON ... 304
FIGURE 21.23FIND OR UPLOAD IMAGE ... 304
FIGURE 21.24UPLOADED IMAGE ... 305
FIGURE 21.25FLICKR ... 306
FIGURE 21.26IMAGE TABS ... 306
FIGURE 21.27IMAGE ALIGNMENT ... 306
FIGURE 21.28ADVANCED TAB... 307
FIGURE 21.29MP3PLAYER ... 308
FIGURE 23.1LICENCES ... 311
FIGURE 23.2LICENCE ... 312
About Moodle
Moodle is a software package for producing Internet-based courses and web sites. It is a global development project designed to support a social constructionist framework of education.
Moodle is provided freely as Open Source software (under the GNU General Public License). Basically this means Moodle is copyrighted, but that you have additional freedoms. You are allowed to copy, use and modify Moodle provided that you agree to: provide the source to others; not modify or remove the original license and copyrights, and apply this same license to any derivative work. Read the full license for details and please contact the
copyright holder via the Moodle.com helpdesk if you have any questions.
Moodle can be installed on any computer that can run PHP, and can support an SQL type database (for example MySQL). It can be run on Windows and Mac operating systems and many flavors of Linux. There are many knowledgeable
Moodle Partners to assist you, even host your Moodle site.
The word Moodle was originally an acronym for Modular Object-Oriented Dynamic Learning Environment, which is mostly useful to programmers and education theorists. It's also a verb that describes the process of lazily meandering through something, doing things as it occurs to you to do them, an enjoyable tinkering that often leads to insight and creativity. As such it applies both to the way Moodle was developed, and to the way a student or teacher might approach studying or teaching an online course. Anyone who uses Moodle is a Moodler.
• Philosophy
• Pedagogy
• Usage
• Moodle site - basic structure
Chapter 1
Philosophy
The design and development of Moodle is guided by a "social constructionist pedagogy". This page attempts to unpack this concept in terms of four main, related concepts: constructivism, constructionism, social constructivism, and connected and separate.
1.1 Constructivism
From a constructivist point of view, people actively construct new knowledge as they interact with their environments.
Everything you read, see, hear, feel, and touch is tested against your prior knowledge and if it is viable within your mental world, may form new knowledge you carry with you. Knowledge is strengthened if you can use it successfully in your wider environment. You are not just a memory bank passively absorbing information, nor can knowledge be "transmitted" to you just by reading something or listening to someone.
This is not to say you can't learn anything from reading a web page or watching a lecture, obviously you can, it's just pointing out that there is more interpretation going on than a transfer of information from one brain to another.
1.2 Constructionism
Constructionism asserts that learning is particularly effective when constructing something for others to experience. This can be anything from a spoken sentence or an internet posting, to more complex artifacts like a painting, a house or a software package.
1.3 Social constructivism
Social constructivism extends constructivism into social settings, wherein groups construct knowledge for one another, collaboratively creating a small culture of shared artifacts with shared meanings. When one is immersed within a culture like this, one is learning all the time about how to be a part of that culture, on many levels.
A very simple example is an object like a cup. The object can be used for many things, but its shape does suggest some "knowledge" about carrying liquids. A more complex example is an online course - not only do the "shapes" of the software tools indicate certain things about the way online courses should work, but the activities and texts produced within the group as a whole will help shape how each person behaves within that group.
1.4 Connected and separate
This idea looks deeper into the motivations of individuals within a discussion: • Separate behaviour is when someone tries to remain 'objective' and 'factual',
and tends to defend their own ideas using logic to find holes in their opponent's ideas.
• Connected behaviour is a more empathic approach that accepts subjectivity, trying to listen and ask questions in an effort to understand the other point of view.
• Constructed behaviour is when a person is sensitive to both of these approaches and is able to choose either of them as appropriate to the current situation.
In general, a healthy amount of connected behaviour within a learning community is a very powerful stimulant for learning, not only bringing people closer together but promoting deeper reflection and re-examination of their existing beliefs.
1.5 Conclusion
a personal way that addresses their own learning needs, and moderating discussions and activities in a way that collectively leads students towards the learning goals of the class.
Chapter 2
Pedagogy
Let's sit back and really reflect on the pedagogy that is at the core of what we, as online educators, are trying to do.
2.1 Definition of Pedagogy
One definition of pedagogy in Wiktionary says
1. The profession of teaching
2. The activities of educating, teaching or instructing
Wikipedia has a much longer page on Pedagogy. At one point it said Pedagogy is the art or science of being a teacher, generally refers to strategies of instruction, or a style of instruction. The word comes from the Ancient Greek παιδαγωγέω (paidagōgeō; from παῖς (child) and ἄ γω (lead)): lit erally, "to lead the child”.
2.2 Moodle in three short paragraphs
The heart of Moodle is courses that contain activities and resources. There are about 20 different types of activities available (forums, glossaries, wikis, assignments, quizzes, choices (polls), scorm players, databases etc) and each can be customised quite a lot. The main power of this activity-based model comes in combining the activities into sequences and groups, which can help you guide participants through learning paths. Thus, each activity can build on the outcomes of previous ones.
There are a number of other tools that make it easier to build communities of learners, including blogs, messaging, participant lists etc, as well as useful tools like grading, reports, integration with other systems and so on.
2.3 Social Constructionism as a Referent
I have these five points on a slide which I use in every presentation I do. They are useful referents taken from research that apply to education in general, boiled down into a simple list that I carry around under the moniker of "social constructionism".
1. All of us are potential teachers as well as learners - in a true collaborative environment we are both.
It's so important to recognise and remember this.
I think this perspective helps us retain some humility as teachers and fight the (very natural!) tendency to consolidate all your history and assume the revered position of “wise source of knowledge”.
It helps us keep our eyes open for opportunities to allow the other participants in our learning situation to share their ideas with us and to remind us to listen carefully and ask good questions that elicit more from others.
I find I need to constantly remind myself of this point, especially when the culture of a situation pushes me into a central role (like now!)
2. We learn particularly well from the act of creating or expressing something for others to see.
For most of us this is basically “learning by doing”, and is fairly obvious, yet it's worth reminding ourselves of it.
It's surprising how much online learning is still just presenting static information, giving students little opportunity to practice the activities they are learning about. I often see online teachers spending a great deal of time constructing perfect resources for their course, which no doubt is a terrific learning experience for them, but then they deny their students that same learning experience. Even textbooks often do a better job, with exercises after every chapter and so on.
(the inventor of logo) famously described the process of constructing something for others to see as a very powerful learning experience, and really this sort of thinking goes right back to Socrates and beyond.
3. We learn a lot by just observing the activity of our peers.
Basically this is about “classroom culture”, or learning by osmosis. Humans are good at watching each other and learning what to do in a given situation through cues from others.
For example, if you walk into a lecture theatre where everyone is sitting in seats, facing the front, listening quietly to the teacher at the front and taking notes, then that's most likely what you are going to do too, right?
If you are in a less rigid class where people are asking questions all the time, then it's likely you'll feel freer to do so too. By doing so you'll be learning about both the subject itself and the meta-subject of how learning occurs from overhearing the discussions of your peers and the kinds of questions that get asked, leading to a richer multi-dimensional immersion in learning.
4. By understanding the contexts of others, we can teach in a more transformational way (constructivism)
As you probably know from experience, advice from a mentor or friend can provide better, more timely and customised learning experience than with someone who doesn't know you and is speaking to a hundred people.
If we understand the background of the people we are speaking to then we can customise our language and our expression of concepts in ways that are best suited to the audience. You can choose metaphors that you know the audience will relate to. You can use jargon where it helps or avoid jargon when it gets in the way.
Again this is a pretty basic idea - every guide to public speaking talks about knowing your audience - but in online learning we need to be particular mindful of this because we often have not met these people in person and don't have access to many visual and auditory cues.
5. A learning environment needs to be flexible and adaptable, so that it can quickly respond to the needs of the participants within it.
tailored opportunities to share ideas, ask questions and express their knowledge, then you need an environment which is flexible, both in time and space.
If you discover that you need to throw your schedule out the window because your participants know a lot less than you'd expected when you first designed the course, you should be able to readjust the schedule, and easily add new activities to help everyone (or just one group) catch up. Likewise, some great ideas for a simulation or something may have come up during discussions, so you should be able to add those later in the course.
Timewise, your participants may be spread over different timezones, or maybe they live in the same timezone but have differing free time, so you should be able to offer asynchronous activities where people can work together but at different times.
Jason Cole from Open University recently referred to these as “Martin's five laws” (ha!) but really they are referents: guiding concepts that I personally find useful to refer to whenever I need to make a decision in any given educational situation. In particular I find them useful for building communities of learners.
I guess you probably find a lot of this familiar, even if you use different terms. If not there is a lot of research about constructionism, constructivism and social Constructionism which you can find out more about in some of my more formal papers.
2.4 How Moodle tries to support a Social Constructionist view
I'm going to go through the earlier list again, this time pointing out existing features in Moodle. Pedagogy and software design are closely intertwined in online learning - the "shape" of the software can help or hinder the teacher in what they are trying to do.
1. All of us are potential teachers as well as learners - in a true collaborative environment we are both
Many of the activities in Moodle are designed to allow students to control common content, such as forums, wikis, glossaries, databases, messaging and so on. This encourages students to add to the total course experience for others.
administrators and teachers to create new roles with any mix of capabilities they like. If you want students to be allowed to facilitate forums, create quiz questions or even control the course layout then you can. There is a very fine degree of control – for example you can allow students the ability to delete posts in just one single forum if you like.
I hope that people will take these features and experiment with control in their courses, allowing students more flexibility to do things that were previously thought of as something teachers should do.
2. We learn particularly well from the act of creating or expressing something for others to see
Moodle has a wide range of ways in which people can create representations of their knowledge and share them.
o The course structure itself is terrific way to construct a shared and
active representation of the learning journey that everyone is going through.
o Forums of course are the core of this, providing spaces for discussion
and sharing of media and documents (using the media plugin filters, attachments or simply links).
o Wikis are collaboratively-built pages useful for group work and other
negotiations.
o Glossaries are collaboratively-built lists of definitions that can then
appear throughout the course.
o Databases are an extension of this idea allowing participants to enter
structured media of any type (for example a collection of digital photos or a library of references).
3. We learn a lot by just observing the activity of our peers
The participants link in the navigation block is the main place where you can see everyone in your course. It shows a lot of information about your participants and how recently they've been there.
An Online Users block is the best way to see everyone else who might be on right now.
some sense that everyone is submitting Assignment 1 now and this peer pressure hopefully helps those who need it.
Finally, almost all the modules will "tag" an entry or change with the name of the user, so that you can see who did what and when. For example, wiki pages all have a history link with full details on every edit.
4. By understanding the contexts of others, we can teach in a more transformational way (constructivism)
There are many different ways to find out about people. Access to these can be decided on a site basis (different sites have different privacy policies):
o The user profile contains several fields where people can provide
information about their background, etc. In particular there is a user profile photograph, which appears throughout Moodle whenever that person writes something. The photo links back to the profile page.
o A compendium of forum posts (and discussion starters) by that
person in that course (or across the site).
o Individual blogs allow people to express things in a public but
reflective way, often providing access to thinking that might not normally expressed in, say, a forum. Others can give comments on the blog posts.
o Overall activity reports show all the contributions from a user in a
course, including assignment submissions, glossary entries, etc.
o User log reports show detailed logs of every action taken by a person
in Moodle, as well as graphs showing overall activity statistics.
o The survey module provides a variety of proven questionnaire
instruments for discovering interesting information about the state of mind of the group.
5. A learning environment needs to be flexible and adaptable, so that it can quickly respond to the needs of the participants within it
o The course page itself is the main tool for a teacher, allowing them to
add/remove and structure activities as necessary. Changing the course is one button click away at any time, so the teacher can change it on a whim. We have AJAX features, so that activities, sections and blocks can all be simply dragged-and-dropped. Access can be restricted according to time, conditions or user profile fields.
o Roles can be applied individually in every context across the site, and
o Navigation around the course and site is automatically generated.
o The gradebook is automatically maintained, and reflects the activities
in the course at any given time.
o There are preferences for many aspects of appearance and
behaviour, at site, course and activity levels, allowing educators to fine-tune the behaviour of Moodle in many ways.
o External systems can be integrated easily, to maintain authentication,
enrolments and other things, allowing Moodle to react smoothly as data in other systems is modified.
2.5 Finding a balance
Before I talk about where we are going, let me talk a little about the balance that a Course Management System (aka VLE) like Moodle needs to achieve. One thing I found out quickly in a community like ours is that people have a wide range of expectations of online learning.
At the authoritarian extreme there are those who want students to be highly controlled: reading resources that are revealed at set times and later sitting quizzes to prove they read those resources. I call this the rat-in-the-maze approach, or dump-and-pump.
At the techno-hippy end of that spectrum there are those who want to devolve management completely, with every user running their own portfolio site, streaming blogs and files to each other using RSS and trackbacks. It's an interesting dream that really opens up thinking about education but I think the problems to be solved are many (such as security, accountability, the structure of institutions etc).
The vast majority of people that I meet fall somewhere between these two extremes. Many of them are new to online learning, and are looking for the next step beyond what they were being paid to do offline, while being accepting of gentle guidance to improving their online techniques. These people are on a steep learning curve already without facing the aggregation of 100 different blogs.
2.6 Progression
then progress to more and more advanced community facilitation over time. Ultimately, we'd like to see teachers being involved with and supported by a community of their peers.
Let's look at a typical progression that a teacher might go through as they learn to use the Moodle tools:
1. Putting up the handouts (Resources, SCORM)
2. Providing a passive Forum (unfacilitated)
3. Using Quizzes and Assignments (less management)
4. Using the Wiki, Glossary and Database tools (interactive content)
5. Facilitate discussions in Forums, asking questions, guiding
6. Combining activities into sequences, where results feed later activities
7. Introduce external activities and games (internet resources)
8. Using the Survey module to study and reflect on course activity
9. Using peer-review modules like Workshop, giving students more control over
grading and even structuring the course in some ways
10. Conducting active research on oneself, sharing ideas in a community of peers
2.6.1 Repositories and Portfolios
Special-purpose repositories are a growing area, and it means institutions can keep their valuable data where they want to, even if they switch front-end systems like VLEs. Most importantly, this will allow the development of e-Portfolios to explode, and these are something I think a lot of us really want to see as a very positive pedagogical enhancement.
2.6.2 Community Hubs
We want to improve the way teachers and users of Moodle communicate with each other, not only about e-learning and Moodle, but also in their subject areas. For example, imagine a Biology 101 teacher finding a "community search" block in their course, taking them straight to a place where their peers are all discussing best practice for teaching Biology 101, sharing and browsing repositories of course materials and learning designs.
2.6.3 Interaction between tools
By piping all the messaging from throughout the system via the Messaging module that we already have, users have a much finer control over exactly what sorts of messages they want to see.
2.6.4 Metadata and outcome statements
Moodle has a mechanism so that:
1. admins can import a long list of outcome statements (as tags)
2. teachers can relate a subset of these to their course
3. teachers can connect each activity to an even smaller subset
Progress Tracking allows these things to be guided by individual learning plans for each student.
2.6.5 Role-playing and scenario simulations
A popular and effective technique in face-to-face teaching is that of role-playing in scenarios, and this can be difficult to do online. You could imagine an Environmental Science course running a role-playing simulation where some students play the government, some as Greenpeace, some as industry for a particular scenario.
Chapter 3
Moodle Site - Basic
Structure
3.1 How does Moodle work?
3.1.1 The Front page
• The Front page of a Moodle site - the page you reach from your browser - usually includes information about the establishment itself and can be highly customised. (Note that it is also possible to lock the front page down so that all a user sees when they click on the Moodle URL is a log in screen.)
• How users join a Moodle site depends on the establishment: they might be
given logins; they might be allowed to make accounts themselves, or they might be signed in automatically from another system.
3.1.2 Inside Moodle
• Moodle's basic structure is organised around courses. These are basically
pages or areas within Moodle where teachers can present their learning
resources and activities to students. They can have different layouts but they usually include a number of central sections where materials are displayed and side blocks offering extra features or information.
• Courses can contain content for a year's studies, a single session or any other
variants depending on the teacher or establishment. They can be used by one teacher or shared by a group of teachers.
• How students enrol on courses depends on the establishment; for example
they can self -enrol, be enrolled manually by their teacher or automatically by the admin.
• Courses are organised into categories. Physics, Chemistry and Biology courses
might come under the Science category for instance.
3.1.3 Teachers, students and other Moodle users
• You don't enter Moodle with the "teacher" or "student" role.
• Everyone who logs into Moodle has no special privileges until they are
allocated roles by the administrator according to their needs in individual
3.1.4 Finding your way around
• A logged in user can access areas of Moodle such as their courses or profile
from the Navigation block and Settings block. What a user sees in these
blocks depends on their role and any privileges granted them by the administrator.
Chapter 4
Moodle Key Terms
A Moodle site is made up of courses which are basically pages containing the learning materials teachers want to share with their students. A teacher in a Moodle course can select items from three different elements which together assist in the learning process. They are: Activities, Resources and Blocks.
Figure 4.1 Moodle Key Terms
4.1 Activities
• An Activity in Moodle is a feature where students learn by interacting with
each other or with their teacher. They might for instance contribute in a
forum, upload an assignment, answer questions in a quiz or collaborate together in a wiki. Activities can be graded.
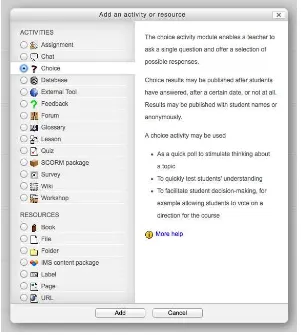
• A teacher can add activities by turning on the editing and choosing an activity
by clicking Add an activity or resource in a course section. They then select an activity from the activity chooser. (If the activity chooser has been turned off, a drop down menu appears instead.) Activities usually appear in the central area of the course.
Figure 4.2Link to the activity chooser
• Moodle has a number of activities which come as standard and there are also extra ones available for download by the administrator. See Activities to find out more.
4.2 Resources
• A Resource in Moodle is an item that a teacher can add to a Moodle course to
support learning, such as a file, a video or link to a website. A resource differs from an activity in that it is static; ie, the student can merely look at or read it, rather than participate.
• A teacher can add resources by turning on the editing and by clicking Add an
activity or resource in a course section. They then select a resource from the activity chooser.(If the activity chooser has been turned off, a drop down menu appears instead.) Resources usually appear in the central area of the course.
Figure 4.4Link to the activity chooser
Figure 4.5 Drop down menu when activity chooser is disabled
• Moodle has a number of resources which come as standard and there are
also extra ones available for download by the administrator. See Resources to find out more.
4.3 Blocks
• A Block in Moodle is an item that a teacher can add to the left or right of a
Moodle course page. They provide extra information or links to aid learning. Blocks are a bit like "widgets" elsewhere online and can contain; for example,
RSS news feeds, quiz results, a calendar, links to blogs, glossary terms or
private files. There is also a simple HTML block which can be customised as
the teacher wishes.
• A teacher can add blocks by turning on the editing and choosing from the
Figure 4.6 Add Block
• Moodle has a number of blocks which come as standard and there are also
Managing Course
A course in Moodle is an area where a teacher will add resources and activities
for their students to complete.It might be a simple page with downloadable documents or it might be a complex set of tasks where learning progresses through interaction. Progress can be tracked in a number of ways.
The course page is made up of central sections which contain the tasks and (if desired) blocks to the side. The course teacher has control over the layout of the
course homepage and can change it at any time.
Students can be enrolled manually by the teacher, automatically by the administrator, or they can be allowed to enrol themselves. Students can also be added to groups if they need to be separated from classes sharing the same course or if tasks need to be differentiated.
• Courses - how to set up your courses.
• Editing text - how to use the text editor and what the icons mean. • Activities - how to involve students actively in their learning. • Resources - how to add static materials to your course.
• Blocks - how to add extra items and information to the sides of your course page.
• Questions - how to create questions for use in quizzes and Moodle's lesson module
• Course enrolment - how to give students access to your course.
Chapter 5
Managing Courses
Courses are the spaces on Moodle where teachers add learning materials for their students. Courses are created by admins, course creators or managers. Teachers can then add the content and re-organise them according to their own needs. The links below will provide more information about creating, organising and managing courses.
• Adding a new course - how to create a new course on your Moodle site. • Course categories - how to organise your courses into a hierarchy suitable for
your establishment.
• Course settings - how to control how your course appears to participants. • Course formats - the different ways your course sections might be laid out. • Course homepage - an overview of a typical course home page.
• Course FAQ - a list of frequently asked questions about Moodle courses.
5.1 Adding a new course
By default a regular teacher can't add a new course. To add a new course to Moodle you need to have either Adminstrator, Course Creator or Manager
rights.
5.1.1 Adding a course
To add a course:
• Go to Settings>Site Administration>Courses>Add/edit courses
Figure 5.2 Add Edit Course
• Choose the category where you want your course to be. For more
information see Course categories
• Click the "Add a new course" button
• Enter the course settings, then click the "Save changes" button.
• On the next screen, choose your students/teachers to assign to the course.
5.1.2 Deleting a course(s)
A regular teacher can't delete a course. Administrators and managers (i.e. users with a role for which the capability moodle/course:delete is allowed) can delete courses. A Course creator can delete courses they have created themselves.
To delete a course (as an administrator or manager):
• Click the course's category (to drill down the category tree) and find the course you wish to delete. Or use the "Search course" textbox at the bottom of the category list.
• Click the "X" icon to the right of the course's name to delete it.
You can delete multiple courses by:
• Creating a new (temporary) category. You can name it "To be deleted". • Select and move the "About to be deleted" courses to that category ("To be
deleted").
• Delete the category ("To be deleted") and choose "Delete ALL - cannot be undone".
There is no user interface for course creators to delete courses they have created, however they can do so by editing the URL of the course from
http://yourmoodlesite.net/course/view.php?id=N to http://yourmoodlesite.net/course/delete.php?id=N (replacing 'view' with
'delete').
5.1.3 Course requests
Figure 5.3 Course Request Screen
The course request feature can be enabled by an administrator in Settings > Site
The default category for new courses requested can be selected from this screen, and users who will be notified when courses are requested can also be selected here. (These are users with the capability moodle/site:approvecourse.)
New feature in Moodle 2.4! In Moodle 2.4 onwards, the course request form can include the
option to select a course category.
A button will then appear on the All courses page for users to request a new course. The All courses page can be accessed via a link in the Courses block.
By default, all authenticated users can make course requests (after you have enabled it). It is controlled by the capability moodle/course:request.
5.1.4 Bulk Course Create Options
As of Moodle 2.2, this is not an out of the box feature.
The main Tracker item: http://tracker.moodle.org/browse/MDL-13114
Some forum discussions:
1. Import files to batch create courses and users
http://moodle.org/mod/forum/discuss.php?d=27333
2. Bulk / automated course creation with phpMyAdmin
http://moodle.org/mod/forum/discuss.php?d=27333
3. Bulk Course Creation in v1.9
http://moodle.org/mod/forum/discuss.php?d=96622
4. Bulk Course Upload tool question
http://moodle.org/mod/forum/discuss.php?d=91850#p572909
5. Bulk Course Upload tool for Moodle 2.0
http://moodle.org/mod/forum/discuss.php?d=91850&parent=744931
6. uploaduser.php enhanced to upload also courses
http://moodle.org/mod/forum/discuss.php?d=128317
5.2 Course categories
The list of courses within a category by default shows the teachers and the summary of each course. If the number of courses within a category exceeds 9 (10 or more), then a short list without teachers and summary is shown.
5.2.1 Adding a category
Most people organize their courses by department and college or by topic. Be sure to test the organizational scheme with a few users before entering a large number of courses, to save time in moving them later.
Adding categories is very simple:
• Go to Settings > Site Administration > Courses > Add/edit courses • Click the "Add a new category" button.
Figure 5.4 Add Category
• Type the name of your new category and a description (optional) and click the
'Create category' button.
5.2.2 Editing or moving a category
• You can edit the details of a course category by clicking the edit icon next to
its name in Settings>Site Administration>Courses>Add/edit courses. (1)
• You can move categories up or down by clicking the up/down arrow next to
• You can make one category a subcategory of another by selecting from the drop down menu "Move category to" (3)
Figure 5.5 Edit Move Category
If the category is visible, the course category description will be displayed to users when they enter the category, above the list of courses.
5.2.3 Adding sub course categories
• Sometimes it might be useful to have a sub-category of a course. For
example, you might have a category "Science" and wish to have sub-categories "Biology", "Chemistry" and "Physics".
• Course sub-categories may be created by adding a new course category then
using the "move category to" drop-down menu to move the category inside another category. Similarly, sub-sub-categories etc. may be created.
• You can also add sub-categories directly in the category you want it in. With
the editing turned on, enter the course category, and click 'Add a sub-category':
Figure 5.6 Sub Category
5.2.4 Hiding categories
• Categories may be easily hidden or shown via Settings > Site Administration > Courses > Add/edit courses.
• Click on the eye icon to show or hide a category. Hidden categories are only
5.2.5 Setting category depth
You can limit the number of categories that are displayed in the front page 'List of Categories' or 'Combo List' by adding the following line to your config.php:
$CFG->max_category_depth = n;
Where n is the maximum number of categories you wish to display.
5.2.6 Assigning users a role in a course category
To assign users a role in a course category, see Category enrolments.
5.3 Course settings
A teacher, or other user with the update course settings capability, can change course settings in Settings > Course administration > Edit settings.
5.3.1 General
Figure 5.7 General Settings
5.3.1.1 Category
The site administrator may have created course categories to help teachers and students find their courses easily. Course categories may be reflected in the
Navigation block.
The capability moodle/course:changecategory controls whether a user can edit the course category.
5.3.1.2 Course full name
This is the name of the course. It is displayed as a link on course lists on the
Front page and on My home and in reports. It is also used in the browser title bar when the course is viewed.
5.3.1.3 Short name
Many institutions have a shorthand way of referring to a course, such as BP102 or COMMS. Even if you do not already have such a name for your course, make one up here. It will be used in several places where the long name is not appropriate, such as the Navigation block.
The capability moodle/course:changeshortname controls whether a user can edit the short name field.
By default, only course full names are displayed in the list of courses. However an administrator can enable short names to be displayed too if required by ticking the checkbox in Settings > Site administration > Appearance >
Courses.
5.3.1.4 ID number
The ID number is an alphanumeric field. It has several potential uses. Generally, it is not displayed to students. However, it can be used to match this course against an external system's ID, as your course catalogue ID or can be used in the certificate module as a printed field.
The capability moodle/course:changeidnumber controls whether a user can edit the ID number.
5.3.1.5 Course summary
The summary appears on the course listings page. This field is searched when searching for a course and also appears in the Course/Site description block.
The capability moodle/course:changesummary controls whether a user can edit the course summary.
5.3.1.6 Format
See Course formats
5.3.1.7 Course layout
and weekly core course formats and contributed collapsed topics course format only.
Teachers choose from the dropdown whether they wish to "show all sections on one page" in the familiar scrolling format, or "show one section per page".
If one section per page is selected, the course page is abbreviated to a list of links to individual sections. If an individual section is shown, next and previous sections may be accessed via links above and below the section.
Figure 5.8 Course page for course using one section per page course layout
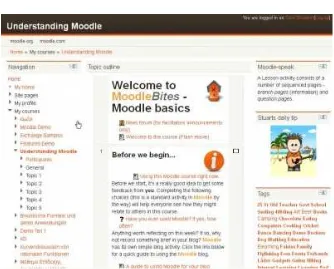
Visit the School demo site course The Types of Sport to see the "Show one section per page" course layout in action!
For further details plus screenshots, see blog post Moodle 2.3 – Section per page by Gavin Henrick.
5.3.1.8 Number of weeks/topics
This setting is only used by the 'weekly' and 'topics' course formats. In the 'weekly' format, it specifies the number of weeks that the course will run for, starting from the course starting date. In the 'topics' format, it specifies the number of topics in the course. Both of these translate to the number of "boxes" down the middle of the course page.
If the number of weeks/topics is changed for an existing course so that the number is less than the number of course sections containing activities (for example the course contains activities in 3 sections and the number or weeks/topics is set to 2) then when editing is turned on section(s) at the bottom of the course page will be shown with the title 'Orphaned activities'.
The number of weeks/topics may be set to 0, so that only the top general section is displayed on the course page and there are no numbered sections.
By default, the maximum number of weeks/topics is 52, but an administrator can set a different maximum number which will apply to all courses on the site (see below).
5.3.1.9 Course start date
This setting affects the display of logs and the weekly format topic dates.
If you use the "Weekly" course format, the start date will appear in the first section of the course. For example selecting 27 July, will display "27 July - 2 August" in the first section (when default display is selected for that section).
This setting will have an effect on the display of logs. This will be the earliest possible date the log activity will display.
This setting will not affect courses using the 'social' or 'topics' formats.
TIP: If your institution runs on a weekly schedule, you may want to consider
TIP: In general, if your course does not have a real starting date then set the date to yesterday and use the availability setting to reveal the course to students.
TIP: See self enrolment course settings to prevent students from entering the
course before a certain date/time.
5.3.1.10 Hidden sections
This option allows you to decide how the hidden sections in your course are displayed to students. By default, a small area is shown (in collapsed form, usually grey) to indicate where the hidden section is, though they still cannot actually see the hidden activities and texts. This is particularly useful in the Weekly format, so that non-class weeks are clear, or if you have quizzes you don't want your students to see.
TIP: If you choose, these non-available items can be completely hidden, so
that students do not even know that sections or an activity in the course are hidden.
5.3.1.11 News items to show
How many news items should show the Latest news block. Set it to 0 and Latest news block will not appear.
The Latest News block relies on the use of the associated News Forum. News posted in other forums do not display in the latest News block
5.3.1.12 Show gradebook to students
Many of the activities allow grades to be set. By default, the results of all grades within the course can be seen in the Grades page, available from the main course page for students and teachers.
5.3.1.13 Show activity reports
Activity reports are available to each student. These reports or logs show their activity and contributions in the current course. These reports include their detailed access log.
Student access to their own reports is controlled by the teacher via this course setting. For some courses, these reports can be a useful tool for a student to reflect on their involvement and appearance within the online environment, but for some courses, this may not be necessary.
Teachers always have access to these reports via a link in the navigation block.
Your site administrator may ask you to turn this feature off. Showing activity reports can place a load on the server, slowing it down at times. For large or long classes it may be more efficient to keep it off.
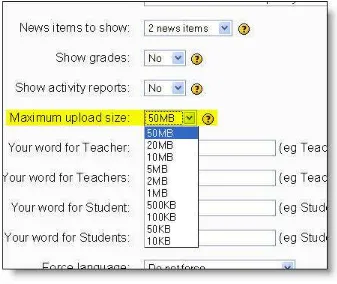
5.3.1.14 Maximum upload size
This setting defines the largest size of file that can be uploaded by students in this course. The site administrator can determine sizes available for the teacher to select.
Editing teachers or other users may be allowed to upload files larger than the maximum size by giving them the capability moodle/course:ignorefilesizelimits
It is possible to further restrict this size through settings within each activity module.
TIP: When uploading large files, consider that your students will need to
download them to view them.
5.3.1.15 Force theme
If the site administrator has allowed the teacher to set a course theme, this pull down menu will appear with a list of themes on the site. Teachers can use this to choose a different look for the course from the rest of the Moodle site.
5.3.2 Guest access
Figure 5.11 Guest Access
Allows any authenticated user (i.e. logged in) to access the course (as a guest), including those who have logged in "as guest". You can choose if they need a password to enter the course or if they may enter without a password. This password is a password to the unit, not the users password to gain access to Moodle.
Guests in a course ALWAYS have "read-only" access - meaning they cannot leave any posts or otherwise mess up the course for real students. No user information is stored for a guest.
TIP: This can be handy when you want to let a colleague in to look around at
your work, or to let students see a course before they have decided to enrol.
TIP: You have a choice between two types of guest access: with a password or
without. If you choose to allow access for guests who have the password, then the guest will need to provide the current password EVERY TIME they log in (unlike students who only need to do it once). This lets you restrict your guests. If you choose to allow access to guests without a password, then anyone can get straight into your course.
5.3.3 Groups
Figure 5.12 Groups Settings
5.3.3.1 Group mode
Here you can define the group mode at the course level by a pull down menu. "No groups", "Separate groups" and "Visible groups" are the choices. The selected setting will be the default group mode for all activities defined within that course. The group setting can affect what users see in the Participants list and who they can interact with in activities.
5.3.3.2 Force
If the group mode is "forced" at a course-level, then this particular group mode will be applied to every activity in that course. This will override any activities that may have a special group setting.
TIP:The force setting is useful when the teacher wants to set up a course and
5.3.3.3 Default grouping
If groupings are enabled, a default grouping for course activities and resources may be set.
TIP: You may leave it set to "No groups" and still have specific activities use groups. In this case the force setting below should be set to "no". For example, the teacher can use a group setting to completely separate cohorts of students such that each group is unaware of the other in the course.
5.3.4 Availability
Figure 5.13 Availability
This option allows you to "hide" your course completely. It will not appear on any course listings, except for managers, course creators, teachers and any other users with the view hidden courses capability. Even if students try to access the course URL directly, they will not be allowed to enter.
The hide/show courses capability controls whether a user can hide a course.
5.3.5 Language
Figure 5.14 Language Settings
If you force a language in a course, the interface of Moodle in this course will be in this particular language, even if a student has selected a different preferred language in his/her personal profile.
5.3.6 Student progress
Student progress must be enabled for Activity completion. Course completion
• Completion tracking can be either disabled, not shown in activity settings, or enabled.
• You can enable starting the tracking upon student enrolment.
5.3.7 Role renaming
Figure 5.15 Role Renaming Settings
You can rename the roles used in your course. For example, you may wish to rename the Teacher role as "Facilitator", "Tutor" or "Guide". These new role names will appear within the course. For example on the participants and the override permissions pages.
Please note that the site administrator or a course manager may have changed the names or added new roles. These names will appear and the teacher may rename them.
Tip: Do not worry about changing every role name. Only change the site roles
which are used in your course. For example, you may want to ignore renaming roles such as the Administrator role or the Authenticated user role.
Tip: To include new role names in a course backup, users should be included
in the backup.
5.3.8 Site administration settings
An administrator can set course default settings in Settings > Site
administration > Courses > Course default settings.
A default course layout setting is available in Moodle 2.3.2 onwards.
5.3.9 Preventing teachers from editing course settings
Any/all of the following fields - course full name, short name, ID number and category, summary - may be locked to prevent teachers from editing them. To do so:
1. Access Site Administration > Users > Permissions > Define roles. 2. Click the edit icon opposite the teacher role.
3. Change any/all of the capabilities moodle/course:changefullname,
moodle/course:changeshortname, moodle/course:changeidnumber,
moodle/course:changecategory, moodle/course:changesummary from allow to not set.
4. Click the "Save changes" button at the bottom of the page.
5.4 Course formats
A course format refers to the layout of a course. The course format can be selected in Settings > Course administration > Edit settings.
An administrator can enable, disable or delete course formats for courses in
Settings>Site administration>Plugins>Courses>Course formats>Manage course formats. They can also change the order in which available course
formats are displayed to teachers in the course settings. New feature
in Moodle 2.4!
5.4.1 Standard course formats
5.4.1.1 Weekly format
Figure 5.17 Weekly Format Example
The course is organized week by week, with a clear start date and a finish date. Moodle will create a section for each week of your course. You can add content, forums, quizzes, and so on in the section for each week.
TIP: If you want all your students to work on the same materials at the same
time, this would be a good format to choose.
NOTE: Make sure your course start date is correct. If it is not your weeks will have the wrong date on it. This is especially important if you are restoring a course to use with a new section of students.
5.4.1.2 Topics format
The course is organised into topic sections that a teacher can give titles to. Each topic section consists of activities, resources and labels.
TIP: This is great to use if your course is objective based and each objective may take different amounts of time to complete. An example of this would be scaffolding where the students are building upon the knowledge from earlier topics.
5.4.1.2.1 "Show only one section"
With the Weekly format and the Topics format it is possible via Settings >
Course administration > Edit settings to "show one section per page". Here is a
course with three topics, with the second one currently shown. The links left and right lead to topics 1 and 3:
Figure 5.19 Show Only One Section
Notes:
1. The course home page shows just the section names and any text in the
section description, with the names being clickable.
2. If editing is ON, on the Main course page, then you will see all the content in
all the sections.
5.4.1.3 Social format
Figure 5.20 Social Format Example
This format is oriented around one main forum, the social forum, which appears listed
on the main page. It is useful for situations that are more free form. They may not
even be courses. The Moodle Lounge is an example of a social format course.
The social forum can be edited by clicking the 'Update this forum' button on the social forum page. The forum introduction is displayed at the top of the course page.
5.4.1.4 SCORM format
The SCORM format only has 1 section, and allows teacher to insert a pre-built SCORM package. Moodle can use SCORM packages as a content type (see
SCORM module), or as a course format.
An example of SCORM format is the New Staff Induction course on the School demo site
Note: If you have a large SCORM object you want to use as an entire course, then you can select this course format and students will only be able to interact with the SCORM object, not the rest of the Moodle tools.
5.4.2 Contributed Course Formats
See MDL-27646 and MDL-28555 and maybe the discussion
http://moodle.org/mod/forum/discuss.php?d=175758#p770737
5.4.2.1 Collapsed Topics and its sister format, Collapsed Weeks
These are formats that are essentially the same as the standard Topic and Weekly formats but with a 'toggle' for each section except '0'. The toggles' purpose is to reduce the amount of initial information presented to the user thus reducing the 'scroll of death' that can plague courses with a lot of content. The 'state' of the toggles is remembered on a per course per user basis. Collapsed Weeks automatically opens the current week. For more information, please visit
Collapsed_Topics_course_format and Collapsed_Weeks_course_format.
5.4.2.1.1 Demonstration
For a demonstration of 'Collapsed Topics' and its latest structure enhancement please see this video:
http://www.youtube.com/watch?v=gvo-OseVKr8
5.4.2.2 Daily format
5.4.2.3 Grid format
The grid format is a modular and visual course format. Hides all topics and creates a grid of icons (one for each topic) with short titles. Clicking on an icon brings up the content from the corresponding topic in a "lightbox" style display.
5.4.2.4 Menutopic format
The menutopic format allows you to display the topics/sections in a menu.
5.4.2.5 Noticeboard format
The Noticeboard format presents the latest post in the news forum at the top of the course.
5.4.2.6 Onetopic format
The onetopic format shows each topic in a tab, keeping the current tab between calls to resources, in such a way that when it returns from a module as the blog or the glossary it returns to tab from where you started. This format is based on the Moodle standard format: “Topics”.
5.4.2.7 Topic format (colors)
The colored topic format is based on the 'Topics' standard format and allows a teacher to specify the foreground and background colours for each course section.
5.4.2.8 Flexible sections format
The flexible sections format for Moodle 2.4+ allows to have nested sections and each section may be displayed expanded (with all content on the parent section page) or collapsed (as a link to a separate page)
5.4.2.9 Single activity format
The single activity format for Moodle 2.4+ does not have a course main page and immediately redirects to the activity. It is similar to SCORM format except that it can have any activity type.
5.5 Course homepage
5.5.1 Standard view of a blank course
Our examples will be for a course homepage that is the standard default for a new install on a site. There are many course options that determine a course's appearance and make it look very different from our examples. The example course has a header, a footer (both content largely determined by a theme) and 3 columns in the middle.
Figure 5.21 Example of Weekly format, teacher view, edit off
5.5.1.1 Parts of a course homepage
Using the above image, here are the parts of a typical course homepage. It is possible to move and hide parts of the page and different themes display blocks in different regions, so not all courses will look like this.
*1 Course full name *6 Section header &News topic
*9 Login information
*2 Navigation bar *7 Current week - First section *10 Turn editing on button
*4 Navigation block *8 Future week - Second section
*11 Latest news
*5 Settings block *14 "Show only this section" *12 Upcoming events
*15 "Switch role to" *13 Recent activity
*16 User profile settings *17 Site Administration
5.5.1.2 Course sections
Course sections are displayed in the centre of the course page.
To edit a course section:
1. Turn editing on
2. Click the edit icon after the section title
If Conditional activities are enabled for the site, access to the section (including all activities and resources within it) may be restricted.
The number of course sections in the centre column may be changed in Settings
> Course administration > Edit settings or by clicking the plus or minus icons
Figure 5.22 Editing a Course Section
Figure 5.23 Changing the number of course sections
To move a course section:
1. Turn editing on
2. Click the up/down arrow or the crosshairs icon to move the section
3. Drag the section to where you want to position it and let go
Newfeaturein Moodle 2.4!
Note: The ability to move course sections is controlled by the capability