3
WRITING LINGO SCRIPTS
I N T H I S C H A P T E R
What Is Lingo?
78
Creating Scripts
79
Understanding Lingo Elements
83
Navigation with Lingo
96
Understanding Messages and Behaviors
102
Writing Lingo Code
108
Troubleshooting
112
WHAT IS LINGO?
Lingois the programming language used in Director movies. Unless you stick to bare bones, PowerPoint-like presentations or linear animations, you need to learn Lingo to use Director to its full capabilities.
Lingo code is stored in cast members called scripts. There are three different types of script mem-bers: movie scripts, behavior scripts, and parent scripts. In addition, other cast members, such as bitmaps, can have scripts embedded inside them. These are usually referred to as cast scripts.
The difference between script types is not in what they look like or how they behave, but in when they act. Here is a summary:
•
Movie script—Contains handlers that can be accessed by any other script. Cannot be assigned to specific sprites or frames.•
Behavior script—Assigned to sprites or frames. Controls the sprite or frame that it is assigned to.•
Parent script—Can be used only by object-oriented programming techniques.•
Cast script—Exists inside a cast member. Only affects that one cast member, but affects every sprite instance of the cast member.A movie script is a global presence in a movie. If a movie script produces a system beep whenever the mouse is clicked, this script sounds the beep whenever the mouse is clicked anywhere in the movie. Thus the name moviescript: It acts on the entire movie.
A behavior script does nothing until it is placed on a sprite or in a frame script channel. When a behavior script is placed on a sprite, the Lingo commands inside the script are active only as far as the sprite is concerned. If you have a behavior that plays a beep when the mouse is clicked, for example, and you apply that behavior to a sprite, the beep sounds only when users click that sprite. Behavior scripts are sometimes called sprite or Score scripts for this reason. They act only on a sprite in the Score to which they are assigned.
➪
For more information about behaviors, see “Creating Simple Behaviors,” p. 319.Behavior scripts can also be assigned to the frame script channel of the Score. When they are, they act like movie scripts, but only for the frame or frames to which they are assigned. Behaviors used this way are sometimes called frame scripts.
Parent scripts are a different type of script. They actually don’t do anything until you use some object-oriented programming Lingo commands to tell them how and when they are to be used.
You would use parent scripts if you like object-oriented programming. This means that the code and the data exist in special objectsthat can be duplicated and modified.
➪
For more information about parent scripts, see “Using Parent Scripts,” p. 345.Cast scripts, on the other hand, are easy to use. You can create one by selecting a member, such as a bitmap, and clicking the Script button at the top of the Cast panel. This opens the Script panel and enables you to add a script to that particular member.
Cast scripts act only on that one cast member. If you place a script with a cast member that makes the system beep when users click the mouse, that action affects only that one cast member when it is on the Stage. If you use that cast member more than once in the Score, the script that is a part of that cast member is active in all those places.
CREATING SCRIPTS
To create a script, select an empty location in the Cast panel and press (Command-0) [Ctrl+0]. The Script panel appears. The Script panel also appears when you try to edit an
exist-ing cast member, double-click on the frame sprite channel, or use any of the various shortcuts found throughout Director to get access to a frame’s, sprite’s, or cast member’s script.
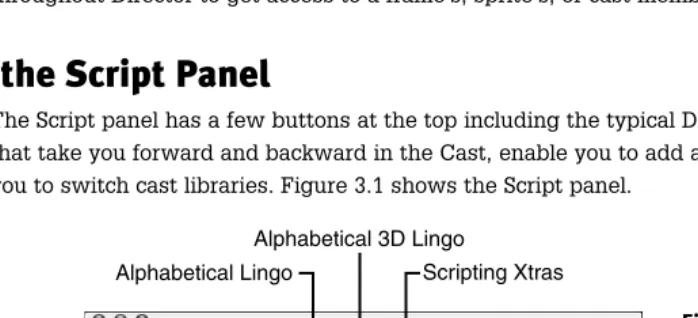
Using the Script Panel
The Script panel has a few buttons at the top including the typical Director cast member buttons that take you forward and backward in the Cast, enable you to add a new cast member, and enable you to switch cast libraries. Figure 3.1 shows the Script panel.
3
Cast scripts are not used much with modern Lingo programming. Behaviors can accomplish the same tasks and are much more flexible. However, they do come in useful when you want to create some quick buttons without crowding a Cast with both the but-ton members and the scripts that are assigned to them.
Figure 3.1
The Script panel enables you to edit movie scripts, behaviors, and parent scripts.
Scripting Xtras
Categorized 3D Lingo Categorized Lingo
Alphabetical 3D Lingo Alphabetical Lingo
The rest of the buttons deal with more advanced Lingo functions, such as handlers and debugging. You will learn about them as you learn about those functions.
➪
For more information about debugging your Lingo code, see “Using Lingo Debugging Tools,” p. 671.remember the name of a command, but you have a good idea of how it starts or under which cate-gory it falls. They are also handy in refreshing your memory as to the proper syntax for using Lingo commands.
Script Cast Member Properties
A script cast member’s properties can be changed with the Property Inspector. Script cast members have one script-related property: the type of script. The three options, of course, are Movie, Behavior, and Parent. You can also use the Link Script As button to use an external file, rather than an internal member, as the script text.
Linked scripts can be used to allow several movies to share a single script. The code resides in an external text file that you can edit with any text editor. Linked scripts also permit what is called source control—you can check your scripts into a source database, keep track of changes to scripts, perform backups, and so on.
A Typical Frame Script
So what sort of code gets placed in script members? It depends on what the script is used for. For instance, if a behavior script is placed in the Score in the frame’s script channel, then it is called a frame script. Here is an example of a very typical frame script:
on exitFrame
go to the frame end
This small piece of code is called a handler. A handler starts with onand the name of the handler, in this case exitFrame. A handler ends with the word end.
There are two types of handlers: event handlers and custom handlers. Event handlers use names that match specific events in Director. The exitFrame event occurs when Director is done displaying a frame and is about to move to the next frame.
The other type of handler, a custom handler, is never called by Director, but is instead called by a piece of code that you write. In other programming languages, these are known as procedures or functions.
Everything in between the onand endlines is the code that runs when the handler is called. In this example, go to the frameis the only code. This is a simple command. The go tocommand tells Director to jump to a new frame in the movie. The the frameportion of the line identifies the cur-rent frame by number.
So, go to the frameis basically commanding Director to jump to the frame that it is already on. The exitFrame event is called just before Director is about to leave the current frame and continue on to the next one. Instead, the script tells it to simply repeat
the current frame.
The result of this common script is that the movie will repeat the same frame over and over again. This is the preferred technique for getting the movie to pause on a frame. It is
3
Lingo is very forgiving and will also accept go the frame
used for presentations, applications, games, and just about every other type of Director movie out-side of straight animation.
A Typical Button Script
Buttons can be almost anything in Director. For instance, they could be bitmaps, shapes, Flash mem-bers, or even Director’s own button member. Regardless of the media used, you’ll need a script applied to that sprite to make the button work.
A button script can react to a number of events. The most common one would be the mouseUp event. This occurs when the user has completed a mouse click on that sprite. Here’s a simple button script:
on mouseUp
go to frame 3 end
When the mouseUp event occurs, the on mouseUphandler will be called. The code in it will make the movie jump to frame 3.
You can use a button script like this, along with the previous looping frame code, to build a simple presentation. The movie initially loops on frame 1. When the user clicks on the button, the movie jumps to frame 3. You can see these two scripts in the file called simplescripts.diron the CD-ROM.
➪
For more information about button scripts, see “Creating a Simple Button Behavior,” p. 325 (Chapter 12).Reusing Scripts
In the simplescripts.direxample, when the user clicks on the button, the movie jumps to frame 3. The movie then loops on frame 3, just as it looped on frame 1. Since the behavior of frame 1 and frame 3 is the same, they can use the exact same script. They don’t use a copyof the same, script, but instead the exact same script cast member is applied to both frames.
Figure 3.2 shows the score for the simplescripts.dirmovie. You can see that the same script has been applied to both frames 1 and 3.
3
Figure 3.2
The Score shows a simple two-frame presentation that reuses the frame script.
Testing Lingo with the Message Panel
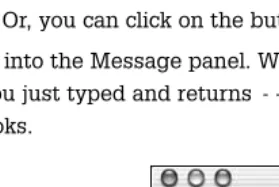
Although Lingo scripts are usually stored in cast members, you can also run short, one-line pro-grams in something called the Message panel. Open the Message panel by choosing Windows, Message, or by pressing (Command-M) [Ctrl+M].
The Message panel has two modes in Director MX. The split-pane mode divides the panel into two portions: the top typing portion and the bottom output portion. If you have it set to this mode, change it to the single-pane mode by dragging the divider bar down to the bottom of the panel like in Figure 3.3. Or, you can click on the button in the middle of this divider.
Type put 42into the Message panel. When you press (Return) [Enter], the Message panel inter-prets what you just typed and returns -- 42on the next line. Figure 3.3 shows how the Message panel now looks.
3
Figure 3.3
The Message panel enables you to type single lines of Lingo code and see the results.
The double dash, --, appears before lines that Director returns to you in the Message panel. Later, you will learn how to use the double dash to comment your code.
➪
For more information about commenting your code, see “Writing Good Code,” p. 662.The putcommand is used to place text into the Message panel. It has some other uses that you will learn much later.
➪
For more information about the put command, see “Using String Variables,” p. 295.You asked Director to put the number 42 into the Message panel. It did just that. But it did more than just echo a number back at you. It actually understood what you meant by 42. To prove it, try this:
put 42+1 -- 43
Now you see that Director can add. It doesn’t merely spit back 42+1, but instead understands that these are numbers and that the plus symbol means that they should be added together.
You can do other things with Lingo besides math. Try this in the Message panel:
beep
Notice that the Message panel does not return anything in the next line, because you didn’t ask it to. The command beepsimply plays the system beep. It does not place anything in the Message panel as the putcommand does.
The Message panel is nice for taking your first Lingo steps, and it continues to be useful as you learn new Lingo commands. Even expert Lingo programmers use the Message panel constantly to program in Lingo.
UNDERSTANDING LINGO ELEMENTS
If you have never written a computer program before, there are a few basics you should know about. A computer program is a set of instructions that tells the computer what to do. For Lingo, we can be more specific and say that a Lingo program is a set of instructions that tells the movie what to do.
Commands
Commandsare the active part of any program. They are single words or lines that tell the movie to do something.
For instance, the gocommand will tell the movie to jump to the beginning of a specified frame. Other commands might play a sound or bring up a dialog box.
Handlers
A handleris a group of Lingo commands put together and given a name. A handler would be referred to as a procedure, function, method, or subroutine in another programming language.
They are called handlers in Lingo because they handle events. An event can be something like a mouse click or a advancement of the movie from frame to frame. When these events occur, a handler might be called if you as the programmer have created a handler for that event.
When a handler is called, all of the commands inside that handler are run in order. For instance, here is a handler that will issue three system beeps and then show an alert dialog box.
on myHandler
beep(3)
alert “Testing!”
end
Using Variables
Another key element in Lingo and every other programming language is the variable. Variables are storage areas for values.
For instance, you can store the number 42 in a variable named myNumber. To do this, assign this value with the =symbol. Try it in the Message panel:
myNumber = 42
The syntax myNumbermeant absolutely nothing to Director and Lingo before you typed this line. This line, however, told Director to create a variable called myNumberand store the numerical value 42 in it. You can now get this value back by using the putcommand to place it in the Message panel.
myNumber = 42
put myNumber -- 42
Director remembered that you stored the value 42 in a variable called myNumber. When you asked it to place myNumberin the Message panel, it looked into its memory, found a variable called
myNumber, and placed its value in the Message panel. You can do even more complex things with variables. Try this:
myNumber = 42+1 put myNumber
-- 43
Director performed the arithmetic before placing the value in the variable. You can even do arith-metic with variables that already have a value.
myNumber = 5
myOtherNumber = 3
put myNumber+myOtherNumber
-- 8
You can also change the value of a variable that already exists.
myNumber = 42
put myNumber -- 42
myNumber = myNumber+1 put myNumber
-- 43
Numbers are not the only items that variables can store. They can also store characters. Try this:
myName = “Gary”
put myName -- “Gary”
A series of characters is called a string. Strings are usually shown with quotation marks around them. Lingo, in fact, insists that these quotation marks be present. So, a number, such as 42, can just be written as 42, but a string, such as my name, must be written with quotes: “Gary”.
Variables can be used in handlers as well. For instance:
on playWithVariables
myNumber = 5
myNumber = myNumber+4
myNumber = myNumber-2 put myNumber
end
3
If you have ever used variables in older programming languages, you may think that variables need to hold only one type of data. For instance, once a variable holds a number, it can only hold a number from that point on. This is called
If you place this handler in a movie script, and then type
playWithVariablesin the Message panel, you will see the number 7 placed in the Message panel.
A variable used in this way is called a local variable. That means it is used inside only that handler. It exists only when the handler is being used, and is disposed of when the han-dler ends. If the hanhan-dler is called again, or the same variable name is used in another handler, the variable is re-created from scratch.
If you created another handler that also used a variable named myVariable, it would in fact be a different variable altogether. Each handler is like a little world all to itself. A local variable inside a handler belongs to it and no other handler.
Type this script in a movie script cast member:
on myHandlerOne
myVariable = 42 put myVariable
end
on myHandlerTwo put myVariable
end
Now, try out these handler in the Message panel:
myHandlerOne
-- 42 myHanderTwo
When you type the last line above, you will get an error message. That is because the variable
myVariableis not defined in the handler myHandlerTwo. This handler knows nothing about the variable because it is local only to the handler myHandlerOne.
You can see that on myHandlerOnefills the variable with 42 and it knows its contents when you ask it to put the variable to the Message panel. But handler on myHandlerTwodoesn’t know what the contents of myVariableare because that variable was local to on myHanderOne. As soon as on myHanderlOnewas done, it forgot about the variable and its contents.
You can create another type of variable, called a global variable, which is shared by more than one handler. Here are the same two handlers, but the variable being used is a global.
on myHandlerOne
global myVariable myVariable = 42
put myVariable end
on myHandlerTwo
global myVariable
3
put myVariable end
Now, try out these handler in the Message panel:
myHandlerOne -- 42
myHandlerTwo -- 42
The variable persisted when on myHandlerOnewas done and the handler on myHandlerTwowas able to read its value.
Rather than declare the global variable with globalcommands in each and every handler, you can place one globalcommand outside all the handlers, perhaps in the first line of the script. This declares the global variable for every handler in that script member. Here’s how the previous two handlers would look with this technique:
global myVariable
on myHandlerOne
myVariable = 42 put myVariable
end
on myHandlerTwo put myVariable
end
➪
For more information about variables, see “Using Number Variables,” p. 288, and “Using String Variables,” p. 295.Custom Handlers
The previous example handlers were not tied to Director events. The handlers in these examples are custom handlers that will only be called when you specifically call them in your code.
When you write your own handler, it can have any name you want, as long as it is not the name of an event.
Creating a Custom Handler
The following example is a movie script. An on startMoviehandler is called by an event message when the movie starts. It, in turn, calls a custom handler named on initScore. The word “score” refers to a game score, in this case, rather than the Director Score. This handler sets a few global variables:
on startMovie initScore
go to frame “intro” end
3
on initScore
global gScore, gLevel
set gScore = 0 set gLevel = 0
end
You could have all the lines of the on initScorehandler included in the on startMoviehandler. However, creating your own custom handler does a couple things. First, it makes the code neater. The on initScorehandler takes care of one task and one task only. Second, it makes it so that the on initScorehandler can be called again later in the program. In this case, you might need to reset the score when users start a new game. If you were to place the same lines in on
startMovie, you would be stuck executing unwanted lines, such as go to frame “intro”again, even though that might not be required the next time you want to reset the score.
Using Functions
One type of custom handler is sometimes called a function. What makes this type of handler differ-ent is that it returns a value. It works in the same way as the math functions shown earlier in this chapter. The difference, of course, is that you can define what the function does.
Two elements of a function are different from a simple handler: input and output. A function handler usually accepts one or more values as input, and sends one value back. The inputs are called parametersand the output is simply called thereturned value.
For a handler to accept parameters, all you need to do is add the variable names to the handler dec-laration line. This is the line that begins with the word on. Here is an example:
on myHandler myNumber
return myNumber+1 end
By placing the variable name myNumberin the declaration line of a handler, you are preparing the handler to receive myNumber’s value when it is called. If you place this handler in a movie script and then type the following in the Message panel, the handler executes:
put myHandler(7) -- 8
You can see that the number 8 was sent to the Message panel. The handler on myHandlerreceived the value 7 as the contents of myNumber. It then returned that value plus one.
You can also have more than one variable as a parameter. Just use commas to separate them in the declaration line as well as when you are calling the handler. Here is an example:
on myHandler myNumber, myOtherNumber
mySum = myNumber + myOtherNumber return mySum
end
When you call this handler from the Message panel, place two numbers after the handler name in the parentheses. The handler places both those numbers in the variables specified by the
declaration line. In the case of our handler, it then adds them to create a new variable and then outputs that variable to the Message panel.
put myHandler(7,4) -- 11
if
Statements
Computer programs need to be able to make their own decisions. This is called conditional branch-ing. Your code performs a test and executes different instructions depending on the outcome of the test. In Lingo, these tests are done with if thenstatements.
Simple
if then
Statements
Theifand thenkeywords can be used to process comparisons. Here is an example:
on testIf num
if num = 7 then
put “You entered the number 7”
end if end
You can probably guess what the result of trying this in the Message panel is:
testIf(7)
-- “You entered the number 7”
Any commands that you place between the line starting if
and the line end ifare executed if the value of the state-ment between the ifand the thenis true.
A natural extension of the ifstatement is the else key-word. You can use this keyword to specify commands to be performed when the ifstatement is not true. Here is an example:
on testElse num
if num = 7 then
put “You entered the number 7”
else
put “You entered a number that is not 7”
end if end
Here is what happens when you test this function in the Message panel:
put testElse(7)
-- “You entered the number 7”
put testElse(9)
-- “You entered a number that is not 7”
3
If a function handler expects a value to be passed into it, and no value is passed, the parameter variables start off with a value of VOID.
You can also place the entire if
statement on one line:
if num = 7 then put “You
entered the number 7”
case
Statements
ifstatements can actually get a little more complex. You can use the elsekeyword to look for other specific situations. For example
on testElse2 num
if num = 7 then
put “You entered the number 7”
else if num = 9 then
put “You entered the number 9”
else
put “You entered another number”
end if end
Now you have a handler that deals with all sorts of different cases. In fact, Director has some special syntax that handles multiple condition statements like those in this handler. Here is a handler that does exactly the same thing:
on testCase num case num of
7:
put “You entered the number 7”
9:
put “You entered the number 9”
otherwise:
put “You entered another number”
end case end
The casestatement is simply a neater way of writing multiple condition statements. It provides no extra functionality over the ifstatement.
In the casestatement, you enclose the condition between the word caseand the word ofin the first line. Then, you order your commands under each value, followed by a colon. The otherwise
keyword acts like a final elsein an ifsequence.
Nested
if
Statements
It is important to understand that Lingo commands are very dynamic. An ifstatement, for instance, can exist inside another ifstatement. Check out this example:
on nestedIf num
if num < 0 then if num = -1 then
put “You entered a -1” else
put “You entered a negative number other than -1” end if
else
if num = 7 then
put “You entered a 7” else
put “You entered a positive number other than 7” end if
end if end
The preceding example first determines whether the number is less than 0. If it is, it does one of two things depending on whether the number is -1 or another negative number. If the number is not less than 0, it does another one of two things—one if the number is 7, and something else otherwise.
Although this nesting is not really necessary to achieve the desired result, it demonstrates using the
ifstatement in a nested fashion. You could do this to make your code better fit the logic you have in mind, or you could do this because the logic requires nested ifstatements. You will encounter situations like this as you gain more programming experience.
The nests can even go further. You can go as many levels deep as you want. You can even embed if
statements inside casestatements and vice versa.
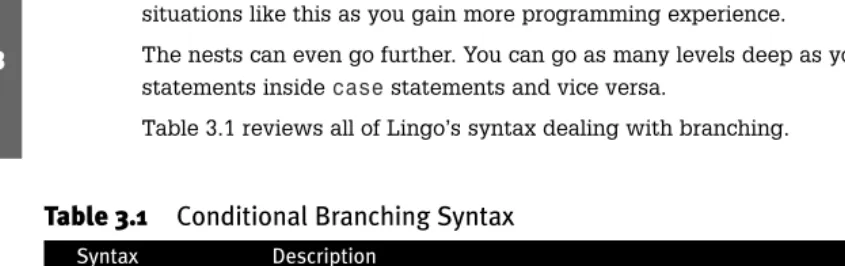
Table 3.1 reviews all of Lingo’s syntax dealing with branching.
Table 3.1
Conditional Branching Syntax
Syntax Description
if x then Runs the nested code only if the expression xis true.
else if Performs another test if the previous test(s) in the ifstatement have failed.
else Used at the end of an ifstatement. Runs the nested code only if all other tests have failed.
end if Ends an ifstatement
case x of Begins a casestatement. xis the value that will be compared to each section of the case statement.
otherwise Nested code will run if none of the preceding cases were true.
end case Ends a casestatement.
Loops
Computers are great at doing repetitive tasks. To ask a set of Lingo commands to repeat, you use the repeatcommand. You can have commands repeat a certain number of times, until a certain con-dition is met, or forever.
repeat with
If you want to make a Lingo program count to 100, all you need are a few simple lines. Here is an example:
on countTo100
repeat with i = 1 to 100
put i end repeat
end
The repeat withloop creates a new variable—in this case, i—and tells it where to start and where to end. Everything in between the repeatline and the end
repeatis executed that many times. In addition, the vari-able icontains the number of the current loop.
The result of this handler is to count from 1 to 100 and place each value in the Message panel.
repeat while
Another type of repeatloop is the repeat whileloop. This operator repeats until a certain state-ment is true. Here is a handler that does exactly the same thing as the last example:
on repeatTo100 i = 1
repeat while i <= 100 put i
i = i + 1 end repeat
end
This handler starts the variable iout as 1, and then repeats over and over, each time outputting the number to the Message panel and increasing it by 1. Each time, before the repeatloop begins, the statement i <= 100is checked to see whether it is true. When it is, the repeatloop ends. This example is, of course, very simple. If you wanted to do this in real life, you would use the
repeat withloop in the earlier example. The repeat withsyntax is good for counting and the
repeat whilesyntax is good for a lot of other things, such as in the following simple example. In this case, you are writing a handler that counts until the user presses and holds the Shift key to stop it:
on countWhileNoShift i = 1
repeat while not the shiftDown put i
i = i + 1 end repeat
end
This example uses a new property called the shiftDown. It returns a TRUE when the Shift key is held down, and a FALSE when it is not. When you run this handler in the Message panel, the i vari-able starts counting. Press and hold the Shift key and it stops. The Message panel contains the his-tory of the count.
3
Other
repeat
Variations
Suppose you want a handler that counts to 100, but can also be interrupted by the Shift key. The fol-lowing is one way to do that:
on countTo100orShift1 i = 1
repeat while (i <= 100) and (not the shiftDown) put i
i = i + 1 end repeat
end
This handler uses a repeat whileloop that checks to make sure two conditions are true: iis still less than or equal to 100 and the Shift key is not down. Another way to do this is to use the exit repeatcommand:
on countTo100orShift2
repeat with i = 1 to 100 put i
if the shiftDown then exit repeat end repeat
end
This second handler is much neater. It uses a repeat withloop, which makes more sense for a loop that counts. One line of the loop checks whether the Shift key is down, and then the exit repeatcommand breaks Director out of that loop.
The exit repeatcommand works in both repeat withand repeat whileloops. It acts essen-tially as a second way for the loop to end. The loops you are writing now are only a few lines long, but advanced Lingo programmers write loops that are much more involved. Sometimes an exit repeatcommand is the best way to break out of a loop when needed.
There is also a next repeatcommand that doesn’t go quite as far as the exit repeat. Rather than end the loop, next repeatprevents all the rest of the lines in that loop from executing and goes immediately back to the beginning of the loop. Here is an example:
on countTo100WithShift
repeat with i = 1 to 100 put “Counting...”
if the shiftDown then next repeat put i
end repeat end
The preceding handler counts from 1 to 100 like a lot of the previous examples. Each time through the loop it sends a “Counting…” to the Message panel. It then sends the number to the Message panel. However, if you hold the Shift key down while it is running, the next repeatcommand prevents Director from continuing to the put iline. The result is that only “Counting…” goes to the Message panel those times.
3
Repeating Forever
Sometimes, it might be necessary to construct a repeatloop that keeps going until an exit
repeatcommand is executed. In that case, you don’t want to use repeat with, because that com-mand causes the loop to repeat only a certain number of times. Using repeat whiledemands that you also place a condition on when the repeatloop stops.
However, there is a tricky way to use repeat whilewithout a condition, but instead basically tell it to repeat forever. Here is an example:
on repeatForever repeat while TRUE
put “repeating...”
if the shiftDown then exit repeat
end repeat end
This handler doesn’t really repeat forever; it just repeats until the Shift key is pressed. However, an
exit repeatand only an exit repeatcan terminate the loop, because you have placed TRUE as the condition on the repeat whileloop. Because TRUE is always true, it repeats forever, or at least until the exit repeatcommand executes.
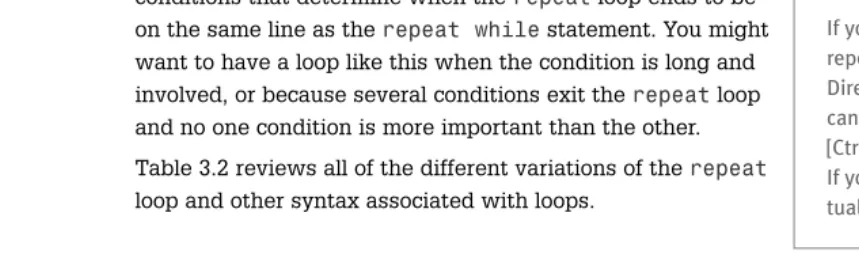
You need this kind of repeatloop when you don’t want the conditions that determine when the repeatloop ends to be on the same line as the repeat whilestatement. You might want to have a loop like this when the condition is long and involved, or because several conditions exit the repeatloop and no one condition is more important than the other.
Table 3.2 reviews all of the different variations of the repeat
loop and other syntax associated with loops.
Table 3.2
Loop Syntax
Syntax Description
repeat with a = b to c Repeats enough times for the value of ato move from bto c.
repeat with a = b down to c Repeat enough times for the value of ato move from bto c, assuming bis larger than c.
end repeat Ends the nested code inside the loop.
repeat while x Repeats so long as xis true.
next repeat Stops executing the nested code in a loop and starts the next iteration of the loop immediately.
exit repeat Breaks out of the loop
repeat with a in alist Loops through the items in alistassigning each value to a. The last item in Table 3.2 will make more sense once you learn about lists in the next section. In this example, the code will loop five times, and iwill have the value 7 the first time, then 3, 9, 2 and 12.
3
repeat with i in [7,3,9,2,12] put i
end repeat
Using List Variables
Every major programming language has the capability to store a series of variables. In some lan-guages, these are called arrays. In Lingo, they are called lists. There are two types of lists: linear lists and property lists.
Linear Lists
A linear list is a series of numbers, strings, or data of some other type that is contained in a single variable. Try this in the Message panel:
myList = [4,7,8,42,245] put myList
-- [4, 7, 8, 42, 245]
Now that you have created a list, you need a way to access each of the items in it. This is done with some special syntax:
put myList[1]
-- 4
put myList[4]
-- 42
Lists can also hold strings. In fact, they can hold a combination of numbers and strings. They can even hold structures such as points, rects, and color values. Here are some examples of valid lists:
myList = [“apples”, “oranges”, “peaches”]
myList = [1, 2, 3, “other”]
myList = [point(50,50), point(100,100), point(100,125)]
myList = [[1,2,3,4,5], [1,2,3,5,7,9], [345,725]]
The last example shows a list that actually contains other lists. These come in handy in advanced Lingo. Here is an example of a list that holds a small database of names and phone numbers:
myList = [[“Gary”, “555-1234”], [“William”, “555-9876”], [“John”, “555-1928”]]
Here is a handler that shows a somewhat practical use for lists. The list contains a series of member names. When the handler is called, it uses the list to rapidly change sprite 1’s member to these members:
on animateWithList
myList = [“arrow1”, “arrow2”, “arrow3”] repeat with i = 1 to 3
sprite(1).member = member myList[1] updateStage
end repeat end
The handler uses a repeatloop to take the variable ifrom 1 to 3. It then sets the member of sprite 1 to the member with the name used in each location of the list. An updateStageis used to make the change visible on the Stage.
Another way to create lists is to use commands that add or remove an item from them, rather than create the list all at once. The addcommand places an item in a list that already exists. A deleteAt
command removes an item from a list. Try this in the Message panel:
myList = [] add myList, 5
add myList, 7 add myList, 9
put myList -- [5, 7, 9]
add myList, 242 put myList
-- [5, 7, 9, 242] deleteAt myList, 3
put myList -- [5, 7, 242]
The first line in this example creates an empty list. Then, you added three items to it. After taking a look at the contents, you added a fourth item. Finally, you deleted item number 3, which was the number 9, from the list.
Another command you should know about is the countproperty of a list. It tells you how many items are currently in the list. Try this in the Message panel:
myList = [5,7,9,12]
put myList.count -- 4
In the preceding handler example, instead of having igo from 1 to 3, you could have had igo from 1 to myList.count. This would have made it possible to add or remove items from the list later, without having to worry about changing the hard-coded number 3 in the script as well.
Property Lists
One of the problems with linear lists is that you can refer to the items in the list only by position. A different type of list, called a property list, enables you to define a name for each item in the list. Here is a typical property list:
myList = [#name: “Gary”, #phone: “555-1234”, #employedSince: 1996]
Each item in a property list contains both a property name and a property value. For instance, the first item in the preceding list is the property #name, and its value is “Gary”. The property name and the property value are separated by a colon.
To refer to a property in a list such as this, you can use the property name rather than the position. Try this in the Message panel:
myList = [#name: “Gary”, #phone: “555-1234”, #employedSince: 1996]
put myList.name
-- “Gary”
put myList[#name]
-- “Gary”
Add items to a property list with the addPropcommand, and Delete an item in a property list with a deleteProp
command.
myList = [:]
addProp myList, #name, “Gary” addProp myList, #phone, “555-1234”
put myList
-- [#name: “Gary”, #phone: “555-1234”]
deleteProp myList, #phone put myList
-- [#name: “Gary”]
Notice that you use a [:] rather than a [ ] to create an empty property list. You cannot use addProp
with a linear list and you cannot use addwith a property list.
To get values from a property list, you can use dot syntax, or the function getProp.
myList = [#name: “Gary”, #phone: “555-1234”] put myList.name
-- “Gary”
put getProp(myList,#name)
-- “Gary”
➪
For more information about lists, see “Using List Variables,” p. 305.NAVIGATION WITH LINGO
One of the simplest tasks you can do with Lingo is to control the flow of your movie. You can tell the movie to jump straight from frame 4 to frame 12, for instance. Or, you could tell it to jump from frame 17 back to frame 9.
Better still, you can tell the movie to wait on a frame, and then let the user control the movie by associating navigation commands with buttons.
Navigation With the
go
Command
Thegocommand is the most basic Lingo navigation command. If you are building a presentation with Director, you will want to use various Lingo navigation commands to allow the user to move through the screens of your presentation.
You can make the movie jump to a frame number by simply telling it to go. Open the Score panel and the Message panel. The playback head should be on frame 1. Now, in the Message panel, type
go 5.
3
The playback head should proceed to frame 5. A more common form of this command is to use the full statementgo to frame 5. This is a little more readable.
You can also tell the movie to go to the next marker. Create a marker label for frame 7 simply called “intro”. Do this by clicking on the marker/label bar above the frame numbers in the Score. Then, in the Message panel type go to frame “intro”.
You can put this code into a button using the on mouseUphandler. For instance, to create a button that will jump to the “intro” frame, all you need is to attach this script to the button:
on mouseUp
go to frame “intro”
end
Use the gocommand to jump to frames based on the current location of the movie. When you issue a go to the framecommand, the frameis actually the frame number of the frame that you are on. You can test this in the Message panel:
put the frame
-- 7
So in order to go to the next frame, just issue a command like this:
go to the frame + 1
If you want to jump ahead to the next labeled frame, use the special syntax go next. For instance, if frame 1 is labeled “menu”, frame 2 is empty, and frame 3 is labeled “summary”, and the movie is on frame 1, then go nextwill take the movie to frame 3.
Similarly, you can use go previousto jump to the previously labeled frame relative to the current frame. Table 3.3 shows all the variations of the gocommand.
Table 3.3
The Many Versions of the
goCommand
Version Description Example
go to frame x The movie goes to frame number X. go to frame 7
go to frame “x” The movie goes to the frame labeled X. go to frame “credits” go to the frame The movie begins the current frame go to the frame
over again.
go to the frame + x The movie jumps ahead X frames. go to the frame + 1 go to the frame - x The movie jumps back X frames go to the frame - 1 go next The movie jumps to the next labeled frame. go next
go previous The movie jumps to the labeled frame go previous
immediately before the current frame
go loop The movie jumps back to the currently go loop
labeled frame.
go marker(x) The movie jumps forward X labeled frames. go marker(2) go marker(-x) The movie jumps back X labeled frames. go marker(-2)
play Jumps to the frame or movie, and play frame 40
remembers where it came from
play done Returns to the frame where the last play done playcommand was issued.
The playand play donecommands will be covered in more detail in the next section.
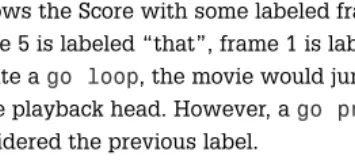
The most confusing concept is the difference between the current label and the previous label. Figure 3.4 shows the Score with some labeled frames. The playback head is between two of them in frame 7. Frame 5 is labeled “that”, frame 1 is labeled “this”, and frame 10 is labeled “other”. If you were to execute a go loop, the movie would jump back to “that”, because it is the closest marker just before the playback head. However, a go previous command takes the movie back to “this”, which is considered the previous label.
3
Table 3.3
Continued
Version Description Example
Figure 3.4
The playback head is between two labeled frames. “that” is considered the current label and “this” is the previous one.
The function marker()is used to get frame label information from the Score. It takes one number as a parameter. If that number is a 0, it returns the name of the current label marker. If it is a -1, it returns the name of the previous marker. A 1 returns the name of the next marker.
play
and
play done
A second way to navigate around a movie is to use the playcommand. The basic command works just like a go, but there is a major difference. The playcommand actually remembers which frame the movie was on when the command was issued. That way, the play donecommand can be used to return the playback head to the original frame.
Suppose you have three labels named “menu”, “chapter1”, and “chapter2” in the Score. A button on the frame labeled “menu” can issue this command:
play frame “chapter1”
Then, another button on the frame labeled “chapter1” can issue a play doneto have the playback head return to the frame “menu”. The same play donebutton and behavior can be reused in the frame labeled “chapter2”.
Jumping to Other Movies
Bothgoand playcan be used to jump to another movie as well as a frame in the current movie. The syntax is simply an extension of what you have already read about.
Here is a behavior that opens another movie and starts play-ing it from frame 1:
on mouseUp
go to movie “nextMovie.dir”
end
If you don’t want to have the movie start playing on frame 1, you can specify the frame by extending the command a bit:
on mouseUp
go to frame “intro” of movie “nextMovie.dir” end
You can use the same format with the playcommand. The power of the playcommand really shines here. You can have
a button that takes users to a completely separate movie and enables them to navigate there. When they are finished, they can press a button that executes a play donecommand and they will return to the previous movie. The play donecommand even returns users to the correct frame in that movie.
Example: Creating a Simple Presentation
The set of files presentation1.dirand presentation2.dir contain a simple presentation built in Director. It has been designed to teach basic navigation techniques.
In the first sample movie, you can see the four frames of the presentation. Each contains information about one of four countries. Each frame is labeled in the Score. Figure 3.5 shows what the Score looks like.
3
Director is actually smart enough to assume the correct extension at the end of a movie name if you leave it off. This way, you don’t have to worry about having a
.dirextension on a Windows file but not on a Mac file. It also solves the problem of changing the movie’s filename to have a
.dxror a .dcrwhen you protect or compress it later.
Figure 3.5
Each frame has a frame script applied to it. This looks like the looping frame script mentioned earlier in this chapter.
on exitFrame go to the frame
end
By using this script, the movie will remain on each frame, without advancing automatically to the next frame in the Score.
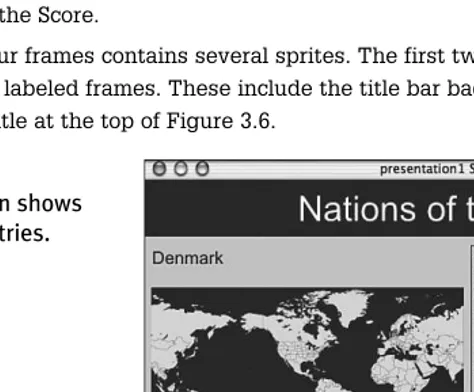
Each of the four frames contains several sprites. The first two sprites of the Score are stretched across all four labeled frames. These include the title bar background and the title. You can see the title bar and title at the top of Figure 3.6.
3
Figure 3.6
This simple presentation shows information about countries.
There is also a world map graphic and another border around the text area that are stretched across all frames.
Then each screen contains a separate set of three sprites: the city name, the text information about the city, and a circle to indicate the position of the city on the map.
The city name and text information sprites each use a different cast member on each frame. So there are four city name members and four city information members. The circle for the map is just one member. Each of the four sprites that use this single member have it positioned at the different loca-tion on the Stage.
Two other sprites that are stretched across the Score are the two buttons at the bottom of the screen. They look like arrows pointing left and right.
These are actually the same member in the Cast. The right button sprite uses that member as-is. But the left button member uses a sprite ability to flip itself horizontally to create a mirror image. This way we only need one Cast member for both the left and right buttons.
on mouseUp go previous
end
On the right button, we’ll use this script:
on mouseUp
go next end
This will allow the user or presenter to navigate between the four frames. Try the movie out and look at each sprite and script.
Example: A Presentation Menu Screen
This simple presentation movie simulates a basic PowerPoint presentation. However, it would be much more useful if information were available more easily to the user. For instance, the user should be able to jump to any screen in the movie, not just the previous or next screen.
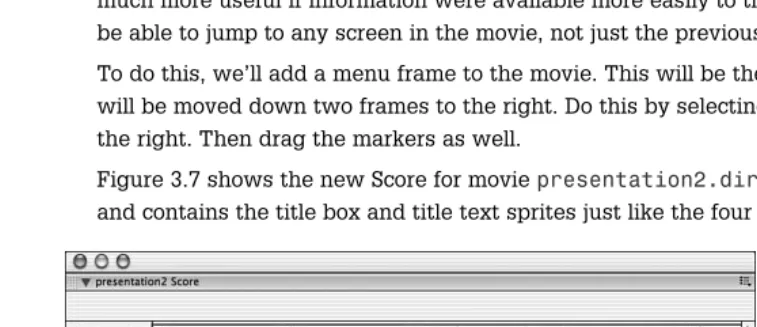
To do this, we’ll add a menu frame to the movie. This will be the first frame. The other four frames will be moved down two frames to the right. Do this by selecting the sprites and dragging them to the right. Then drag the markers as well.
Figure 3.7 shows the new Score for moviepresentation2.dir. The first frame is labeled “menu” and contains the title box and title text sprites just like the four other frames.
3
Figure 3.7
This Score includes a menu frame.
The menu frame includes four buttons. These are the same bitmap member, but stacked vertically on the Stage, one under the other. Overlaid on top of that is a text member that gives each button a label. By using the same exact button four times and a text member on top of them, we make it easy to add new buttons or change the text on the existing ones. The end-user doesn’t know or care that the text and buttons are really separate elements.
Since the entire area of a button is clickable, making the buttons larger than they appear will give the user a larger space to click on. In this case, the user will be able to click on the area under the text.
The scripts for each button will be very similar. Here is the script for the first one. The rest of the button scripts use different frame names.
on mouseUp
go to frame “US” end
We’ll also add another button to the movie to allow the user to get back to the menu frame. This but-ton only needs to be on the content frames, not the menu frame. This menu butbut-ton will allow the user to jump back to the menu to select another city.
on mouseUp
go to frame “menu”
end
With presentation2.dir, the user can navigate through the same content in a very different way. They can select a city and jump right to that screen. Then can then return to the menu and select another city. The next and previous arrow buttons are still there as another option.
UNDERSTANDING MESSAGES AND BEHAVIORS
When you run a Director movie, certain things are put into motion. Sprites are displayed, messages are sent to scripts, and the movie moves forward, frame-by-frame. Or perhaps not, if you have placed Lingo code to stop it.
Understanding what happens when a movie runs is the key to writing Lingo code and controlling the movie.
Movie Event Messages
As the movie runs, events occur. For instance, when a new sprite is encountered for the first time in the Score, the beginSprite event occurs. This triggers an on beginSpritemessage that is sent to the appropriate part of the movie, in this case the sprite’s script.
One way to divide these messages is into two groups: messages sent to global movie scripts, and messages sent to frame and sprite scripts. The first group includes prepareMovie and startMovie, which can be used to trigger handlers to perform actions when the movie starts. The stopMovie message, likewise, can be used to trigger commands that happen when a movie is done.
Frame and sprite scripts have another set of messages. The beginSprite message is sent when the frame script or sprite span is first encountered during movie playback. Then the prepareFrame,
3
Figure 3.8
enterFrame, and exitFrame messages are sent while each frame plays out. Finally, an endSprite mes-sage is sent when the sprite span ends.
Table 3.4 shows a run-down, in order, of the messages sent by the movie as it runs.
Table 3.4
Movie Event Messages
Message Description Sent To
prepareMovie Issued before anything else Global movie scripts
beginSprite (frame) Initializes the frame script The frame script
beginSprite (sprite) Initializes the sprite script Each sprite script, starting with sprite 1
prepareFrame (sprite) Sent to each sprite before the sprite is drawn Each sprite script, starting
to the Stage with sprite 1
prepareFrame (frame) Sent to the frame script before any sprites are Frame script drawn
startMovie All sprites in frame 1 are drawn Global movie script
enterFrame (sprite) Sent to each sprite just after all sprites have Sprite scripts, starting
been drawn with sprite 1
enterFrame (frame) Sent to the frame script just after all sprites Frame script have been drawn
idle Sent to the frame script at least once every Frame script frame. If time allows, this message will be
sent repeatedly to the frame script until the frame rate dictates that it is time to move on
exitFrame (sprite) Sent to each sprite when it is time to move to Sprite scripts, starting
the next frame with sprite 1
exitFrame (frame) Sent to the frame script when it is time to Frame script move to the next frame
stopMovie Sent when the movie is halted Global script
endSprite (frame) Sent to the frame when the frame script span Frame script ends or the movie is halted
endSprite (sprite) Sent to each sprite when the sprite span ends Sprite scripts, starting or the movie is halted with sprite 1
In a typical sequence, the first few messages are triggered when the movie starts. Then, after the exitFrame messages, the sequence loops back to the prepareFrame messages. The endSprite mes-sages happen whenever a sprite ends, but the stopMovie message only when the movie is done or is stopped.
The exception to this is the idle message. This is repeated several times depending on how much time the movie has between enterFrame and exitFrame messages. If time is tight, then only one idle message will be sent. But if the movie must delay itself between enterFrame and exitFrame so that it can stick to a slower frame rate, then the idle message may happen multiple times.
So now that we know all of the messages sent when a movie plays, the next step is learning how to use them. To do this, you need to write handlers.
An event handler always has the same name as the message it is meant to handle. For instance, if you want to write a movie script that should execute when the movie starts, you would write anon startMoviehandler and place it in a movie script. Here is an example:
on startMovie gScreensVisited = 0
end
If you want to write a frame or sprite handler that runs when a sprite span begins, you would write anon beginSpritehandler and place it in a script attached to that frame or sprite.
on beginSprte
sound(1).play(member(“intro sound”)) end
It is important to remember to use handlers in appropriate places. For instance, an on startMovie
handler belongs in a movie script and will only work properly there. An on beginSpritehandler belongs in a frame or sprite script, and only belongs there.
User Event Messages
There is a whole other set of messages that don’t happen automatically. Instead, they happen in reaction to user events.
The most common example is when the user clicks on a sprite. A mouse click can be dissected into two parts: when the user presses down on the mouse button, and when they release it. Both of these events have a corresponding message: mouseDown and mouseUp.
In the case of user event messages, the message is passed from one part of the movie to another until it finds a handler to deal with it. For instance, if the user clicks on a sprite and creates a mouseUp message, the message is sent first to the sprite’s script. In there is an on mouseUp han-dler attached to that sprite, it will trigger that hanhan-dler. The message does not continue on from that point until special Lingo is used to pass it along to the next level.
However, if the sprite has no behavior with an on mouseUphandler in it, the message continues to look for a receiving handler.
The next place it looks is in the cast member. It checks to see whether an on mouseUphandler has been placed in the cast script. If not, it checks the behavior in the Frame Script channel. Finally, if that fails, it looks for an on mouseUpin a movie script member.
If it still cannot find a handler to receive the message, the message is simply not used.
Messages look for handlers in
•
A behavior attached to the sprite acted upon. If there is more than one behavior, it looks at them in the order that they appear in the Behavior Inspector.•
The cast script.•
A behavior in the Frame Script channel.•
Any movie script cast member.Table 3.5 shows all of the user event messages.
Table 3.5
User Event Messages
Message User Action
mouseDown The user presses the mouse button. In Windows, this corresponds to the left mouse button.
mouseUp The user releases the mouse button after clicking. Every “mouseUp” message is preceded by a “mouseDown” message, although they don’t necessarily have to be on the same sprite.
mouseEnter The cursor enters the area of a sprite.
mouseLeave The cursor leaves the area of a sprite.
mouseWithin A message sent continuously, once per frame, as long as the cursor is over a sprite.
mouseUpOutside A message sent when users click in a sprite, but move the cursor away and then release the mouse button.
keyDown A message sent when users press a key on the keyboard.
keyUp A message sent when users release a key on the keyboard.
The keyDown and keyUp messages will only ever happen if the sprite has some sort of link to the keyboard. An example would be a text member set to be editable. The user can click in that text member and type. Each key press generates a keyDown and keyUp message that can be intercepted with an on keyDown or on keyUp handler.
Connecting Messages to Sprites
When a message, such as mouseUp, reaches a sprite’s script, it carries with it one piece of informa-tion: a reference to the sprite itself. This seems redundant. After all, why does a script need a refer-ence to the very sprite it is attached to? Doesn’t it already know which sprite it is attached to?
But this allows us to capture that reference and give it a name. By convention, this name is always
me. For instance, look at this script:
on mouseUp me go to frame 7
end
The meis the first parameter of the handler. The event calls the handler and places a reference to the sprite inside of me. We can then use meto get information about the sprite. For instance:
on mouseUp me
put me.spriteNum end
When this button is clicked, the spriteNumproperty of meis place in the Message panel. This prop-erty, which is the one most commonly used for sprites, tells us the sprite number of the sprite that the script is attached to. If the previous script is attached to sprite 3, the result will be a “3” in the
Message panel. Move the same sprite down one channel, and you will get a “4” when the sprite is clicked.
If you are not accessing any properties of the sprite, you don’t need to use the meparameter. But since it is so common to need properties such as spriteNum, the meparameter is usually placed after the handler name in every case. This is only true for sprite and frame scripts, as movie script handlers do not get a meparameter passed to them.
Creating Your Own Properties
The spriteNumproperty is built-in to the script’s meobject. However, you can also create your own custom properties that will be available to all of the handlers in the script.
Properties are special variables that maintain their values during the life of a sprite. To declare a property, we need to use the propertydeclaration in the script. By convention, it is placed before the first handler.
property pJumpFrame
Once declared, the variable pJumpFramecan be used in any handlers in that script. Any value you set it to will persist for other handlers, or the next time that same handler is called.
For instance, this script will set the property in the on beginSpritehandler that runs when the sprite first appears on the Stage. It then uses that property later in the on mouseUphandler.
property pJumpFrame
on beginSprite me
pJumpFrame = 7 end
on mouseUp me
go to frame pJumpFrame end
While this script doesn’t have any advantage over the previous version, it does demonstrate the use of a persistent property. Now, we’ll see how properties can be used to make scripts more useful.
Creating Simple Behaviors
In the previous script, when the sprite begins, it sets pJumpFrameto 7. It then uses this value in a
gocommand when the user clicks.
What would be great is if you could apply this same script to several buttons, but have each button have a different value for pJumpFrame.
So one button would use a pJumpFrameof 7, the second would use a value of 9, the third a value of 13. There would only be one script, but it would be used three times, each with a different value for
pJumpFrame.
The way to do this is with an on getPropertyDescriptionListhandler. This handler will be used to customize the value of a property on a per-use basis. So each time you apply the script to a sprite, you get to tell the script what value it should use for pJumpFrame.
Here is what a script would look like that allows you to customize pJumpFramefor each application of the script.
property pJumpFrame
on getPropertyDescriptionList me
return [#pJumpFrame: [#comment: “Jump To:”, format: #integer, #default: 1]]
end
on mouseUp me
go to frame pJumpFrame
end
The value returned by the on getPropertyDescriptionListfunction is a property list that con-tains one or more other property lists. The property name for the first (and only, in this case) item of the list is the name of the property, turned into a symbol by adding a #in front of it.
The list that is its property value contains three items. The first is the #commentproperty. This is the string that the Parameters dialog box will show for this parameter. The second item, #format, tells the Parameters dialog box which types of values to accept for this parameter. The last item is a default value for this parameter.
When you drag this script to a sprite, a Parameters dialog box will automatically appear. It will look like Figure 3.9.
3
Figure 3.9
The Parameters dialog box appears when you drop a behav-ior on a sprite and that behavbehav-ior needs custom parameters set.
This behavior can now be attached to many sprites, but with a different target frame each time. This reusability is one of the powerful features of behaviors. You can have a movie filled with navigation buttons, but you need only this one behavior.
In addition to getting the Parameters dialog when you drag and drop the script on to a sprite, you can also bring it up at any time by selecting the sprite, using the Behaviors tab of the Property Inspector, and clicking the Parameters button at the top of that tab. The Parameters button’s icon looks like two gear wheels. This way you can change the value of the parameters at any time.
When a script contains customizable parameters, it is usually referred to as a behavior. Some pro-grammers refer to all sprite and frame scripts as behaviors, while others reserve that name only for customizable ones with on getPropertyDescriptionListhandlers.
WRITING LINGO CODE
There are many ways to go about creating a Director movie with Lingo. Over time, you will adopt your own method.
For instance, some programmers create one movie script member to hold all their movie handlers. Others break them up into several script members by category. Some people even create one script member per handler.
If you do a lot of programming, you will find that your style adjusts over time. There is no right or wrong way to go about doing it. However, some basic programming guidelines can help you get started.
The Lingo Programmer
Lingo programmers are really of two types. The first type is someone who has a background in com-puter science or engineering. These programmers probably know languages such as C or Pascal, and took courses such as “Data Structures” and “Linear Algebra” in college.
The second type is far more common. This is the graphic artist or multimedia producer. These pro-grammers may have used presentation tools before, even Director, but have never used a program-ming language before. They have explored the basic range of Director and want to go beyond the basics. They are now ready to start learning Lingo.
For both types of programmers, starting to learn Lingo can be difficult. For experienced program-mers, Lingo takes care of much of the tedious work that they were used to in the past, but gives them control over graphics elements and the user interface. For graphic artists, Lingo can seem like lines and lines of text that stand between them and their end products.
The important point to remember is that programming is an art. Programming languages, such as Lingo, provide a wide canvas for programmers to express themselves. Two programmers given the same task are almost certain to write two different programs. Each one shows the programmer’s own style.
For experienced programmers, this means that programming in Lingo provides another type of can-vas on which they can create. As an experienced programmer myself, I will even venture to say that Lingo will enable them to be more creative than before.
For graphic artists, this means that Lingo is a new brush with which they can paint. I know many artists who have become Lingo programmers and used it as a way to create the art they envision.
Programming as Problem Solving
Programming is just problem solving. If you want to make a Director movie, think of it as a problem. Your goal is to find a solution.
As with all problems, more than one step is usually needed to solve the problem. You have to exam-ine the problem, take it apart, and find out what you know and what you don’t. Then, you need to come up with a plan for solving it.
To solve a programming problem, first define it. What, exactly, do you want to have happen? Saying “I want to animate a sprite” is not a well-defined problem. Saying “I want to move a sprite from the left side of the Stage to the right side” is better. What you really should be going for is something like “I want to move a sprite from position 50,200 to position 550,200 over the period of 5 seconds at the rate of 10fps.”
After a problem has been defined, you can start to see how it can be solved. Imagine that your goal is to move a sprite 500 pixels in 5 seconds at 10fps. At 10fps, 5 seconds will be 50 frame loops. So, you want to move the sprite 10 pixels per frame loop.
Only by clearly defining the problem can you start to envision a solution.
Solving Smaller Problems
The key to writing a program in any language is being able to break it down. You start off with a large concept, such as “A quiz that teaches children about geography.” That’s a fairly tall order. You can bet that Lingo has no quizKidsOnGeographycommand.
So, you break it into smaller parts. Maybe you want to have each question of the quiz show a map of the world with one country lit up. Then, three choices are presented as to what the country might be. So, now forget about the whole program and start to concentrate on just asking one question.
But this part is also too big to tackle all at once. However, it has smaller parts. How does the map display a country? How do the three choices appear? How do you make sure one of the three choices is correct?
A very small part of this might be just having a Lingo program that selects a random country out of a list of 100 names. Now that you have broken the problem down this far, you might begin to pro-gram. The result is a handler that selects a random country and outputs it to the Message panel. You build it and test it and you’ve solved your first small problem.
Then, you continue to identify and solve other small problems in this way. Before you know it, you have a working program.
The concept of breaking big problems into smaller ones is the most important aspect of programming. If you ever get stuck while programming in Lingo, it is likely to be because you have not broken the problem down into small enough pieces. Take a step back from what you are doing and decide how you can break it down before continuing.
Many Ways to Do Things
The first thing to realize about programming in just about any language is that there are usually many ways to accomplish the same task. This is particularly true of Lingo.
For instance, suppose you want the movie to loop on the current labeled frame. You could use a go to the framecommand in an on exitFramehandler. Or you could use go loop. Or, you could use go marker(0). All of these will work. They have differences when used in other situations, but for a single labeled frame, they will all behave exactly the same way.
3
So why use one method over the other? You might choose one method because you use it more often, so you want to be consistent. You might choose one because you are using that same method elsewhere, where the slight differences in the commands will bring about different behavior. Or, you might just like how one sounds.
In some cases, one solution is more elegant than another. For instance, there are several ways to change the volume of a sound. One method changes the volume setting for the entire movie, not just that one sound. So you may find that advantageous in some cases and a problem in others. In some cases, that technique is not compatible with certain sound cards. So you fall back on another tech-nique which will work better in your situation.
Calling one of these methods the “right” method is subjective. So don’t worry too much if you are doing things the “right” way, as there may be no such thing. Instead, work toward getting your pro-gram to correctly solve the problem.
Setting Up Your Script Members
If you are creating a small Shockwave movie or projector, a useful way to organize your scripts is to have one movie script member and several behavior members.
In fact, you might not need to have any movie scripts at all. Well-written behaviors can eliminate the need for movie scripts.
If your movie requires mostly buttons, some behavior scripts can handle it all. Each behavior can be attached to a button and tell the movie what to do when it is clicked.
A larger Lingo project might require a few movie scripts. Movie scripts are needed for items placed in the on startMoviehandler, for instance, where commands need to be executed when the movie is initially run.
Movie scripts can also hold handlers that are used by more than one behavior. If you want various behaviors to play a random sound, for instance, you might want them all to call your on
playRandomSoundhandler that is stored in a movie script member. This saves you from having to include a similar handler in many different behavior scripts.
It is always a good idea to keep movie scripts together in the Cast. The same goes for behaviors. There are exceptions, of course. Sometimes, you might want to place behaviors near the bitmap members that they usually control.
Commenting Your Code
Director is equipped with an automatic script color function. This function color-codes different types of words in your scripts. For instance, Lingo keywords are blue and comments are red. The goal is to make it easier for you to read. You can also turn this function off in the Script Preferences dialog box. If you do, you can use the Text Inspector to color and style your code manually.
The most important task to complete when writing code is to remember to add comments. Comments are words, phrases, and even sentences that you can sprinkle throughout your code to help clarify what the code is doing. You can place comments on a new line, or at the end of a line of code. Use a double dash to tell Director that everything after it is a comment and should be ignored when the Lingo runs. Here is an example:
-- This handler outputs powers of 2 to the Message panel on powersOfTwo
n = 2 -- start with 2
repeat with i = 1 to 100 -- output 100 numbers
put n -- send to the Message panel
n = n*2 -- multiply by 2 to get the next number
end repeat end
Now compare that with the same exact handler that is not commented:
on powersOfTwo n = 2
repeat with i = 1 to 100 put n
n = n*2 end repeat
end
The first can be understood immediately. If you wrote the second one, and then saved the file and came back to it a year later, would you be able to remember what it did immediate